BestRest Products F800GS LightGuard User manual

BestRest Products, LLC
www.bestrestproducts.com 6908 - 220th St. SW (425) 673-1023
info@bestrestproducts.com Mountlake Terrace, WA 98043 fax (425) 673-0502
F800GS LightGuard
Also fits F650GS Twin
The F800GS LightGuard provides a
protective shield for your fragile and
expensive headlight lenses. It will deflect
most stones and other road debris, absorb
the kinetic impact of any debris, and prevent
expensive repairs.
The plexiglass LightGuard is highly impact
resistant but it’s not bulletproof. Hard impacts
from foreign objects may cause it to crack or
shatter. This is considered a normal part of
the headlight protection process, and is not
covered under warrantee. Replacement
shields can be ordered from BestRest.
Thank you for purchasing a BestRest
LightGuard. We appreciate every order. If
you have problems with installation please
call us at the number above or send us an
email.
May the Lord God bless you, watch over you,
and keep you safe as you travel the world on
your motorcycling adventures.
David & Judy Petersen
Tools needed for installation:
5mm hex wrench, T40 torx wrench
Your parts package should contain:
Qty Description
1 Plexiglass shield
1 Rubber light seal
2 Small stainless brackets
2 Large stainless brackets
12 Rubber grommets
4 3/16” x ¾” clevis pin
4 Hairpin cotter pin (small)*
4 Small stainless washers
4 Hairpin cotter pin (LARGE)
4 Nylon spacers
4 5x16 hex head screws
4 5mm nylon locknuts
*Small cotter pins are optional and may not be
included in your parts package
Installation
Read and follow these instructions carefully.
Improper installation may result in damage to
your motorcycle or personal injury. Do not
attempt installation unless you can perform it
in a safe and professional fashion.
BestRest recommends use of a semi-
permanent thread-locking compound (blue
Loctite) on all fasteners, nuts and bolts.
Carefully sort all the parts. Clean the
plexiglass shield with soap and water or a
product specifically approved for plexiglass.
Do not use abrasive polishes or scrubbing
pads. Do not use a dry cloth because it
creates a static charge and attracts dust.
Assemble the small brackets to the large
brackets. Looking down from the top,
configure the brackets as shown. Place the
screws thru the small brackets, fit nylon
spacers on the screws, fit the large brackets
on the screws, and then fit the locknuts. The
locknuts will be toward the OUTSIDE of the
assembled brackets. The heads of the nuts
will be flush with the ends of the screws.
Tighten the screws snugly.
The assembled brackets fit either side of the
motorcycle. There’s no left or right.
Work on one side of the motorcycle at a time.
Be careful not to move the headlight
assembly as you’re installing the brackets,
because that will affect the aiming point of
your headlight.
Remove one of the screws that holds the
headlight housing.
Fit the one of the assembled brackets over
the black headlight housing. Align the oblong
screw hole in the small bracket, with the hole
for the screw that tightens the headlight (the
one you just removed).
The rear of the small bracket will fit tightly
around the rear of headlight mounting frame.
The oblong hole of the small bracket will
match the oblong hole of the headlight
mounting frame. This oblong hole allows you
to adjust the aim of the headlight.
Replace the headlight screw, with the original
washer, and tighten the screw snugly.
Wiggle the bracket to make sure it’s secure.
Note that the heads of the 5mm screws will
be in contact with the rounded headlight
mounting frame. These points of contact
help to keep the brackets from rotating
downward due to vibration.
Repeat the bracket installation on the other
side of the motorcycle. From the front,
eyeball the two brackets and align them with
each other. Adjust as needed.
Fit the rubber light seal to the top of the plexi
shield. The seal goes on the upper curved
surface. See page 2 (center column) for
more details about installing the rubber seal.
The flap will be projecting toward the rear.
Put a flat washer on a clevis pin, followed by
a rubber grommet. Place the pin thru the
plexiglass shield (from the front) , and follow
with a second rubber washer, reversed. Put
a 3rd grommet on the pin as shown. Repeat
at all 4 holes.
Front of motorcycle Rear
p
lexi
g
lass
Small washer bracket
Cotter
pin thru
h
o
l
e
screw
nut
spacer
Place the plexiglass shield (with pins) onto
the brackets. Adjust the brackets if necessary
so the pins fit the holes. Compress the
grommets and fit the cotter pins thru the
holes on the ends of the clevis pins.
The finished project will look like this:
Slip the rubber seal between the headlight
and the windscreen.
To remove the LightGuard for cleaning, pull
the cotter pins and remove the shield. To
reinstall, follow the procedures above.
Clean and care for your LightGuard in the
same fashion as you do your windshield.
Use plenty of soapy water to dissolve bugs
and grit before you wipe the surface. Don't
rub or scrub, or you'll scratch the plexiglass.
Don't use a dry cloth or paper towels.
Use only cleaners approved for plexiglass
and plastic. We like Plexus and ProtectAll.
F800GS LightGuard
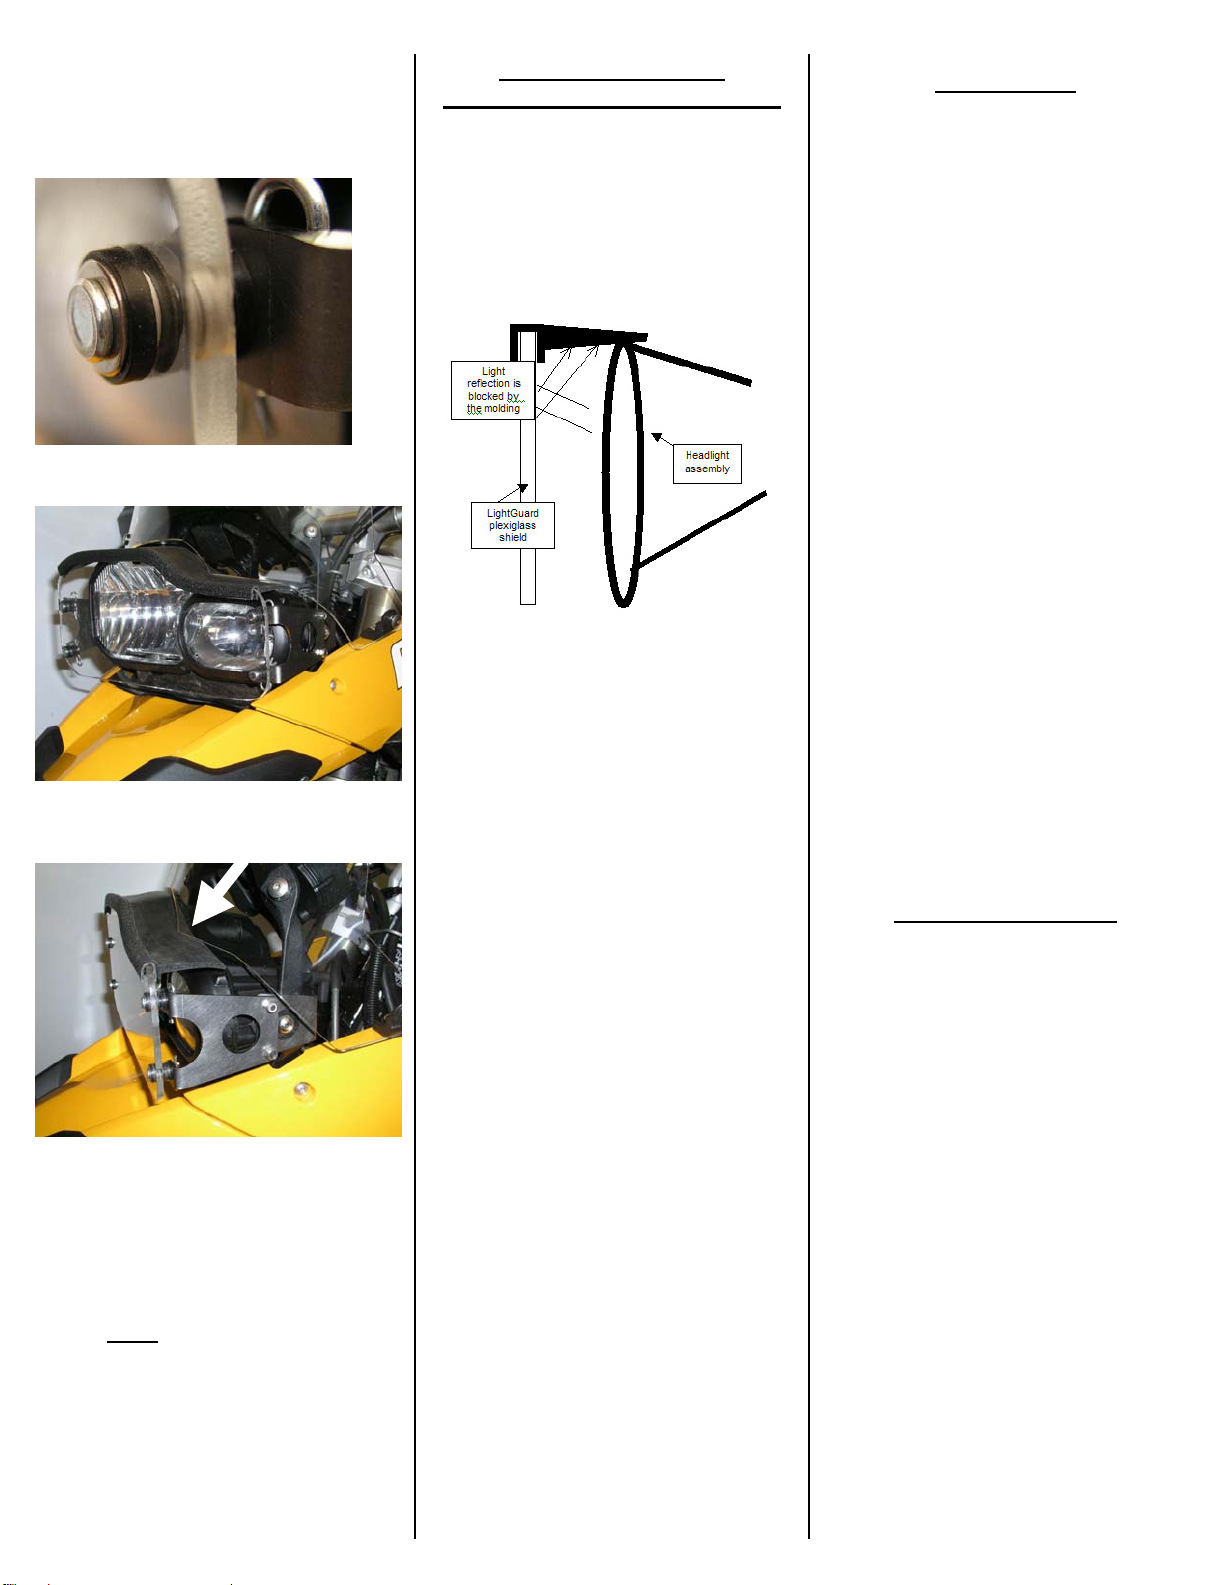
"Anti-Reflective" Rubber Seal
If you ride at night you'll find that the
plexiglass reflects light from the headlight,
back into the rider's line-of-sight. Although
this is not a safety hazard, it can become a
distraction. We came up with a solution to
the problem be designing a rubber molding
that fits on top of the plexiglass panel, and
substantially reduces any reflection.
If the ends of the molding are found to be
slightly irregular, they can be trimmed with a
sharp pair of heavy-duty scissors or snips. If
one of the internal aluminum clamping clips is
exposed, it can be removed with pliers.
Pre-form the molding to the approximate
profile of the top of the plexiglass. Gently
bend the molding using two hands.
To apply the rubber molding, center it on the
on the curved top of the LightGuard, then
GENTLY press it onto the top edge of the
plexiglass.
Make sure the plexiglass is fully seated in the
groove. Because the molding is flexible, it
will conform to the contour of the shield. The
rubber flap at the rear of the molding will rest
across the top of the plastic headlight
assembly.
When it's necessary to clean the rubber seal,
remove it by gently pulling upward. It can be
reinstalled as before. If the internal clips
become loose, they can be gently pinched
with a pair of pliers to restore the tight fit of
the molding onto the shield.
Safety Warnings
It is the responsibility of the Consumer to evaluate
the suitability of these products for personal use.
Consumers must evaluate whether these products
meet their needs and whether these products can
be mounted and used in a safe fashion. The
Consumer accepts full and complete responsibility
for selection of products and for mounting and
maintenance of these products. The Consumer
agrees to follow and abide by all instructions,
warnings, recommendations, or other information
supplied or published by BestRest Products.
It is the Consumer's responsibility to inspect all
screws, fasteners and fittings on a daily basis,
tighten or replace them as necessary, and to
regularly inspect the entire BestRest LightGuard
and mounting hardware for signs of missing parts,
excessive wear, metal fatigue, or imminent failure.
Should any of these be observed the assembly
should be removed from the motorcycle and not
used until inspected and repaired by BestRest.
BestRest Products, it's employees, agents, and
owners assume no liability whatsoever for property
damage, personal injury or other losses resulting
from the Purchaser's failure to properly maintain
the products, for unauthorized modifications of any
kind, for use of unauthorized parts (including
bushings, screws, pins, or other fasteners), or for
use of any BestRest Product in a fashion not
intended by BestRest or described as a suggested
application in BestRest literature.
Because installation of these products is done by
others outside our control, we cannot assume any
liability or responsibility whatsoever for improper or
unsafe installation, or installation which is contrary
to published instructions, for products that are
improperly secured or maintained, or that are
improperly tightened or otherwise secured, or
which are otherwise improper fitted to the
motorcycle.
Authorized Repairs and Parts
Only authorized, and approved replacement parts,
assemblies, nuts, washers, screws, fasteners or
fittings may be used when mounting, installing, or
repairing any BestRest Product. Authorized
replacement parts may be purchased only from
BestRest Products. Parts from other sources or
vendors are not covered under warrantee and will
void any Consumer claims against BestRest or
others. Any use, modifications, or applications of
any BestRest Product, other than those authorized
by us in writing, are specifically prohibited.
BestRest products are warrantee against defects in
workmanship or materials for 90 days after
purchase by the original retail customer. For full
legal disclosures and a description of our
warrantee, please refer to our website.
‘BestRest’, ‘BestRest System’, ‘BestRest-GS’,
‘BestRest Products’, ‘BackRest’, and ‘CargoRest’,
‘BackPad’, 'GrillGuard', 'LightBar', 'LightGuard', the
motorcycle design and triangle logo are all
trademarks of BestRest Products, LLC. The
BestRest System is protected by US patent
6,659,547. Please respect our Trademark,
Copyright and Patent rights.
©2009 BestRest Products LLC
Revised 03-09-2009 All rights reserved.
This manual suits for next models
1
Other BestRest Products Motorcycle Accessories manuals


