BestRest Products PegPacker User manual
BestRest Products, LLC
www.bestrestproducts.com 6908 - 220th St. SW (425) 673-1023
info@bestrestproducts.com Mountlake Terrace, WA 98043 fax (425) 673-0502
PegPacker™
Auxiliary Fluid Carrying System for BMW
F800GS, R1100GS, R1150GS, R1200GS.
For Solo Riding ONLY
Thank you for purchasing a BestRest Peg-
Packer™. We truly appreciate every order. If
you have problems with the installation
please call us at the number above or send
us an email. May the Lord God bless you,
watch over you, and keep you safe as you
travel the world on your motorcycling adven-
tures.
David & Judy Petersen
Safety & Fuel Hazard Warnings
Please read these warnings.
They’re for your safety and
they’re very important.
Installing this product incorrectly could result
in a fire or explosion leading to serious bodily
injury or death to you or others.
Using this product other than as described
and approved by BestRest could result in a
fire hazard leading to serious bodily injury or
death to you or others.
Carrying flammable or explosive fluids exter-
nally on any vehicle presents an inherent
safety hazard. The only truly safe method of
carrying fuel is in your vehicle fuel tank.
Carry external fuel only when you anticipate
conditions where you won’t be able to get
gasoline through normal sources.
As soon as your vehicle fuel tank level has
been consumed, transfer fuel from the Peg-
Packer™to your vehicle fuel tank.
In the event of a collision or tip-over, exter-
nally mounted containers may leak, burst,
vent, or otherwise spill their contents. This
may result in a fire hazard leading to serious
bodily injury or death to you or others.
If the PegPacker™is mounted so that it’s
wider than your panniers, the Blitz®container
could be torn from it’s mounts and could spill
its contents. The Blitz®container is not abra-
sion resistant. If it contacts the road surface
the container may spill its contents. This may
result in a fire hazard leading to serious bod-
ily injury or death to you or others.
This product is designed for “off road use
only”. If you choose to use the PegPacker™
on the streets, you are doing so completely at
your own risk.
Read and follow all the safety warnings on
the Blitz®container. Read the colored sticker
on the end of the container, and read the
embossed warnings on the side of the con-
tainer.
When refilling the Blitz®container, place it on
the ground to prevent static charge and
sparking that may result in a fire or explosion
hazard. Read and follow the safety warnings
on the service station fuel pump.
Read all of the instructions before you begin.
If you don’t have proper tools or lack me-
chanical experience, DO NOT PROCEED.
Take the PegPacker™to a qualified me-
chanic for installation.
If you intend to use the container for potable
water, clean the inside with a dish detergent
solution and/or disinfectant. Mark the con-
tainer clearly so it doesn’t get mixed up with a
fuel container. Don’t ever put fuel in a con-
tainer intended for carrying water. Once
you’ve put fuel in a container, it can NEVER
AGAIN be used to carry potable water! Mark
water containers with white paint, or wrap
white tape around the handle so you don’t
accidentally mix water and fuel.
The PegPacker™is for SOLO riding only. It
should never be used when carrying a pas-
senger.
Failure to properly secure the nylon straps
could result in the container falling off the
motorcycle, resulting in a fire hazard leading
to serious bodily injury or death to you or
others.
Failure to tighten the nozzle may cause fuel
leakage and a fire hazard leading to serious
bodily injury or death to you or others.
Do not overfill the Blitz®containers. Leave
plenty of room in the container for expansion
of fuel. Hot weather will cause the gasoline
to expand, which may cause the nozzle to
leak. Allow for expansion by leaving an air
space at the top. The Blitz®container has an
embossed “SAFE FILL LEVEL”. Do not ex-
ceed this mark.
When opening a Blitz®nozzle, do so slowly to
allow vapors to safely escape. If you open
the nozzle too quickly, the fuel may spray
outward and cause a fire hazard leading to
serious bodily injury or death to you or others.
Do not smoke when you are opening, refill-
ing, mounting, or demounting the Peg-
Packer™. Keep the Blitz®container away
from any spark, flame, or other ignition
source.
Yeah, we know, these are dire warnings, full
of doom and gloom. We don’t mean to
frighten you, but we do want you to clearly
understand the risks involved when you carry
fuel externally. Use common sense.
BestRest assumes no responsibility for any
damages or injuries that may occur as from
using this product. Simply stated, you’re us-
ing this product at your own risk. Your legal
rights may vary from state to state, but if
you’re not willing to assume full and complete
personal liability for the safe and proper use
of this product, you shouldn’t be using it.
Return the product to BestRest for a refund.
Refer to the return policy slip attached to your
sales invoice for return authorization details.
Installation
Please read ALL of the instructions before
you begin. You’ll be glad you did.
Tools needed for installation:
10mm box wrench(s)
10mm socket(s)
5mm hex key wrench
File or rasp
Cordless drill and ¼” drill bit
Fine tipped marker
Blue (semi-permanent) thread compound
The PegPacker™comes in 1 or 2 gallon
sizes. Installation of either size is identical.
The PegPacker™can be mounted on the left
or right side of the motorcycle. The alumi-
num shelf has curved slots to allow rotation of
the shelf to accommodate the geometry of a
motorcycle’s passenger footpeg bracket.
There are minor differences between mount-
ing the PegPacker™on the F800GS, and
mounting on other. We’ll cover those differ-
ences in the text.
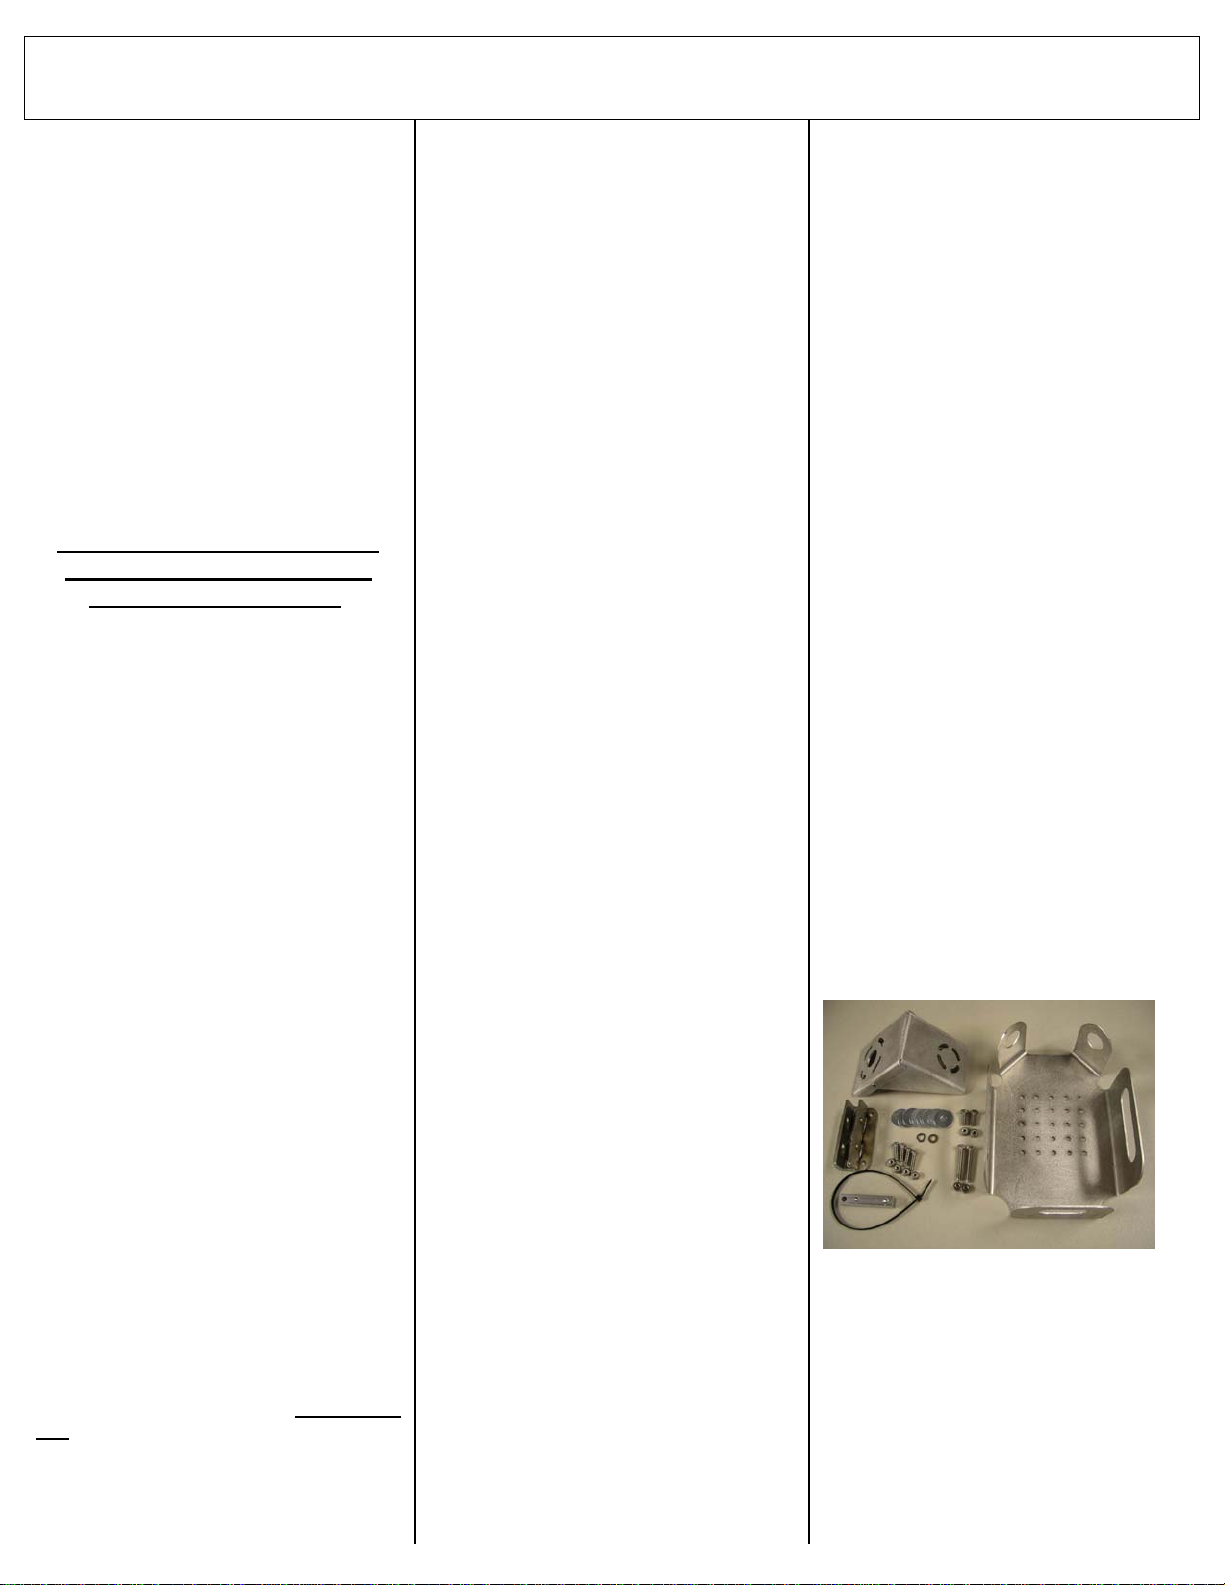
Sort out the parts and identify them.
At upper left is the aluminum shelf.
At far left is the stainless bracket
At lower left is the F800GS tension bar
(not needed for BMW 1100/1150/1200GS)
A ziptie encircles the tension bar
At right is the aluminum Blitz®carrier
(nylon straps not shown)
Other hardware included:

2
2-6x16 hex head screws
2-6x40 hex head screws
4-6x16 button head screws
2-6mm flat nuts
6-6mm nylon locknuts
2-small washers
11-large flat washers
2-rubber caps (not shown in photo)
1-rubber sheet (not shown in photo)
The PegPacker™can be mounted in a HIGH
or LOW position, depending on your needs.
That’s why the stainless bracket has 2 large
holes for the footpeg pivot pin, and 3 small
holes with threaded fittings. For 1-gallon
containers we prefer to mount them in the
HIGH position, for 2-gallon containers we use
the LOW position.
Remove the passenger footpeg. Pull the
cotter pin and washer (or remove the spring
circlip), and then pull the pivot pin holding the
footpeg in place. Push the footpeg inward to
release any tension on the pin.
Temporarily fit the stainless bracket in place
between the two flanges of the welded foot-
peg mount. Reinsert the pin to hold the
bracket in place. In this condition the bracket
is loose and would “flop” or rattle if there
wasn’t some method of providing tension for
the bracket. We have a clever way of solving
that problem.
Here’s a cross section of the system, looking
down from the top of the motorcycle.
The footpeg pin holds the stainless bracket in
place on the welded footpeg bracket. The
long screws hold the aluminum shelf to the
stainless bracket, AND the ends of the
screws also push against the aluminum
block. This forces the stainless bracket into
tension against footpeg pin. The flat nut acts
as a “jamb-nut” which tightens the aluminum
shelf against the stainless bracket, and also
keeps the system from loosening due to vi-
bration. Simple, huh? It works.
The aluminum block has two countersunk
holes to receive the ends of the 40mm
screws, to keep the block from moving. The
other thru-hole is for a zip tie so you can se-
cure the aluminum block to the motorcycle
and prevent loss.
R1100GS-R1150GS-R1200GS, there is no
need to use the machined aluminum block.
Instead the ends of the screws will push
against the inside of the welded footpeg
bracket. See the BIG GS installation section
on page 5.
For the F800GS, temporarily fit the machined
aluminum block in the footpeg bracket and fit
the footpeg pivot pin in place.
If the pin and aluminum bar won’t fit, you can
file a small notch in the bar, in the middle
between the two countersunk holes. You
won’t need to remove much material, just
enough so the pin will fit.
Thread the 2 flat nuts onto the long screws,
followed by a small flat washer and finally a
large washer. Keep the nuts up near the
heads of the screws.
The sequence of nuts and washers is very
important. Please pay close attention.
Fit the two screws into two holes of the alu-
minum shelf. You’ll be working with the
smaller series of slots. Hold the shelf up to
the footpeg bracket and get a general idea of
the angles involved, then select the two holes
that give you a mounting position that pro-
vides a level surface for the Blitz®container.
Place the stainless bracket on the aluminum
shelf and thread the two screws into the
LOWER fittings of the stainless bracket.
Thread the screws about halfway into the
stainless bracket, keeping the nuts up against
the heads of the screws.
Then place the stainless bracket in motorcy-
cle welded footpeg bracket, and insert the pin
thru all 4 holes.
If you’re mounting an F800GS system, make
sure the aluminum block is in place. The
bottom of the block should be even with the
bottom of the stainless bracket, and the ends
of the screws should penetrate into the coun-
tersunk holes.
Before you go any further, reinstall the
washer and cotter pin in the end of the foot-
Motorcycle frame and welded footpeg U-bracket
Footpeg pin
Stainless bracket w/threaded fittings
A
luminum block
(F800GS only)
6x40 screw
Flat nut
Small washer
La
r
ge washe
r
A
luminum shelf
File here
A
pply blue thread locking compound to the
upper ½” of the screws. Do NOT use red
com
p
ounds.

3
peg pin. If you don’t do this now it will be
harder to do when the pin is under tension.
Slip the zip-tie thru the hole in the aluminum
bar, and secure the bar to the footpeg frame
of the motorcycle.
As you tighten the two long screws, keep
their length about the same, in other words
tighten them equally. As they tighten they will
bring tension against the aluminum block, the
footpeg pin, and the stainless bracket.
The aluminum block should be parallel to the
stainless bracket, as shown in this photo.
As you tighten the long bolts, the tension
between the parts will increase and the
stainless bracket will become rigid in relation
to the welded footpeg bracket. Tighten the
bolts gently but firmly. Don’t over-tighten or
strip the threads. Keep the nuts up against
the heads of the screws,
Until now, the aluminum shelf has been free
to rotate on the circular holes. Adjust the
shelf so the top surface is level to the ground,
and tighten the jamb-nuts so the shelf can no
longer rotate. The shelf should be tight and
rigid at this point.
The stainless bracket has 4 holes, one in
each corner. The purpose of these holes is
to receive a “dead-man” screw. This screw
locks the shelf to the stainless bracket, pre-
vents rotation of the shelf on the bracket,
provides an additional fastening point, and
improves stability.
From the back of the stainless bracket, mark
the hole on the back of the shelf. Remove
the shelf and drill the hole, then refit the shelf
and place a short screw thru the hole.
Place a large flat washer on a 6x16 screw,
pass it thru the shelf and thru the stainless
bracket, and a nylon locknut on the end.
The above photo shows the dead-man screw
on an F800GS with the shelf in the LOW po-
sition.
When mounting the shelf in the HIGH posi-
tion, the dead-man screw might not have a
good drilling point so it might not be usable.
R1100GS, R1150GS, and R1200GS geome-
tries work well with the dead-man screw. We
strongly encourage using this option.
Mounting the shelf in the HIGH position.
Some riders will want to mount the Peg-
Packer™in the highest position. This maxi-
mizes leg clearance in the event you’re pad-
dling thru sand or mud.
Fit the stainless bracket to the welded foot-
peg bracket, using the footpeg pivot pin.
Fit the shelf to the UPPER two holes of the
stainless bracket.
Place a short screw (with a large flat washer
on it), thru the UPPER rounded hole of the
shelf, and thread it into the upper threaded
fitting of the stainless bracket.
Place one long screw (with flat nut, small
washer, and large washer as shown in the
earlier photos) thru the middle threaded hole
of the stainless bracket.
Place the second long screw (with flat nut,
small washer, and large washer as shown in
the earlier photos) thru the lower threaded
hole of the stainless bracket.
Now fit the stainless bracket onto the welded
footpeg bracket, and fit the footpeg pivot pin
thru all 4 holes of the brackets.
If you’re mounting an F800GS, use the ma-
chined aluminum block as described above.
Follow those procedures carefully.
If you’re mounting an R1100-1150-1200, skip
the aluminum block. It’s not needed. The
ends of the long screws will contact the
welded footpeg bracket and push against it to
providing tensioning.
Tighten the two long screws evenly until you
achieve tension between the stainless
bracket and the welded footpeg bracket.
Adjust the angle of the aluminum shelf to
achieve a level surface for the Blitz®.
Tighten the jamb-nuts of the two longer bolts,
and tighten the upper short bolt. The shelf
should be in tension.
Once the screws and jamb-nuts are tight, fit a
rubber cap over the ends of the screws. This
finishes off the “look”, protects the screws,
and protects your leg.
Still awake? Keep reading.
Mounting the Blitz®carrier to the shelf.
Now you can plan how you’ll fit the aluminum
Blitz®carrier to the shelf. Place the Blitz®
container in the aluminum carrier and set
them on the shelf. Rotate and consider how
the Blitz®can best be mounted, so that it’s as
close to the motorcycle as possible, and as
far to the rear as possible to give you the
maximum leg clearance.
IMPORTANT NOTE: For structural and
safety reasons it’s important to maximize the
amount of carrier that is resting on the shelf
below. At least ½ of the carrier should be
resting fully on the shelf. The photos below
show different configurations, each of which
places the carrier securely on the shelf.
Short screw at top
With large washer
Long screw
Flat nut
Small washer
Large washer
Long screw
Flat nut
Small washer
Large washer

4
The next series of photos shows possible
installations of a PegPacker™on the right
side of an F800GS. The container is
mounted in the LOW position.
Above is a 1-gallon Blitz®. below a 2-gallon.
The next series of photos shows installation
of a set of 1-gallon PegPackers™on an
F800GS. The Blitz®containers are mounted
in the HIGH position.
Left side above, right side below.
And here’s what it looks like from above:
Depending on your panniers and frame ge-
ometry, rotate the Blitz®carriers to get the
best fit. We prefer to have one corner of the
plastic container touching the pannier. This
small point of contact prevents the system
from vibrating. Use a small piece of foam to
prevent the Blitz®from marring your pannier.
Once you’ve settled on the location of the
Blitz®, hold the aluminum carrier in place and
have a friend pull the plastic Blitz®container
straight up and out of the way - don’t allow
the aluminum carrier to move in relation to
the shelf below.
The bottom of the carrier has a series of
holes that MAY align with the circular holes in
the shelf. With luck you’ll be able to drop 4
screws down thru those holes, but usually
you’ll have to add some holes. We only hit 1
hole and had to drill 3 more holes.
From the underside of the shelf, mark the
carrier with a permanent marker. Remove
the carrier and drill the necessary holes.
NOTE: For structural and safety reasons it’s
EXTREMELY IMPORTANT that the carrier
be secured to the shelf with a minimum of
four (4) screws.
Don’t be limited by the holes we provided –
maximize the “footprint” and get your holes
as wide as possible.
Once your 4 holes are marked and drilled,
replace the carrier on the shelf. Place a large
flat washer on the 4 button head screws, and
drop the screws thru the holes.
On the underside of the shelf, place a large
flat washer on each screw, followed by a ny-
lon locknut.
In the above photo, the lower left washer
needed to be trimmed to fit inside the shelf.
IMPORTANT NOTE: For structural and
safety reasons it’s important to use a large
flat washer on the top and bottom for each
screw!
Tighten the screws and nuts.
To protect the plastic Blitz®container from
damage caused by the raised head of the
button screws, insert the rubber sheet into
the carrier. Trim the sheet as needed.
Reinstall the Blitz®container in the carrier.
Check for proper clearances, and confirm
that the PegPacker™fittings are tight.
4 button head screws w/
large washers

5
Mounting to the BIG GS Series
R1100GS / R1150GS / R1200GS
There are some minor mounting differences
between the F800GS (described in nauseat-
ing detail above), and the BIG GS series.
The footpeg pivot pin is a tight fit. You MAY
find that while you can get the pivot pin into
the top hole of the stainless bracket, it just
won’t fit into the lower holes. This is because
the welds and bends of the footpeg bracket
are hitting the corners of the stainless
bracket, preventing the bracket from fitting
into place.
To correct this issue you can use a rattail file
to slightly enlarge or elongate the pivot pin
holes in the stainless bracket. Don’t file the
holes of the welded footpeg bracket itself.
Alternatively you can file the ends of the
stainless bracket. This drawing shows the
area to file:
Or, elongate this hole slightly. (exaggerated)
It doesn’t take much filing to get the part to fit.
Unlike the F800GS system, the BIG GS sys-
tem relies on only one long screw to provide
tensioning between the welded footpeg
bracket, the pivot pin, and the stainless
bracket.
The lower screw should be fully tightened
until it makes contact with the welded
bracket.
Depending on your motorcycle and the
placement of the welded footpeg bracket, the
lower tensioning screw may not provide full
tension because the jamb-nut is bottomed
between the head of the screw and the small
washer. Rather than using a longer screw,
remove the small flat washer from the long
screw. This will allow the screw to penetrate
further. Keep the large flat washer on the
screw, along with the jamb-nut. Replace the
screw and tighten until the system comes into
tension, then tighten the jamb-nut to prevent
the shelf from rotating.
The upper long screw won’t make contact
with anything at the far end. Thread the
screw in about ¾ of its length, then tighten
the jamb-nut to secure the shelf to the
stainless bracket.
Follow the above instructions regarding
placement of the Blitz® carrier on the shelf.
Here’s photos of the completed system on
the R12GS and R12GSA.
Shelf in place on R12GS, above.
1-gallon Blitz®in place on R12GS, below.
2- gallon Blitz®in place on R12GS, below.
1-gallon Blitz®in place on R12GSA, above.
2-gallon Blitz®in place on R12GSA, below.
Nylon Straps
Each PegPacker™is supplied with a 2” wide
nylon strapping system. This system is de-
signed to provide a safe and secure method
of securing the Blitz®container to the alumi-
num carrier, while still enabling easy access
when fluids are needed.
This is accomplished by means of metal fig-
ure-8 fittings, and a pinch release nylon buck-
le system. To release the buckle pinch the
two sides until the buckle releases. To se-
cure the buckle, push the ends together until
both tabs CLICK and lock.
The nylon straps are configured by BestRest,
and should not be changed. Should you
need to reconfigure the straps for any reason,
replicate our system without changes. If a
nylon strap is improperly configured it could
result in the Blitz® container coming loose
from the motorcycle, with potentially serious
consequences. See page 1 for the hazards.

6
The nylon strapping system can be adjusted
by moving the straps thru the metal figure-8
fittings.
One of the straps is adjustable at the nylon
buckle; the other one is not. The “male” fit-
ting is fixed and cannot be adjusted. The
“female” fitting can be adjusted by pulling the
strap thru the fitting. To create tension on the
straps, grip the loose end of the strap that
projects from the “female” portion of the
buckle, and pull.
Secure loose ends of the straps by running
them thru the figure-8 fittings. Don’t leave
ends loose or the strap could work itself
loose. Loose straps can constitute a safety
hazard, refer to page 1.
Every time you ride the motorcycle you
should check the straps on the PegPacker™.
Adjust as necessary.
The nylon straps should be inspected on a
daily basis for signs of fatigue, wear, or abra-
sion. Pay special attention to the points
where the straps pass thru and around the
openings in the aluminum Blitz®carrier.
If the straps get cut, become fatigued or are
otherwise damaged the Blitz®container could
fall from the motorcycle. Refer to page 1 for
potential hazards.
Visit our online SmugMug photo repository to
view larger images of the photos shown in
these instructions:
www.bestrest.smugmug.com
Alternative Applications
The PegPacker™can also be used as a
camera-mounting platform. The series of
rounded holes on the upper shelf will fit with a
RAM®ball mount. Instead of fitting a Blitz®
carrier, install a RAM®mount and use the
system to hold your video camera.
More Safety and Legal Notices
Off-road travel and/or riding on washboard
surfaces will place high stress levels on the
mounting system. Off road travel can lead to
premature metal fatigue and/or structural
failure. Likewise, a tip-over or other collision
can cause a similar failure.
To reduce the chance of metal fatigue, do not
allow the PegPacker™to vibrate or oscillate.
You can reduce this vibration by running a
second strap (not included) thru the handle of
the plastic container and around a frame
member, then gently cinching the strap to
take out any free movement. Normally this
second strap is not needed, but we mention it
for informational purposes.
If structural failure of the mounting system
occurs, the bracket and container could fall
beneath the wheel, interfere with control of
the motorcycle, and result in handling or con-
trol problems.
It‘s very important to check the brackets on a
daily basis for signs damage, metal fatigue,
and/or loose or missing hardware. If these
are discovered you should immediately re-
move the PegPacker™from service until
repairs can be made.
Do not proceed with product installation
unless you are qualified to complete the in-
stallation in a safe fashion and as described
herein. Do not use these products unless
you have read all instructions and understand
how these products work and what limita-
tions, if any, they may have.
It is the responsibility of the Consumer to
evaluate the suitability of these products for
personal use. Consumers must evaluate
whether these products meet their needs and
whether these products can be mounted and
used in a safe fashion. The Consumer ac-
cepts full and complete responsibility for se-
lection of products and for mounting and
maintenance of these products. The Con-
sumer agrees to follow and abide by all in-
structions, warnings, recommendations, or
other information supplied or published by
BestRest Products.
It is the Consumer's responsibility to inspect
all screws, fasteners, straps, nozzles, and
other fittings on a daily basis, tighten or re-
place them as necessary, and to regularly
inspect the entire system for signs of missing
parts, excessive wear, metal fatigue, or im-
minent failure. Should any of these be ob-
served the assembly should be removed from
the motorcycle and not used until inspected
and repaired by BestRest.
BestRest Products, it's employees, agents,
and owners assume no liability whatsoever
for property damage, personal injury or other
losses resulting from the Purchaser's failure
to properly maintain the products, for unau-
thorized modifications of any kind, for use of
unauthorized parts (including bushings,
screws, pins, straps or other fasteners), or for
use of any BestRest Product in a fashion not
intended by BestRest or described as a sug-
gested application in BestRest literature.
Because installation of these products is
done by others outside our control, we cannot
assume any liability or responsibility whatso-
ever for improper or unsafe installation, or
installation which is contrary to published
instructions, for products that are improperly
secured or maintained, or that are improperly
tightened or otherwise secured, or which are
otherwise improper fitted to the motorcycle.
Only authorized, and approved replacement
parts, assemblies, nuts, washers, screws,
fasteners or fittings may be used when
mounting, installing, or repairing any
BestRest Product. Authorized replacement
parts may be purchased only from BestRest
Products. Parts from other sources or ven-
dors are not covered under warranty and will
void any Consumer claims against BestRest
or others. Any use, modifications, or applica-
tions of any BestRest Product, other than
those authorized by us in writing, are specifi-
cally prohibited.
BestRest products are warranty against de-
fects in workmanship or materials for 90 days
after purchase by the original retail customer.
PegPackers™that have been modified by
the consumer are not covered under war-
ranty.
Warranty does not cover damage caused by
collision or accident.
PegPackers™that have been drilled or
mounted are not eligible for return.
Blitz®containers that have been filled with
any type of fluids, including fuel or water, are
not eligible for return.
For legal disclosures and a description of our
warranty, please refer to our website:
www.bestrestproducts.com
www.pegpacker.com
“PegPacker” is a trademark of BestRest Pro-
ducs, LLC
“Blitz” is a registered trademark of Blitz USA.
The Blitz®fuel container nozzle is covered
under US Patent #D434,328.
©2008 BestRest Products LLC. All rights
reserved.
Table of contents
Other BestRest Products Motorcycle Accessories manuals


