BETACHEK G5 User manual

The Betachek G5 meter has been designed to give years of reliable
and trouble free use. Its speed and unique memory card system will
save you time and inconvenience.
Please read this manual thoroughly so that you are aware of all the
features that have been incorporated into this state of the art device.
Overview of main features:
•5 second test time
•Small sample required
•Unlimited result storage with unique memory card
system – all results saved permanently
•250 in meter memories with time and date
•7 and 14 day averaging
•Auto on and Auto shut off
•Auto calibration with memory card plug in
•Large, easy to read screen
•12 or 24 hour time format
•Sound or silent operation
•Small and lightweight
•Easy to operate
BETACHEK G5
Blood glucose Monitoring System
User Manual
Contents System components
•Betachek®G5 Meter and batteries
•Betachek®Lancing device and lancets
•Carry case
Parts summary
1
2
1. Battery cover
2. Finger slot for removing
memory card
3. Measurement optics
4. Memory card slot
5. Test strip guide
6. Display
7. Power button
8. Memory recall button
4
3
5
6
8
7
1. Meter set up Getting started
Before using your meter for the first time, insert batteries in the battery
compartment. See Changing the batteries section of this manual.
Setting the time, date and sound
Enter Set Up
To enter set up, hold down both buttons simultaneously, until the
following display appears (approx. 3 seconds),then release the buttons:
To set up meter preferences scroll through the options using the
buttons shown below. The flashing item may be changed or accepted.
Change Accept
Time Date
Setting the time, date and sound
Step 1: Select time format (24h/12h)
Step 2: Set Time and Date
Hours Minutes
Year Month Day
Step 3: Select date format
(dd-mm) OR (mm-dd)
Step 4: Turning the sound on and off
When the sound is on, the meter will display:
Change to PIP OFF for the meter to be silent.
Press to select your preference and the meter will save the
settings and turn off.
Coding your meter (Calibration)
Each pack of test strips comes with a memory card that must be
inserted into the meter before any tests are performed.
In addition to recording your result, the memory card programs the
meter to read test strips accurately.
Each memory card has a three-digit number printed on it called
a code number. The code number is also printed on the test strip
container.
Before you insert the memory card the meter will display three bars
and flash the word code.
Procedure for coding
Step 1: Insert memory card
Take the memory card from the pack of test strips and insert it into
the meter.
The meter will sound a chime when the card is correctly
inserted and the coding is completed*.
* If you have the sound turned off, there will be no chime.
Procedure for coding
Step 2: Check code number
The meter will then display a three-digit code number.
The following is an example only:
Check that the number displayed matches the number printed on
the container of the test strips and memory card.
Example: In the above case, the screen, the memory card and the
label should all have the code number 829.
code
mg/dL
mmol/L
BG5TL0307
Betachek
829
2009-03
123456789
37 - 67
131 - 177
1
2
2, 0 - 3, 7
7, 3 - 9, 9
829
Caution: It is critical that a pack of test strips be used only
with the memory card supplied. The memory cards are not
interchangeable as each has different calibration information.
The memory card carries calibration data only for the pack with
which it is supplied. When the meter is programmed with this
data it is able to give accurate results for that pack only.
If the code number on the screen does not match the code
number on the pack of tests, the meter will give incorrect
readings!
The G5 meter has an LCD that should be checked periodically to
ensure it is showing all segments correctly.
Turn on the meter using the button and the meter will perform a
screen test by lighting all segments for 3 seconds.
Check that all the segments are functioning correctly as shown
above.
2. Checking the Display
The G5 meter has two memory systems that work automatically and
in conjunction to provide you with a record of your results.
1. Card Memory
2. Meter Memory
Why two systems?
The meter has a storage capacity of 250 results. When full, the
oldest results are deleted to make room for new ones. This is
a “first in, first out” system which means results are not stored
permanently.
Conversely, the memory card supplied with each pack of test strips
provides a permanent record of results from a single pack of strips.
4. Memory 1. Card memory
Each new pack of test strips comes with a memory card that will
permanently store the 50 results with time and date.
When a test is performed, the result is automatically stored on the
memory card. Once the pack is finished, you should have 50 test
results stored on the memory card. The memory card stores these
results permanently and it should be kept for future reference. An
extended chime indicates that the memory card is full.
Recalling results from the memory card using the memory
button
With the card inserted, press and hold the button until ‘C1’
appears, this indicates that the card is being read. When the button
is released, the most recent test result will be displayed. Use the
button again to read ‘C2, 3, 4...’ to a maximum of 50.
Note: The prefix ‘C’ means card memory.
2. Meter memory
Your meter stores 250 test results with time and date. Each time
a test is performed and a result displayed, the meter automatically
stores the value in memory. If 250 results are already stored, then
the oldest result is deleted to make space for the newest result.
Recalling results from the meter using the memory
button
Remove the memory card and press the button. This will
recall a maximum of 250 results in the meter.
When pressing and holding button, the memory number will
be displayed and when the button is released, the result will be
displayed.
Recalling 7 and 14 day averages
1. Turn the meter off.
2. Press and hold the button until 7d appears
(approximately three seconds).
The result that appears immediately after releasing the button
is the 7 day average. Press again and 14d appears, release for
the 14 day average.
Note: Time and date must be set.
Technical data
Test Time Approx. 5 seconds
Measuring method Reflex photometry
Assay method Glucose Oxidase
Blood sample Fresh capillary blood
Sample size 1 - 2μl
Memory 250 readings with time and date
Permanent memory Unlimited memory card storage (50 readings
with time and date per card)
Batteries 2 button batteries type LR44 (Panasonic) or
A76 (Ucar) V13GA (Varta) or G13 (Toshiba);
alternatively,2 lithium batteries type CR1/3N
(Varta) or DL1/3N (Duracell)
Battery life 2000 tests
Measuring range 10-500mg/dL (0.6 – 27.7 mmol/L)
Auto power off 120 seconds
Storage of meter Humidity <85%
Temperature -40˚C & + 70˚C (-40°F & + 158°F)
Optimum Operating
Temperature
10 - 40˚C (50 - 104˚F)
Dimensions 95 x 45 x 20mm
Weight Approx. 55g
Item/Serial Number Located on meter label
Safety Class III
National Diagnostic Products
503 Cambridge Heath Road
Bethnal Green, E29BU, UK
Email: [email protected]
EC REP
Manufactured by
Expiry date
This product fulfils the requirements of Directive 98/79/EC
on in vitro diagnostic medical devices and Directive 89/336
EEC on electromagnetic compatibility
For in vitro diagnostic use
Please read instructions before use
Storage temperature range
Important information accompanies this product
Authorised Representative in the European Community
0123
EC REP
National Diagnostic Products
7-9 Merriwa Street, Gordon
Sydney NSW 2072 Australia
Email: [email protected]
Accuracy
Comparison against capillary whole blood by hexokinase method
produced the following regression:
y(mg/dL) = 1.0307x - 6.4114 R² = 0.9815.
Precision
The repeatability obtained with the blood samples is shown in the
following Table. The table gives the pooled standard deviation and
pooled CV% with 95% confidence intervals for the five levels of
glucose tested (n=100). No outliers were detected and excluded from
data analysis.
At glucose concentrations of 44.7, 96.1, 132, 170 and 276 mg/dL
coefficients of variation (CVs) of 3.7, 3.5, 2.3, 2.8 and 2.1% were
obtained respectively, indicating a high degree of precision. At all
glucose levels tested the coefficient of variation was below 4%.
Sources of interference
Do not carry out a test in direct sunlight. Strong electromagnetic fields
(e.g. mobile phones, microwave ovens) may affect performance.
Betachek G5 will detect this and an error message will be displayed.
Grand mean
(mg/dL) 44.7 96.1 132 170 276
Pooled SD (mg/dL) 1.7 3.4 3.0 4.8 5.8
95% CI (mg/dL) 1.5-3.0 3.0-6.2 2.6-5.4 4.2-8.7 5.1-10.7
Pooled CV% 3.7 3.5 2.3 2.8 2.1
95% CI 3.2-6.7 3.1-6.4 2.0-4.1 2.5-5.2 1.9-3.9
3. Performance Characteristics
1. Meter set up
Parts summary
Getting started
Setting the time, date and sound
Coding your meter (Calibration)
Procedure for coding
2. Checking the Display
3. Performance Characteristics
Sources of interference
4. Memory
Card memory
Meter memory
Recalling 7 and 14 day average
5. Performing a test
Materials needed
Preparation
Lancing pen
Test procedure
Was enough blood applied
Double checking the result (Comparing colour)
Disposal
Measurement range
6. Meter maintenance
Caring for the G5 meter
Changing the batteries
Control Solution (Checking the meter accuracy)
Problem solving 24
7. Troubleshooting
26 Key to symbols
26 Error messages
Problem Solving
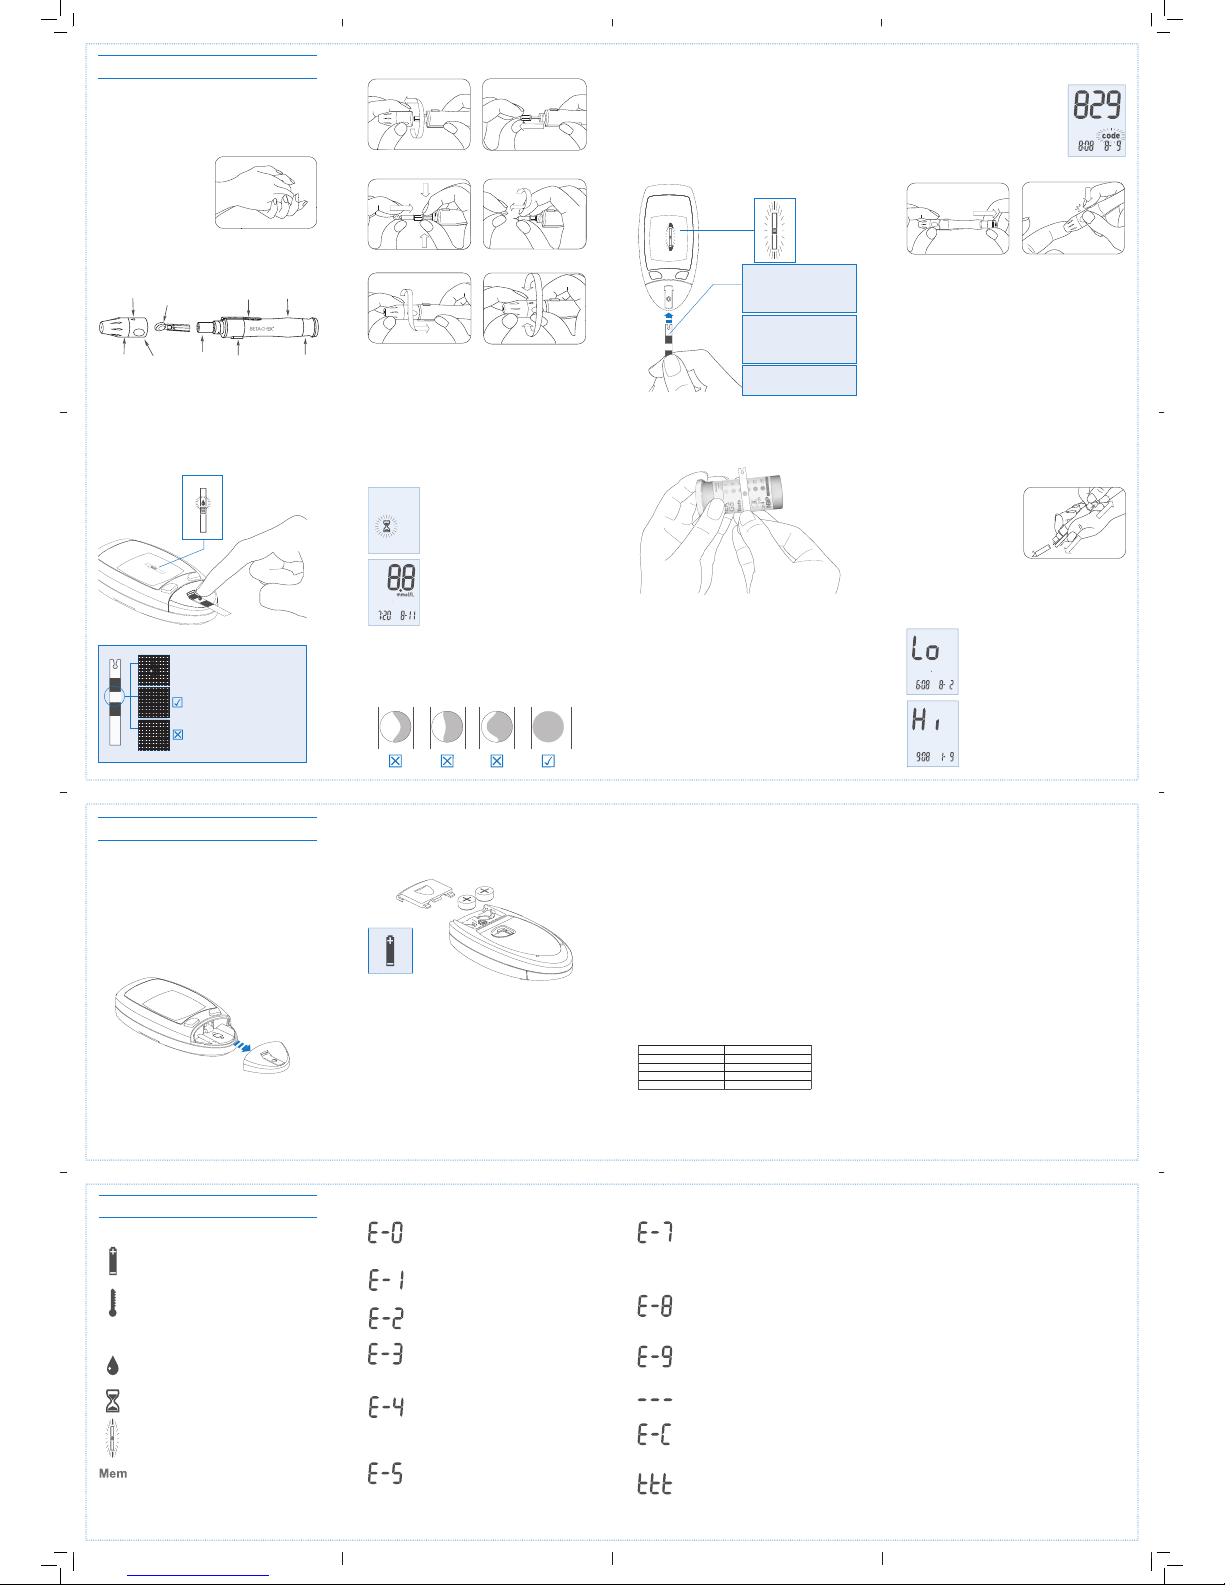
5. Performing a test Test procedure
IMPORTANT: Remove a test strip from the container and quickly
reseal it. The cap contains a drying agent that will be exhausted if
the cap is not quickly replaced.
Step 1: Insert a test strip
Note: A test strip may be inserted either before or after turning
the meter on. If you turn the meter on using the button and have
not inserted a test strip, the meter will prompt you by flashing the
test strip icon:
The meter will display the code number and
flash the word code. Check the code number
matches the code number printed on the test
strip label.
Step 3: Apply blood with the strip in the meter
A small drop is all that is needed to
quickly cover the test zone.
WARNING: The test zone must be
completely covered, otherwise you
may obtain a false reading.
Apply the drop to the centre of
the test zone. It is OK to touch the
mesh.
When a blood drop has been applied, the meter will give a beep and
commence measuring. Do not move the test strip as this will lead to an
incorrect result. The hourglass icon will flash until a result is displayed.
The meter will display the result with time and date.
The result will automatically be saved to the meter
and card memory.
The test is underway, await the result.
Was enough blood applied?
Remove the test strip from the meter and check that the circular
window on the back of the strip is even in colour. If it is not even, then
you have not applied enough blood. You will need to repeat the test.
Double Checking the Result
Comparing colour
Does the meter result match the colour chart?
On the test strip container label, you will find a range of colours, each
corresponding to a glucose concentration.
1. Match the colour in the circular window to the nearest colour on
the chart.
2. Compare the value from the chart to the value you obtained from
the meter.
This should be done between 30 and 60 seconds after applying
blood to the test strip.
If the two values approximately agree then the result is confirmed. If
they do not agree then repeat the test. If the problem persists you
should perform a control test and see the Meter maintenance section
of this manual.
Disposal
As blood is potentially infectious, please dispose of the used
test strip and lancet in a contaminated waste container or in
another suitable way.
Measurement range
The G5 meter measures blood glucose between 10-500mg/dL
(0.6 – 27.7mmol/L) . Values outside this range are reported as ‘Lo’
or ‘Hi’.
Results greater than 500mg/dL (27.7mmol/L).
Results less than 10mg/dL (0.6mmol/L).
Caring for the G5 meter
The meter must be kept clean and stored safely away from water,
moisture (<85% humidity), extremes of heat or cold and dust. Avoid
getting blood on the meter. If you do, clean it immediately.
Cleaning the strip guide
The black area where the strip is inserted may be removed for
cleaning. Slide it off and rinse it with cold soapy water. Check it is
clean on both sides and then dry it.
The optics area under the strip guide can be cleaned using a cotton
tip or soft damp cloth. Be careful not to get water into the meter!
Do not scratch the optics area as this will lead to incorrect
readings.
6. Meter maintenance Changing the batteries
When the battery warning symbol appears, it is time to replace your
batteries. Approximately 50 tests may still be conducted before the
batteries completely fail.
Battery types
•2 button batteries LR44 (Panasonic) or
•A76 (Ucar) or
•V13GA (Varta) or
•G13 (Toshiba)
alternatively;
•2 batteries type CR1/3N (Varta) or
•DL1/3N (Duracell)
Note
Results stored in the meter’s memory will not be lost if the batteries
are removed, however time and date will need to be reset.
Problem solving
Error message
If the meter displays an error message or warning symbol, consult
the section, Key to symbols and error messages for an explanation.
Implausible results
If a result which has been obtained is not plausible, then repeat the
test. If the problem persists then check through the following list:
•Does the code number on the screen match the one on the test strips?
•Was enough blood put on the strip?
•Is the circular window on the back of the test strip even in colour?
•Are the test strips within their expiry date?
•Is the optical area under the strip guide clean?
•Are your hands clean and dry?
•Was the strip inserted fully and was it straight and flat in the guide?
•Was the blood sample capillary blood (obtained from a finger prick)?
•Have the strips been stored and handled in accordance with the test
strip instructions? e.g. in the container and away from heat or cold?
If you answered no to any of the above then repeat the test after
addressing the problem. See the section Checking the meter’s
accuracy if you continue to obtain implausible results.
Meter not turning on
Check the following:
•Are batteries in the meter?
•Are they facing the correct way?
•Is contact being made with the terminals (they may have been
bent when the batteries were inserted)?
•Has the meter been dropped? If so it will need to be returned for repair.
Key to symbols
Insert strip
When this symbol flashes, insert a test strip into the
meter.
Low battery warning
When this symbol appears the meter will still perform
another 50 tests. You should replace the batteries.
Ambient temperature
The ambient temperature is/was outside the
recommended range 10-40˚C (50-104˚F). The result
will be stored in memory with this symbol. Do not make
treatment decisions based on this result.
Apply blood
Apply blood to the test strip.
Testing underway
Test is underway, await result.
Memory recall
Memory result recalled.
7. Troubleshooting Key to error messages
EMC error
EMC error (electromagnetic field) move away from
possible source e.g. mobile phone, microwave.
Flat battery
Flat battery, no test may be performed.
Calibration error
Out of calibration, return to supplier.
Check test strip
Damaged or used test strip or strip not fully inserted or
the measurement optics are dirty. See section Caring
for the meter - Cleaning.
Too much light
Too much ambient light or strip removed during test.
Move out of direct sunlight.
Memory card full
Replace with a new memory card from a fresh pack of
test strips.
Note: Some models will sound a warning chime instead
of E-4.
Key to error messages
Faulty test strip
Faulty test strip. Check that you have stored and handled
the test strips as instructed in the package insert.
Check memory card
Memory card not properly inserted or has a fault.
Memory card failure
Memory card cannot be read. Remove your card and
reinsert. If the problem persists, you cannot use the card
or test strips.
Incorrect temperature
Temperature outside permissable range.Tests cannot be
performed outside permitted limits 5-45˚C (41 - 113˚F).
Test strip removed
Test strip removed during testing, repeat the test and
leave test strip in the meter until the test is completed.
Strip inserted incorrectly
Review test procedures or try inserting the strip BEFORE
turning the meter on.
OR Blood applied too early
Blood applied too early, repeat the test and wait for the
blood drop icon.
•UsefreshteststripifdropofControlSolutionhasnotcompletelywettestpad.
•Ifthedropappliedcontainedairbubbles,repeatthetest.
Storage and handling of control solution
•StoretheControlSolutionbetween4and30ºC(39and85ºF).
•Donotrefrigerate.
•Usebeforetheexpirationdateshownonthelabel.
•Wipethebottletipandresealtightlyaftereachuse.
Procedure: To perform a Control Solution test, follow the same test
procedure that is used for a blood glucose test, substituting Control
Solution for a drop of blood. Refer to Performing a test.
•DiscardthefirstdropofControlSolution.
•Iflargebubblesarepresentatthetipofbottle,wipeoffthebubbleswith
a clean tissue before applying a drop of Control Solution to the test strip.
•Applyonedroptotheteststrip.
•ToavoidcontaminatingtheControlSolutionwithenzyme,DONOT
touch the test strip with the tip of the Control Solution bottle.
Expected results: See Memory/Code card for the acceptable range of
values. If result is within the stated range, the meter and test strips are
performing correctly. If control result is outside the stated range, check
that you have followed the correct procedures (see Sources of error). After
eliminating all potential sources of error, repeat the control test. If control
result is still outside stated range after the second test, please call your NDP
representative.
Sources of error: If test results fall outside the acceptable range, the test
should be repeated. Results which fall outside the acceptable range may
indicate user error, Control Solution or test strip expiration, Control Solution
contamination, test strip deterioration, meter malfunction, or extremes in
testing temperature. Refer to Troubleshooting for assistance. Ensure;
•Thattheteststripguideisclean(seeCaring for the G5 meter),
•ThattheteststripsandControlSolutionyouusedwerecorrectlystored
(expiry date, storage conditions),
•Thatthemeter,teststripsandControlSolutionwereatthecorrect
temperature during the control test.
Betachek G5 Control Solutions
Checking the meter’s accuracy
Special solutions of glucose are available as a quality check to verify
the accuracy of your Betachek G5 blood glucose system.
BETACHEK®G5 Control Solutions are water based solutions containing
a known amount of glucose which when used in place of blood will
react with BETACHEK®G5 Test Strips. The Control Solution should
give results within the expected range printed on the memory/coding
card. Obtaining a result within the expected range is sufficient to verify
system performance.
When to carry out a control test:
•Ifyouobtainunexpectedresults.
•Afteropeninganewpackofteststrips
•Afteryouhavereplacedthebatteries.
•Afteryouhavecleanedyourmeter.
•Wheneveryoususpectthemeterorteststripsmaynotbe
functioning properly.
Use of Control Solution is also recommended for teaching or learning
how to use the system.
Also required: BETACHEK®G5 Meter and BETACHEK®G5 Test Strips.
Chemical composition1
Glucose 0.03
Buffer 0.70
Preservative 0.40
Non reactive constituents 18.00
Water 80.87
1Values are expressed as a percentage by weight and vary depending on the control
level. Figures given are for control 1.
Precautions and limitations
•DonotallowControlSolutiontoenterthemeter,useonlyonteststrips.
•DiscardanyunusedControlSolution3monthsafteropening.Note
the discard date on the Control Solution label.
Materials needed
Betachek G5 Meter
Test strips and the memory card supplied with the test strips
Lancing device with lancet
Preparation
Check test strips have not past the expiry date printed on the label.
Inserting a lancet
Wash hands with warm soapy water.
This removes traces of glucose from
your hands that may contaminate
the test sample. Warm water
increases blood flow to your fingers
to make it easier to obtain a blood
drop without excessive squeezing.
Twist off protective lancet cover.
Firmly hold body, twist off head
to expose lancet holder.
Gently pull out lancet holder.
Replace the head. Select skin penetration depth
by twisting selector until arrow
points to desired number.
1 = minimum ; 5 = maximum
Note: After use, remove used lancet and replace the protective lancet cover onto
the lancet tip. Dispose of lancet in a suitable sharps container.
123
Arrow Protective
lancet cover
Lancet
enjector
Cocking
mechanism
Body
Head
Penetration
depth
selector
Lancet
holder Release
button
1 2 3
Lancing Pen
IMPORTANT: The lancing device is intended for personal use only. It may
only be used by one person for obtaining blood. If used by other people,
there is a risk of infection being transmitted. Note:
•Hold the strip close to the middle
AS SHOWN. DO NOT hold strip
at the end, as you may kink or
bend strip while inserting it.
Caution:
•Carefullyinsertthestripasfar
as it will go into the meter.
•DONOTbendorkinkthestrip
as this will damage it.
•Toavoidinsertionerrors(E7),
insert strip before turning the
meter on.
Example Only:
Step 2: Obtain Blood Sample
When you are ready to perform
a test, pull back cocking
mechanism.
Push lancing device firmly
against fingertip and press the
release button to obtain blood
sample.
Insert a new sterile lancet.
For safe removal of used lancet
from lancing pen, twist of head
to expose lancet holder. Push
the lancet ejector with thumb and
simlutaneously pull back cocking
mechansism.
BG5UM-ENG-JUL12
Table of contents
Other BETACHEK Blood Glucose Meter manuals


