Test Result
- Blood glucose test results are shown on the meter as mg/dL or mmol/L, based on your setting (refer to User's
manual for unit setting).
- If your blood glucose result is unusually high or low, or if you question your results, repeat the test with a new test
strip. You can also run a Quality Control Test with the GC550 Control Solutions to check your meter and Test Strip. If
the test result still remains unusually high or low, contact your doctor immediately.
- If you are experiencing symptoms that are not consistent with your blood glucose test results and you have followed
all the instructions in this manual, contact your doctor immediately.
- The RIGHTEST Blood Glucose Meter displays results between 10 and 600 mg/dL (0.6 and 33.3 mmol/L). If your test
result is below 10 mg/dL (0.6 mmol/L), " Lo " will appear on the screen. Please repeat your test with a new strip. If
you still get a " Lo " result, you should immediately contact your doctor.
- If your test result is above 600 mg/dL (33.3 mmol/L), " Hi " will appear on the screen. Please repeat your test with a
new strip. If you still get a " Hi " result, you should immediately contact doctor.
GT100 BLOOD GLUCOSE TEST STRIP INSERT
Intended Use
The GT100 Blood Glucose Monitoring System is used:
By diabetics for checking glucose levels in capillary whole blood (CB) from the fingertip, palm and forearm.
As an aid in management of diabetes at home and clinical sites.
GT100 Blood Glucose Test Strips:
Are intended for testing outside the body (in vitro diagnostic use for self-testing only).
Are designed for use only with GT100 Blood Glucose Meter to assure accurate results.
GT100 Blood Glucose Monitoring System includes meter, test strips, control solutions, lancing device and lancets.
Special conditions for use statement(s): GT100 System provides plasma equivalent results.
Test Procedure
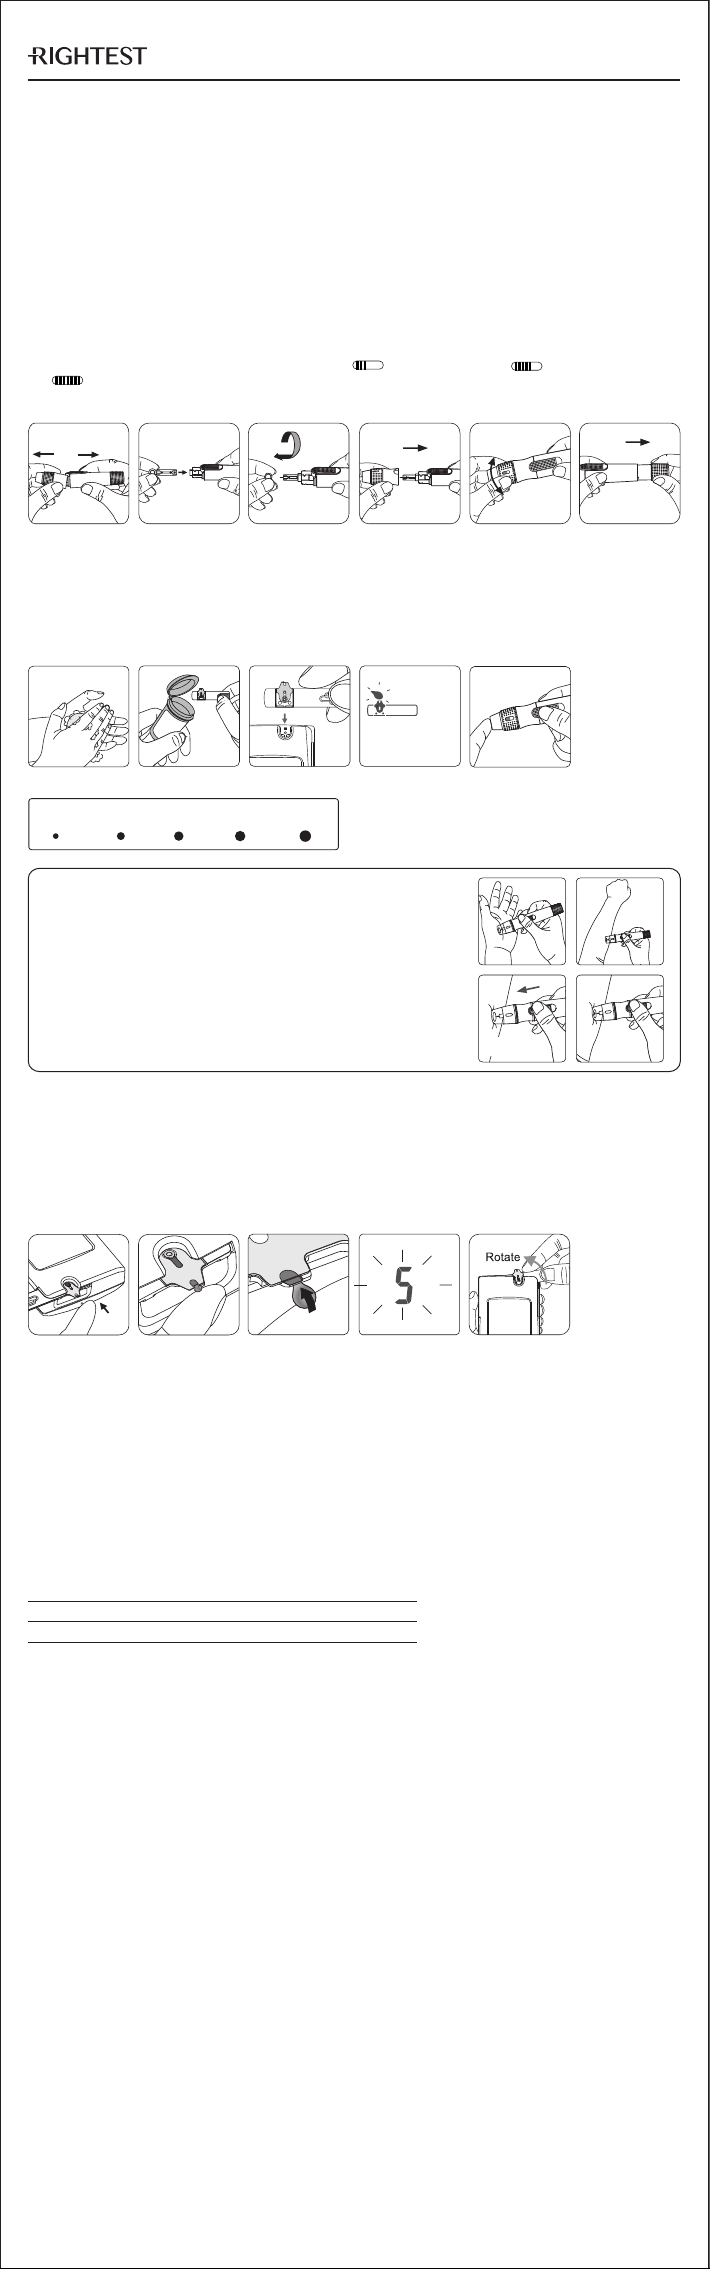
Preparing the Lancing Device
1) Hold the depth adjustable cap in one hand and hold the hub in the other hand. Bend the cap towards the down side,
until a gap appears between the cap and hub. Pull the cap and hub off in opposite directions, remove the cap.
2) Insert a new disposable lancet firmly into lancet carrier.
3) Twist off and set aside the protective cover of the disposable lancet.
4) Replace the depth adjustable cap.
5) Choose a depth of penetration by rotating the top portion of the depth adjustable cap until your desired setting is
visible in the window. Settings are based on skin type: " " for soft or thin skin; " " for average skin;
" " for thick or calloused skin.
6) Hold the hub in one hand and pull on the plunger with the other hand. The device will be cocked. Release the
plunger and it will automatically move back to its original position near the hub.
Performing a Test
1) Wash your hands in warm soapy water and dry.
2) Take one test strip from the vial. Close the vial cap immediately.
3) Insert the strip into the strip port of the meter with the indication symbol facing up. Push the strip in until it snaps
and stops. The meter will automatically detect the code number.
4) When the blood drop icon is flashing on the display window, you are ready to apply the blood sample within 2
minutes.
5) Place the lancing device to the side of your fingertip and press the release button.
1
0.75 µL 1.0 µL µL µL 3 µL 1.5 2.0 .0 Please take a minimum of 0.75 to perform the test on µL
glucose monitoring system. Blood sample size above
3.0 might contaminate the test strip port and the meter. µL
Sample Size Example
6) Touch and hold the drop to the edge of sample entry until you hear a " beep " (if volume is turned on) and the view
window is completely filled with blood. If the view window is not completely filled with blood the test will not start.
Please discard the test strip and repeat the test with a new test strip.
7) The countdown mode will begin on the display window. After 5 seconds your test result will appear.
8) Remove the test strip from the meter. Please follow your local regulations to discard the used strip properly.
9) To remove the lancet, pull off the depth adjustable cap of the lancing device. Without touching the used disposable
lancet, insert the lancet tip into the protective cover. Hold the release button of the lancing device in one hand and
pull on the plunger with the other hand to safely eject the used disposable lancet into an appropriate puncture-
proof or biohazard container.
5
1 2 3 4 5 6
Alternative site testing: palm or forearm blood sampling
- To perform a test using samples obtained from alternative sites, choose
the clear cap and follow step 1 through step 4.
- Massage the puncture area of your palm or forearm for a few seconds.
- Immediately after massaging the puncture area, press and hold the
lancing device with the clear cap against your palm or forearm.
- Press the release button.
- Continue holding the lancing device against your palm or forearm and
gradually increase pressure for a few seconds until the blood sample size
is sufficient (Refer to Instruction manual for the lancing device).
Releasing
button
7
4
3
Status
Fasting
Range
70 - 99 mg/dL (3.9 - 5.5 mmol/L)
2
For more information on how to use your meter and understand your test results, see the User’s manual.
(1)
Expected glucose values without diabetes
6 8
Precautions
- Check the expiration date printed on the strip vial. Do not use expired test strips.
- Close the vial cap immediately after taking test strip out from the vial.
- Do not perform quality control test with expired control solution.
- Do not bend or twist the test strip. Damage of test strip may cause wrong result.
- Do not reuse test strips and lancets.
- Discard the used disposable lancet and strip into an appropriate puncture-proof or biohazard container.
- If the RIGHTEST Blood Glucose Meter and strips are exposed to a high temperature difference, please wait 30
minutes before measurement.
- If you want to purchase new normal or high level control solutions, please contact Customer Service.
- Test results may vary if blood samples are taken from different sites or under certain conditions where glucose levels
can change such as: following a drink, a meal, an insulin dose or exercise. In these cases, only the fingertip should
be used.
Warning
- Keep the test strips or vial cap away from children, they may cause a choking hazard. If a test strip or vial cap is
swallowed, contact your doctor instantly.
Limitations
- The meter readings of the blood glucose may be significantly lower than " true glucose levels " in the hyperglycemic-
hyperosmolar state, with or without ketosis. Critically ill patients should not be tested by RIGHTEST Blood Glucose
Monitoring System, or tested with extreme caution.
- Caution is advised when glucose values are below 50 mg/dL (2.8 mmol/L) or above 250 mg/dL (13.8 mmol/L).
Consult a doctor as soon as possible, if values in this range are obtained.
- Healthcare professionals should evaluate their technique and their patients' technique at periodic intervals. To
accomplish this, it is recommended that BGM (blood glucose monitoring) results be compared with a concurrently
obtained laboratory measurement on the same blood sample. A well characterized clinical laboratory method
employing hexokinase or glucose oxidase should be used as the comparative method.
- Flouoride should not be used as a preservative when collecting blood glucose samples.
- Hands and fingers contaminated with sugar from foods or beverages may cause false elevated results.
- The results of blood glucose measurements are different for measurements with whole blood and plasma.
- Storage of strips near bleach as well as bleach containing products will affect the results of RIGHTEST Blood
Glucose Test Strips.
- RIGHTEST Blood Glucose Test Strips are designed for use with capillary whole blood samples. Do not use serum or
plasma samples.
TM
Palm
Forearm
Pressing for
a few seconds


