eversense CGM Sensor User manual

•The status bar in the Eversense
app will show “Warm Up Phase”
immediately after linking the smart
transmitter with the newly inserted sensor
•It is not necessary to wear smart transmitter on your arm during
the Warm-up Phase. After moving the smart transmitter o of the
arm, the status bar will change to “No Sensor Detected”. When the
smart transmitter is powered o, “No Transmitter Connected” will
show on the status bar
Warm Up: 24 hours
• Insert sensor
• Link smart transmitter
and sensor
• Not necessary to wear
smart transmitter
• Place smart transmitter
over sensor
• 4 BG Calibrations
(2-12 hours apart)
• 2 Daily BG Calibrations
(10-14 hours apart)
Initialization Daily Wear
BEYOND
Today,
Tomorrow
and
Beyond
Tap the Menu icon on top left of the My Glucose home page to
display app menu.
Incision area
•Do not swim or soak in a tub for five days
•Avoid strenuous activities that may pull at the incision or cause
a lot of sweating around the insertion area while the incision heals
•Replace Tegaderm™ if it becomes saturated; otherwise, leave it on
over the Steri-Strips™
•Leave the Steri-Strips™ on until they fall o
•Trim the edges of the Steri-Strips™ if they start to curl; do not
remove them when doing so
•Place the smart transmitter over the Tegaderm™ after the first day
Notify your doctor if:
•Steri-Strips™ come o before incision is fully closed
•You develop a fever, or experience pain, redness, swelling, warmth
or drainage at the incision site
•During sensor wear, skin over the sensor looks like it is thinning,
depressed, or changing color
•You experience a significant change in health or well-being that
you believe is related to your incision site
Incision care
.
Personalized
settings
.
The Main Menu
.
Warm-up Phase and app status bar
.
Overview: Today, Tomorrow
and
Beyond
TO DAY TOMORROW
TO DAY
A. Set Glucose Targets and Glucose Alerts B. Set how often Alerts Repeat (Snooze) C. Set Daily Calibration Reminders
The system will accept a
calibration up to 2 hours
before your set reminder time.
Your alerts sounds are also
customizable. See User Guide
Section 8.
*The smart transmitter should remain on
when programming your App in order to
have access to all app settings and features
•A “No Sensor Detected” pop-up alert
may appear
•Simply tap Not Now to clear the alert
Transmitter powered on*
but not over the sensor
Transmitter powered o
The Eversense® Continuous Glucose Monitoring (CGM) System
is indicated for continually measuring glucose levels in persons
age 18 and older with diabetes for up to 90 days. It is intended to
complement, not replace, fingerstick blood glucose monitoring.
The sensor insertion and removal is performed by a physician.
The Eversense CGM System is a prescription device; patients
should talk to their doctor to learn more. For important safety
information, see https://eversensediabetes.com/safety-info/
•Within 10 minutes, you will receive a calibration prompt in the app
•Do a fingerstick blood glucose check; Tap Calibrate and enter the
glucose value into the app
•You will receive three more calibration prompts during Initialization,
each 2 hours after the previous completed calibration. You can
complete all 4 calibrations in as quickly as 6 hours. All 4 calibrations
must be completed within 36 hours (record schedule on the right)
•Choose calibration times when blood glucose is likely to be stable
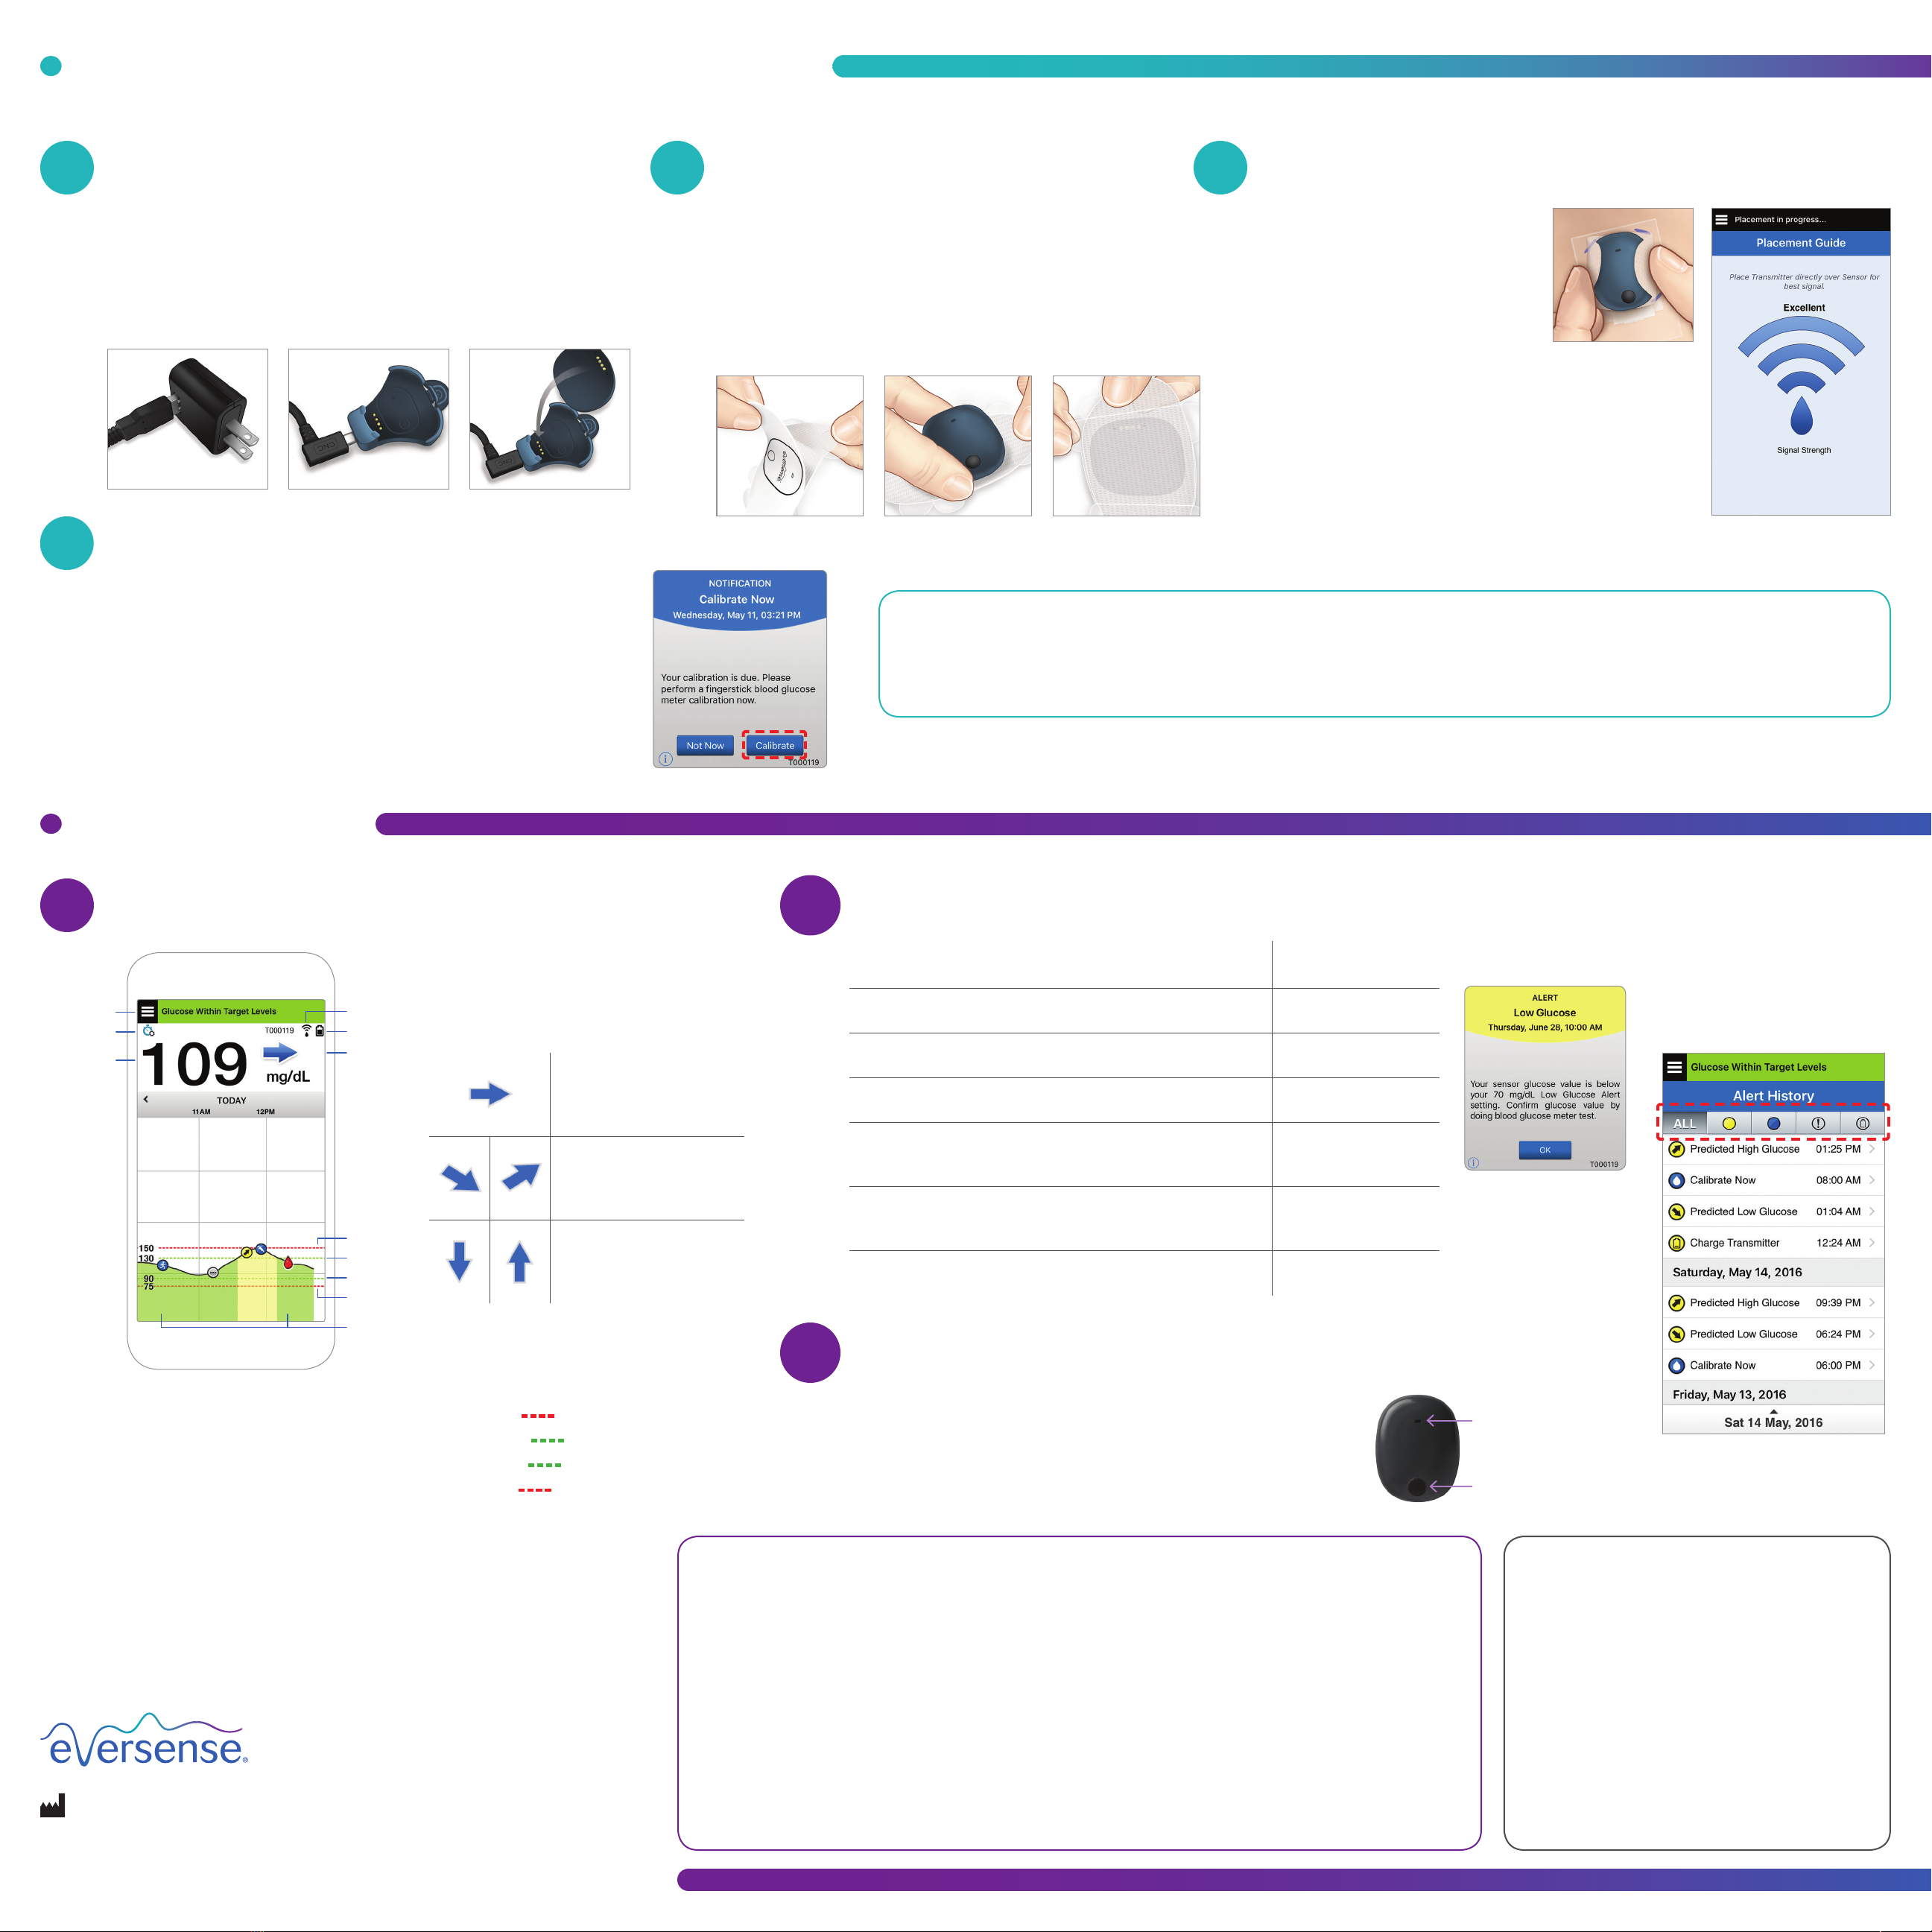
•Open the placement guide in the app
•Hold the smart transmitter with
adhesive with "wings back" as shown
•Start by gently placing your smart
transmitter on the top half of your
bandage, using any visible smart
transmitter corner marks as a guide
•Wait for the signal strength bars to appear
– this may take several seconds
•Position the smart transmitter where the signal strength
shows 2-3 bars (good to excellent)
•If you need to reposition the smart transmitter with
adhesive, you can carefully lift it o the bandage to do so
•Remove the smaller adhesive backing, and smooth out the
adhesive patch. Close the placement guide in the app
•Peel o paper backing with the Eversense Smart Transmitter
outline on it
•Align the smart transmitter over the sticky side (center) of
patch and press firmly to secure
•Remove the larger clear backing
TOMORROW (System Initialization)
•Attach the USB cable to the USB adapter and charging cradle as shown
•Line up the 4 gold pins
•Position the smart transmitter in the cradle
•Push to snap smart transmitter into place
•Charge until LED turns solid green (~15 min)
and BEYOND
(See User Guide Section 9
for more information)
Alerts and Notifications Smart Transmitter
Vibration Pattern
Alerts where no glucose values can be displayed
Requires immediate and appropriate action. 3 long vibes
Alerts related to Low Glucose
Low Glucose Alert. Requires immediate and appropriate action. 3 short vibes x 3
Alerts related to Predictive Low and Out-of-Range Low Glucose
Requires immediate and appropriate action. 3 short vibes
Alerts related to High Glucose
High Glucose Alert, Predictive High, and Out-of-Range High.
Requires immediate and appropriate action.
1 long vibe then
2 short vibes
Alerts related to Smart Transmitter Charge
Your smart transmitter is running low on battery and should
be charged.
3 quick vibes then
1 long vibe x 2
Alerts related to less critical issues, or Notifications
Requires some action but may not be as critical in nature. 1 short vibe
Gradually falling or rising
glucose levels at a rate
between 0.0 mg/dL and
1.0 mg/dL per minute.
Moderately falling or rising
glucose levels at a rate
between 1.0 mg/dL and
2.0 mg/dL per minute.
Very rapidly falling or
rising glucose levels at a
rate more than 2.0 mg/dL
per minute.
Trend Arrows
There are 5 dierent trend arrows that show
the current direction of your glucose levels,
and how fast they are changing.
Tips for Success
•Establish a daily routine for charging your smart transmitter, changing your adhesive patch, and calibrating
•Use both a mirror and the placement guide when positioning your smart transmitter
•Blood glucose may not always match sensor glucose. Always do a fingerstick blood glucose check before
treatment decisions and if you have symptoms of low or high blood glucose
•If you experience an Ambient Light alert (more common in early wear), try moving away from direct light,
covering the smart transmitter with darker clothing, or placing the smart transmitter slightly higher on the
arm over the sensor
•Contact your doctor if you have a medical question or concerns about your diabetes treatment plan
•Contact Eversense Customer Care if you have technical questions about the Eversense CGM System
Eversense Customer Care: 1-844-SENSE4U (736-7348) • Support@eversensediabetes.com
© Senseonics, Inc. 2019 PN: CLN-0022 Rev 4 01/2019
Manufactured and Distributed by:
Senseonics, Inc.
20451 Seneca Meadows Parkway
Germantown, MD 20876-7005 USA
844.SENSE4U |301.515.7260
(844.736.7348)
eversensediabetes.com
Menu icon
Temp Profile icon
Current glucose reading
Transmitter connection to sensor
Transmitter battery power
Trend arrow
High glucose alert level
High glucose target level
Low glucose target level
Low glucose alert level
Event Log icon
NOTE: For a complete description
of all screen icons, see Section 7 in
your User Guide.
Experience Success video available at https://eversensediabetes.com
Charge smart transmitter
.
My Glucose home screen
. Alerts and notications – see, hear, feel
.
Calibrate system
.
Attach smart transmitter
to adhesive
. Place smart transmitter over sensor
.
Menu > Alert History
•Alerts are sortable
To Access Alert History
Calibration Times for Initialization Warm-Up Phase ends: ________________
#1____________AM/PM #2____________AM/PM* #3____________AM/PM #4____________AM/PM
*Glucose data available after 2nd calibration
Turn OFF smart transmitter for remainder
of the 24 hour Warm-up Phase
.
Press and hold the power button for about 5 seconds until smart
transmitter vibrates. LED will flash orange when button is released.
NOTE: When turning on, repeat same steps but LED will flash green. Power button
LED indicator
(lights green
or orange)
Eversense DMS account information:
Username: ______________________________
Password: ______________________________
Health care provider clinic ID#: ________________
Notes: ________________________________
_______________________________________
_______________________________________
_______________________________________
Other manuals for CGM Sensor
2
Other eversense Blood Glucose Meter manuals


