Betta 3000 User manual

2.
3.
Installation Guide for Betta 3000 Straight Drop
Multi Stop Awning –with Brackets
Please Note: These instructions should be read thoroughly before installing.
This is a guide to assist in the installation and care of your external awnings. Betta Blinds and Awnings do not
guarantee the accuracy of the information contained in this guide. We recommend an experienced expert installer
to rely upon their own skills. This is based on general knowledge concerning the assembly, materials and working
process of the external blinds, which is known to us at the time of printing this guide, consequently, is subject to
change and Betta Blinds and Awnings specifically reserves the right to change this guide without notification.
Ensure all components are included in your packaging, before proceeding to install:
Side channels x 2
Awning
Channel end cap (if required)
Pull down ring (if required)
Pull down stick (if required)
You will also need: screws, plugs, drill, hammer drill (if drilling into concrete), measuring tape, spirit level, shifter,
rivets, rivet gun (if required), dyna bolts (if required)
If installing on a brick wall NEVER put the screw into a mortar line. If the position, you need to drill is over a
mortar line move up to the centre of the brick above that position.
Check the size of your blind against the label, which will be attached to the packaging.
1. FACE FIT, attach the side channel with the snap in recess facing outwards. Pre-Drill holes through in-fill part of
the channel. Place channel against post/wall and mark holes
2. Pre-drill all holes and plug if needed. When all holes are drilled, position the channels, and fasten with
appropriate fixings. Repeat these steps for other the channel.
3. REVEAL FIT, attach the side channel to the inside of the post/wall, with the snap in recess facing backwards.
Pre-Drill holes through the channel. Place channel against post/wall and mark holes
4. Pre-drill all holes and plug if needed. When all holes are drilled, position the channels,
and fasten with appropriate fixings. Repeat these steps for other the channel
5. ADJUSTING SPRING: Lock spring and attach a shifter to the Pin. refer to picture 2.
Wind the shifter clockwise to apply tension. Use the size chart to determine how many
turns of tension are required. Link to Spring Tension Chart at the bottom of this
guide. Do NOT let go of the shifter while tensioning as the spring has a lot of force in
it. Do NOT try and over tension the spring. When the right amount of tension has been
applied, drop the holding tab down and wind the spring back until it engages the pin
6. Install blind into brackets NB: Spring end/lock off pin should be on the
left side.
7. If FACE fit snap the infill cover plate into the recess refer to picture 3
8. Twist bottom rail and roll down and test operation.
Caution: Like all outdoor blinds, it is prudent to retract the blind in the presence of strong winds.

Installation Guide for Betta 3000 Straight Drop
Multi Stop Awning –Semi Cassette Pelmet
Please Note: These instructions should be read thoroughly before installing.
This is a guide to assist in the installation and care of your external awnings. Betta Blinds and Awnings do not
guarantee the accuracy of the information contained in this guide. We recommend an experienced expert installer
to rely upon their own skills. This is based on general knowledge concerning the assembly, materials and working
process of the external blinds, which is known to us at the time of printing this guide, consequently, is subject to
change and Betta Blinds and Awnings specifically reserves the right to change this guide without notification.
Ensure all components are included in your packaging, before proceeding to install:
Side channels x 2
Awning
Channel end cap (if required)
Pull down ring (if required)
Pull down stick (if required)
Semi Cassette
You will also need: screws, plugs, drill, hammer drill (if drilling into concrete), measuring tape, spirit level, shifter,
rivets, rivet gun (if required), dyna bolts (if required)
If installing on a brick wall NEVER put the screw into a mortar line. If the position, you need to drill is over a
mortar line move up to the centre of the brick above that position.
Check the size of your blind against the label, which will be attached to the packaging.
Fitting the Semi Cassette Pelmet
9. Remove the awning from the pelmet.
10. FACE FIT Measure the width of the pelmet then the width of the post/window/opening. The difference between
the two is the total amount of overhang your box will have. Divide this number by two to determine how much
overhang you will have on each side. E.g. If the hood measures 2300 and the window/opening measures 2000,
the total overhang will be 300mm. dividing by two equals 150mm each side of the window.
11. Pre-drill the holes for the Pelmet as per the desired fixing points below.
12. Carefully raise the Pelmet into position ensuring that it is horizontal. Mark the holes
13. Pre-drill all holes and plug. When all holes are drilled, carefully position the pelmet, and fasten with screws.
2.
14. FACE FIT, attach the side channel with the snap in recess facing outwards directly below pelmet. Pre-Drill
holes through in-fill part of the channel. Place channel against post/wall and mark holes
15. Pre-drill all holes and plug if needed. When all holes are drilled, position the channels, and fasten with
appropriate fixings. Repeat these steps for other the channel.
16. REVEAL FIT, attach the side channel to the inside of the post/wall, with the snap in recess facing backwards
and directly below pelmet. Pre-Drill holes through the channel. Place channel against post/wall and mark holes
17. Pre-drill all holes and plug if needed. When all holes are drilled, position the channels, and fasten with
appropriate fixings. Repeat these steps for other the channel
The Spring has been tensioned in the factory but may need to be adjusted onsite.
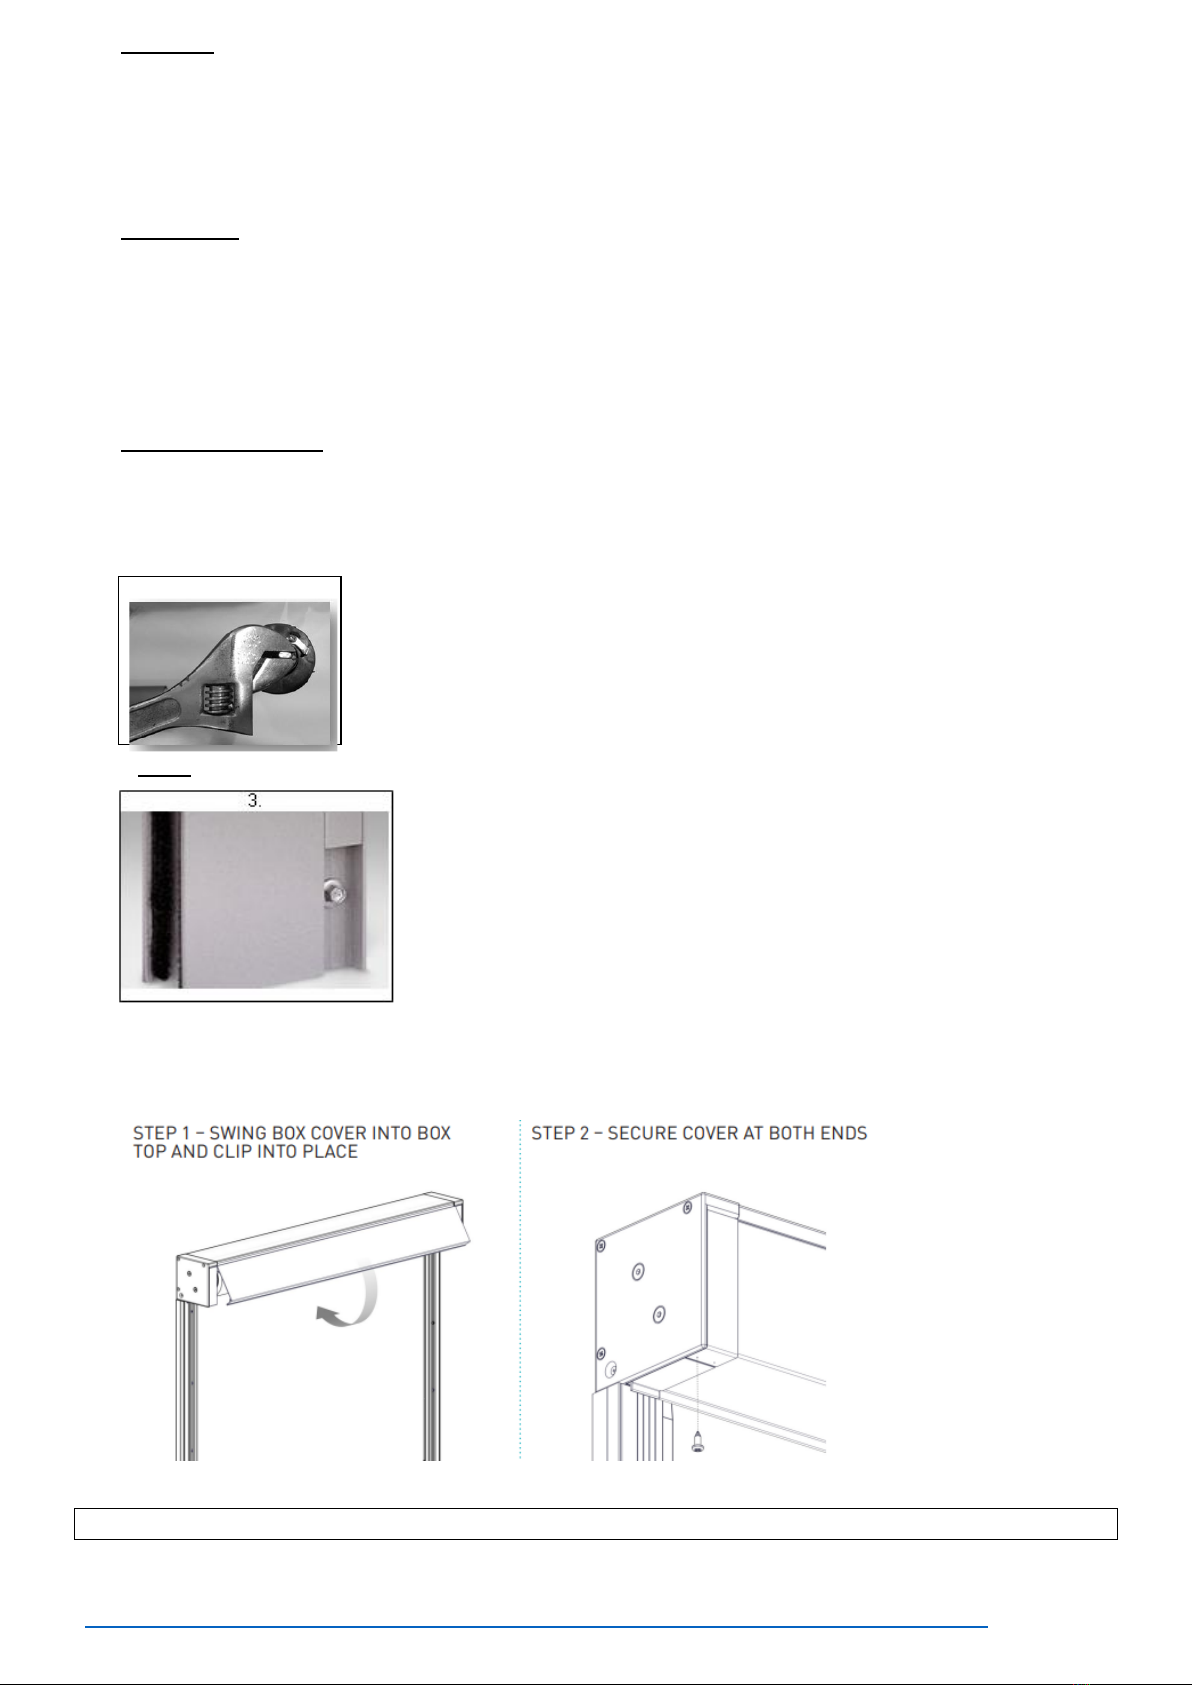
18. ADJUSTING SPRING: Take semi cassette front cover off by removing screws. Lock spring and lift awning out
of cassette slightly. Attach a shifter to the Pin. Wind the shifter clockwise to apply tension. Use the size chart to
determine how many turns of tension are required. Link to Spring Chart Tension Below. refer to picture 2.
Do NOT let go of the shifter while tensioning as the spring has a lot of force in it. Do NOT try and over tension
the spring. When the right amount of tension has been applied, drop the holding tab down and wind the spring
back until it engages the pin.
19. If FACE fit snap the infill cover plate into the recess refer to picture 3
20. Twist bottom rail to release and roll down and test operation.
21. Close cassette
Caution: Like all outdoor blinds, it is prudent to retract the blind in the presence of strong winds.
Spring Tension Chart
https://www.betta-blinds.com.au/downloads/installation_guides/Spring%20Pretensioning%20Chart.pdf
Table of contents
Other Betta Accessories manuals


Popular Accessories manuals by other brands


SEBSON
SEBSON IR OUT F user manual

Wenglor
Wenglor ZD600 Series operating instructions

elsner elektronik
elsner elektronik KNX L Technical specifications and installation instructions

PCB Piezotronics
PCB Piezotronics IMI Sensors CS640B92 Installation and operating manual

DuroZone
DuroZone MB Series Multi-Blade Damper installation instructions

Motorola
Motorola 8900 - Blackberry Curve Cell Phone OEM Car... Developer's guide