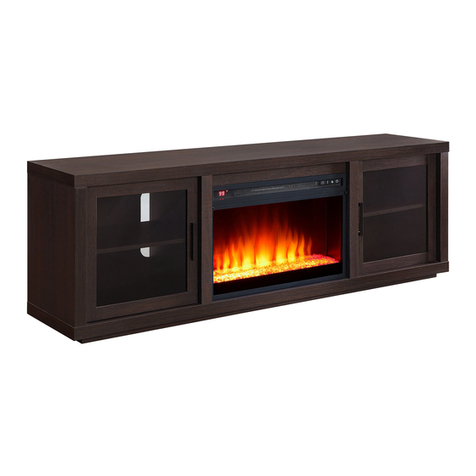
Better Homes and Gardens Granary BHW-10046 User manual

THIS INSTRUCTION BOOKLET CONTAINS IMPORTANT SAFETY INFORMATION.
PLEASE READ AND KEEP FOR FUTURE REFERENCE.
Date 2019-07-15 Rev. 0001-A
Granary Modern Farmhouse Fireplace
MODEL # BHW-10046
ADULT ASSEMBLY REQUIRED
If you have any questions regarding assembly or if parts are missing, DO NOT return this item to the
store where it was purchased. Please call our customer service number and have your instructions
and parts list ready to provide the model name, part name or factory number:
866-942-5362
Pacific Standard Time: 8:30 a.m. - 4:30 p.m., Monday - Friday
Or visit our web site 24 hours a day, 7 days a week for product assistance at
www.whalenstyle.com
Or e-mail your request to parts@whalenfurniture.com
LOT NUMBER:
DATE PURCHASED: / /

2
MANUFACTURER: Whalen Furniture Manufacturing
CATALOG: Granary Modern Farmhouse Fireplace
MODEL # BHW-10046
MADE IN CHINA
How to adjust the European adjustable hinges on doors
Shipping may cause doors to go out of alignment. If you find that the doors need to be adjusted slightly,
turn the appropriate screw, as illustrated.
1. TO ADJUST DOOR FORWARD OR BACKWARD.
2. TO ADJUST DOOR TO RIGHT OR TO LEFT.
3. TO ADJUST DOOR UP OR DOWN.
M A X I M U M R E C O M M E N D E D W E I G H T L O A D S
FITS UP TO MOST 139.7 cm / 55”
DIAGONAL FLAT PANEL TVs
MAXIMUM LOAD 61.2 kg / 135 lb
THIS UNIT IS NOT INTENDED FOR USE WITH CRT TVS. USE ONLY WITH FLAT
PANEL TVS AND AUDIO/VIDEO EQUIPMENT MEETING RECOMMENDED SIZE AND WEIGHT
LIMITS. NEVER USE WITH LARGER/HEAVIER THAN RECOMMENDED FLAT PANEL TVS OR
EQUIPMENT. TO AVOID INSTABILITY, PLACE FLAT PANEL TV IN THE CENTER OF THE UNIT; THE
BASE OF THE TELEVISION MUST BE ABLE TO REST ON THE SUPPORTING SURFACE OF THE
UNIT WITHOUT OVER-HANGING THE EDGES. IMPROPERLY POSITIONED FLAT PANEL TVS, OR
FLAT PANEL TVS INCLUDING OTHER EQUIPMENT THAT EXCEED RECOMMENDED SIZE AND
WEIGHT LIMITS COULD FALL OFF OR BREAK THE UNIT, CAUSING POSSIBLE SERIOUS INJURY.
FOR USE WITH TELEVISIONS WEIGHING 135LBS (61.2 KG) OR LESS. USE WITH HEAVIER
TELEVISIONS MAY RESULT IN INSTABILITY CAUSING TIP OVER RESULTING IN DEATH OR
SERIOUS INJURY.
MAXIMUM LOAD 22.7 kg / 50 lb
PLACE TV BEHIND THE STOPPER
12
3

3
Important
Before you begin: Open, identify and count all parts prior to assembly. Lay out parts on a flat and non-
abrasive surface. You will need the parts identified on page 4 and 5 of this instruction manual.
NOTE: IT IS VERY IMPORTANT TO USE GLUE WITH DOWELS. EXCESS GLUE CAN BE WIPED
OFF WITH DAMP CLOTH.
Insert the Dowel at least half way by tapping lightly with a rubber mallet, IF NECESSARY.
CAM LOCK SYSTEM OPERATION
HOW THE KNOCK DOWN (KD) ASSEMBLY SYSTEM WORKS
1. Screw the Cam Bolt into the threaded inserts on the panel. Connect both panels together; making sure Cam
Bolt goes into the pre-drilled hole on the end of panel for Cam Lock.
2. Insert the Cam Lock into the pre-drilled large hole on the panel. Make sure the arrow on the face of Cam
Lock faces out and points towards Cam Bolt.
3. Take a Phillips screwdriver and rotate the Cam Lock clockwise to lock the Cam Bolt in place.
4. Plug the Cam Lock Cover into the cross slot of the Cam Lock to conceal the Cam.
You are now ready to assemble the fireplace.
XX
FINAL
1 2 43

4
Parts and Hardware List
Please read completely through the instructions and verify that all listed parts and hardware are present
before beginning assembly.
A- Top Panel (Qty. 1) B- Left Lower Side Panel (Qty. 1) C- Right Lower Side Panel (Qty. 1)
D- Upper Side Panel (Qty. 2) E- Upper Partition Panel (Qty. 1) F- Upper Side Panel Molding (Qty. 2)
G- Fixed Shelf (Qty. 1) H- Middle Crossbar (Qty. 1) I- Left Lower Partition Panel (Qty. 1)
J- Right Lower Partition Panel K- Left Middle Stile L- Right Middle Stile
(Qty. 1) (Qty. 1) (Qty. 1)
M- Bottom Panel (Qty. 1) N- Bottom Front Stretcher (Qty. 1) O- Bottom Back Stretcher (Qty. 1)
P- Door (Qty. 2) Q- Adjustable Shelf (Qty. 2) R- Upper Back Panel (Qty. 1)
S- Lower Back Panel (Qty. 2) T- Stop Rail (Qty. 1) U- Top Front Stretcher (Qty. 1)

5
Parts and Hardware List
Please read completely through the instructions and verify that all listed parts and hardware are present
before beginning assembly.
Fireplace Insert (Qty. 1) Remote Control with Battery (Qty. 1)
(1) Cam Lock (2) Cam Bolt (3) M8 x 30 mm Wood Dowel
(Qty. 46+2 extra) (Qty. 46+2 extra) (Qty. 46+2 extra)
(4) M3.5 x 12 mm Flat Head Screw (5) M4 x 50 mm Wood Screw (6) Metal Bracket
(Qty. 4+1 extra) (Qty. 4+1 extra) (Qty. 2)
(7) M3.5 x 15 mm Washer Head Screw (8) Handle Bolt (9) Handle
(Qty. 36+1 extra) (Qty. 16) (Qty. 8)
(10) Shelf Support (11) Cam Lock Cover (12) Rubber Bumper
(Qty. 8+1 extra) (Qty. 20+1 extra) (Qty. 4+1 extra)
(13) M4 x 45 mm Wood Screw Glue Touch-up Pen Tipping Restraint Hardware Kit
(Qty. 4+1 extra) (Qty. 2) (Qty. 1) (Qty. 2) (Included in plastic bag)
Tools required: Phillips screwdriver and hammer (not provided).

6
Assembly Instructions
1. Unpack the unit and confirm that you have all the hardware and required parts. Assemble the unit on a
carpeted floor or the empty carton to avoid any scratch.
2. Securely screw the Cam Bolts (2) into the designated small holes on the Top Panel (A), the Fixed Shelf
(G) and the Bottom Panel (M) using a Phillips screwdriver.
② x 24
A
G
2
M

7
Assembly Instructions
3. Securely screw the Cam Bolts (2) into the designated small holes on the Upper Side Panel Moldings (F),
Lower Side Panels (B and C) and Middle Stiles (K and L) using a Phillips screwdriver.
② x 16
K
L
F
F
B
C

8
Assembly Instructions
4. Glue the 30 mm Wood Dowels (3) into side holes of Lower Partition Panels (I and J).
③ x 12
J
I
3
3
3
3
3
3
3
3
3
3
3
3

9
Assembly Instructions
5. Align and attach the Left Middle Stile (K) to the Left Lower Partition Panel (I) by engaging 2 Cam
Locks (1) (Refer to page 3 on Cam Lock system operation supplement).
6. Repeat the same procedure to combine the Right Middle Stile (L) to the Right Lower Partition Panel (J).
K
L
I
J
1
1
1
1
① x 4

10
Assembly Instructions
7. Glue the 30 mm Wood Dowels (3) into side holes of Bottom Panel (M) and Bottom Stretchers (N and
O).
③ x 12
3
3
3
3
3
3
N
O
3
3
3
3
M
3
3
3
3

11
Assembly Instructions
8. Align and attach the Bottom Back Stretcher (O) to the Bottom Panel (M) by engaging 3 Cam Locks (1).
M
O
C
1
① x 3

12
Assembly Instructions
9. Align and attach the Bottom Front Stretcher (N) to the Bottom Panel (M) by engaging 4 Cam Locks (1).
N
MO
1
① x 4

13
Assembly Instructions
10. Attach the Lower Partition Panels (I and J) to the Bottom Panel (M) with four 50 mm Wood Screws (5).
I
J
M
5
5
5
5
N
O
⑤ x 4

14
Assembly Instructions
11. Glue the 30 mm Wood Dowels (3) into side holes of Middle Crossbar (H) and Lower Side Panels (B and C).
③ x 6
33
BC
3
3
3
3
H
3
3

15
Assembly Instructions
12. Align and attach the Middle Crossbar (H) to the Fixed Shelf (G) by engaging 3 Cam Locks (1).
H
G
1
1
1
① x 3

16
Assembly Instructions
13. Align the large holes on Left Lower Side Panel (B) with the inserted Wood Dowels (3) on the assembled
base. Firmly press them together and fasten it in place by engaging 4 Cam Locks (1).
14. Repeat the previous step to attach Right Lower Side Panel (C) at the other end.
I
J
M
B
C
1
G
B/C
① x 8

17
Assembly Instructions
15. Ask for assistance to position the Fixed Shelf (G) onto the inserted Wood Dowels (3). Attach the Fixed
Shelf (G) in place by engaging 8 Cam Locks (1).
B
C
I
J
M
G
1
① x 8

18
Assembly Instructions
16. Glue the Wood Dowels (3) into side holes of the Upper Panels (D and E).
③ x 14
3
3
3
3
D
3
3
3
3
3
3
D
3
3
3
3
E

19
Assembly Instructions
17. Align and attach one Upper Side Panel Molding (F) to one Upper Side Panel (D) by engaging 2 Cam
Locks (1).
18. Repeat the same procedure to combine the other Upper Side Panel Molding (F) to the other Upper Side
Panel (D).
D
F
1
1
D
F
1
1
① x 4

20
Assembly Instructions
19. Stand the unit upright.
20. Securely screw the Cam Bolts (2) into the designated small holes on the Fixed Shelf (G) using a Phillips
screwdriver.
② x 6
B
G
2
Table of contents
Languages:
Other Better Homes and Gardens Indoor Fireplace manuals
Popular Indoor Fireplace manuals by other brands

Twin-Star International
Twin-Star International 26MM4995 instruction manual
Masport
Masport Inverell installation instructions

RealFlame
RealFlame Vektor 1100 instruction manual

ModaFlame
ModaFlame GF301200 user manual
Heat-N-Glo
Heat-N-Glo SL-36 Installer's guide

Heat & Glo
Heat & Glo SL-36-Ultimate owner's manual
