Betterbee BetterComb Frame User manual

Betterbee • 8 Meader Rd, Greenwich, NY 12834 • (800) 632-3379 • betterbee.com
BetterComb
™
Frame Assembly Instructions
Version 1.2 • Updated September 26, 2019
BetterComb is a completely drawn comb made of food-grade, virgin, synthetic wax, similar in
composition to beeswax. When installed into the included wooden frame, it is ready for the bees to
use right away.
These instructions start from assembled wooden frames. If you are starting with unassembled
wooden frames, you will first need to assemble the frames using Betterbee’s frame assembly
instructions. The combs are sized for Betterbee frames, which are produced by Humble Abodes. The
combs can be cut with a sharp knife to fit smaller frames.
Wired vs. unwired frames: which to use?
There are two ways to install BetterComb into frames: pinning with toothpicks into unwired frames,
and melting into wired frames. Pinning with toothpicks is quick and easy, and works well for brood
chamber use. Pinning the combs does not work well in very hot climates, or for use with in honey
supers. The combs tend to droop or buckle due to the weight of nectar or softening of the wax in
intense heat. Wiring is recommended for these applications. Wired frames can be extracted in
tangential or radial extractors just as any other frames are extracted. Wiring supplies are available at
Betterbee.
Tools and parts required:
Installation shim: 7-3/4” x 16-3/4” x ¼” piece of cardboard or wood (included in complete kit or
available as part number BCOMBINSTALLBOARD)
Hive tool (optional)
Round toothpicks for pinning comb (included in kit or part number TPICK) or frame wire (BW)
and eyelets (EYELETS)
Wooden grooved-top frames with holes drilled in top/bottom (ADFGGBC or AMFGGBC) or
frames wired with 4 wires (ADFWBC or AMFWBC)
BetterComb comb pieces (BCOMB)
For wiring only: 12V power supply such as battery charger or car battery
Betterbee • 8 Meader Rd, Greenwich, NY 12834 • (800) 632-3379 • betterbee.com
Method 1: Unwired frames pinned with toothpicks
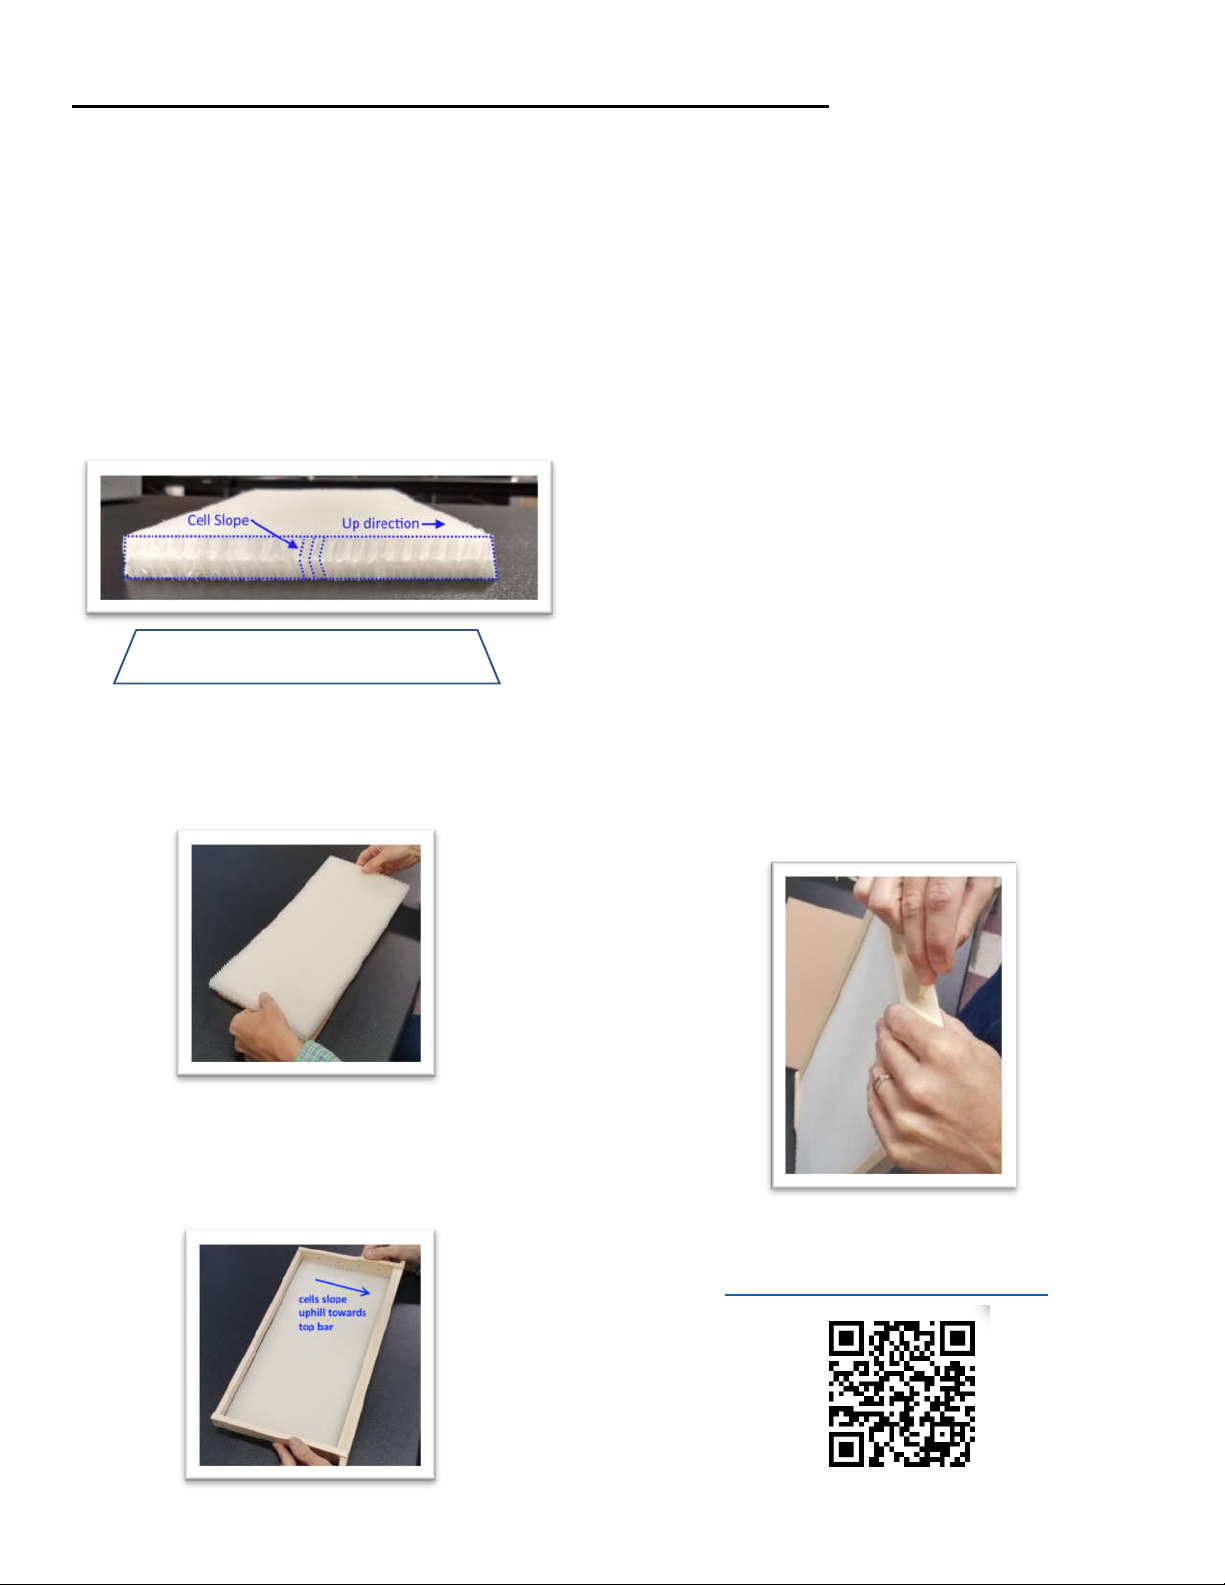
Step 1: Determine the orientation of
the comb.
Look at the cells. Each cell slopes in one
direction, just as in natural comb. The cells
need to be sloped “uphill” when installed in the
frame, so be sure to orient the cell slope
toward the top bar. One side of the comb is
slightly narrower to aid in installation. Place the
wider side down. Reference the illustration
below (looking down the end of a comb).
Step 2: Center the comb on the
cardboard installation shim.
The top of the comb is facing the installer.
Step 3: Place assembled frame over
the comb.
Be careful to align and center all four edges,
with cells sloping uphill towards the top bar.
Step 4: Press the frame firmly but
evenly over the comb.
Keep the wood frame level as you press down
to the table. Press until the wider portions of
the side bars are flat on the table.
Step 5: Manually fine tune the
position of the comb.
In all locations, the comb should be centered
relative to the frame.
Step 6: Insert toothpicks for support.
While holding the comb centered, insert a
toothpick half way into each side bar hole to
pin the comb in place. Once inserted half way,
break off the protruding half by bending toward
the bottom or top bar (not side-to-side).
Use the broken off half for the next hole, and
continue until all holes are pinned. Repeat this
process for the three holes on the top and
bottom bar. Insert the top bar toothpicks
2
/
3
of
the way, break off, and use the short piece on
the bottom bar.
Watch a video of wireless installation
here:
youtube.com/watch?v=JI813vh2FyQ
Narrow Side Up
Wider Side Down

Betterbee • 8 Meader Rd, Greenwich, NY 12834 • (800) 632-3379 • betterbee.com
Method 2: Wired frames
We recommend watching a video of
the embedding process before
starting: youtu.be/a-ElrV6SR4s
Step 1: Assemble and wire frames.
Assemble frames using preferred method of
assembly (nails, staples, etc.).
Prior to wiring, consider how the wire will be
heated. The ends of the wires need to be
positioned so they can be electrified by a 12-
volt power source. An illustration is shown
below.
Deep Frame Wire Routing:
Medium or Shallow Frame Wire Routing:
Use quality steel frame wire between 26 and
28 gauge. Install eyelets in side bars, thread
wire, and then stretch wire tight. Anchor firmly
with a wedge nail at each end. Wire frames
completely: 4 wires for deeps, or 2 wires for
mediums. Use two nails to anchor the wire
such that the wire is an “open circuit” that
can be electrified with 12 volts. See
illustrations above.
Step 2: Prepare Comb.
Determine orientation of comb as described in
previous section. Set the comb on the
installation shim, making note of which side is
the top. Place the wired frame on top of the
comb so that the wires rest on the comb, and
double check that the cell orientation is correct
with respect to the top of the frame.
Step 3: Embed Wires.
Slide the frame into contact with the 12-volt
power source. The wires will heat up
immediately. Press down on the frame until all
wires melt into the center wax core of the
comb. Slide the frame away from the power
source, and allow the wires to cool for two to
three seconds.

Betterbee • 8 Meader Rd, Greenwich, NY 12834 • (800) 632-3379 • betterbee.com
BetterComb Recommendations for Use
Carefully place the assembled frames into a deep hive body for storage until you are ready to
use your BetterComb frames in a hive.
If any cells were damaged during the installation process, the bees will take care of the repairs
once the frame is installed in the hive.
You can use any number of BetterComb frames mixed with other types of frames, drawn or
undrawn. Bees prefer their own drawn comb over the BetterComb until they have used it and
made it their own. To make best use of the comb, do not “checkerboard” the frames. Place
them in a group off to one side, on the outside, or in the center. See photos below for
reference:
Bees love to put nectar in BetterComb! However, we only recommend extracting honey
from wired frames. The pinned frames without wires cannot withstand extraction except at low
speed in a tangential extractor.
Are you using the frames in a very hot climate? We recommend using wired frames to
prevent drooping of the combs.
Label your frames! If you are building your own frames, be sure to label them as BetterComb
frames to help you keep track of them. After time, it is difficult to distinguish from other frames.
Other Betterbee Farm Equipment manuals


