Betterbee Colorado Bee Vac Instruction sheet
Page 1of 5
Colorado Bee Vac™ Product Instructions
Updated June 28, 2021
Quick Start Guide
If you’re one who prefers not to read instructions, at least read these few points before you start using
your Colorado Bee Vac!
1. Be sure to leave the bypass valve partially open (see diagram pg. 2). If closed, the bees may
be exposed to excessive vacuum pressure. Only close the valve as much as is needed.
2. Do not coil the vacuum hose during use. Keep the hose as straight as possible to reduce
damage to the bees as they travel through the hose.
3. When done vacuuming, close the blast gate before shutting off the vacuum so the bees don’t
crawl back into the hose.
4. When done vacuuming, remove the cover from the catch box, keep the box in the shade, and
give the bees plenty of air to prevent them from overheating.
5. Do not store the vacuum cover on the catch box to avoid having the seal material stick to the
catch box.
6. Please read the full instructions! Over the years we have learned many tricks on the most
successful ways to use the Colorado Bee Vac.
Page 2of 5
User Manual
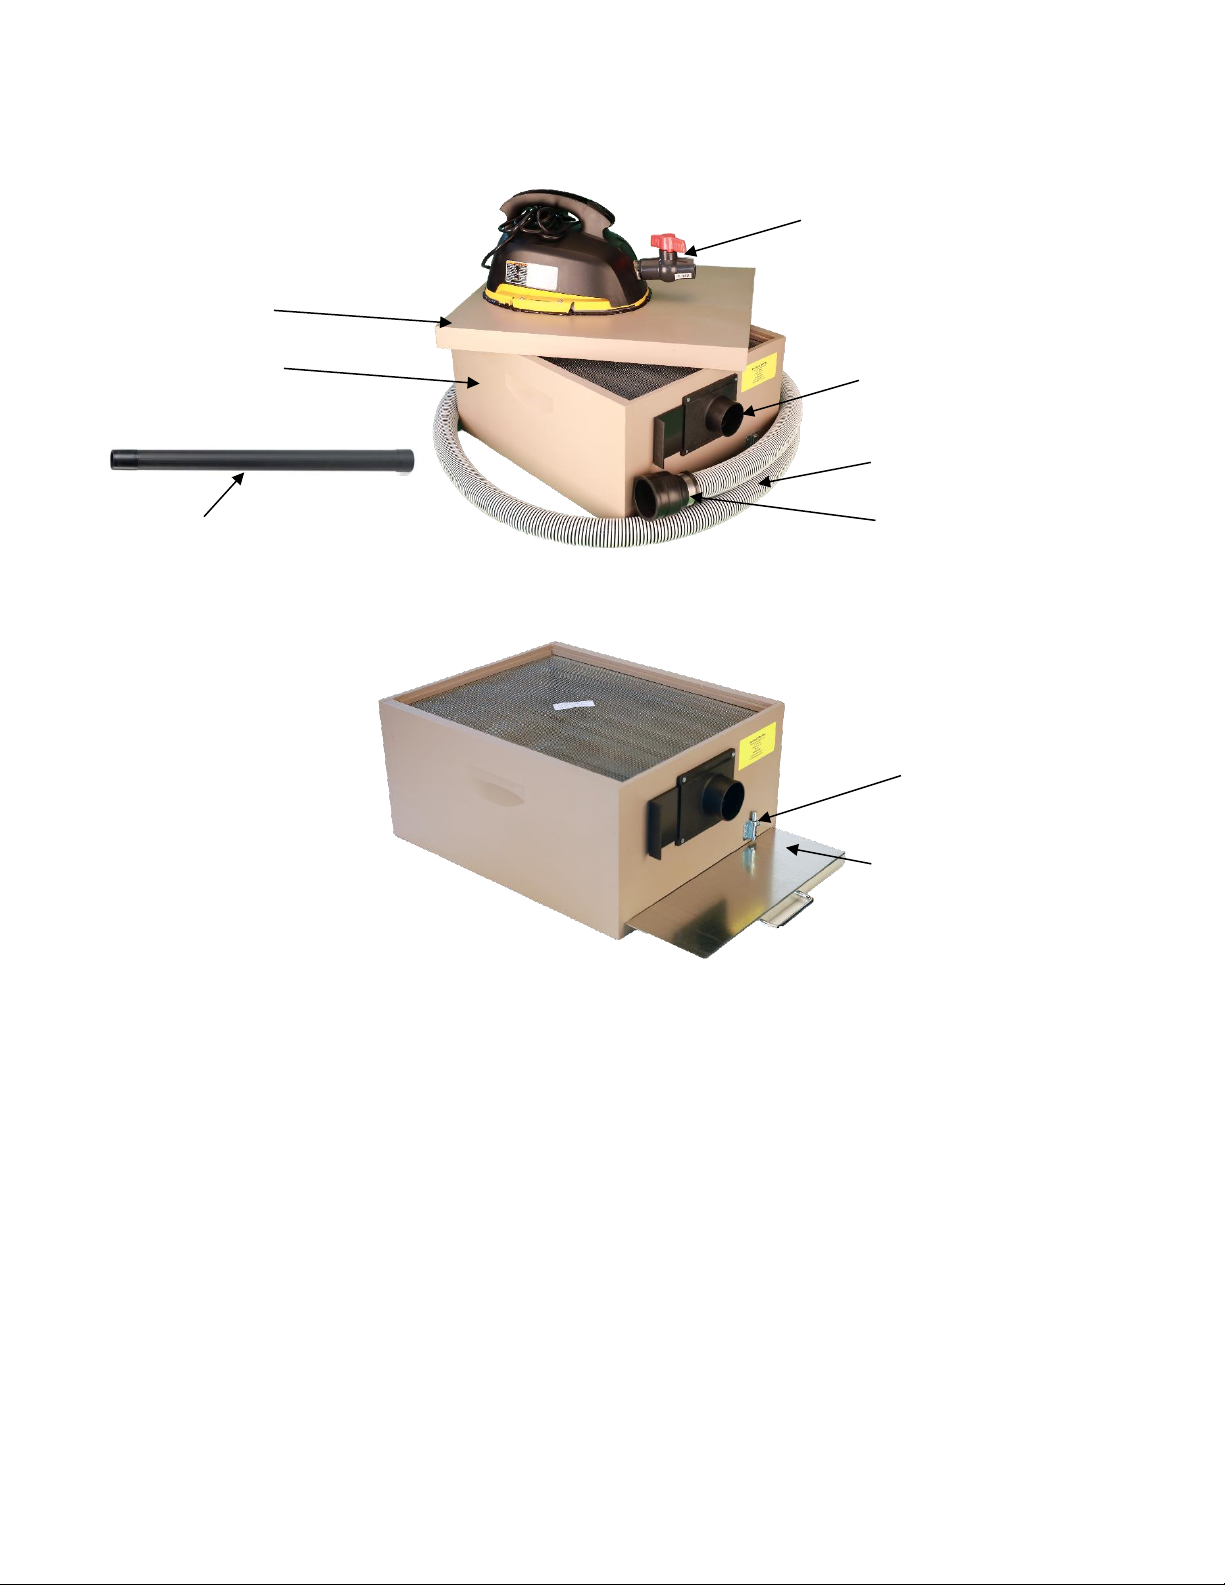
Parts Listing
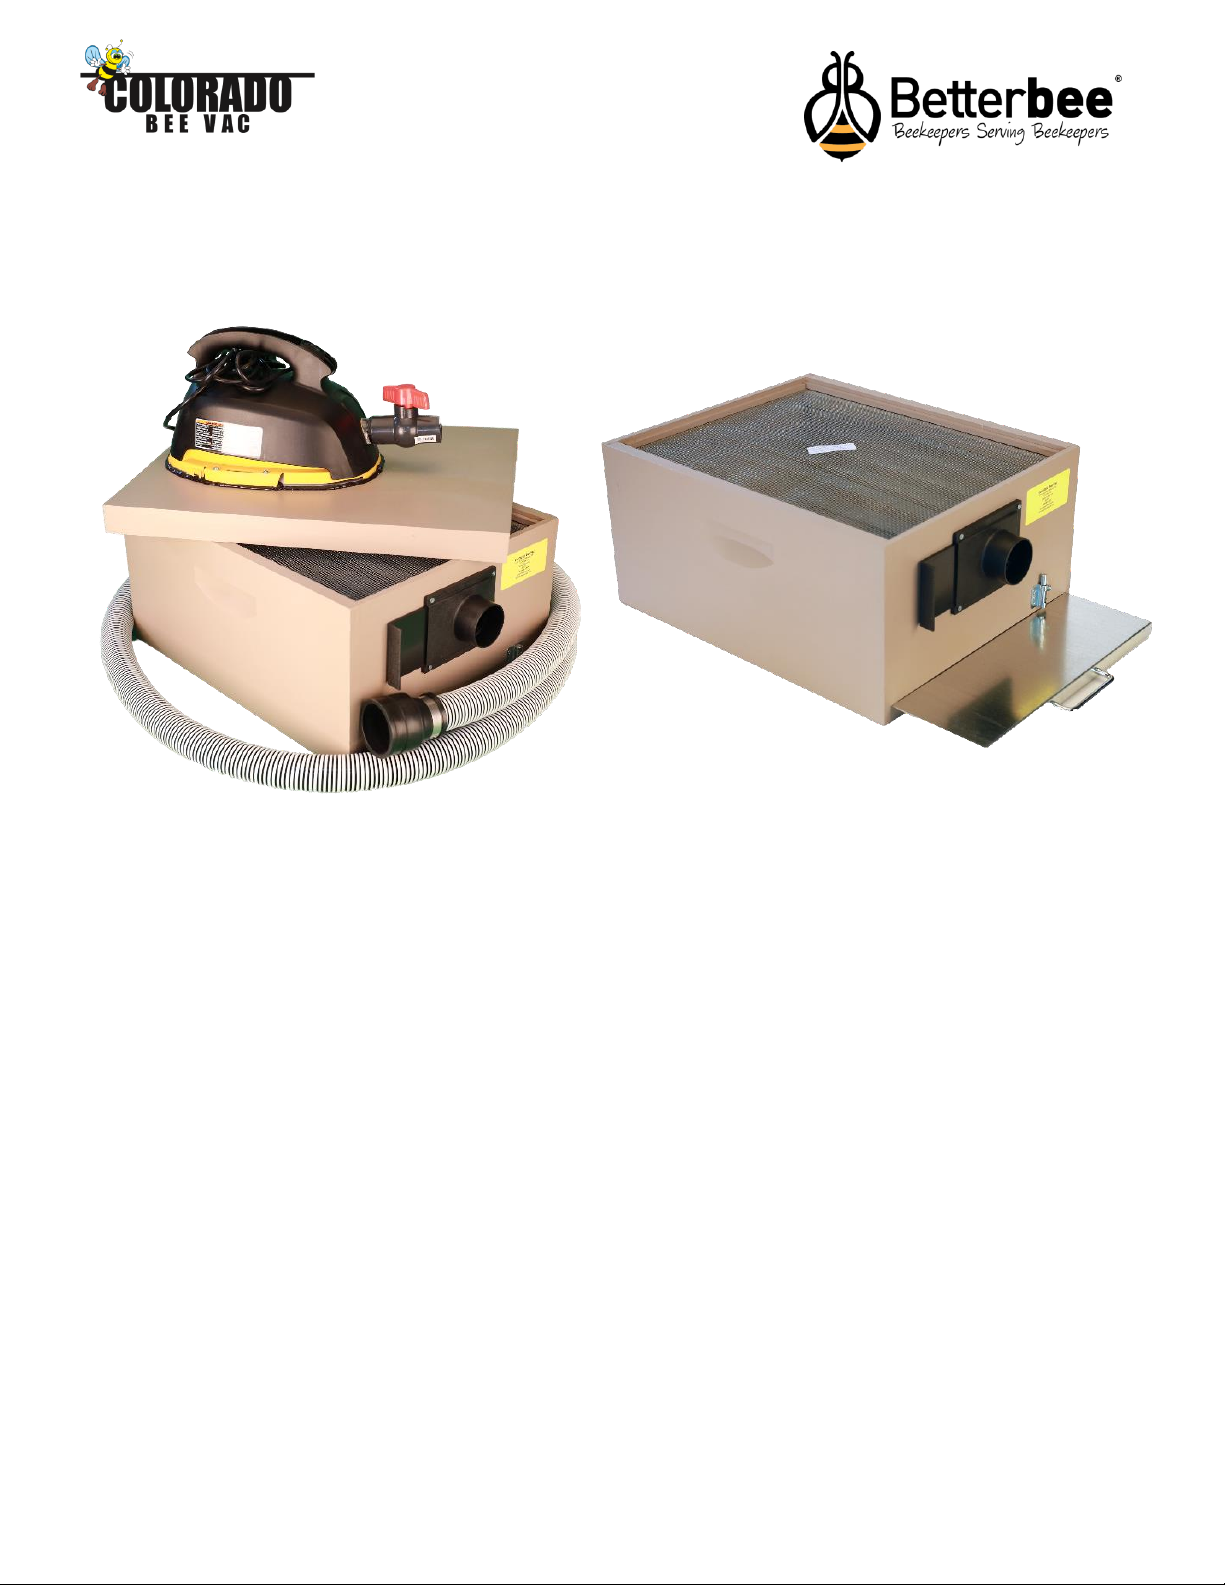
Figure 1 - Complete Colorado Bee Vac
Figure 2 - Catch box
Assembly:
1. Slide the rubber coupling at one end of the hose over the round inlet of the blast gate.
2. Insert the wide end of the suction wand into the other end of the hose and tighten the hose
clamp.
3. Before starting, open the blast gate “door” all the way.
4. Slide the metal tray in all the way in and lock into position with the latch.
5. Set the vacuum top on the catch box so that it is sitting flat and resting on the foam gasket.
6. Plug in power cord and you are ready to go.
Bypass valve
Blast gate
Hose (10’ standard)
Coupling and hose clamp
Vacuum top
Catch box
Suction wand
Metal tray
Latch

Page 3of 5
Operation:
1. Plan to set your vacuum as far away from the location of the bees as possible, such that the
hose will be as straight as possible. It is best to avoid excessive bends in the hose to protect
the bees from damage. It is also a good practice to locate the vacuum in the shade. By having
the catch box out of the direct sunlight, you reduce the chance of the bees overheating and
dying. If you are concerned about the temperature being too warm it is a good idea to leave
the vacuum on so that it will continue circulating air through the catch box.
2. Make sure that the black plastic blast gate door is all the way open.
3. While holding the body of the bypass valve, turn the bypass valve handle an eighth of a turn so
that the valve is half open. This valve allows air to bypass the catch box; as the valve is closed,
the suction pressure and velocity in the hose will increase. You can increase the suction by
closing the valve (turn clockwise). Open the valve (counterclockwise) to decrease vacuum
suction. Use the smallest amount of suction necessary to suck up the bees; using too
much pressure can expose the bees to unsafe speeds and kill them as they enter the
catch box!
➢TIP: If you don’t have vacuum suction after turning the vacuum on, either the vacuum
top is not sitting flat on the catch box, the bypass valve is completely open, or you have
forgotten to open the blast gate door.
4. Use the wand to collect bees from the swarm or cutout. Try to keep the hose relatively straight
(that is, do not have a coil of hose at your feet). When finished, close the bypass valve to
increase suction and “sweep” any remaining bees from the hose. Remember to close the blast
gate door before turning the vacuum motor off. Otherwise, the bees will immediately begin
going back out the blast gate and into the hose once the vacuum is switched off.
5. If you take a break and turn the vacuum off, be sure to remove the vacuum top from the catch
box and set it to the side so that air can circulate through the screened top. If it is a hot day,
you may give the bees a few squirts of water from a spray bottle through the screen to give
them a drink and help keep them cool.
➢Note: If you remove the vacuum from the catch box during a break, you could have a
considerable number of bees land on the screen when you want to start up again,
especially if you have vacuumed up the queen and she’s in the catch box. The bees
must be swept off the screen before setting the vacuum top down again. Bees on top of
the screen will be sucked into the cover and vacuum, potentially destroying the vacuum.
This is not covered by warranty.
6. Once the bees are collected, remove the vacuum top to give the bees plenty of airflow. Do
not leave the catch box in the sun or in a hot vehicle; you will cook your bees. Remember to
keep them in the shade. Give them a few squirts of water or sugar water spray if they will be in
the catch box for a while. When transporting in a vehicle, keep the windows open to allow for
plenty of airflow over the catch box.
Transfer to Hive
There are two basic methods of transferring the bees from the catch box to a hive: top down or
bottom up. For either method, you should make sure the hive box receiving the bees has been set up
for their arrival. For a cutout, the removed combs should be installed into frames in the hive body. A
large cutout may need multiple hive bodies to hold all the removed combs. For a swarm, empty or
drawn frames should be installed in the box. A full frame feeder or frames of honey should be added
to help encourage the bees to stay. In summary, the hive body should be completely full of frames
and ready to receive bees without further manipulation.

Page 4of 5
If transferring to an 8 frame hive, use an 8-to-10 frame adapter shim (available from Betterbee).
Top-Down Method:
1. Set the catch box on top of your prepared hive body and bottom board.
2. Gently remove the metal tray and set it on top of the catch box to darken the hive. You can
also set your hive’s outer cover on the catch box. It is important to block light from entering the
top of the catch box.
3. The bees will usually move down into the hive gradually. If time allows, leave the catch box
overnight to allow the bees to move into the prepared frames and combs below.
a. If short on time, or if the bees don’t move on their own, carefully lift one edge of the box
at a time and tap downward on the hive to knock the bees loose.
4. Once most of the bees are out of the catch box, remove the catch box from the hive. Knock
any remaining bees on the ground in front of the hive, ensuring none of them are the queen; if
she isn’t in the hive, carefully place her between frames in the hive. Put a cover on the hive,
and leave undisturbed while they settle in.
Bottom-Up Method (The Annaliese Method):
This method, which lets the bees climb upward an upside down catch box into the hive body, was
developed by a young Oregon beekeeper, Annaliese, and is named in her honor. It works especially
well for swarms who don’t have their own combs to move into and are inclined to start combs right
away in the catch box. By turning the catch box upside down, they tend to move more reliably up into
the prepared hive body above.
1. Put the catch box full of the swarm upside down on the bottom board, with the reducer
removed temporarily. This allows plenty of ventilation for the hive through the screen.
2. Place the prepared hive body box on top of the catch box. Gently “knock” the catch box on the
bottom board to knock bees off the metal tray. This will minimize “squishing” of any bees that
are hanging onto the metal tray when you pull the slide out.
○Important note: If your prepared hive body has a top entrance/exit at the cover board
level make sure you plug up the entrance/exit during your preparation. You don't want
the swarm escaping as quickly as you release the bees.
3. Pull the metal slide out. The swarm will migrate up almost immediately into the prepared hive
body above.
4. The empty catch box can be removed once empty, but to improve the odds of keeping the
swarm, you may keep them captive for two to three days. This will allow the queen to begin to
lay and become acclimated to the new home. Otherwise, some swarms might immediately
leave the new hive.
5. After two to three days, gently set the hive body full of bees to the side, remove the catch box,
and replace the hive body on the bottom board. Install an entrance reducer.
Care of the Vacuum and Catch Box:
1. KEEP IT OUT OF THE RAIN. The vacuum is not waterproof or water resistant. Do not expose
it to rain, sprinklers, or try to hose it off. Water will destroy the vacuum. If dirty, wipe off with a
warm damp rag.
2. Hose: Remove the hose from the blast gate, and flush with water. Insert a garden hose into
the hose and flush out. Hang to dry before using again. It is recommended the hose is cleaned
after each use.
Page 5of 5
3. Blast Gate: If the gate becomes sticky with honey or bees, remove the four screws and pull
the blast gate out. Rinse clean in warm water. Reinstall using the four screws. To keep the
gate clean, remember to close it before turning the vacuum off.
4. Catch Box: If the catch box needs cleaning, wipe clean with a wet rag. Remove the metal tray
and wipe clean and dry before re-installing. Do not use any cleaners if possible. If necessary,
use a mild dish soap and be sure to wipe clean. Allow the catch box to dry thoroughly.
5. Storage: Make sure all parts are clean and dry. Place a piece of newspaper over the catch
box, and then install the vacuum cover on top. The paper prevents the cover gasket from
sticking to the hive body. Store the vacuum in a clean, dry place indoors.
Frequently Asked Questions:
●There isn’t enough suction, what is wrong?
oFirst, make sure the vacuum top is completely flat on the catch box, and not resting
on the rim.
oMake sure the blast gate is open.
oClose the bypass valve to increase suction through the hose.
●Can I use a longer hose?
oYes, longer hoses are available from Betterbee. Up to 50 ft of hose can be used.
●How do I carry the vacuum on a ladder?
oWe do not recommend carrying the Bee Vac on a ladder. It is safer to keep the
vacuum on level ground, and only bring the hose up a ladder to reach high locations.
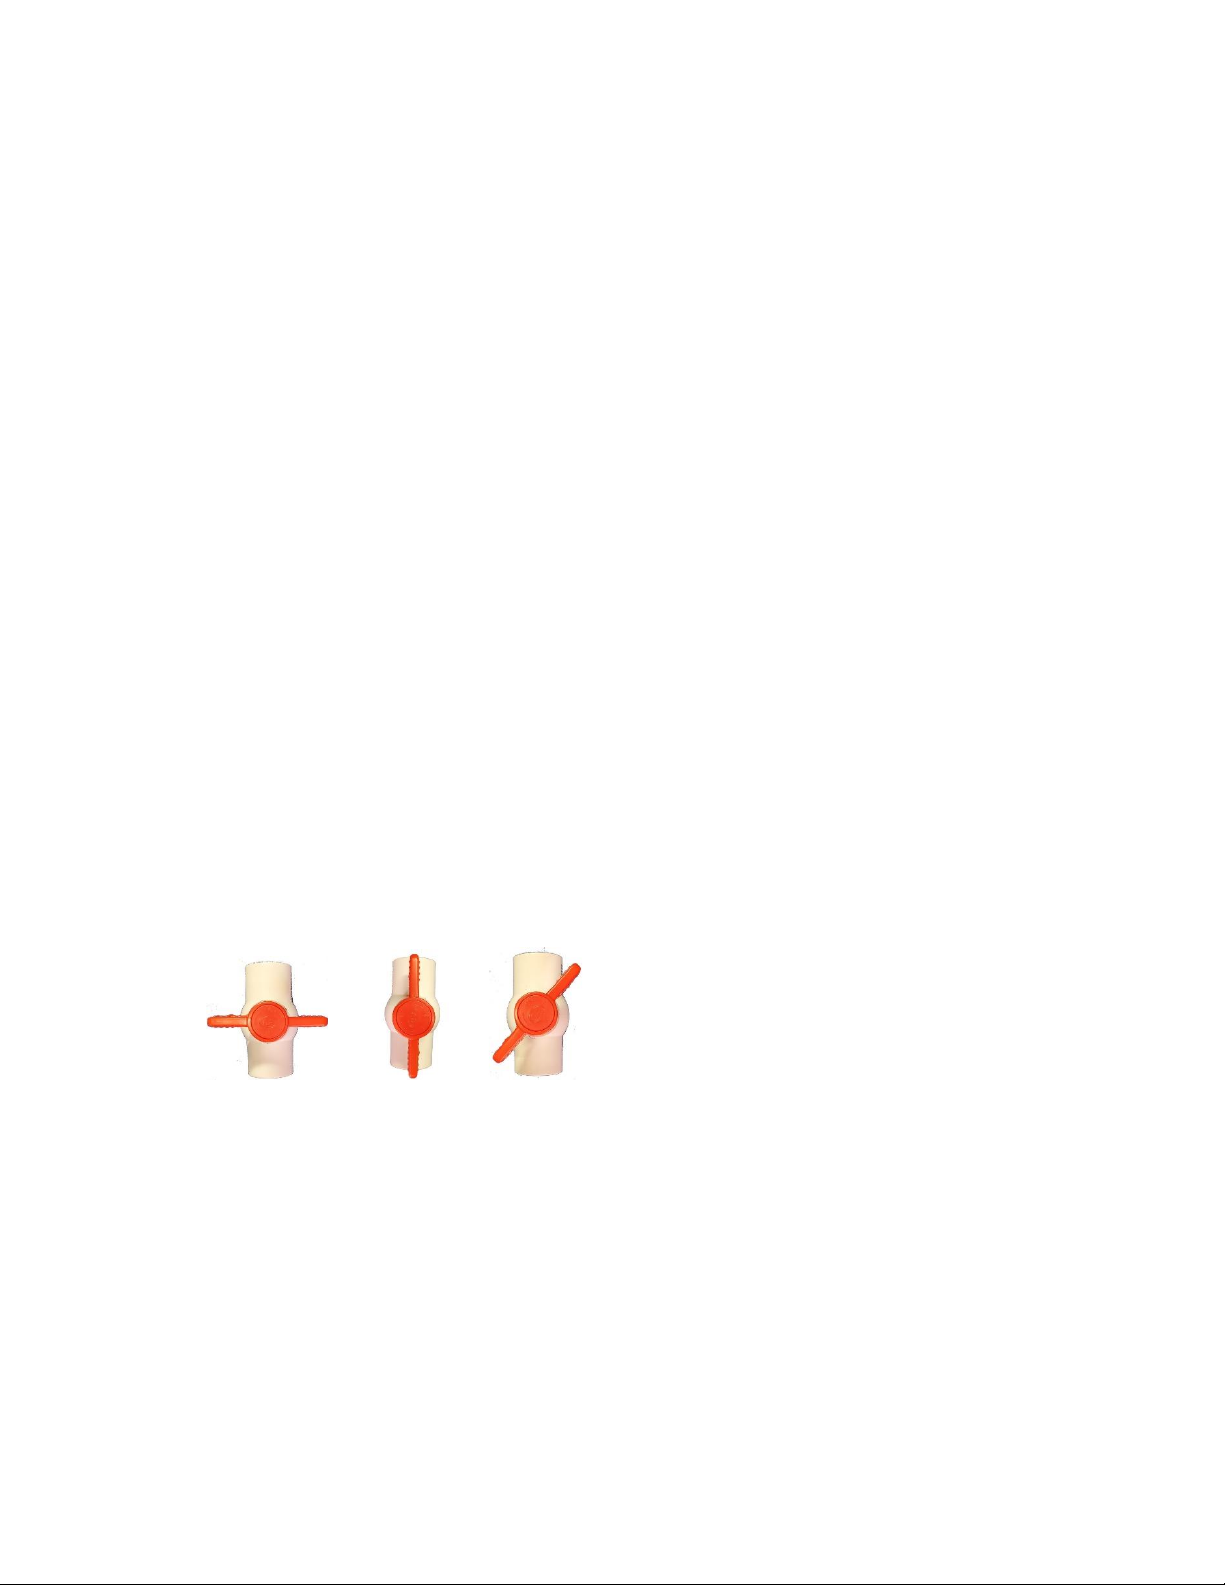
●Which can I tell if the bypass valve is open or closed?
oHandle perpendicular to valve: closed
oHandle parallel to valve: open
o45 degrees: half open
oTurn clockwise to close
Closed Open Half Open
●I have more questions!
oContact us by email at [email protected] or by phone toll-free at 800-632-
3379. We are always happy to talk to fellow beekeepers, and to offer our advice.
Table of contents
Other Betterbee Farm Equipment manuals


Popular Farm Equipment manuals by other brands


MANDAKO
MANDAKO REDDI-LYNX Operator's manual

Checchi & Magli
Checchi & Magli WOLF PRO Use and maintenance manual

Wiesenfield
Wiesenfield WI-CF-100 user manual

First Products
First Products UA60T Operator's manual & parts list

HORST WAGONS
HORST WAGONS CONTOUR CHCFRF30 Operator's manual

Agria
Agria Cyclone 5900 Translation of the original operating instructions