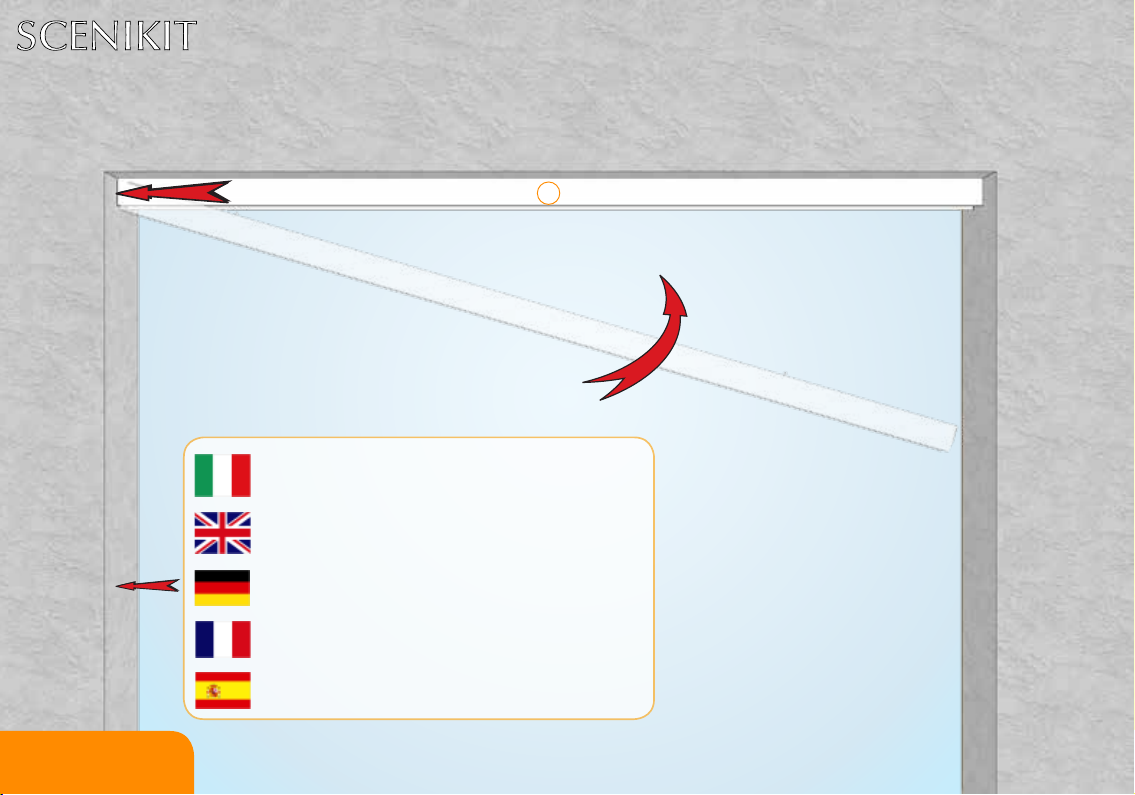
Bettio SCENIKIT 2.0 Operating instructions

Montage-, Benutzungs- und Wartungshandbuch
Manuale di installazione, uso e manutenzione
Manual de instalación, uso y mantenimiento
Manuel de montage, utilisation et maintenance
Installation, user and maintenance manual
SCENIKIT 2.0

Il prodotto d’eccellenza della gamma Bettio, composto esclusivamente da un cassonetto
e da una guida superiore, privo di qualsiasi prolo di chiusura e binario a terra.
Semplice da installare in tutte le sue varianti.
Resa estetica impeccabile, grazie al telo sempre perfettamente teso.
Pratica da utilizzare, grazie alle possibilità di bloccarla in qualsiasi posizione.
Eleganza, sicurezza e automazione all’avanguardia.
Bettio’s top of the range, comprising just a box and upper side rail; no closing prole or ground
rail required.
All versions are easy to install. Highly attractive nish due the mesh always being perfectly
tensioned. Practical to use as the screen can be locked in any
position. Elegance, safety and cutting-edge automation.
Le produit d’excellence de la gamme Bettio, composé exclusivement par un caisson et une
coulisse supérieure, sans aucun prol de fermeture et sans rail au sol.
Simple à monter dans toutes ses variantes.
Grand avantage esthétique, grâce à la toile toujours parfaitement tendue.
Pratique, grâce à la possibilité de la bloquer en quelconque position.
Élégance, sécurité et automation d’avant-garde.
Das Top-Produkt aus dem Hause Bettio, das ausschließlich aus einem Kasten und aus einer
oberen Führungsleiste besteht, ohne irgendwelche. Abschlussprole und Schienen am Boden.
In allen Varianten einfach zu installieren.
Ästhetisch immer in Top-Form, das Gitter ist immer perfekt gestrafft.
Praktisch im Gebrauch, es lässt sich in jeder Position blockieren.
Eleganz, Sicherheit und moderne Automation.
El producto de excelencia de la gama Bettio, compuesto exclusivamente por un cajón y una guía
superior, desprovisto de cualquier perl de cierre y guía en el suelo.
Sencillo de instalar en todas sus variantes
Resultado estético impecable, gracias a la tela siempre perfectamente tensa.
Práctica de utilizar, gracias a la posibilidad de bloquearla en cualquier posición.
Elegancia, seguridad y automatización a la vanguardia.
SCENIKIT 2.0

INDICE CONTENTS INDEX INDEX INDICE
Scenikit
®
ad 1 battente
Scenikit
®
ad incasso
Scenikit
®
a 2 battenti
Problemi e soluzioni
Manutenzione
Sicurezza e normative
Installazioni opzional
1 battente
Installazioni opzionali
2 battenti
Scenikit
®
one leaf
Scenikit
®
built-in
Scenikit
®
two leaves
Problems and solution
Maintenance
Safety and CE rules
Optional installations
one leaf
Optional installations
two leaves
Scenikit
®
1 battant
Scenikit
®
à encaissement
Scenikit
®
2 battants
Problèmes et solution
Maintenance
Sécurité et normes
Installation à discrétion
1 battant
Installation à discrétion
2 battants
Scenikit
®
1 Flügel
Scenikit
®
eingelassen
Scenikit
®
1 hoja
Scenikit
®
para encaje
Scenikit
®
2 Flügel Scenikit
®
2 hojas
Probleme und Lösunge Problemas y solucione
Wartung Manteniemiento
Sicherheit und
Vorschrifte
Seguridad y normas
Wahlfreie Installation
1 Flügel
Wahlfreie Installation
2 Flügel
Instalaciónes opcionales
1 hoja
Instalaciónes opcionales
2 hojas
Regolazioni Adjustments Adjustements
Regulierungen Adaptaciónes
Pg. 5-31
Pg. 45-51
Pg. 19-24
Pg. 52-53
Pg. 54-57
Pg. 58-63
Pg. 32-34
Pg. 42-44
Pg. 35-41

19
26
31
27 28
10
42
32
33
30 44
14
15
21
45
46
16
10. Prolo compensatore
14. Piastrina di ssaggio KIT1806/77
15. Compensatori KIT1801/77
16. Cufa per guida KIT1812/77
19. Tappi coprivite per prolo di riscontro
21. Tappo compensatore KIT1814/77
26. Viti STEI M 5x6 KIT636
27. Confezione viti Torx KIT1842
28. Confezione viti Torx KIT 1768
30. Chiave esagonale KIT635
31. Viti STEI M 12x12 KIT1748
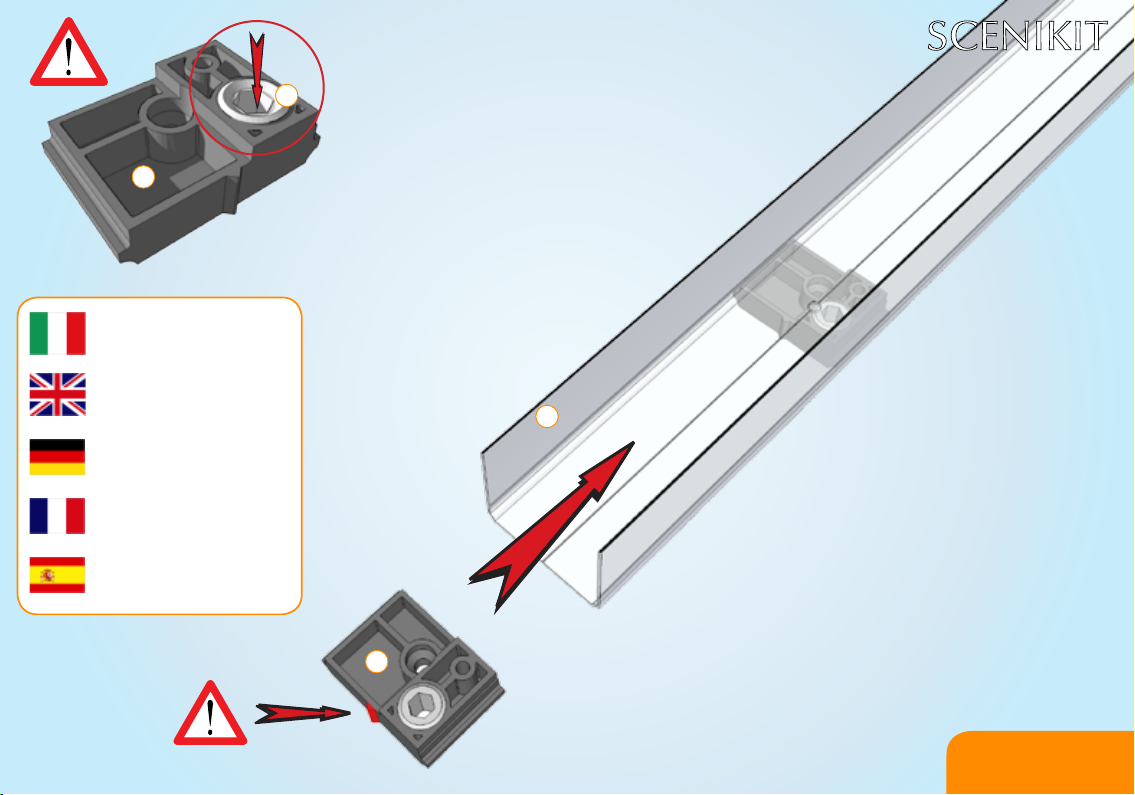
32. Prolo di riscontro
33. Prolo di scorrimento
42. Zanzariera
44. Chiave Torx T15 KIT1842
45. Piastrina Pavimento KIT2567/77
46. Tappo coprivite per
compensatore KIT1886/77
10. Adjuster prole
14. Fixing plate KIT1806/77
15. Adjusters KIT1801/77
16. End cap KIT1812/77
19. Hole caps for side prole
21. Adjuster end cap KIT1814/77
26. STEI M 5x6 screws KIT636
27. Torx screws set KIT1842
28. Torx screws set KIT1786
30. Allen wrench KIT635
31. STEI M 12x12 screws KIT1748
32. Side prole
33. Sliding prole
42. Flyscreen
44. Torx T15 key KIT1842
45. Floor plate KIT2567/77
46. Hole caps for
adjuster KIT1886/77
10. Ausgleichsprol
14. Befestigungsplatte KIT1806/77
15. Ausgleicher KIT1801/77
16. Haube KIT1812/77
17. Untere Sperre KIT1815/77
19. Bohrungsabdeckstöpsel für Seitlichprol
21. Ausgleichsstöpsel KIT1814/77
26. Gewindestift 5x6 KIT636
27. Torx Schraubesatz KIT1842
28. Torx Schraubesatz KIT1768
30. Sechskantschlüssel KIT635
31. Gewindestift 12x12 KIT1748
32. Seitlichprol
33. Laufprol
42. Insektenschutz
44. Torx 15 Schlüssel KIT1842
45. Bodenplatte KIT2567/77
46. Bohrungsabdeckstöpsel für
Ausgleicher KIT1886/77
10. Prol adaptateur
14. Plaque de xage KIT1806/77
15. Régulateurs KIT1801/77
16. Coiffe KIT1812/77
17. Blocage inférieur KIT1815/77
19. Bouchon couvre-trou pour prol latéral
21. Bouchon compensateur KIT1814/77
26. Vis sans tête 5x6 KIT636
27. Confection vis Torx KIT1842
28. Confection vis Torx KIT1768
30. Clé hexagonale KIT635
31. Vis sans tête 12x12 KIT1748
32. Prol latéral
33. Prol de coulissement
42. Moustiquaire
44. Clé Torx T15 KIT1842
45. Plaque pour le sol KIT2567/77
46. Bouchon couvre-trou pour
régulateurs KIT1886/77
10. Perl adaptador
14. Placa de jación
15. Adaptadores
16. Testero para guía
17. Bloque inferior
19. Tapónes cubretornillos para perl lateral
21. Testero adaptador
26. Tornillos STEI M 5x6 KIT 636
27. Pack Torx KIT1842
28. Pack Torx KIT1768
30. Llave exagonal KIT 635
31. Tornillos STEI M 12x12 KIT 1748
32. Perl lateral
33. Perl de deslizamiento
42. Mosquitera
44. Llave Torx T15 KIT1842
45. Placa al suelo KIT2567/77
46. Tapónes de adaptación KIT1886/77
®

15
31
15
10
Towards box side
Verso il lato cassonetto
Richtung Kastenseite
Vers le caisson
Hacia el cajón
Installazione 1 battente - 1 leaf installation
Installation 1 battant - 1 Flügel Installation - Montaje 1 hoja
R
5
Installazione 1 battente
1 leaf installation
Installation 1 battant
1 Flügel Installation
Montaje 1 hoja
®

10
Lean against the box side.
Appoggiare sul lato di montaggio del cassonetto.
Lehnen an die Kastenmontageseite.
Appuyer à la côte de montage du caisson.
Apoyar en el lado de instalación del cajón
6
Installazione 1 battente
1 leaf installation
Installation 1 battant
1 Flügel Installation
Montaje 1 hoja
®

15
15
15
10
7
Installazione 1 battente
1 leaf installation
Installation 1 battant
1 Flügel Installation
Montaje 1 hoja
®

8
Installazione 1 battente
1 leaf installation
Installation 1 battant
1 Flügel Installation
Montaje 1 hoja
®

14
9
Installazione 1 battente
1 leaf installation
Installation 1 battant
1 Flügel Installation
Montaje 1 hoja
®

14
10
Installazione 1 battente
1 leaf installation
Installation 1 battant
1 Flügel Installation
Montaje 1 hoja
®

22
23
Sganciare la guida dall’apposito ferma
guida tenendola saldamente durante
l’operazione. Attenzione: la molla interna
è precaricata!
Conservare i pezzi n. 22 e 23 in caso il prodotto debba essere
imballato nuovamente.
Unhook the guide from the appropriate
pegs holding it rmly during the
operation. Warning: the internal spring is
preloaded!
Décrocher le guide des arrêts appropriés,
tenant fermement pendant l’opération.
Attention: le ressort interne est préchargé!
Hängen Sie die Führung aus den
entsprechenden Klammern und während
des Betriebs, halten Sie fest. Achtung: Die
interne Feder ist vorgespannt!
Desenganche la guía de los clips
adecuados sosteniendo rmemente
durante la operación. Advertencia: el
resorte interno está precargado!
Retain pcs. n. 22 and 23 in case you have to package again
the product.
Conserver les pièces n. 22 et 23 , si le produit doit être
emballer une autre fois.
Bewahren Sie Artikel n. 22 und 23 , wenn der Produkt ein
anderes Mal verpacken werden wird.
Conservar los artículos n.22 y 23 en caso de tener que
empaquetar de nuevo el producto.
11
Installazione 1 battente
1 leaf installation
Installation 1 battant
1 Flügel Installation
Montaje 1 hoja
®

STOP!
Ruotare la guida tenendo come centro di rotazione la sede di aggancio
e inserirla facendo passare la ruota nera nell’apposita sede, ponendo
attenzione a non sovrapporre o ostacolare i li.
Rotate the guide pivoting around the hooking slot. Insert the guide by
making the black wheel pass inside its own housing. Be careful not to
swap or twist the cords.
Tournez le guide, en pivontant autour de la fente d’accrochage. Insérez le
guide en faisant passer de roue noir à l’intérieur de son propre logement.
Ne pas échanger ou tordre les cordons.
Stecken Sie die Führungsschiene, wie abgebildet oben auf das schwarze
Laufrädchen des Kastens auf. Achten Sie darauf, dass die Kabel nicht
verdreht sind.
Gire el pivote guía alrededor de la ranura de enganche. Inserte la guía al
hacer el pase negro rueda dentro de su propia vivienda. Tenga cuidado de
no cambiar ni retuerza los cables.
12
Installazione 1 battente
1 leaf installation
Installation 1 battant
1 Flügel Installation
Montaje 1 hoja
®

44
Attenzione! La parte eccedente del lo può essere tagliata soltanto dopo
aver effettuato tutte le regolazioni. Si consiglia di lasciare almeno 5cm di
lo per eventuali future regolazioni.
Attention! Cut the wire in excess only after the whole adjustments. We
suggest you to leave at least 5cm for further adjustments in the future.
Attention! Coupez le cordon en excès seulement après tous les ajuste-
ments. Il est conseillé de laisser au moins 5 cm de cordon pour de futurs
ajustements.
Achtung! Die dickere Schnur kann am Ende der Montage abgeschnitten
werden, doch wir empfehlen mindestens 5 cm für eventuelle Regulierun-
gen übrig zu lassen!
¡Atención! Cortar el hilo superior sólo después de
todo los ajustes. Le sugerimos que deje al menos 5
cm de realizar ajustes adicionales en el futuro. 13
Installazione 1 battente
1 leaf installation
Installation 1 battant
1 Flügel Installation
Montaje 1 hoja
®

Assicurarsi che il cordino no superiore sia libero di muoversi e che il
cordino grosso sia inserito correttamente nella gola della puleggia.
Make sure that the upper thin cord is free to move and that the thick cord
is in the groove of the pulley.
S’assurer que le cordon mince supérieur est libre de glisser et que le
cordon gros est dans la gorge de la poulie.
Achten Sie darauf, dass die obere dünne Schnur frei zu bewegen ist und,
dass die dickere Schnur sauber im äußeren Laufrädchen liegt.
Asegúrese de que el cable delgado superior sea libre de moverse y que el
cable grueso esté en la ranura de la polea.
14
Installazione 1 battente
1 leaf installation
Installation 1 battant
1 Flügel Installation
Montaje 1 hoja
®

ok!
NO
Accompagnare se pre la guida
durante l’installazione!
Caution: hold the rail during the
installation!
Führen immer die Führungsschiene
während der Installation!
Cuidado: aguantar siempre la guía
durante el montaje.
Accompagner la guide pendant
l’installation!
15
Installazione 1 battente
1 leaf installation
Installation 1 battant
1 Flügel Installation
Montaje 1 hoja
®

14
10
42
2
1
14
42
16
Installazione 1 battente
1 leaf installation
Installation 1 battant
1 Flügel Installation
Montaje 1 hoja
®

27 28
15
Avvitare la vite corta n° 28 nchè la zanzariera inizia a sollevarsi, quindi
svitare il grano esagonale del regolatore con la chiave adatta (6 mm) e farlo
appoggiare dietro la guida. Se la vite 28 dovesse risultare troppo corta per
essere avvitata al regolatore, utilizzare la vite lunga NERA n° 27.
Tighten the short screw No. 28 until the yscreen begins to rise, then unscrew
the hex grub screw of the adjuster with the appropriate key (6 mm) and place it
behind the guide. If the screw 28 is too short, use the BLACK long screw No. 27.
Serrer la vis courte n ° 28 jusqu’à la moustiquaire commence à monter, puis
dévisser la vis sans tête hexagonale avec la clé appropriée (6 mm) et placez-le
derrière le guide. Si la vis 28 est trop courte , utiliser la vis longe NOIRE n ° 27.
Ziehen Sie die kurze Schraube No. 28, bis das Fliegengitter zu steigen beginnt.
Schrauben Sie den Gewindestift mit Hilfe eines Inbusschlüssel (6 mm) und
legen Sie sie hinter der Führungsschiene. Wenn die Schraube 28 zu kurz ist,
verwenden Sie die schwarze lange Schraube Nr. 27.
Apriete el tornillo corto Nº 28 hasta que la mosquitera empieza a subir, luego
desenroscar el ajustador hexagonal con la tecla adecuada (6 mm) y colocarlo
detrás de la guía. Si el tornillo 28 es demasiado corto, utilice el tornillo largo
NEGRO N ° 27.
44
17
Installazione 1 battente
1 leaf installation
Installation 1 battant
1 Flügel Installation
Montaje 1 hoja
®

ok!
NO
Vericare che i li non siano
bloccati dalle viti!
Make sure the strings are not
blocked by the screws!
Prüfen, ob die Fäden durch die
Schrauben blockiert sind.
Comprobar que los cordoncillos non
sean bloqueados por los tornillos.
Vérier que les ls ne sont pas
bloqués par les vis.
18
Installazione 1 battente
1 leaf installation
Installation 1 battant
1 Flügel Installation
Montaje 1 hoja
®

ok!
1-2 mm
At least a sheet of paper must pass
underneath the handlebar. Problem also
valid for the two-leaves version.
Deve passare almeno un foglio di carta
sotto la maniglia. Problematica valida anche
per la versione a due battenti.
Ein Papierblatt muß unter die Griffschiene
schieben lassen. Das Problem ist auch
gültig für 2 Flügel Modell.
Au moins une feuille de papier doit passer
sous la barre-poignée. Problématique valide
aussi pour la version à 2 battants.
Por lo menos un papel tiene que pasar bajo
el tirador. Misma cosa también en la version
de 2 hojas.
19
Installazione 1 battente
1 leaf installation
Installation 1 battant
1 Flügel Installation
Montaje 1 hoja
®

2
> 2 mm
27 28
13
max.
6 mm
28 28
Se la vite 28 dovesse risultare
troppo corta per essere avvitata al
regolatore, utilizzare la vite lunga
NERA n° 27.
If the screw 28 is too short use the
BLACK long screw No. 27.
Si la vis 28 est trop courte , utiliser
la vis longe NOIRE n ° 27.
Wenn die Schraube 28 zu kurz ist,
verwenden Sie die schwarze lange
Schraube Nr. 27.
Si el tornillo 28 es demasiado
corto, utilice el tornillo largo
NEGRO N ° 27.
44 44
20
Installazione 1 battente
1 leaf installation
Installation 1 battant
1 Flügel Installation
Montaje 1 hoja
®
Table of contents
Other Bettio Insect Control Equipment manuals
Popular Insect Control Equipment manuals by other brands

DynaTrap
DynaTrap Terrazza Series owner's manual

Radarcan
Radarcan ANTS REPELLER HOME Instructions for use

Dynamic
Dynamic Dynatrap 3 owner's manual

auna
auna sena Series quick start guide

Universal Pest Solutions
Universal Pest Solutions AllClear Mosquito Mister product manual

Multi PSI
Multi PSI Multi-160 Operator's manual