BIELMEIER HEPA BHG 280 User manual

D
5
WICHTIG!
Bitte lesen Sie diese Bedienungsanleitung auf-
merksam durch, sie enthält wichtige Hinweise für
die Sicherheit, den Gebrauch und die Wartung des
Gerätes.
Bewahren Sie die Bedienungsanleitung sorgfältig
auf und geben Sie diese gegebenenfalls an den
Nachbesitzer weiter.
SICHERHEITSHINWEISE
Gerät nur an Wechselstrom – mit Spannung
gemäß Typenschild – anschließen und nur im
Innenbereich verwenden.
Die Verwendung von Verlängerungskabeln
wird nicht empfohlen. Bei der Verwendung
von Verlängerungskabeln auf die Belastbarkeit
(siehe Technische Daten) achten.
Nach Gebrauch, vor der Reinigung oder bei
eventuellen Störungen während des Betriebes
den Netzstecker ziehen. Fassen Sie den Netz-
stecker nicht mit feuchten oder nassen Händen
an.
Schalten Sie das Gerät ab, bevor Sie den Netz-
stecker ziehen. Ziehen Sie am Stecker, nie am
Kabel.
Kinder erkennen nicht die Gefahr, die im Um-
gang mit einem elektrischen Gerät entstehen
kann; deshalb Kinder niemals unbeaufsichtigt
mit dem Gerät lassen.
Das Gerät nicht auf heißen Oberächen oder in
die Nähe eines Ofens oder einer Heizung stel-
len und betreiben. Gerät nicht in der Nähe von
Gasquellen betreiben.
Das Gerät muss während des Betriebs frei ste-
hen und darf nicht abgedeckt werden, damit
Zu- und Abluft nicht behindert werden.
Schalten Sie das Gerät aus und ziehen Sie den
Netzstecker, bevor Sie das Gerät reinigen oder
an einer anderen Stelle platzieren.
Ziehen Sie den Netzstecker immer bei längerer
Abwesenheit und während eines Gewitters,
um Schäden durch Blitzschlag zu vermeiden.
Das Gerät nur in trockenen Räumen betreiben
und vor Spritzwasser schützen.
Bei oensichtlichen Schäden am Gerät oder
der Zuleitung, oder wenn das Gerät unge-
wöhnliche Gerüche oder Geräusche erzeugt,
das Gerät vom Fachmann oder dem BIELMEIER-
Kundendienst überprüfen lassen.
Reparaturen an Elektrogeräten sind nur von
Fachkräften durchzuführen. Durch unsach-
gemäße Reparaturen können erhebliche Ge-
fahren für den Benutzer entstehen. Der Her-
steller haftet nicht für eventuelle Schäden, die
durch nicht bestimmungsgemäßen Gebrauch
oder falsche Bedienung verursacht werden.
Die Oberächen können zerkratzt werden. Ver-
wenden Sie keine Scheuermittel oder spitzen
Gegenstände beim Reinigen.
ANBRINGEN DES LUFTREINIGERS
Damit Ihr Luftreiniger optimal arbeitet wird
empfohlen, das Gerät auf einen stabilen Unter-
grund zu stellen oder an einer Wandhalterung
in ca. 50 cm Höhe anzubringen.
ARBEITSWEISE DES LUFTREINIGERS
1 Vorlter (7): Filtert die größeren Partikel aus
der Luft um die Lebensdauer des HEPA-Filters
zu verlängern.
2 Hauptltersystem (8): Das Filtersystem ent-
hält zwei Lagen von Filtern: den HEPA-Filter
und den Aktivkohle-Filter.
Der HEPA-Filter ist dafür vorgesehen, kleinste
Partikel (bis zu 3 / 10 000mm) aus der Luft zu
entfernen wie z. B. Pollen, Rauch, Tierhaare,
Schimmelsporen etc.
Der Aktivkohle-Filter ist dazu da, um unange-
nehme Gerüche zu verarbeiten.
3 UV-Röhren (9): Die keimtötenden Strahlen der
Röhren zerstören übertragbare Bakterien und
Viren.
4
Nano-fotokatalytischer-Filter (10):
Dieser Filter
baut giftige Gase und Viren 300-mal eektiver
ab als gewöhnliche Kohle-Filter. Ein weiterer
Vorteil dieses Filters ist, dass er sich mit mini-
malem Aufwand selbst regeneriert und reinigt.
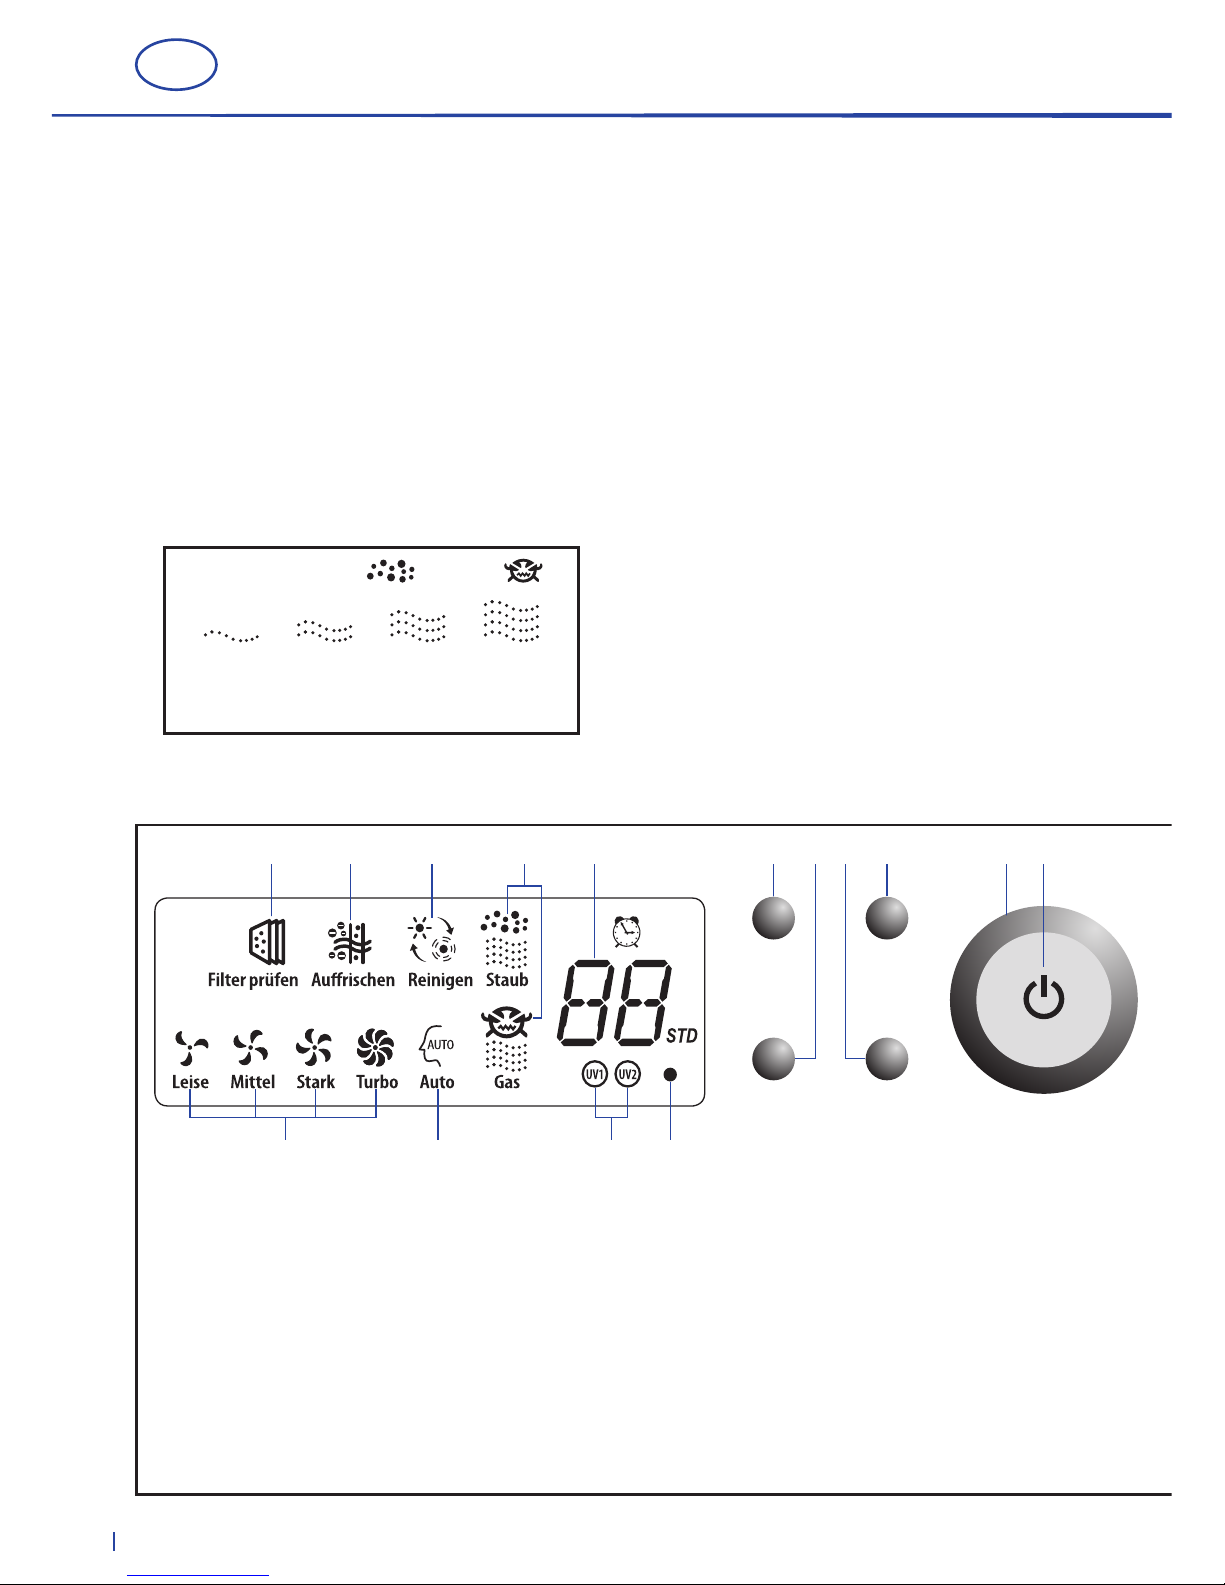
Abb. 2: Anzeige (2) und Bedienelement (3)
Abb. 1:
Luftqualität dargestellt in der Anzeige
(2)
Gebläse Dauer
Luft reinigen Aurischen
17 18 19 20 21 22 23 24 25 26 27
28 29 30 31
sehr gute gute normale schlechte
Qualität Qualität Qualität Qualität
Anzeige bei Staub und Gas
17 Filter prüfen, reinigen oder wechseln
18 Anzeige des Ionengenerators
19 Anzeige der fotokatalytische Luftreinigung
20 Anzeige der Luftqualität
21 eingestellte Betriebsdauer bzw. Restzeit
22 Regulierung der Ventilatorgeschwindigkeit
23 Starten / Beenden der
fotokatalytischen Reinigung
24 Ein- / Ausschalten des Ionengenerators
25 Einstellen der Betriebsdauer
26 Betriebsanzeige
27 EIN / AUS
28 eingestellte Ventilatorgeschwindigkeit
29 Automatischer Betrieb
30 UV-Lampe überprüfen, ggf. wechseln
31 Stand-by-Anzeige
6
D
5 Anionen Generator: Diese Funktion hat den
Zweck, eine perfekte Luftqualität durch nega-
tive Ionen zu erzeugen, die das Wohlbenden
steigern.
6 Staubsensor (15) und Gassensor (16): Die
gemessene Luftqualität ist in der Anzeige (2)
sichtbar (Staub, Gas). Je schlechter die Qualität
der Raumluft ist, umso mehr Wellenlinien wer-
den angezeigt (vgl. Abb. 1). Im Automatikbe-
trieb wird die Ventilatorleistung automatisch
an die Luftqualität angepasst.
Blinkt die Anzeige des Gassensors (20), so be-
ndet er sich in der Aufwärmphase.
INBETRIEBNAHME
1 WICHTIG!
Bevor Sie den Netzstecker des Gerätes in die Steck-
dose stecken, önen Sie die vordere Abdeckung
(5) durch Drücken auf die beiden oberen Ecken
und heben Sie die Abdeckung aus dem Gerät.
Hinter dem Vorlter (7) ist eine Schutzfolie, die vor
dem Einschalten entfernt werden muss!
2 EIN / AUS
Sobald der Luftreiniger mit Strom versorgt wird,
ertönt ein Signal, es blinkt die Betriebsanzeige
(26) und das Display (2). Das Gerät wechselt nach
1Sekunde in den Stand-by-Modus. Die Anzeigen
am Gerät sind ausgeschaltet, die rote Kontroll-
lampe (31) leuchtet.
Drücken Sie EIN / AUS (27 / 32) und der Luftreini-
ger startet mit der höchsten Leistungsstufe. Die
Betriebsanzeige (26) leuchtet rot. Nach 3 Minuten
schaltet das Gerät in den Automatik-Modus. Die
Betriebsanzeige (26) leuchtet nun grün.

Abb. 3: Fernbedienung
(4)
EIN / AUS
Gebläse
Aurischen
Dauer
Auto
Luft reinigen
32
33
34
35
36
37
32 Das Gerät wird ein- bzw. ausgeschaltet.
33 Reguliert die Geschwindigkeit
des Ventilators.
34 Startet oder beendet die Arbeit
des Ionengenerators.
35 Stellt ein, wie lange das Gerät in Betrieb
sein soll (1 – 12 Stunden).
36 Startet oder beendet
den Automatik-Modus.
37 Startet oder beendet die
fotokatalytische Reinigung.
D
7
FERNBEDIENUNG 4
FUNKTIONEN DER TASTEN
BATTERIEN EINSETZEN
1 Önen Sie das Batteriefach auf der Rückseite
der Fernsteuerung
(4)
.
2 Setzen Sie die Batterien korrekt ein.
Achten Sie dabei auf die „+“ und „–“ Symbole,
die im In neren der Fernsteuerung aufgezeich-
net sind.
3 Schließen Sie nun wieder das Batteriefach.
3 AUTOMATIKBETRIEB (29)
In diesem Modus passt das Gerät seine Arbeitswei-
se an die Luftqualität an. Die Luft wird mit der au-
tomatisch gewählten Leistungsstufe (28) gereinigt
und das Gerät schaltet sich ab, sobald der ideale
Reinheitsgrad für Raumluft erreicht ist.
Die Geräteleistung richtet sich
nach der Luftqualität (20):
sehr gute Qualität niedrige Leistung
gute Qualität mittlere Leistung
normale Qualität hohe Leistung
schlechte Qualität sehr hohe Leistung
Jede der vier Leistungsstufen (28) hat in der
Betriebsanzeige (27) eine eigene Farbe:
niedrige Leistung Grün
mittlere Leistung Blau
hohe Leistung Orange
sehr hohe Leistung Rot
4 MANUELLE EINSTELLUNG
Drücken Sie „Auto“ (36) der Fernbedienung (16)
oder „Gebläse“ (22) am Gerät, um den Auto ma-
tikmodus (29) zu verlassen. Nun können Sie das ge-
wünschte Programm direkt wählen, indem Sie „Auf-
frischen“ (24) für die Ionisierung oder „Luft reini-
gen“ (23) für die fotokatalytische Reinigung, keine
oder beide Tasten drücken und die gewünschte Ge-
räteleistung durch Drücken von „Gebläse“ (22) wäh-
len. Die zuletzt verwendete Einstellung wird vom
Gerät für die nächste Inbetriebnahme gespeichert.
5 BETRIEBSDAUER (21) EINSTELLEN
Der Bereich der Laufzeiteinstellung reicht von 1bis
12 Stunden. Pro Knopfdruck auf „Dauer“ (25/ 35)
wird eine Stunde eingestellt. Nach dem Ende des
Einstell vorganges beginnt die Zeit zu laufen. Wenn
Sie die Taste „Dauer“ (25 / 35) gedrückt halten,
läuft die Zeitein stellung schnell hoch. Der Luft-
reiniger schaltet sich automatisch ab, wenn die
eingestellte Zeit abgelaufen ist.
6 LUFTQUALITÄTSANZEIGE
Für „Staub“
(20)
und „Gas“
(20)
gibt es vier Stufen,
in denen die Luftqualität angezeigt wird.
Sehr gut, gut, normal und schlecht (vgl. Abb. 1).

8
D
REINIGUNG UND PFLEGE
GEHÄUSE
Bitte denken Sie daran, dass Sie den Netz stecker
ziehen, bevor Sie das Gerät reinigen.
Reinigen Sie das Gerät nur wenn es notwendig ist.
Wenn die Anlage in einer schmutzigen Umgebung
benutzt wird, ist es möglich, dass sie öfter gereini-
gt werden muss.
Entfernen Sie den Schmutz mit einem weichen
Tuch.
Nehmen Sie nur neutrale Reinigungsmittel um
den Schmutz zu entfernen.
Vorsicht: Nehmen Sie die Abdeckung (5) vorsich-
tig ab, um das Gerät nicht zu beschädigen.
SENSOREN (15 / 16)
Entfernen Sie den Staub vor dem Lufteinlass des
Sensors.
Reinigen Sie die Lufteinlässe der Sensoren (15/
16) und andere schwer zu erreichende Stellen mit
dem Staubsauger.
VORFILTER (7)
Die Filter müssen regelmäßig gereinigt bzw. aus-
getauscht werden.
Der Vorlter (7) ist waschbar im Feinwasch-
programm bei 30° ohne Weichspüler. Der Filter
(7) darf aber nicht geschleudert werden! Lassen
Sie ihn ach aufgelegt trocknen.
Der Filter (7) sollte alle 3Monate gewaschen und
einmal im Jahr ausgetauscht werden.
HAUPTFILTER (8)
Es wird empfohlen, den Staub von diesem Filter (8)
alle 3 Monate mit dem Staubsauger zu entfernen.
Der Filter (8) soll ausgewechselt werden, wenn die
Reinigungsezienz stark nachlässt.
Im Allgemeinen sollte der Filter alle 1 – 2 Jahre aus-
getauscht werden.
FILTER (7 / 8) ALLGEMEINE INFORMATIONEN
Wenn der Luftreiniger 3 000 Stunden in Betrieb
war, wird die Anzeige Sie darauf aufmerksam ma-
chen, dass der Vorlter (7) und der Hauptlter (8)
ausgetauscht werden müssen.
Nach dem Auswechseln der Filter, drücken Sie
den Knopf „Gebläse“ (22) und „Aurischen“ (24)
gleichzeitig für 3 Sekunden, um die Betriebsstun-
den zurückzusetzen. Bitte beachten Sie, dass
immer wenn diese beiden Knöpfe gleichzeitig
gedrückt werden, die Betriebsstunden gelöscht
werden.
Sollten Sie vergessen, die Betriebsstunden nach
dem Wechseln der Filter (7 / 8) zurückzusetzen,
werden Sie bei 3 500 Betriebsstunden wieder da-
rauf aufmerksam gemacht, die Filter zu tauschen.
Bitte wenden Sie sich an Bielmeier Haus-
geräte GmbH um neue Filter zu kaufen.
UVRÖHREN 9
Wenn das „UV1“ oder „UV2“ –Zeichen aueuchtet,
bedeutet das, dass eine oder beide UV-Röhren
nicht richtig funktionieren und ausgetauscht
werden müssen.

D
9
DEMONTAGE UND MONTAGE
DEMONTAGE
1 Vordere Abdeckung (5): Drücken Sie auf die
rechte und linke obere Ecke der Abdeckung (5),
um die Verriegelung zu lösen. Ziehen Sie dann
die Abdeckung (5) noch oben, um sie abzu-
nehmen.
2 Vorlter (7): Önen Sie die Schlösser in der
angegebenen Richtung in Abb. 4, um den
Vorlter (7) abnehmen zu können.
3 Hauptlter (8): Ziehen Sie die den Filter (8) an
den beiden oberen Laschen heraus.
4 UV-Röhren (9): Drehen Sie die Röhren (9)
vorsichtig im Uhrzeigersinn oder gegen den
Uhrzeigersinn, bis die Anschlüsse durch die
Önungen der Fassungen zu sehen sind. Neh-
men Sie die Röhren (9) nun aus der Röhrenhal-
terung. Fassen Sie die Röhren (9) nur an den
Keramik-Endstücken an und tragen Sie Haus-
haltshandschuhe.
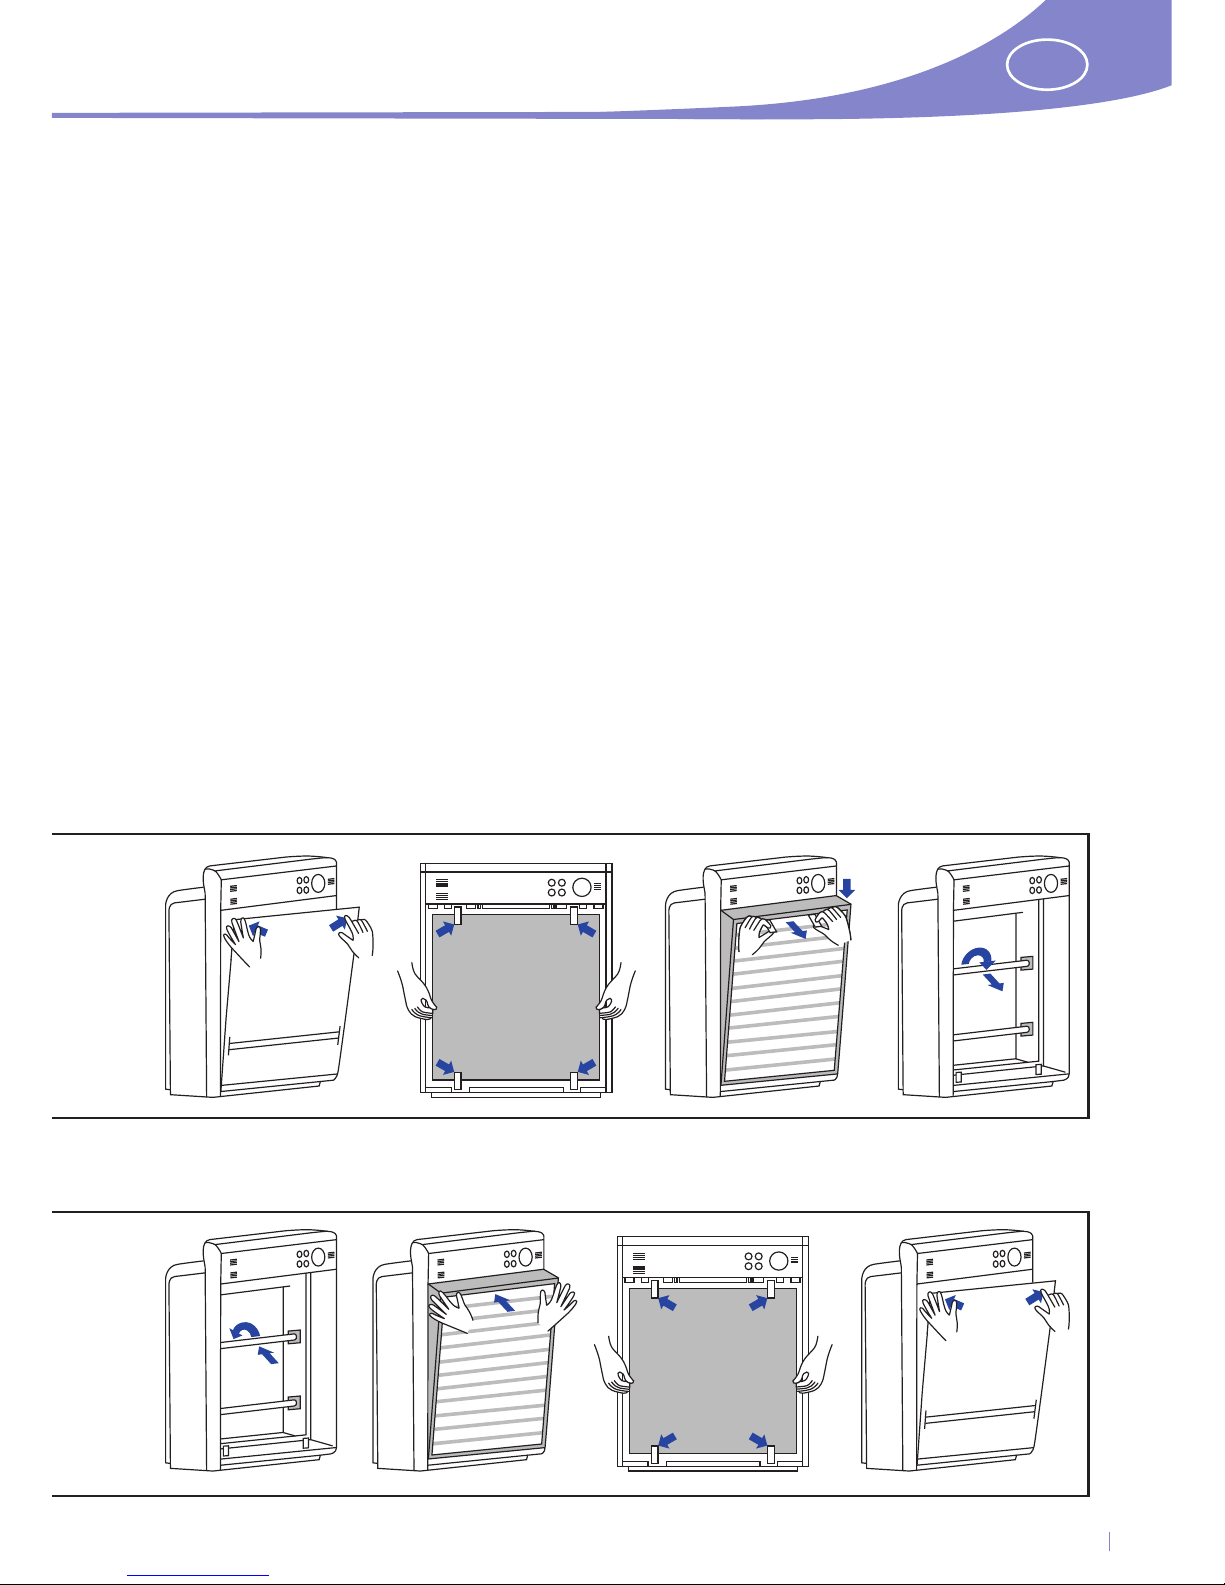
MONTAGE
1
UV-Röhren (9):
Platzieren Sie die Röhren (9) vor-
sichtig in deren Fassung. Drehen Sie die Röhren
(9) mit Gefühl im oder gegen den Uhrzeigersinn,
bis die Anschlüsse hörbar einrasten. Fassen Sie
die Röhren (9) nur an den Keramik-Endstücken
an und tragen Sie Haushaltshandschuhe.
2 Hauptlter (8): Setzen Sie den Hauptlter (8)
zuerst am unteren Rand des Gehäuses ein und
drücken Sie Ihn dann in das Gehäuse hinein.
Die Aufschrift „HEPA“ (weiße Filterseite) muss
außen sein.
3 Vorlter (7): Setzen Sie den Filter (7) ein und
drehen Sie die Schlösser in der angegebenen
Richtung in Abb. 5, um den Vorlter (7) zu be-
festigen.
4
Vordere Abdeckung (5): Setzen Sie zuerst
die unteren Halterungen in die Önungen des
Ge häuses. Befestigen Sie die Abdeckung (5)
indem Sie auf die rechte und linke obere Ecke
drü cken, die Abdeckung (5) rastet hörbar ein.
Abb. 4: Demontage
Abb. 5: Montage

10
D
PROBLEMBEHEBUNG
Problem Grund Lösung
Die Anlage arbeitet nicht Der Netzstecker ist nicht
fest in der Steckdose.
Überprüfen Sie den
Netzstecker.
Vordere Abdeckung ist
nicht verriegelt.
Verriegeln Sie die Abdeckung.
Kein Strom in der Steckdose. Sehen Sie in Ihrem
Sicherungskasten nach.
Die Anlage reagiert nicht
auf die Fernsteuerung
Die Batterien sind zu schwach. Ersetzen Sie die Batterien.
Die Batterien haben keinen
Kontakt.
Stellen Sie sicher, dass die
Batterien die Kontaktfedern
berühren.
Gerät läuft aber bläst
keine Luft aus
Gegenstände blockieren
die Luftzufuhr oder den Luft-
abzug, die Schutzfolie wurde
nicht entfernt.
Entfernen Sie die Gegen-
stände / Schutzfolie.
Kontaktieren Sie die Bielmeier
Hausgeräte GmbH, falls das
Problem weiter besteht.
Der erwartete Luft-
reinigungseekt wird
nicht erfüllt
Das Gerät steht in einem
schlecht gelüfteten Raum
oder wird von anderen
Gegenständen blockiert.
Stellen Sie sicher, dass die
Luft um das Gerät zirkulieren
kann.
Die Filter sind durch zu viel
Rauch und Staub verschmutzt.
Filter reinigen oder tauschen.
Die Luftqualitätsanzeige
zeigt immer schlechte Luft-
qualität an und der Luft-
reiniger läuft dadurch
immer mit hoher Leistung
Die Sensoren im Gerät sind
verschmutzt.
Reinigen Sie die Sensor-
önungen mit dem Staub-
sauger.
Sollten diese hier angeführten Lösungsvorschläge dennoch nicht das Problem beheben, wenden Sie
sich bitte an die Bielmeier Hausgeräte GmbH oder an die nächste Servicestelle.
Versuchen Sie niemals, den Luftreiniger selbst zu reparieren!
TECHNISCHE ANGABEN
Anschlussspannung: 220 – 240 V ~ / 50 Hz
Leistungsaufnahme: 123 W
Luftdurchsatz (max.): 500 m³ / Std
Zeitschaltuhr: 1 – 12 Stunden
Abmessungen (H x B x T): 555 x 445 x 210 mm
DER UMWELT ZULIEBE BITTE BEACHTEN
Verpackungsmaterial und ausgediente Geräte
nicht einfach wegwerfen, sondern der Wieder-
verwertung zuführen.
Den zuständigen Recyclinghof bzw. die nächste
Sammelstelle erfragen Sie bitte bei Ihrer Kommu-
nalverwaltung.

D
11
GARANTIE
Für die am Verkaufstag beginnende Garantie gelten innerhalb der Bundesrepublik Deutschland,
Österreichs und der Schweiz folgende Bestimmungen:
1. Garantiedauer: 2 Jahre
2. Garantieleistungen:
a) Nach unserer Wahl Reparatur oder Austausch
von Teilen, die nach unserer Überprüfung
Material- oder Fertigungsfehler aufweisen.
b) Die Garantie wird nur bei Vorzeigen dieser
Garantiekarte und der Verkaufsrechnung
geleistet. Die Karte ist nur gültig, wenn
sie am Verkaufstag vollständig ausgefüllt
wurde.
c) Die Garantieleistung gilt nur gegenüber dem
Erstverbraucher.
d) Durch die Reparatur oder den Austausch von
Teilen innerhalb der Garantiedauer wird die
ursprüngliche Garantiezeit weder verlängert
noch erneuert.
e) Transportkosten gehen zu Lasten des Käufers
(gilt nicht für die ersten 6 Monate der Garantie-
zeit).
f) Sofern der Schaden oder Mangel nicht be-
seitigt werden kann oder die Nachbesserung
von uns abgelehnt oder unzumutbar verzö-
gert wird, wird innerhalb von 6 Monaten ab
Kauf- / Lieferdatum auf Wunsch des Endab-
nehmers entweder kostenfrei Ersatz geliefert
oder der Minderwert vergütet oder das Gerät
gegen Erstattung des Kaufpreises, jedoch
nicht über den marktüblichen Preis hinaus,
zurückgenommen.
3. Die Garantie gilt nicht:
für Kratzer und Flecken am Gerät.
für Beleuchtungs- und Kontrolllampen.
für Motorbürsten.
für leicht zerbrechliche Teile aus Bakelit, Glas,
Plastik und so weiter, es sei denn, es handelt
sich um Materialfehler, die von uns als solche
anerkannt werden.
für Beschädigungen, die durch falsche Installa-
tion oder Befestigung verursacht wurden.
wenn das Gerät an ein Stromnetz mit höherer
Spannung, als auf dem Gerät angegeben, an-
geschlossen wird.
bei falscher oder unsachgemäßer Bedienung.
bei mangelnder Sorgfalt.
bei ungenügender oder falscher Wartung.
bei Fallenlassen des Gerätes oder einzelner
Teile.
bei unsachgemäßem Transport oder unsach-
gemäßer Verpackung für den Transport.
4. Die Garantie erlischt:
wenn das Gerät für andere als für Haushalts-
zwecke eingesetzt wird.
wenn Personen, die nicht von unserer Firma
dazu ermächtigt sind, Reparaturen oder Än-
derungen durchführen.
Stempel und Unterschrift des Verkäufers Verkaufsdatum
Wichtig! Bitte notieren Sie hier den auf
dem Typenschild am Gerät befindlichen
FD-Code:
Modell:
Für dieses Gerät leisten wir 2 Jahre Garantie für Mängel, die auf Fertigungs- oder Materialfehler
zurückzuführen sind. Die Garantiezeit beginnt mit dem Tag der Übergabe und wird nur bei Vorlage
der Garantiekarte und der Verkaufsrechnung gewährt. Weitergehende Ansprüche bestehen nicht.

12
GB
IMPORTANT!
Please read these instructions for use carefully as
they contain important information about safety
as well as for usage and maintenance of the ap-
pliance.
Keep the instructions for use in a safe place and
pass them on to any new owner of the appliance.
SAFETY INFORMATION
Only connect this appliance to an AC power
outlet (voltage acc. to rating plate) and only
ever use indoors.
The use of extension cables is not recommend-
ed. If using extension cables, check power
rating (see Technical data).
After usage, unplug the appliance from the
mains before cleaning or if any fault occurs
during operation. Do not touch the power plug
with damp or wet hands.
Switch the appliance o before removing the
power plug. Grasp by the plug to remove –
never drag on the cable.
Children are unaware of the risks associated
with electrical equipment. For this reason never
leave a child alone and unsupervised with the
appliance.
Do not set down/operate the appliance on
a hot surface or near an oven/stove or heat-
ing. Do not operate the appliance near gas
sources.
During operation the appliance must stand
well away from other objects. Do not cover or
otherwise hinder the free ow of air.
Switch the appliance o and remove the pow-
er plug before cleaning or moving to another
location.
Always remove the power plug before any
lengthy absence or during thunderstorms to
prevent any damage being caused by light-
ning.
Only use the appliance in dry rooms and pro-
tect from splashing.
If the appliance or mains cable are visibly dam-
aged, please have your appliance checked by a
technician or BIELMEIER customer service. This
also applies if the appliance is making unusual
noises or giving o a strange odour.
Repairs to electrical appliances should only
be carried out by appropriately qualied pro-
fessionals. Unauthorised repairs may result in
signicant safety risks to the user. The manufac-
turer accepts no liability for any damage caused
by improper usage or incorrect operation.
Surfaces may scratch. Do not use scouring
agents or sharp objects when cleaning.
INSTALLATION OF AIR PURIFIER
To ensure your air purier functions to opti-
mum eect, we recommend placing the ap-
pliance on a stable base or mounting it on the
wall at a height of approx. 50 cm.
FUNCTIONING OF AIR PURIFIER
1 Prelter (7): Filters out the largest particles
in the air to length the service life of the HEPA
lter.
2 Main lter system (8): The lter system con-
sists of two layers of lters: the HEPA lter and
the activated carbon lter.
The HEPA lter is designed to remove tiny parti-
cles (down to 3 / 10 000mm) from the air such as
pollen, smoke, animal hairs, mould spores etc.
The activated carbon lter is designed to deal
with unpleasant odours.
3 UV tubes (9): The germicidal rays emitted by
the tubes destroy transmissible bacteria and
viruses.
4
Nano-photocatalytic lter (10): This lter is
300 times more eective at removing toxic
gases and viruses than conventional carbon
lters. A further benet of this lter is that it re-
generates and cleans itself with minimum cost.
5 Anion generator: The purpose of this function
is to ensure perfect air quality using negative
ions, which promote well-being.
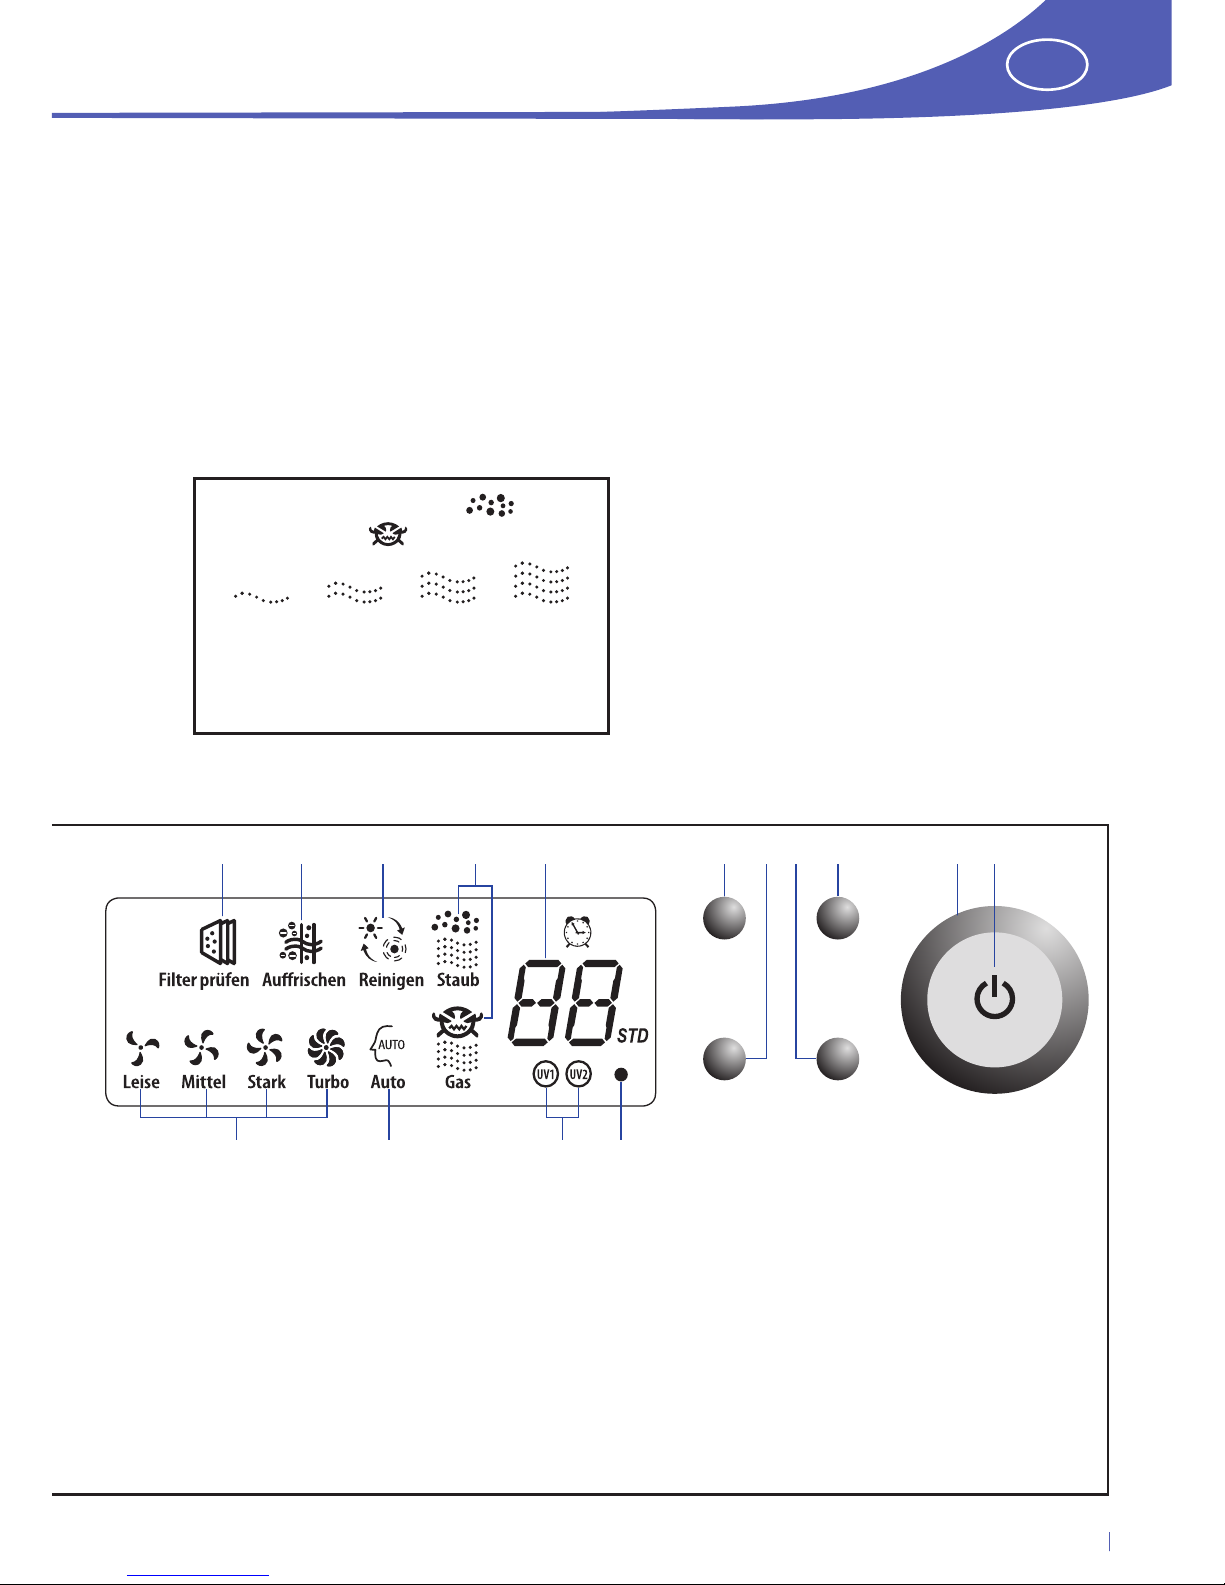
Fig. 2: Display (2) and operator panel (3)
Fan Duration
Purify air Condition
17 18 19 20 21 22 23 24 25 26 27
28 29 30 31
Fig. 1: Air quality as shown on the display (2)
very good good normal poor
quality quality quality quality
Display for “Staub” (dust)
and “Gas” (gas)
17 Check, clean or replace lter
18 Ion generator indicator
19 Photocatalytic air purication indicator
20 Air quality indicator
21 Operating time selected / remaining time
(in hours)
22 Control fan speed
23 Start / Stop photocatalytic purication
24 Switch ion generator on / o
25 Select operating time
26 Operation indicator
27 ON / OFF
28 Fan speed selected
29 Automatic mode
30 Check / replace UV lamp
31 Stand-by indicator
13
GB
6 Dust sensor (15) and gas sensor (16): The
air quality measured is shown on the display
(2) (dust, gas). The poorer the quality of the
room air, the more wavy lines that will appear
(see Fig. 1). In Automatic mode fan perform-
ance is automatically adjusted according to the
air quality.
If the gas sensor indicator is ashing (20), it is
warming up.
USING THE BHG 280 FOR THE FIRST TIME
1 IMPORTANT!
Before inserting the power plug of the appliance
in the socket, open the front cover (5) by press-
ing on the two top corners and lift the cover o
the appliance. There is protective foil behind the
prelter (7) and this needs to be removed before
switching on!
2 ON / OFF
As soon as the air purier is supplied with power, a
signal will sound and the operation indicator (26)
and display (2) will ash. The appliance will switch
to Stand-by mode after 1second. The indicators
on the appliance are switched o, and the red in-
dicator lamp (31) lights up.
Press ON / OFF (27 / 32), and the air purier will
start up at the highest power level. The operation
indicator (26) lights up red. The appliance switches
to Automatic mode after 3 minutes. The operation
indicator (26) now lights up green.
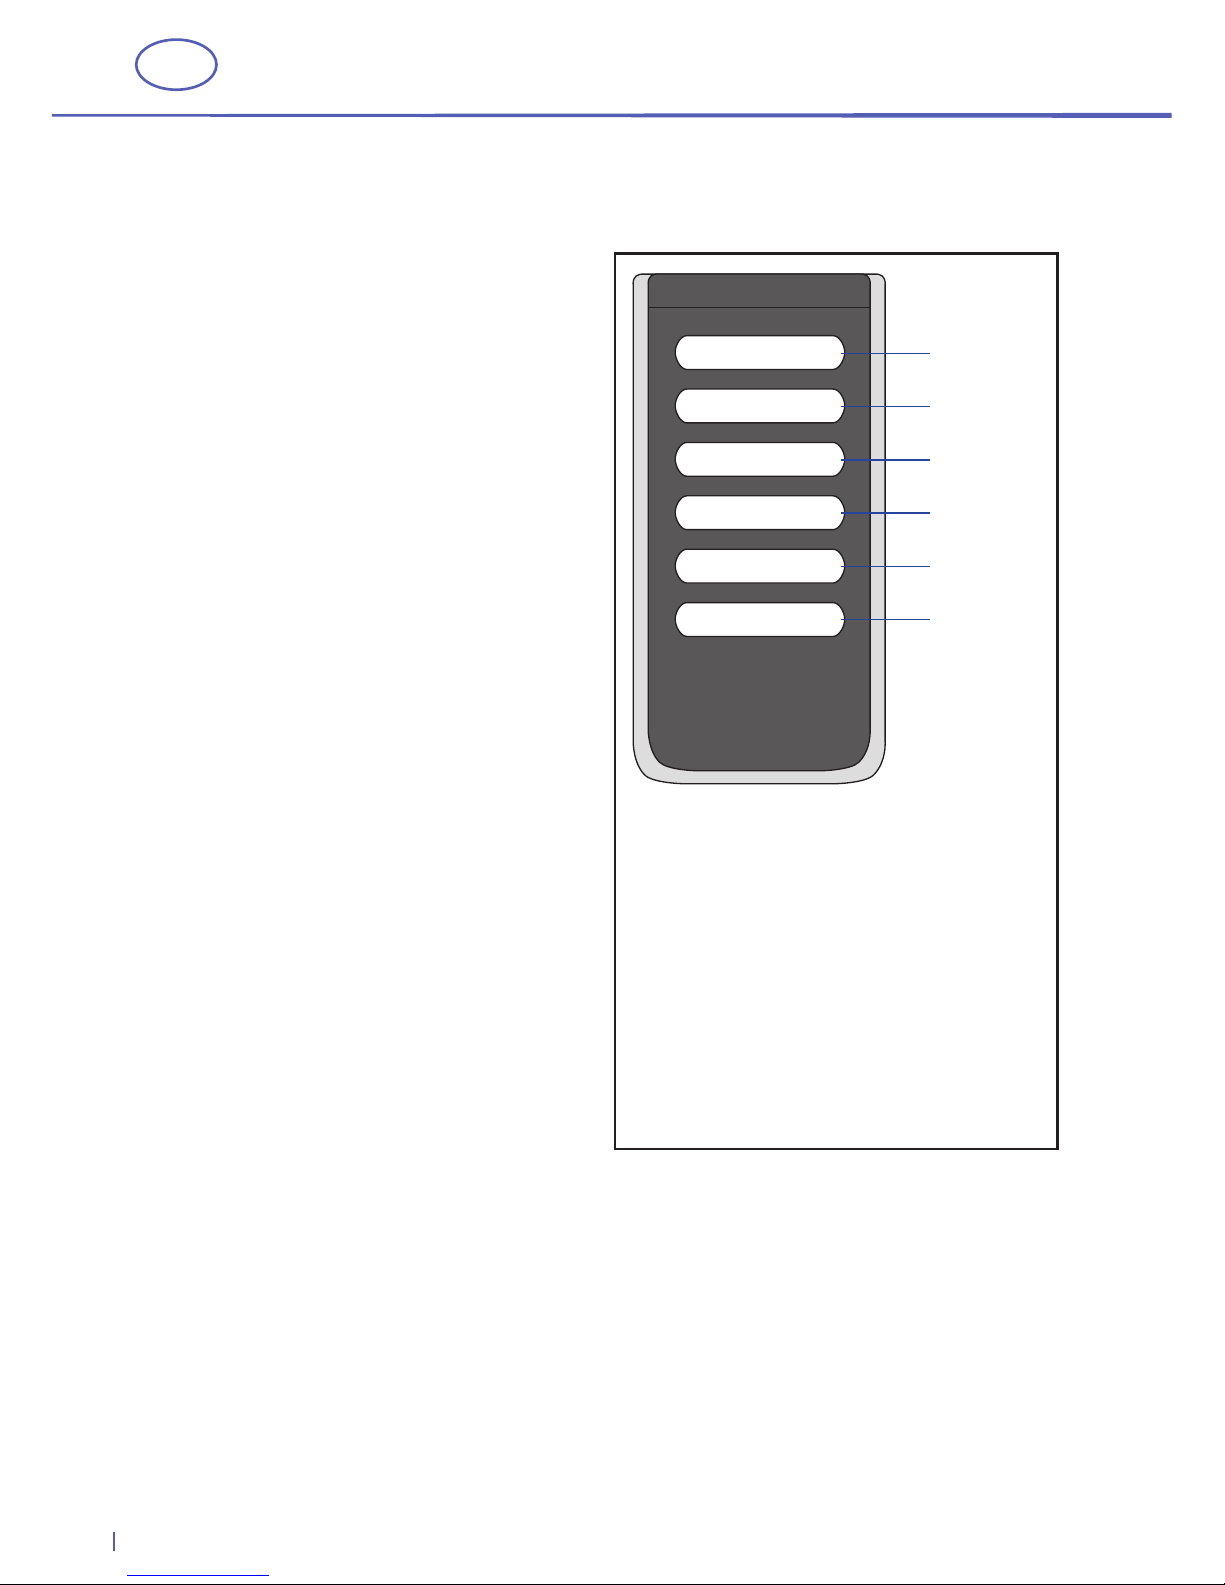
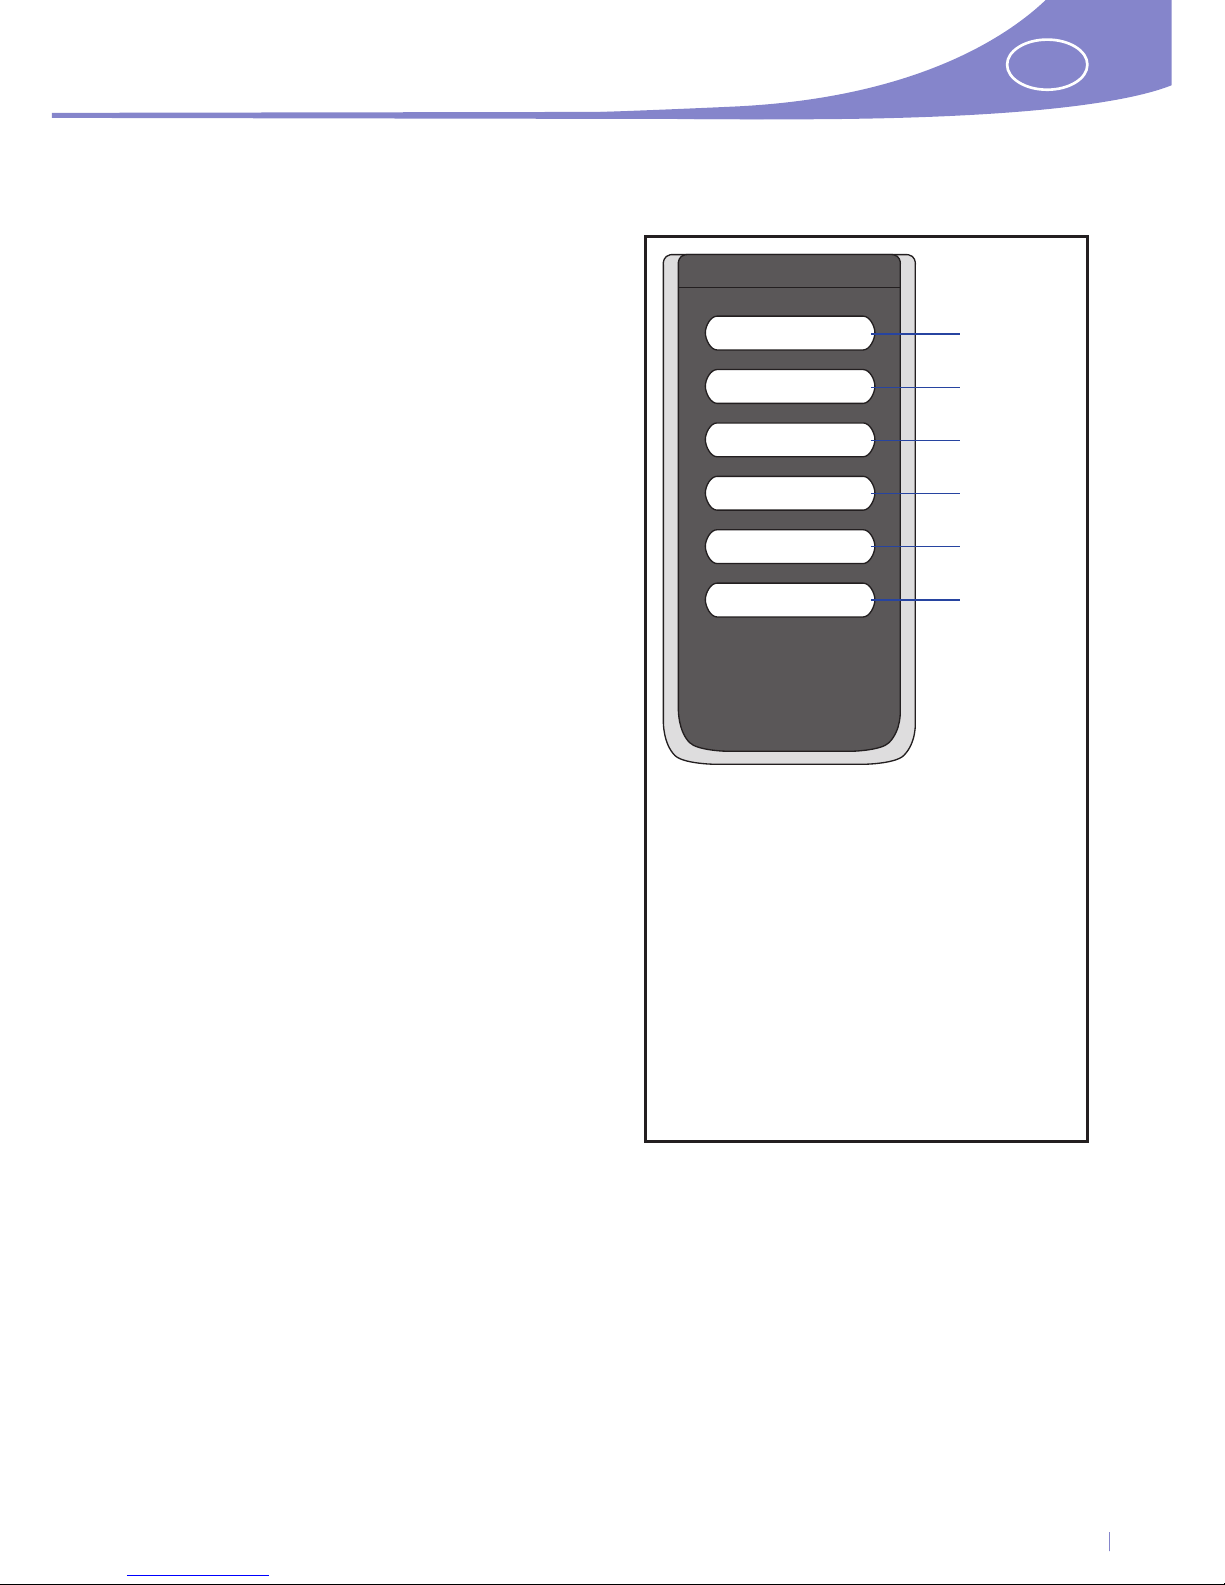
Fig. 3: Remote control
(4)
32 Appliance is switched on / o.
33 Controls fan speed.
34 Starts or stops ion generator.
35 Selects the length of time the
appliance is to remain in operation
(1 – 12 hours).
36 Starts or stops Automatic mode.
37 Starts or stops photocatalytic
purication.
EIN / AUS
Gebläse
Aurischen
Dauer
Auto
Luft reinigen
32
33
34
35
36
37
14
GB
INSERT BATTERIES
1 Open battery compartment on rear of remote
control unit
(4)
.
2 Insert batteries correctly.
When doing so, take note of “+” and “–” sym-
bols marked on the inside of the remote control
unit.
3 Now close the battery compartment again.
3 AUTOMATIC MODE (29)
In this mode the appliance adjusts itself accord-
ing to the air quality. The air is puried with the
power level (28) automatically selected, and the
appliance switches o as soon as the ideal purity
for room air is attained.
Appliance performance depends
on the quality of the air (20):
very good quality low performance level
good quality medium performance level
normal quality high performance level
poor quality very high performance level
Each of the four power levels (28) has a dier-
ent colour on the operation indicator (27):
low performance level green
medium performance level blue
high performance level orange
very high performance level red
4 MANUAL SETTING
Press “Auto” (36) on the remote control unit (16)
or “Gebläse” (fan) (22) on the appliance to leave
Automatic mode (29). You can now directly se-
lect the program you require by pressing “Auf-
frischen” (refresh) (24) for ionisation or “Luft
reinigen” (purify air) (23) for photocatalytic pu-
rication, pressing neither or both buttons and
selecting the required performance level for the
appliance with “Gebläse” (fan) (22). The setting
last selected for the appliance will be saved and
used when it is next started up.
5 SELECT OPERATING TIME (21
Running times from 1to 12 hours can be selected.
An hour is set each time you press the “Dauer” (du-
ration) button (25 / 35). The running time will start
as soon as selection ends. If you hold down the
“Dauer” (duration) button (25 / 35), this will speed
up time selection. The air purier switches o au-
tomatically when the selected time expires.
6 AIR QUALITY INDICATOR
There are four levels used to display the air quality
for “Staub” (dust)
(20)
and “Gas” (gas)
(20)
.
Very good, good, normal and poor (see Fig. 1).
REMOTE CONTROL UNIT 4
FUNCTIONS OF BUTTONS

15
GB
CLEANING AND CARE OF APPLIANCE
HOUSING
Please make sure you remove the power plug
before cleaning the appliance.
Only clean the appliance when necessary. If it
is used in a contaminated environment, it may
need to be cleaned more frequently.
Remove dirt with a soft cloth.
Only use mild cleaning products to remove dirt.
Caution: Remove the cover (5) carefully so as not
to damage the appliance.
SENSORS (15 / 16)
Remove dust from the air inlet of the sensor.
Use the vacuum cleaner to clean the air inlets of
the sensors (15/ 16) and other parts which are
not easily accessible.
PREFILTER (7)
Filters must be regularly cleaned or replaced.
The prelter is washable (30° washing pro-
gramme without softener) although it should
not be spun! Allow the lter to dry at.
The lter should be washed every 3months and
replaced once a year.
MAIN FILTER (8)
It is recommended removing the dust from this
lter (8) with the vacuum cleaner every 3months.
The lter should be replaced when purication
eciency falls o sharply.
Filters should generally be replaced every 1 – 2
years.
FILTER (7 / 8) GENERAL INFORMATION
When the air purier has been in operation for
3 000 hours, the display will tell you that the pre-
lter (7) and main lter (8) need to be replaced.
After replacing the lters, press the “Gebläse”
(fan) (22) and “Aurischen” (refresh) (24) buttons
simultaneously for 3 seconds to reset the oper-
ating hours. Please remember that whenever
these two buttons are pressed simultaneously,
the operating hours will be deleted.
If you forget to reset the operating hours after
exchanging the lters (7 / 8), you will again be
reminded to replace them at 3 500 operating
hours.
Please contact Bielmeier Hausgeräte
GmbH to buy new lters.
UV TUBES 9
If the “UV1” or “UV2” symbol (30) lights up,
this means that one or both UV tubes are not
working properly and must be replaced.

16
GB
DISMANTLING AND ASSEMBLY
DISMANTLING
1 Front cover (5): Press on the top right and left-
hand corners of the cover (5) to release the
locking mechanism. Then slide up the cover
(5) to remove.
2 Prelter (7): Open the catches in the direction
shown in Fig. 4 to remove the prelter (7).
3 Main lter (8): Grasp the two straps at the top
to pull out the lter (8).
4 UV tubes (9): Carefully rotate the tubes (9)
either clockwise or anticlockwise until the
connections can be seen through the open-
ings of the holders. Now remove the tubes (9)
from their holders. Only grasp the tubes (9)
by the ceramic endpieces and wear gloves to
do so.
ASSEMBLY
1 UV tubes (9): Carefully t the tubes (9) into
their holders. Gently rotate the tubes (9) either
clockwise or anticlockwise until the connec-
tions audibly engage. Only grasp the tubes (9)
by the ceramic endpieces and wear gloves to
do so.
2 Main lter (8): First position the main lter (8)
at the bottom of the housing and then press
into the housing. The word “HEPA“ (on white
side of lter) must face outwards.
3 Prelter (7): Insert the lter (7) and turn the
catches in the direction shown in Fig. 5 to
secure the prelter (7).
4 Front cover (5): First position the bottom
holders in the openings of the housing. Secure
the cover (5) by pressing on the top right and
left-hand corners (5) until the cover audibly
engages.
Fig. 4: Dismantling
Fig. 5: Assembly

17
GB
TROUBLESHOOTING
Problem Reason Solution
Appliance is not functioning Power plug is not
properly inserted in socket.
Check power plug.
Front cover is not secured. Secure cover.
No power supply from socket. Check your
fuse box.
Appliance does not respond
to remote control unit
Batteries are failing. Replace batteries.
Batteries without contact. Check that batteries are
touching the contact springs.
Appliance is running but not
emitting air
Objects are blocking
air supply or exhaust;
protective foil has not been
removed.
Remove objects / protective foil.
Contact Bielmeier Hausgeräte
GmbH if problem persists.
Expected air purication
eect is absent
Appliance is standing in a
room with poor ventilation or
is blocked by other objects.
Check that air can circulate
around the appliance.
Filters are contaminated with
smoke and dust.
Clean or replace lters.
The air quality indicator
shows air quality constantly
worsening while the per-
formance level of the air
purier keeps increasing
Sensors in appliance are
contaminated.
Clean the sensor openings
with the vacuum cleaner.
If the solutions suggested here still do not eliminate the problem, please contact Bielmeier Hausgeräte
GmbH or your nearest service centre.
Never try to repair the air purier yourself!
TECHNICAL DETAILS
Supply voltage: 220 – 240 V ~ / 50 Hz
Power consumption: 123 W
Airow (max.): 500 m³ / h
Timer: 1 – 12 hours
Dimensions (H x W x D): 555 x 445 x 210 mm
CARING FOR THE ENVIRONMENT
Do not simply throw away packaging and disused
appliances. These can be recycled.
Contact your local authority for details of the rel-
evant recycling centre or the nearest collection
point.

18
GB
GUARANTEE
For the warranty, which begins as of the date of sale of the product, the following conditions
shall apply in Great Britain:
A 2-years warranty is provided for damage caused by defects in material or workmanship. The
warranty period shall begin on the hand-over day and warranty is only granted on presenta-
tion of the warranty card and the purchase receipt. No further claims shall be granted.
1. Warranty period: 2 years
2. Conditions of warranty:
a) Parts, which exhibit defects in material and / or
workmanship after our inspection, will either
be repaired or replaced according to our de-
cision.
b) Warranty is only provided on presentation of
this warranty card and purchase receipt. This
warranty is only valid if it is lled out on date
of sale and in a complete and appropriate
manner.
c) This warranty is only valid for the rst owner
of the device.
d) No change or repair of parts performed within
the warranty period shall provide grounds for
any extension of the original warranty period.
e) Any transportation costs shall be borne by the
purchaser (this shall not apply during the rst
6 months of the warranty).
f) If the damage or defect cannot be eliminated
or if we refuse to repair the defect or in the
event of a delay in our repairing of the device,
then within the rst 6 months after purchase / -
delivery of the device, and according to the
wish of the end user, the device will be replaced
free of charge or its value will be reimbursed
or the device will be taken back with a refund
of the original purchase price which shall not
exceed the usual market price.
3. The warranty shall not apply to:
spots and scratches on the device.
control lamps and lights.
motor brushes.
easily breakable parts (e. g. bakelite, plastic ,
glass), even in case of defects in material
recognized by us.
damage due to improper installation or im-
proper xing.
damage caused by an unsuitable voltage
supply or an unsuitable electricity network.
improper or inappropriate use of the equip-
ment.
unsatisfactory care.
damage caused by incompetent or insucient
maintenance.
damage caused by dropping the equipment or
part thereof.
improper transportation or inappropriate
packaging during the transportation.
4. The warranty shall be deemed void:
in case of use or application of the device other
than its intended use for household purposes.
in case of any servicing or repairing of the device
performed by third parties that have not been
authorized for such purpose by our company.
Stamp and signature of salesperson Date of sale
Important! Please write down the FD-code
located on the rating plate here:
Model:

19
CZ
DŮLEŽITÉ!
Tento návod k obsluze si prosím pečlivě přečtěte,
obsahuje mnoho důležitých upozornění, která se
týkají bezpečnosti, použití a údržby přístroje.
Pečlivě jej uschovejte, případně jej předejte dal-
šímu vlastníkovi.
BEZPEČNOSTNÍ POKYNY
Přístroj připojte ke střídavému proudu –
s napětím podle typového štítku na přístroji –
a používejte uvnitř.
Nedoporučuje se používání prodlužovacích
kabelů. Při jejich použití zkontrolujte výkono-
vou zatížitelnost (viz. technické údaje)
Zástrčku vytáhněte – po ukončení používá-
ní, před čištěním nebo při případných poru-
chách během provozu. Zástrčky se v žádném
případě nedotýkejte mokrýma nebo vlhkýma
rukama.
Když chcete vytáhnout zástrčku ze zásuvky,
nejprve přístroj vypněte. Netahejte za kabel,
ale za zástrčku.
Děti nerozpoznají nebezpečí, které jim hrozí
při manipulaci s přístrojem, proto je nikdy
nenechávejte v blízkosti přístroje bez dozoru.
Přístroj nikdy nenechávejte stát na horkém
povrchu, v blízkosti otevřeného ohně, topení
nebo zdroje plynu. To samé platí i pro jeho
provoz.
Během provozu musí přístroj stát ve volném
prostoru, nesmí být ničím přikrytý, aby přívod
a odvod vzduchu zůstal volný.
Pokud chcete přístroj čistit nebo přemístit
na jiné místo, vypněte ho a vytáhněte ze zá-
suvky.
Při delší nepřítomnosti a během bouřky pří-
stroj vždy vypínejte, aby nedošlo ke škodám
způsobeným úderem blesku.
Přístroj uvádějte do chodu pouze v suchých
místnostech, chraňte před stříkající vodou.
Když je přístroj viditelně poškozen nebo když
vydává neobvyklé zvuky nebo pachy, nechte
jej překontrolovat u odborníka, nebo kontak-
tujte zákaznickou linku BIELMEIER.
Opravy elektropřístrojů smí být prováděny
pouze odborníky. Neodbornými opravami
mohou vzniknout spotřebiteli značné škody.
Výrobce neručí za případné škody, které jsou
způsobeny chybnou obsluhou, nebo chyb-
ným používáním.
Povrchové plochy se mohou poškrábat. Nepo-
užívejte proto při čištění žádné špičaté před-
měty nebo abrazivní látky.
UMÍSTĚNÍ ČISTIČE
Aby čistič optimálně pracoval, doporučuje se
postavit na stabilní podložku nebo uchytit
na zeď ve výšce asi 50 cm.
ZPŮSOB FUNGOVÁNÍ
ČISTIČE VZDUCHU
1 Předltr (7): Filtruje větší částice vzduchu, aby
se prodloužila životnost HEPA-ltru.
2 Systém hlavního ltru (8): Systém obsahuje
dvě vrstvy ltrů: HEPA-ltr a ltr-aktivní uhlí.
HEPA-ltr je určen k tomu, aby odstranil ze
vzduchu nejmenší částice (až do 3 /
10000mm),
např. pyl, kouř, zvířecí chlupy, plísně atd.
Filtr s aktivním uhlím je určen k tomu, aby
zpracoval nepříjemné pachy.
3 UV-trubky (9): Sterilizační paprsky trubek ničí
nakažlivé bakterie a viry.
4 Fotokatalytický nanoltr (10): Tento ltr
redukuje jedovaté plyny třistakrát efektivněji
než běžné uhelné ltry. Další předností toho-
to ltru je, že se sám s minimálními náklady
regeneruje a čistí.
5 Aniontový generátor: Tato funkce vytváří
perfektní kvalitu vzduchu prostřednictvím
záporných iontů, které zlepšují dobrý zdra-
votní stav.

Obr. 2: ukazatel (2) a ovládací prvky (3)
Gebläse Dauer
Luft reinigen Aurischen
17 18 19 20 21 22 23 24 25 26 27
28 29 30 31
17 zkontrolovat, vyčistit nebo vyměnit ltr
18 ukazatel iontového generátoru
19 ukazatel fotokatalytického čištění vzduchu
20 ukazatel kvality vzduchu
21 nastavená doba provozu,
popř. zbývající čas
22 nastavení rychlosti ventilátoru
23 začátek / konec fotokatalytického čištění
24 zapnutí / vypnutí iontového generátoru
25 nastavení doby provozu
26 ukazatel provozu
27 vypnutí / zapnutí
28 nastavená rychlost ventilátoru
29 automatický provoz
30 zkontrolovat, popř. vyměnit UV-lampu
31 ukazatel pohotovostního režimu (stand-by)
Obr. 1:
Kvalita vzduchu je zobrazená na ukazateli (2)
velmi dobrá
dobrá normální špatná
kvalita kvalita kvalita kvalita
Ukazatel “Staub” (prachu)
a “Gas” (plynu)
20
CZ
6 Senzor prachu (15) a senzor plynu (16):
Měřenou kvalitu vzduchu uvidíte na ukaza-
teli (2) (prach / plyn). Čím horší je kvalita vzdu-
chu v místnosti, tím více ukazuje vlnovek (srov.
obr. 1).
V automatickém provozu se výkon ventilátoru
automaticky přizpůsobuje kvalitě vzduchu.
UVEDENÍ DO PROVOZU
1 DŮLEŽITÉ!
Než zapojíte přístroj do zásuvky, otevřete stisk-
nutím obou horních rohů přední ochranný kryt
(5) a odklopte ho z přístroje. Za předltrem (7)
je ochranná fólie, která musí být před otevřením
odstraněna!
2 EIN / AUS (VYPNUTÍ / ZAPNUTÍ)
Jakmile je přístroj připojen k proudu, zazní signál,
bliká ukazatel provozu (26) a displej (2). Během
jedné sekundy přejde přístroj do pohotovostní-
ho provozu. Ukazatelé na přístroji jsou vypnuté,
červená kontrolka (31) svítí.
Stiskněte EIN / AUS (vypnutí / zapnutí) a čistič vzdu-
chu začne pracovat na nejvyšší stupeň. Ukazatel
provozu (26) svítí červeně. Po třech minutách pře-
pne přístroj do automatického provozu. Ukazatel
provozu (26) svítí zeleně.
Obr. 3: dálkové ovládání
(4)
EIN / AUS
Gebläse
Aurischen
Dauer
Auto
Luft reinigen
32
33
34
35
36
37
32 Přístroj se zapíná a vypíná
33 Reguluje rychlost ventilátoru
34 Spouští nebo ukončuje práci
iontového generátoru
35 Nastavuje, jak dlouho má být
přístroj v provozu
(1 – 12 hodin)
36 Spouští nebo ukončuje
automatický režim
37 Spouští nebo ukončuje
fotokatalytické čištění
21
CZ
DÁLKOVÉ OVLÁDÁNÍ 4
FUNKCE JEDNOTLIVÝCH TLAČÍTEK
VLOŽENÍ BATERIÍ
1 Otevřete přihrádku na baterie na zadní straně
dálkového ovládání (4).
2 Vložte baterie.
Zároveň zkontrolujte symboly „+“ a „–“, které
jsou znázorněny uvnitř.
3 Přihrádku na baterie opět zavřete.
3 AUTOMATICKÝ PROVOZ (29)
V tomto režimu přizpůsobuje přístroj svůj způsob
práce kvalitě vzduchu. Vzduch se čistí automatic-
ky nastaveným stupněm výkonu (28) a přístroj se
vypíná, jakmile je dosažen ideální stupeň čistoty
vzduchu v místnosti.
Výkon přístroje se řídí kvalitou vzduchu (20):
Velmi dobrá kvalita nízký výkon
Dobrá kvalita střední výkon
Normální kvalita vysoký výkon
Špatná kvalita velmi vysoký výkon
Každý ze čtyřech stupňů (28) má na ukazateli
provozu (27) svoji vlastní barvu:
Nízký výkon zelená
Střední výkon modrá
Vysoký výkon oranžová
Velmi vysoký výkon červená
4 MANUÁLNÍ NASTAVENÍ
Stiskněte „Auto“ (36) na dálkovém ovládání
nebo „Gebläse“ (22) na přístroji pro ukončení
auto matického provozu (29). Nyní si můžete
přímo zvolit žádaný program tak, že stisknete
obě tlačítka zároveň, nebo žádné tlačítko – „Auf-
frischen“ (24) pro ionizaci nebo „Luft reinigen“
(23) pro fotokatalytické čištění – a zvolíte poža-
dovaný výkon přístroje stisknutím „Gebläse“ (22).
Naposledy zvolené nastavení se uloží pro další
uvedení do provozu.
5 NASTAVENÍ DOBY PROVOZU (21)
Dobu provozu lze nastavit od 1 do 12 hodin.
Stisknutím tlačítka „Dauer“ (25 / 35) se nastaví
jedna hodina. Pak začíná běžet nastavený čas.
Když tlačítko „Dauer“ (25 / 35) podržíte, čas se
nastaví rychleji. Přístroj se vypne automaticky,
když nastavený čas vyprší.
6 UKAZATEL KVALITY VZDUCHU
Pro „Staub“ (prach) (20) a „Gas“ (plyn) (20) existují
čtyři stupně, jimiž se znázorní kvalita vzduchu.
Velmi dobrá, dobrá, normální a špatná (srov.
obr.1).

22
CZ
ČIŠTĚNÍ A PÉČE
KRYT
Dbejte na to, abyste před čištěním přístroje
vytáhli zástrčku ze zásuvky.
Čistěte přístroj pouze tehdy, když je to nutné.
Pokud se přístroj používá ve znečištěném pro-
středí, je možné, že se bude muset častěji čistit.
Nečistoty odstraňujte měkkým hadrem. K jejich
odstranění používejte neutrální čisticí prostředky.
Pozor: Ochranný kryt (5) snímejte vždy opatrně,
aby se přístroj nepoškodil.
SENZORY (15 / 16)
Před vstupem vzduchu odstraňujte prach.
Vstupy vzduchu senzorů (15 / 16) a ostatní těžko
přístupná místa čistěte pomocí vysavače.
PŘEDFILTR (7)
Filtry musí být pravidelně čištěny, popř. vymě-
něny.
Předltr lze vyprat, ale nesmí se ždímat! Po
vyprání ho nechejte uschnout rozložený na rov-
né podložce.
Filtr by se měl každé tři měsíce prát a jednou za
rok vyměnit.
HLAVNÍ FILTR (8)
Doporučuje se každé tři měsíce odstranit vysava-
čem prach z tohoto ltru (8).
Filtr by se měl vyměnit, když silně poklesne účin-
nost čištění.
Obecně vzato by se ltr měl vyměnit každé 1 – 2
roky.
FILTR (7 / 8) VŠEOBECNÉ INFORMACE
Když je čistič vzduchu 3000 hodin v provozu, uka-
zatel upozorní na to, že předltr (7) a hlavní ltr
(7) se musí vyměnit.
Po vyměnění ltru stiskněte současně na tři vteři-
ny tlačítka „Gebläse“ (22) a „Aurischen“ (24), aby
se počet provozních hodin vrátil do původního
stavu. Zkontrolujte prosím, že vždy když sou-
časně stisknete obě tlačítka, se provozní hodiny
vymažou.
Pokud je zapomenete po výměně ltrů (7 / 8)
znovu vrátit do původního stavu, budete zase u
3500 provozních hodin upozorněni, že máte ltry
vyměnit.
Pokud chcete koupit nové ltry, ob-
raťte se prosím na zákaznické cent-
rum BIELMEIER.
UVTRUBKY 9
Když se rozsvítí značky „UV1“ nebo „UV2“, zname-
ná to, že jedna nebo obě nefungují správně, a je
třeba je vyměnit.
23
CZ
DEMONTÁŽ A MONTÁŽ
DEMONTÁŽ
1 Přední ochranný kryt (5): Stiskněte pravý
a levý horní roh krytu (5), odjistíte tak uzá-
věr. Kryt pak vytáhněte směrem nahoru a
vyndejte.
2 Předltr (7): Otevřete zámky v uvedeném
směru (viz. obr. 4), pak můžete předltr (7)
pohodlně vyndat ven.
3 Hlavní ltr (8): Vytáhněte ltr (8) za obě dvě
spony ven.
4 UV-trubky (9): Trubky (9) opatrně otáčejte
ve směru nebo proti směru hodinových ru-
čiček, dokud nejsou otvory objímky vidět
spoje. Vyndejte trubky (9) z upínacího ústrojí.
Držte trubky (9) jen za keramické konce a po-
užívejte při tom rukavice.
MONTÁŽ
1 UV-trubky (9): Umístěte je (9) opatrně do je-
jich objímek. S citem otáčejte trubkami (9) ve
směru nebo proti směru hodinových ručiček,
až spoje slyšitelně zaklapnou. Držte trubky
(9) jen za keramické konce a používejte při
tom rukavice.
2 Hlavní ltr (8): Hlavní ltr (8) nejprve na-
saďte na spodní okraj krytu a zmáčkněte ho
do krytu směrem dovnitř. Nápis „HEPA“ (bílá
strana ltru) musí být na vnější straně.
3 Předltr (7): Filtr (7) nasaďte a otáčejte zám-
ky v uvedeném směru (viz obr. 5), tak před-
ltr (7) upevníte.
4 Přední ochranný kryt (5): Nasaďte nejprve
spodní úchyty do otvorů krytu. Kryt upev-
níte (5) tak, že stisknete pravý a levý horní
roh, dokud kryt (5) slyšitelně nezaklapne.
Obr. 4: Demontáž
Obr. 5: Montáž

24
CZ
ODSTRANĚNÍ PROBLÉMŮ
Problém Důvod Řešení
Zařízení nepracuje. Zástrčka není pevně zasunutá
do zásuvky.
Přední ochranný kryt není
uzavřen.
V zásuvce není proud.
Zkontrolujte zástrčku.
Kryt uzavřete.
Zkontrolujte pojistky.
Zařízení nereaguje na
dálkové ovládání.
Baterie jsou slabé.
Baterie nemají kontakt.
Baterie vyměňte.
Zkontrolujte, jestli se baterie
dotýkají kontaktní pružiny.
Přístroj je v chodu, ale
nevypouští žádný vzduch.
Výstup nebo vstup vzduchu
blokují předměty, nebyla
odstraněna ochranná fólie.
Odstraňte předměty /
ochrannou fólii.
Kontaktujte zákaznické cen-
trum BIELMEIER, pokud daný
problém nezmizel.
Očekávaný efekt čištění
vzduchu se nedostavil.
Přístroj stojí ve špatně větrané
místnosti nebo je blokován
jinými předměty.
Filtry jsou znečištěné velkým
množstvím kouře a prachu.
Zkontrolujte, jestli může
vzduch volně cirkulovat
kolem přístroje.
Filtry vyčistěte, nebo vyměňte.
Ukazatel kvality vzduchu
ukazuje stále špatnou kvalitu
vzduchu a přístroj tak pracu-
je na vysoký výkon.
Senzory v přístroji jsou
znečištěné.
Vyčistěte vysavačem otvory
senzorů.
Pozor! Pokud byste měli s přístrojem problémy a výše uvedené návrhy řešení by je neodstranily,
obraťte se prosím na zákaznický servis BIELMEIER nebo svého prodejce.
Přístroj sami nerozebírejte a také ho sami neopravujte!
TECHNICKÉ ÚDAJE
Napájecí napětí: 220- 240 V ~ / 50 Hz
Příkon: 123 W
Průtok vzduchu (max.): 500 m³ / hod.
Spínací hodiny: 1 – 2 hodiny
Rozměry: (v x š x h): 555 x 445 x 210 mm
DBEJTE NA ŽIVOTNÍ PROSTŘEDÍ!
Obalový materiál a starý přístroj nevyhazujte, ale
dovezte k recyklaci.
Na příslušné recyklační místo nebo sběrný dvůr
se informujte na vašem obecním nebo městském
úřadě.
Other manuals for HEPA BHG 280
1
Table of contents
Languages:
Other BIELMEIER Air Cleaner manuals


