BIELMEIER BHG 558 User manual

D
5
WICHTIG!
Bitte lesen Sie diese Bedienungsanleitung auf-
merksam durch, sie enthält wichtige Hinweise für
die Sicherheit, den Gebrauch und die Wartung des
Gerätes.
Bewahren Sie die Bedienungsanleitung sorgfältig
auf und geben Sie diese gegebenenfalls an den
Nachbesitzer weiter.
SICHERHEITSHINWEISE
Gerät nur an Wechselstrom – mit Spannung
gemäß Typenschild – anschließen.
Nach Gebrauch, vor Reinigung oder bei even-
tuellen Störungen während des Betriebes den
Netzstecker ziehen. Fassen Sie den Netzstecker
nicht mit feuchten oder nassen Händen an.
Kinder erkennen nicht die Gefahr, die im Um-
gang mit einem elektrischen Gerät entstehen
kann; deshalb Kinder niemals unbeaufsichtigt
mit dem Gerät lassen.
Das Gerät nicht auf heißen Oberächen oder in
der Nähe von oenen Gasammen abstellen
und betreiben.
Das Gerät muss während des Betriebs frei ste-
hen und darf nicht abgedeckt werden, damit
Zu- und Abluft nicht behindert werden.
Schalten Sie das Gerät aus und ziehen Sie den
Netzstecker bevor Sie das Gerät reinigen oder
an einer anderen Stelle platzieren.
Schalten Sie den Luftbefeuchter nicht ein,
wenn kein Wasser im Tank ist.
Ziehen Sie den Netzstecker immer bei längerer
Abwesenheit und während eines Gewitters,
um Schäden durch Blitzschlag zu vermeiden.
Füllen Sie kein warmes oder heißes Wasser in
den Tank, das Gerät könnte dadurch beschä-
digt werden.
Entleeren Sie das Wasser aus dem Gerätesockel
und dem Tank bei Temperaturen unter 0° C, da
andernfalls das Wasser gefrieren könnte und
das Gerät Schaden nehmen könnte.
Den Gerätesockel mit der Zuleitung niemals in
Wasser tauchen.
Das Gerät nur in trockenen Räumen betreiben.
Bei oensichtlichen Schäden an Gerät oder
Zuleitung, oder wenn das Gerät ungewöhn-
liche Gerüche oder Geräusche erzeugt, das
Gerät vom Fachmann oder dem BIELMEIER-
Kundendienst überprüfen lassen.
Reparaturen an Elektrogeräten sind nur von
Fachkräften durchzuführen. Durch unsach-
gemäße Reparaturen können erhebliche Ge-
fahren für den Benutzer entstehen. Der Her-
steller haftet nicht für eventuelle Schäden, die
durch nicht bestimmungsgemäßen Gebrauch
oder falsche Bedienung verursacht werden.
REINIGUNG UND PFLEGE
Die Oberächen können zerkratzt werden. Ver-
wenden Sie keine Scheuermittel oder spitzen
Gegenstände beim Reinigen.
Reinigen Sie die Anzeige (3), den Tank (2) und
das Gehäuse (9) mit einem trockenen oder leicht
feuchten Tuch ohne Reinigungsmittel.
Die Anzeige (3) ist empndlich. Reinigen Sie die
An zeige nur mit einem weichen, feuchten Tuch.
REINIGUNG UND AUSTAUSCH
DES WASSERFILTERS
1
Der Wasserlter (7) im Tankdeckel (8) enthält
Nano
-
Silber
-
Keramikkugeln und einen Kalklter.
Achtung: Zerlegen Sie den Wasserlter (7) nicht,
sondern halten Sie sich an diese Anleitung.
2 Wasserqualität: Der Luftbefeuchter kann mit
Leitungswasser betrieben werden. Die Nano-
Silber-Keramikkugeln sterilisieren das Wasser.
Der Kalklter reduziert Ablagerungen im Gerät
und vermeidet zugleich, dass sich Kalk auf den
umliegenden Oberächen im Raum ablegt.
3 Der Wasserlter (7) soll alle ein bis zwei Monate
gereinigt werden. Eine regelmäßige Reinigung
des Wasserlters (7) ist für das Gerät besser.
So reinigen Sie den Filter (7):
Den Wassertank (2) abnehmen, den Deckel
(8) abschrauben und den Wasserlter (7)
herausschrauben.
Tauchen Sie den Wasserlter (7) in sauberes
Wasser. Entfernen Sie die Verunreinigungen
von der glatten Oberäche des Filters (7)
und waschen Sie den gesamten Filter (7).

6
D
Nun den Wasserlter (7) wieder im Deckel
(8) xieren und den Tank (2) aufsetzen.
Die Reinigung ist nun beendet.
4 Der Wasserlter (7) sollte alle 6 bis 12 Monate
erneuert werden.
So erneuern Sie den Filter (7):
Den Tank (2) abnehmen, den Deckel (8) ab-
schrauben und den Wasserlter (7) heraus-
schrauben.
Nun den neuen Wasserlter (7) im Deckel (8)
xieren und den Tank (2) aufsetzen.
Der Austausch ist nun beendet.
5 Bitte nehmen Sie den Wasserlter (7) heraus
und bewahren Sie ihn mit dem Gerät an einem
trockenen Ort auf, wenn der Luftbefeuchter
längere Zeit nicht in Betrieb ist.
PFLEGEEMPFEHLUNGEN
Benutzen Sie den Luftbefeuchter mit destil-
liertem Wasser, um Kalkablagerungen zu ver-
meiden.
Wechseln Sie das nicht verbrauchte Wasser
regelmäßig, um es vor Verunreinigungen zu
schützen.
Wenn der Luftbefeuchter längere Zeit nicht
benutzt wird, nehmen Sie den Wasserlter (7)
heraus (siehe „Reinigung und Austausch des
Wasserlters“), lassen Sie den Wassertank (2)
oen gut austrocknen und bewahren Sie das
Gerät an einem trockenen Ort auf.
Lassen Sie alle Teile des Luftbefeuchters trock-
nen bevor Sie ihn verpacken.
ANWENDUNG VON ZITRONENSÄURE
ODER ANDEREN ENTKALKUNGSMITTELN
Den Luftbefeuchter ausschalten und den Netz-
stecker (11) ziehen.
Wasser entfernen.
5 – 10 Tropfen Entkalker oder 1 – 2 g Zitronen-
säure in die Mulde im Gerätesockel (9) geben,
mit warmem Wasser auüllen (ca. 60° C), bis
das Wasser das weiße Ventil bedeckt.
Anschließend die Mulde im Gerätesockel (9)
mit klarem Wasser nachspülen.
INBETRIEBNAHME
1 Stellen Sie den Luftbefeuchter an einen geeig-
neten Platz und nehmen Sie den Tank (2) ab.
Entfernen Sie den Deckel (8) und befüllen Sie
den Tank (2) mit Wasser (Leitungswasser oder
destilliertes Wasser).
Empfehlung: Bei Verwendung von destil-
liertem Wasser bleibt Ihr Luftbefeuchter frei
von Kalkablagerungen.
2 Nun können Sie den Deckel (8) wieder auf den
Tank (2) geben. Entfernen Sie Wasserecken an
der Außenseite des Wassertanks (2) am besten
mit einem weichen Tuch.
Setzen Sie den Tank (2) wieder auf den Geräte-
sockel (9).
3 Stecken Sie den Netzstecker ein (220 – 240 V /
50 Hz) und drücken Sie den Netzschalter (10),
es ertönt ein Piepton. Der Luftbefeuchter be-
ndet sich nun im Stand-by-Modus. Die Stand-
by-Anzeige (16) schaltet sich ein.
4 Drücken Sie die EIN / AUS-Taste (21), die Stand-
by-Anzeige (16) erlischt und die Nebeleinstel-
lung S2 (rot + orange) wird angezeigt (18).
Der Luftbefeuchter bendet sich im Dauerbe-
trieb (AUTO-Anzeige (12) leuchtet nicht) und
gibt somit unentwegt Sprühnebel der Stärke2
von sich.
Die aktuelle relative Luftfeuchtigkeit der Um-
gebung wird in der Luftfeuchtigkeitsanzeige
(13) dar gestellt.
5 Durch Drücken der Nebel-Taste (20) stellen Sie
die Stärke des Sprühnebels (18) ein.
Es gibt vier Stufen um die Dichte des erzeugten
Nebels einzustellen:
S1 – S2 – S3 – S4 (rot – orange – blau – grün).
Auf der Anzeige (18) sehen Sie die gerade ein-
gestellte Dichte des Sprühnebels.
6 Im automatisch gesteuerten Betrieb (12), wird
eine bestimmte Luftfeuchtigkeit im Raum an-
gestrebt.
Um diesen Betrieb zu aktivieren, drücken Sie
die Luftfeuchtigkeits-Taste (19) – AUTO (12)
leuchtet auf und in der Luftfeuchtigkeitsan-
zeige (13) erscheint 40 %.

Abb. 1:
Anzeige (3) und Bedienelement (4) im Detail
12 Anzeige bei automatisch
gesteuertem Betrieb
13 Anzeige der relativen Luftfeuchte
(in %)
14 Wassertank leer
15 Betriebsanzeige
16 Stand-by-Anzeige
17 Anzeige der Betriebsdauer
(in Stunden)
18 Anzeige der Nebeldichte:
Stufe 1 = S1 (rot)
Stufe 2 = S2 (rot + orange)
Stufe 3 = S3 (rot + orange + blau)
Stufe 4 = S4 (rot + orange + blau + grün)
19 Einstellung der Luftfeuchtigkeit
20 Einstellung der Nebeldichte
21 EIN / AUS-Taste
22 Einstellung der Betriebsdauer
S1 S2 S3 S4
12
13
14
15
16
17
18
19
20
21
22
D
7
Die Auswahl der relativen Feuchte der Raum-
luft ist von 40 % – 70 % RF möglich. Wenn Sie
die Einstelltaste (19) kurz drücken, erhöht sich
die gewählte Luftfeuchte um 1 %. Wenn Sie die
Einstelltaste längere Zeit drücken, erhöht sich
die gewählte Luftfeuchte um 5 %.
Nach dem Einstellen schaltet die Luftfeuchtig-
keitsanzeige (12) alle 5 Sekunden zwischen
eingestellter und aktueller Luftfeuchtigkeit
hin und her.
Das Gerät schaltet automatisch ab, wenn die
Luftfeuchte im Raum dem am Luftbefeuchter
eingestellten Wert entspricht. Die Luftbefeuch-
tung startet wieder, sobald die Luftfeuchte im
Raum wieder absinkt.
7 Die Betriebsdauer ist von 1 – 12 Stunden ein-
stellbar. Drücken Sie hierzu die Dauer-Taste
(22). Per Knopfdruck wird eine Stunde einge-
stellt. Nach dem Ende des Einstellvorganges
beginnt die Zeit zu laufen.
Der Luftbefeuchter schaltet sich automatisch
ab, wenn die eingestellte Zeit abgelaufen ist.
8 Wenn zu wenig Wasser im Tank ist, wird kein
Sprühnebel mehr produziert, ein Piepton ist zu
hören und die Wasserstandsanzeige (14) leuch-
tet auf. Bitte schalten Sie den Luftbefeuchter
aus und füllen Sie Wasser in den Tank (2) (siehe
Punkt 1 und 2).
Wird kein Wasser zugeführt, schaltet sich das
Gerät nach 1 Minute automatisch von selbst
aus.
RICHTWERTE FÜR RELATIVE LUFTFEUCHTE
IN RÄUMEN JE NACH NUTZUNGSART
geschlossene Räume
bei 20°C
rel. Luftfeuchte
(in %)
Wohn- / Arbeitszimmer
im Sommer
35 – 50
Wohn- / Arbeitszimmer
im Winter
50 – 70
Büroräume 40 – 60
Achtung: Die angegebenen Werte für die Luft-
feuchtigkeit in dieser Bedienungsanleitung sind
nur Richtwerte.

8
D
PROBLEMBEHEBUNG
Problem Grund Lösung
Stand-by-Anzeige
ist außer Betrieb,
keine Funktion.
Gerät ist nicht eingeschaltet. Schalten Sie das Gerät ein.
Kein Strom in der Steckdose. Überprüfen Sie die Sicherung.
Wasserstandsanzeige
leuchtet,
keine Befeuchtung.
Wassermangel. Wasser in den Tank füllen.
Sprühnebel mit
sonderlichem oder
störendem Geruch.
Neues Gerät. Önen Sie den Tank und
spülen Sie mit klarem Wasser.
Schmutziges Wasser. Reinigen Sie den Tank und
füllen Sie frisches Wasser ein.
Sprühnebelerzeugung
abnormal.
Das Gerät ist verschmutzt,
das Wasser ist verschmutzt
oder ist zu lange im Tank.
Das Gerät reinigen, den Tank
reinigen und frisches Wasser
einfüllen.
Zu viel Wasser in der
Sockelmulde.
Leeren Sie die Sockelmulde
und setzen Sie den Tank
sorgfältig auf.
Abnormales Geräusch. Hohlraum zwischen Gerät
und Untergrund.
Platzieren Sie das Gerät auf
einem stabilen Untergrund.
Wasser aus dem Tank
wird nicht genutzt.
Der Tankdeckel ist
verschmutzt.
Reinigen Sie den Tankdeckel
und das Ventil im Deckel.
Tank sitzt nicht richtig auf
dem Gerätesockel.
Setzen Sie den Tank sorgfältig
noch einmal auf.
Achtung! Sollten Sie ein Problem mit dem Gerät haben und der angegebene Lösungsvorschlag da-
zu nicht funktionieren, wenden Sie sich bitte an die BIELMEIER Hausgeräte GmbH oder den Verkäufer
des Geräts. Zerlegen Sie das Gerät nie selbst. Reparieren Sie das Gerät auch nie selbst.
TECHNISCHE ANGABEN
Stromquelle / Anschlusswert:
220 – 240 V ~ (50 Hz) / 30 W
Max. Volumen
des Wassertanks: 5 Liter
Nebelausstoß: ab 260 ml pro Stunde
Laufgeräusch: < 35 dB
DER UMWELT ZULIEBE BITTE BEACHTEN
Verpackungsmaterial und ausgediente Geräte
nicht einfach wegwerfen, sondern der Wieder-
verwertung zuführen.
Den zuständigen Recyclinghof bzw. die nächste
Sammelstelle erfragen Sie bitte bei Ihrer Kommu-
nalverwaltung.

D
9
GARANTIE
Für die am Verkaufstag beginnende Garantie gelten innerhalb der Bundesrepublik Deutschland,
Österreichs und der Schweiz folgende Bestimmungen:
1. Garantiedauer: 2 Jahre
2. Garantieleistungen:
a) Nach unserer Wahl Reparatur oder Austausch
von Teilen, die nach unserer Überprüfung
Material- oder Fertigungsfehler aufweisen.
b) Die Garantie wird nur bei Vorzeigen dieser
Garantiekarte und der Verkaufsrechnung
geleistet. Die Karte ist nur gültig, wenn
sie am Verkaufstag vollständig ausgefüllt
wurde.
c) Die Garantieleistung gilt nur gegenüber dem
Erstverbraucher.
d) Durch die Reparatur oder den Austausch von
Teilen innerhalb der Garantiedauer wird die
ursprüngliche Garantiezeit weder verlängert
noch erneuert.
e) Transportkosten gehen zu Lasten des Käufers
(gilt nicht für die ersten 6 Monate der Garantie-
zeit).
f) Sofern der Schaden oder Mangel nicht be-
sei tigt werden kann oder die Nachbesserung
von uns abgelehnt oder unzumutbar verzö-
gert wird, wird innerhalb von 6 Monaten ab
Kauf- / Lieferdatum auf Wunsch des Endab-
nehmers entweder kostenfrei Ersatz geliefert
oder der Minderwert vergütet oder das Gerät
gegen Erstattung des Kaufpreises, jedoch
nicht über den marktüblichen Preis hinaus,
zurückgenommen.
3. Die Garantie gilt nicht:
für Kratzer und Flecken am Gerät.
für Beleuchtungs- und Kontrolllampen.
für leicht zerbrechliche Teile aus Bakelit, Glas,
Plastik und so weiter, es sei denn, es handelt
sich um Materialfehler, die von uns als solche
anerkannt werden.
für Beschädigungen, die durch falsche Installa-
tion oder Befestigung verursacht wurden.
wenn das Gerät an ein Stromnetz mit höherer
Spannung, als auf dem Gerät angegeben, an-
geschlossen wird.
bei falscher oder unsachgemäßer Bedienung.
bei mangelnder Sorgfalt.
bei ungenügender oder falscher Wartung.
bei Fallenlassen des Gerätes oder einzelner
Teile.
bei unsachgemäßem Transport oder unsach-
gemäßer Verpackung für den Transport.
4. Die Garantie erlischt:
wenn das Gerät für andere als für Haushalts-
zwecke eingesetzt wird.
wenn Personen, die nicht von unserer Firma
dazu ermächtigt sind, Reparaturen oder Än-
derungen durchführen.
Stempel und Unterschrift des Verkäufers Verkaufsdatum
Wichtig! Bitte notieren Sie hier den auf
dem Typenschild am Gerät befindlichen
FD-Code:
Modell:
Für dieses Gerät leisten wir 2 Jahre Garantie für Mängel, die auf Fertigungs- oder Materialfehler
zurückzuführen sind. Die Garantiezeit beginnt mit dem Tag der Übergabe und wird nur bei Vorlage
der Garantiekarte und der Verkaufsrechnung gewährt. Weitergehende Ansprüche bestehen nicht.

10
D
Notizen:

11
GB
IMPORTANT!
Please read these instructions for use carefully as
they contain important information about safety
as well as for usage and maintenance of the ap-
pliance.
Keep the instructions for use in a safe place and
pass them on to any new owner of the appliance.
SAFETY INFORMATION
Only connect this appliance to an AC power
outlet (voltage acc. to rating plate).
After usage, unplug the appliance from the
mains before cleaning or if any fault occurs
during operation. Do not touch the power plug
with damp or wet hands.
Children are unaware of the risks associated
with electrical equipment. For this reason never
leave a child alone and unsupervised with the
appliance.
Do not set down/operate the appliance on a
hot surface or near a naked gas ame.
During operation the appliance must stand
well away from other objects. Do not cover or
otherwise hinder the free ow of air.
Switch the appliance o and remove the power
plug before cleaning or moving to another lo-
cation.
Do not switch the air humidier on when there
is no water in the tank.
Always remove the power plug before any
lengthy absence or during thunderstorms to
prevent any damage being caused by light-
ning.
Do not add warm or hot water to the tank as
this might damage the appliance.
Drain the water from the base of the appliance
and the tank if the temperature falls below 0° C
as otherwise the water might freeze and dam-
age the appliance.
Never immerse the appliance base with the
mains cable in water.
Only use the appliance in dry rooms.
If the appliance or mains cable are visibly dam-
aged, please have your appliance checked by
a technician or BIELMEIER customer service.
This also applies if the appliance is making un-
usual noises or giving o a strange odour.
Repairs to electrical appliances should only
be carried out by appropriately qualied pro-
fessionals. Unauthorised repairs may result in
signicant safety risks to the user. The manufac-
turer accepts no liability for any damage caused
by improper usage or incorrect operation.
CLEANING AND CARE OF APPLIANCE
Surfaces may scratch, so do not use scouring
agents or sharp objects when cleaning.
Clean the display (3), the tank (2) and the housing
(9) with a dry or slightly damp cloth without using
any cleaning products.
The display (3) is easily damaged. Only clean the
display with a soft, damp cloth.
CLEANING AND REPLACEMENT
OF WATER FILTER
1 The water lter (7) in the lid of the tank (8) con-
tains nano-silver ceramic balls and a scale lter.
Caution: Do not take apart the water lter (7)
but observe these instructions.
2 Water quality: The air humidier can be oper-
ated with tap water. The nano-silver ceramic
balls sterilise the water for atomisation. Scale
lter reduces precipitation in the appliance.
Furthermore it avoids, that chalk is layed down
on surrounding surfaces in the room.
3 The water lter (7) should be cleaned every
1 – 2 months. It is better for the appliance if the
water lter (7) is cleaned regularly.
How to clean the lter (7):
Remove the water tank (2), unscrew the
lid (8) and remove the water lter (7).
Immerse the water lter (7) in clean water.
Remove soiling from the smooth surface of
the lter and wash the entire lter.

12
GB
Now secure the water lter (7) back in the
lid(8) and put the tank (2) back in place
again.
This completes the cleaning process.
4 The water lter (7) should be replaced every
6 – 12 month.
How to replace the lter (7):
Remove the tank (2), unscrew the lid (8) and
remove the water lter (7).
Now secure the new water lter (7) in the
lid(8) and put the tank (2) back in place
again.
This completes replacement.
5 Please remove the water lter (7) and store in a
dry place with the appliance if the air humidier
is not going to be used for a lengthy period of
time.
CARE RECOMMENDATIONS
Operate the air humidier with distilled water
to prevent limescale.
Replace any unused water regularly to protect
it from contamination.
If the air humidier is not going to be used for
a lengthy period of time, remove the water
lter (7) (see “Cleaning and replacement of
water lter”). Leave the water tank (2) uncov-
ered to dry thoroughly and store the appliance
in a dry place.
Allow all parts of the air humidier to dry before
packing it away.
USE OF CITRIC ACID OR OTHER DESCALERS
Switch o the air humidier and remove the
power plug (11).
Drain o the water.
Add 5 –10 drops of descaler or 1 – 2 g of citric
acid to the recess in the appliance base (9) and
ll up with warm water (approx. 60° C) until
the water covers the white valve.
Then rinse out the recess in the appliance base
(9) with clean water.
USING THE APPLIANCE
FOR THE FIRST TIME
1 Position the air humidier at a suitable loca-
tion and remove the tank (2).
Remove the lid (8) and ll the tank (2) with
water (tap water or distilled water).
Recommendation: The use of distilled wa-
ter in the BHG 558 air humidier will prevent
limescale.
2 Now put the lid (8) back on the tank (2). Wipe
o any splashes of water on the outside of the
water tank (2) preferably using a soft cloth.
Place the tank (2) back on the appliance base
(9).
3 Insert the power plug (220 – 240 V / 50 Hz) and
press the power switch (10). You will hear a
beep. The air humidier is now in Stand-by
mode. The Stand-by indicator (16) switches
on.
4 Press the “EIN / AUS” (on/o) button (21). The
Standby indicator (16) is extinguished, and the
mist setting S2 (red + orange) is displayed (18).
The air humidier is now in Continuous mode
(AUTO indicator (12) not lit up) and continu-
ously emits an atomised spray at level2.
The current relative air humidity in the envi-
ronment is displayed on the humidity indi-
cator (13).
5 Press the “Nebel“ (mist) button (20) to adjust
the level of the atomised spray (18).
There are four levels for selecting the density
of the mist produced:
S1 – S2 – S3 – S4
(red – orange – blue – green).
The indicator (18) displays the density of the
atomised spray just selected.
6 Automatic mode (12) aims to attain a specic
humidity level in the room.
To activate this mode, press the Humidity but-
ton (19) . AUTO (12) lights up, and the humidity
indicator (13) reads 40 %.
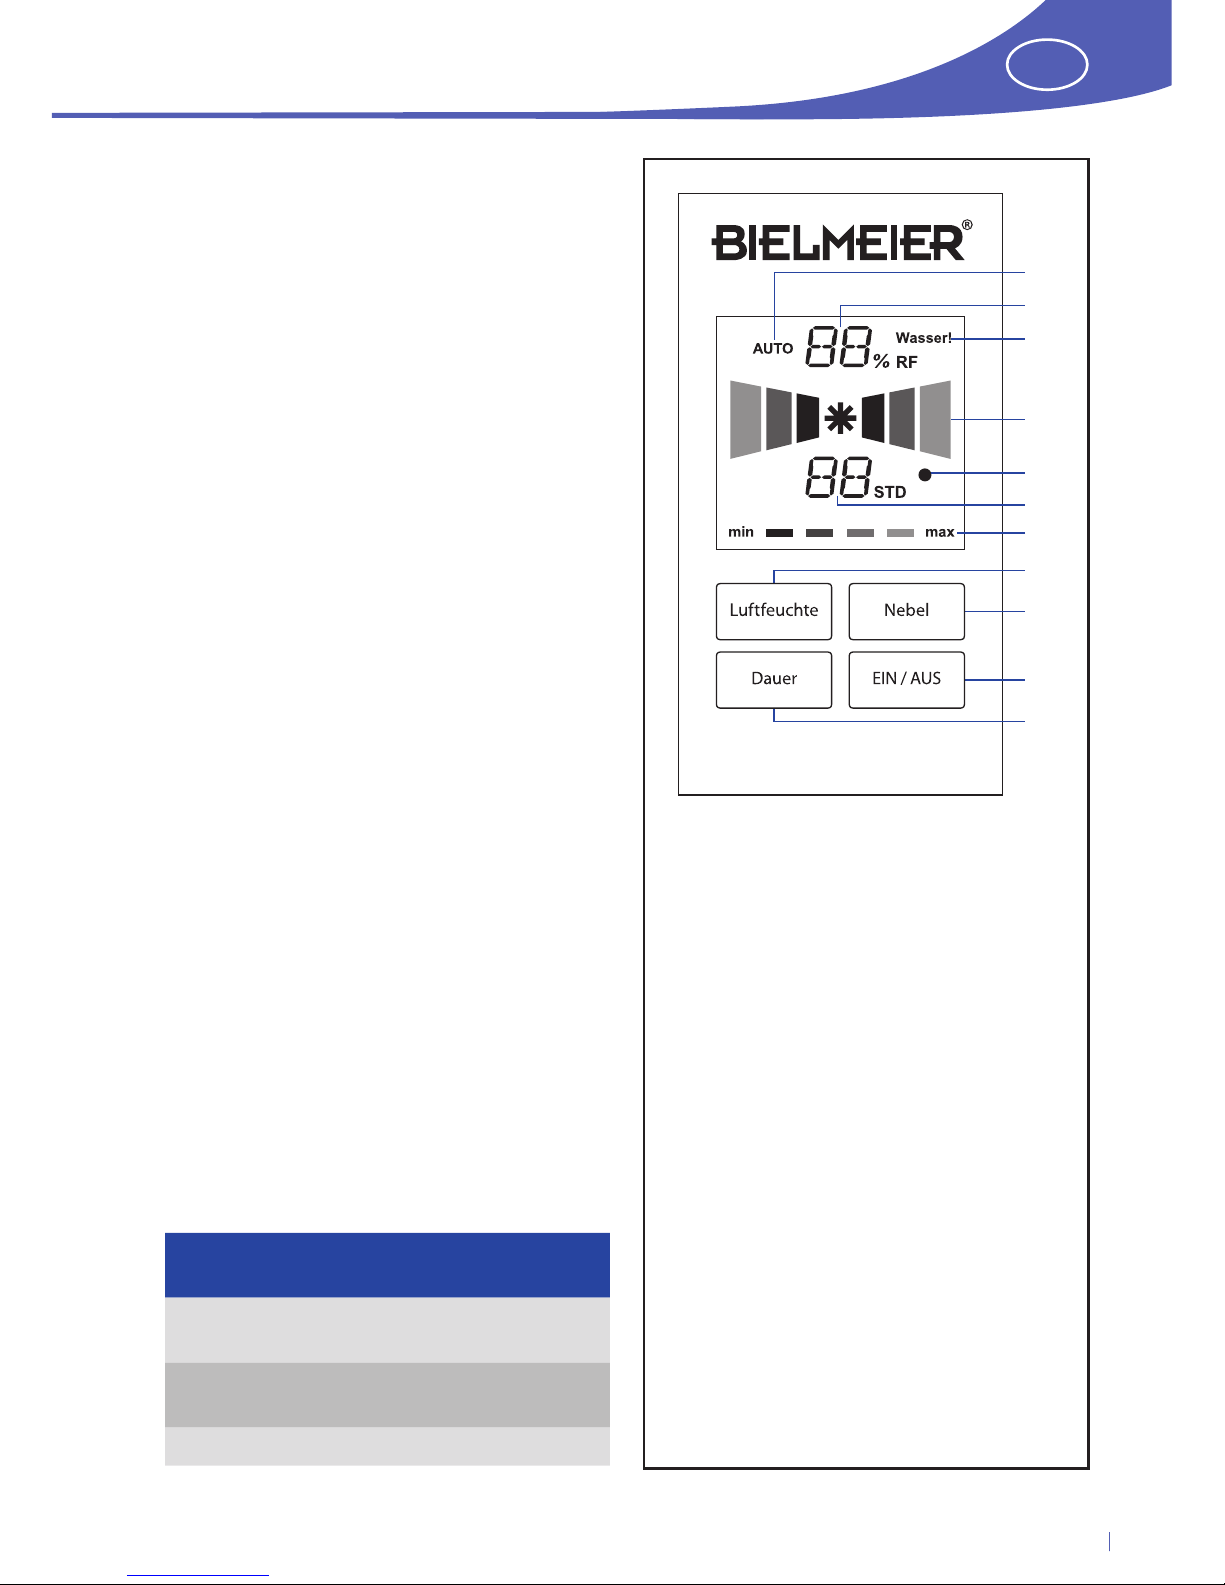
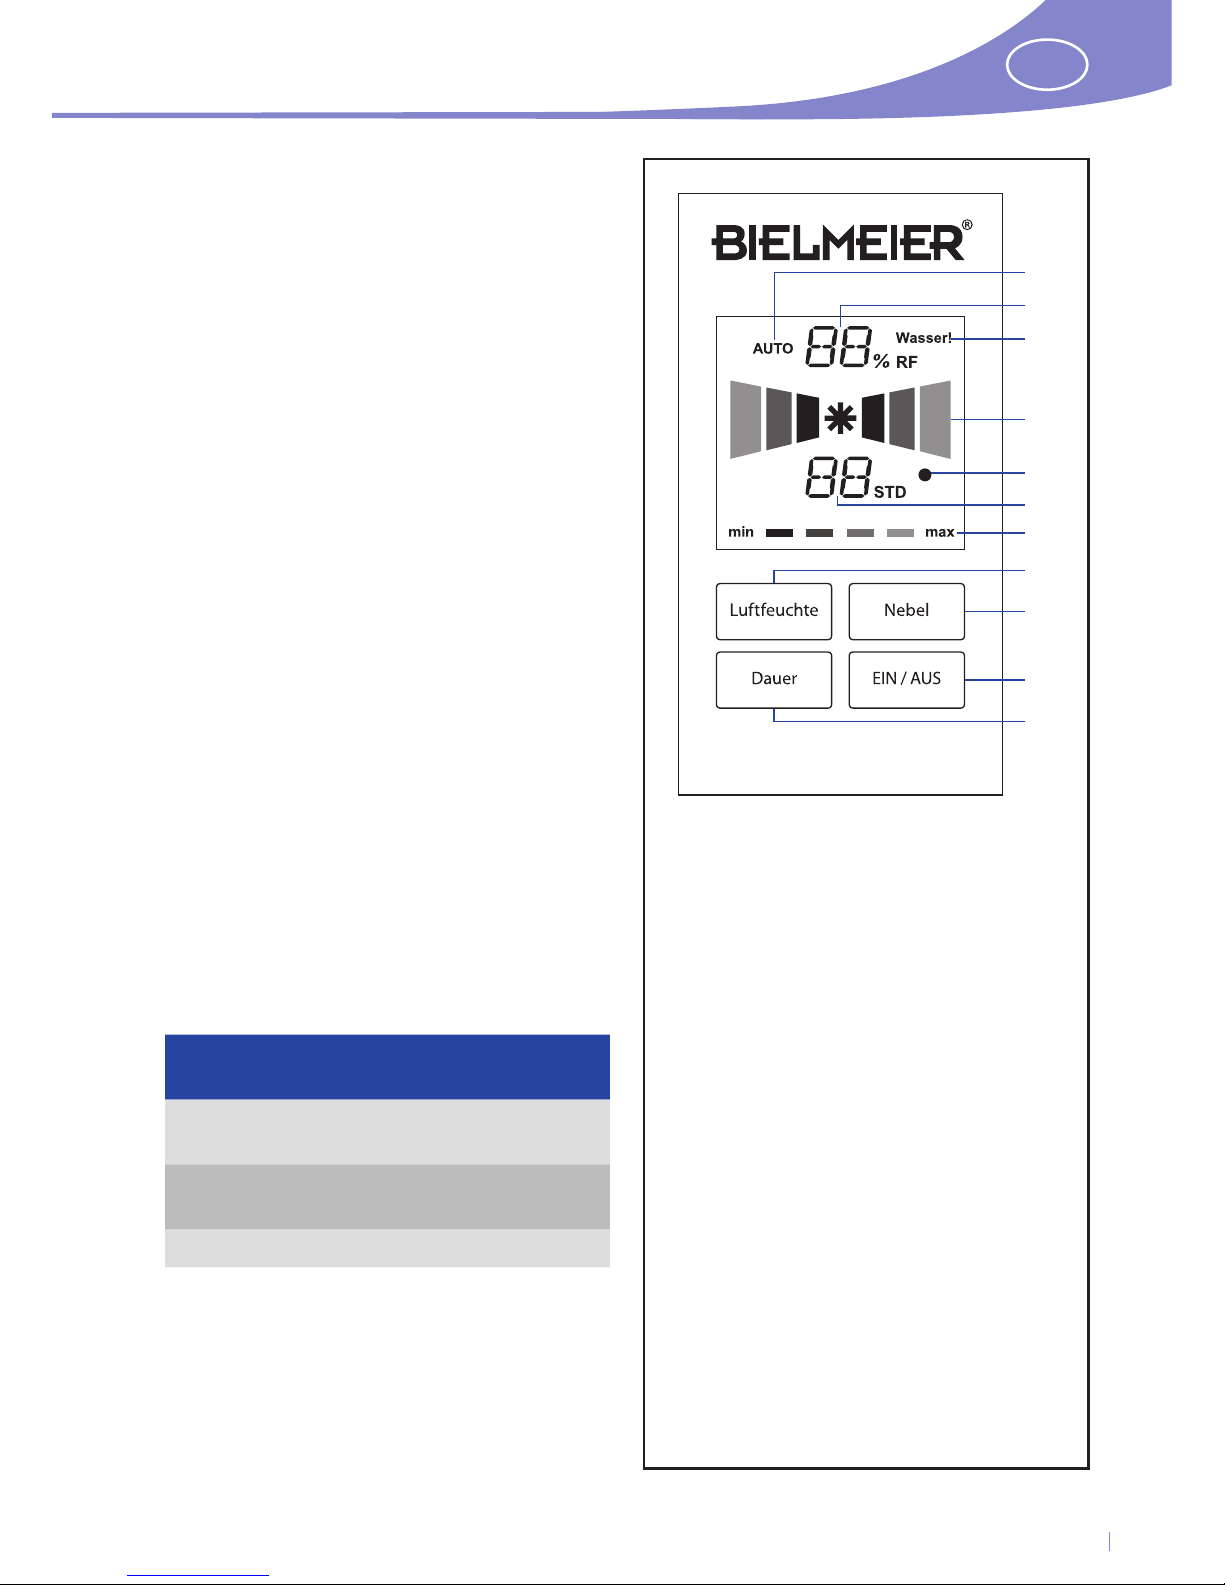
Fig. 1:
Display (3) and operator panel (4) in detail
12 Display of automatic mode
13 Display of relative humidity
(in %)
14 Water tank empty
15 Operation indicator
16 Stand-by indicator
17 Display of operating time
(in hours)
18 Display of mist density:
Level 1 = S1 (red)
Level 2 = S2 (red + orange)
Level 3 = S3 (red + orange + blue)
Level 4 = S4 (red + orange + blue + green)
19 Selection of humidity level
20 Selection of mist density
21 On / o button
22 Selection of operating time
S1 S2 S3 S4
12
13
14
15
16
17
18
19
20
21
22
13
GB
It is possible to select a relative humidity level
of 40 % – 70 % RF (relative humidity) for the
room air. Every time you tap on the selection
button (19), the humidity level selected will in-
crease by 1 %. If you press the selection button
slightly longer, the humidity level selected will
increase by 5 %.
After selection the humidity indicator
(13)
switches between the current / selected humi-
dity level every 5 seconds.
The appliance switches o automatically when
the humidity level in the room reaches the val-
ue set on the air humidier. Humidication will
restart as soon as the humidity level falls again
in the room.
7 The operating time can be set from 1 – 12
hours. To do so press the “Dauer” (duration)
button (22). Each press of the button will add
an hour. The running time will start as soon as
selection ends.
The air humidier switches o automatically
when the selected time expires.
8 If there is too little water in the tank, no spray
will be produced. You will hear a beep, and
the water level indicator (14) lights up. Please
switch the air humidier o and ll up the tank
with water (2) (see items 1 and 2).
If no water is added, the appliance will switch
o automatically after 1 minute.
GUIDE VALUES FOR RELATIVE HUMIDITY
LEVELS IN ROOMS DEPENDING ON THEIR
FUNCTION
Closed rooms
at 20°C
Rel. humidity
(in %)
Living / work room
in summer
35 – 50
Living / work room
in winter
50 – 70
Oces 40 – 60
Caution: The humidity levels specied in these
instructions for use are only guide values.

14
GB
TROUBLESHOOTING
Problem Reason Solution
Stand-by indicator is not lit
up, no function.
Appliance is not switched on. Switch on appliance.
No power supply from socket. Check fuse.
Water level indicator lit up,
no humidication.
Not enough water. Add water to tank.
Strange or unpleasant
odour to atomised spray.
New appliance. Open tank and rinse with clean
water.
Dirty water. Clean tank and
ll up with fresh water.
Abnormal atomisation of
mist.
The appliance is dirty, the water
is either dirty or has been in the
tank too long.
Clean appliance, clean tank and
ll up with fresh water.
Too much water in recess
of base.
Remove water from recess and
carefully set up tank again.
Strange noises. Gap between appliance and sup-
porting surface.
Place appliance on a stable
surface.
Water is not used from
tank.
Lid of tank is dirty. Clean lid of tank and valve in lid.
Tank is not securely positioned
on appliance base.
Carefully reposition tank again.
Caution! If you have a problem with the appliance and the solutions suggested here do not work, please
contact BIELMEIER Hausgeräte GmbH or the vendor of the appliance. Never take the appliance apart
yourself. Never repair the appliance yourself.
TECHNICAL DETAILS
Power source / Connected load:
220 – 240 V ~ (50 Hz) / 30 W
Max. volume of water tank: 5 litres
Spray output: from 260 ml per hour
Noise level: < 35 dB
CARING FOR THE ENVIRONMENT
Do not simply throw away packaging and disused
appliances. These can be recycled.
Contact your local authority for details of the rel-
evant recycling centre or the nearest collection
point.

15
GB
GUARANTEE
For the warranty, which begins as of the date of sale of the product, the following conditions
shall apply in Great Britain:
A 2-years warranty is provided for damage caused by defects in material or workmanship. The
warranty period shall begin on the hand-over day and warranty is only granted on presenta-
tion of the warranty card and the purchase receipt. No further claims shall be granted.
1. Warranty period: 2 years
2. Conditions of warranty:
a) Parts, which exhibit defects in material and / or
workmanship after our inspection, will either
be repaired or replaced according to our de-
cision.
b) Warranty is only provided on presentation of
this warranty card and purchase receipt. This
warranty is only valid if it is lled out on date
of sale and in a complete and appropriate
manner.
c) This warranty is only valid for the rst owner
of the device.
d) No change or repair of parts performed within
the warranty period shall provide grounds for
any extension of the original warranty period.
e) Any transportation costs shall be borne by the
purchaser (this shall not apply during the rst
6 months of the warranty).
f) If the damage or defect cannot be eliminated
or if we refuse to repair the defect or in the
event of a delay in our repairing of the device,
then within the rst 6 months after purchase / -
delivery of the device, and according to the
wish of the end user, the device will be replaced
free of charge or its value will be reimbursed
or the device will be taken back with a refund
of the original purchase price which shall not
exceed the usual market price.
3. The warranty shall not apply to:
spots and scratches on the device.
control lamps and lights.
easily breakable parts (e. g. bakelite, plastic ,
glass), even in case of defects in material
recognized by us.
damage due to improper installation or im-
proper xing.
damage caused by an unsuitable voltage
supply or an unsuitable electricity network.
improper or inappropriate use of the equip-
ment.
unsatisfactory care.
damage caused by incompetent or insucient
maintenance.
damage caused by dropping the equipment or
part thereof.
improper transportation or inappropriate
packaging during the transportation.
4. The warranty shall be deemed void:
in case of use or application of the device other
than its intended use for household purposes.
in case of any servicing or repairing of the device
performed by third parties that have not been
authorized for such purpose by our company.
Stamp and signature of salesperson Date of sale
Important! Please write down the FD-code
located on the rating plate here:
Model:

16
GB
Notes:

17
CZ
DŮLEŽITÉ !
Tento návod k obsluze si prosím pečlivě přečtěte,
obsahuje mnoho důležitých upozornění, která se
týkají bezpečnosti, použití a údržby přístroje.
Pečlivě jej uschovejte, případně jej předejte další-
mu vlastníkovi.
BEZPEČNOSTNÍ POKYNY
Přístroj připojte ke střídavému proudu – s na-
pětím podle typového štítku na přístroji.
Zástrčku vytáhněte – po ukončení používá-
ní, před čištěním nebo při případných poru-
chách během provozu. Zástrčky se v žádném
případě nedotýkejte mokrýma nebo vlhkýma
rukama.
Děti nerozpoznají nebezpečí, které jim hrozí při
manipulaci s přístrojem, proto je nikdy nene-
chávejte v blízkosti přístroje bez dozoru.
Přístroj nikdy nenechávejte stát na horkém
povrchu nebo v blízkosti otevřeného ohně
(plynových hořáků). To samé platí i pro jeho
provoz.
Během provozu musí přístroj stát ve volném
prostoru, nesmí být ničím přikrytý, aby přívod
a odvod vzduchu zůstal volný.
Pokud chcete přístroj čistit nebo přemístit na
jiné místo, vypněte ho a vytáhněte ze zásuvky.
Přístroj nezapínejte, jestliže v něm není žádná
voda.
Při delší nepřítomnosti a během bouřky přístroj
vždy vypínejte, aby nedošlo ke škodám způ-
sobeným úderem blesku.
Do nádrže nepřidávejte teplou nebo horkou
vodu, přístroj by se tím mohl poškodit.
Při teplotách pod 0°C vždy vyprázdněte nádrž
i podstavec přístroje, v opačném případě by
voda mohla zmrznout a přístroj by se tak mohl
poškodit.
Nikdy neponořujte do vody podstavec a ani
přívodní kabel.
Přístroj uvádějte do chodu pouze v suchých
místnostech.
Když je přístroj viditelně poškozen nebo když
vydává neobvyklé zvuky nebo pachy, nechte
jej překontrolovat u odborníka, nebo kon-
taktujte zákaznickou linku BIELMEIER.
Opravy elektropřístrojů smí být prováděny
pouze odborníky. Neodbornými opravami
mohou vzniknout spotřebiteli značné škody.
Výrobce neručí za případné škody, které jsou
způsobeny chybnou obsluhou, nebo chyb-
ným používáním.
ÚDRŽBA A PÉČE
Povrchové plochy se mohou poškrábat. Nepou-
žívejte proto při čištění žádné špičaté předměty
nebo abrazivní látky.
LCD-displej (3), nádrž (2) a kryt (9) přístroje čistěte
suchým, nebo vlhkým hadrem bez přidání čisticího
prostředku.
LCD-displej je citlivý. Otírejte jej pouze vlhkým
měkkým hadrem.
ČIŠTĚNÍ A VÝMĚNA VODNÍHO FILTRU
1 Vodní ltr (7) ve víku nádrže (8) obsahuje na-
nočástice stříbra a jeden ltr na odstranění
vodního kamene.
Pozor: Nerozebírejte ho (7), ale dodržujte po-
kyny v tomto návodu.
2 Kvalita vody: Zvlhčovač vzduchu může pou-
žívat vodu z vodovodu. Nanočástice stříbra
sterilizují vodu. Filtr na vodní kámen redukuje
usazeniny v přístroji a zároveň zamezuje usazo-
vání vodního kamene v okolí.
3 Vodní ltr (7) musíte čistit každý měsíc (nebo
jednou za dva měsíce). Pro přístroj je lepší,
když se vodní ltr (7) čistí pravidelně.
Čištění ltru (7) – postup:
Vytáhněte nádrž (2), odšroubujte víko (8) a
vyšroubujte vodní ltr (7).
Vodní ltr (7) ponořte do čisté vody.
Odstraňte nečistoty z hladké povrchové
plochy ltru a celý ho umyjte.

18
CZ
Pak už jen znovu upevněte vodní ltr (7) do
víka (8) a nádrž (2) nasaďte.
4 Vodní ltr byste měli vyměnit jednou za 6 až 12
měsíců.
Výměna ltru (7) – postup:
Vytáhněte nádrž (2), odšroubujte víko (8) a
vyšroubujte vodní ltr (7).
Pak už jen znovu upevněte vodní ltr (7) do
víka (8) a nádrž (2) nasaďte.
Výměna je hotová.
5 Pokud není přístroj delší dobu v provozu, vyn-
dejte vodní ltr (7) a spolu s přístrojem ho ulož-
te na suchém místě.
ÚDRŽBA DOPORUČENÍ
Do zvlhčovače vzduchu používejte destilova-
nou vodu, abyste zabránili usazování vodního
kamene.
Zbytkovou vodu vyměňujte pravidelně, aby se
zabránilo znečištění.
Pokud zvlhčovač nepoužíváte delší dobu,
vyndejte vodní ltr (7) (viz. „Čištění a výměna
vodního ltru“), otevřenou nádrž (2) nechte
vyschnout a přístroj uložte na suché místo.
Před uložením a zabalením přístroje nechte
všechny jeho části důkladně vyschnout.
POUŽITÍ KYSELINY CITRONOVÉ NEBO JINÝCH
ODVÁPŇOVACÍCH PROSTŘEDKŮ
Přístroj vypněte a zástrčku (11) vytáhněte ze
zásuvky.
Vodu vylijte.
Do otvoru v podstavci (9) dejte 5 – 10 kapek
odvápňovače nebo 1
– 2 g kyseliny citronové,
naplňte teplou vodou (ca. 60°C), až voda za-
kryje bílý ventil.
Potom opláchněte otvor v podstavci (9) čistou
vodou.
PRVNÍ UVEDENÍ DO PROVOZU
1 Postavte zvlhčovač na vhodné místo a vyndejte
nádrž (2).
Sundejte víko (8) a naplňte ji (2) vodou (voda
zvodovodu nebo destilovaná voda).
Doporučení: Při použití destilované vody ne-
zůstanou ve vašem zvlhčovači vápenaté usaze-
niny.
2 Nyní už můžete nádrž (2) zase zakrýt víkem (8).
Měkkým hadrem odstraňte skvrny od vody na
vnější straně nádrže (2).
Nádrž (2) nasaďte zpátky na podstavec pří-
stroje (9).
3 Zástrčku dejte do zásuvky (220 – 240 V / 50 Hz)
a stiskněte síťový spínač (10), zazní zvukový
signál. Zvlhčovač se nyní nachází v pohoto-
vostním režimu. Ukazatel pohotovostního
režimu (16) se zapne.
4 Stiskněte tlačítko EIN/AUS (21), ukazatel po-
hotovostního režimu (16) zhasne a ukáže se
nastavení mlhoviny S2 (červené + oranžové)
(18).
Přístroj se nachází v nepřetržitém provozu
(ukazatel AUTO (12) nesvítí) a vydává mlhu
síly2.
Aktuální relativní vlhkost vzduchu okolí je
zobrazena ukazatelem vlhkosti (13).
5 Stisknutím tlačítka NEBEL (20) nastavíte sílu
mlhy (18).
Čtyři stupně, pomocí nichž nastavíte sílu mlhy
(18):
S1 – S2 – S3 – S4
(červený – oranžový – modrý – zelený)
Nastavenou sílu uvidíte na ukazateli (18).
6 V automaticky řízeném provozu (12) je vždy do-
sažena stanovená vlhkost vzduchu v místnosti.
K aktivaci tohoto provozu stiskněte tlačítko vlh-
kosti (19) – rozsvítí se AUTO (12) a na ukazateli
vlhkosti (13) se ukáže 40 %.
Výběr relativní vlhkosti vzduchu v místnosti
je možný v rozmezí 40 % – 70 % . Když krátce
Obr. 1:
Ukazatel (3) a ovládací pole (4) – detailně
12 ukazatel při automaticky
řízeném provozu
13 ukazatel relativní vlhkosti vzduchu (v %)
14 nádrž na vodu – prázdná
15 ukazatel provozu
16 ukazatel pohotovostního režimu
(stand-by)
17 ukazatel doby provozu (v hodinách)
18 ukazatel hustoty mlhy:
stupeň 1 = S1 (červený)
stupeň 2 = S2 (červený + oranžový)
stupeň 3 = S3 (červený + oranžový
+ modrý)
stupeň 4 = S4 (červený + oranžový
+ modrý + zelený)
19 nastavení vlhkosti vzduchu
20 nastavení hustoty mlhy
21 vypnutí / zapnutí přístroje
22 nastavení doby provozu
S1 S2 S3 S4
12
13
14
15
16
17
18
19
20
21
22
19
CZ
stisknete tlačítko nastavení (19), zvýší se zvo-
lená vlhkost vzduchu o 1 %. Když tlačítko po-
držíte déle, zvýší se zvolená vlhkost vzduchu
o 5 %.
Po nastavení přepíná ukazatel vlhkosti vzdu-
chu (12) každých pět sekund mezi nastavenou
a aktuální vlhkostí.
Přístroj se automaticky vypíná, když vlhkost
vzduchu v místnosti odpovídá nastavené
hodnotě na zvlhčovači. Ten se opět zapne, jak-
mile vlhkost vzduchu v místnosti klesne.
7 Délku provozu je možné nastavit na dobu
1 – 12 hodin. K tomu stiskněte tlačítko DAUER
(22). Stisknutím tlačítka se nastaví jedna hodi-
na. Po dokončení nastavení začíná běžet čas.
Zvlhčovač se automaticky vypíná, když nasta-
vený čas vyprší.
8 Pokud je v nádrži málo vody, nevzniká už žád-
ná mlha, zazní zvukový signál, ukazatel stavu
vody (14) se rozsvítí. Zvlhčovač vypněte a
nádrž (2) naplňte vodou (viz. 1 a 2)
Když vodu nedoplníte, přístroj se automaticky
po jedné minutě vypne.
ORIENTAČNÍ HODNOTA PRO RELATIVNÍ
VLHKOST VZDUCHU V MÍSTNOSTECH PODLE
ZPŮSOBU VYUŽITÍ
Uzavřené prostory při
20ºC
Relativní vlhkost
vzduchu (v %)
Obývací pokoj / pracovna
v létě
35 – 50
Obývací pokoj / pracovna
v zimě
50 – 70
Nebytové prostory 40 – 60
Pozor: Uvedené hodnoty vlhkosti vzduchu v
tomto návodu jsou pouze orientační.

20
CZ
ODSTRANĚNÍ PROBLÉMŮ
Problém Důvod Řešení
Ukazatel pohotovostního
režimu je mimo provoz,
žádná funkce
Přístroj není zapnutý.
V zásuvce není proud.
Zapněte přístroj.
Zkontrolujte pojistky.
Svítí ukazatel stavu vody,
žádné zvlhčování.
Nedostatek vody. Doplňte vodu do nádrže.
Mlha – zvláštní nebo
rušivý zápach.
Nový přístroj.
Špinavá voda.
Otevřete nádrž a vymyjte
čistou vodou.
Vyčistěte nádrž a naplňte
čistou vodou.
Výroba mlhy –
abnormální.
Přístroj je znečištěný, voda je
znečištěná nebo je v nádrži
příliš dlouho.
Vyčistěte přístroj, nádrž a
naplňte ji čistou vodou.
Příliš mnoho vody
v otvoru podstavce.
Vyprázdněte jej a nádrž
opatrně nasaďte.
Abnormální hluk. Dutina mezi přístrojem a pod-
ložkou.
Umístěte přístroj na stabilní
podložku.
Voda z nádrže není
vyčerpaná.
Víko nádrže je špinavé.
Nádrž nesedí správně na pod-
stavci.
Vyčistěte víko a ventil nádrže.
Znovu nádrž pečlivě nasaďte.
Pozor! Pokud byste měli s přístrojem problémy a výše uvedené návrhy řešení by je neodstranily, obraťte
se prosím na zákaznický servis BIELMEIER nebo svého prodejce.
Přístroj sami nerozebírejte a také ho sami neopravujte!
TECHNICKÉ ÚDAJE
Zdroj elektřiny / příkon:
220-240 V~ (50 Hz) ú 30 W
Maximální objem
nádrže na vodu: 5 litrů
Výstup mlhy od 260 ml za hodinu
Hlučnost chodu: < 35 dB
DBEJTE NA ŽIVOTNÍ PROSTŘEDÍ!
Obalový materiál a starý přístroj nevyhazujte, ale
dovezte k recyklaci.
Na příslušné recyklační místo nebo sběrný dvůr
se informujte na vašem obecním nebo městském
úřadě.
Other manuals for BHG 558
1
Table of contents
Languages:
Other BIELMEIER Humidifier manuals


