Bigassfans Obsidian BAFCF30240B User manual
1
–
MODELS
VOLTAGE
TOTAL POWER (W)
CURRENT(AMPS)
BAFCF30240B
208/240
2250/3000
10.8/12.5
FIRE/EXPLOSION HAZARD WARNING
NOT FOR USE IN HAZARDOUS OR EXPLOSIVE ATMOSPHERES
During operation, always ensure combustible materials are kept at a safe distance from the heater
body and from the emitted radiant energy. This heater is not intended for use in hazardous areas where
flammable vapours, gases, liquids or other combustibles are present. Failure to do so can result in
personal injury/or property damage.
FOR OUTDOOR RESIDENTIAL AND INDOOR OR OUTDOOR COMMERCIAL USE
BIG ASS FANS dba DELTA T LLC 238 INNOVATION DR. LEXINGTON KY 405011 PHONE: 877.BIG.FANS

2
TABLE OF CONTENTS
1 - SAFETY ............................................................................................................................................................... 3
2 - INSTALLATION INSTRUCTIONS .......................................................................................................................... 5
3 - OPERATING INSTRUCTIONS............................................................................................................................... 9
3.2.1 Operation of the Remote Control ....................................................................................................10
4 - MAINTENANCE ................................................................................................................................................ 11
5 - GROUNDING INSTRUCTIONS........................................................................................................................... 14
WARNINGS
THIS ELECTRIC APPLIANCE PRODUCES INFRARED HEAT, AND FAILURE TO FOLLOW
WARNINGS AND INSTRUCTIONS CAN CAUSE FIRE, ELECTRIC SHOCK, OR INJURY.
READ AND SAVE THESE INSTRUCTIONS
Please read this owner’s manual carefully before using the unit and keep the manual for future reference.
USE THIS HEATER ONLY AS DESCRIBED IN THIS MANUAL. ANY OTHER USE NOT RECOMMENDED BY THE
MANUFACTURER MAY CAUSE FIRE, ELECTRIC SHOCK OR INJURY TO PERSONS
Notice: Changes or modifications not approved by the party responsible for compliance will void the user's
authority to operate the equipment.
IMPORTANT INSTRUCTIONS
When using electrical appliances, basic precautions should always be followed to reduce the risk of fire, electric
Heater must be installed by a certified electrician and installation must
adhere to all local, state and national electric codes.

3
shock, and injury to persons, including the following outlined in section 1 –SAFETY. Read all instructions before installing
or using this heater.
1 - SAFETY
WARNINGS
WARNING: FIRE OR EXPLOSTION HAZARD
•Failure to precisely follow safety warnings could
result in serious injury or property damage.
•Heater has hot surfaces and arcing or sparking
parts inside. Do not use the heater in areas where
gasoline, paint or flammable vapors or liquids are
used or stored.
•Heater is not to be installed or used in an area
containing hazardous or flammable materials
including but not limited to rags, fabrics, spray or
aerosol cans, cleaning compounds, plastic
containers, paper products, organic dusts,
straw/hay, gasoline, kerosene, lighter fluid, etc.
•To prevent a possible fire, do not block air intakes
or exhaust in any manner.
•Do not insert or allow foreign objects to enter any
ventilation or exhaust opening as this may cause an
electric shock or fire, or damage to the heater.
•Do not cover the heater in any manner, do not hang
clothing on or near the heater.
•Caution! Do not use the heater together with
another appliance connected to the same supply
line or connected to the same breaker.
•Heater must be properly grounded
•The power cord must not be left on or around the
heater body.
•Keep combustible materials, such as furniture,
pillows, bedding, papers, clothes, curtains, etc. at
least 6 feet (1.8m) from the front of the heater and
keep them away from sides and rear.
WARNING: PERSONAL INJURY HAZARD - OPERATION
•This heater is hot when in use. To avoid burns, do
not let bare skin touch hot surfaces.
•Use this heater only as described in this manual.
Any other use not recommended by the
manufacturer may cause fire, electric shock, or
injury to persons.
•Extreme caution is necessary when any heater is
used by or near children or invalids and whenever
the heater is left operating and unattended.
•Never leave the heater unattended while it is
operating.
•Do not use the heater without the aluminium grille
in place.
•Do not operate any heater after it malfunctions.
Disconnect power at service panel and have heater
inspected by an electrician before reusing.
•Do not use the heater to light cigarettes or similar
materials.
•Do not insert objects in heater openings. Electrical
shock could result.
•To disconnect heater, turn controls to off, and turn
off power to the heater circuit at the main
disconnect panel

4
WARNING: PERSONAL INJURY HAZARD - CLEANING AND MAINTENANCE
•To avoid property damage, personal injury
or death due to electrical shock DO NOT
service the unit without turning the unit
OFF and disconnecting the heater from the
main power supply.
•Before cleaning the unit or replacing the
emitter, turn off the main power. Make sure
the heater and/or the emitter is cool before
handling.
•Service must be performed only by a
qualified service technician.
WARNING: INSTALLATION
•This product must be installed by a certified
electrician and must adhere to all local,
state and national electric codes (NEC)
•This product is not suitable for indoor
residential use (Indoor commercial
installation is acceptable)
•Do not direct the radiant part of the heater
towards the ceiling.
•Specified minimum clearances from front,
sides, bottom and back of unit must be met.
Failure to meet clearance minimums can
result in fire.
•Heater is not for use in bathrooms, laundry
areas or other locations where unit could fall
into water.
•Do not use the heater if it has been dropped
or damaged in any way. Ensure the emitter is
not cracked or chipped visually. Contact an
authorized BIG ASS FANS dealer for support.
•Do not use the heater if the power cord is
damaged. Contact an authorized servicer or
qualified electrician to replace the cord prior
to use.
•Unplug the appliance when it is not in use for
long periods of time, or for cleaning and
maintenance.
•Heater is not to be recessed
•The heater must be installed at level on a
flat, stable surface, rigid enough to safely
withstand the weight of the heater and the
heater must not be covered by any flexible
material, such as carpets, plastic or fabric.
SAVE THESE INSTRUCTIONS

5
2 - INSTALLATION INSTRUCTIONS
Heater installation must be carried out by qualified personnel in compliance with local National Codes
(NEC) as well as any other applicable standards. Failure to comply with applicable requirements could
result in personal injury and/or property damage. Wiring procedures and connections shall be made in
accordance with national and local electrical codes having jurisdiction.
BIG ASS FANS infrared heaters produce radiant heat that warms people and objects, rather than the air around
them. The heater can be wall or ceiling mounted and includes brackets which allow the user to direct the
infrared heat where desired.
To reduce the risk of fire, do not store or use gasoline or other flammable vapors and liquids in the vicinity of
the heater.
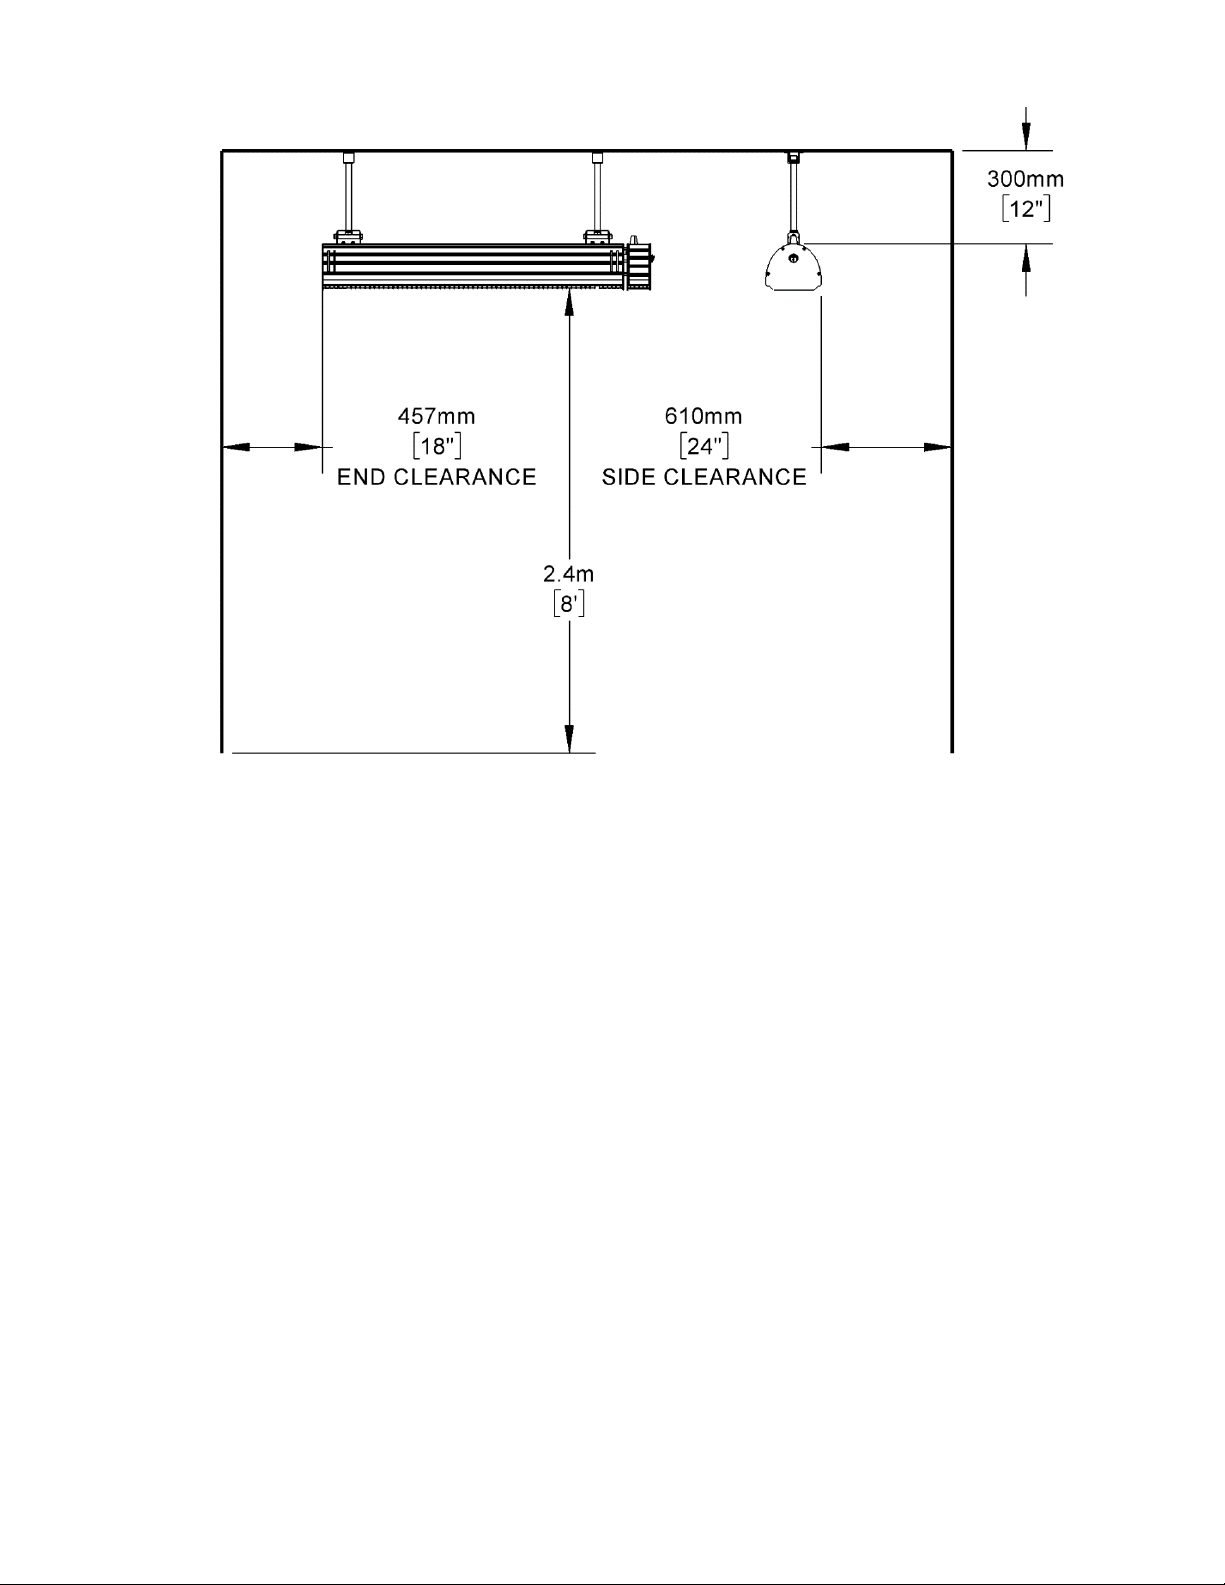
2.1 INSTALLATION CLEARANCE DISTANCES
DANGER FIRE HAZARD
The minimum clearances indicated on the nameplate and in the user manual must be observed.
CAUTION: High temperatures are present, risk of fire! Keep electrical cords, drapery, furnishings and other
combustibles at least 6 feet (1.8m) from the front of the heater and away from the sides and rear.
Wall Mount Minimum Clearances
6
2.2 ELECTRICAL INSTALLATION
Safety Precautions
1. Each power supply circuit must be properly grounded.
2. Use a certified ground fault protection device for wet environment installations.
3. Use a proper electrical connection box
4. Supply voltage and frequency must correspond to the electrical rating indicated on unit’s information
plate
Ceiling Suspended Minimum Clearances

7
2.3 WALL-MOUNTED INSTALLATION
THE BAFCF30240B HEATER MUST BE INSTALLED WITH BOTH MOUNTING BRACKETS PROVIDED IN THE BOX.
1. Take the heater out of the box and remove all
protective foam inserts.
2. The heater comes with ceiling suspension
brackets installed. To mount the heater on the
wall, these brackets must be switched to the
wall mount pivot brackets. Unscrew the
fasteners holding the ceiling suspension
brackets to remove them. Keep all parts and
fasteners, you will need them in the next step.
3. Install the two wall mount pivot brackets using
the screws removed in the previous step.
4. Select the installation location on the wall by
identifying the studs or structural beams that will
allow the heater to be securely attached.
WARNING: Ensure minimum clearances outlined in
section 2.1 are met.
5. Securely fasten the L-shaped brackets to the
mounting surface using both fixing holes in the
short part of the bracket. NOTE: Wall bolts or
anchors are not supplied. Select an appropriate
size to provide adequate support for the weight
of the unit and taking into consideration any
wind load conditions.
CAUTION: If there is any question regarding
security of the bolts and fixtures, contact a
professional contractor.
6. Mount the heater to the brackets with the
terminal box at the right side of the heater.
7. Adjust the heater to the desired directional
angle, then fix in this position by tightening the
fixing bolts on the brackets at the back of the
heater.
8. Secure the electrical supply cable so it does not
contact the heater body or obstruct the air vents.
Follow local and national electrical code
requirements.
The angles of attachment are 20° to 70°, measured
from the mounting wall.

8
2.4 CEILING MOUNTED INSTALLATION
WARNING
Heater should be hung using rigid mounting brackets, the unit must not
be able to swing in any direction under applied load from wind or
persons. It is highly recommended that users install the heater with the
ceiling mounting hardware provided.
HEATER POSITION MUST MAINTAIN A MINIMUM CEILING CLEARANCE OF
0.3m (1’)
1. Assemble the ceiling mounting hardware as
shown in the guide below. The socket head cap
screw should be used on the ceiling bracket
side, and the hexagon head cap screw should
be used on the heater bracket side for
clearance purposes. See Illustration.
2. Secure the heater to the mounting brackets
using nuts and washers provided.
3. Select the installation location on the ceiling by
identifying the studs or structural beams that
will allow the heater to be securely attached.
NOTE: ceiling bolts or anchors are not supplied.
Select an appropriate size to provide adequate
support for the weight of the unit (14.3lbs /
6.5Kg) and take into consideration any wind load
conditions.
4. Attach the unit to the ceiling using the ceiling
brackets and user selected bolts. An illustration
of the bolt pattern dimensions is shown to the
right.
5. The heater can be hung vertically or pointed at
a maximum angle of 45° from vertical.
NOTICE: NEVER direct the infrared heat produced
by the appliance at an adjacent wall. ALWAYS
MAINTAIN MIMIUM CLEARANCE FROM
WALLS, FROM THE SIDES AND ENDS OF THE
HEATER.
6. Secure the electrical supply cable so it does not
contact with the heater body or cover the
heater air vents.

9
2.5 ADJUSTING DIRECTIONAL POSITIONING
WARNING
Never attempt to move or adjust the heater angle while it is running. Personal
injury could result.
1. Turn off the heaters electrical supply line from the main power supply.
2. Allow the heater to cool before adjusting the angle.
3. Loosen the fixing bolts on the brackets at the back of the heater; adjust the heater as desired, then re-
tighten the fixing bolts.
Notice :The unit produces radiant heat that warms people and objects rather than the air around them. Install
the heater at an angle which points the reflector at the target space. Do not point the heater at windows or vacant
spaces, as the heat will not be delivered to the occupants.
3 - OPERATING INSTRUCTIONS
Caution! The heater must be properly installed before it is used.
Caution! When the heater is not in use for extended periods of time, be sure to set the operating mode to the
"OFF" position.
The heater has two modes of operation, these two modes can be selected using the button on the right side of
the heater.
PCB Bypass Mode
Remote Mode
OFF
INCORRECT
CORRECT

10
3.1 PCB BYPASS MODE
When the bypass mode is selected, the heater will operate at 100% of rated power OR may be controlled by
other type of external control system. Installer or specifier is responsible for compatibility and safety of controls
not included with this heater.
3.2 REMOTE MODE
The remote control must be pointed in the direction of the receiver on the heater body (located on the front
face) and must be used within a maximum distance of 6 m.
In remote mode the heater has 6 power levels. The power level can be selected with the remote. The selected
power level is displayed on the screen on front of the heater. The remote mode only works with the remote
control supplied with the product. L0 represents standby while L6 represents the maximum heating level.
3.2.1 OPERATION OF THE REMOTE CONTROL
Symbol
Description
˄
Up one heating level
MAX
The heater goes directly to the highest heating level (short
delay on start).
˅
Down one heating level.
ON
To switch the heater ON: Press On.
The heater has a soft start function using only 16% of
maximum power. 4 seconds after the heater has been turned
on, it will automatically switch to the last heating level used.
In case of the first-time use, after 4 seconds the heater will
automatically switch to 100% power.
OFF
To switch the heater OFF: Press OFF. The heater will switch to
Standby mode (the receiver indicator will light up).
Display
Description
Power setting
L1
Heating level 1
33%
L2
Heating level 2
50%
L3
Heating level 3
66%
L4
Heating level 4
80%
L5
Heating level 5
88%
L6
Heating level 6
100%
L0
Standby
0%
11
Notice:
1. Use 2 pieces AAA, 1.5V batteries (not included) in the remote control. Remove the batteries when not in use for an
extended period of time to increase battery life.
2. The heater can be still used normally in the event the remote control is misplaced, however it must be used in PCB
bypass mode where the heater will run fully on. Contact your local authorized BIG ASS FANS Dealer for remote
replacement.
3. The remote-control function may not work if there is a barrier between the remote control and heater.
4. Replace the batteries as required to ensure correct remote functionality.
4 - MAINTENANCE
WARNINGS
1. Allow the heater and the emitter to cool down before handling.
2. Installation and maintenance must be performed by a qualified technician.
3. Turn off the power before beginning maintenance.
4. Do not attempt to service or repair the unit while it is running.
5. Should the heater be dropped or damaged or malfunction at any time, immediately turn off the main
power source and do not use it until it has been examined by an authorized service facility.
6. All other servicing should be performed by qualified service personnel.
Notice: Do not touch the emitter with bare hands. Wearing soft cotton gloves is highly recommended. Finger
prints will burn into the carbon emitter during use and cause premature heater failure. If the emitter is
anidvertently touched, or if it needs to be cleaned, carrefully wipe it using rubbing alcohol or methylated spirits.
4.1 CLEANING
To keep the heater running at peak performance and prevent premature failure, the emitter lamp and reflector
should be cleaned as required. Buildup of dust on these components will accelerate aging. In seaside
environments, salt spray may collect on these components. Salt spray should be removed regularly.
To clean the reflector or emitter lamp, follow these steps:
1. Turn the power to «OFF» and disconnect the heater from the main power supply.
2. Remove screws from the left side cover and slide the perforated front grille out of the heater body.
3. Carefully wipe the reflector with a soft, lint-free cloth.
4. After cleaning, be sure to properly reinstall the heater grille.
12
4.2 REPLACING THE EMITTER
Contact your distributor for the correct replacement emitter, providing the model number and rating from the
rating label. Using an incorrect replacement emitter can cause the heater to fail.
Notice: Read through the Emitter replacement procedure below before beginning the replacement. For easier
replacement, remove the heater from the wall or ceiling.
1. WARNING! TURN OFF THE POWER AND
DISCONNECT THE HEATER FROM THE MAIN
POWER SUPPLY. FAILURE TO DISCONNECT
HEATER BEFORE REPLACING THE EMITTER
COULD CAUSE ELECTRIC SHOCK OR DEATH!
2. Turn OFF the power and disconnect from main
power supply.
3. Be sure the heater and the emitter are cool:
burns can result from touching hot
components.
4. Remove screws from the left side of the heater
fixture and remove the aluminum end cap.
(keep these parts).
5. Carefully slide the protective grille out of the
heater body to expose the emitter and the
plastic sealing connectors.
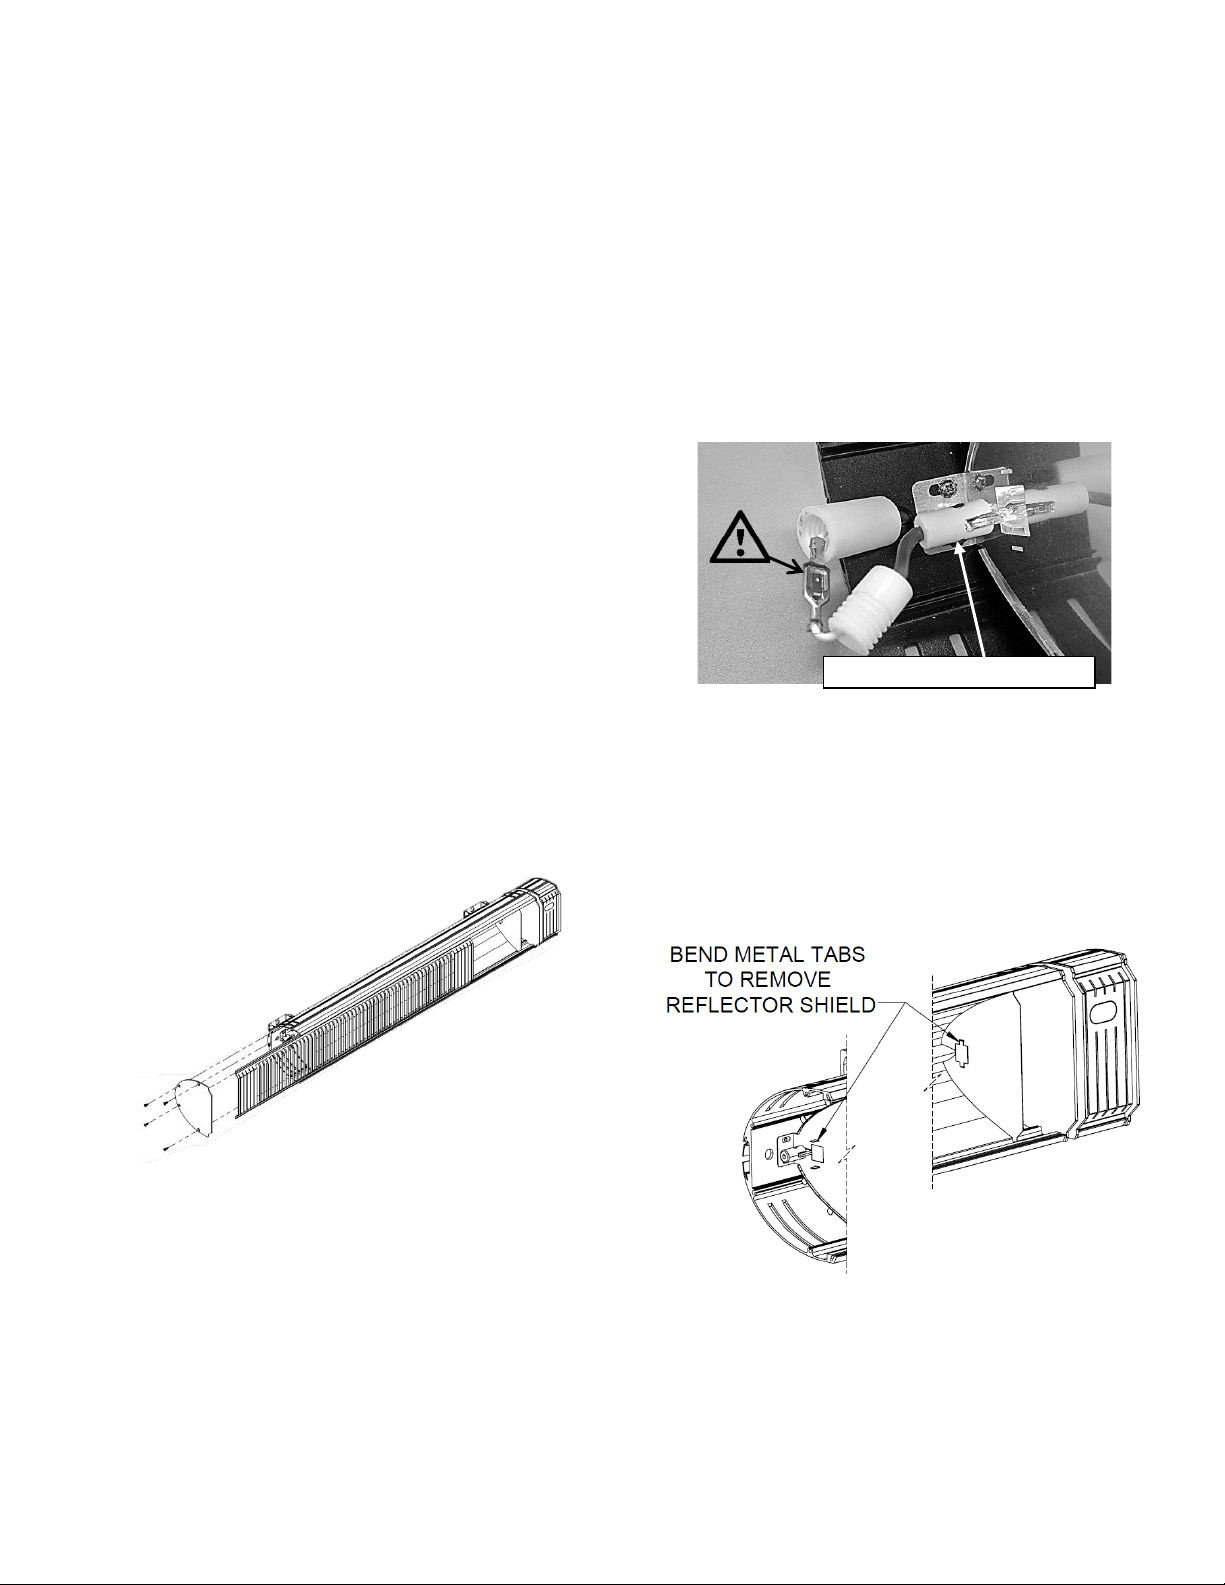
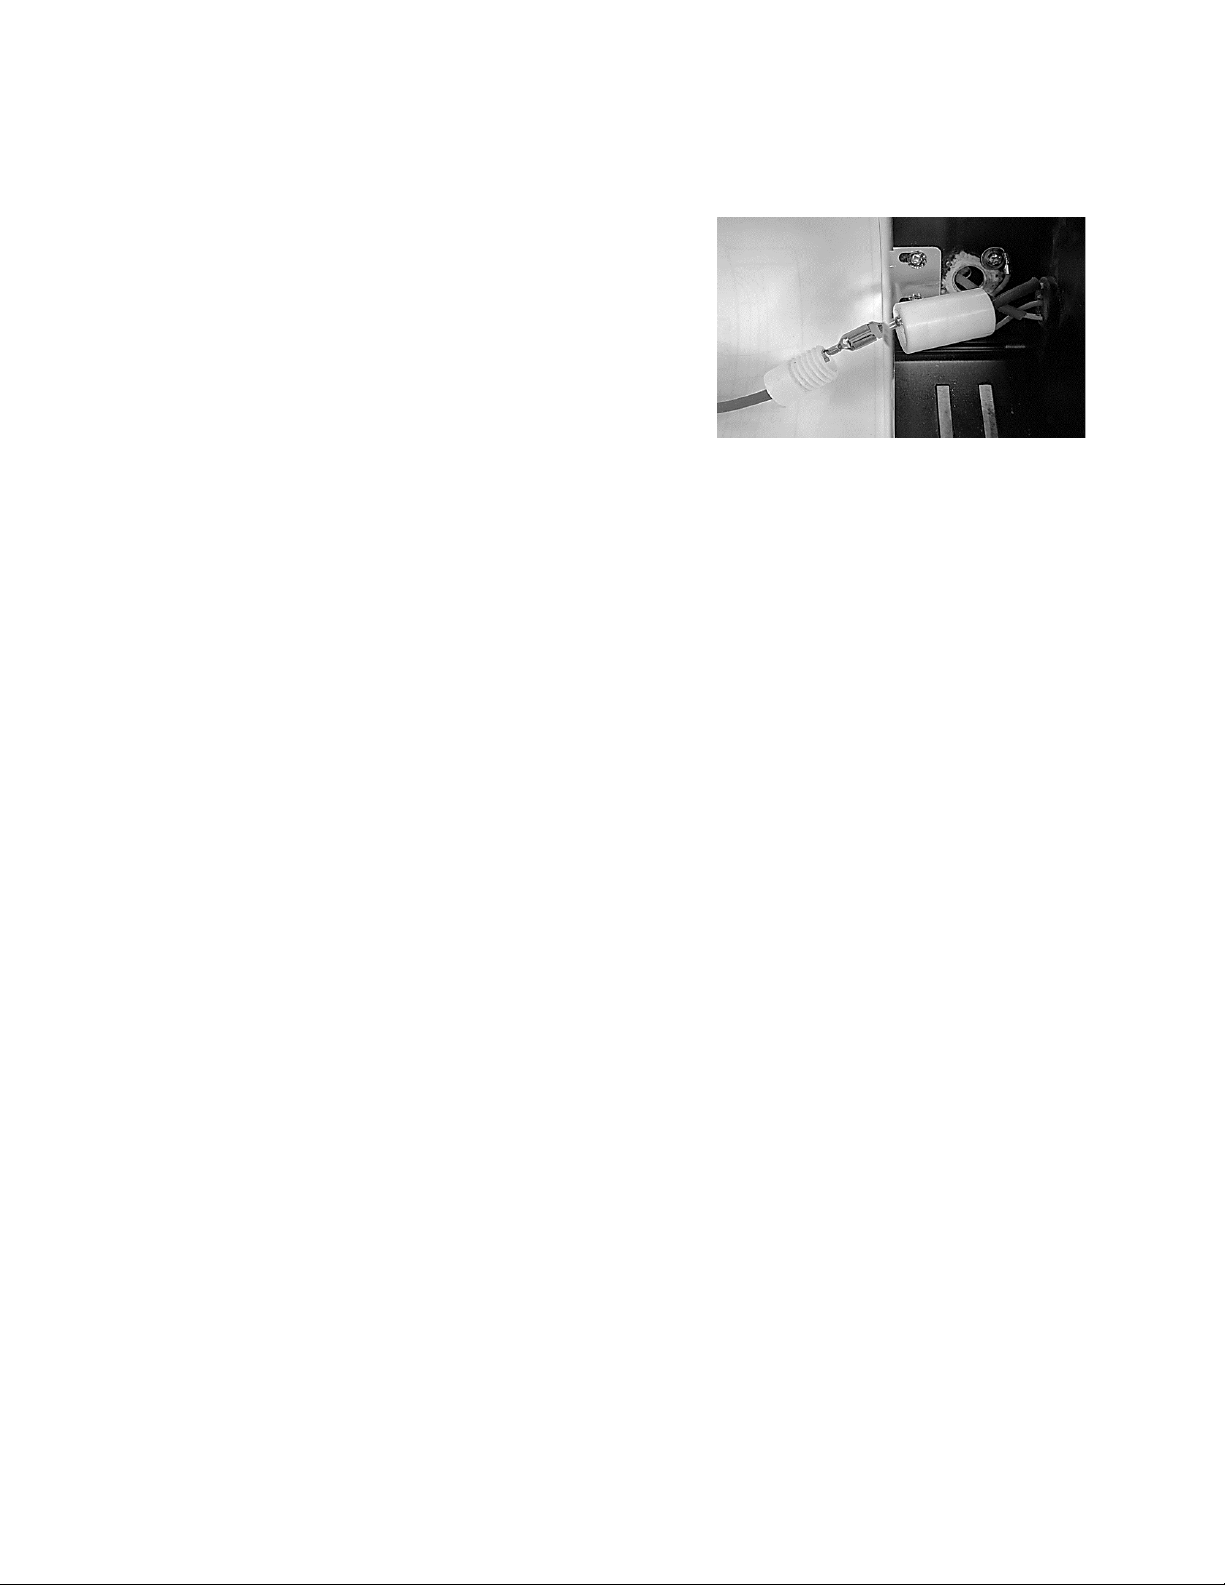
6. Carefully unscrew the protective plastic cap
and carefully slide the cap back cap to expose
the wire/ metal connector system.
Caution! Disconnect the metal locking
connectors by squeezing the metal tab.
7. Bend the metal tabs to remove the small
reflector shield sheet metal parts. Hold on to
these pieces. This will allow you to slide the
emitter into a bigger cavity to remove it from
the reflector and heater body. Properly dispose
of the broken emitter at your local recycling
center.
8. Hold the new emitter by the ceramic ends or
wear clean dry gloves to prevent and position
the new lamp inside the unit.
Ceramic Infrared Emitter End
13
9. Insert the new emitter through the reflector
openings. Insert the Reflector Shields and bend
the tabs back into place. The Reflector Shields
hold the emitter in the correct position during
operation. It is important that they are re-
installed during emitter replacement.
10. Connect the new emitter to the terminals of
the heater; screw in the protective plastic caps
11. Carefully replace the protective aluminum
grille and screw the protective end cap in place.
14
5 - GROUNDING INSTRUCTIONS
WARNING
Connection to GFCI protected outlet is recommended For outdoor, exposed
environments and/or as required by local, state and National Electrical Code
(NEC) requirements.
FAILURE TO USE A GFCI PROTECTED OUTLET COULD RESULT IN FIRE OR
ELECTRIC SHOCK!
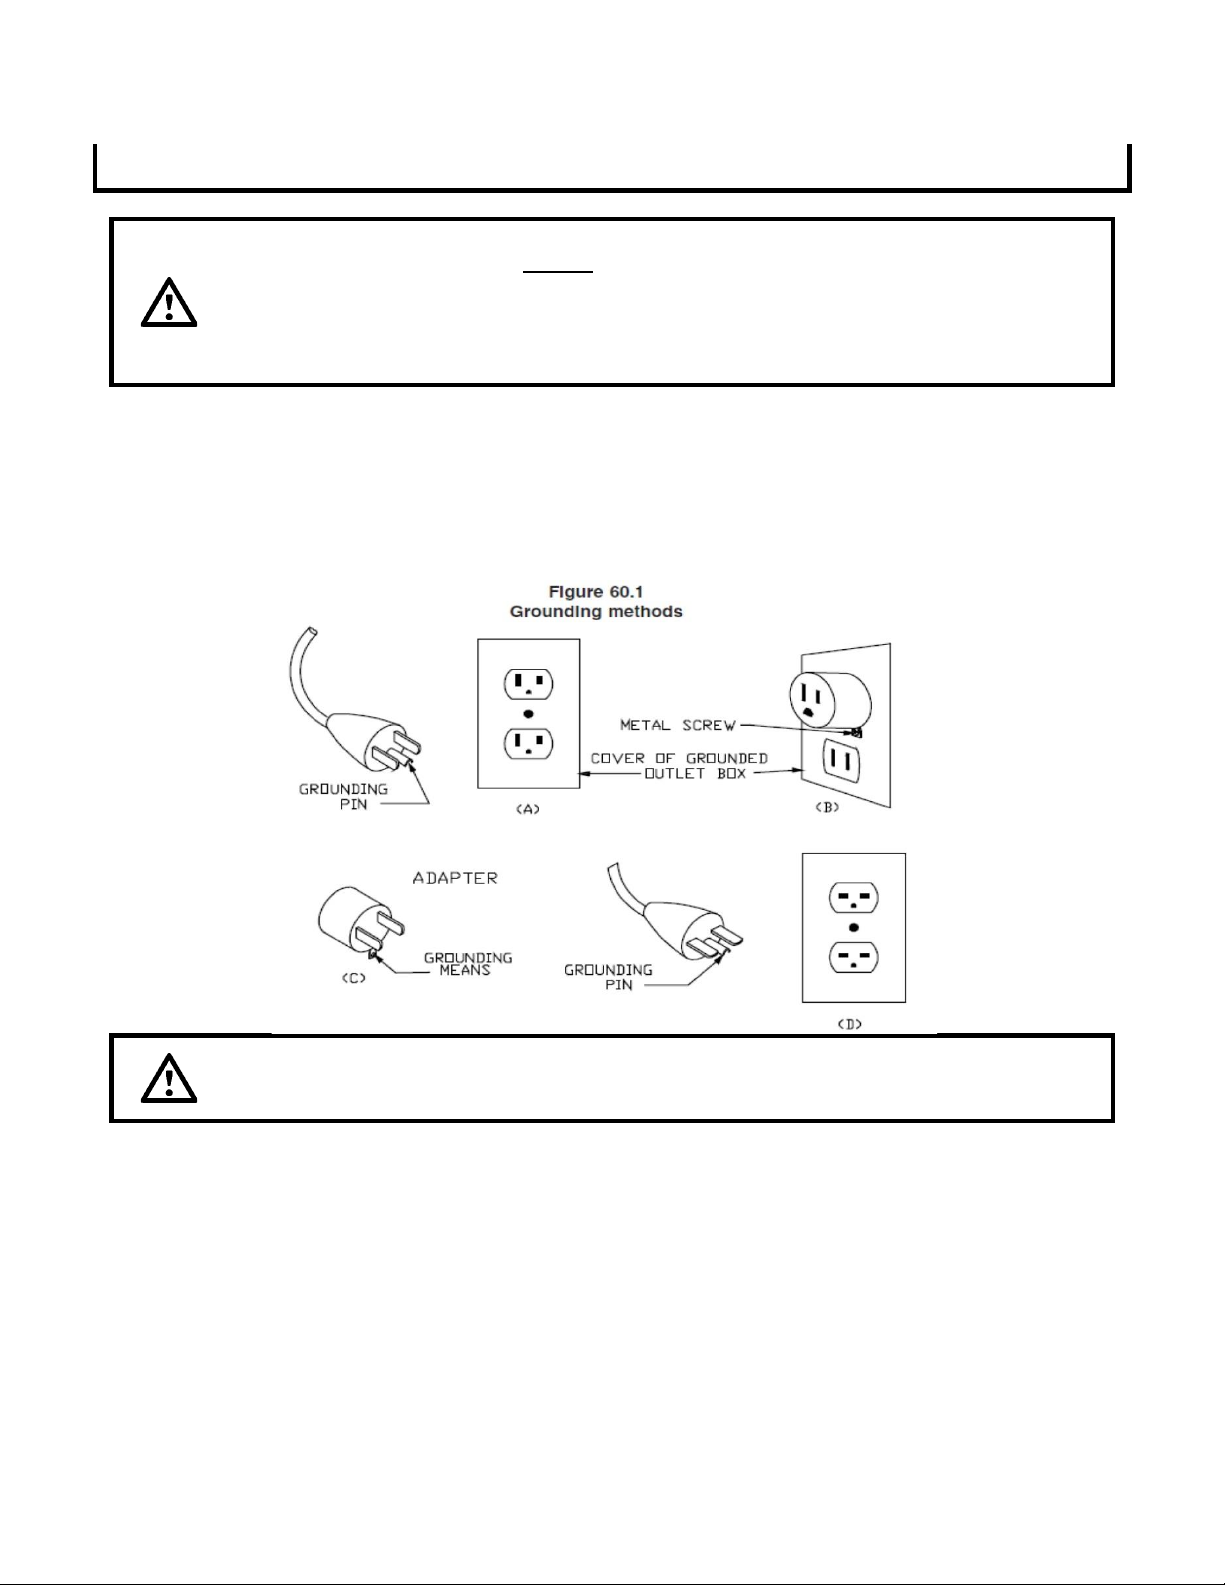
This heater is for use on 240 Volts. The cord has a plug as shown in D in Figure 60.1. No adaptor is available for
this for this blade configuration, and none should be used. The type of outlet is a 240 volt grounding outlet.
When properly installed, it provides a ground connection through the cord to the heater to protect the operator
from electric shock.
NOTE: This heater may be hard wired by a licenced electrician per NEC or Local codes. To hard wire, a licenced
electrician may remove the plug and hard wire the heater to a properly grounded junction box.
WARNING
Modification of the supplied cord for hardwire purpose may only be completed
by CERTIFIED ELECTRICIANS, and modification must satisfy local and NEC
requirements. Incorrect modifications could result in electric shock or fire!
Due to ongoing product improvements, specifications and dimensions are subject to change and correction without notice and
without incurring obligations. Determining the application and suitability for use of any product is the responsibility of the
installer. Additionally, the installer is responsible for verifying dimensional data on the actual product prior to beginning any
installation preparations.
Incentive and rebate programs have precise requirements as to product performance and certification. All products meet
applicable regulations in effect on date of manufacture; however, certifications are not necessarily granted for the life of a
product. Therefore, it is the responsibility of the applicant to determine whether a specific model qualifies for these
incentive/rebate programs.
Manual Revision: A1: 2023-10-18

15
Table of contents
Other Bigassfans Patio Heater manuals


