Prem-I-Air EH0368 User manual

1
EH0368
2 kW PATIO HEATER
CHAUFFAGE DE PATIO 2kW

2
IMPORTANT
Installer and Users please note:
These instructions should be read carefully and left with the user of the product
for future reference.
INSTALLATION
To wall-mount: Referring to the diagram below, draw two horizontal lines on the
wall 90 mm (3½") apart, the lower line more than 1500 mm (5') from the floor.
On the upper line, drill holes 70mm (2¾") from the centre line, using a 6 mm (¼")
masonry bit, and insert a wall plug.
On the lower line, drill a hole on centre line using a 6 mm (¼") masonry bit, and
insert a wall-plug.
Insert screws into the upper two holes and almost fully tighten.
Hang the heater on the upper screws using the keyhole slots on the back.
Insert a screw through the hole in the heater, just below the power display
window. This screw will fit into the lower hole.
Fully tighten the screw, and push the rubber plug (supplied) into the hole to
protect from water ingress.

3
PRODUCT SAFETY
•This appliance can be used by children aged from 8 years and above
and persons with reduced physical, sensory or mental capabilities or lack of
experience and knowledge if they have been given supervision or instruction
concerning use of the appliance in a safe way and understand the hazards
involved.
•Children shall not play with the appliance.
•Cleaning and user maintenance shall not be made by children without
supervision. Ensure that curtains are at least 900 mm (3') from the top of the
heater.
•Do not place on soft surfaces.
•Do not cover when in use.
•This symbol shown on the casing of the heater means that the
heater should not be covered when in use.
•Do not place the mains lead beneath a carpet or rug.
•Do not use the heater in locations where paint, petrol or other flammable
liquids are used or stored.
•Do no insert any object into the heater through the grilles. This may damage
the heater or result in overheating or electric shock.
•If used outdoors, the heater must be connected via a Residual Current
Device (RCD) rated at 30 mA or less.
•The heater must be installed where it cannot be touched whilst in a bath or
shower.
•This heater must not be connected to a timer or other type or programmable
switch (a fire hazard exists if the heater is covered when the timer switches it
on)
•The fireguard of this appliance is intended to prevent direct access to the
heating elements and must be in place when the appliance is in use.
•The fireguard does not give full protection for young children and for infirm
persons.
PAT TESTING
When used in a workplace, this product must be safety-tested yearly by a
qualified electrician (PAT Tested) in order to comply with the Electricity at Work
Regulations.
We recommend that it is PAT tested regularly when used in a domestic
environment.

4
GENERAL SAFETY REQUIREMENTS
Domestic wiring must be tested periodically by a qualified electrician at least
once every 10 years or at every change of occupancy.
For office and retail premises, and buildings such as village halls, the wiring must
be inspected at least once every 5 years.
It is recommended that all buildings be fitted with smoke alarms (it is mandatory
for new buildings)
OPERATION
•Plug the mains lead into a 13 Amp mains socket that is protected by a 30
mA Residual Current Device (RCD). Never use equipment outdoors that is
connected to a socket that is not protected by an RCD.
•If connecting via an extension lead, make sure that the lead is rated at 10
Amps or more, and that it is fully unwound.
•Switch the unit on at the mains socket.
•Pull the cord-operated switch to select the required operation:
oFigure "1" displayed = Low Heat (700 W)
oFigure “2” displayed = Medium Heat (1300 W)
oFigure "3" displayed = High Heat (2000 W)
•Do not touch the grille when the heater is in operation, because it will be hot
and may cause burns.
•Unplug the heater from the mains when not in use.
•To adjust the angle, switch off the heater and allow it to cool for 15 minutes.
Slacken the pivot screw, and adjust the reflector to the preferred angle. Re-
tighten the screw. The heater may now be switched on.
OPERATING COSTS
At time of going to press, the average cost of electricity is £0.13 per unit (kilowatt-
hour). The amount you are being charged will be shown on your electricity bill.
At this cost, the EH0368 will cost £0.09 per hour to run on the "low heat " setting,
and £0.26 per hour to run on the "high heat".

5
MAINTENANCE
Before cleaning, turn the heater off, and disconnect from the mains supply. The
heater may then be cleaned using a damp cloth with a drop of washing-up liquid
to remove any dust or dirt from the case. Do no use stronger detergents or
solvents as these may damage the paint finish.
Using a dry 1" (25 mm) paint-brush, remove any dust from the grilles.
•If the mains lead is damaged, it must be replaced by the manufacturer or
and authorised service centre. If the mains plug needs to be replaced,
proceed as follows:
•Connect the brown wire to the
terminal labelled "L".
•Connect the blue wire to the terminal
labelled "N".
•Connect the green/yellow wire to the
terminal labelled with the earth
symbol or "E".
•Make sure that the cord-grip is
positioned correctly (over the outer
sheath of the cable) and it fully
tightened.
STORAGE
When not in use, or during inclement weather, the black fabric dirt and dust
protector should be deployed. Always make sure that the heater is unplugged
and cannot be accidentally switched on when the dirt and dust protector is being
used.
DISPOSAL AND RECYCLING
You must not dispose of this appliance with domestic household waste.
Most local authorities have specific collection system for appliances and disposal
is free of charge to the end-user.
When replacing an existing appliance with a similar new appliance your retailer
may take the old appliance for disposal.
TECHNICAL SPECIFICATION
Dimensions: 260×525×230 mm
Weight: 1.98 kg
Power supply: 230 V ~
Power consumption: 2000 W
Operating current: 8.7 A
IP Rating IPX4

6
SERVICE WARRANTY
•Prem-i-Air guarantees the product free from defects in materials and
workmanship for a period of twelve months.
•Should this appliance be operated under conditions other than those
recommended, at voltages other than the voltage indicated on the appliance,
or any attempts made to service or modify the appliance, then the warranty
will be rendered void.
•The product you buy may sometimes differ slightly from illustrations. This
warranty is in addition to, and does not affect, your statutory rights.
•Our guarantee is administered by our retailers.
•If your product arrives damaged, you must contact the retailer from whom
you bought it. The retailer's contact details will be on the invoice that arrived
with the product, or on the e-mail you received when you placed the order.
Do not contact Prem-i-air, only your retailer can arrange a replacement.
•If the product needs to be repaired or replaced, you must contact the retailer
from whom you bought it.
•The retailer's contact details will be on the invoice that arrived with the
product, or on the e-mail you received when you placed the order.
If you have just received your product and require technical help in using it,
please call our Help Desk on (0845) 459 4816
•If you have any other technical queries about the product, please call our
Help Desk on (0845) 459 4816.
Prem-i-Air Appliances Ltd.,
Lancots Lane, Sutton,
St. Helens, Merseyside.
WA9 3EX
website: www.prem-i-air.com

7
IMPORTANT
Installateurs et Utilisateurs, veuillez noter:
Vous devez lire cette notice attentivement et la conserver précieusement pour
une éventuelle future consultation.
INSTALLATION
Pour une pose murale : En vous référant au schéma ci-dessous, tracez deux
traits horizontaux sur le mur espacés de 98mm, le trait le plus bas devant se
situer à plus de 1500 mm du sol.
Sur la ligne supérieure, percez un trou de chaque côté à 70mm du centre de la
ligne à l'aide d'un forêt à maçonnerie de 6mm et insérez une cheville murale.
Sur la ligne inférieure, percez un trou au centre de la ligne à l'aide d'un forêt à
maçonnerie de 6mm et insérez une cheville murale.
Insérez les vis dans les trous du haut et serrez bien les vis.
Accrochez le radiateur sur ces vis à l'aide des fentes situées à l'arrière du
radiateur.
Insérez une vis dans le trou situé sur le radiateur, juste au-dessous de
l'affichage. Cette vis est destinée au trou du bas.
Serrez fermement la vis et poussez le bouchon en caoutchouc (fourni) dans le
trou pour le protéger contre les infiltrations d'eau.

8
CONSIGNES DE SECURITE
•Cet appareil peut être utilisé par des enfants âgés de 8 ans et plus et par
des personnes dont les capacités physiques, sensorielles ou mentales sont
diminuées ou manquant d'expérience ou de connaissances uniquement
sous la surveillance d'un adulte qui leur aura appris à utiliser l'appareil et leur
aura expliqué les risques encourus.
•Les enfants ne doivent pas jouer avec l'appareil.
Respectez un espace minimum de 900mm entre les rideaux et le haut du
chauffage.
•Ne le placez pas sur une surface molle ou instable.
•Ne le couvrez pas pendant l'utilisation.
•Ce symbole présent sur le boîtier du radiateur signifie que le
radiateur ne doit jamais être couvert pendant l'utilisation.
Ne placez pas le cordon d'alimentation sous un tapis ni une
carpette.
•N'utilisez pas le radiateur dans des endroits où sont stockés ou utilisés de la
peinture, de l'essence ou d'autres liquides inflammables.
•N'insérez pas d'objets dans les grilles du radiateur. Cela pourrait provoquer
une surchauffe ou un choc électrique et endommager le radiateur.
•S'il est utilisé à l'extérieur, le radiateur doit être branché via un dispositif de
courant résiduel calibré à 30mA ou moins.
•Le radiateur doit être installé à un endroit afin qu'il ne puisse pas être touché
depuis une baignoire ou une douche.
•Le radiateur ne doit pas être connecté à un programmateur ou un
commutateur programmable (un risque d'incendie existe si le radiateur est
couvert quand le programmateur est allumé).
•La grille coupe-feu de cet appareil est prévue pour éviter un accès direct aux
éléments chauffants et doit être bien en place quand l'appareil est en cours
d'utilisation.
•La grille coupe-feu ne protège pas totalement les jeunes enfants ni les
personnes infirmes.
TEST DE CONFORMITE
Si vous utilisez cet appareil sur un lieu de travail, il doit être contrôlé tous les ans
par un électricien qualifié qui vérifiera la conformité aux normes électriques en
vigueur.
Nous vous conseillons de le faire contrôler régulièrement quand vous l'utilisez à
la maison.

9
EXIGENCES GENERALES DE SECURITE
Le câblage électrique domestique doit être vérifié régulièrement par un
électricien qualifié, au minimum tous les 10 ans ou à chaque changement
d'occupant.
Pour les bureaux, commerces et bâtiments comme la maison du village ou salle
des fêtes, le câblage doit être contrôlé tous les 5 ans.
Il est conseillé d'équiper les bâtiments de détecteurs de fumée (ceci est
obligatoire pour les nouveaux bâtiments).
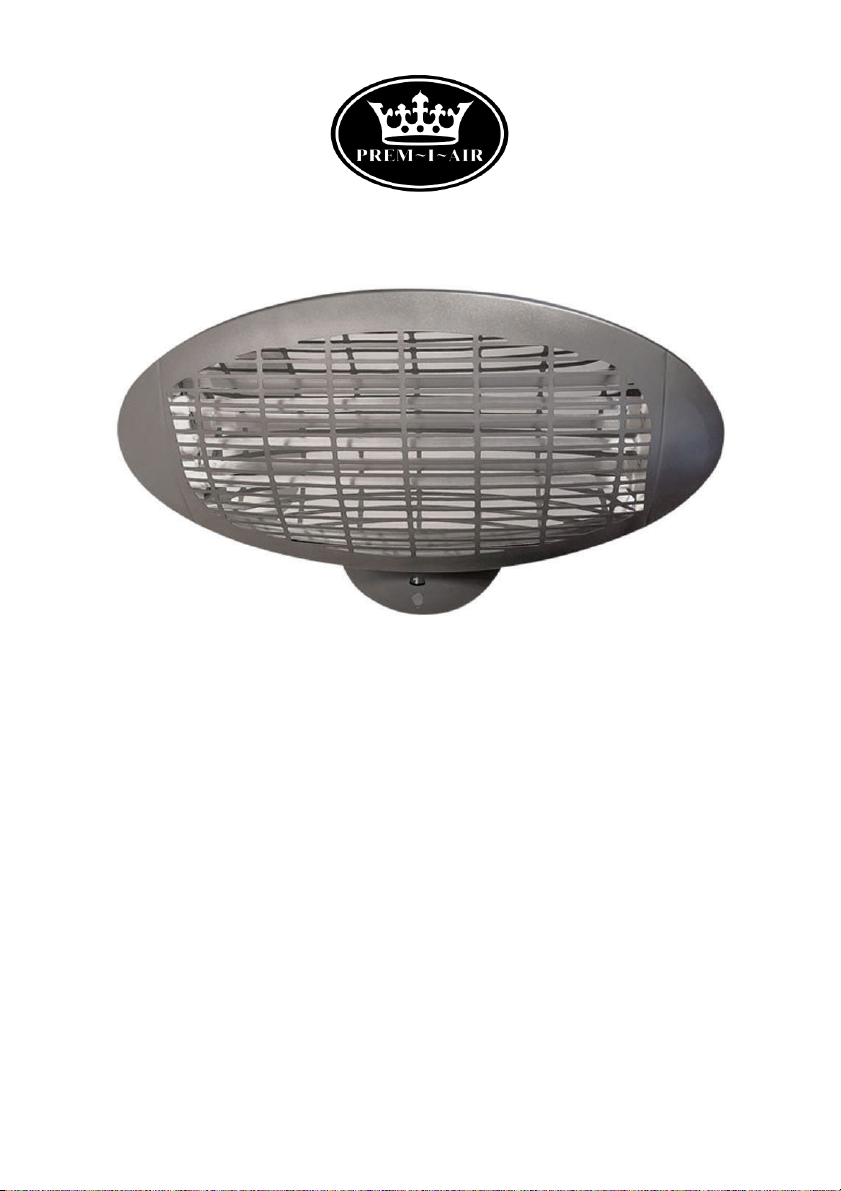
FONCTIONNEMENT
•Branchez le cordon d'alimentation dans une prise protégée par un dispositif
différentiel de courant résiduel 30 mA. N'utilisez jamais d'équipements à
l'extérieur qui soit branchée à une prise non protégée par un dispositif
différentiel à courant résiduel.
•Si vous utilisez une rallonge, vérifiez que le cordon est calibré à 10 Ampères
ou plus, et que la rallonge est entièrement déroulée.
•Allumez le chauffage.
•Tirez l'interrupteur à cordelette pour sélectionner le fonctionnement désiré :
•Le chiffre ''1'' = Chaleur Faible (700 W)
•Le chiffre ''2'' = Chaleur Moyenne (1300 W)
•Le chiffre ''3'' = Chaleur Elevée (2000 W)
•Ne touchez pas la grille quand le radiateur est en fonctionnement, car elle
serait chaude et vous risqueriez de vous brûler.
•Débranchez le radiateur quand vous ne l'utilisez pas.
•Pour régler l'angle d'orientation, débranchez le radiateur et laissez-le refroidir
pendant 15 minutes.
•Desserrez la vis pivot puis réglez le réflecteur à l'angle désiré. Resserrez la
vis. Vous pouvez maintenant allumer le radiateur.
COUT DE FONCTIONNEMENT
Au moment où nous imprimons cette notice, le coût moyen de l'électricité en
France est de 0,14€ par unité (kilowattheure).
A ce prix, le coût moyen de fonctionnement de l'appareil est de 0,09€ par heure
en mode ''chaleur faible'' et 0,28€ par heure en mode ''chaleur élevée''.

10
ENTRETIEN
Eteignez le radiateur avant de le nettoyer.
Le radiateur doit être nettoyé en utilisant un chiffon humide avec une goutte de
liquide vaisselle pour enlever la poussière ou la saleté. N'utilisez pas de
détergents forts ni de solvants car cela abîmerait le plastique. A l'aide d'un
pinceau sec (25 mm), enlevez la poussière des
grilles. Si le cordon d'alimentation est endommagé, il doit être remplacé par un
électricien confirmé.
Procédez comme suit :
• Connectez le câble marron sur le bornier libellé ''L''.
• Connectez le câble bleu sur le bornier libellé ''N''.
• Connectez le câble vert/jaune sur le bornier libellé ''E'' ou portant le symbole
terre.
• Vérifiez que le serre-câble est positionné correctement (sur la gaine extérieure
du câble) et qu'il est bien serré.
RANGEMENT
Quand vous ne l'utilisez pas ou en cas d'intempéries, le tissu noir protecteur de
saleté et de poussière doit être utilisé. Vérifiez toujours que le radiateur est
débranché et ne peut pas être accidentellement allumée quand la protection anti-
saleté et poussière est utilisée.
ELIMINATION ET RECYCLAGE
Vous ne devez pas jeter cet appareil avec les ordures ménagères.
La plupart des communes disposent d'un système de collecte spécifique pour ce
type d'appareils et la collecte est gratuite.
Si ce n'est pas la cas, renseignez-vous auprès de votre mairie.
Quand vous remplacez l'appareil existant par un nouvel appareil neuf, votre
revendeur peut se charger du recyclage de votre ancien appareil
CARACTERISTIQUES TECHNIQUES
Dimensions: 260×525×230mm
Poids : 1,98kg
Alimentation : 230V ~
Consommation : 2000W
Courant de Fonctionnement : 8,7A
Taup IP IPX4

11
GARANTIE
•Prem-I-Air garantit ce produit contre tout défaut de fabrication ou de
matériaux pendant douze mois.
•Si ce radiateur est utilisé dans des conditions autres que celles
recommandées dans cette notice, à des tensions autres que celles
indiquées sur l'appareil, la garantie est annulée. De même, toute tentative de
réparation ou modification annulera la garantie.
•Le produit que vous avez acheté peut différer légèrement de l'illustration.
•Cette garantie est en sus, et n'affecte pas vos droits statutaires.
•Notre garantie est gérée par nos revendeurs.
•Si votre produit arrive endommagé, vous devez contacter votre revendeur
chez lequel vous avez acheté votre produit.
•Les coordonnées du revendeur sont indiquées sur la facture voyageant avec
le produit, ou sur l'e-mail que vous avez reçu quand vous avez passé votre
commande. Ne contactez pas Prem-i-air, seul votre revendeur peut
s'occuper du remplacement du produit.
•Si le produit doit être réparé ou remplacé, vous devez contacter le revendeur
qui vous a vendu l'appareil.
•Les coordonnées du revendeur sont indiquées sur la facture voyageant avec
le produit, ou sur l'e-mail que vous avez reçu quand vous avez passé votre
commande.
•Si vous avez reçu votre produit et avez besoin d'assistance technique
concernant son utilisation, nous vous remercions de bien vouloir contacter
notre service d'assistance au 01.30.34.48.60.
ALTAI EUROPE Ltd
Z.A. Du Bel Air
17 D rue de Creil
95340 BERNES-SUR-OISE
website: www.prem-i-air.eu
Table of contents
Languages:
Other Prem-I-Air Patio Heater manuals