BIGHORN SRPG18003 User manual

Pellet Pizza Oven
Model# SRPG18003
Please kindly e-mail our customer service :Questions, problems, missing parts?
1
These instructions are for your safety. Please read through them thoroughly before use and retain them for future reference.
ƔPlease dispose all plastic bags carefully and keep it away from children.
ƔCheck the part and make sure you have all of the parts listed. If not, contact your local store who will be able to help you.
ƔTake a few moments to familiarize yourself with the contents & before starting check all holes are clear of any paint residue.
ƔWhen you are ready to start, make sure that you have plenty of space and a clean dry area for assembly.
ƔImportant - Whilst every care is taken in the manufacture of this product, care must be taken during assembly in case sharp
edges are present.
ƔWARNING – Pellet pizza oven give off CARBON MONOXIDE when used, which is poisonous and can kill. DO NOT use a pizza
oven indoors or either in a tent, caravan or awning.
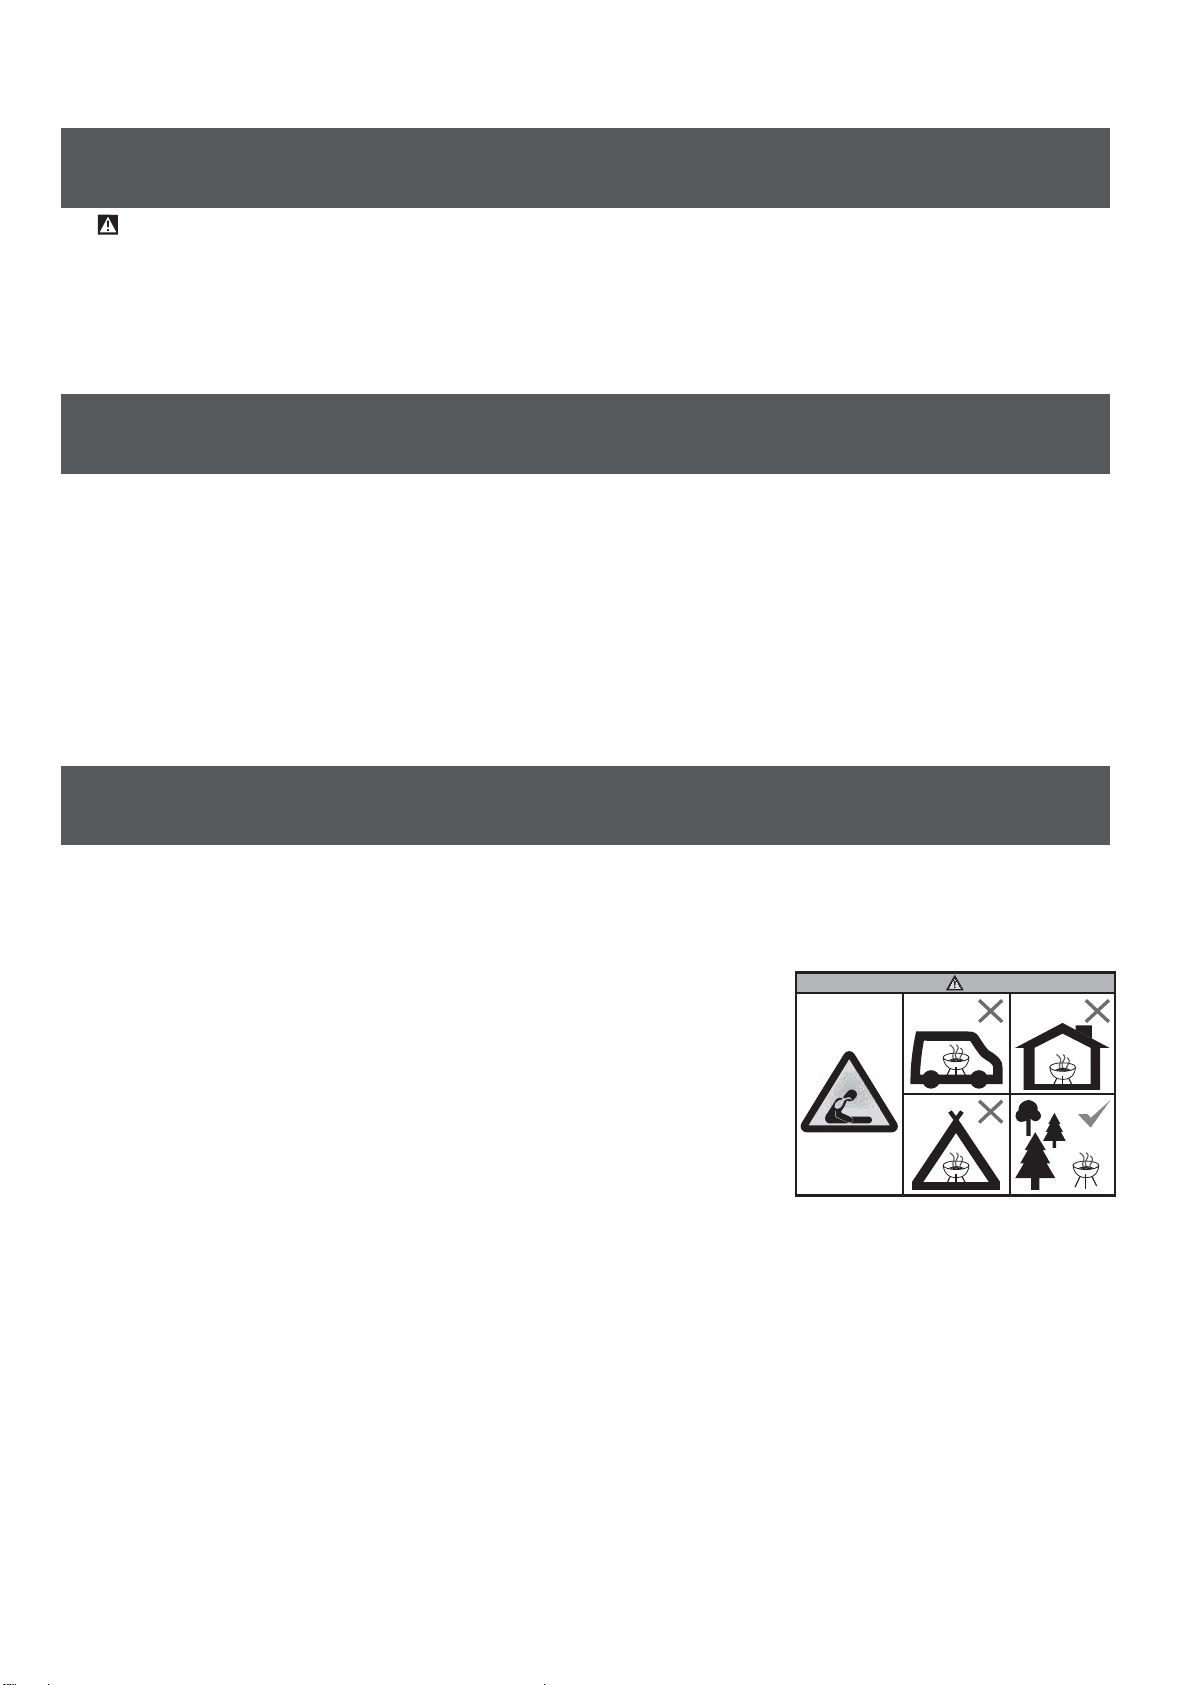
ƔWARNING - Do not use indoors! OUTDOOR USE ONLY. Do not use the barbecue in a confined and/or habitable space e.g.
houses, tents, caravans, motor homes, boats. Danger of carbon monoxide poisoning fatality.
ƔDO NOT use this product as a furnace.
ƔEnsure that the product is positioned on a permanent, flat, level, heat resistant
non-flammable surface always from flammable items.
ƔAlways stand your barbecue on a firm surface away from wooden fences or
overhanging trees.
ƔEnsure the product has a minimum of 2 m overhead clearance and has a
minimum of 2 m clearance from other surrounding items.
ƔWARNING! Do not use spirit or petrol for lighting or relighting! Use only firelighters
complying to en 1860-3!
ƔDO NOT handle or move the product whilst alight as it will become hot.
ƔNEVER leave a burning fire unattended.
ƔKeep children and pets at a safe distance from the product when in use.
ƔDO NOT cook before the fuel has a coating of ash.
ƔThe pizza oven shall be heated up and the fuel kept red hot for at least 15 minutes prior to the first cooking on the pizza oven.
ƔBe careful when handling metal parts of pizza oven as there are likely to become hot.
Ɣ
ƔEnsure that the pizza oven has cooled down completely before removing ash.
ƔKeep a fine water sprayer at hand to extinguish any small flare-ups, otherwise use baking powder or salt to extinguish.
ƔTo extinguish the unit - stop adding fuel and allow the fire in the pizza oven to die or douse with water.
ƔTo prolong the life of your pizza oven grill do not leave it outside unprotected, use a suitable pizza oven cover when not in use.
ƔDO NOT store flammable materials near this product.
ƔDO NOT use aerosols near this pizza oven.
Ɣ
Ɣ
DO NOT use coal in this product.
ƔPlease read and follow this advice when cooking on your grill.
ƔALWAYS wash your hands before or after handling uncooked meat and before eating.
ƔALWAYS keep raw meat away from cooked meat and other foods.
ƔBefore cooking ensure pizza oven grill surfaces and tools are clean and free of old food residues.
ƔDO NOT use the same utensils to handle cooked and uncooked foods.
ƔEnsure all meat is cooked thoroughly before eating.
ƔCAUTION - eating raw or under cooked meat can cause food poisoning (e.g. bacteria strains such as E.coli).
ƔTo reduce the risk of under cooked meat cut open to ensure it is cooked all the way through internally.
ƔCAUTION - if meat has been cooked sufficiently the meat juices should be clear in colour and there should be no traces of
pink/red juices or meat colouring.
ƔPre-cooking of larger meat of joints is recommended before finally cooking on your barbecue.
ƔAfter cooking on your pizza oven always clean the grill cooking surfaces and utensils.
Before you start
Food cooking information
Safety warning
2
DO NOT attmpt to move the product when it is hot or in using.
Flames may blow outside of the metal as below:
a. at the back,where flames burns;
b.from the top of hopper assembly when the lid is opened;
c.from the front of the pizza oven when open the door;
d.from the top of the chimney.
Ɣ
ƔModification of the pizza oven may be dangerous, is not permitted, and will nullify any warranty.
ƔFailure to follow the instructions in this manual could result in serious injury or property damage.
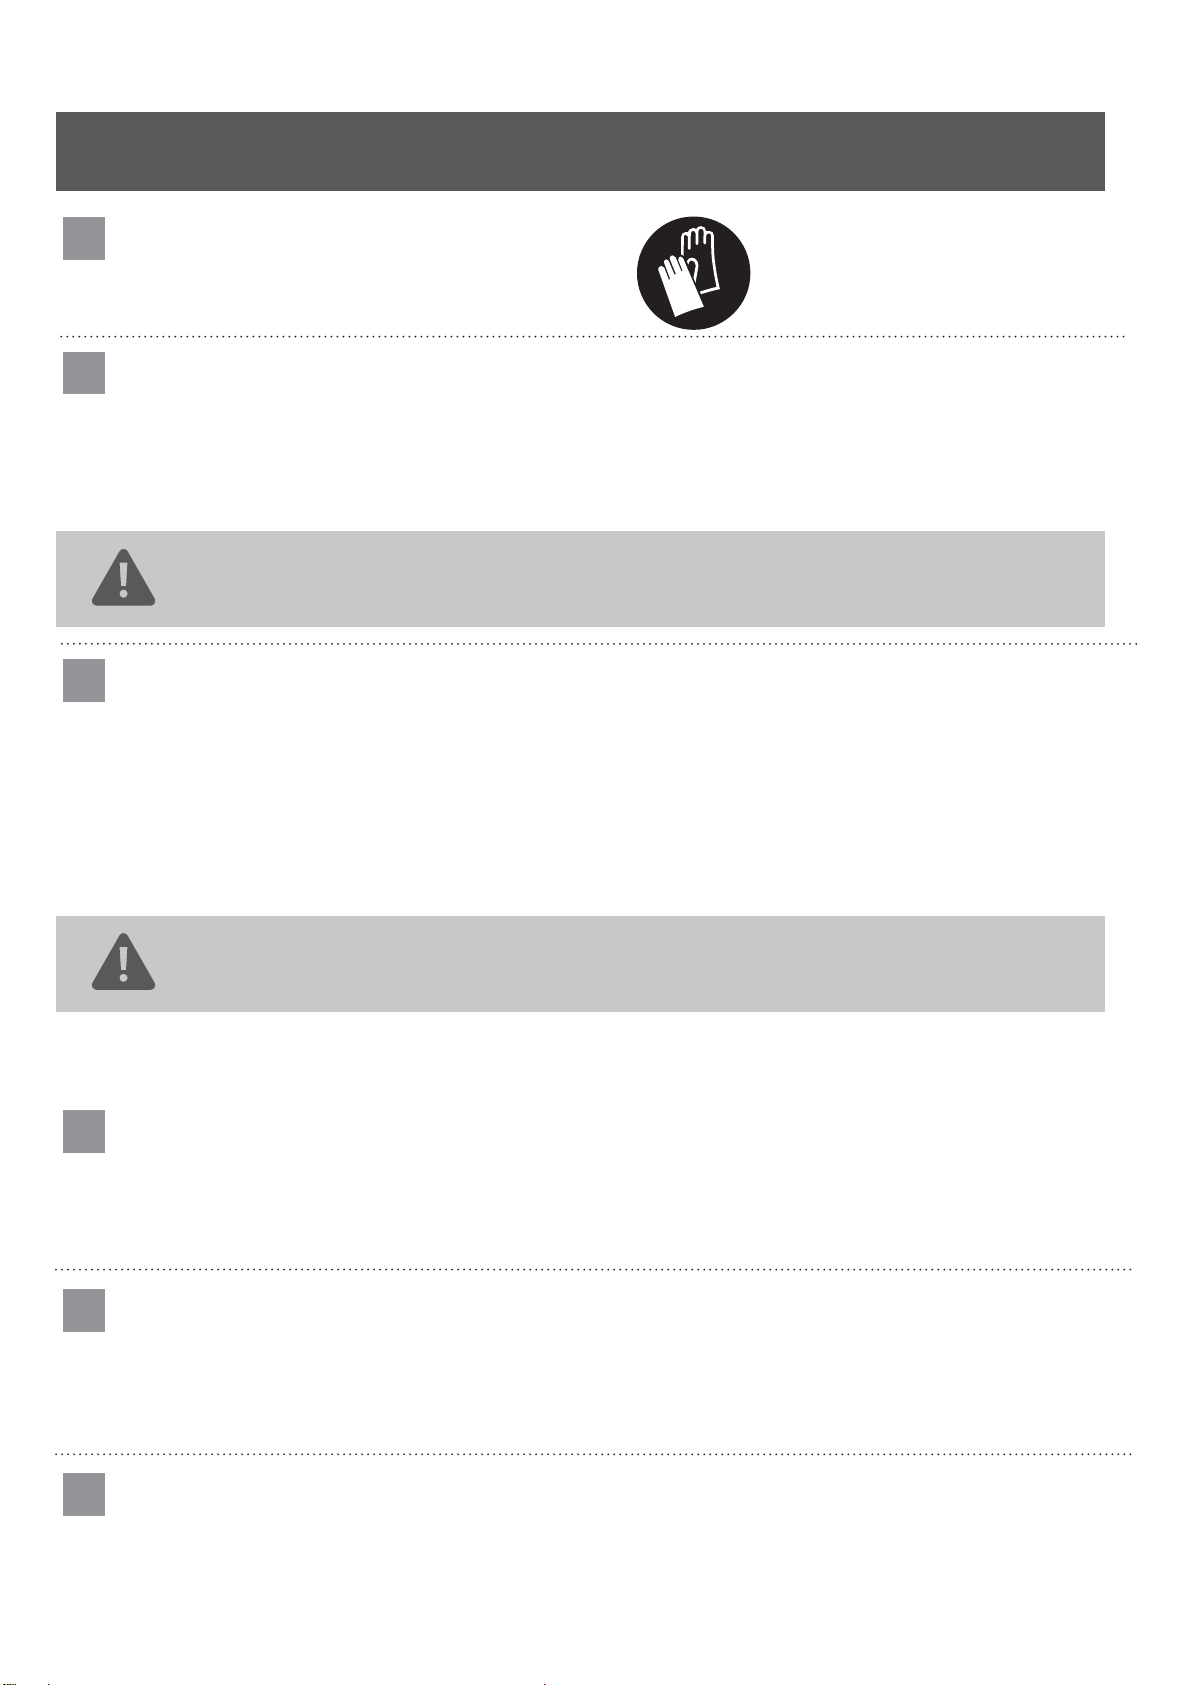
Always use heat resistant gloves when handling the product. Do not touch any metal parts in using, only touch the door
handle when open the door.
Use
Protection
Things to check before you start
ƔPlease dispose all plastic bags carefully and keep it away from children.
ƔCheck the part and make sure you have all of the parts listed. If not, contact our customer service department who will be able
ƔTake a few moments to familiarize yourself with the contents & before starting check all holes are clear of any paint residue.
ƔWhen you are ready to start, make sure that you have plenty of space and a clean dry area for assembly.
IMPORTANT - Whilst every care is taken in the manufacture of this product, care must
be taken during assembly in case sharp edges are present.
Lighting procedures
ƔPut the pellet grid into the combustion chamber.
ƔSet the pizza oven up in a suitable position, on a level surface away from areas likely to catch fire. The base of the grill will get
hot so ensure it stands on a suitable surface.
ƔPlace the pellets on the pellet grid and ignite the pellets on the top with refillable butane utility lighter.
ƔWhen the pellets are burning, put the combustion chamber into the body through the handle.
ƔClose the door so that the pellets burn completely to bake the pizza.
ƔWhen burning is established spread the fuel out evenly.
WARNING! The pellet will be very hot so take suitable precautions.
ƔNever touch metal parts which may be hot.
ƔDo not cook before the fuel has a coating of ash.
Before each cooking session
ƔTo prevent foods from sticking to the pizza stone, please clean the pizza stone before each use.
ƔFill the pellet fuel compartment with pellet, light the pellet and allow the pellet to become red-hot. It is recommended to
wait for at least 18 minutes before cooking. Once the pellet has turn ash grey it is now ready to be used for cooking.
Replenishing the pellet
ƔTo replenish the pellet during use, use the handle to open hopper assembly lid, then use the hopper shovel to take some pellets
and pour them into the hopper assembly. Place the hopper assembly lid back
on the hopper assembly with the handle.
ƔDuring cooking, keep the pellet in hopper assembly more than half capacity of the hopper assembly.
ƔMake sure oven gloves or mitts are used.
Extingushing the pizza oven
Ɣ
ƔEnsure that the pizza oven has cooled down completely before removing charcoal ash.
3
01
02
03
06
05
04
to help you.
Do not leave handle on the pizza oven.Ɣ
Take out the pellet grid and fire box assembly(E&G) and use water to extinguish the fire when finished the cooking.
Pour the remaining hardwood pellets into a bucket of water.
ƔAlways use heat resistant gloves when handling the product.
Product maintenance
The golden rules for care
Good and regular care can extend the life and maintain the condition of your pizza oven.
Ɣ
IMPORTANT - Please note that it is normal, when in use, that the coated metal
surfaces on the pizza oven may discolour due to the heat generated by the burning
pellet.The coating may appear to smoulder / smoke and the surfaces darken,
At the beginning of the season
ƔCheck to ensure all components are secure.
ƔCheck and tighten all screws and bolts.
Before each use
ƔCheck to ensure the cooking surfaces are clean & free from rust.
After each use
ƔTo prolong the life of your pizza oven do not leave it outside unprotected, use a suitable pizza oven cover when not in use.
ƔCooking surfaces (pizza stone, etc)
Clean with hot, soapy water. To remove any food residue, use a mild cream cleaner on a non-abrasive pad. Rinse well and dry
thoroughly. We do not recommend cleaning the pizza stone in a dishwasher.
ƔAsh tray
After every use, check the pellet fuel. Discard the ash, and wash any remaining ash or fat from the tray/collector. Failure to clean
thoroughly may affect your cooking performance. Use the tool provided to remove the collector as it may be hot.
ƔPizza oven body
Regularly remove excess grease or fat from the pizza oven body with a soft plastic or wooden scraper. It is not necessary to remove
all the grease from the body. If you need to clean fully, use hot soapy water and a cloth, or nylon-bristled brush only. Remove
pizza stone before full cleaning.
ƔAfter 2 or 3 uses
Check and tighten all screws and bolts.
At the end of the season
ƔIn order to extend the life and maintain the condition of your pizza oven, we strongly recommend that the unit be covered when left
outside for any length of time, especially during the winter months.
ƔDo not leave the pizza oven exposed to outside weather conditions or stored in damp, moist areas.
Ɣproduct.
4
01
02
03
04
05
Ɣ
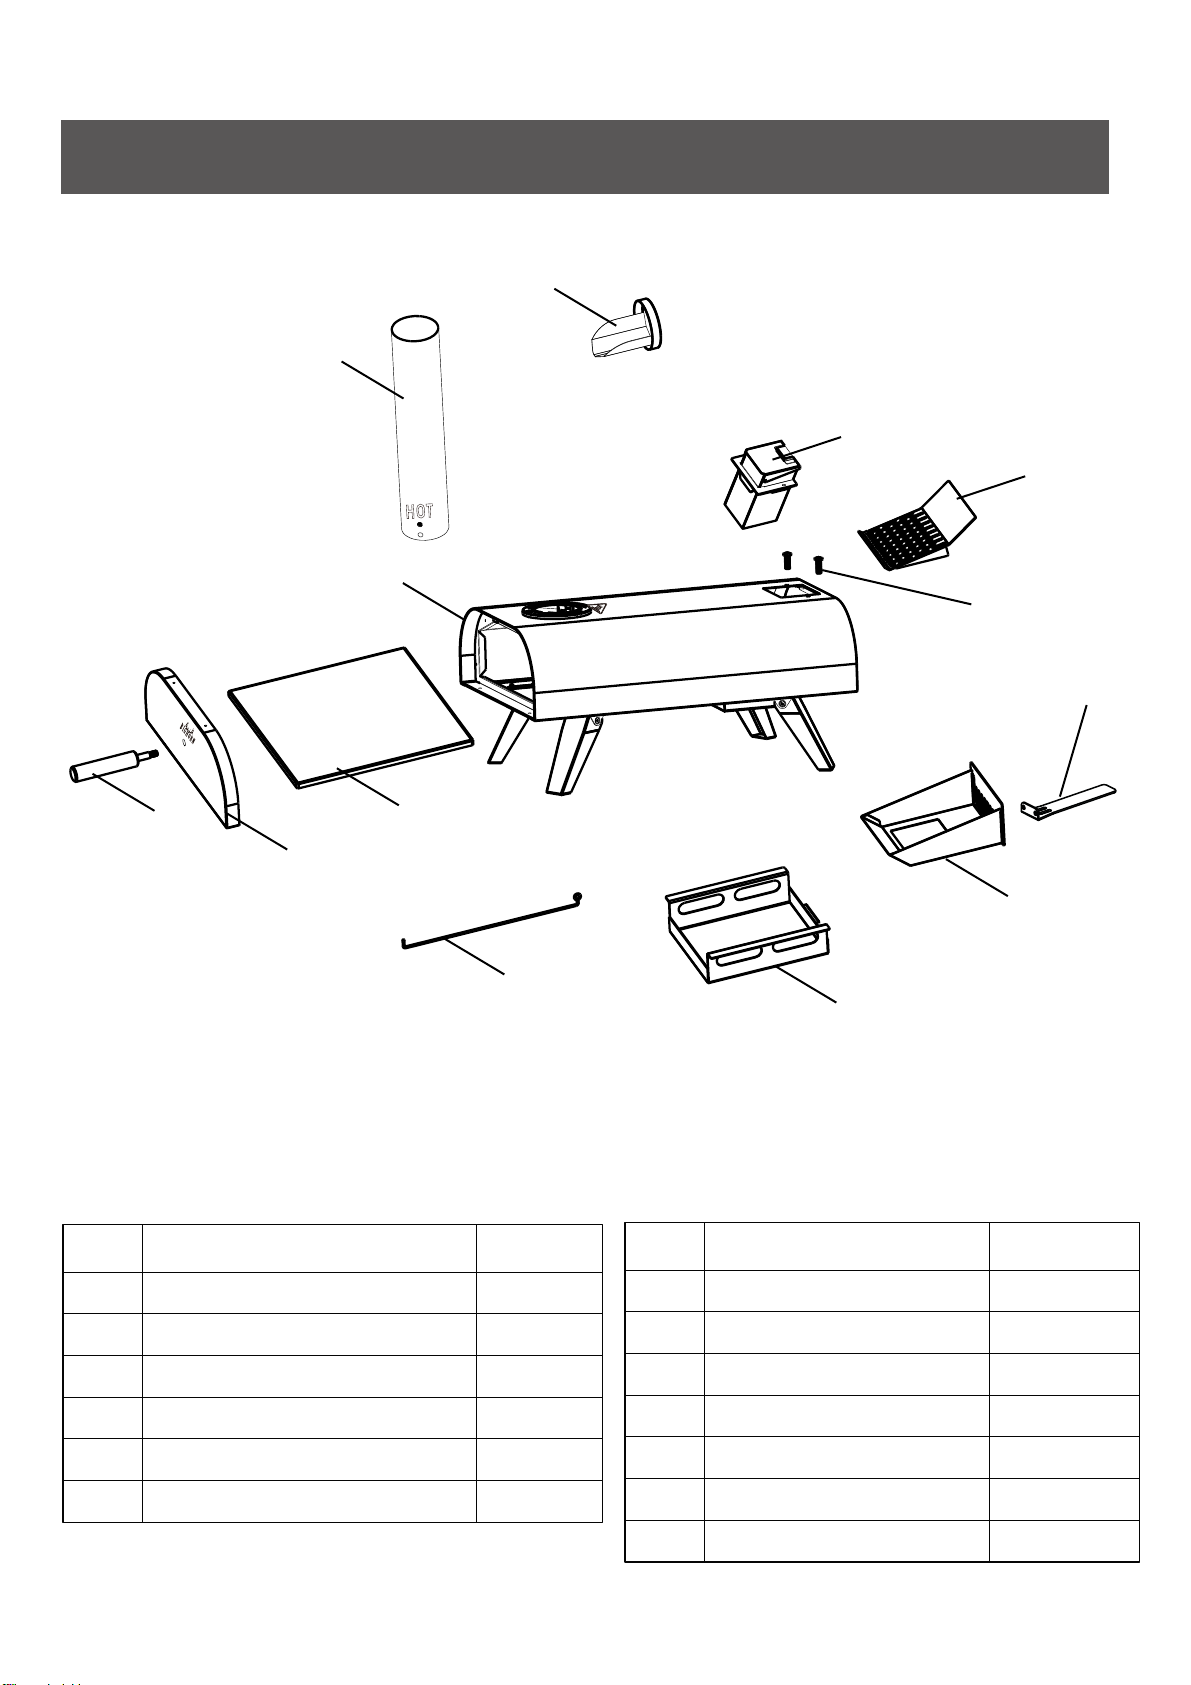
Exploded View
A
B
C
D
E
M
F
G
H
I
J
K
L
PART DESCRIPTION
Pizza Oven Body Assembly
Chimney Pipe
Chimney Lid & Hopper Shovel
Hopper Assembly
Pellet Grid
A
B
C
D
E
F
1
1
1
1
1
1
QUANTITY PART DESCRIPTION
G
H
I
J
K
L
M
1
1
1
1
1
1
2
QUANTITY
Door Handle
Door
Pizza Stone
Poker
ylbmessA xoB eriF
Ash Tray
Fire Box Assembly Handle
Parts List
5
M4 Bolt
+27

Assembly Instructions
Step 1
Step 2
With assistance, place the pizza oven body
assembly (A) upside down on a soft, level surface.
Then open four legs (completed pre-installed)
as illustrated.
A
A
H
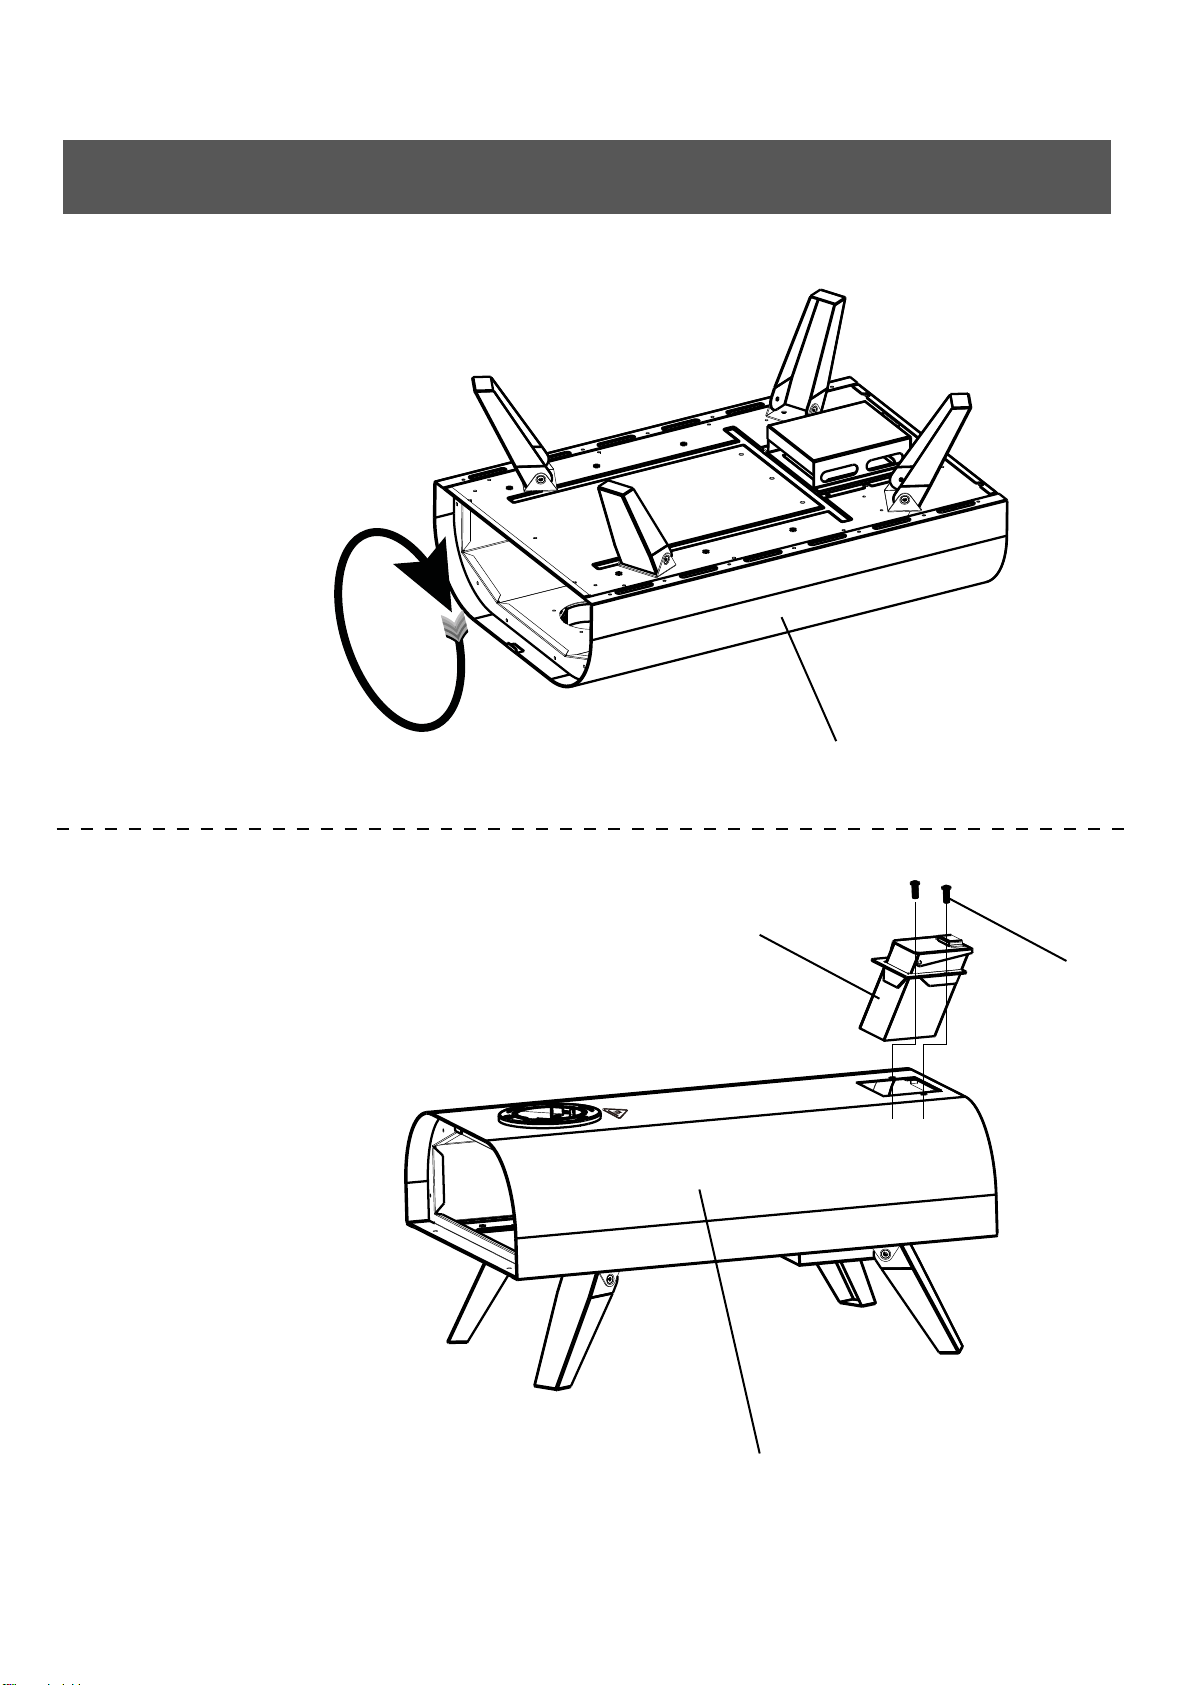
Install the ash tray (H) to the pizza oven body assembly (A) as illustrated.
6
Assembly Instructions
Step 3
Step 4
Flip over the pizza oven body assembly (A) as illustrated.
A
7
A
D
Take out two M4x10 screws(M) from pizza oven
body assembly(A), install the hopper assembly(D)
to the pizza oven body assembly(A) with two M4x10
screws (M) as illustrated.
M

Assembly Instructions
Step 5
Step 6
8
J
A
Put the pizza stone (J) into the pellet pizza
oven assembly (A) as illustrated.
L
K
Whirl the door handle (L) clockwise by hand to the door (K) as illustrated.

+27
A
Assembly Instructions
Step 7
Step 8
9
B
A
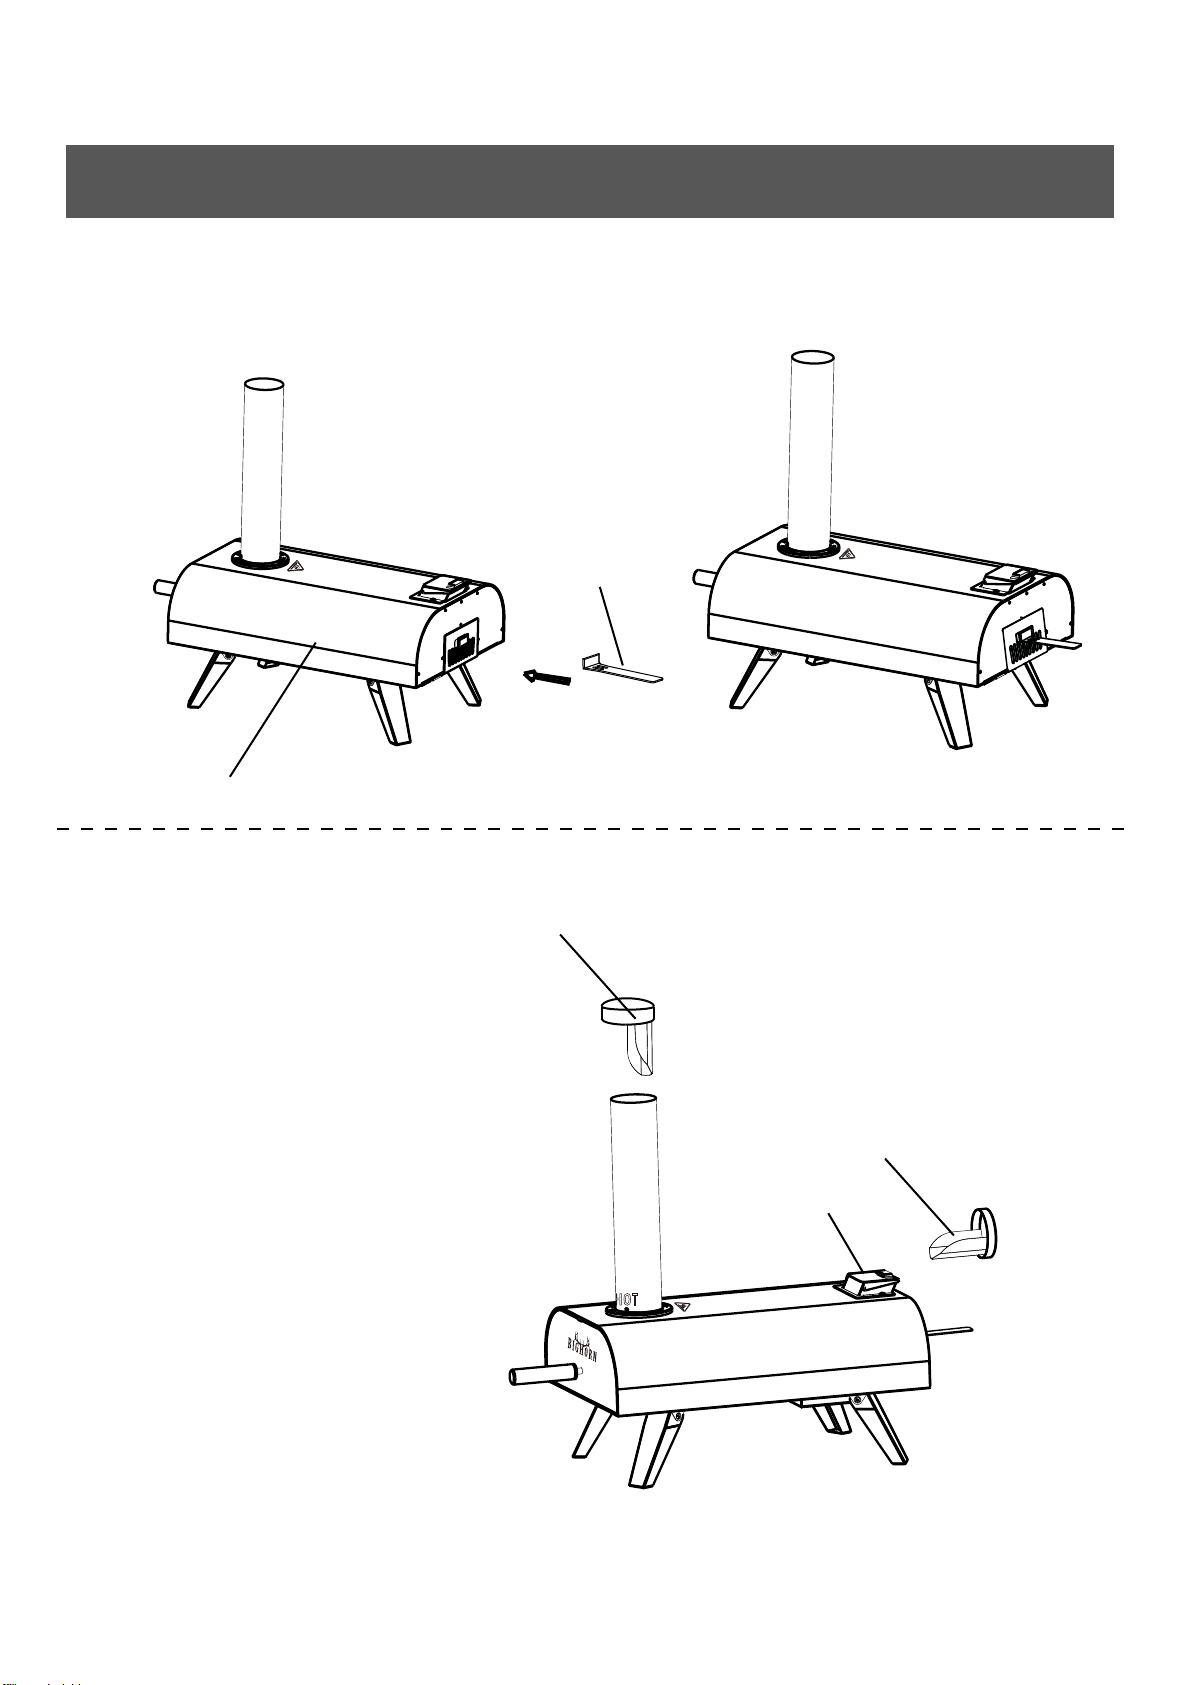
Install and whirl the chimney pipe (B)
clockwise by hand to the pizza oven
body assembly (A) as illustrated.
Place the pellet grid (E) to the
fire box assembly (G) first,
then put into the pizza oven body
assembly (A) as illustrated.
E
G
A
Assembly Instructions
Step 9
Step 10
10
Install the ash tray assembly handle (F) to the pizza oven body assembly (A) as illustrated.
The chimney lid & hopper
shovel (C) can be used to cover
the chimney pipe (B) , or to shovel
particles as illustrated.
C
F
A
C
D
Use Instruction
11
Cleaning
Lightening
1.Make sure clean the ash inside the whole pizza oven carefully after each use, and tap the chimney
pipe slightly to shake off the dust;
2.Clean the combustion chamber( where the food put inside) and pizza stone with kitchen paper;
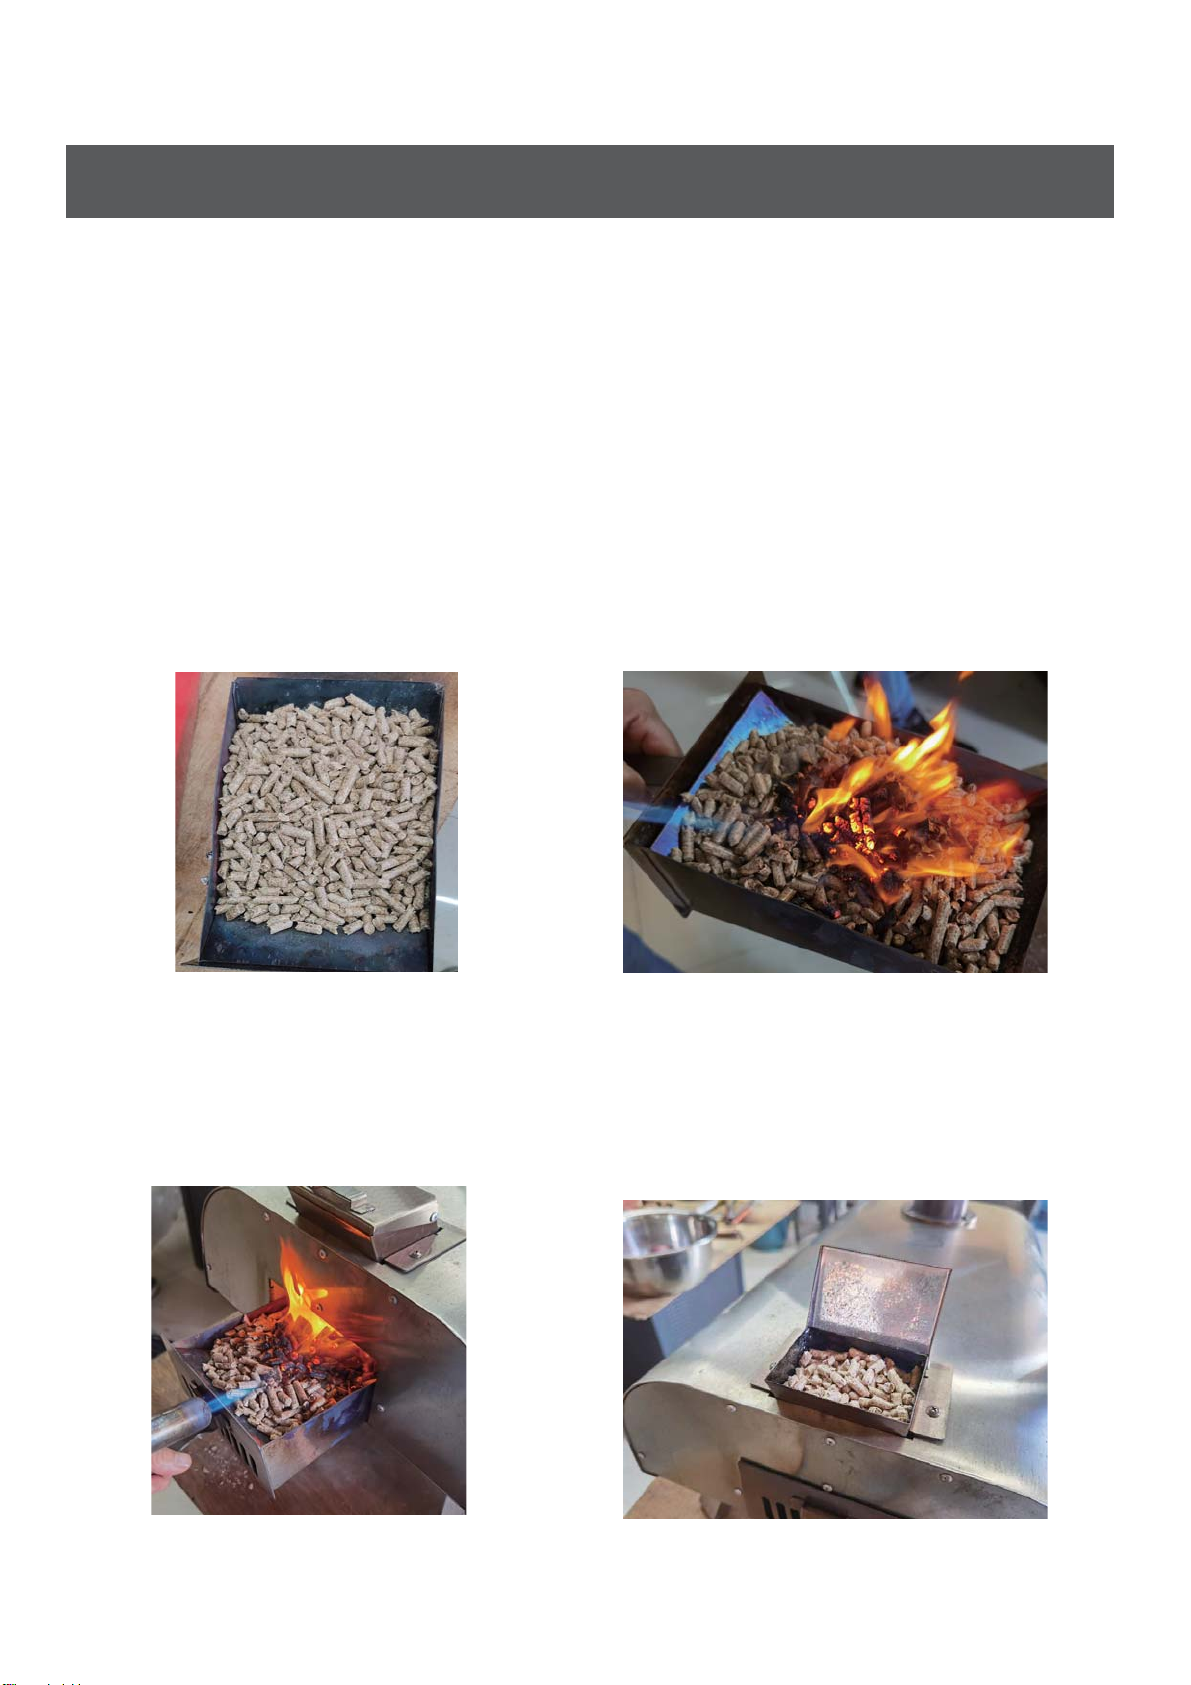
1.Remove the hopper shovel(C) from the top of the chimney pipe(B);
2.Put the door onto position and make sure only take it off when adding or operating with food;
3.Take out the pellet grid and fire box assembly
(E&G)with the handle, then put 100% natural
hardwood pellets with hopper shovel (C) as
the level picture shown( around 300g);
4.Place the fire box assembly onto an even and
nonflammable surface. Ignite the hardwood pellets
with a igniter or fire starter and wait for around
45-90 seconds to allow the fire on;
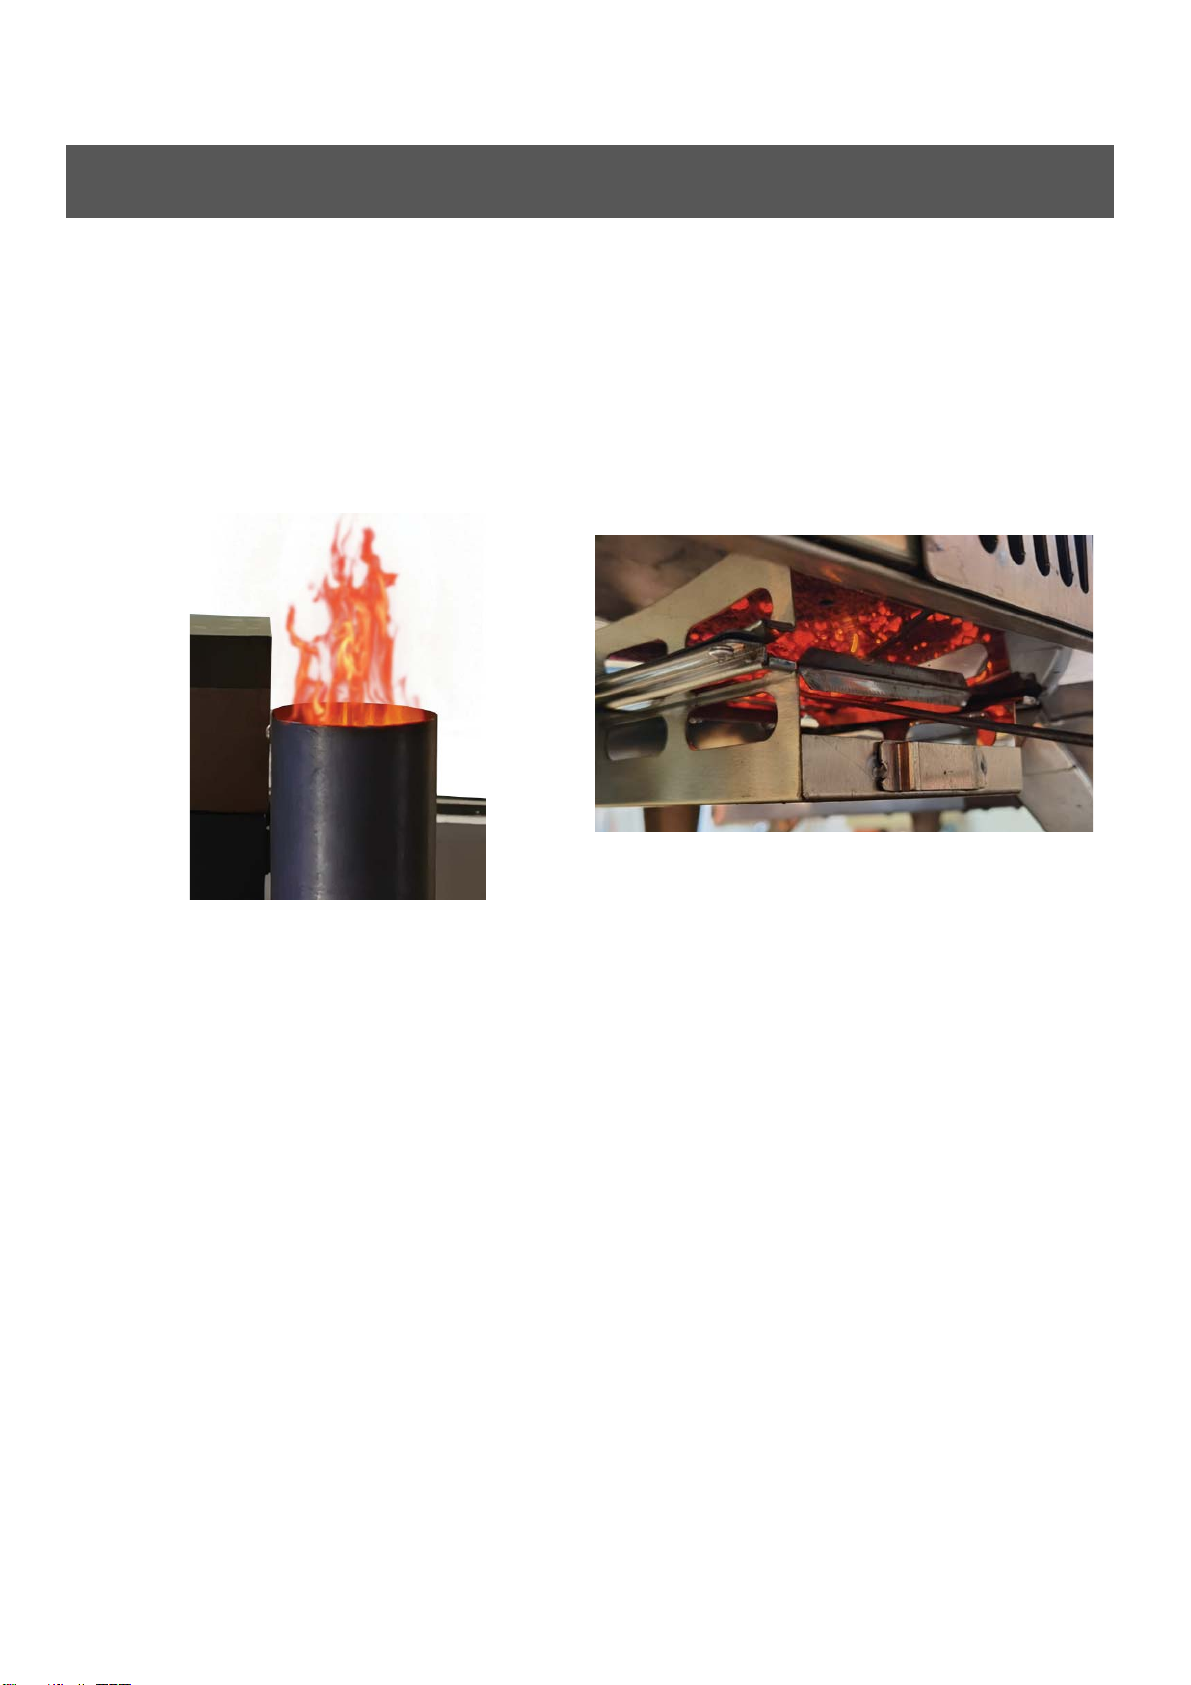
5.Put the pellet grid and fire box assembly into 6.Open hopper lid carefully with handle and add
the back of pizza oven with the handle, put hardwood pellets about 450g with hopper
the door on and cover the hopper lid. Keep shovel when more flames being watched on top
burning for about 18 minutes; of the chimney pipe;
Use Instruction
12
Cooking
1.Baking pizza
7.Close hopper lid with handle and wait for
2-3 minutes. When the flame being watched on
top of the chimney again, it’s right time to cook
your food! Take off the door carefully and put
the food onto middle of pizza stone inside the
combustion chamber, then close the door;
8.When burning time exceeds 1 hour, please use the
poker to remove the ash/dust in the ash grid, so that
it can achieve better burning with air venting.
1) Smear some olive oil or cooking oil on the surface of pizza peel(not included ) to avoid pasting;
2) Put the pizza on pizza peel and make your pizza with your desired add-ons;
3) Put the pizza in the pizza stone with pizza peel, then close the door and bake for about 15 seconds;
4) After 15 seconds, rotate pizza 90 degrees with pizza peel or baking tools, then close the door to
bake another 15 seconds. Repeat the same process until the pizza is rotated and baked 360 degrees;
5) Open the door and take out the pizza. Now, enjoy your pizza!
After the first round of baking is completed, if you want to continue to cook another pizza, please
control the baking time around 10 seconds between each rotating since the temperature inside
the oven reaches up to 350 degrees.
*:KHQWKHSHOOHWIXHOLQWKHSL]]DRYHQLVEXUQLQJWKHGRRUPXVWEHFORVHGXQOHVVIRRGQHHGVWREH
SXWLQRUWDNHQRXW7KLVLVWRSUHYHQWWRRPXFKDLUFRPLQJLQIURPWKHRYHQGRRUZKLFKPD\
FDXVHKHDY\VPRNHLQVLGHWKHILUHER[DVVHPEO\(*DQGKRSSHUDVVHPEO\'
*$OZD\VRSHUDWHWKHGRRUZLWKSURYLGHGKDQGOH
Remind:

Use Instruction
13
2. Cooking Steak
1) Put the marinated steak to pizza stone;
2) Close the door and cook 20 seconds, After 20 seconds, open the door and rotated the steak 180
degrees with tools, then close the door and cook another 20 seconds;
3) Flip over the steak and repeat above operateion for another side of the steak;
4) Finished step 2) and step 3), the total cooking time is around 80 seconds, and now you have a
steak in medium;
5) If you want to medium well steak, adjust each cooking time to 25 seconds, total cooking time is
100 seconds;
6) Adjust the cooking time according to the actual temperature of the pizza oven and personal
preferences.
You can use this pizza oven to cook more than pizza and steak. Please enjoy
your cooking journey!
*:KHQWKHSHOOHWIXHOLQWKHSL]]DRYHQLVEXUQLQJWKHGRRUPXVWEHFORVHGXQOHVVIRRGQHHGVWREH
SXWLQRUWDNHQRXW7KLVLVWRSUHYHQWWRRPXFKDLUFRPLQJLQIURPWKHRYHQGRRUZKLFKPD\
FDXVHKHDY\VPRNHLQVLGHWKHILUHER[DVVHPEO\(*DQGKRSSHUDVVHPEO\'
*$OZD\VRSHUDWHWKHGRRUZLWKSURYLGHGKDQGOH
Remind:

Warranty Information
14
This warranty is valid for the original consumer purchaser only and excludes industrial,
commercial or business use of the product, product damage due to shipment or failure which
results from alteration, product abuse, or product misuse, whether performed by a contractor,
service company, or consumer. We will not be responsible for labor charges and / or damage
incurred in installation, repair or replacement, nor for incidental or consequential damage.
The appliance has been manufactured under the highest standards of quality and workmanship.
We warrant to the original consumer purchaser that all aspects of this product will be free of
defects in material and workmanship for one year from the date of purchase. A replacement
for any defective part will be supplied free of charge for installation by the consumer. Defects
or damage caused by the use of other than genuine parts are not covered by this warranty.
This warranty shall be effective from the date of purchase as shown in the purchaser’s receipt.
Need help?
Please kindly e-mail our customer service:
cs@shinerichgroup.com
Table of contents
Other BIGHORN Kitchen Appliance manuals


