BigPond Elite User manual

TEL7800_WMC_UserGuide_R11.indd 41 24/7/08 3:07:11 PM
USER
GUIDE

BigPond Elite™ Wireless Broadband Network Gateway USER GUIDE
2
TABLE OF CONTENTS
1– IntroductIon ........................................................................................................ 5
1.1 FEATURES .................................................................................................................... 6
1.2 PACKAGE CONTENTS ................................................................................................... 7
1.3 LED INDICATORS.......................................................................................................... 8
1.4 PANELS......................................................................................................................... 9
2– QuIck Setup (WIth uSB key)................................................................................. 11
2.1 SETUP PROCEDURE..................................................................................................... 11
3– AdvAnced Setup (WIthout uSB key) ................................................................... 13
3.1 SETUP PROCEDURE..................................................................................................... 13
3.2 TRANSMISSION CONTROL PROTOCOL/INTERNET PROTOCOL (TCP/IP) SETTINGS.. 13
3.3 DEFAULT SETTINGS..................................................................................................... 20
3.4 LOGIN PROCEDURE .................................................................................................... 21
WeB uSer InterfAce
4–BASIc ……………........................................................................................................23
4.1 WEB USER INTERFACE HOMEPAGE............................................................................. 23
5– next G™ SettInGS................................................................................................... 26
5.1 NEXT G™ SERVICE SETUP..............................................................................................26
5.1.1 PROFILE SETUP..................................................................................................26
6– WI-fI ……............................................................................................................... 28
6.1 SETUP .........................................................................................................................29
6.2 SECURITY ................................................................................................................... 31
6.3 CONFIGURATION ........................................................................................................33
6.4 MEDIA ACCESS CONTROL (MAC) FILTER.................................................................... 36
6.5 WIRELESS BRIDGE ..................................................................................................... 37
6.6 STATION INFO..............................................................................................................38
7– AdvAnced SettInGS .............................................................................................. 40
7.1 LOCAL AREA NETWORK (LAN).....................................................................................40
7.2 NETWORK ADDRESS TRANSLATION (NAT) ................................................................ 42
7.2.1 PORT FORWARDING ......................................................................................... 42
7.2.2 PORT TRIGGERING .......................................................................................... 44
7.2.3 DEMILITARIZED ZONE (DMZ) HOST ................................................................ 45
7.3 SECURITY .................................................................................................................... 46
7.3.1 IP FILTERING .................................................................................................... 46
7.3.2 PARENTAL CONTROL........................................................................................ 48

BigPond Elite™ Wireless Broadband Network Gateway USER GUIDE
3
7.4 ROUTING .................................................................................................................... 48
7.4 .1 STATIC ROUTE.................................................................................................. 48
7.4 . 2 DYNAMIC ROUTE ............................................................................................. 49
7.5 DOMAIN NAME SYSTEM (DNS) .................................................................................. 50
7.5.1 DOMAIN NAME SYSTEM (DNS) SERVER............................................................ 50
7.5.2 DYNAMIC DOMAIN NAME SYSTEM (DYNAMIC DNS)........................................ 52
7.6 DEVICE SETTINGS ...................................................................................................... 54
7.6.1 BACKUP SETTINGS ........................................................................................... 54
7.6.2 UPDATE SETTINGS ........................................................................................... 54
7.7 DEVICE SETTINGS ...................................................................................................... 56
7.7.1 BACK UP SETTINGS .......................................................................................... 56
7 .7.2 UPDATE SETTINGS ........................................................................................... 56
7.7.3 RESTORE DEFAULT ........................................................................................... 57
7.7.4 UPDATE FIRMWARE.......................................................................................... 58
7.8 ACCESS CONTROL…................................................................................................... 59
7.8.1 SERVICES ......................................................................................................... 59
7 .8.2 PASSWORDS .................................................................................................... 60
7.9 SIMPLE NETWORK MANAGEMENT PROTOCOL (SNMP).............................................. 61
7 .10 SIMPLE NETWORK TIME PROTOCOL (SNTP)............................................................ 62
7.11 USB SETTINGS .......................................................................................................... 63
7.11.1 PRINT SERVER ................................................................................................ 63
7.11.2 USB STORAGE.................................................................................................. 73
7.12 SAVE AND REBOOT.................................................................................................... 77
8– dIAGnoStIcS ........................................................................................................ 79
8.1 DIAGNOSTICS ............................................................................................................ 80
8.2 SYSTEM LOG .............................................................................................................. 82
8. 3 NEXT G™ STATUS ........................................................................................................ 84
8.4 STATISTICS ..................................................................................................................86
8.4.1 LAN STATISTICS ................................................................................................86
8.4.2 NEXT G™ STATISTICS ........................................................................................ 86
8.5 ROUTE ........................................................................................................................ 87
8.6 ADDRESS RESOLUTION PROTOCOL (ARP) ................................................................ 88
8.7 DYNAMIC HOST CONFIGURATION PROTOCOL (DHCP) ............................................. 89
8.8 PING ........................................................................................................................... 90

1
TEL7800_WMC_UserGuide_R11.indd 1 24/7/08 3:06:25 PM
GETTING
STARTED

BigPond Elite™ Wireless Broadband Network Gateway USER GUIDE
5
Welcome to BigPond Wireless Broadband – thanks for choosing us!
This g u i d e is designed to help you get t he most out of your BigPo n d Wire l e ss B roadband
exp e ri e n ce . We’re sure you’re i t c hing to get st a r t e d , s o d o n’ t f e e l t h a t y o u h ave to st u d y i t a l l
right away. However, it’s important to re a d t h rough the Quic k S e t u p section to ensure y o u set
up your BigPond EliteTM Wireless Bro a d b a n d N e t w o rk Gateway correctly. T h e re st wil l b e t here
when you need it.
As a Big Pond Wireless Bro a d b a n d M e m b e r, y o u c a n n o w e n j o y a h u g e ra nge of intern e t services,
including state of the art security options, great account tools, flexible plans, extra email
features, worlds of ‘unmetered’ content, special shopping deals and lots more.
So let’s get started.
Make a note of your BigPond email address and password. Remember, your email address is your
username@bigpond.com. We suggest protecting your security by writing down an unmistakable
clue rather than your actual password.
INTRODUCTION

BigPond Elite™ Wireless Broadband Network Gateway USER GUIDE
6
1.1 FEATU R E S
• Co m b i n e s N e x t G ™ B roadband service , Wi - Fi and Et h e rnet gateway in one device
• Dual-band HSPA+/UMTS (850 / 2100 Mhz)
• Embedded multimode HSUPA/HSDPA/HSPA+/UMTS module
• 2 x USB 2.0 host ports
• WEP/WPA/WPA2 and 802.1x
• MAC address a n d I P f iltering
• Static route functions
• DNS Pro x y
• Integrated 802.11n AP (backward compatible with 802.11b/g)
• CLI command interface
• Web-based management
• Supports VPN Pass-through
• NAT / PAT
• DHCP Server/Relay/Client
• Configuration backup and restoration
GETTING STARTED

BigPond Elite™ Wireless Broadband Network Gateway USER GUIDE
7
1.2 PACKAG E C O NTENTS
Your package contains the following:
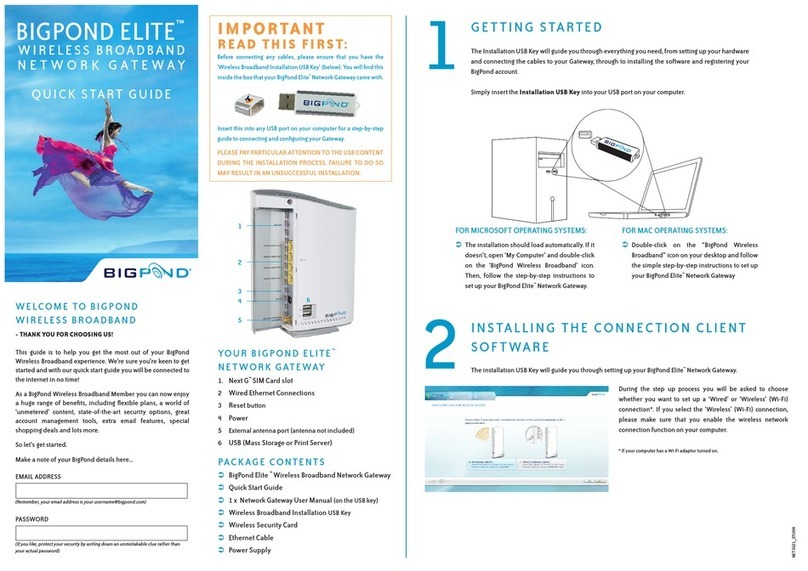
• Bigpond EliteTM Wireless Broadband Network Gateway
• Printed Quick Start Guide
• USB key (Containing Bigpond Connection Manager and User Guide)
• Et h e rn e t Ca b le
• Security Card
• Power Supply

BigPond Elite™ Wireless Broadband Network Gateway USER GUIDE
8
1.3 LED INDICATORS
The LED indicators are explained in the table below.
LED Icon Color Mode Description
Hig h Blu e On Hig h signa l stre ngth
O ff No a ctiv ity, gate way p ow ere d off o r on o t h er sign al st reng t h
Med Bl ue On Medi um signal st re ngt h
O ff No a ctiv ity. The ga te way is p owe red o ff or is c urre ntl y usi ng
a no t he r sign al st re ng t h
Lo w Bl ue On Low sign al st reng t h
O ff No a ctiv ity. The ga te way is p owe red o ff or is c urre ntl y usi ng
a no t he r sign al st re ng t h
3G Blue On Connection established with the 3G network
O ff Ei t her t h ere is n o ac tiv ity, the G at eway is pow ere d off, o r t here is
no cable or no powered device connected to the associated port
Blink Connecting with 3G network
LAN 1 ~4 Blue On Powered device connected to the associated LAN port (includes
de vices wi t h Wa ke-on -LAN cap abil it y whe re a slight v oltage is
supplied to an Ethernet connection)
Off No device connected or Connected device is off
Blink LAN activity present (traffic in either direction)
Internet
Blue On Internet connection established
Off No connection to the internet or gateway powered off
Blink Data is currently being transmitted through the Internet connection
Wi -Fi
Bl ue On Loca l Wi- Fi access t o t he Gate way is e nab le d and w orki ng
O ff Lo cal Wi -Fi a cce ss t o t h e Ga teway is dis ab led
Blink Data being transmitted or received over Wi-Fi.
POWER Blue On Power on
O f f Po we r o ff

BigPond Elite™ Wireless Broadband Network Gateway USER GUIDE
9
1.4 PANEL S
The rear and side panels shown below contain the ports for data and power connections.
6
7
1
2
3
4
5
(1) USIM card slot
(2) Fo u r R J - 45 Et hernet LAN ports
(3) Reset button
(4) Power jack for DC power input (12VDC / 1.5A).
(5) External 3G SMA Connector (Optional)
Note: The Gateway will automatically select to use either the internal or external 3G antenna during
power up based on whichever has the stronger signal. To switch between internal and external
an ten na , t h e Ga teway may requ ire a rebo ot
(6) USB1 Port
(7) USB2 Port

TEL7800_WMC_UserGuide_R11.indd 8 24/7/08 3:06:48 PM
QUICK
SETUP

BigPond Elite™ Wireless Broadband Network Gateway USER GUIDE
11
2.1 SETUP PROCEDURE (WITH USB KEY)
These steps explain how to quickly setup your Next G™ Gateway:
1: In sert your SIM card (until y o u h e a r a click) into t he USIM slot on t he rear of t he Gateway.
2: Co n n e c t t he yellow Et hernet cable to one of the yellow LAN p o r t s f o u n d a t t h e b a c k o f t h e
Gateway.
3: Co n n e c t t he ot her end of t he ye l l o w n e t w o rking cable to t he Et hern e t p o r t o n y o u r
computer.
4: Connect t h e p o w e r a d a p t e r t o t h e Power socket on t he back of t he Gateway.
5: Plug t h e p o w e r a d a p t e r i n t o a wall socket and press t he power button into t he ON
position.
6: Configure t he Gateway t h rough t h e Web Use r I n t e r f a ce ( W U I ) .
NOTE: Ch apt ers 4 t hro ugh 8 e xpla in how to se t up an d use the W UI
7: Save t he Gateway co n f igura t i o n a n d reboot (see se c t i o n 7.13 ) .
QUICK SETUP

TEL7800_WMC_UserGuide_R11.indd 21 24/7/08 3:06:56 PM
ADVANCED
SETUP

BigPond Elite™ Wireless Broadband Network Gateway USER GUIDE
13
3.1 SETUP PROCEDURE (WITHOUT USB KEY)
These steps explain how to quickly setup your Next G™ Gateway:
1: In sert your SIM card (until y o u h e a r a click) into t he USIM slot on t he rear of t he Gateway.
2: Connect t h e yellow Et h e rnet cable to one of t h e yellow LAN ports found at t he back of t h e
Gateway.
3: Co n n e c t t he ot her end of t he ye l l o w n e t w o rking cable to t he Et hern e t p o r t o n y o u r
computer.
4: Connect t h e p o w e r a d a p t e r t o t h e Power socket on t he back of t he Gateway.
5: Plug the power adapter into a wall socket and press the power button into the ON position
(depressed).
6: Configure t he Gateway t h rough t h e Web Use r I n t e r f a ce ( W U I ) .
NOTE: Ch apt ers 4 t hro ugh 8 e xpla in how to se t up an d use the W UI
7: Save t he Gateway co n f igura t i o n a n d reboot (see se c t i o n 7.13 ) .
3.2 TCP/IP SETTINGS
It is likely that your computer will automatically obtain an IP Address and join the network.
This is because t he Dynamic H o st Config u ra t i o n Protocol (DHCP ) server (on t h e d e v ice ) will
start automatically when your Gateway powers up.
This a u t o m a t ic assign m e n t require s t h a t D H CP is configure d o n y o u r computers. It is like l y
t h a t t his is alre a d y t he case , b u t s h o u l d y o u b e require d t o config u re t his, please see the
instructions on the following page.
ADVANCED SETUP

BigPond Elite™ Wireless Broadband Network Gateway USER GUIDE
14
W I N D O W S X P
To acce ss the dia l o g b o x t h a t a l l o w s y o u t o co n f igure your network co n n e c t i o n , click on Start >
Control Panel > Network Connections. Then right mouse click on the Local Area Connection and
select Properties. Select Internet Protocol (TCP/IP) then select Properties
DHCP MODE
You can set your PC to DHCP mode by selecting Obtain an IP address automatically in the dialog
box shown below.

BigPond Elite™ Wireless Broadband Network Gateway USER GUIDE
15
STATI C I P M O D E
The following steps show how to assign a Static IP addre ss t o y o u r P C u sing subnet 10 . 0 . 0 . x .
1: Ch a nge t h e I P a d d ress t o t h e d o m a i n o f 10.0.0.x. (1<x<254) wi t h su b n e t m a sk of
255 . 255.255.0.
2: Se t t h e d e f a u l t g a t e way a n d D N S server to t h e g a t e way’s I P a d d ress.
NOTE: Th e IP ad dre ss o f t h e ga teway is 10.0 .0 .138. ( De fau lt ), so t h e PC mu st b e set wi t h a d if fere nt I P. In
t he ca se be low, t he PC ’s IP ad dre ss is set as 10. 0.0 .2
3: Cl ick Ok to submi t t h e settings .

BigPond Elite™ Wireless Broadband Network Gateway USER GUIDE
16
M A C O S X 10 .4
To access the dialog box that allows you to configure your network connection. Browse to
t h e A p p l e m e n u a n d select Syst e m Prefere n ce s . From t h e Syst e m Prefere n ce s m e n u , click t he
Network icon and then select the Ethernet connection.
DHCP MODE
You c a n set your Mac to DHCP by selecting DHCP f rom t h e Configure d rop down list. Af t e r
clic king Apply, yo u r M a c ’s I P Address will now be automatically assigned fro m t he Gateway.
STATI C M O D E
1. Fro m t he Config u re drop down list , y o u c a n set your computer to Static I P m o d e by selecting
the option Manually.
The following steps show how to assign a Static IP addre ss t o y o u r M a c

BigPond Elite™ Wireless Broadband Network Gateway USER GUIDE
17
2. Choose an IP address between 10.0.0.1 – 10.0.0.254 (Do not choose the Gateway IP of
10.0.0.13 8 ) . e n t e r t his IP address i n t o t he field marked IP Addre ss , a n d e n t e r a S u b n e t M a sk of
255 . 255.255.0
3. Set the Router and DNS server field to 10.0.0.138 (The gateway’s IP address).
NOTE: Th e IP ad dre ss o f t h e ga teway is 10.0 .0 .138. ( de fau lt ), so t h e comput er mu st b e set wi t h a d if fere nt I P
to t he g ate way. In t h e ca se bel ow, t he PC ’s IP ad dre ss is set a s 10. 0.0 .2
4. Click Apply to su b mit t h e settings .

BigPond Elite™ Wireless Broadband Network Gateway USER GUIDE
18
WINDOWS VISTA
To acce ss the dia l o g b o x t h a t a l l o w s y o u t o co n f igure your network co n n e c t i o n , click on Start >
Control Panel > Network Connections. Then right mouse click on the Local Area Connection and
select Properties. Select Internet Protocol (TCP/IP) then select Properties
DHCP MODE
You can set your PC to DHCP mode by selecting Obtain an IP address automatically in the dialog
box shown below.

BigPond Elite™ Wireless Broadband Network Gateway USER GUIDE
19
STATI C I P M O D E
To config u re your Gateway manually, y o u r P C m u st have a static I P a d d ress wit hin t h e G a t e way ’s
subnet. The followi ng steps show how to assign a Static IP address t o y o u r P C u si ng subnet
10.0.0.x.
1: Select Use the following IP Address. Choose an IP address between 10.0.0.1 – 10.0.0.254
NOTE: Th e Ip ad dre ss o f t h e ga teway is 10.0 .0 .138. ( de fau lt ), so t h e PC mu st b e set wi t h a d if fere nt I p. In
t he ca se be low, t he PC ’s IP ad dre ss is set as 10. 0.0 .1
2: Set the Router and DNS server field to 10.0.0.138 (The gateway’s IP address).
3. Click Ok to apply t he se t t i ngs.

BigPond Elite™ Wireless Broadband Network Gateway USER GUIDE
20
3.3 DEFAULT SETTINGS
The following a re t h e d e f a u l t settings f o r t h e G a t e way
• Local (LAN) access (username: admin, password: admin)
• Remote (WAN) access (username: support, password: support)
• Use r a cce ss ( u sername: user, password : u ser)
• LAN IP addre ss: 10.0.0.13 8
• Remote WAN access: dis a b l e d
• NAT and firewall: enabled
• Dynamic Host Configuration Protocol (DHCP) server on LAN interface: enabled
Technical Note:
During power on, the device initializes all settings to default values. It will then read the configuration
profile from the permanent storage section of flash memory. The default attributes are overwritten when
identical attributes with different values are configured. The configuration profile in permanent storage
can be created via the web user interface or telnet user interface, or other management protocols. The
factory default configuration can be restored either by pushing the reset button for more than five seconds
until the power LED blinks or by clicking the Restore Default Configuration option in the Restore Default
Se tti ngs screen ( see se cti on 7.7.3 ).
Other manuals for Elite
2
Table of contents
Other BigPond Gateway manuals
