Bimar PMS350 User manual

1
LIBRETTO ISTRUZIONI
INSTRUCTION BOOKLET
NOTICE D’UTILISATION
BEDIENUNGSANLEITUNG
Frullatore con brocca in vetro
Blender with glass jug
Blender avec bol en verre
Mixer mit Glaskanne
type PMS350 (mod. TB508AE)

2
Questo simbolo vi invita a leggere attentamente
queste istruzioni prima dell’uso dell’apparecchio, ed
eventualmente informare terzi, se necessario.
Conservare il libretto per ulteriori consultazioni e per
l’intera durata di vita dell’apparecchio. Se nella lettura
di queste istruzioni d’uso alcune parti risultassero
difficili nella comprensione o se sorgessero dubbi,
prima di utilizzare l’apparecchio contattare l’azienda
all’indirizzo scritto in ultima pagina.
ATTENZIONE!
Questo simbolo vi invita a prestare attenzione a
determinate funzioni, istruzioni, e avvertenze per un
impiego sicuro.
Questo simbolo indica: apparecchio di classe II.
AVVERTENZE GENERALI
•Questo apparecchio è destinato all’uso domestico (quindi non
professionale), per frullare frutta o verdure o alimenti
leggermente viscosi unitamente a acqua o altri liquidi
commestibili, secondo le modalità indicate in queste istruzioni.
Gli alimenti devono essere privi di parti dure (semi, gusci,
scorze), privi di fibre resistenti o legnose, e in cubetti di 2-3cm:
la temperatura degli alimenti non deve superare 60°C.
La frullatura in continuo non può durare più 2 (due) minuti
onde evitare il susrriscaldamento del motore: attendere 10
(dieci) minuti prima del successivo utilizzo.

3
Esempi pratici di impiego: per preparare passati di verdure, per
miscelare creme a base di frutta o verdure. Ogni altro uso è da
considerarsi improprio e pericoloso.
Esempi di apparecchi per ambiente domestico sono
apparecchi per tipiche funzioni domestiche, anche da persone
non esperte usati in ambito domestico:
-in negozi, uffici e altri luoghi di lavoro similari;
-in aziende agricole o similari;
-da clienti di alberghi, motel e altri ambienti di tipo
residenziale;
-in ambienti del tipo bed and breakfast.
•Il costruttore non potrà essere ritenuto responsabile di
eventuali danni derivanti da uso improprio, erroneo e
irresponsabile e/o da riparazioni effettuate da personale non
qualificato.
•L'utilizzatore non deve lasciare l’apparecchio senza
sorveglianza quando è collegato all'alimentazione.
•Le lame sono affilate! Per vitare lesioni si raccomanda la
massima attenzione quando si maneggiano e quando si
pulisce la brocca.
•La spina deve essere disinserita dalla presa di corrente, prima
di montare o staccare qualunque componente, se
l’apparecchio non è in uso, prima di eseguire la pulizia
dell’apparecchio.
•Prima di ogni utilizzo accertarsi che:
-Il cavo di alimentazione sia libero e non attorcigliato su se
stesso, e non sia danneggiato.
-Il fondo sia perfettamente solidale e fissato alla brocca.

4
-Il coperchio sia inserito sulla brocca, e la brocca correttamente
inserita nel corpo motore.
-Non vi siano corpi estranei all’interno della brocca e a contatto
con le lame.
-Il contenuto all’interno della brocca non superi il livello
massimo indicato sul lato della medesima.
•Durante l'utilizzo prestare continua attenzione affinchè
l’apparecchio funzioni correttamente: se le lame dovesssero
rimanere incastrate, o se ingredienti dovessero attaccarsi alla
parete della brocca spegnere immediatamente l’apparecchio,
disinserie la spina dalla presa di corrente e con un utensile
appropriato liberare il cibo da sotto le lame o dalle pareti.
•Rimuovere il coperchio o la brocca solo quando il motore è
completamente fermo e dopo aver tolto la spina dalla presa di
corrente.
•Se l’apparecchio non è in uso o se lasciato incustodito, togliere
la spina dalla presa di corrente
•Non utilizzare l'apparecchio per miscelare liquidi.
•I bambini non devono utilizzare l’apparecchio. Tenere
l’apparecchio e il suo cavo fuori dalla portata di mano dei
bambini.
•I bambini non devono utilizzare l’apparecchio come gioco.
•Questo apparecchio può essere utilizzati da persone con
ridotte capacità fisiche sensoriali o mentali o con mancanza di
esperienza e di conoscenza, se sono sorvegliati oppure se
hanno ricevuto istruzioni riguardo l’utilizzo in sicurezza
dell’apparecchio e se ne hanno capito i pericoli implicati.

5
•Utilizzare l'apparecchio solo in ambienti chiusi. Non lasciare
l’apparecchio esposto agli agenti atmosferici (sole, pioggia
ecc..).
•Verificare periodicamente il buono stato dell’apparecchio e dei
suoi elementi: in caso di dubbio rivolgersi ad un centro
assistenza autorizzato e accertarsi che i ricambi forniti siano
originali.
•Non utilizzare l'apparecchio se le lame o altre parti sono
danneggiate.
•Non utilizzare l’apparecchio se il cordone elettrico è
danneggiato: se lo fosse, deve essere sostituito dal costruttore
o dal suo servizio assistenza tecnica o comunque da una
persona con qualifica similare, in modo da prevenire ogni
rischio.
•Attenzione: quando si utilizzano apparecchi elettrici, occorre
sempre rispettare le precauzioni di sicurezza di base per
evitare i rischi di incendio, di scosse elettriche e di lesioni fisiche.
•Prestare le seguenti precauzioni riguardanti l'uso di apparecchi
elettrici:
-Non toccare l’apparecchio con mani e piedi bagnati.
Assicuratevi di avere le mani perfettamente asciutte prima di
toccare l’apparecchio. Al fine di proteggersi da ogni rischio di
shock elettrico, non immergere la spina, il cordone elettrico e il
corpo motore nell’acqua od in nessun altro liquido.
-Non tirare il cavo di alimentazione o l’apparecchio stesso per
disinserire la spina dalla presa di corrente.
-Non tirare il cavo per spostare l’apparecchio.

6
INSTALLAZIONE
•Dopo aver tolto l’imballaggio assicurarsi dell’integrità dell’apparecchio; in caso
di dubbio non utilizzarlo e rivolgersi a personale professionalmente qualificato.
Gli elementi dell’imballaggio (sacchetti in plastica, polistirolo, punti metallici,
ecc…) non devono essere lasciati alla portata di bambini o persone
irresponsabili, in quanto possibili fonti di pericolo, ma vanno smaltiti secondo le
norme vigenti.
•Prima di collegare l’apparecchio accertarsi che i dati di targa (tensione, ecc..)
corrispondano a quelli della vostra rete di distribuzione elettrica. In generale è
sconsigliato l’uso di adattatori, prese multiple e/o prolunghe; se il loro uso si
rendesse indispensabile, devono essere conformi alle vigenti norme di
sicurezza e la portata in corrente (ampères) non deve essere inferiore a quella
massima dell’apparecchio.
•La presa di corrente deve essere facilmente accessibile in modo da poter
disinserire con facilità la spina in caso di emergenza.
•Assicurarsi che il cordone elettrico sia posizionato correttamente e non sia a
contatto con parti calde o spigoli taglienti, né avvolto intorno all’apparecchio e
non passi sotto l’apparecchio, non sia attorcigliato su se stesso e non si impigli,
onde evitare una caduta dell’apparecchio.
•Posizionare l’apparecchio:
-lontano da fonti di calore (ad es. altri forni, fornello gas, ecc. )
-su un piano d’appoggio orizzontale, ben stabile, la cui superficie sia liscia (in
modo che i piedini a ventosa possano fare presa) e non sia delicata (ad
esempio mobili laccati, tovaglie, ecc), in posizione dove non possa subire urti,
e a debita distanza dal bordo del mobile, per evitare cadute.
-lontano da contenitori di liquidi, ad esempio lavelli ecc. Nel caso l’apareccchio
inavvertitamente si bagnasse o immergesse in un liquido, per prima cosa
disattivare la presa di corrente spegnendo l’interruttore del quadro elettrico, e
solo dopo togliere la spina dalla presa di corrente. Asciugarlo con cura sia
spina che la presa di corrente e solo dopo riattivare la corrente alla presa. Re-
inserire la spina nella presa di corrente, e poi utilizzare l’apparecchio. In caso
di dubbio, rivolgersi a personale professionalmente qualificato.

7
USO
Il frullatore è comosto da base con motore e brocca in vetro, e più in dettalglio
dalle parti qui descritte:
BASE (7) contiene il motore ed è
dotata dei seguenti elementi:
-Manopola (8) per accendere e
spegnere il motore: seleziona “ I “
velocià minima , “ I I “ velocità massima
(per entrambe il motore funziona in
modo continuo), e se ruotata in “
PULSE” seleziona la velocità massima
solo per gli istanti in cui la manopola
viene trattenuta (al suo rilascio il
motore si spegne). La posizione “ 0 ”
spegne il motore.
-Interruttore sicurezza : attiva il
motore solo se la brocca è bene e
correttamente inserita nella base, e se
contemporaneamente il coperchio è
bene e correttamente inserito sulla
brocca.
-Foro drenaggio, per eliminare
tracimazione di liquidi.
-Piedini in gomma (10) a ventosa, che
aderiscono alla superficie e
conferiscono stabilità all’apparecchio.
-Tasca per il cordone elettico (11): si
inserisce e si estrae attraverso il foro a
lato.
-BROCCA (4) in vetro temperato, con
scala graduata e indice di livello
massimo (1,5l), dotata dei seguenti
elementi:
-Coperchio (2) con asola centrale e
relativo tappo-misurino con
graduazioni.
-Guarnizione (3)
-Lame inox (5): sono solidali al fondo,
che può essere rimosso dalla brocca.

8
Seguire le seguenti istruzioni per il fissaggio dei vari elementi:
1. Le lame sono solidali al fondo,
la cui tenuta stagna è assicurata
dalla guarnizione ad anello.
Per il fissaggio del fondo al lato
inferiore della brocca, inserire in
modo corretto la guarnizione,
innestare il fondo (le lame devono
risultare all’interno della brocca) e
ruotarlo in senso anti-orario per
bloccarlo. Per toglier il fondo,
operare nel modo inverso.
2. Inserire a fondo il tappo-
misurino nella propria asola e
ruotarlo per il fissaggio.
Posizionare il coperchio sul lato
superiore della brocca, in maniera
che sia leggermente orientato a
sinistra: le alette del suo bordo
devono risultare adiacenti alle
linguette della brocca. Inserire il
coperchio a fondo in modo che
vada in battuta, e ruotare in senso
orario di quel poco per raggiungere
la posizione esatta (i simboli e
sono allineati), necessaria per
intercedere sull’interruttore di
sicurezza e attivare il motore.
Per togliere coperchio e tappo-
misurino, operare nel modo
inverso.

9
3. Inserire a fondo la brocca nella
base in modo che i simboli e
siano allineati, ruotarla in senso
orario per bloccarla (i simboli e
sono allineati), e così
intercedere sull’interruttore di
sicurezza e attivare il motore.
Per togliere la brocca, operare nel
modo inverso.
Al primo utilizzo è necessario lavare le parti a contatto gli alimenti e asciugarle
con cura. (vedi paragrafo “Pulizia e Manutenzione).
Funzionamento.
Estrarre il cordone elettrico dalla base.
Assicurarsi che i piedi a ventosa siano in completa aderenza alla superficie di
appoggio.
Inserire gli alimenti all’interno della brocca in quantità non eccedente al massimo
livello (1,5l.), e richiudere il coperchio e il tappo-misurino.
Inserire la brocca sulla base e bloccare.
Verificare che il selettore si in posizione “0 “ (spento) e solo dopo insrire la spina
nella presa di corrente.
Ruotare la manopola nella posizipne “I “o“ I I “ per frullare (non oltre 2 minuti),
oppure “ PULSE” per l’utilizzo momentaneo.
Ruotare la manopola in posizione “0“ per spegnere il motore, e terminato
l’impiego togliere la spina dalla presa di corrente.
Successivi utilizzi si possono effettuare solo dopo 10 minuti di raffreddamento
del motore.
Lavare accuratamente la brocca prima di ogni altro utilizzo, eventualmente pulire
la base, nelle modalità indicate la paragrafo pulizia e manutenzione. Se
conveneinte, prima di riporre l’appareccchio inserire il cavo elettrico all’interno
della base.
Consigli pratici
-Un leggero movimento a vortice del frullato, evita grumi dei frullati o la
separazione nelle salse a base di uova.
-Gli alimenti dovrebbero essere tagliati a cubetti di circa 2-3 cm: ciò contribuirà a
ottenere un frullato uniforme.
-Non riempire mai la brocca oltre il livello massimo indicato (1,5 l.) o ancor meno
se il preparato aumenta volume durante la frullatura.

10
-Per la frullatura di alimenti secchi, necessita aggiungere acqua o altri liquidi in
misura tale che il preparato riusulti fluido, e così evitare che le lame si blocchino.
-Se durante la frullatura il preparato aderisce alle pareti della brocca,
interrompere l’operazione, rimuovere il coperchio e con una spatola rimuovere il
cibo dalle pareti, aggiungere acqua o altri liquidi, chiudere e poi riprendere la
frullatura.
-Quando si miscelano una varietà di ingredienti, miscelare prima i liquidi, e poi
aggiungere gli ingredienti secchi.
-Assicurarsi sempre che di aver rimosso le parti dure o fibrose dagli alimenti, per
non danneggiare le lame.
-Alimenti caldi non possono superare la temperatura di 60°C. Devono essere
versati con cautela nella caraffa. Terminato l’impiego, raffreddare la brocca
lasciandola qualche minuto al di furi della base.
PULIZIA E MANUTENZIONE
Prima di eseguire le operazioni, accertarsi che la manopola sia in posizione “ 0 “
(spento), e la spina sia scollegata dalla presa di corrente.
Risciacquo veloce
. Per eseguire un veloce risciacquo della caraffa, operare come
descritto:
-Inserire acqua nella brocca per metà della capienza, e un po di detrgente liquito
per stoviglie.
-Attivare la funzione PULSE per 1 o 2 secondi, e ripetere 3 o 4 volte.
-Eliminare l’acqua e risciacquare abbondantemente con acqua corrente.
Si rammenta che prima di riporre l’apparecchio è bene pulirlo accuratamente.
Pulizia accurata
.
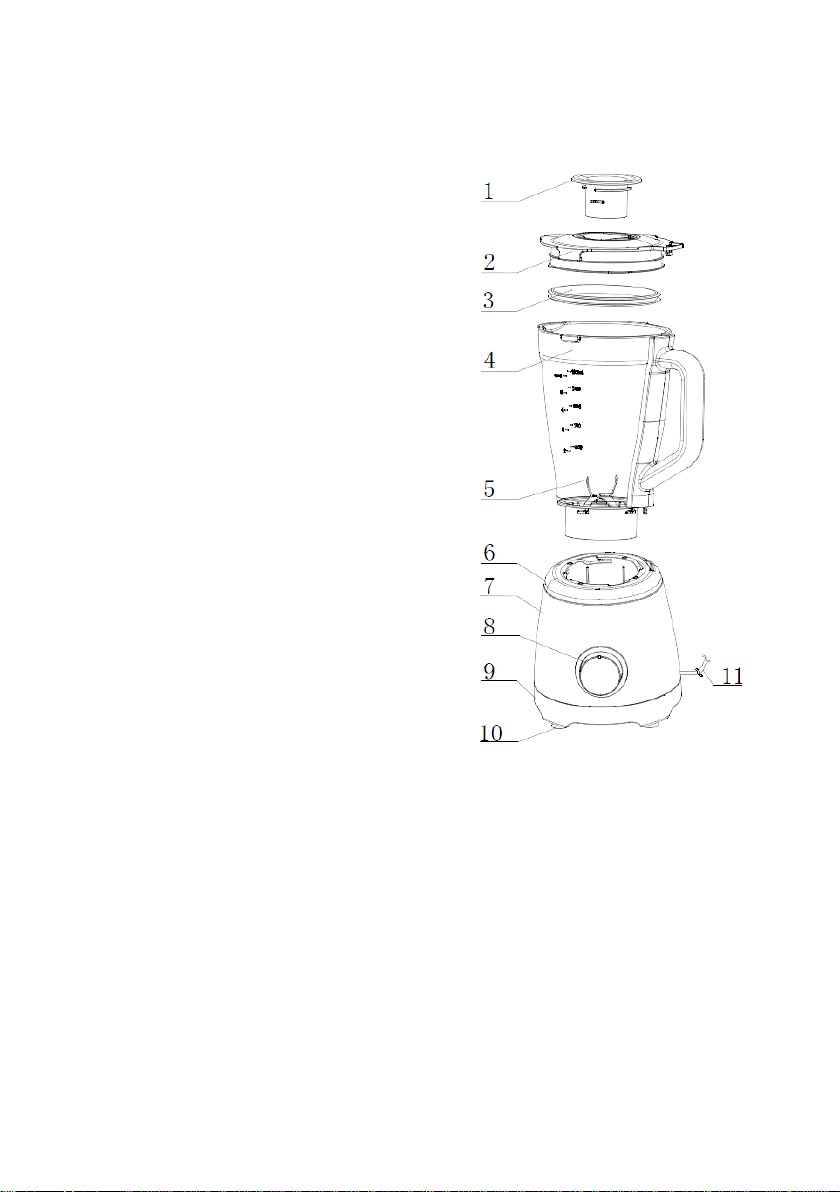
Per la pulizia delle lame, togliere il fondo dalla brocca, ruotandolo in senso anti-
orario.
Rimuovere la guarnizione ad anello
Rimuovere il coperchio e il tappo-misurino
Lavare accuratamente questi elementi e la brocca con acqua e detergente
liquido per stovigle e, nel caso, con un panno (non utilizzare prodotti abrasivi), e
sciacquare accurtamente e asciugare prima del loro ri-assemblaggio. Questi
elementi si possono lavare in lavastoviglie.
Il corpo motore: può essere pulito unicamente con un panno morbido
leggermente imbevuto d’acqua e/o normale detersivo liquido per stoviglie. Non
può essere lavato in lavastoviglie, nè sotto il getto d’acqua, né immeso in acqua o
altri liquidi: nel caso le parti elettriche (inclusi cordone e spina) si bagnino,
asciugare con cura e completamente prima dell’utilizzo.
•Quando non si utilizza l’apparecchio, riporlo in un luogo asciutto.
•Se si decide di non utilizzare più l’apparecchio, si raccomanda di renderlo
inoperante tagliando il cavo di alimentazione (prima assicurarsi d’aver tolto la

11
spina dalla presa di corrente), e di rendere innocue quelle parti che sono
pericolose qualora utilizzate per gioco dai bambini.
Avvertenze per il corretto smaltimento del prodotto ai sensi della Direttiva
Europea direttiva 2011/65/UE
.
Alla fine della sua vita utile il prodotto non deve esser smaltito insieme ai rifiuti
urbani.
Può essere consegnato presso gli appositi centri di raccolta differenziata
predisposti dalle amministrazioni comunali, oppure presso i rivenditori che
forniscono questo servizio.
Smaltire separatamente un elettrodomestico consente di evitare possibili
conseguenze negative per l’ambiente e per la salute derivanti da un suo
smaltimento inadeguato e permette di recuperare i materiali di cui è composto al
fine di ottenere un importante risparmio di energia e di risorse. Per rimarcare
l’obbligo di smaltire separatamente gli elettrodomestici, sul prodotto è riportato
il marchio del contenitore di spazzatura mobile barrato. Lo smaltimento abusivo
del prodotto da parte dell’utente comporta l’applicazione delle sanzioni
amministrative previste dalla normativa vigente.

12
This symbol tells you to read these instructions
carefully before using the appliance, and to inform
any third parties if necessary. Keep the instruction
booklet for further reference throughout the lifetime
of the appliance. If when reading these instructions
you find any parts difficult to understand or have any
doubts, contact the manufacturer at the address
provided on the back page before using the
appliance.
WARNING!
This symbol tells you to pay special attention to
specific functions, instructions and precautions for
safe use.
This symbol informs you that the appliance is in class
II.
GENERAL WARNINGS
•This appliance is intended only for household (therefore not
professional) use, for blending fruit, vegetables or slightly
viscous foods together with water or other edible liquids, as
instructed here. Foods must not have hard parts (seeds, shells
or rind) or tough or woody fibres, and must be diced into
cubes of 2-3cm: foods must not be at a temperature over
60°C.
Continuous blending for more than 2 (two) minutes is not
possible as this may cause the motor to overheat: wait 10 (ten)
minutes before the next use.

13
Practical examples of use: for blending soups, and for
creaming fruit or vegetables. Any other use constitutes
misuse and is hazardous.
Examples of household appliances are appliances for typical
household functions, which may be used in the home even by
persons without specific skill:
-in shops, offices and other similar workplaces;
-on farms and in similar locations;
-by the customers of hotels, motels and other residential
environments;
-in bed and breakfast establishments.
•The manufacturer cannot be held liable for any damage
arising from misuse or incorrect or irresponsible use, and/or
from repairs carried out by unqualified persons.
•The user must not leave the appliance unattended when it is
connected to the power supply.
•The blades are sharp! To avoid injuries, take great care when
handling and when cleaning the jug.
•The plug must be disconnected from the power socket before
any component is removed or disconnected, with the
appliance not in use, before proceeding to clean it.
•Before each use, make sure that:
- The power cord is unrestricted, not twisted and free from
damage.
-The base is securely fixed to the jug.
-The lid is fitted onto the jug, and the jug is properly secured to
the motor unit.

14
- There are no foreign bodies inside the jug and touching the
blades.
- The contents of the jug do not exceed the maximum level
marked on its side.
•During use, check continually that the appliance is operating
correctly. If the blades jam or ingredients stick to the sides of
the jug, switch off the appliance at once, disconnect the plug
from the power socket and use a suitable utensil to remove
the food from underneath the blades or the sides of the jug.
•Do not remove the lid or the jug until the motor has stopped
completely and the plug has been removed from the power
socket.
•If the appliance is not in use or is left unattended, remove the
plug from the power socket.
•Do not use the appliance for mixing liquids.
•Children must not use the appliance. Keep the appliance and
its power cord out of reach of children.
•Children must not play with the appliance.
•This appliance may be used by persons with reduced physical,
sensory or mental capabilities or lack of experience and
knowledge if they have been given supervision or instruction
concerning use of the appliance in a safe way and have
understood the hazards involved.
•Only use the appliance indoors. Never leave the appliance
exposed to the weather (sun, rain, etc.).
•Check regularly that the appliance and its elements are in
good condition: if in doubt, contact an authorised service

15
centre and make sure that the spare parts supplied are
genuine.
•Do not use the appliance if the blades or other parts are
damaged.
•Do not use the appliance if the power cord is damaged; if this
is the case, it must be replaced by the manufacturer or its
aftersales service, or by a person with similar qualifications, to
prevent all risks.
•Warning: when using electrical appliances, always comply with
the basic safety precautions to avoid the risks of fire, electric
shock and physical injury.
•Take the following precautions when using electrical
appliances:
-Do not touch the appliance with wet hands and feet. Make
sure that your hands are perfectly dry before touching the
appliance. To guard against all risk of electric shock, do not
immerse the plug, the power cord or the motor unit in water or
any other liquid.
-Do not pull the power cord or the appliance itself to remove
the plug from the power socket.
-Do not move the appliance by pulling the cord.
INSTALLATION
•After removing the packaging, check that the appliance is intact; if in doubt, do
not use it and contact a qualified professional. Packaging components (plastic
bags, polystyrene, metal staples, etc.) must not be left within reach of children
or persons with diminished responsibility, since they are potentially hazardous;
they must be disposed of in accordance with the current law.
•Before connecting the appliance, check that the nameplate data voltage, etc.)
are the same as those of your mains electricity supply. In general, the use of
adapters, multiple sockets and/or extension leads is not recommended; if their

16
use is unavoidable, they must comply with current safety regulations and their
current rating (amps) must be no lower than the maximum current draw of the
appliance.
•The power socket must be easily accessible so that the plug can be removed
easily in an emergency.
•Make sure that the power cord is correctly positioned and is not in contact with
hot parts or sharp edges, is wound around and does not pass underneath the
appliance, is not twisted, and does not become entangled, to prevent the
appliance from falling.
•Place the appliance:
-well away from heat sources (e.g. other ovens, gas burners, etc.)
-on a firm, horizontal support with a smooth surface (so that the sucker feet
can grip it firmly) which does not have a delicate finish (e.g. lacquered kitchen
units, tablecloths, etc.), in a position where it cannot be knocked, and far
enough from the edge of the unit to prevent it from falling.
-well away from containers holding liquids, such as sinks, etc. If the appliance
is accidentally wet or immersed in a liquid, first disconnect the power supply
by turning off the control panel switch, and only then remove the plug from
the power socket. Dry both the plug and the power socket carefully before
reactivating the power socket. Reconnect the plug to the power socket and
then use the appliance. If in doubt, call in qualified staff.

17
USE
The blender consists of a base containing the motor and a glass jug, and in
greater detail of the parts described here:
BASE (7) containing the motor and
consisting of the following parts:
-Motor on/off knob (8): selects “ I
“minimum speed, “ I I “ maximum
speed (the motor operates continually
at both speeds), and, if turned to “
PULSE”, selects maximum speed only
as long as the knob is depressed (the
motor stops when it is released). The
"0" setting stops the motor.
- Safety switch: only enables operation
of the motor if the jug is correctly
fitted onto the base and the lid is also
correctly fitted onto the jug.
- Drainage hole, to prevent liquid
overflows.
- Rubber sucker feet (10), which stick
to the surface and give the appliance
added stability.
- Power cord pocket (11): the cord is
inserted and extracted through the
hole at the side.
- Toughened glass JUG (4), with
graduated scale and maximum level
marker (1.5l), complete with the
following:
- Lid (2) with central hole and
graduated measuring cap.
- Gasket (3)
- Stainless steel blades (5): integral
with the base, which can be removed
from the jug.

18
Proceed as follows to assemble the various parts:
1. The blades are integral with the
base, which is provided with a
watertight seal by a circular gasket.
To fix the base to the underside of
the jug, fit the gasket correctly,
engage the base (the blades must
be inside the jug) and turn it
anticlockwise to lock it in place.
Reverse this procedure to remove
the base.
2. Fit the measuring cap fully into
its hole and turn it to secure it.
Place the lid on the top of the jug
so that it is facing slightly to the
left: the fins on its edge must be
next to the tabs on the jug. Push
the lid fully down and turn it
clockwise into the correct position
(symbols and aligned), which
will trip the safety switch and
enable the motor to start.
Reverse the above procedure to
remove the lid and measuring cap.

19
3. Push the jug fully down into the
base so that symbols and
are aligned, and turn it clockwise to
lock it in place (symbols and
aligned), which will trip the safety
switch and enable the motor to
start.
Reverse the above procedure to
remove the jug.
At first use, wash the parts in contact with the foods and dry them carefully. (see
"Cleaning and Maintenance" section).
Operation.
Extract the power cord from the base.
Make sure that the sucker feet are adhering firmly to the supporting surface.
Place the foods in the jug (do not exceed the maximum level - (1.5l.) and close
the lid and the measuring cap.
Fit the jug onto the base and lock it in place.
Check that the switch is turned to “0 “ (off) and then connect the plug to the
power socket.
Turn the knob to the “I “or “ I I “ setting to blend (not more than 2 minutes), or to
"PULSE” for use in jog mode.
Turn the knob to "0" to stop the motor, and after use remove the plug from the
power socket,
The appliance must not be reused until the motor has been left to cool for 10
minutes.
Wash the jug thoroughly before every further use, and if necessary clean the
base as instructed in the cleaning and maintenance section. If this is convenient,
insert the power cord into the base before putting the appliance away.
Practical hints
- Gentle blending avoids lumps in the blended foods or the curdling of egg-
based sauces.
- Foods should be diced into cubes of 2-3 cm; this will help to achieve uniform
blending.
- Never fill the jug above the maximum level shown (1.5 l.) especially if the
preparation increases in volume during blending.
- When blending dry foods, enough water or other liquids must be added to
produce a fluid preparation and prevent the blades from jamming.

20
- If the preparation sticks to the sides of the jug during blending, stop blending,
remove the lid and use a spatula to remove the food from the sides, add water or
other liquids, close and restart blending.
- When mixing a variety of ingredients, mix the liquids first and then add the dry
ingredients.
- Take care to remove hard or fibrous parts from the foods, to avoid damaging
the blades.
- Hot foods must not be at temperatures over 60°C. Care must be taken when
pouring them into the jug. After use, cool the jug by leaving it off the base for a
few minutes.
CLEANING AND MAINTENANCE
Before proceeding with any operations, make sure that the knob is turned to “ 0 “
(off) and the plug is disconnected from the power socket.
Quick rinse
. To rinse the jug quickly, proceed as follows:
- Half fill the jug with water and a little washing-up liquid.
- Operate the PULSE function for 1 or 2 seconds and repeat 3 or 4 times.
- Pour out the water and rinse with plenty of running water.
Remember that the appliance should be dried thoroughly before it is put away.
Thorough cleaning
.
To clean the blades, remove the base from the jug by turning it anticlockwise.
Remove the round gasket
Remove the lid and measuring cap
Wash these parts and the jug thoroughly with water and washing-up liquid and, if
necessary, with a cloth (do not use abrasive products), then rinse thoroughly and
dry before reassembly. These parts may also be washed in a dishwasher.
Motor unit: can only be cleaned with a soft cloth dipped in a little water and/or
ordinary washing-up liquid. It cannot be washed in a dishwasher or under
running water, or immersed in water or other liquids: if the electrical parts
(including the power cord and plug) become wet, dry carefully and completely
before use.
•When the appliance is out of use, store it in a dry place.
•If you decide not to use the appliance any more, it must be rendered unusable
by cutting off the power supply cord (first making sure that the plug has been
removed from the power socket), and any parts which are hazardous if used as
children's playthings must be rendered harmless.
This manual suits for next models
1
Table of contents
Languages:
Other Bimar Blender manuals
Popular Blender manuals by other brands

Breville
Breville Moda Bar Blender CBL30XL Instructions for use and recipe book

Twothousand
Twothousand DEM-I200 user manual

Black & Decker
Black & Decker PartyMate DM100 Series Use and care book

Braun
Braun PowerBlend MX 2050 R user manual

Gastroback
Gastroback 40974 user manual

Cuisinart
Cuisinart BFP603U manual