BIMG METVISA RDA Series User manual

1

2
Congratulations,
You just acquired a BIMG-BRAZIL equipment, higher product quality, safety and efficiency.
Founded in 1989, BIMG-BRAZIL is a company respected as one of the best and most
complete companies in the manufacturing industry of equipment for gastronomy.
The constant innovation and improvement of its products, using raw materials of the first line,
ensuring top quality products, consumed in Brazil and in more than 25 countries worldwide.
CONFIDENCE AND CERTAINTY OF A GOOD PRODUCT ARE ON NAME
BIMG-BRASIL - BIMG-METVISA
IMPORTANT:
FOR PROFESSIONALUSE.DO NOTUSE WITHOUTREADINGCAREFULLYTHE MANUAL.
IFIN DOUBT, CONTACTUS:
BIMG-BRASIL Gastronomy Machinery Industry Ltda.
CNPJ 11.193.347/0001-14 - CREA 131726-3
Rod. Antônio Heil –KM 23 Nº 5825 –Bairro: Limoeiro –CEP 88352-502 - Brusque –SC –Brasil
Phone/fax. +55 47 3251-5555 - Site: www.metvisa.com.br

3
INDEX
1.
Safety Information ................................................................................................ 4
1.1
General Instructions ........................................................................................................... 4
1.2
Mechanical Safety ............................................................................................................. 5
1.3
Electrical Safety ................................................................................................................. 6
2.
Technical Specifications ..................................................................................... 6
2.1
Main Components ............................................................................................................. 6
2.2
Technical Data ................................................................................................................... 7
2.3
Supply and Disposal of Packing ......................................................................................... 8
3.
Installation ............................................................................................................ 8
3.1
Device Layout .................................................................................................................. 8
3.2
Electrical Connection ........................................................................................................ 9
3.3
Security Measures and User Instructions ........................................................................ 11
4.
Device’s Use ....................................................................................................... 11
4.1
Utility ................................................................................................................................ 11
4.2
Commands ....................................................................................................................... 11
4.3
Operating Procedures ...................................................................................................... 12
5.
Cleaning and Maintenance ................................................................................ 15
5.1
Procedures for Cleaning and Products to be used .......................................................... 15
5.2
Maintenance and Behavior in case of Malfunctions …..................................................... 16
5.3
Prolonged interruption in use of the Device ..................................................................... 17
6.
Annex .................................................................................................................. 18
Wiring Diagram ………………………................................................................................ 18
Exploded Drawing ............................................................................................................ 19
Spare Parts List ................................................................................................................ 20
WARNING!
Features, photos and figures presented in this manual should be considered for information
purposes. BIMG BRASIL reserves the right to make modifications as may be necessary without
prior notice.

4
1. Safety Information
1.1 General Instructions
• There are care/precautions that should be observed when assembling, use, maintenance and
discontinue using this device;
• Before performing any operation (installation, use, maintenance and reuse after prolonged
interruption in the use of the device), read the manual;
• The device must be used by people trained and knowledgeable in use and safety requirements
described in this manual;
• This device is not intended for use by persons (including children) with physical, sensory or mental
capacities reduced, or people with lack of experience and knowledge, unless they have received
instructions regarding the use of the device or under the supervision of a person responsible for their
safety;
• It is recommended that children be supervised to ensure that they are not playing with the device;
• In case of alternation of staff to work with the device, the new operator must be instructed on the
rules and the operation of the device;
• The operator must use the appropriate PPE (personal protective equipment). For example: use cap
in hair preventing it from locking up in moving parts;
• The operator must always be alert to situations that can cause risks of accidents and avoid them.
For example: avoid working with loose sleeves uniforms, where they can lock in the moving parts,
causing accidents;
• After being held reading and clarified all doubts, this manual should be stored carefully in an easily
accessible place, known to all people who will operate the unit and placed the willingness of people to
carry out maintenance, for any queries. Whenever there is any doubt, be sure to consult the manual.
Do not operate in any way with any questions;
• Upon installation, it is essential to put this manual available for the professionals who will do the
same;
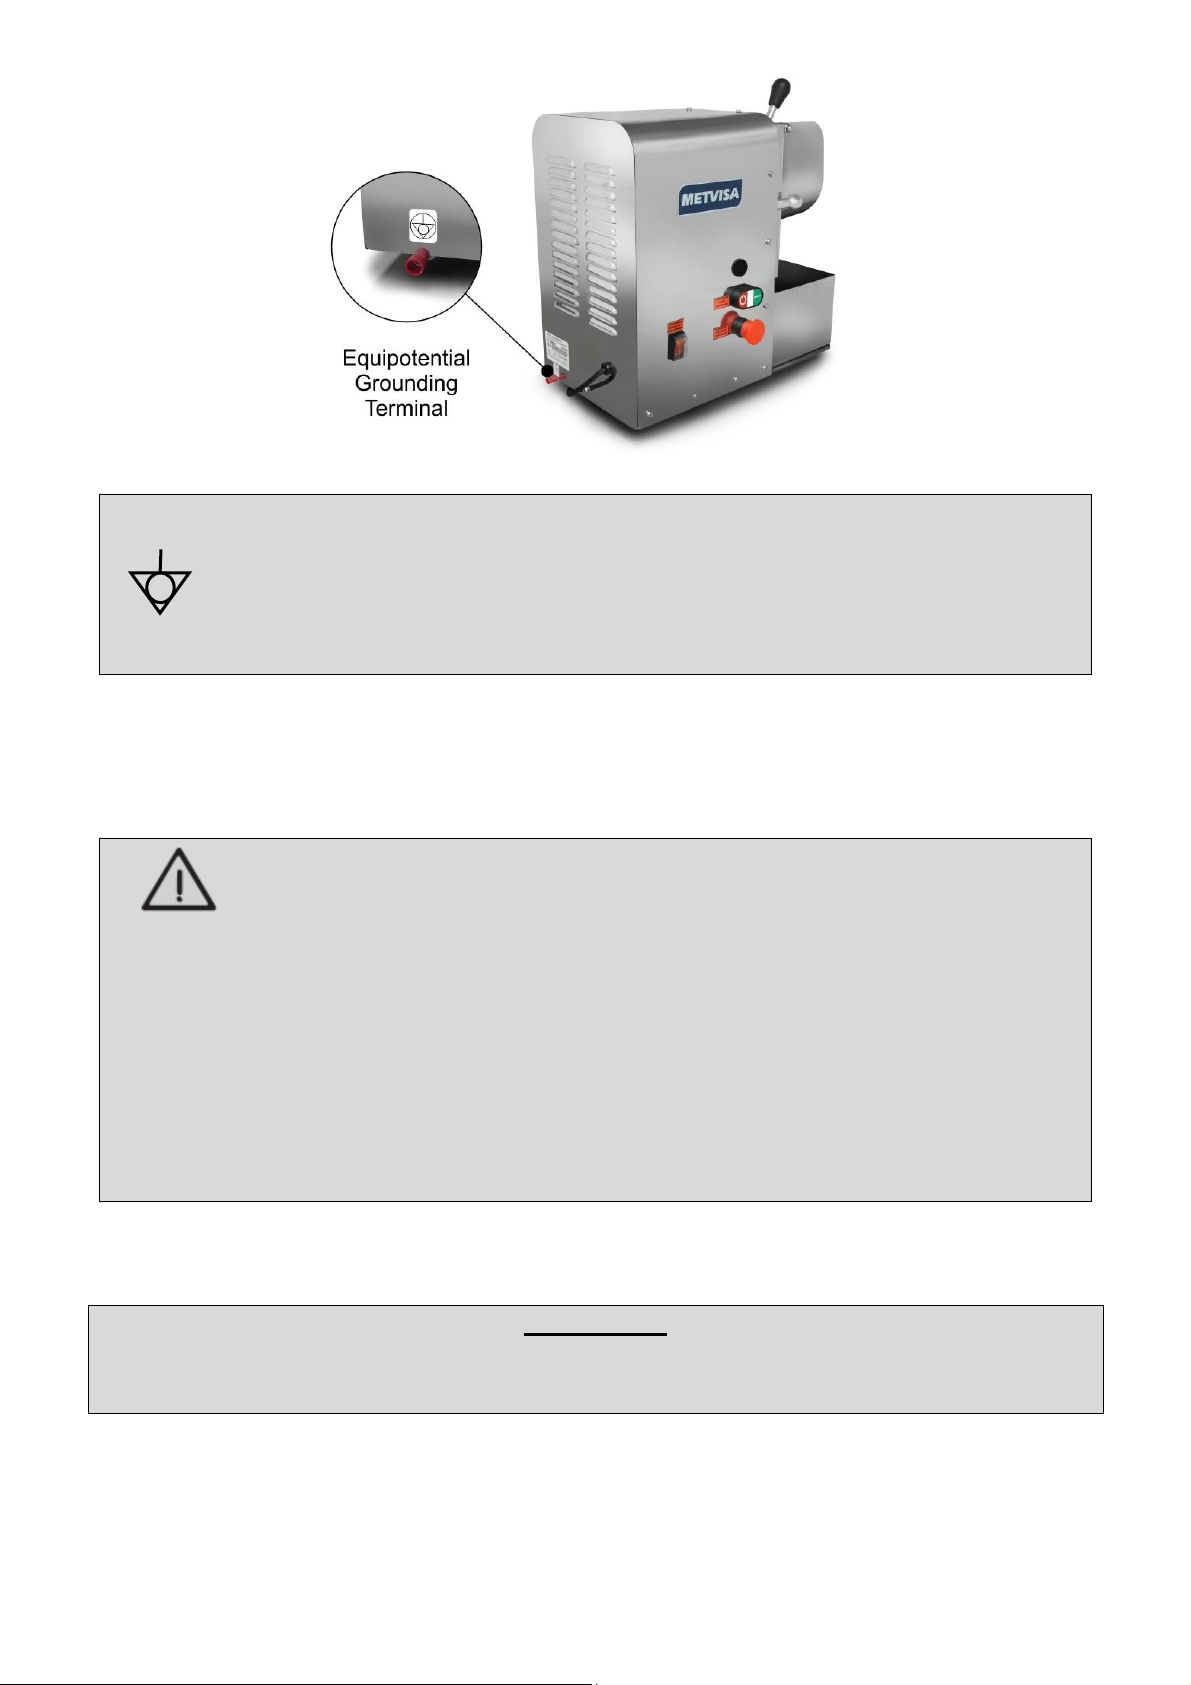
• Before you start cleaning and any maintenance, it is essential to disconnect the device from the
power network;
• Periodically check the condition of cables and electrical parts;
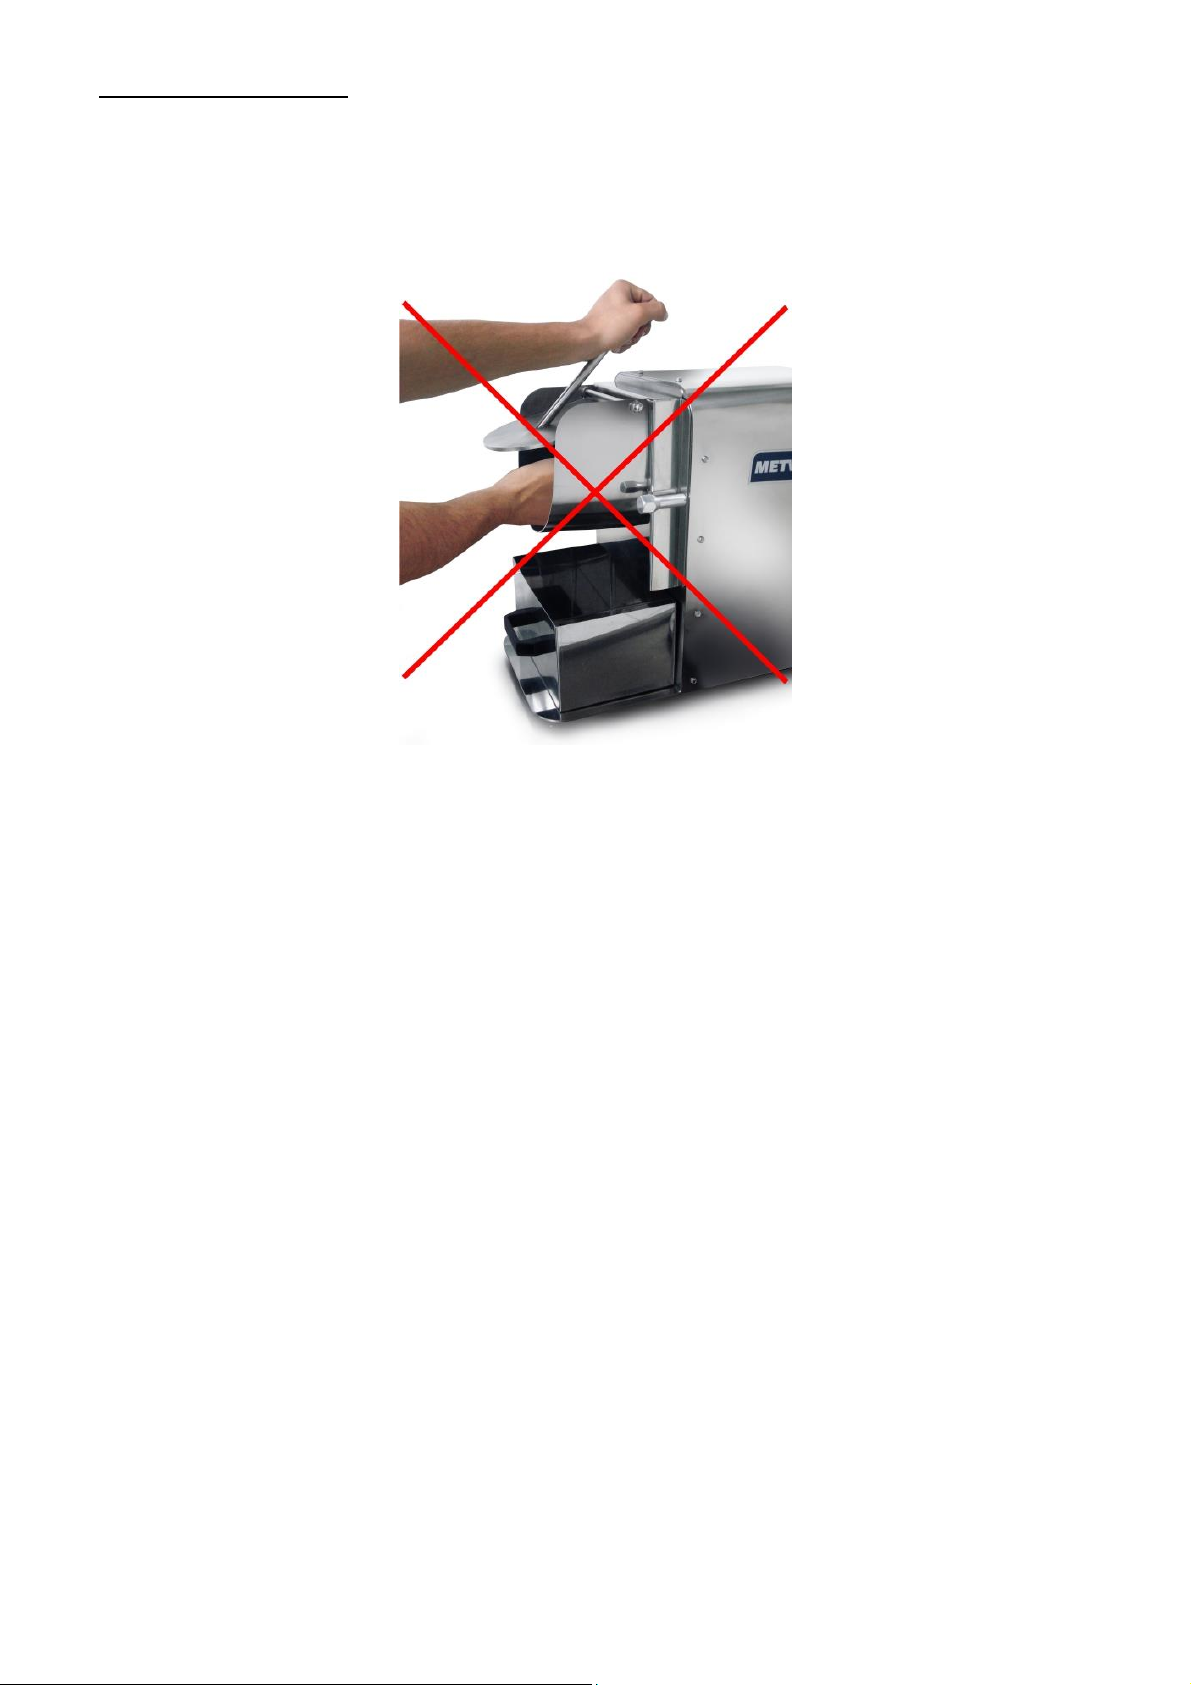
• Do not turn the device on without locking the Disc or Nozzle. Insert only specific products to what the
device was made for, and never place your hands, fingers or objects on the Nozzle or mobile parts
with the power on, it might cause an accident;
• Do not leave the device switched on without supervision.
WARNING!
Do not make repairs yourself. Go to technical assistance authorized by the manufacturer.
Use only original parts in your device.

5
1.2 Mechanical Safety
• Even existing a security system on Mobile Cover (which do not let the device activate while this
Cover is opened), never place fingers, hands or objects (as spoons or knifes) inside the Nozzle, it
might cause an accident;
• When cleaning the Disc while device is turned off, be careful. Discs are extremely sharpened and
might cause an accident (cuts, for example) if not carefully handle.
• Before turning on the device, be sure that the Disc is locked with Flat Washer and Screw, and the
Nozzle is locked by the Knobs.
The devices described in this Manual guide meet the regulation against the risk of
mechanical type. The safety is achieved with:
1. Mechanical design that prevents access by hand to electrical parts and spin cutting parts during
process;
2. Body and Base that protects the Motor, avoiding contact with water, dust and other materials.
Also prevents access to electrical parts by operator;
3. Nozzle, used to support the product that will be grate. Mobile Cover pushes the food against the
Disc to be grate. Both parts works avoiding contact by operator with Disc and food during
process;
4. Tray, works as processed food container, avoiding that food accumulates around work area;
5. Non-skid foot;
To visualize main components, see item 2.1 (Main Components –p. 7) on this manual.

6
WARNING!
Whenever you remove any safety item of the device (for example, during cleaning or
maintenance), reset in place and confirm that is performing its function properly.
1.3 Electrical Safety
• Periodically check the condition of cables and electrical parts;
• If the power cord is damaged it must be replaced by a new one. The exchange must be made by the
manufacturer, authorized agent or a qualified person in order to avoid risks;
• Do not use water jets because it could cause electric shock. For cleaning your device, follow the
instructions on item 5 of this manual;
• Do not operate the device in humid or with wet clothes and shoes. Put proper footwear, this will
avoid electric shock and even death;
• Use the device on a firm, dry and well level surface;
• Never do any maintenance, adjustment and disassemble with the device on. For such procedures,
make sure that it is turned off by removing the plug from the electrical outlet.
• Do not use extension cords and adapters with various other appliances connected to the device.
This may cause fire or overload;
• The device has a security system that prevents from working with the Mobile Cover opened or the
Nozzle demounted. Remove or adulteration on security system might cause accidents.
The components used for safety against electrical hazards were selected according to
applicable regulatory standard and CE marking. Given the perfect isolation of all electrical parts and
the great resistance of all materials used, this device is able to perform the work to which it propose.
WARNING!
Whenever you remove any safety item of the device (for example, during cleaning or
maintenance), reset in place and confirm that is performing its function properly.
2. Technical Specifications
2.1 Main Components
To the device described in this manual, safety in use, cleaning, maintenance and maximum
hygiene are guaranteed by design and the special design of all parts, and also used stainless steel
and other suitable materials for the contact with food.

7
The device is designed with the following features:
• All metallic parts, including Nozzle and the Mobile Cover, are produced in stainless steel, with higher
corrosion resistance than other steels. It is a material resistant from attack from several corrosive
agents;
• Discs, with base produced in nontoxic plastic and lined with stainless steel.
See below the main components of the Device:
2.2 Technical Data
Model
Voltage
(V)
Nominal
Current
(A)
Nominal Measures
WidthxHeightxLength
(mm)
Net
Weight
(kg)
Capacity
(kg/h)
RDA127M60S5
127
6,0
255x487x476
22,2
30*
RDA220M60S5
220
3,5
RDA110M60S4
110
6,0
RDA220M50S1
220
3,3
RDA220M50S2
220
3,3
RDA220M50S4
220
3,3
RDA220M50S4
220
3,5
RDA220M50C7
220
3,3
* May vary due to the user's speed and according to the product processed.
Note: To exploded drawing
with spare parts list, see
annexes.

8
WARNING!
Features such as model, serial No. and electrical device voltage are indicated on the data
label (figure below). Before installation check if device’s voltage is according to the
electrical outlet.
2.3 Supply and Disposal of Packing
The device is packed with wood or cardboard, to ensure the perfect integrity during
transportation and is accompanied by the following:
• Instruction Manual for Installation, Maintenance, Use and Safety;
IMPORTANT
The packaging components (cardboard, wood, foam, foil, etc.) are products assimilable to
urban solid waste and can be disposed off without difficulty. In the event that the device is
installed in countries where there are different standards, eliminate the packaging in
accordance with current standards. Perform the correct disposal of the product helping to
protect the environment. For more information about recycling the same, contact the local
authorities, the garbage collect service or the shop where you purchased the product.
3. Installation
3.1 Device Layout
The connection to the Electrical Outlet and the arrangement for the operation must be
performed by a qualified professional. Check if the device voltage is according to the electrical outlet.
During installation, it is essential to indicate this manual for the professionals who will make
it.

9
To ensure the correct operation and safety, you should position the device in a ventilated
environment and in wide support surface, well leveled, dry and stable, away from sources of heat and
water taps, and an average height of 80 cm. Install your device leaving a distance of at least 20 cm
around it, doing this you have enough space to perform inspection, maintenance, cleaning and use.
WARNING!
The installation and the place where it will be set must comply with the rules of prevention
of risk and safety at work (Regulatory Standard NR-12 for Brazil or according to regulatory
standard present on your country).
The manufacturer is not responsible for possible direct or indirect damages caused by the
non-compliance of the said rules and other instructions in this manual.
3.2 Electrical Connection
The device is supplied with a power cable to be connected to an electrical outlet. If the power
cable is damaged, it must be replaced by a new cable. The exchange must be carried out by the
manufacturer, dealer or qualified person in order to avoid risks.
The power cord plug varies depending on the country. The installation of the device must be
done by a technician qualified for this function and always observing the current regulatory standard
of the country, in special about ground connection (if applicable).
It is supplied with the device an Equipotential Grounding Terminal (Terminal Block), located on
back of the base.

10
The Terminal Block shown on figure beside is an additional protection to the main
supply grounding, it must be connected to a bar of Grounding Terminals, not
depending on the main supply connection, other devices that have accessible
metal parts and are stationary, must also be connected to this bar, as well as the
workbench, if it is metallic. This way, all devices will be at the same electric
potential avoiding harmful electric current.
The device is mono-voltage, ie it operates at 110 V, 127 V or 220 V. If you need to change the
voltage of your device, contact the manufacturer or your authorized dealer.
WARNING!
Before connecting your device, always checks if the main supply voltage is the same as the
device voltage. If it is not, proceed changing the voltage on the device as instructed.
The supply voltage of the mono-voltage devices is 110, 127 or 220 V (60 Hz) and 220 V (50
Hz), as can be seen in the voltage label pasted on the power cord or as indicated on the
identification label, which is on the back of the device (see figure of this label in item 2.2 of
this manual).
Make sure that the main voltage where the device will be installed is compatible with the
voltage shown in those labels.
For more details about the electrical part of the device, see the wiring diagram in the
manual.
IMPORTANT
The manufacturer is not responsible for possible direct or indirect damages caused by non-
compliance with rules and instructions in this manual.

11
3.3 Security Measures and User Instructions
The professional who sell the device must instruct the user about the correct operation and
must deliver him this instruction manual.
The user must be informed about the necessary safety measures and have to respect them,
and also respect all the measures described in this manual.
4. Device’s Use
4.1 Utility
This device was made only to shred, grate coconut, cheese and other products.
4.2 Commands
This device has a Voltage Selector Switch (multi-voltage devices), General Switch,
Emergency Button and On/Off Switch.
The General Switch, Emergency Button and On/Off Switch are located on the left side of the
device, when seen from Nozzle frontal.
See description of each button:
• General Switch –used to activate and deactivate, on a safe way, the electric supply of the device.
Position “1” activate, position “0” deactivate the electric supply.
• On/Off Switch –used to turn on an off the device. In position "1" turn on, in position "0" turn off.
• Emergency Button –used to stop the device when on emergency situation. Press the button to
activate it, to deactivate the button, turn it clockwise (as indicated on button itself).

12
4.3 Operating Procedures
Before operating your device, perform a cleaning of components that have contact with food
(Tray, Nozzle, Discs, etc.), to do so make sure that the device is disconnected from the power outlet,
then disassemble. Follow the cleaning instructions in section 5 of this manual.
Check the assembly and disassembly procedure described below.
• Disassembly:
• Assembly: The assembly procedure is the reverse of removal. When remounting the Disc, choose
the suitable Disc model to the process, mount it on the motor axle and turn until the Disc Notch
(located behind the Disc) locks on the axle pin. Then, mount the Nozzle on the Threaded Axel (image

13
bellow) and use the Knobs to lock the Nozzle. All parts must be mounted and locked perfectly with
screw and Knobs, to guarantee operator safety. At last, place the Tray on the base.
If Disc or Nozzle are not firm, may not be correctly mounted. In this case, repeat the
operation and if not getting success, contact technical assistance.
WARNING!
Never turn on the device with the Disc or Nozzle out of position, this might cause an
accident.
• Operation: The device can be operated only after verify if the Disc and the Nozzle are locked, and if
the device’s voltage is the same as the mains.
After verified all those items, follow the operation procedures:
• Connect the power cord to the electrical outlet;
• Verify if he Emergency Button is on working position and if the Tray is placed above the base;
• With the Mobile Cover closed, press the General Switch in position “1” (On), activate Reset Button
and press the On/Off Switch in position “1” (On). At this point, the Disc starts spinning;
• Rise the Mobile Cover using the Knob. Due to the security system on Mobile Cover, the device will
not work while the Mobile Cover is raised. Insert food on the Nozzle;
• To Disc spins, lower the Cover by the Knob and lightly press the food against the Disc. For best
process performance, perform push and relieve pressure on food against disc. Increase the pressure
gradually during food processing;
• The processed food comes out from the bottom of the Nozzle, falling inside the Tray;
• After finishing the process, turn the device off by pressing the On/Off Switch in position “0” (Off);
• Remove from Tray the processed food. Disassemble the Nozzle (as instructed on assembly and
disassembly procedure) to remove the food that eventually is accumulated inside the Nozzle.

14
TIP
To shred and to grate soft cheese and chocolates, it is necessary to freeze them, to firm this
foods, making the processing become easy. This procedure avoids the transformation of the
processed product into paste (this prejudice the process), making the product departure
from the bottom of the Nozzle get harder.
WARNING!
In emergency case, press the Emergency Button, it will stop the device instantly.
If you activate the General Switch, the Reset Button and then the On/Off Switch and your
device do not activate, be sure if:
• The Nozzle is mounted correctly and locked with the Knobs, and the Mobile Cover is closed. Due to
the security system, the device will not work while these conditions are not attended;
• Emergency Button can’t be activated. To deactivate the button, turn it clockwise (as indicated on
button itself), then check if the Mobile Cover is closed and press the On/Off Switch on position “1”
(on), and your device will be ready to be used.
WARNING!
If the device cannot process the product or stops processing, reduce the quantity or food
size on pre-cut, before insert it on the Nozzle. The excess pressure on Mobile Cover to press
food against the Disc also may prejudice the speed and performance of the Electric Motor,
Disc, and device’s life cycle.
Failure to follow these guidelines will be considered unsafe act and machine abuse.
WARNING!
Even existing a security system on the device (the device will not work with the Mobile
Cover raised or the Nozzle unmounted), never try to remove the Nozzle or the Disc while the
device is turned on, also never place fingers, hands or objects (spoons and knifes) on Disc,
it might cause an accident.
Always use the Mobile Cover Knob to process food, never use your hands or objects to
push food against the Disc during operation.
Any irregularity contact the nearest authorized service.
IMPORTANT
The operator must use the appropriate PPE (personal protective equipment). For example:
use cap in hair preventing it from locking up in moving parts and appropriate gloves to
guarantee hygiene when handling food, also protects the operator during the process.

15
IMPORTANT
The manufacturer is not responsible for possible direct or indirect damages caused by non-
compliance with rules and instructions in this manual.
5. Cleaning and Maintenance
5.1 Procedures for Cleaning and Products to be used
Your device was built with first class materials, so use it correctly and get great satisfaction.
Keep it always clean and well maintained, by doing this, your device will have longer life cycle.
You must do daily cleaning on the device for a good operation and durability.
WARNING!
Before performing maintenance or cleaning, ensure that the On/Off Switch is in position "0"
(off) and that the plug is disconnected from the mains.
WARNING!
Do not use water jet to clean the device.
IMPORTANT
This device is not intended to be fully immersed in water for cleaning.
Follow the instructions below to learn which parts can be immersed and which one needs
special care.
Demountable parts (Disc, Tray and Nozzle) should be removed from the device (as
instructions on item 4.3) and washed with warm water and mild detergent. Thoroughly clean the
corners, eliminating waste from the food.
The device must be cleaned as many times as possible, to prevent dry food waste from
sticking on parts. For cleaning, dilute soap or mild detergent in warm water and apply with a soft cloth.
With a cloth humidified with water rinse the device and then, dry the parts with a soft dry cloth.
Never use products or abrasive sponges for cleaning, it may scratch or damage the surface of
the pieces. Do not pour water into it for cleaning, it can cause electric shock or even burn the device.

16
WARNING!
Be careful while cleaning the Discs, it is extremely sharpened. Handle carefully otherwise it
might cause an accident. Same warn for any other cutting part of the device.
Once the cleaning of the Disc is finished, and it is locked on the axle with screws and flat
washers, reset the Nozzle locking with the Knobs.
Never operate the device if the Disc is not locked and the Nozzle is not locked with the
Knobs, it might cause an accident.
IMPORTANT
The manufacturer is not responsible for possible direct or indirect damages caused by non-
compliance with rules and instructions in this manual.
WARNING!
It is extremely important that the products used in cleaning ensure maximum hygiene and
are nontoxic.
5.2 Maintenance and Behavior in Case of Malfunctions
The operator must be instructed to perform routine inspections, making small adjustments,
cleaning and watch evidence of malfunction that may occur. Examples: check strange noises; power
loss; device non-performance the result; among others. These actions are indispensable to ensure a
longer life of the device.
WARNING!
When maintenance is made (even if minor adjustments), always disconnect the device from
the power outlet.
It is recommended to perform preventive maintenance from 6 in 6 months, checking and
adjusting clearances, cleaning the internal parts, etc. By detecting broken or impaired functioning
parts, make the replacement, always using original parts.
The preventive maintenance eliminates the inconvenience of staying with device stopped
when most needed, reduces the cost of maintenance and reduce the risk of accidents.
WARNING!
Preventive maintenance requires skilled professional.
Make sure the device is unplugged from the power outlet.
Whenever you remove any safety item of the device (for example, during cleaning or
maintenance), reset in place and confirm that is performing its function properly.

17
To detect any malfunction or nonconformity, send your device to the nearest service. See list
of technical assistance in the link on our website: www.metvisa.com.br
5.3 Prolonged interruption in use of the Device
When you have to leave the device stopped for a long period of time, disconnect it from the
power outlet and clean it, including the different accessories. It is advised to protect all device’s parts
with white Vaseline Oil or with suitable products. Also protect the device from dust, covering it with a
nylon fabric or other material.

18
6. ANNEX
Wiring Diagram
ATTENTION: The ground connection varies depending on the power cord plug.
During installation observe the current regulatory standards of the country, in special about ground
connection (if applicable).

19
Exploded Drawing

20
Spare Parts List
Position
Code
Description
Quantity
1
ANL015
Elastic Ring
02
2
PRE006
Screw Fixing Discs
01
3
PCC002
Screw
01
4
BDJ023
Tray
01
5
BOT002
On/Off Switch
01
6
BOT003
Emergency Button
01
7
BCH036
Black Cover
01
8
CAB012
Nozzle
01
9
CBE023
Electric Cable Type 1 –Model RDA220M50S1
01
CBE029
Electric Cable Type 2 –Model RDA220M50S2
CBE001
RDA110M60S4
Electric Cable Type 4 –Model RDA220M60S4
RDA220M50S4
CBE143
Electric Cable Type 5 –Model RDA127M60S5
Electric Cable Type 5 –Model RDA220M60S5
CBE175
Electric Cable Type 7 –Model RDA220M50C7
10
CHE059
Actuator
01
11
CHE087
General Switch
01
12
CHE094
Sensor
01
13
CHE082
Safety Unit
01
CHE101
Safety Unit –Model RDA220M50C7
14
BCH067
Black Cover
01
15
CJT386
Equipotential Grounding Terminal
01
16
CJT548
Grater Disc
01
17
CJT549
Shredding Disc Ø 5 mm
01
18
CJT550
Shredding Disc Ø 8 mm
01
19
EIX164
Mobile Cover Axle
01
20
EPR006
Mobile Cover
01
21
ETR040
Structure
01
22
GAB195
Body
01
23
MNL006
Mobile Cover Knob
01
24
MNL058
Locking Nozzle Knob
02
25
MTE240
Electric Motor 1/3 cv 60 Hz 127 V
01
MTE241
Electric Motor 1/3 cv 60 Hz 220 V
MTE149
Electric Motor 1/3 cv 50 Hz 220 V
26
PCC006
Screw
02
27
PEP010
Foot
08
28
PNL003
Elastic Pin
01
29
POC011
Cap Nut
02
30
POS138
Hex Nut
02
31
PRA009
Screw
17
32
TCE021
Rubber Eyelet
01
33
PRC013
Screw
04
34
PRS043
Screw
02
35
PRS332
Screw
02
36
SBT152
Actuator Support
01
37
SBT160
Actuator Tube
01
38
TCE004
Fit Terminal
04
39
TCE008
Amendment Terminal
04
40
TCE013
Female Terminal
01
41
GIA087
Product Guidance Front Tab
01
42
RBT002
Rivet
02
This manual suits for next models
7
Table of contents
Other BIMG Kitchen Appliance manuals
Popular Kitchen Appliance manuals by other brands

Goldmedal
Goldmedal 2213 Series instruction manual

New Air
New Air AB-850 owner's manual

Silvercrest
Silvercrest SEAD 1800 B1 operating instructions

Silvercrest
Silvercrest SSMW 750 A1 operating instructions

Goldmedal
Goldmedal 4110BG instruction manual

Silvercrest
Silvercrest SCM 1400 A1 operating instructions