Binatone Speakeasy GSM User manual

EnglishSvenskaNorsk
Suomi
Speakeasy GSM
Art.no. Model
36-3691 Speakeasy GSM Ver. 201102

2 3

2 3
English
Binatone Speakeasy GSM
Art. no 36-3691 Model Speakeasy
Please read theentire instruction manual before use and save it for
future reference. Wereserve theright for any errors in text or images
and for making any necessary technical changes to this document.
Ifyou should have any questions concerning technical problems
please contact our Customer Services.
If you need help …
The Binatone Help Line is available from 9.00 am to 5.00 pm,
Monday to Friday. Thenumber is 0845 345 9677
(local call rate in theUK).
Or visit our website: http://www.binatoneonline.com
The box contains:
• The mobile phone
• A mains power adapter
• A rechargeable battery pack
• This user guide
• A charger base
Keep thepackaging materials for future use.
Keep your sales receipt - it is your guarantee.
IMPORTANT - Your handset is not supplied with aSIM card.
Youwill need to insert aSIM card for thehandset to work correctly.
Thismobile phone can be used on every GSM network except “3”.
Network services - The phone is approved for use on theGSM900
and GSM1800 networks. Checkwith your mobile phone service
provider to see if you can use thedual-band feature or other net-
work services described in this guide. Someservice providers may
not support all language-dependent characters and/or services.

4
English
5
Contents
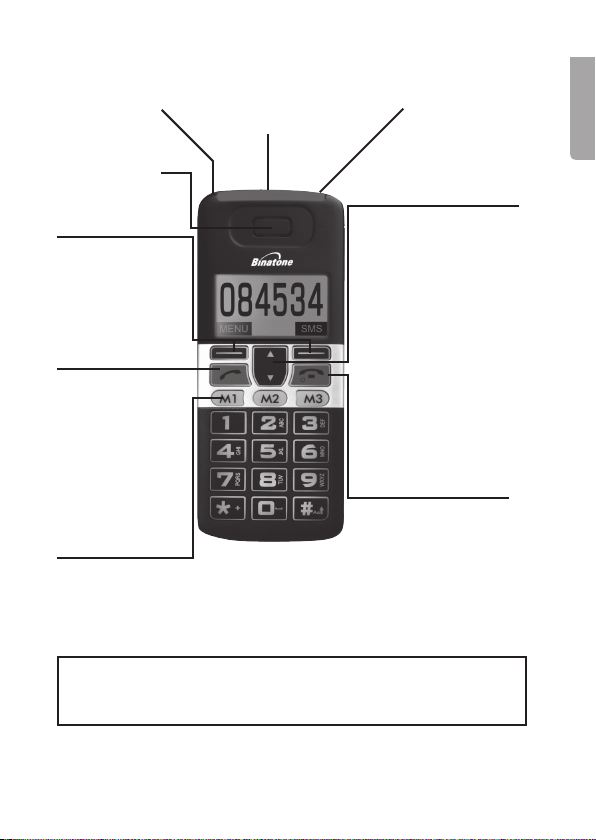
Where to find it .............................................................................5
Symbols on thedisplay ................................................................6
Menu operation ............................................................................8
Read these notes first ..................................................................8
Getting started ..............................................................................9
Switching on and off ..................................................................11
Making and answering calls .......................................................12
Using thephone book and fastkeys (M1-M3) ...........................14
Call log ........................................................................................16
SMS text messaging ..................................................................17
Settings .......................................................................................19
Phone settings (language, display, security, reset) .............20
Clock settings .......................................................................20
Network settings ..................................................................20
Call settings ..........................................................................21
Sound profiles ......................................................................21
Alarm clock .................................................................................21
Torch ...........................................................................................22
Troubleshooting ..........................................................................23
Battery information ....................................................................25
Additional safety information .....................................................25
Care and cleaning ......................................................................27
Disposal ......................................................................................27

4
5
English
Wrist strap
holes Visual ringer Torch beam
Up/down buttons
Press during a call to
adjust speaker volume.
Press to step through
names, phone numbers,
menus and settings.
Standby mode shortcuts:
Up – to sound profiles
Down – to phonebook
Warning! The torch uses a high-brightness LED. The beam must
not be aimed directly at anyone’s eyes. Do not view the LED
through any kind of optical instrument.
End Call / Power
On-Off button
Press and hold to switch
the phone on or off.
Press to end or decline
a call.
Press to return to
standby mode.
Memory buttons
(M1, M2 and M3)
Three memory buttons
for outgoing calls.
Call/Answer
Press to answer an
incoming call.
Press to make
acall.
Press to go to
theredial list.
Selection keys
(right/left)
Used to confirm
choices depen-
ding on what is
displayed above
thekeys.
Loudspeaker
Where to find it

6
English
7
Torch button
Press and hold to switch the torch on.
Keypad lock/unlock button
Slide up to unlock the keypad and down to lock it.
Network name or logo
(if thedisplay option is set)
12
Symbols on thedisplay
1 – Pressing theleft-hand key in standby mode takes you to
themenu.
2 – Pressing theright-hand key in standby mode takes you to
theSMS text message function.
The selection keys are “soft keys”. Theirfunction changes
depending on which menu is displayed.
Radio link/signal strength
On steady when aconnection exists. Alsoshows thesignal
strength. Flashesif thehandset is trying to establish aconnection.

6
7
English
Battery charge level
If this symbol shows nearly empty, charge thehandset as soon
as possible. Thebattery symbol flashes when thebatteries are
being charged.
Call diversion
Displayed when call diversion has been set.
Alarm
Displayed when thealarm has been set.
Ringer off (silent mode)
Displayed when theringer has been turned off.
Hands-free
Displayed when ahands-free unit is connected.
New text message (SMS)
Displayed when there is anew text message.
Keypad lock
Displayed when thekeypad is locked.
Vibrator
Displayed when thevibrating ringer is on.
Missed call
Displayed if you have missed acall.
Speakerphone
Displayed if thehandset loudspeaker is on.
Mute
Displayed when thehandset microphone is off.

8
English
9
Menu operation
Menu lists are used for setup and operation.
In standby mode, theleft and right softkeys are Menu and SMS.
When you press Menu ( ) thedisplay changes and thesoftkey
functions change to Select and Back.
Press Up or Down to move up or down in menu lists. PressSelect
or Back to go thenext or previous display.
When entering text, press [#] to switch case:
Upper case (ABC), upper-case initials (Abc), lower case (abc) and
numerals (123).
Press [*] to show special symbols.
Press Up or Down to move thecursor. PressCancel to delete letters.
Read these notes first
The phone is an electronic product and should be treated with care
so that warranties are not voided and thephone can be used safely.
Safe use
Do not use themobile phone where its use is prohibited or
where it might cause interference or danger.
Torch function
Never look into thebeam. Neveraim thebeam directly at
anyone’s eyes.
Hearing aid compatibility
With thehearing aid in standby mode, adjust thevolume of
thephone. Ifthis does not work, switch thehearing aid to
thehearing loop setting (the ‘T’ position).
Water resistance
Keep thephone dry. Itis not water-resistant.
Temperature range
Use: 0 to 40 °C
Storage: -20 to 60 °C

8
9
English
Getting started
Before you can use thephone you must install aSIM card.
Keepyour SIM card out of thereach of small children. TheSIM
card can easily be damaged by scratching or bending, so handle
thecard carefully.
Installing theSIM card and battery
1. Switch off thephone and
disconnect thepower adaptor.
2. Remove thebattery cover
on theback of thephone
by pressing thebutton
at thebottom and sliding
thebattery cover down.
3. Remove thebattery by lifting it
at thetop edge.
4. Carefully slide theSIM card
into theholder, with thegold
connectors facing down and
theangled corner top right.
5. Make sure that thebattery
terminals match theterminals in
thephone. Insertthelower end
of thebattery first, then press in
thetop end.
6. Slide thebattery cover back
until it clicks into place.

10
English
11
Inserting thefast-dial number card
1. Remove thebattery cover on theback of thephone by pressing
thebutton at thebottom and sliding thebattery cover down.
2. The card is located in apocket in thebattery cover. Write down
the desired fast-dial numbers on the card.
3. Slide thebattery cover back until it clicks into place.
Charging thebattery
Warning! Useonly batteries and chargers supplied with or
recommended by Binatone for this model. Theuse of other
types will invalidate warranties and may be dangerous.
Never charge thephone with thecover removed.
1. Plug thecharger lead firmly into thesocket on theside of
thephone.
2. Plug thecharger into a230 V AC mains socket. Thecharging
symbol and theword “Charging…” appear on thedisplay.
(NOTE: If thebattery is fully discharged it may take afew
seconds for thesymbol to appear.)
3. Charging thebattery may take up to 15 hours.
4. If “No charging” is displayed, unplug thecharger and try again.
Ifcharging still fails, contact thehelpline.
5. The battery is fully charged when thebattery symbol on
thedisplay is full. Unplugthecharger from thewall socket
and then unplug thecharger from thephone.
Connecting acompatible headset (accessory)
You can use thephone with aheadset (not supplied). Theconnector
must be a2.5 mm three-pole jack plug that fits thepower/headset
socket on theleft side of thephone.

10
11
English
When connecting aheadset, including those recommended by
Binatone for use with this phone, pay special attention to thevolume
level. Readtheheadset’s user guide for detailed safety instructions.
Donot connect incompatible headsets.
When theheadset is correctly connected, asymbol appears on
thephone display.
Headset/charger socket
Plug in apower adapter to charge thebattery.
Plug in aheadset (not supplied) for headset use.
Switching on and off
Switching thephone on and off
To switch thephone off, press and hold End Call ( ) until
thedisplay clears. To switch thephone back on, press and hold
End Call until thedisplay turns on.
Warning! Donot use themobile phone where theuse of mobile
phones is prohibited or where doing so might cause interference
ordanger.
Locking thekeypad
Slide thekeypad locking switch on theside of thephone down
thelocked position. Thedisplay shows .
To unlock thekeypad, slide thekeypad lock switch on theside of
thephone up to theunlocked position.
NOTE: When thekeypad is locked, you can answer, end or decline
calls in theusual way. Whileacall is in progress, thekeypad works
normally.

12
English
13
Using thetorch
To switch on thetorch, hold down thebutton on theside of
thephone. Releasingthebutton switches thetorch off.
NOTE: You can also switch thetorch on permanently from themain
menu; see page 22.
Warning! Thetorch uses ahigh-brightness LED. Neveraim
thebeam directly into anyone’s eyes or look into thebeam with
an optical instrument.
Making and answering calls
Making acall
Make sure that thephone is switched on and in service.
Key in thetelephone number, including thearea code. (To obtain
theprefix “+”, press [*] twice quickly.)
Press Call/Answer ( ) to call thenumber on thedisplay.
Press End call ( ) to end thecall.
Making acall to afast-dial number
M1/M2/M3
Press thefast-dial button to call thenumber. (Instructions for
programming afast-dial number button are given on page 16.)
Last number redial
In standby mode, press Call/Answer to see alist of thelast ten
numbers dialled. Presstheup/down navigation buttons to go
thenumber you want. PressCall/Answer again to call thenumber.

12
13
English
Answering acall
When thephone rings, press Call/Answer to answer.
Earpiece volume
During calls you can press theup/down navigation buttons to
change thevolume. Theset volume level is retained for future calls.
Switching to speakerphone
During acall, press Options -> Speakerphone. PressSelect to
activate thefunction. Thedisplay shows .
Press End call to end thecall. Todeactivate thespeakerphone
function, press Options, then Down to reach Speakerphone off,
then press Select.
Muting themicrophone
During acall, press Options, then press Mute. PressSelect to
activate themute function .
To deactivate themute function, go to Options -> Unmute,
then press Select.
Conference calls
The conference call function is anetwork service that lets up to four
parties join in thesame call. (Check whether your service provider
offers this service.)
1. Call thefirst person and wait for them to answer.
2. Press theHold button to put thecall on hold.
3. Call thenext person.
4. When that person answers, press Options -> Conference.
PressSelect to connect all theparties. Youcan also press
Swap to switch between thetwo parties.
5. Press theEnd call button to end thecall.

14
English
15
Using thephone book
You can store as many as 250 names and phone numbers in
theinternal phone book and on theSIM card.
Accessing thephone book
When thephone is in standby mode, press Down.
During acall, choose Options -> Main menu -> Phone book ->
List all and press Select.
Checking how many numbers are stored in
thephone book
To check thenumber of entries stored in theinternal phone
book and on theSIM card, choose Menu -> Phonebook ->
Used space. Thephone displays thenumber of entries stored in
theinternal phone book and on theSIM card.
Adding an entry to thephone book
Press Down to open thephone book.
Choose Options -> New -> Save to SIM or Save to phone.
Enterthename.
Press Next, then enter thephone number.
Press Save to save thenew entry.
Calling aphone book entry
Press Down to open thephone book.
Press Up/Down to go to theentry you want to call. Youcan also
key thefirst letter of thename and then press Up/Down.
Press Call/Answer to make thecall.

14
15
English
Editing aphone book entry
Press Down to open thephone book.
Press Up/Down to go theentry you want to edit. Youcan also key
thefirst letter of thename and then press Up/Down.
Choose Options -> Edit Name.
Edit thename, then choose Next and edit thenumber. PressSave
to save thechanges.
Viewing thedetails of aphone book entry
Press Down to open thephone book.
Press Up/Down to go theentry whose details you want to view.
Youcan also key thefirst letter of thename and then press Up/
Down.
Choose Options -> Details.
Deleting aphone book entry
Press Down to open thephone book.
Press Up/Down to go theentry you want to delete. Youcan also
key thefirst letter of thename and then press Up/Down.
Choose Options -> Delete. Thenpress Yes to confirm.
Deleting all phone book entries
Choose Menu -> Phonebook -> Delete all.
Choose All in phone or All in SIM. Thenpress Yes to confirm.
Copying all phone book entries
Choose Menu -> Phonebook -> Copy all.
Choose SIM to phone or Phone to SIM.

16
English
17
Storing aphonebook entry under afastkey
Press Down to open thephone book.
Press Up/Down to go to theentry that you want to store under
thefastkey. Youcan also key thefirst letter of thename and then
press Up/Down.
Choose Option -> Set to fastkey.
Enter thepassword (the factory default setting is 0000) and press OK.
Thedisplay shows “M1”, “M2” and “M3”.
Press Up/Down to choose thefast key where you want to store
thenumber. Thenpress Select to confirm.
Call log
The call log is alist of missed calls. Ifan incoming call is not
answered, thedisplay shows “1 missed call” until you press
Select (to display information about thecall) or Cancel (to delete it).
Reviewing thecall log
Choose Menu -> Call log. Alist appears, showing Received calls,
Dialled calls, Missed calls and Call duration. Goto thelist you
want to view and press Select.
Or: (from standby mode)
Press Call/Answer to show received calls ( ), outgoing calls ( )
and missed calls ( ).
NOTE: When in acall list, press Options to go to alist. Thereyou
can choose Details to see details, Call to make acall, Edit before
call to edit theentry, Send message to send an SMS text mes-
sage, Save to save theentry to thephonebook, Delete to delete
therecord or Delete all to delete all records in thelist.

16
17
English
SMS text messaging
Send and receive text messages. Theseare saved in thephone
memory (max. 100) or on theSIM card.
Received text messages are stored in theInbox and the icon
indicates that there is anew message. Also“1 new message”
is displayed until you press Select (to view) or Cancel (to go to
standby mode).
Access to theSMS menu
Choose Menu -> Message -> SMS to access thevarious choices:
• New – Write anew text message.
• Inbox – Go to theinbox and read incoming text messages.
• Sent – View sent text messages.
• Outbox – View drafts of unsent text messages.
• Msg settings – View/edit text message settings.
• Used space – See how much space is left in
thephonememory or on theSIM card.
• Delete all – Delete all SMS text messages.
Writing and sending SMS text messages
Choose Menu -> Message -> SMS-> New to write anew text
message. Key in your message with thenumber/letter keys.
To send themessage, choose Options -> Send. Enterthetelephone
number you want to send themessage to. Press Select to send
themessage. Thedisplay shows “Sending message …”.
NOTE: If you follow theinstructions above, themessage is sent but
not saved. Youcan also:
• Save in outbox – save themessage in theoutbox without
sending it.
• Send and save – send themessage but also save it in Sent.

18
English
19
NOTE: If you want to send amessage to someone in your phone-
book, you can press Contacts instead of keying in thenumber and
then choose Choose to select therelevant name.
NOTE: If message sending fails, themessage returns to edit mode.
Reading received SMS text messages
Choose Menu -> Message -> SMS-> Inbox to display alist of
received text messages. UseUp/Down to scroll through them.
When themessage you want is highlighted, press Select and
use Up/Down to read theentire message.
Press Options to display:
• Delete – Delete themessage from theinbox.
• Reply – Reply to themessage.
• Forward – Forward themessage to another number.
• Call sender – Call theperson who sent themessage.
• Extract no. – Save thesender’s number in your phonebook.
Press Select when your choice is highlighted. Thenfollow
theinstructions in themenus.
Checking theoutbox, sent box and used space
Choose Menu -> Message -> SMS to access thevarious choices:
Press Select when your choice is highlighted.
Deleting messages
Choose Menu -> Message -> SMS -> Delete. Nowyou can
choose from Delete all, Delete inbox, Delete sent box and Delete
outbox.
Press Select when your choice is highlighted.

18
19
English
Changing theSMS settings
Choose Menu -> Message -> SMS to access thevarious choices:
• Message centre – The SMS service number.
• Message validity** – The SMS storage time.
• Status report** – To request adelivery report.
• Reply path** – If you activate this function and theperson who
receives your text message replies, their message will be sent
via thesame service centre as your message.
Press Select when your choice is highlighted. Thenfollow
theinstructions in themenus.
Message centre – Your mobile phone reads thenumber of
themessage centre from your SIM card. Ifthenumber has
been changed by mistake you will have to change it back to
thecorrectnumber.
(** Only certain operators offer this service.)
Settings
You can adjust various settings on thephone and also reset them to
their factory default values.
Choose Menu, then use Up/Down to go to Settings. Thenpress
Select to access thelist of settings.

20
English
21
Phone settings
• Language – The language used on thedisplay.
• Display settings – Contrast, background lighting and screensaver.
• Security settings – Choose whether aPIN code is needed
to use thephone. (Note: Some SIM cards always require
aPIN code.) Warning: If you enter an incorrect PIN three times
theSIM card is blocked. Tounblock it and set anew PIN code
you will need to enter your PUK code or contact your service
provider.
• Factory reset – Resets your phone to its factory default set-
tings. Thisrequires apassword. (Default password = 1234)
Clock settings
• Date and time – thedisplayed date and time.
• Date format – UK or US.
• Time format – Choose between 12-hour or 24-hour format.
• Clock type – Analog or digital.
• World time – Choose asecond time zone.
Network settings
Contact your service provider for details.
• Call waiting – Press Call/Answer to answer call 2 and put
call1 on hold.
• Call diversion – Set diversion numbers for incoming calls.
• Call barring – To restrict outgoing and incoming calls.
• Select network – Choose another network.
Table of contents
Languages:
Other Binatone Cell Phone manuals

Binatone
Binatone Smart 64 User manual

Binatone
Binatone SM320 User manual

Binatone
Binatone SM800 User manual

Binatone
Binatone Speakeasy 600 User manual

Binatone
Binatone Smart 64 User manual

Binatone
Binatone MiMo User manual

Binatone
Binatone BB200 User manual

Binatone
Binatone Speakeasy 300 User manual

Binatone
Binatone The brick User manual

Binatone
Binatone Speakeasy 200 User manual