Binatone SM320 User manual

MOBILE
TELEPHONE
SM320
USER GUIDE
US

2
CONTENTS
1 BOX CONTENT ................................................... 3
2 GETTING TO KNOW YOUR PHONE.................... 4
3 MENU OPERATION ............................................. 8
4 INSTALLATION AND SETUP ................................ 9
5 MAKING AND ANSWERING CALLS .................. 12
6 USING THE PHONEBOOK................................. 13
7 CALL HISTORY .................................................. 16
8 MESSAGING...................................................... 17
9 SETTINGS.......................................................... 21
10 SOS SETTING .................................................... 25
11 TOOLS............................................................... 26
12 GAMES.............................................................. 28
13 SAFETY AND PRECAUTIONS ............................ 29
14 GUARANTEE AND SERVICE.............................. 35
15 TECHNICAL DETAILS......................................... 36
16 TROUBLESHOOTING ........................................ 37

3
1 BOX CONTENT
In the box you will find:
• 1 mobile handset
• 1 charging cradle
• 1 power adapter
• 1 handset back cover
• 1 user guide
• 1 USB cable
Keep the packing materials in a safe place in case
you later need to transport the device.
Warning
The torch uses a high-brightness LED. Do not shine
directly into eyes, or view with optical instruments.
IMPORTANT
Your handset is not supplied with a SIM card, you
will need to insert a SIM card for the handset to
work correctly.
BECAUSE WE CARE
Thank you for purchasing this product. This product
has been designed and assembled with utmost care
for you and the environment. This is why we supply
this product with a quick installation guide to
reduce the number of paper (pages) and therefore
save trees to be cut for making this paper. Thank
you for supporting us to protect our environment.

4
2 GETTING TO KNOW YOUR PHONE
2.1 Keys and parts
# Meaning
1Left Soft
Key
Performs the function of
displayed text above:
Menu / OK
2Right
Soft Key
Performs the function of text
above: Contacts / Back
3
Up and
Down
Key
• Press to browse menu
• Press to move cursor up
or down while editing
• Press to manually change the
frequency in FM interface
• Press for + and - in the
Calculator
1
4
6 6
11
2
5
3
10
12
7
8
9
14
13

5
4 Talk key
• Press to answer a call
during ringing
• Press to enter the calls
log in standby
• Press to dial a number
5
End key
• Press to end a call
• Press to return to the Home
Screen / Standby mode
6M1/M2
key
• Direct memory keys for
storing a telephone number
you often use, long press to
dial out M1/M2
• Press to search channel in
the FM interface
• Press to switch left/right in
menu
• Press for X and / in the
Calculator
7Power
key
• Press and hold to switch the
phone on or off
• Press to Light the screen
8SOS
key
• Long press to start SOS
procedure : SOS alarm /dial
out the 5 pre-stored memo-
ry numbers/send SOS SMS
9Keypad
lock key
• Push up to lock the Keypad
• Push down to unlock the
Keypad

6
10 Number
key
• Press to input telephone
number.
• In edit mode : press to
input numbers or letters.
11 * Key • Press to input */
+/ P/ W symbols.
12 # Key
• Press to input “#”.
• In edit mode : press to
change input method.
• Long press to active silent
mode
13
Volume
control
buttons
• Ring volume in standby or
speaker volume in call.
• Volume in FM radio
14 Torch
key
• Long press to switch torch
LED ON/OFF

7
2.2 Display icons and symbols
The standby screen shows the following information:
Meaning
Radio link
On with signal strength when linked.
with mobile network.
Battery charge level
Internal segments cycle during battery
charging.
Alarm
On if alarm is set.
Ring and Vibrate off
Ringer and vibration is off.
Ring on
On if only the ringer is enabled.
Vibrate on
On if only vibration is enabled.
Vibrate and ring on
On if both are enabled.
Vibrate then ring
On if vibrate then ring is enabled.
New SMS
Indicates you have new text messages.
Lock
On when the keypad is locked.
FM radio
On when FM is active.
Bluetooth
On when bluetooth is active.
Earphone
On when earphone plugged in.

8
3 MENU OPERATION
Menu lists are used for set up and operation. The
left and right soft key functions initially are Menu
and Names.
• Press Menu to display Messaging the rst entry
in the main Menu list.
Use Up or Down to scroll the menu list. The
display changes and soft keys become OK and
Back.
• Press Ok/ Back for the next/ previous display.
When writing text, use the # key to Switch
input method between (ABC), (abc) , (Abc) and
numerals (123).
Use Up / Down key and M1/M2 to move the
cursor, right soft key to delete letters and the * key
for symbols or punctuation .

9
4 INSTALLATION AND SETUP
Before operating, a SIM card must be installed.
Keep the SIM card out of reach of small children.
The SIM card and its contacts can be damaged
easily by scratches or bending, so handle the card
carefully.
4.1 Install the SIM card and battery
• Switch off the phone, disconnect the power
adaptor.
• To remove the back cover, lift the cover off from
the gap at left side.
• Remove the battery.
• Carefully slide the SIM card into the holder with
the gold connectors face down ( as shown 1).
• Replace the battery by aligning the gold
connectors on the battery with those on the
phone and push the end of the battery down
until it clicks into place (as shown 2).
• Replace the back cover by placing it at on the
back of the handset and pushing down until it
clicks into place.
1. 2.

10
4.2 Charge the battery
Warning:
Use only the supplied/approved batteries and
chargers. Using others may be dangerous and will
invalidate warranty. A battery must be tted.
Do not charge with the back cover removed.
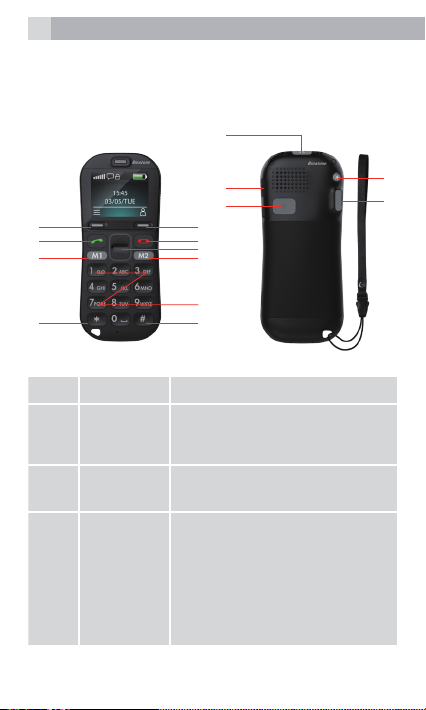
• Connect the charger lead rmly into the USB
socket in the right of the handset, or place the
handset directly in the charging cradle.
• Plug the mains power adapter into an AC mains
socket. If the handset is turned on, “Charger
connected” displays for a few seconds and
the battery symbol bars scroll to indicate that
charging has started.
• If “Charger connected“ does not display,
disconnect and retry.
If charging still fails, contact the helpline.
• The battery is fully charged when the bars
within the battery symbol are continuously on.
Disconnect the charger from the phone and
the AC outlet. “Charger removed” displays
for a few seconds to indicate the charging has
stopped.
Note:
The battery can also be charged if the handset is
connected to a computer USB port.

11
4.3 Switching on and off
To switch the phone on and off:
• To switch off, press and hold Power key until the
display turns off.
• To switch back on, press and hold Power key
until the display turns on.
Warning:
Do not switch on when mobile phone use is
prohibited or if it may cause interference or
danger.

12
5 MAKING AND ANSWERING CALLS
5.1 To make a call
Ensure the phone is switched on and in service.
• Key in the telephone number including
area code. (To add prefix “+” press the * key
twice repeat)
• Press Talk to dial the number on the display.
• To end calls press the End Call button.
5.2 Last number redial
• In idle mode, press Talk to see the All calls list
– a list of the last dialled, received and missed calls.
• Press Up/Down to go to the number you want.
• Press Talk to dial the number.
5.3 To answer a call
• When the phone rings, press Talk to answer it.
• During a call, press Volume control buttons to
change the volume.
The volume level is displayed and stays for future calls.
5.4 To switch to speakerphone
• During a call, press H-Free to turn Loudspeaker
on and press H-Held to turn Loudspeaker off.
• To end the call press the End Call button.
5.5 To mute the microphone
• During a call, press Left Soft Key for Option
then On /Off Mute .

13
6 USING THE PHONEBOOK
You can store names and phone numbers in the
Internal phone book (up to 300) and in the SIM phone
book (SIM dependant, but a maximum of 250).
6.1 To access the phonebook
In idle mode:
• Press RSK or Menu then Down to Phonebook,
OK.
Note:
Indicates entries on the SIM card
Indicates entries in the Internal phone book.
6.2 Add a new phonebook entry
• Press Menu, then Down to Phonebook, press
OK to open the phonebook menu.
• Select Add new contact , and press Options,
then press Select to SIM / to Phone ,then OK.
• Enter the Name then press Down and then
enter the telephone number.
• Press Options then Save the new contact.
Note:
When writing the name, use # to switch
between (ABC), (abc) ,(Abc) and Numerals (123).
6.3 To call a phonebook number
• In the idle, Press Right soft key to open the
phonebook.
• Press Up/Down to nd the name you want to,
Press Talk key to dial the number.

14
6.4 To edit a phonebook entry
• Press Right soft key to open the phonebook,
then Up/Down to nd the entry you want to
change.
• Press Options then Up/Down to select Edit,
then modify the name ,and then Press Down
and modify the Number.
• Press Options then Save the change(s).
6.5 To delete a phonebook entry
• Press Right soft key to open the phonebook,
then Up/Down to nd the entry you want to
delete.
• Press Options then Up/Down to select Delete,
then Yes to conrm the Delete.
6.6 To copy an entry to the phone or SIM card
• Press Right soft key to open the phonebook,
then Up/Down to nd the entry you want to
copy.
• Press Options then Up/Down to select Copy,
then press the LSK to select copy to Phone or
to SIM.
6.7 To add an entry to Blacklist
• Press Right soft key to open the phonebook,
then Up/Down to nd the entry you want to add
to Blacklist.
• Press Options then Up/Down to select add to
Blacklist, then Yes to conrm.

15
Note: Before that insure the Reject numbers in
blacklist is On , setting path as followed:
Settings > Call settings > Advanced settings >
Blacklist > Reject numbers in blacklist
Once you add the number to the blacklist, this
number can not call you anymore.
6.8 Phonebook settings
In idle mode:
• Press RSK or Menu then Down to Phonebook,
then OK to open Phonebook, and Options .
• Down to Phonebook settings and select,
display as following:
Extra
numbers When you set on, you can only call to
xed number, need SIM card support
Memory
status Display SIM/Phone memory status
Copy
contacts Copy all the contacts from SIM/Phone
or Phone/SIM
Move
contacts Move all the contacts from SIM/Phone
or Phone/SIM
Delete all
contacts To delete all SIM/Phone contacts

16
7 CALL HISTORY
With this function, you can view the Call history.If a
call is not answered, 1 missed call(s) displays until
view or back.
7.1 To view the call log entries
• From the home screen/idle mode, press Talk
to show the All Calls log or
• View via the Menu and Call history where
you can view separate lists for Missed calls,
Dialled calls, Received calls , Delete call Logs,
Call timers, Text msg. counter.
• Press Menu, then Up/Down to show Call history,
and then press OK to open the Call history menu.
• Press Up/Down to select the calls log you wish
to view and press ok to show the selected list.
• When in a list, press Up/Down to nd the call
entry you want.
• Press Options to see the following list of ptions:
View View details of the selected call, include
number
Call Call the selected number.
Send text
message Send an SMS message to the selected
number.
Save to
phonebook Save the selected number to your
phonebook.
Add to
Blacklist Add the number to the blacklist
Delete Delete the selected number from the log.

17
8 MESSAGING
Received SMS are stored in the Inbox and the icon
indicates new messages.
Also “New message 1 unread ” is displayed until
View or Back is pressed.
8.1 To access the SMS menu
• Press Menu to show Messages.
• Press OK to open the Messages.
Write
message to write a new message.
Inbox to go to your inbox to read received
messages.
Drafts to go to saved drafts.
Outbox saved messages that not sent
successfully.
Sent
messages saved messages that have send
successfully.
Broadcast
messages setting and save broadcast messages
SMS
Settings to check or change
SMS settings.

18
8.2 To write and send a text message
• Press Menu to show Messaging
• Press OK to show Write message
• Press OK again to display a ashing cursor.
• Write your message using the digit / letter keys.
Note:
When writing text, use # to switch between (ABC),
(abc) ,(Abc) or Numerals (123).
Note:
Use Up/Down and M1/M2 to move the cursor,
Clear to delete letters and the * key for
symbols or punctuation, or repeated pressing of
the 1 key for more.
• To send, press Options and then select Send to.
• Press OK to add number from Phonebook ,
or Up to Enter number , input full number then
OK.
• Press Options when the number is entered, then
select send to send the message.
Note:
When a message is send it is also saved in the
sentbox, provided Save sent messages is selected
in Messaging > SMS Settings It would be saved in
the Outbox without sending.
Note:
After sending, the phone returns to the Messaging
menu list.

19
8.3 To read your messages
• Press Menu to show Messaging and OK to select.
• Press Down to choose Inbox and OK to select.
• Press Up/Down to step through the messages.
• While viewing a message, press Options to
display:
View to read the message
Reply to send a reply message to the sender.
Call
sender
to call the sender
Forward to forward the message to
others
Delete to delete the message.
Delete all to delete all the Inbox messages.
save to Phonebook
Sort by Sort message by date/Sender/Subject/
Unread, read/Message size/
Details Display the number of the sender
8.4 To review the Outbox
• Press Menu to show Messaging and OK to select.
• Press Down for Outbox, Press OK to select it
and then follow the menus.

20
8.5 To delete all messages
Delete Messages from each folder using their
Option menu.
• Press Menu to show Messaging and OK to select.
• Press Up/Down then ok to select Inbox/Drafts/
Outbox/Sent messages
Press Options to open the options list.
• Press Up/Down to select Delete all then Yes to
delete the required messages.
8.6 To modify SMS settings
• Press Menu to show Messaging and OK to
select
• Press Up/Down to SMS Settings and
OK to select:
SIM to select SMSC address ,Delivery
report, Reply path and Voicemail server
Memory
status to display memory status of the SIM/
phone
Save sent
messages to On/Off Save sent messages
Preferred
storage Phone or SIM
Long text
messages Activated/Deactivate
SMS Black
List to On/Off SMS black list
Table of contents
Other Binatone Cell Phone manuals

Binatone
Binatone Speakeasy GSM User manual

Binatone
Binatone BB200 User manual

Binatone
Binatone SM800 User manual

Binatone
Binatone Speakeasy 300 User manual

Binatone
Binatone Speakeasy 600 User manual

Binatone
Binatone Smart 64 User manual

Binatone
Binatone Smart 64 User manual

Binatone
Binatone MiMo User manual

Binatone
Binatone The brick User manual

Binatone
Binatone Speakeasy 200 User manual