Bintelli Sprint User manual


Contents BINTELLI USER’S MANUAL
Instructions to Users
Precautions........................................................................ 1
Vehicle Identification Number (VIN) and Engine Number... 2
Brief Introduction to the Scooter......................................... 3
Technical Specifications ..................................................... 6
Instrument Cluster.............................................................. 9
Left control switch ......................................................... 10
Right control switch ........................................................11
Ignition switch................................................................... 12
Seat Cushion Lock/ Fuel tank .......................................... 13
Vehicle Operation ........................................................... 14
Motorcycle Load............................................................... 15
Vehicle load/ tools included.............................................. 16
Operating Instructions
Basic vehicle information.................................................. 17
Kick starting the engine.................................................... 20
Electric starting the engine............................................... 21
Parking the scooter .......................................................... 22
Service and Maintenance
Regular Service and Maintenance ................................... 24
New Vehicle Maintenance Procedure (500 mile Service)..25
Level 2 Service and Maintenance.................................... 26
Level 3 Service and Maintenance.................................... 26
Service and Maintenance for the Carburetor.................... 27
Checking and Changing the Engine Oil ........................... 28
Service and Maintenance of the Spark Plug..................... 29
Service and Maintenance of the Air Filter......................... 30
Adjustment of the accelerator handgrip............................ 31
Service and Maintenance for the Front Brake.................. 31
Service and Maintenance for the Rear Brake................... 32
Adjustment of the rear brake light .................................... 34
Adjustment of the idle speed............................................ 34
Service and Maintenance for Front and Rear Tires.......... 35
Service and Maintenance for Battery............................... 37
Service and Maintenance for the Fuse............................. 38
Service and Maintenance for the Horn............................. 38
Storage of the Vehicle ...................................................... 38
Service and Maintenance Interval Table........................... 40
Service and Maintenance Interval for Lubricated Parts.... 41
Common Faults and Troubleshooting............................... 42

1
USER’S MANUAL Instructions to Users
Precautions
Please read the User’s Manual before operating the vehicle!
Warning
* Always observe traffic laws and regulations.
*All users’ must have a valid driver’s license.
* Do not hang any items from the throttle grip as this will cause an unsafe driving condition.
*Please wear a helmet and eye protection at all times.
* Be aware the exhaust and muffler are extremely hot. Do not touch any part of the engine after riding to prevent burns.
Caution
* After unpacking the vehicle from shipping, please check the accessories and various documents delivered according to the packing list.
* Always follow the recommended weight limit.Any additional weight will cause premature wear to the engine and drive train.
* Do not modify any part of the vehicle.Any attempt at modifying the vehicle could lead to a decrease in engine life, reliability and safety.
* This high performance vehicle is designed to be run with premium fuel only (93 octane). Failure to use premium fuel will affect performance and
lead to premature engine failure due to detonation and pre-ignition.Any engine damage that has occurred from improper fuel grade is not covered
under warranty. It is the user’s responsibly to always ensure the correct fuel is used.
Suggestion
* This manual provides important information regarding the vehicle. If ownership transfers, please include this manual.
* All repairs must be completed at an authorized service center. The first 500 mile servicing which includes the valve adjustmentmust be completed
to maintain engine warranty. Failure to follow the servicing schedule outlined in this manual will void the warranty.

2
Instructions to Users USER’S MANUAL
Vehicle Identification Number (VIN) and Engine Number
Vehicle Identification Number (VIN) and Engine Number
Please fill in appropriate numbers for
future reference:
VIN:
Engine Number:
①
Vehicle Identification Number (VIN) is
printed on the vertical tube of the frame,
behind this plastic cover.
②
The product nameplate is
riveted on the right lower part of
the frame.
③The Engine Number is printed on
the lower left part of the crankcase.
3
USER’S MANUAL Instructions to Users
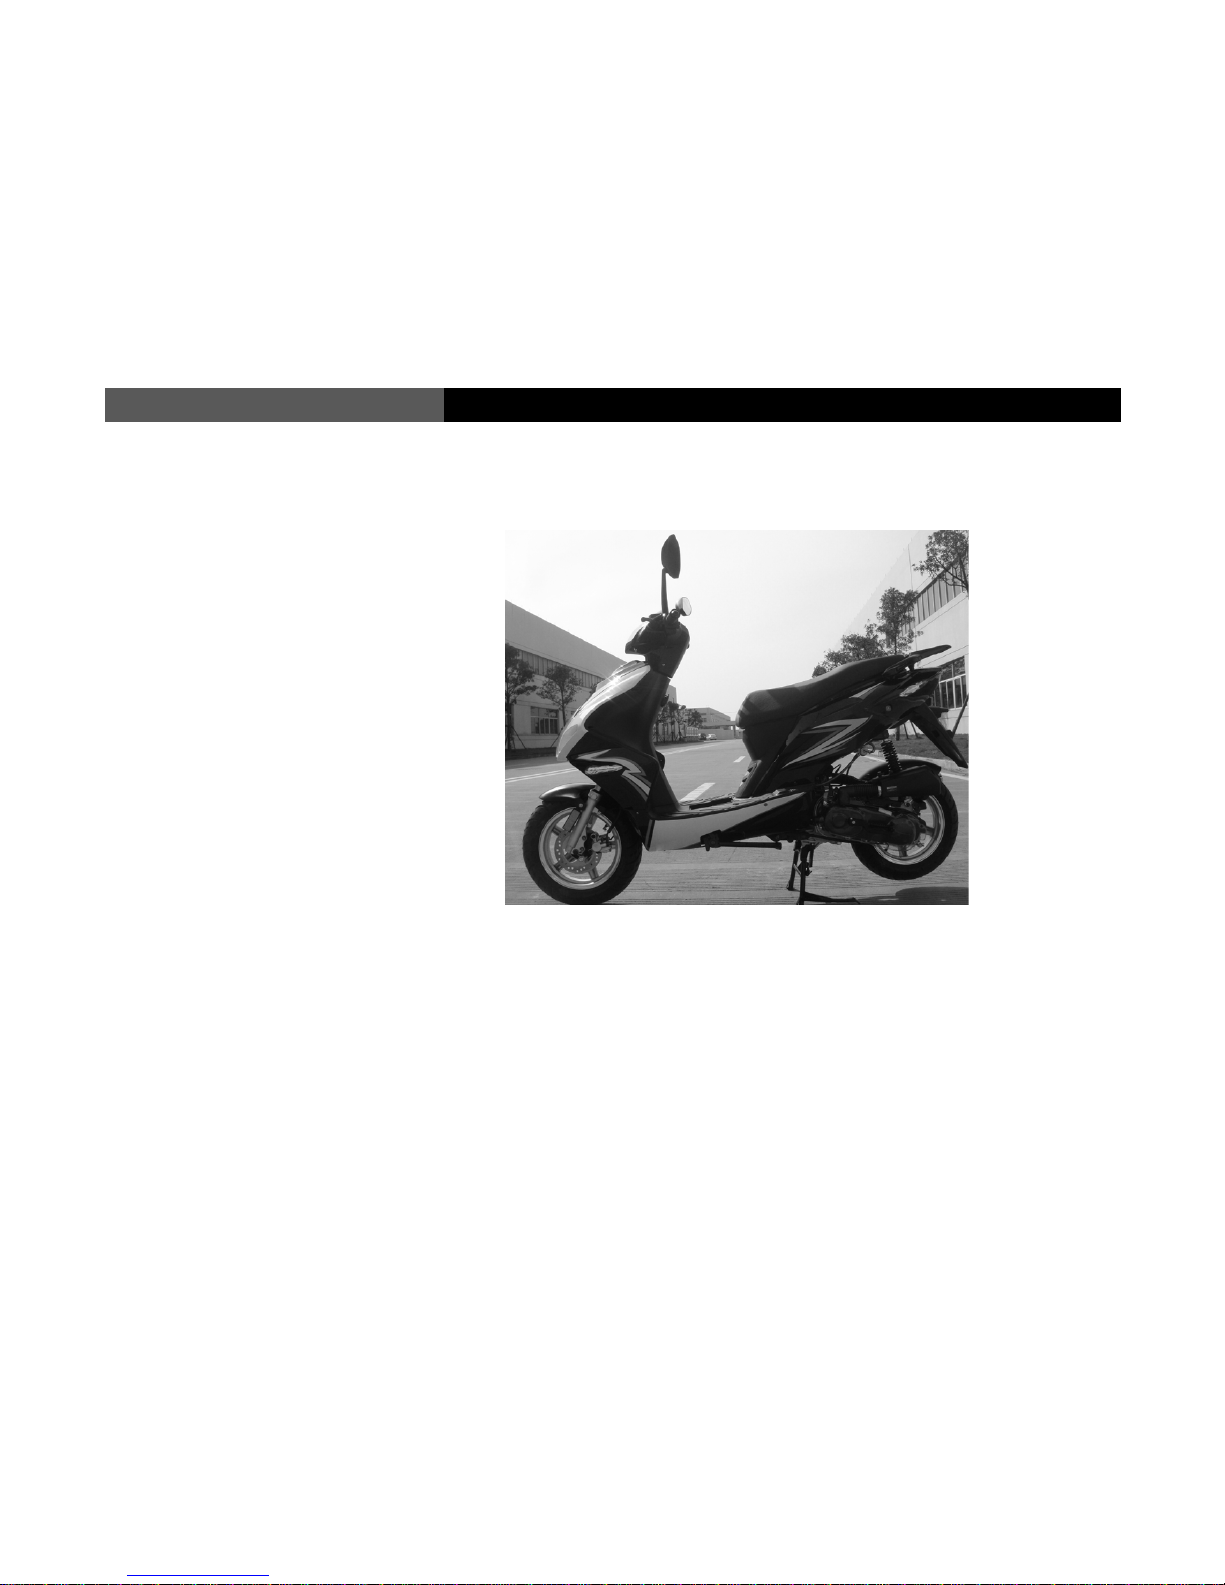
Brief Introduction to the Scooter
1. Head Light
2. Left front turn light
3. Front storage box
4. Seat cushion
5. Rear carrier
6. Disc brake
7. Side support
8. Main support
9. Starting arm
10. Air filter

4
Instructions to Users USER’S MANUAL
Brief Introduction to the Scooter
1. Tail light
2. Rear spoiler
3. Helmet hook
4. Steering column
5. Right front turn signal
6. Rear wheel
7. Muffler
8. Battery Compartment
9. Front brake lever
10. Front wheel

5
USER’S MANUAL Instructions to Users
Brief Introduction to the Scooter
1. Rearview mirrors
2. Left handgrip
3. Left control switch
4. Instrument cluster
5. Ignition switch
6. Right control switch
7. Throttle grip

6
Instructions to Users USER’S MANUAL
Technical Specifications
Sprint
Breeze
Edge
Scorch
Havoc
Engine Type BN139QMB BN139QMB BN139QMB BN139QMB BN157QMJ
Cooling System Air Cooled Air Cooled Air Cooled Air Cooled Air Cooled
Bore x Stroke 4 stroke 4 stroke 4 stroke 4 stroke 4 stroke
Compression Ratio 10.4:1 10.4:1 10.4:1 10.4:1 9.5:1
Horse Power 2.4kw/8000r/min 2.4kw/8000r/min 2.4kw/8000r/min 2.4kw/8000r/min 6.3kw/7500r/min
Max Torque N.m/(r/min)
2.8N.m/6500r/min 2.8N.m/6500r/min 2.8N.m/6500r/min 2.8N.m/6500r/min 8.8N.m/6000r/min
Ignition Type CDI CDI CDI CDI CDI
Starter System Electric/Kick Electric/Kick Electric/Kick Electric/Kick Electric/Kick
Engine Oil SJ10W-40 SJ10W-40 SJ10W-40 SJ10W-40 SJ10W-40
Transmission CVT CVT CVT CVT CVT
Spark Plug Model NGK CR7HSA NGK CR7HSA NGK CR7HSA NGK CR7HSA NGK CR7HSA
Belt Model Gates 669MM Gates 669MM Gates 669MM Gates 669MM Gates 835MM
Front Suspension Straight Straight Straight Straight Straight
Rear Suspension Single Single Single Single Double
Front Tire Size 3.50-10 3.00-10/3.50-10 3.50-10 120/70-12 130/60-13
Rear Tire Size 3.50-10 3.00-10/3.50-10 3.50-10 120/70-12 130/60-13
Brakes (Front/Rear) Disc / Drum Disc / Drum Disc / Drum Disc / Drum Disc / Disc
Scooter L x W x H
67.1" x 25.6"
x42.5"
68.3" x 25.8"
x42.9"
67.7" x 24.8" x
43.3"
73.4" x 27.8" x
46.1"
73.4" x 26.8" x
44.1"
Seat Height 28.9" 29.5" 29.5" 32" 32"
Rider Capacity 2 1 2 2 2
Fuel Capacity 1.4 G 1.3 G 1.3 G 1.6 G 1.5 G

7
USER’S MANUAL Instructions to Users
Max Load Capacity 400lb 400lb 400lb 400lb 400lb
Scooter Weight 170lb 172lb 190lb 190lb 225lb
Frame Material Steel Steel Steel Steel Steel
Battery Motobatt 12V,7A Motobatt 12V,7A Motobatt 12V,7A Motobatt 12V,7A Motobatt 12V,7A
Lights Halogen Halogen Halogen Halogen Halogen
Shipping Dimensions
(LxWxH)
67.3" x 22.8"
x44.1"
67.3" x 22.8"
x44.1"
67.3" x 22.8" x
46.6"
74.8" x 22.8" x
44.9"
74.8" x 22.8" x
44.1"
8
Instructions to Users USER’S MANUAL
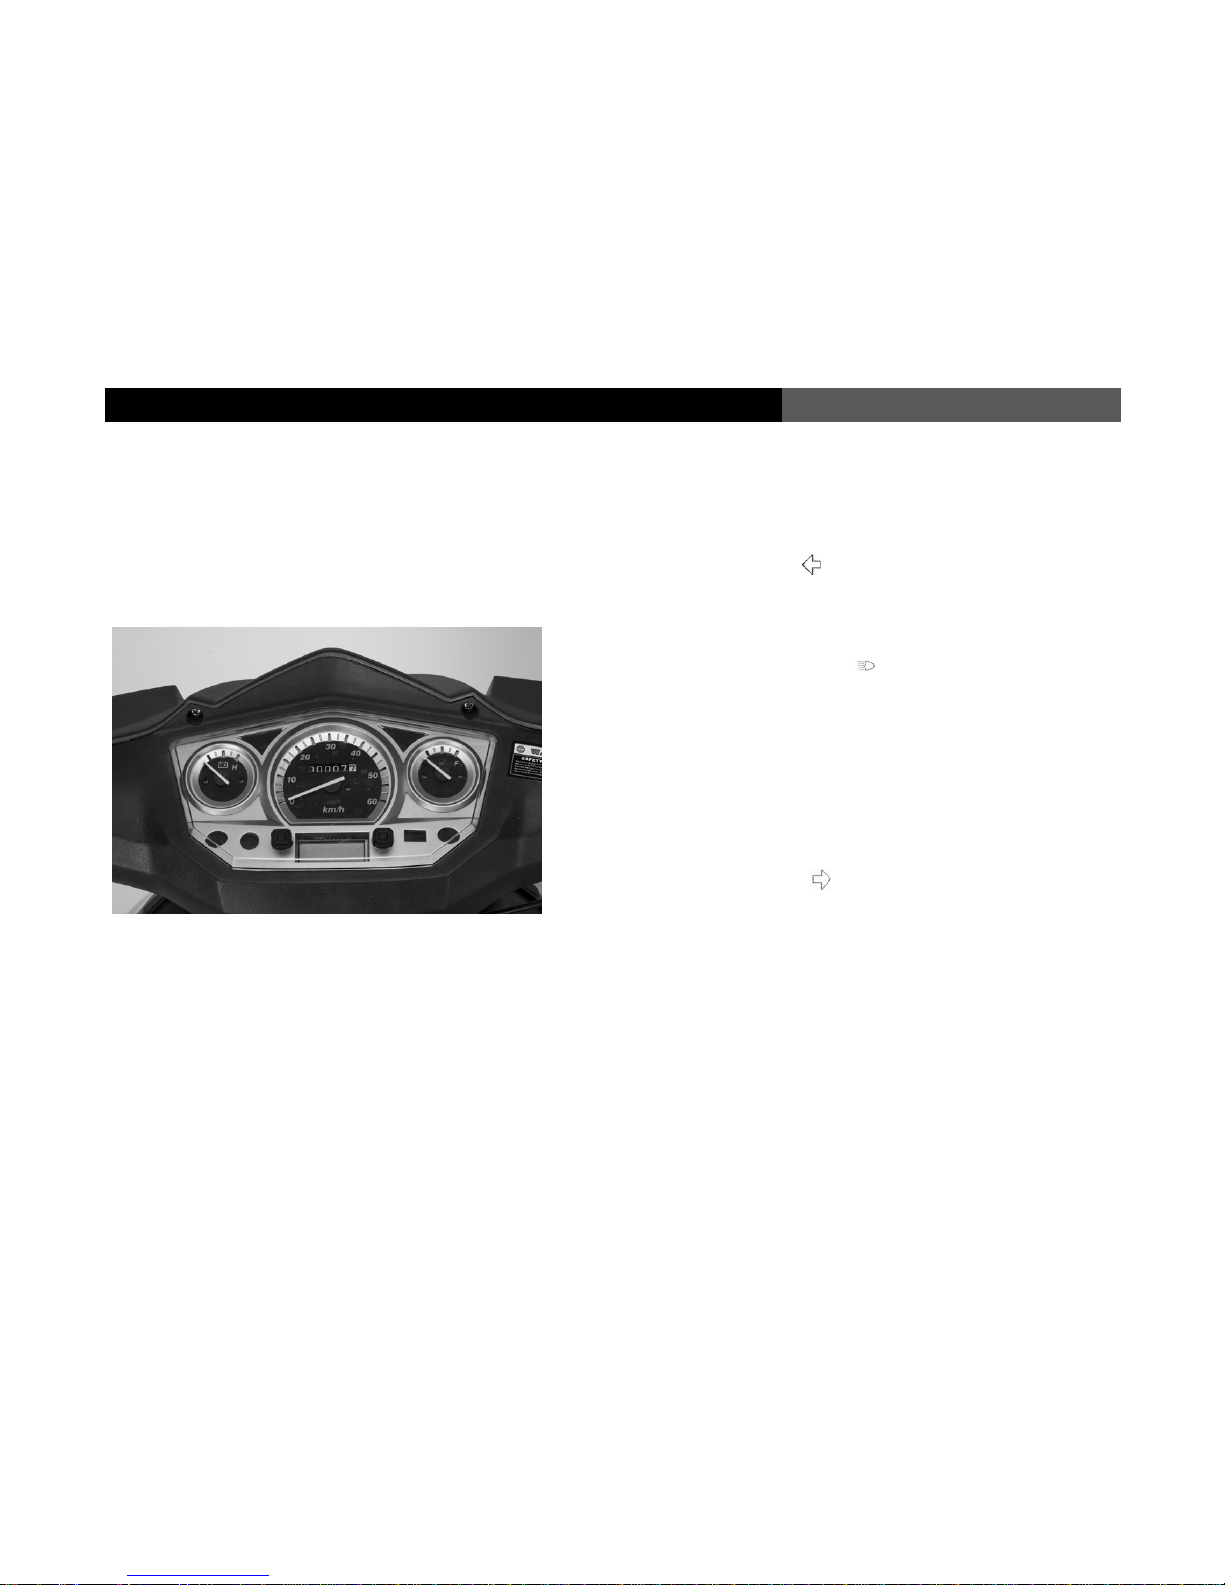
Instrument Cluster
1. Left turn indicator:
When the left turning indicator “” flashes, the left turn signal is on.
2. Tachometer:
Indicates the current engine speed in revolutions per minute.
3. High beam indicator:
When the high beam indicator lamp “” is on, it indicates that the “High
beam lamp” is on.
4. Speedometer:
Indicates the current speed of the vehicle
5. Odometer:
Records the traveled miles of the vehicle
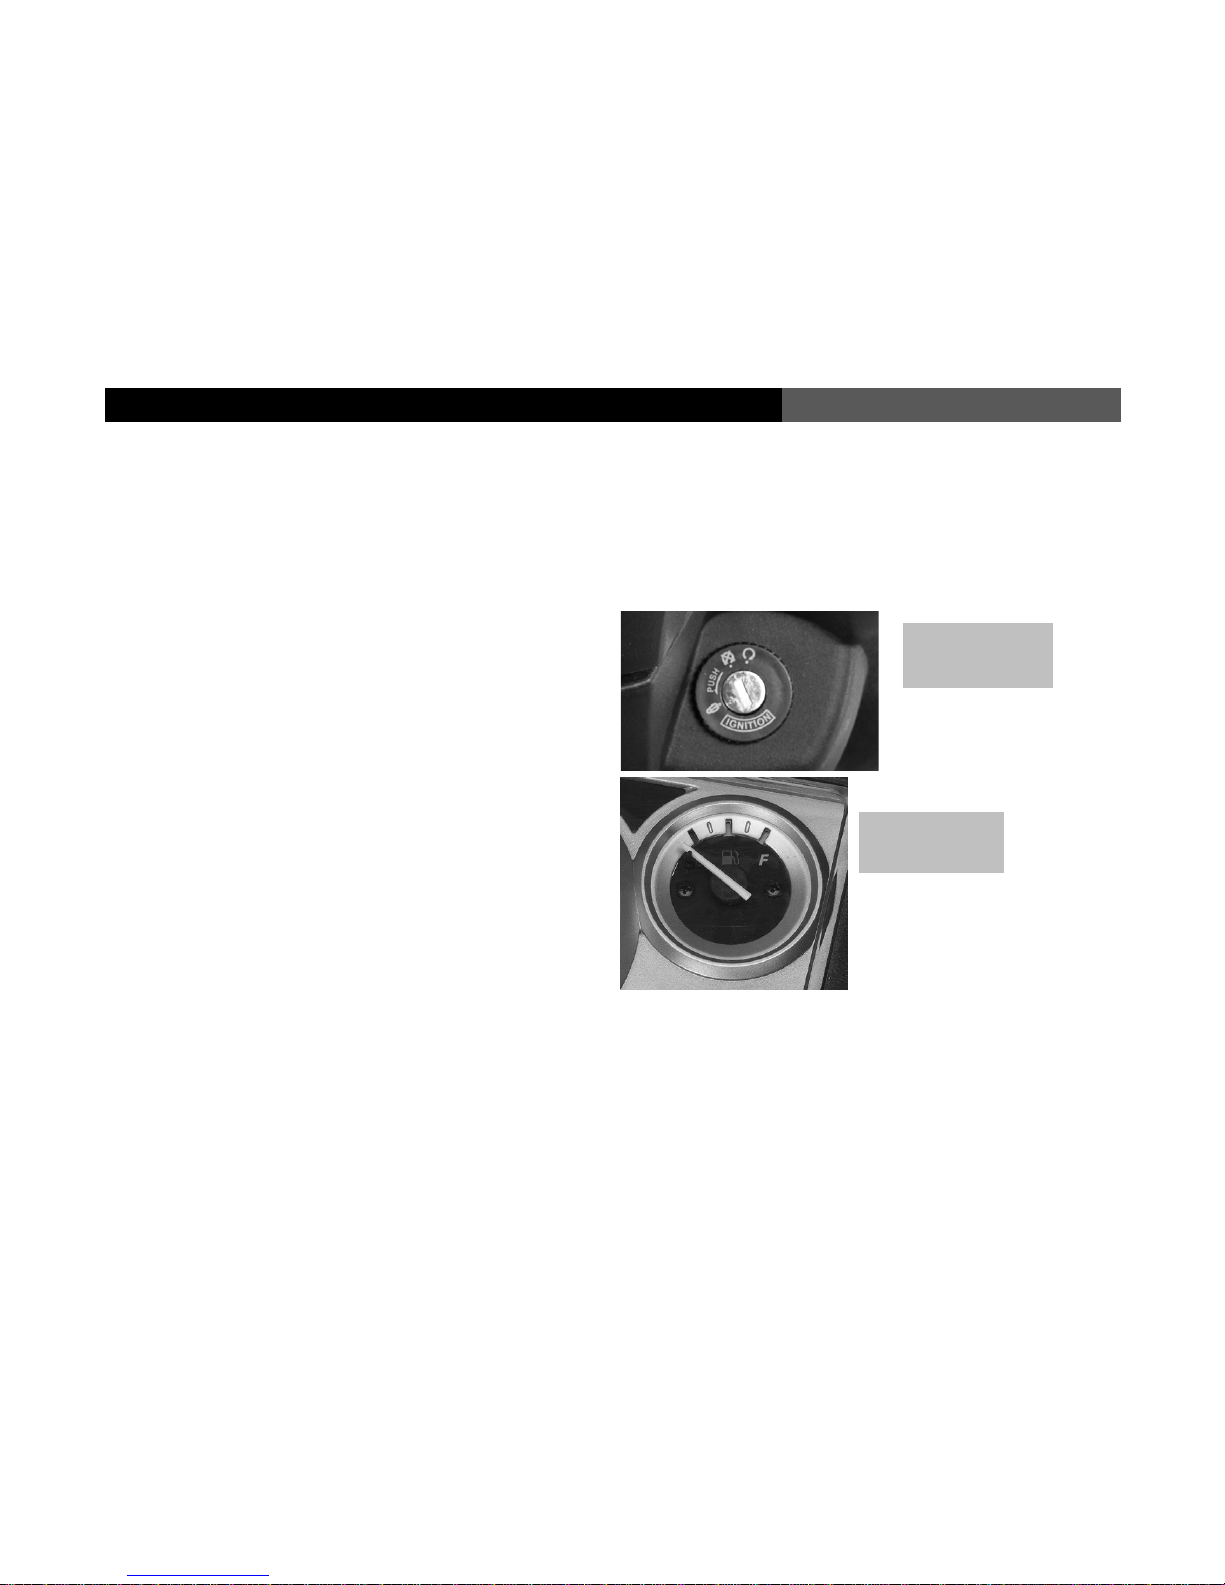
6. Fuel gauge:
Indicates how much fuel is left in the fuel tank
7. Right turn indicator:
When the right turning indicator “” flashes, the right turn signal is on
8. Battery Meter (If equipped)
Indicates the charge of the battery

9
USER’S MANUAL Instructions to Users
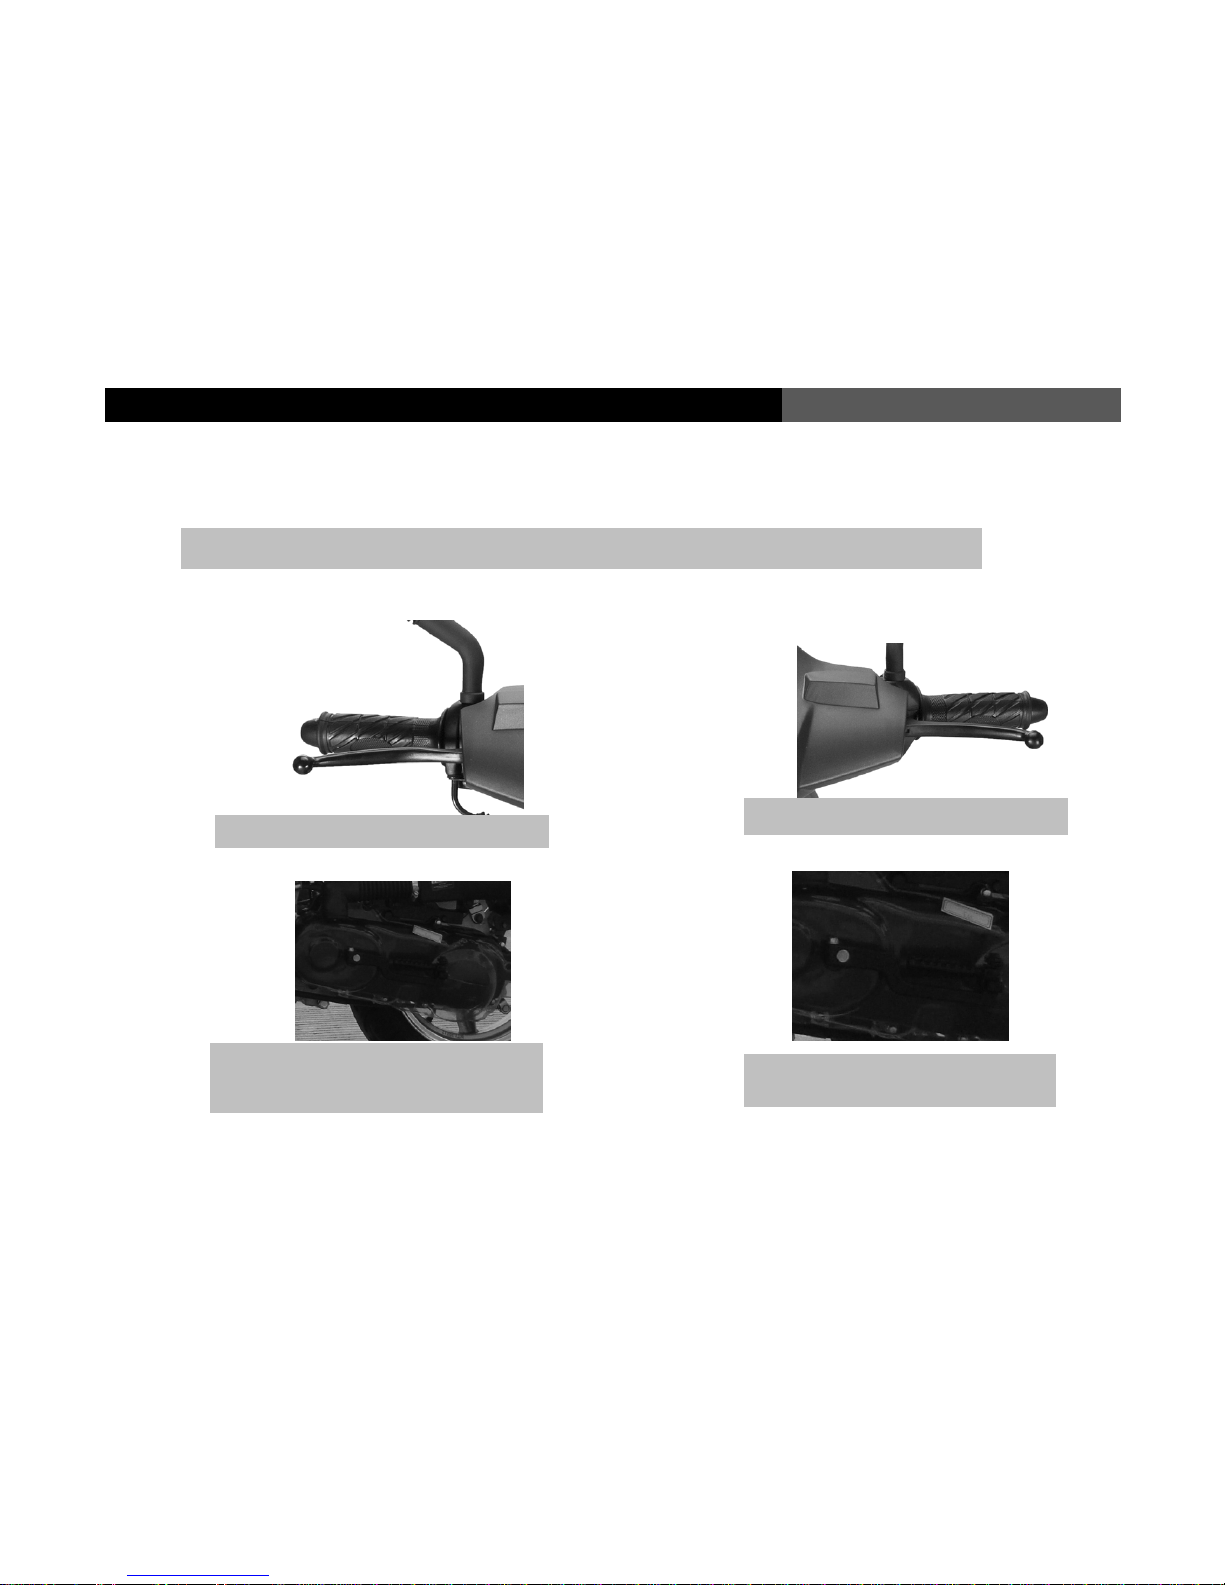
Left Control Switch
1. High beam switch:
To use the High beam headlight setting, flip the switch up to the “” position.
2. Low beam switch:
To use the Low beam headlight setting, flip the switch down to “” position.
3. Horn button:
To use the horn, press the button labeled “”.
4. Turn signal switch:
When changing direction on the scooter, switch to “” or “ ” to turn left or right.
After completing the turn, press the center of the button to turn the signals off.

10
Instructions to Users USER’S MANUAL
Right Control Switch
1. Head Light switch: (When equipped)
On some models the headlights can be controlled from the right hand switch.
To use, turn the Head Light switch to the position “ ”, the headlight will turn
on with the engine running.
2. Electric Start button:
Pressing the “” button in combination with holding a brake lever and having
the ignition turned on will electrically start the scooter.
3. Running light switch: (When equipped)
Turn the Head Light switch to the position“”, and the instrument panel
and running lights will come on with the engine running.
4. Main light switch: (When equipped)
To turn all the lights of the vehicle off, slide the button to the far right “”
position.
5. Throttle Grip:
Turning the grip will increase the speed of the engine which allows the vehicle
to move forward. Always turn the grip slowly to provide smooth and safe
acceleration.
Caution:
Always use your turn signals and adhere to local traffic laws and regulations

11
USER’S MANUAL Instructions to Users
Ignition Switch
Caution
When leaving the vehicle parked, using the “ ” to lock the steering will help deter thefts and prevent the vehicle from being driven.
Ignition On:
Turn the
ignition key right to the position“ ”to
turn
on
the electrical system of the vehicle.
The key cannot
be removed in this position.
While in this position the
vehicle can be either electrical started with the push
button, or
kick started with scooter on the rear kick
stand.
Ignition Off
:
Turn the
ignition key to the position “ ”
to
switch off
the electrical system of the vehicle. In
this position the key can be removed. The
electrical system of the scooter will remain in the
off position.
Steering lock:
Turn the steering left to
the outer most position
,
then t
urn the ignition key to the position “
”
to lock the
steering. Remove the ignition key.
In
this position the steering will not move. This is
recommended when storing the vehicle outside
to deter theft. To undo the steering lock, in
sert
the ignition key then rotate to the right while
gently moving the steering to disengage the
lock.

12
Instructions to Users USER’S MANUAL
Seat Cushion Lock
Fuel tank
Check page 7 to see your models fuel tank capacity.
To gain access to the fuel tank, turn the fuel tank cap 90º
counter
-clockwise and lift up. Always use 93 octane. Be
careful when adding fuel to prevent overfilling.
To close the fuel tank, place the cap on the tank paying
careful attention to line up the slots on the gas cap.
Turn clockwise to tighten.
To open the under seat storage: Insert the ignition
key into the seat cushion lock and turn it 90º
clockwise to open the seat cushion. *Note* on some
scooters like the Breeze, the ignition switch opens
the seat. On those models, insert the key into the
ignition, and slowly turn to the left until the seat
pops open.

13
USER’S MANUAL Instructions to Users
Warning
* Be careful not to overfill the fuel tank. Gasoline can damage the finish of the vehicle. Always remove spilled gas from painted surfaces and clean
with soap and water.
* Gasoline is flammable. Only fill the vehicle with the engine turned off, and parked in a well ventilated area.
* Do not smoke when filling the vehicle with gasoline. Do not expose gasoline to high heat, sparks, or fire.
Caution
* Only use 93 octane fuel. Failure to use anything but premium fuel can cause engine damage and void the warranty.
Fuel petcock: The fuel petcock located in between the gas tank and the
carburetor controls the amount of fuel delivered. It uses the vacuum
created from engine movement to produce a steady supply of fuel.
Some
units are mounted directly to the fuel tank while others are attached to the
fr
ame.
Fuel Filter: The fuel filter located inline from the carburetor to the fuel tank
acts as a safeguard, keeping small particles and contamination from
entering the carburetor. Any blockage of the fuel filter can compromise the
fuel system.
14
Instructions to Users USER’S MANUAL
Vehicle Operation
All Bintelli scooters use a dry-type automatic centrifugal clutch and belt driven CVT transmission. If there is ever an issue with
the transmission belt, variator, or clutch
, please have the vehicle serviced at an authorized service center.
Front brake handle: When applied, the front brake will
engage and slow the vehicle.
Rear brake handle: When applied, the rear brake will
engage and slow the vehicle.
Automatic clutch: The belt driven CVT transmission
allows for constant acceleration with no need for gear
changes. Simply turning the throttle will engage the
transmission.
Kick start lever: Allows for manual starting of the
vehicle. Manual starting can only be used when the
vehicle is on the center kickstand.
15
USER’S MANUAL Instructions to Users
Vehicle Load
The maximum load of the vehicle must be strictly observed. Failure to
do so will result in an unsafe driving condi
tion, potential engine and/or
premature transmission wear.
* Articles in the rear storage box must be securely fixed.(If equipped)
* Never hang items from the front steering.
* The load of the rear carrier must not exceed 10lbs.
* Check page 7 of this
manual for your model specific vehicle load
limit
Warning
Failure to follow the recommended vehicle load can cause
multiple issues with your scooter! Bintelli will not warranty damage or
wear that is the result of improper riding!
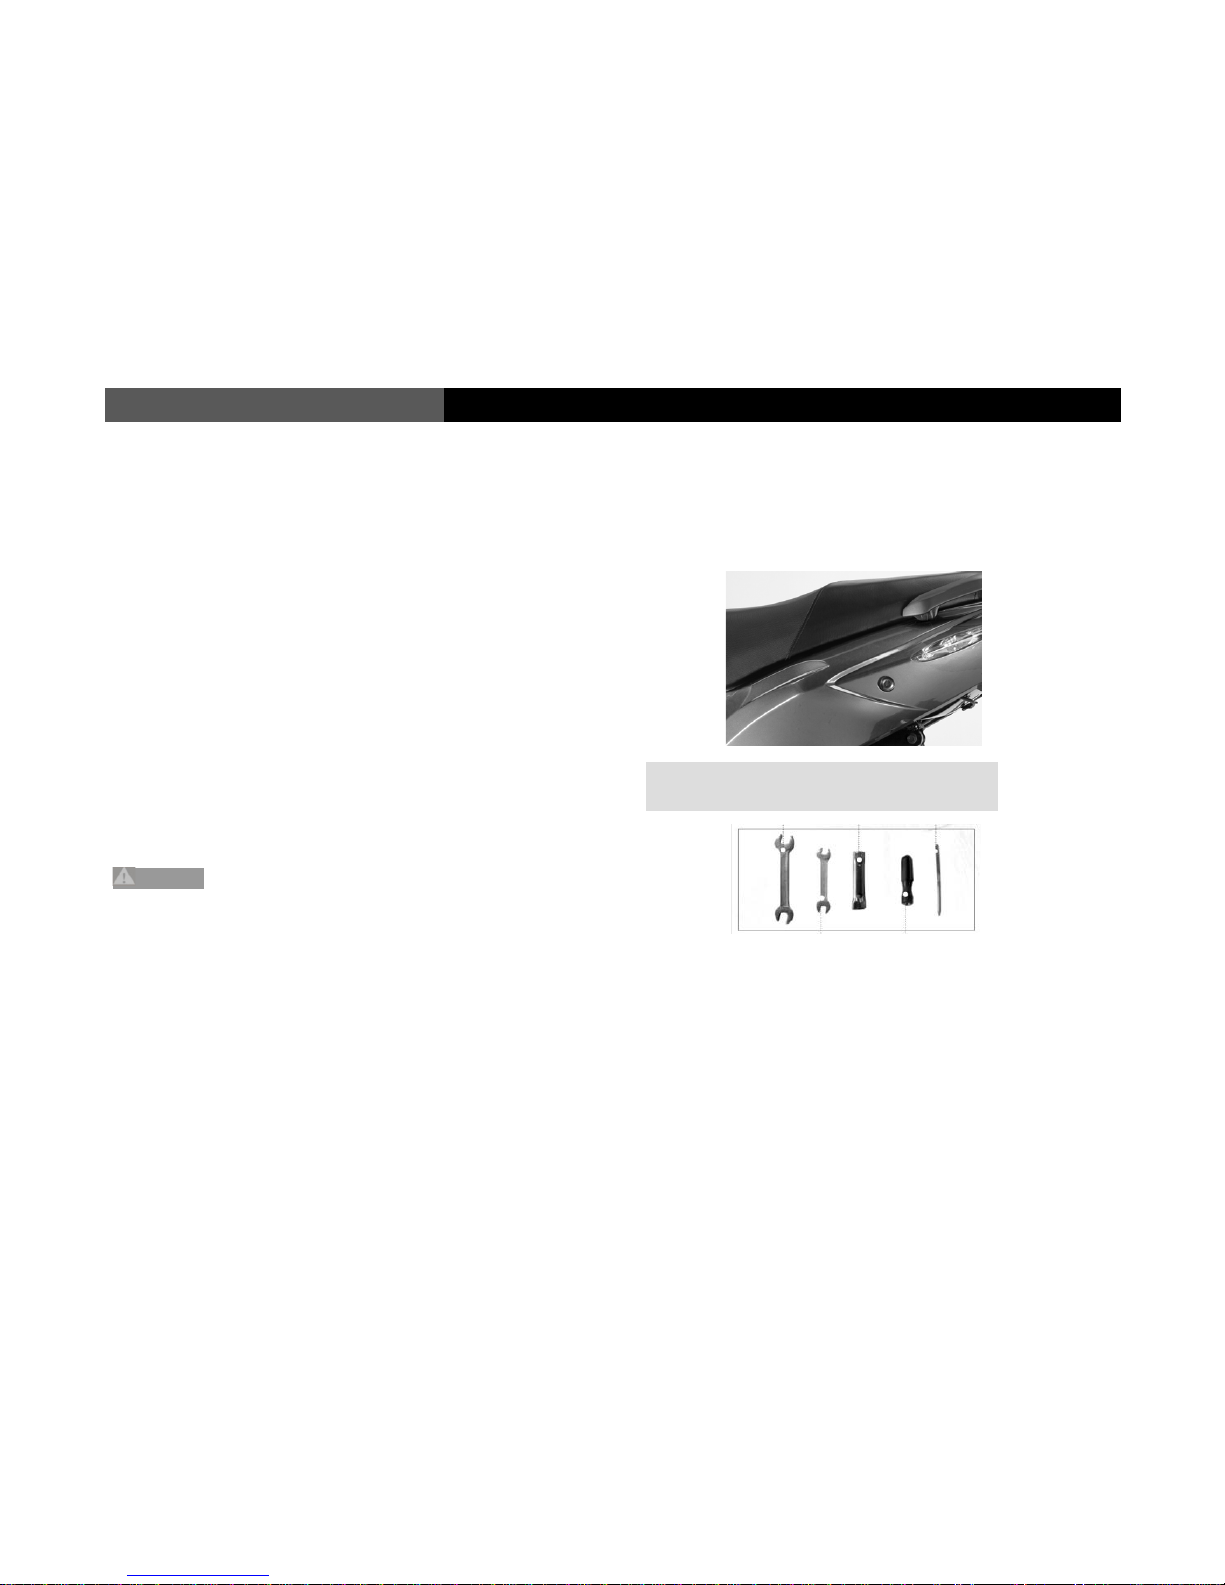
Tools included with vehicle
Common service and maintenance tools included with the vehicle:
A tool kit under the seat features many of the tools
n
eeded to perform routine tasks
16
Operating Instructions USER’S MANUAL
Basic vehicle information
In order to ensure optimal performance of the vehicle, regular service and
maintenance
must be followed. Always check the vehicle is safe to
operate prior to driving.
1.
Start the engine and allow the vehicle to idle for a few minutes to let
the engine warm up.
2. Check for any signs of leaks around and underneath the vehicle.
3. Check all lights and scooter controls for functionality.
Different levels of maintenance and service will be required at certain
odometer
readings. Level 2 and 3 servicings include checking and
adjusting multiple areas of the scooter in addition to the required oil
changes. They are as follows:
500 Mile Servicing: Oil change and valve adjustment
**must be
performed at authorized service center**
Level 1 Service and Maintenance: Odometer reading 1000-1500 miles.
Level 2 Service and Maintenance: Odometer reading every 3000 miles.
Level 3 Service and Maintenance: Odometer reading every 6000 miles.
Prior to using the vehicle, please perform the following checks to ensure
proper safety and performance is met.
Turn the ignition key to
the right and verify the
controls are working.
Check the fuel gauge to
see
if you need to add
fuel.

17
USER’S MANUAL
Check that the vehicle has an adequate level of
gasoline prior to r
iding. Verify the gas cap is secured.
Verify the steering is tight and moves freely.
There should be no binding and no play.
Level the vehicle on the rear kick stand and check
the oil to
verify the oil level is between the upper
and lower markings.
If not, add oil and recheck.
Never drive the scooter with a low oil level, as
this will damage the engine.
Verify the throttle grip turns easily. If the
throttle grip does not turn smoothly or binds,
do not drive the vehicle.

18
USER’S MANUAL
Check under the engine for leaks. Any signs of
leaking should be addressed prior to riding.
Check the front tire pressure and inspect the
tread. Look for any signs of fluid leaks.
Verify the connections on the battery
terminals are tight and free from damage
and corrosion.
Check the rear tire pressure and inspect the
tread. Look for any signs of fluid leaks.
Verify the rear brake cable engages and
disengages smoothly.
This manual suits for next models
4
Table of contents
Other Bintelli Scooter manuals


