Rungu Juggernaut LE User manual

V1.0 RUNGU Electric Juggernaut LE User Manual
Copyright 2018 Standard Bearer Machines, LLC 1
rungu®electric juggernaut
le owners manual
Congratulations on purchasing the Electric Juggernaut LE
1
! Before you ride and make new tracks, please
read the following instructions carefully. The team at Standard Bearer Machines, LLC has partnered with
Hi-Power Cycles, LLC to provide you with an off-road electric Rungu with more than 4,000 Watts of
power. There are references throughout this document to Hi-Power Cycles. In case of trouble, contact
Rungu Support first.
WARNING: The Electric Juggernaut LE is designated for OFF-ROAD use only
(Mandated by federal law due to the 750W/20 MPH limit in the US. Please check with your government
to ensure you follow all local laws and ordinances). Standard Bearer Machines and Hi-Power Cycles are
not liable for those who choose not to follow their local laws.
Standard Bearer Machines and Hi-Power Cycles will not be held responsible for people who choose to
disregard the law!
IMPORTANT- Standard Bearer Machines and Hi-Power Cycles will not be liable for any damage or injury
that may occur due to operation of our kits or bicycles. By using the Electric Juggernaut LE, you are
agreeing to Standard Bearer Machines Terms and Conditions and the warnings and conditions of the
Generic Bike Manual which are included with other files in the USB key accompanying the Electric
Juggernaut LE.
1
As the owner, you agree and are bound by all sales and transfer conditions as defined in “SBM Rungu Sales Terms
and Conditions US 2017a” or “SBM Rungu Sales Terms and Conditions US 2017 –Demo Model.” Copies of these
documents are available on the USB drive that ships with the product or upon request by e-mailing

V1.0 RUNGU Electric Juggernaut LE User Manual
Copyright 2018 Standard Bearer Machines, LLC 2
Contents
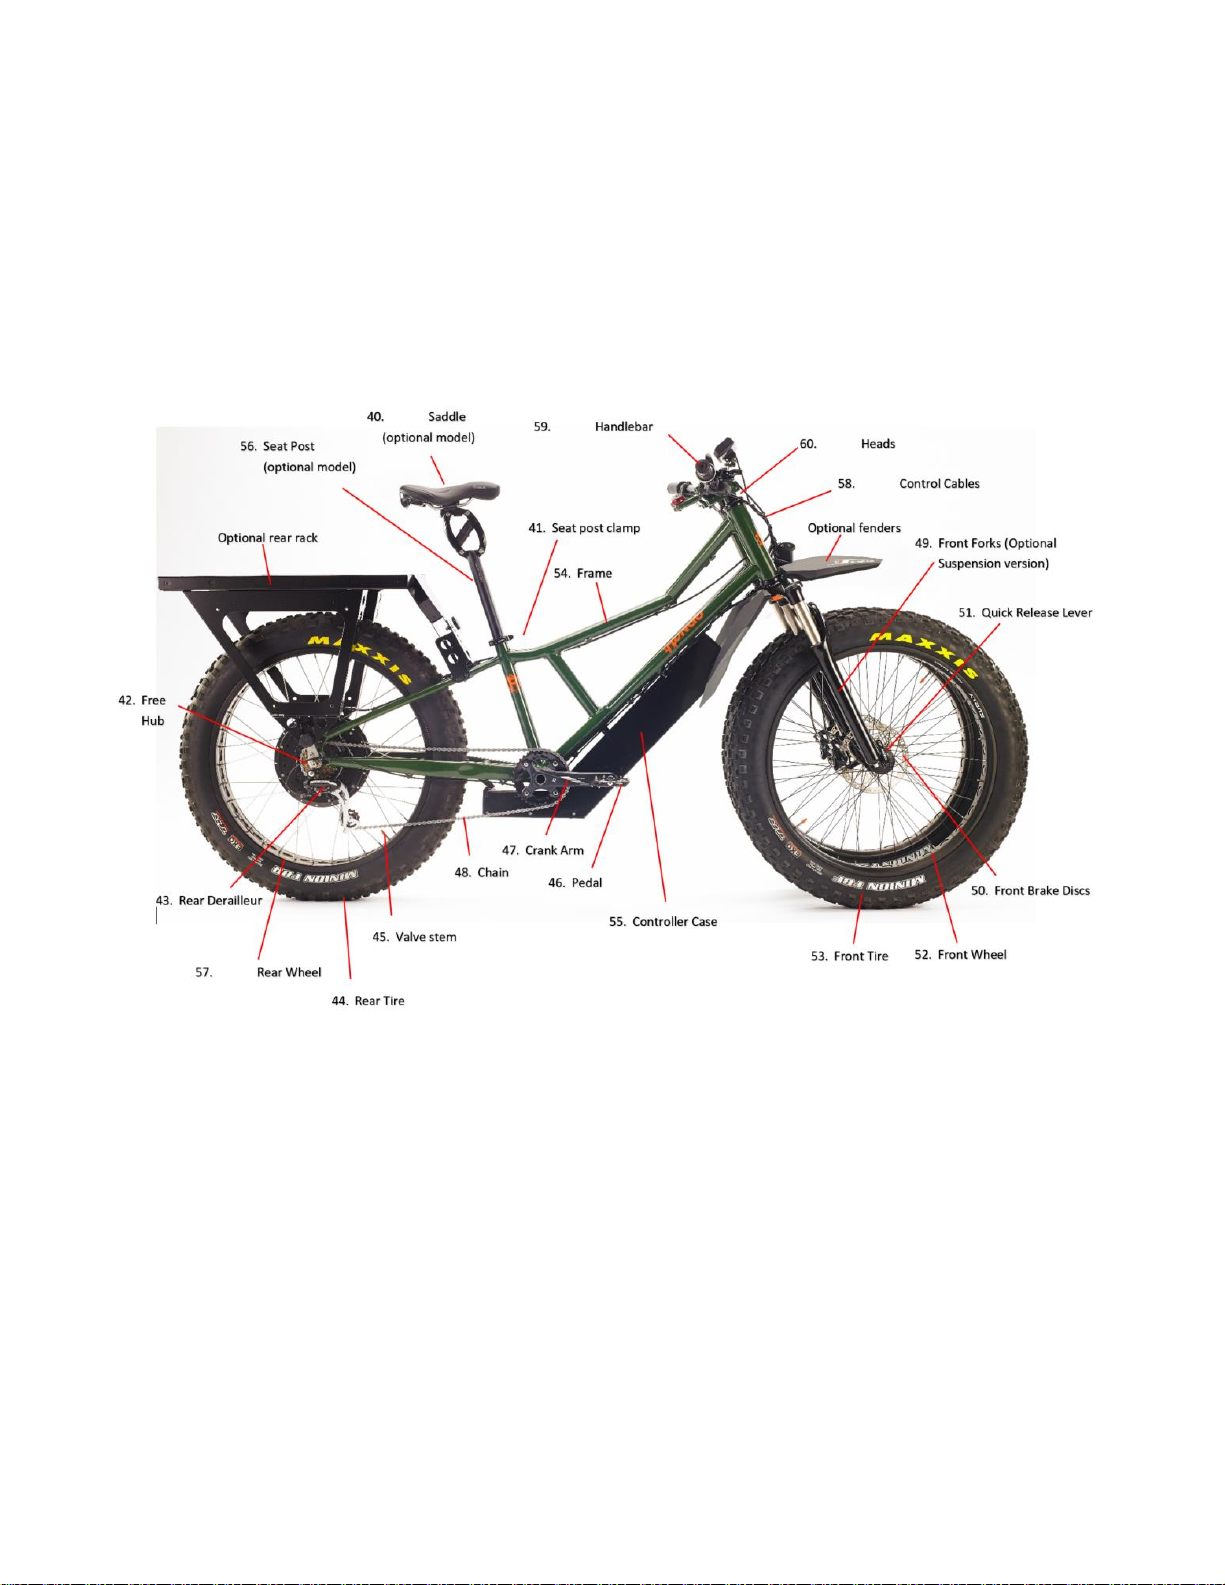
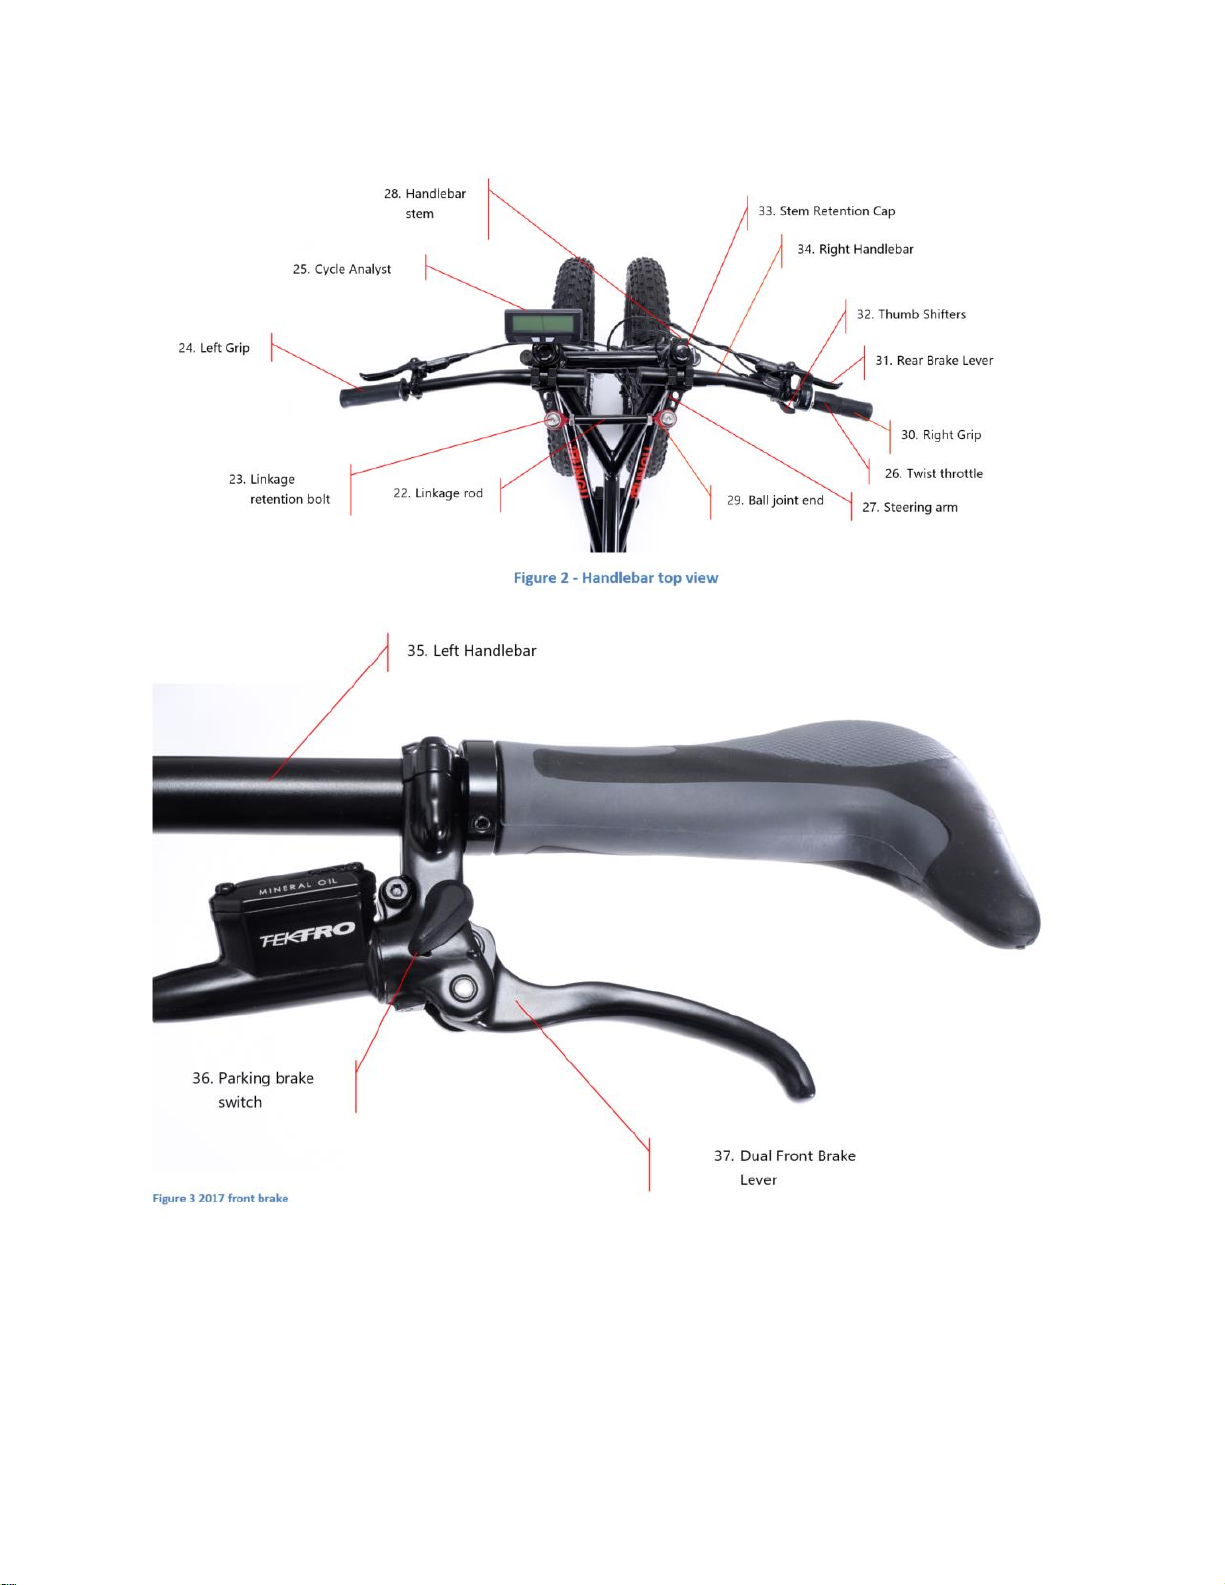
Parts identification........................................................................................................................................ 3
Unpacking and Assembly Instructions..........................................................................................................6
Tools required........................................................................................................................................... 6
Unpacking and Assembly Instructions......................................................................................................7
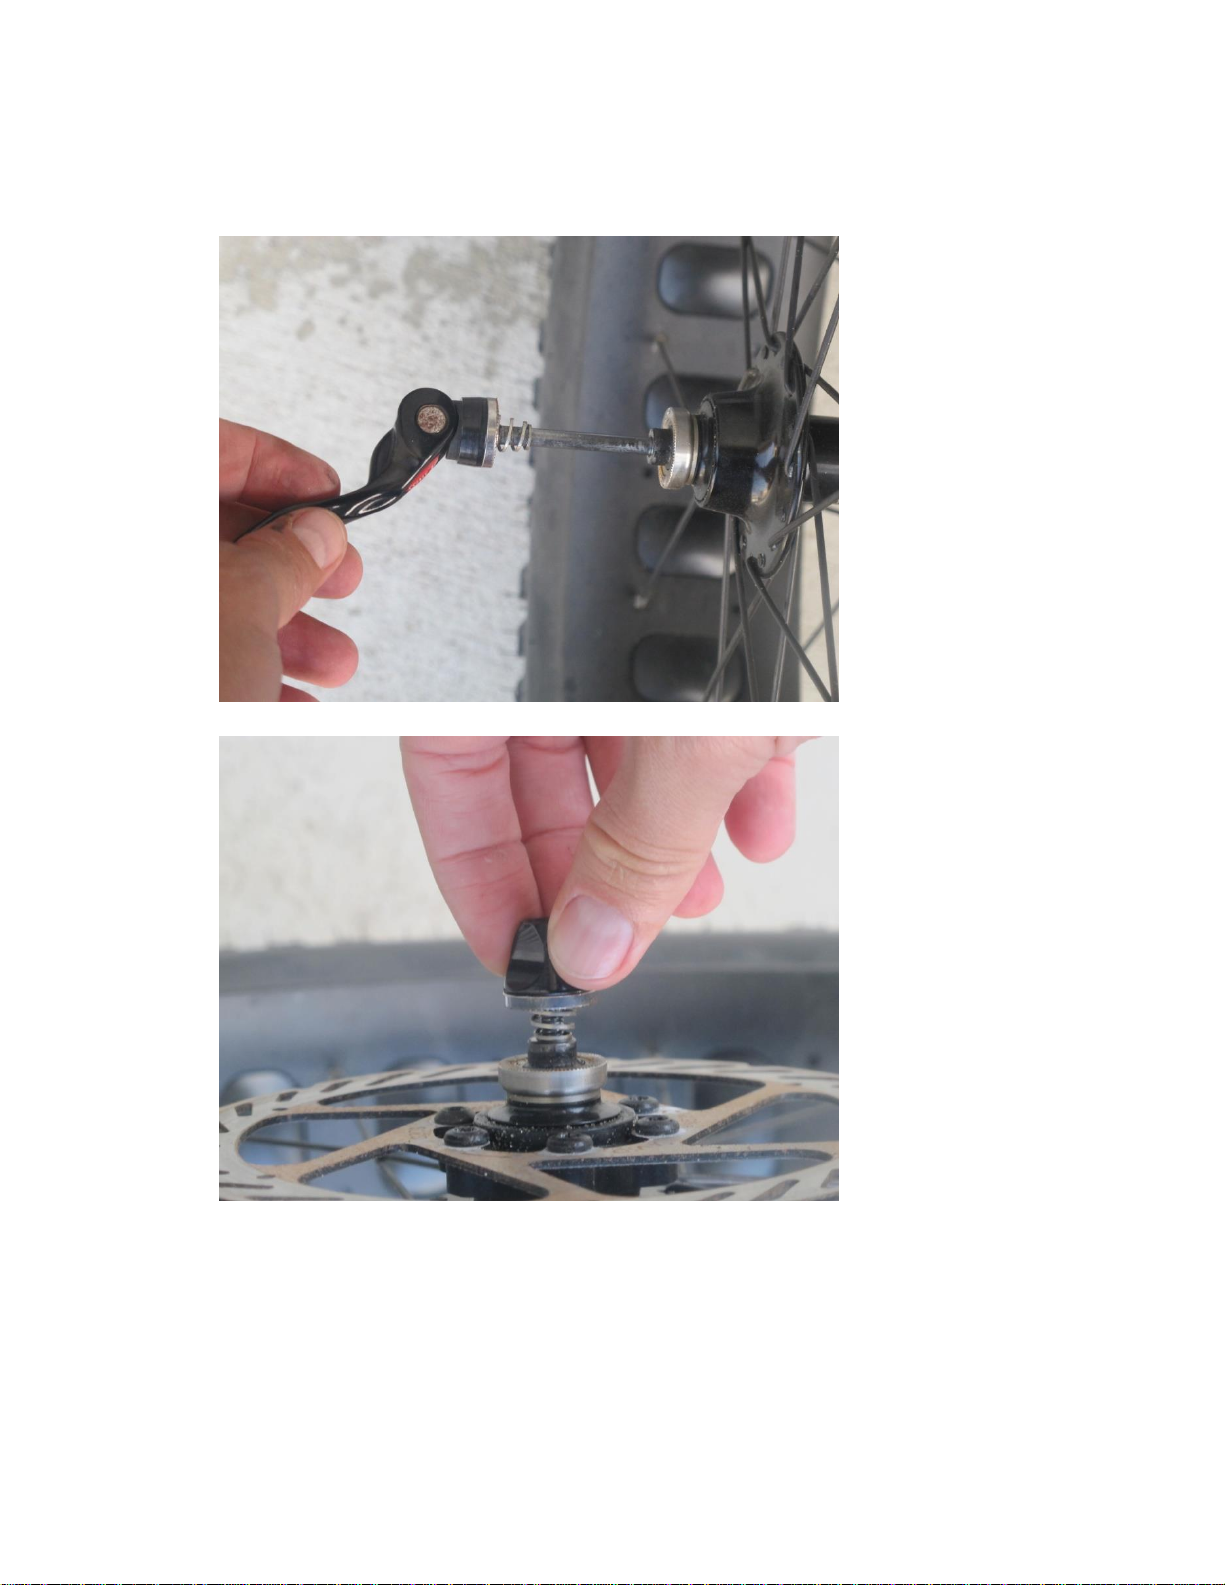
Additional assembly instructions............................................................................................................15
Cautions and Safety .................................................................................................................................... 19
General Cautions and Warnings .............................................................................................................19
Battery Safety (Brief Overview) ..............................................................................................................20
Battery Safety Precautions......................................................................................................................21
Catastrophic Battery Failure ...............................................................................................................21
Battery Safety (In Depth) ....................................................................................................................22
Response Procedure ...........................................................................................................................23
How to Use Your New Rungu Rungu ..........................................................................................................24
How to Charge Your Battery ...................................................................................................................24
Before Riding your Electric Juggernaut...................................................................................................31
Riding the Electric Juggernaut ................................................................................................................ 33
Electric Juggernaut Operation Cautions ............................................................................................. 33
Using the Optional Front Suspension .................................................................................................34
Using the parking brake switch...........................................................................................................34
Low temperature operation limitations .............................................................................................35
Riding Safety .......................................................................................................................................35
Battery Care ............................................................................................................................................ 36
During Charging ..................................................................................................................................36
After riding ..........................................................................................................................................36
Long Term Storage.............................................................................................................................. 36
Prolonging the Life of your Battery..................................................................................................... 36
Rungu Maintenance................................................................................................................................ 37
Getting the Stated Range out of Your System ........................................................................................38
Using your E-Bike Computer .......................................................................................................................39
Electric Juggernaut Computer System Settings ......................................................................................39
Recommended settings for Electric Juggernaut LE (4000w system) ...................................................... 39

V1.0 RUNGU Electric Juggernaut LE User Manual
Copyright 2018 Standard Bearer Machines, LLC 3
Troubleshooting..........................................................................................................................................40
Getting more information...........................................................................................................................41
Parts identification
The following images show the names of various components on the Electric Juggernaut LE
Figure 1 Side View

V1.0 RUNGU Electric Juggernaut LE User Manual
Copyright 2018 Standard Bearer Machines, LLC 4

V1.0 RUNGU Electric Juggernaut LE User Manual
Copyright 2018 Standard Bearer Machines, LLC 5
Figure 4 Battery Access View

V1.0 RUNGU Electric Juggernaut LE User Manual
Copyright 2018 Standard Bearer Machines, LLC 6
Unpacking and Assembly Instructions
Warning: Failure to follow instructions may lead to incomplete or faulty assembly that can result in
accidental rider injury or death.
Before you ride and make new tracks, please follow the assembly instructions carefully. The team at
Standard Bearer Machines recommends that you have the assembly performed by a qualified bike
mechanic.
Tools required
•5mm Hex wrench
•6mm Hex wrench
•Tire inflation pump (presta valve)
•Wire cutters or scissors to remove packing material

V1.0 RUNGU Electric Juggernaut LE User Manual
Copyright 2018 Standard Bearer Machines, LLC 7
Unpacking and Assembly Instructions
Warning: Failure to follow these instructions may lead to incomplete or faulty assembly that can
result in accidental rider injury or death.
1. The Rungu comes in a cardboard carton. After you have removed the binding straps and tape
from the top cover, remove the top cover on the front of the Rungu. If you intend to ship or
return the Rungu, please keep all packing materials.
2. Remove the accessory box containing Quick Release Skewers, AC battery charger, tools, USB
document drive, keys and pedals.
3. Lift the frame and attached components from the carton.
CAUTION: THE ELECTRIC JUGGERNAUT LE WEIGHS 100 LBS (41 KG) USE TWO (2) PEOPLE TO
REMOVE THE RUNGU FROM THE PACKAGING TO AVOID INJURY
Accessory Box. May be
located elsewhere
inside the carton

V1.0 RUNGU Electric Juggernaut LE User Manual
Copyright 2018 Standard Bearer Machines, LLC 8
4. Disconnect the front wheels from the frame packaging and remove the protective packaging
from the forks.
5. Open the accessory box to remove the two quick release skewers from the packaging.
6. Select which wheel will be the right-side wheel and the left-side wheel. Unscrew the retention
nut from one of the quick-release skewers and insert the skewer into the left wheel from the
side of the brake disc as shown below.
7. Replace the retention nut as shown below.

V1.0 RUNGU Electric Juggernaut LE User Manual
Copyright 2018 Standard Bearer Machines, LLC 9
9. Mount the wheel to the left fork as shown in the two pictures below. For the Juggernaut, insert
the wheel into the fork at an angle to clear the tire width as pictured.
10. Tighten and close the quick-release once the wheel is mounted in the fork.
Warning: make sure to tighten the quick-release in the fork so that it cannot fall out of the
fork; failure to adequately tighten the quick-release can result in accidental rider injury or
death.

V1.0 RUNGU Electric Juggernaut LE User Manual
Copyright 2018 Standard Bearer Machines, LLC 10
11. Place the Rungu aside while performing the next two assembly steps.
12. Unscrew the retention nut from one of the quick-release skewers and insert the skewer into the
right wheel from the side opposite to the brake disc, as shown below.
13. Replace the retention nut.
14. Mount the wheel to the right fork.
15. Tighten and close the quick-release once the wheel is mounted in the fork.
Warning: make sure to tighten the quick-release in the fork so that it cannot fall out of the
fork; failure to adequately tighten the quick-release can result in accidental rider injury or
death.

V1.0 RUNGU Electric Juggernaut LE User Manual
Copyright 2018 Standard Bearer Machines, LLC 11
16. On a level surface, stand the Rungu upright and remove the packaging from the front steering
assembly, then remove the handlebars from the frame and packaging.
17. Use the 5mm hex wrench to loosen the handlebar retention screws as shown below
18. Insert the right and left handlebars into the stems. Rotate the handlebars vertically to ensure
the best fit for you.
19. FOR STANDARD (NON SUSPENSION) FORKS: When you have found the best fit for each
handlebar, ensure that the inside end of each handlebar extends up to 30mm as depicted below
and then tighten all four retention screws. Use a pattern of tightening the upper screw and then
bottom screw instead of tightening both top screws and then the bottom screws.
20. FOR OPTIONAL SUSPENSION FORKS: When you have found the best fit for each handlebar,
ensure that the inside end of each handlebar extends 45 mm toward the center of the Rungu
and then tighten all four retention screws. Use a pattern of tightening the upper screw and then
bottom screw instead of tightening both top screws and then the bottom screws.

V1.0 RUNGU Electric Juggernaut LE User Manual
Copyright 2018 Standard Bearer Machines, LLC 12
Caution: 45mm is the minimum distance that prevents the tire on the outside of a turn from touching
the fork on the inside of the turn. Tires rubbing on fork stanchions can result in damage to the forks
and danger to you the rider.
21. Use the pattern shown below to tighten the handlebar clamp screws.
Warning: Tightening handlebar clamp bolts beyond 6Nm (53 in lbs.) or failing to align the bolts
with the threads in the stem may strip threads in stem leading to insufficient tightening of the
handlebar. Failure to tighten handlebar sufficiently may result in unexpected handlebar
rotation that can result in accidental rider injury or death.
22. Remove the remainder of the packing materials.
1
2
4
3

V1.0 RUNGU Electric Juggernaut LE User Manual
Copyright 2018 Standard Bearer Machines, LLC 13
23. Install the left pedal first –the left pedal is marked with an “L” as shown below.
24. The left pedal is threaded backwards, so thread the shaft into the crank arm in a
counterclockwise motion as depicted below.
Caution: Do not force the threading of the pedal onto the crankset. Warranty does not cover
replacement cranks for stripped threads.

V1.0 RUNGU Electric Juggernaut LE User Manual
Copyright 2018 Standard Bearer Machines, LLC 14
25. Use a 6mm Hex wrench to tighten the pedal.
26. Install the right pedal and finger tighten the pedal clockwise –the right pedal is marked with an
“R” as shown below.
Caution: Do not force the threading of the pedal onto the crankset. Warranty does not cover
replacement cranks for stripped threads.
27. Use a 6mm Hex wrench to tighten the pedal.
28. Inflate the Fat Tires between 10 and 15 PSI (69 to 104 KPa).
NOTE: If you plan to ride in sand or on soft ground, experiment with lower pressures (around 5 PSI) to
optimize grip and rear motor power. Riding on sand with inflation pressure above 9 PSI has been
shown to result in rapid, pre-mature tire wear.

V1.0 RUNGU Electric Juggernaut LE User Manual
Copyright 2018 Standard Bearer Machines, LLC 15
Additional assembly instructions
Cycle Analyst Computer Installation
Install the Cycle Analyst on the left stem. Carefully unpack the Cycle Analyst from wrapping and follow
the instructions to mount it to the left stem. Tool required –5mm Hex wrench.
1. Remove the protective rubber
cover to expose the bolt head.
2. Unscrew the retention bolt.
3. Remove the stem retainer.

V1.0 RUNGU Electric Juggernaut LE User Manual
Copyright 2018 Standard Bearer Machines, LLC 16
4. Place the mounting ring of the
Cycle analyst onto the top of the
stem spacer.
5. Replace the stem retainer on top
of the mounting ring. Fasten the
retainer with retention bolt.

V1.0 RUNGU Electric Juggernaut LE User Manual
Copyright 2018 Standard Bearer Machines, LLC 17
Battery Case Installation
1. The battery case (with battery) is packaged separately from the frame inside the packing
carton. Remove it from its packaging.
Caution: the battery case weighs more than 15 lbs. (6.8 kg) –be careful not to drop the case as it may
bend the casing making battery replacement difficult or impossible without repair.
2. Enable the Parking Brake on the Rungu to stop it from moving while you complete the next
steps. Replace the battery case into the controller case at an angle with the connector end
facing towards the top.
3. Slide the battery case so that the tab at the back of the case slides into the controller case.
Caution: When placing the battery case in the controller case, be careful to insert the tab into
the controller case. Not inserting the tab into the controller case can result in the battery
failing to make contact and the battery case falling out of the controller case resulting in
damage to the battery case. Battery case damage is not covered by the warranty.
Battery Case
Tab

V1.0 RUNGU Electric Juggernaut LE User Manual
Copyright 2018 Standard Bearer Machines, LLC 18
4. When the battery case tab is at the bottom of the case and the battery case cannot slide any
further, pivot the battery case into the controller case as far as it will go.
5. Use the key to lock the battery case in position.
Check that the case is locked by pulling on the battery case as though to remove it a second
time.

V1.0 RUNGU Electric Juggernaut LE User Manual
Copyright 2018 Standard Bearer Machines, LLC 19
Cautions and Safety
General Cautions and Warnings
The Electric Juggernaut LE is an electric tricycle that you can ride like a bicycle with the added benefit of
more stability on soft ground.
Refer to the All Purpose Bicycle Manual available on the Rungu USB drive that ships with the Electric
Juggernaut to new customers or online at this link
2
.
WARNING: Being a tricycle, the Electric Juggernaut has a tie-rod that connects the two
front forks. DO NOT USE the tie-rod to lift the Rungu. The steering uses the tie rod as a hard stop so
the forks don’t rub against the front wheels. Grasping the tie rod when lifting WILL RESULT IN A
PINCH TO THE HAND AND FINGERS THAT MAY LEAD TO HAND OR FINGER INJURY. ONLY GRASP
PARTS OF THE FRAME OR SADDLE TO LIFT THE RUNGU.
2
http://riderungu.com/riderungu/wp-content/uploads/2016/08/Generic-Bike-Manual.pdf

V1.0 RUNGU Electric Juggernaut LE User Manual
Copyright 2018 Standard Bearer Machines, LLC 20
Battery Safety (Brief Overview)
NOTE: If you ever suspect a battery problem, please contact Rungu Support immediately by email or
phone so we can go through the appropriate steps/procedures to make sure everything is okay with
the battery system.
At Standard Bearer Machines, safety is our number one concern. Standard Bearer Machines wants our
customers to enjoy an excellent product that will give those customers years of trouble-free operation.
As much effort as Standard Bearer Machines partner, Hi Power Cycles, makes to minimize the risk of
these state-of-the-art batteries, there are always safety concerns when it comes to Lithium batteries
that we want our customers to be aware of. All new portable electronics, including cell phones and
laptops, contain lithium batteries which have the same chemical properties, although bike batteries are
on a much bigger scale. Hi Power Cycles makes every effort to have the highest quality battery cells and
best battery protection (called a BMS or Battery Management
System) to minimize any risk associated with these high-power
batteries.
Hi Power Cycles has gone through extensive research and testing
to get the best electric bike batteries in the world. The battery
chemistry is the same that large car manufacturers (such as
Nissan) use in their vehicles. This state-of-the-art battery
chemistry is called Lithium Nickel Manganese Cobalt
(LiNiMnCoO2) or NMC for short. Hi Power Cycles feels that this is
the best overall combination of power, safety, performance, and
life span compared to the other options available.
Due to the nature of lithium cells, which have a lot of energy stored in a small package, there is always a
possibility this energy can be suddenly released and can cause fire and/or serious injury if not taken care
of immediately. With a state-of-the-art Battery Management System that is found on all of our battery
packs, the cells and pack are protected from failure. The only time a pack will fail will be a result of a
BMS failure and attempting to charge, short circuit, over discharge, or somehow puncture the battery
pack.
The main cause of failure in lithium batteries occurs during the charging portion, when cells can be
overcharged. This is the number one failure and can lead to batteries which vent and eventually release
all their energy at once (or can even cause the battery pack to ignite on fire). Due to a BMS failure, cells
can get out of balance and certain cells may become overcharged as a result. Therefore, Hi Power Cycles
always recommends monitoring the charging process in the extremely rare event something should
happen.
Caution: Charging on a concrete floor, such as in a garage, away from debris and material is always
recommended as a safety precaution.
Table of contents
Other Rungu Scooter manuals