Medema Mini Crosser M1 Cabin User manual

Service Manual
Mini Crosser M1 Cabin
P9-0151-S ver. 1.0.3 - October 2018 GB
medemagroup

Service manual P9-0151-S 2 of 66 Version 1.0.3/2018
Medema Production A/S

Service manual P9-0151-S 3 of 66 Version 1.0.3/2018
Medema Production A/S
Contents
Contents................................................................................. 3
Introduction............................................................................ 5
Symbols.................................................................................. 6
Warning! ................................................................................. 6
Contagion!.............................................................................. 6
Safe servicing ........................................................................ 7
Tool list ................................................................................... 8
Storage ................................................................................... 9
Cleaning ................................................................................. 9
Declaration of conformity..................................................... 10
General care and maintenance ............................................ 11
Control panel ......................................................................... 13
Steering column .................................................................... 16
Service summary for Mini Crosser M1 Cabin...................... 17
Troubleshooting .................................................................... 23
Programming unit.................................................................. 25
Programming via PC ............................................................. 26
Information about the vehicle via PC .................................. 28
Fuses and bulbs .................................................................... 33
Summary of battery connections......................................... 33
Sockets and control panel.................................................... 34
Batteries ................................................................................. 36
Battery disposal..................................................................... 36
Charging................................................................................. 37
Fuel for heater........................................................................ 39
Heater ..................................................................................... 39
Windscreen wiper / washer .................................................. 40
Replacing the wiper blade .................................................... 41
Replacing the bulb - headlight ............................................. 41
Fitting an accelerator switch................................................ 43
Fitting a speedometer ........................................................... 45
Fitting corner speed reduction............................................. 47
Parent potentiometer ............................................................ 48
Fitting an hour counter ......................................................... 49
Fitting a parent key................................................................ 50
Fitting a foot pedal ................................................................ 51
Fitting a twist grip accelerator, right & left.......................... 53
Securing to vehicle oor with belts..................................... 56
Transporting by plane ........................................................... 58
Towing .................................................................................... 58
Dimensioned drawing, Mini Crosser M1
Cabin.................... 59
Front wheel alignment .......................................................... 60
Technical data........................................................................ 61

Service manual P9-0151-S 4 of 66 Version 1.0.3/2018
Medema Production A/S

Service manual P9-0151-S 5 of 66 Version 1.0.3/2018
Medema Production A/S
Introduction
This manual contains servicing instructions for the Mini Crosser
M1 Cabin mobility scooter.
The Service Manual is a supplement to our Spare Parts
Catalogue and User Manual.
The Mini Crosser M1 Cabin is designed for safe travel for
at least 10 years, up to a max. of 5,000 hours, provided it is
serviced and safety-checked every year, corresponding to 500
hours of operation. The service must be carried out either by
Medema Danmark A/S or an authorised workshop.
IMPORTANT! For safety reasons it is of the utmost importance
that the servicing and safety check intervals are complied with,
as this minimises the risk of brake failure and short-circuits in
the wiring, which could generate heat and cause a re.
If help is required with troubleshooting, Medema Production is
always happy to provide telephone assistance. If the problem
seems to be an electrical fault that prevents the scooter from
working, please tell us the error code. This can be found on the
battery indicator on the control panel. Read more about this in
the section on Troubleshooting.
Please also have the scooter’s serial number handy when
contacting Medema Production A/S.
If you have any questions that are not answered directly by this
manual, you are always welcome to contact us at:
Medema Production A/S
Tel: +45 7010 2054
Email: info@minicrosser.com
Internet: www.medema.com
NB: Errors and omissions excepted. Specications subject to
change.
Medema Production A/S also reserves the right to update the
service manual in line with any modications or improvements
to the product.
Service manual P9-0151-S 6 of 66 Version 1.0.3/2018
Medema Production A/S
Symbols
Used in the manual to indicate sections describing situations
where extra care is required owing to the risk of personal injury.
Used to indicate sections on electromagnetic compatibility
(EMC).
Warning!
For safety reasons the vehicle must not be lent to persons who
are not completely familiar with it. The vehicle is designed for
one person only.
The Mini Crosser M1 Cabin has been designed for users
weighing max. 175 kg. Can be supplied in a HD version as
standard for a max person weight of 200 kg.
Contagion!
Note!
The tires can sometimes rub off on oor coverings, particularly
linoleum. Medema Production assumes no responsibility in
case of contagion.
To prevent this, we recommend that you protect delicate oors
with some sort of driving surface.

Service manual P9-0151-S 7 of 66 Version 1.0.3/2018
Medema Production A/S
Safe servicing
To avoid injuries to both the service engineer and the subsequent
user of the scooter, it is important to get to know the product
before servicing it.
Be particularly aware of the following:
The Mini Crosser MUST be turned off at the main switch. If
electrical components are being serviced, the positive terminal on
the battery MUST also be disconnected.
If the voltage needs to be measured in the course of
troubleshooting, take great care not to short-circuit anything.
Take great care not to short-circuit the battery terminals.
Be careful not to lift heavy parts such as the seat, battery and
motor gear incorrectly or drop them.
Make sure to raise one rear wheel off the ground so that the
scooter cannot drive off accidentally.
Use professionally maintained tools.
Where lock nuts are used, NEW ones MUST be tted when the
scooter is reassembled.
Take care to t new cable ties in the same way as the old ones.
Make sure that no cables can be trapped by moving parts or stick
out in such a way as to catch on things.
End every service by making sure that the product is roadworthy:
- Check that all the connectors are plugged in correctly.
- Check that all the mechanical parts are properly secured.
Turn the scooter on and check
- that the magnetic brake clicks when the accelerator is activated.
- When the accelerator is released, it must not be possible to push
the scooter.

Service manual P9-0151-S 8 of 66 Version 1.0.3/2018
Medema Production A/S
Tool list
The following tools are needed to service the scooter:
Circlip pliers
Allen keys
Box spanners, 7-17 mm
Open-ended spanners, 7-17 mm
Phillips and torx screwdrivers, 10/15/20/25 slot
Needle-nose pliers
Side-cutting pliers
Plastic hammer
Set of punches
Retractable knife
Steel brush
Water pump pliers
Wire strippers
Crimping tool
Pliers for Molex 5556/5558 crimps
Riveting pliers
Small cable ties
Multimeter
Battery tester
Tyre pressure gauge
Tyre pump with Schrader valve
Acid-free oil and grease
Loctite 406 / 603
Cable ties
PC
PC Programming package for S180

Service manual P9-0151-S 9 of 66 Version 1.0.3/2018
Medema Production A/S
Storage
The Mini Crosser M1 Cabin is designed for use in all types of
weather. The scooter should, however, be stored and charged
under cover at temperatures in excess of 0°C. The charger
must also be kept dry.
If the Mini Crosser M1 Cabin is not going to be used for a long
time, it is advisable to protect the tyres by chocking the scooter
up. It is also a good idea to cover the scooter to protect it from
dirt, dust and sunlight.
Cleaning
Clean the Mini Crosser M1 Cabin with ordinary autoshampoo. If
necessary, wipe dry with a chamois leather.
Wipe the covers dry and polish with car wax.
Rinse with a garden hose with a soft jet.
IMPORTANT! Never use a high-pressure cleaner or hose, as it
could damage the Mini Crosser’s electronics.

Service manual P9-0151-S 10 of 66 Version 1.0.3/2018
Medema Production A/S
Declaration of conformity
Medema Production A/S hereby declares that:
Machine: Mini Crosser
Use: (Prescribed use in
User Manual)
Model No: M1 Cabin
Complies with the Medical Device Directive 93/42/EEC
The product is made in accordance with the harmonized
standard EN 12184 - Electrically powered wheelchairs, scooters
and their chargers.
The product is risk analysed in accordance with the harmonized
standard DS/EN ISO 14971:2007-04-10 2. edition - Medical
devices - Application of risk management to medical devices.
The Mini Crosser can, for a fee, be taken to the nearest
dealer for disposal in accordance with current environmental
regulations.
Manufacturer: Mini Crosser A/S
Address: Enggårdvej 7, DK-7400 Herning
Tel./Fax +45 7010 2054 +45 9716 8582
Date: 12.04.2010 Signature: _____________________

Service manual P9-0151-S 11 of 66 Version 1.0.3/2018
Medema Production A/S
General care and maintenance
A Mini Crosser M1 Cabin does not require much maintenance.
It should be kept in a generally good condition, however. The
following should be checked regularly:
Tyre pressure (if pneumatic tyres are tted)
Tyre wear
Keep the control panel, the charging socket and the electronics
box under the seat dry.
Battery charging
Never wash the Mini Crosser with a high-pressure cleaner or
direct water jet! This could damage the Mini Crosser’s electronics.
To keep the Mini Crosser in good condition safety-wise, we
recommend the following regular checks:
Daily:
Test the indicators and driving lights before using the Mini Crosser
in the dark or poor visibility.
Every three months:
Test the brakes and motor disengagement
With the disengagement lever up, it must not be possible to
push the Mini Crosser.
Test the brake disengagement function.
With the brake disengagement lever down, the scooter must
not be able to go when the accelerator is activated. The battery
indicator should ash error 9.
When the disengagement lever is up and the scooter has been
switched off and on, the scooter should be able to go again. It
must not be possible to push it.
Test the accelerator.
With the scooter turned off, activate the accelerator while turning
the scooter on. The scooter must not be able to go. The battery
indicator should go up and down.
With the scooter turned on, press the accelerator forward a touch.
When it is released, the scooter should stop completely and the
brake should click. It must not be possible to push the scooter.
Perform the same test again, but pressing the accelerator back.

Service manual P9-0151-S 12 of 66 Version 1.0.3/2018
Medema Production A/S
Test the handbrake.
Apply the handbrake for a couple of seconds at low speed. This
will ensure that the lever arm and brake shoes do not seize up.
Lubricate the lever arm on the front brake hub with acid-free oil.
Test the windscreen wiper.
Spray washer uid on the window and check that the wiper
blade works properly.
Check the tyre pressure and tread.
Annual
Safety checks
The Mini Crosser M1 Cabin is designed for safe travel for
at least 10 years, up to a max. of 5,000 hours, provided it is
serviced and safety-checked every year, corresponding to 500
hours of operation. The service must be carried out either by
Medema Danmark A/S or an authorised workshop.
IMPORTANT! For safety reasons it is of the utmost importance
that the servicing and safety check intervals are complied with,
as this minimises the risk of brake failure and short-circuits in
the wiring, which could generate heat and cause a re.

Service manual P9-0151-S 13 of 66 Version 1.0.3/2018
Medema Production A/S
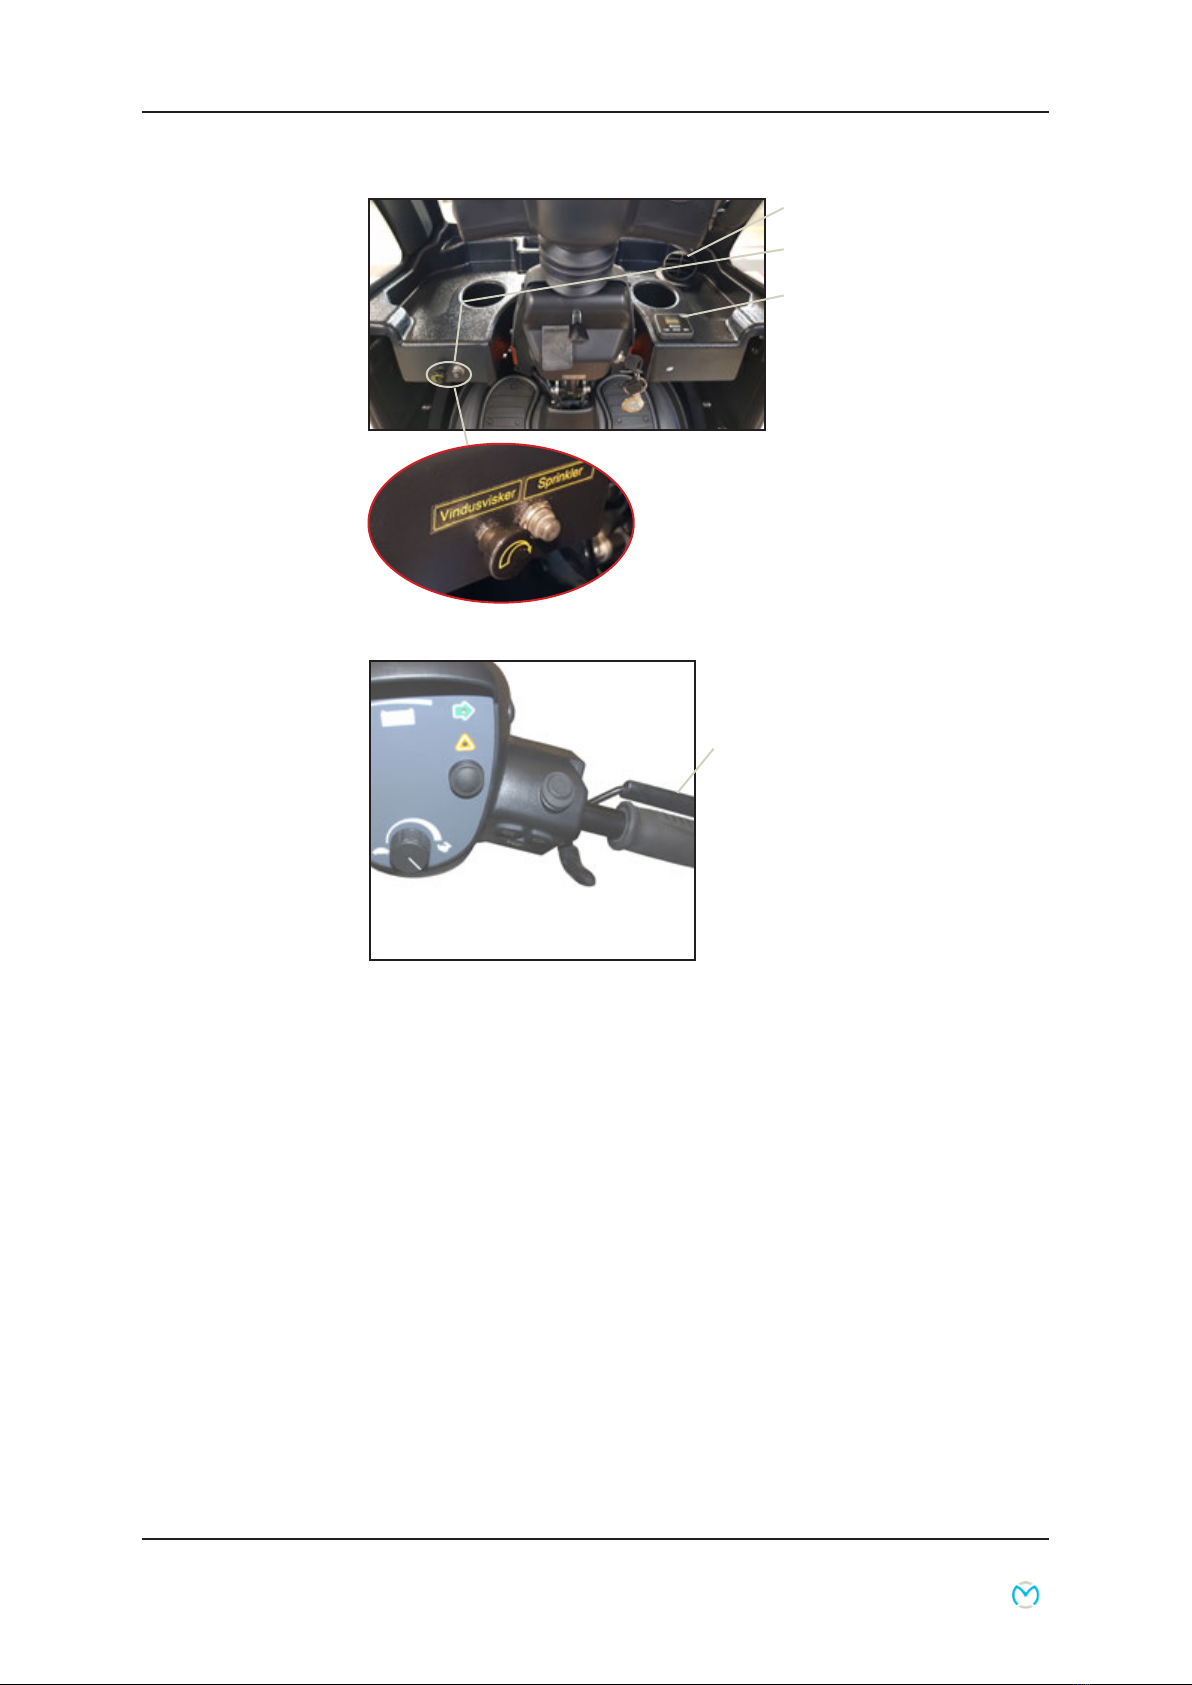
Control panel
Avoid subjecting the control panel to jarring and knocks. Take
care when driving and avoid hitting obstacles.
The manufacturer accepts no liability in respect of the
unauthorised opening, adjustment or modication of the control
panel.
Lever for adjusting the angle of the
handlebars
Charging socket
Key switch
Indicator lights, R/L
Horn
Accelerator
(four-nger control)
Indicator lights,
R/L
Horn
Speed selector
Hazard warning lights
Battery indicator
Handbrake
Light switch
Service manual P9-0151-S 14 of 66 Version 1.0.3/2018
Medema Production A/S
Accelerator
(four-nger control)
Air channel
Windscreen wiper + washer
Heat regulation
Service manual P9-0151-S 15 of 66 Version 1.0.3/2018
Medema Production A/S
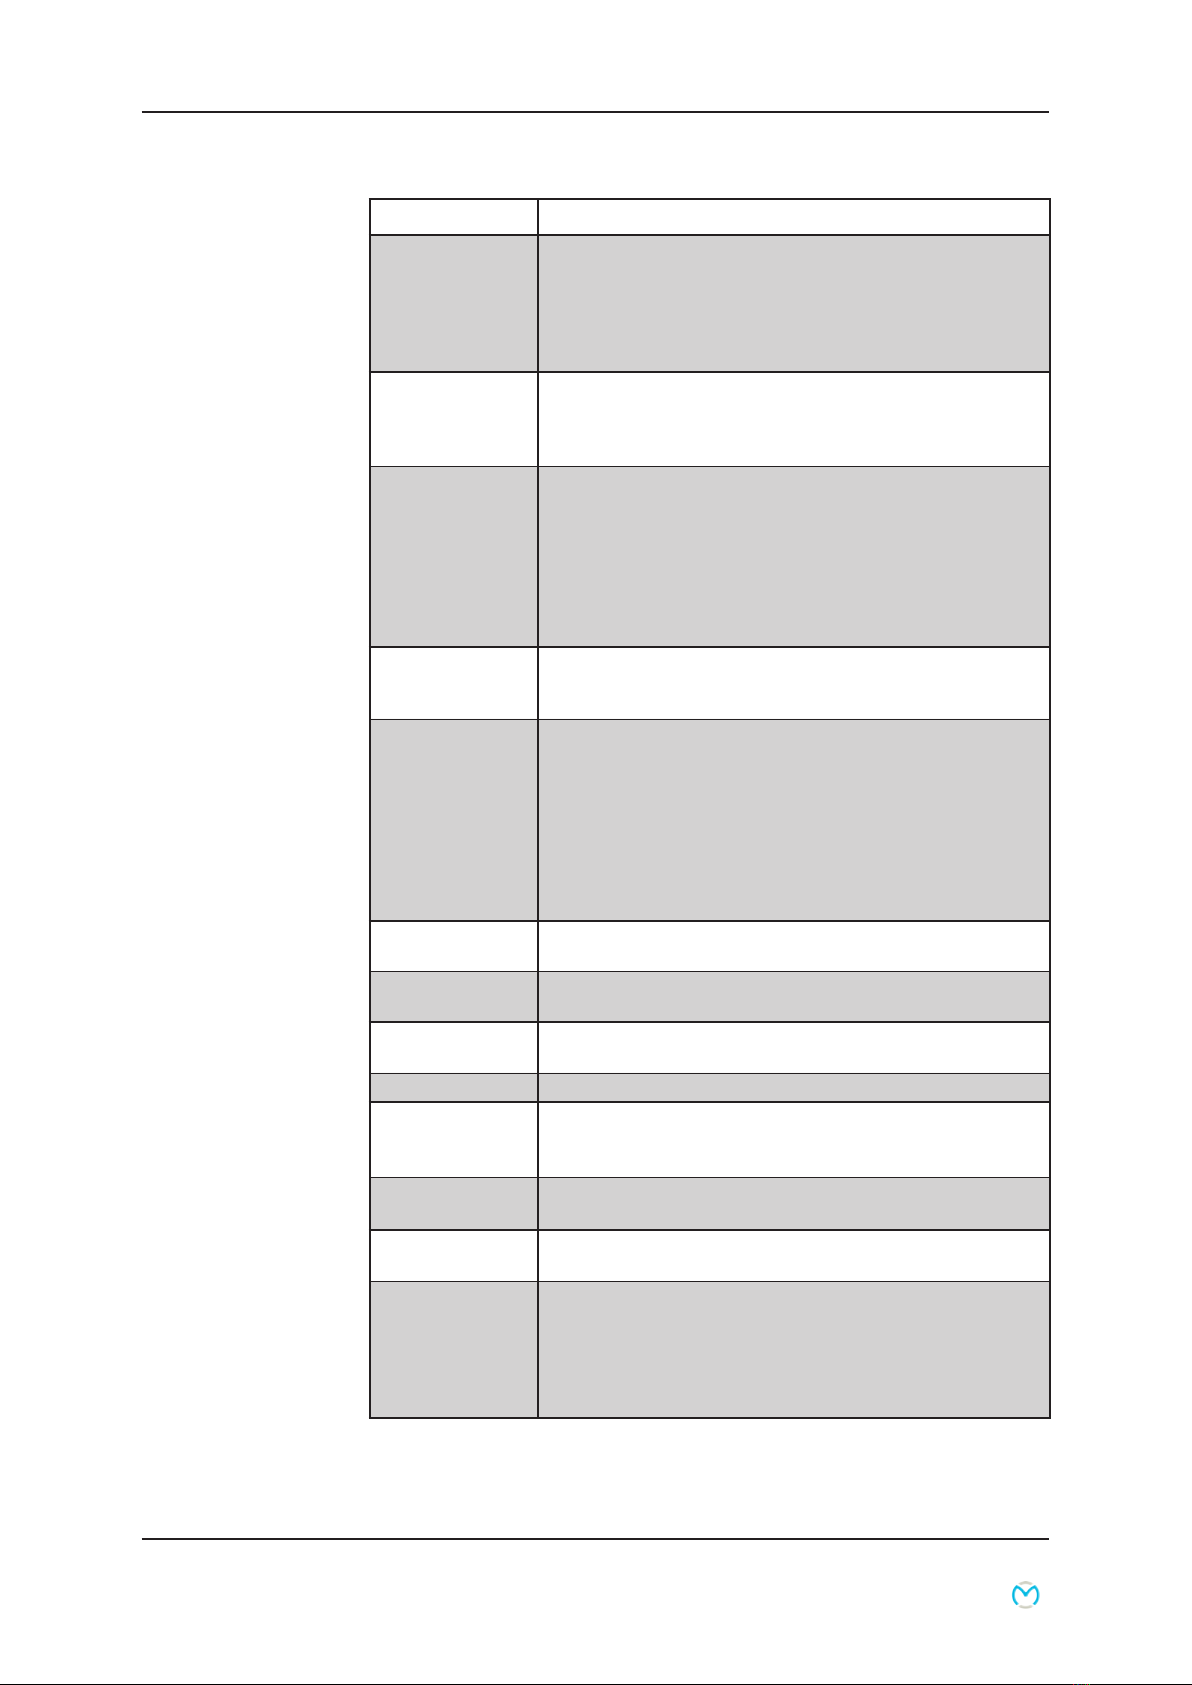
Designation Description
Key switch To start the vehicle:
Turn the key to driving position (1) When the Mini Crosser
is turned on, the control system performs a safety check of
the electrical system. The check lasts half a second. If the
accelerator is operated during this time, the Mini Crosser will not
be able to move until you have turned the key to 0 and back to 1.
Speed selector The tortoise in minimum position indicates the lowest speed
range. 0-6 km/h
The hare in maximum position indicates the highest speed
range. Up to 15 km/h
Battery indicator Lights up when the key is turned. Indicates, after half a
second, the battery charge level. It gives a more precise
indication after approx. 1 minute of driving. When the red,
amber and green sections are lit, the batteries are fully
charged. When the indicator is at the bottom of the amber
section, the batteries should be charged as soon as possible.
If only the red section is lit or ashing, the batteries must be
charged immediately.
Handbrake Acts on the rear wheel and should only be used as an extra
/emergency brake and parking brake. It can be secured in
locked position. Also available as a foot brake.
Accelerator
Activate the arm at the front slowly and the Mini Crosser will
start to move forwards. The more the arm is pressed, the faster
the Mini Crosser will move. When the arm is released, it will ip
back to starting position of its own accord and the Mini Crosser
will stop. Activating the rear arm will cause the Mini Crosser to
reverse. The magnetic brake on the rear wheels will engage
when the scooter is stationary and is equivalent to the parking
brake on a car. The accelerator can also be used to control
speed downhill. In this case the motor will act as a brake.
Light switch Turns on the front and rear lights. The key switch must be in
position 1 (driving position).
Hazard warning
lights
Turns on all the indicator lights at once. Also works when the
key is removed or turned to position 0 (stop position).
Indicator switch
Left arrow: indicator, left-hand side. Right arrow: indicator, right-
hand side. Activate the same switch to turn the indicators off.
Horn Powerful electric horn. Press the horn switch to activate.
Charging socket Turn off the key switch during charging. Please note that it is
not possible to drive the scooter while the batteries are char-
ging. See also the section entitled “Batteries and charging”.
Windscreen wiper Starts the windscreen wiper. Notice the variable speed
ajustment.
windscreen
washer
Spraying washer uid on the front window.
Heat regulation Adjustable heat in the cabin. Note: Heat can be turned on
even if the key is not in the key switch. Heating ribs should
NOT be covered.
REMEMBER! turn off the heat when you leave the vehicle.
Otherwise the batteries may be at the next time you want to
use it.

Service manual P9-0151-S 16 of 66 Version 1.0.3/2018
Medema Production A/S
Steering column
Can be adjusted forward/back with the release lever. Pull down
on the lever and pull the handlebars closer for a good driving
position. Use the lever again and push the steering column
forward to make it easier to get out.
The height of the steering column can be adjusted approx. 11
cm up/down. First remove the rubber plug covering the Allen
screw. Adjust the height using a 4 mm Allen key.
Adjusting the height of
the handlebars.
Lever for adjusting the angle of
the handlebars
Adjusting the height of
the handlebars.
Allen screw for height
adjustment
Service manual P9-0151-S 17 of 66 Version 1.0.3/2018
Medema Production A/S
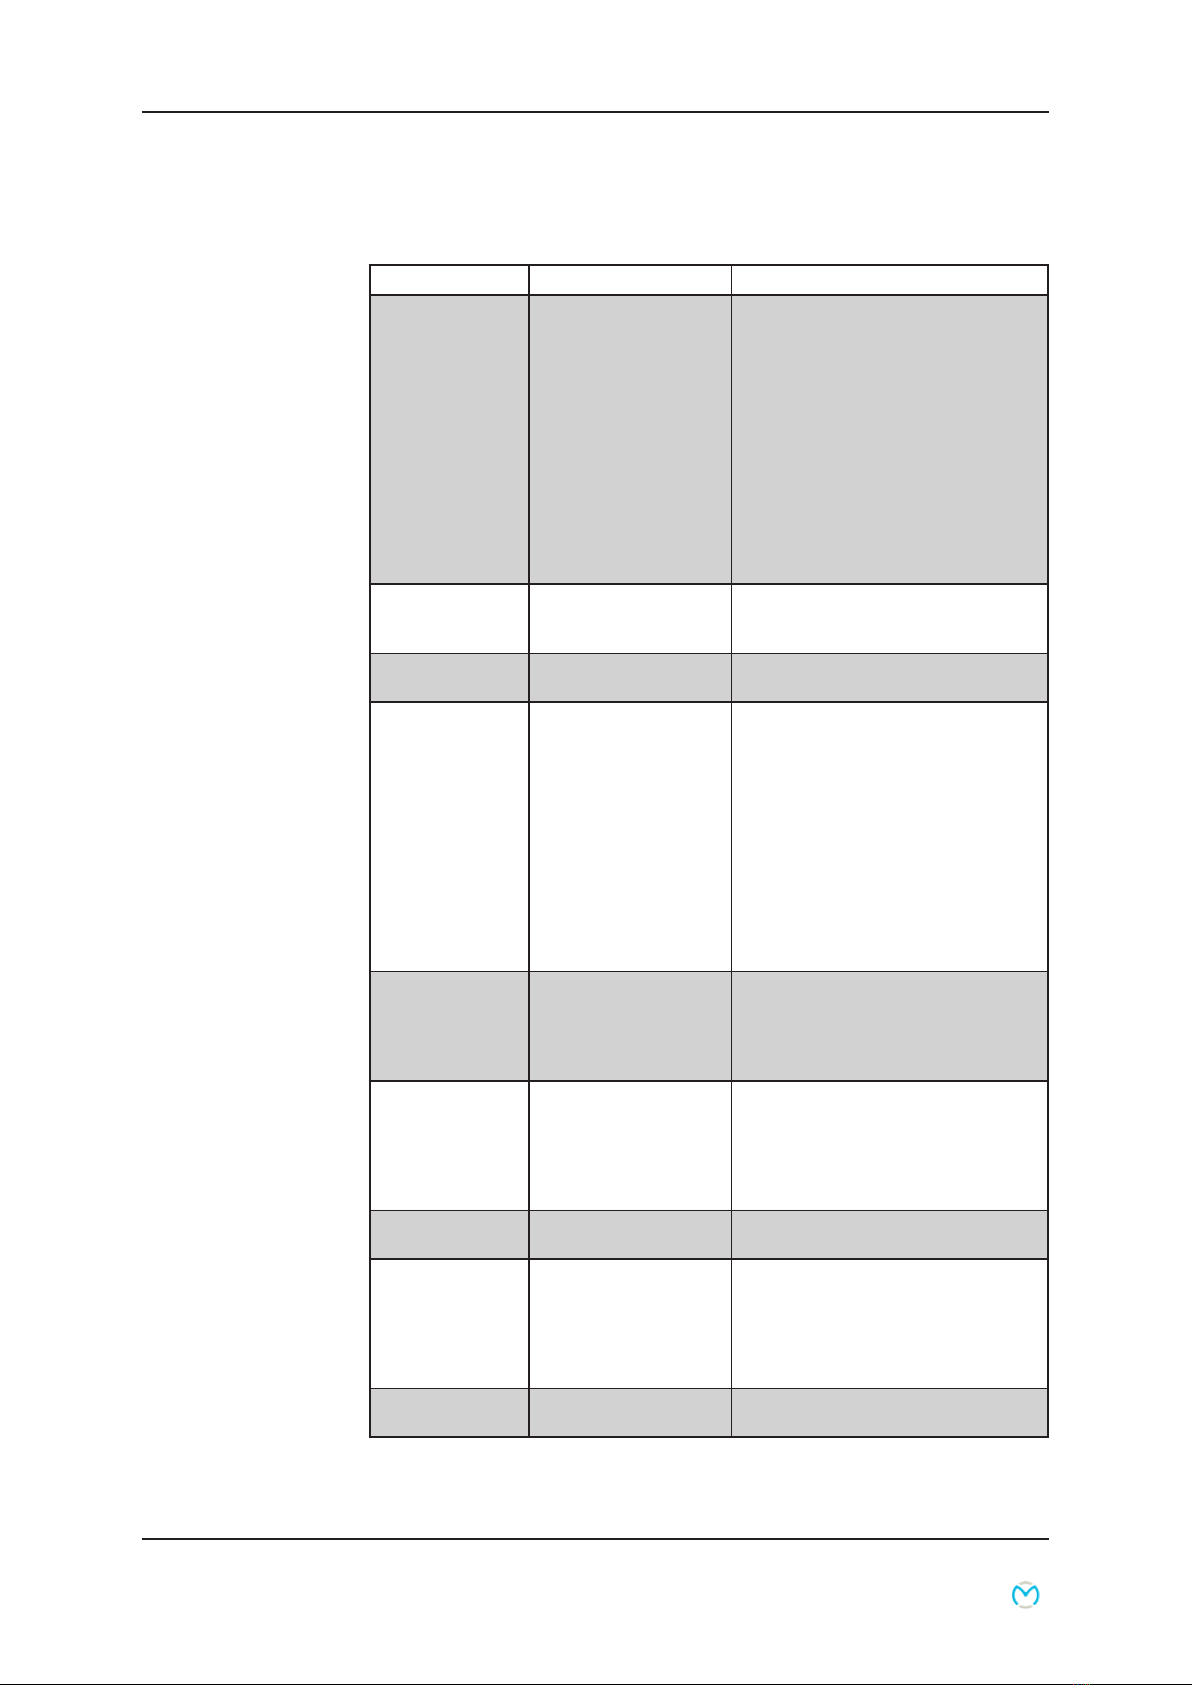
Service summary for Mini Crosser M1 Cabin
Area Component Check and remedy
Suspension and
wheels
Rear suspension Check whether the rear of the
scooter is drooping. The rear wheel
must not rub on the mudguard with
a load on the seat. Replace the
shock absorbers/springs behind
the batteries. See the Spare Parts
Catalogue.
Check the shock absorbers for oil
leaks.
Check that the swivel axle/transaxle
is securely mounted. Retighten or t
bolts/nuts.
Check that no cables
can be trapped by
moving parts.
Fit cable ties.
Check the wheels Check the fastenings and the
condition of the rims.
Check the tyre
pressure and tread.
Recommended tyre pressure: 2.8 bar
(50 psi)
The minimum tread depth for good
grip is approx. 1 mm.
See the Spare Parts Catalogue for
disassembly. NB! The rear and front
wheels on the 4W MUST always be
removed using the ve bolts. NEVER
undo the actual ange using the bolt
in the centre. See the Spare Parts
Catalogue. NB! ALWAYS let the air
out of the inner tube before taking a
wheel apart!
Check that the
handbrake is working.
Lubricate the lever arm on the brake
hub with acid-free oil. Adjust the
cable length using the adjusting
nipple. If parts are defective: See the
Spare Parts Catalogue.
3W: Front fork.
Suspension and
straightness.
Check that the front fork can bounce.
Is it crooked?
Is there an oil leak?
If there is a defect that needs to be
repaired, replace the entire front fork.
See the Spare Parts Catalogue.
3W: Front wheel. Check the ball bearings for play and
wear.
4W: Front suspension. Check that the front wheels do not hit
the underside of the front mudguards.
Check that the rubber dampers are
secure. They should just touch the
axle beam. See the Spare Parts
Catalogue.
Check that the T-suspension block is
working and does not droop.

Service manual P9-0151-S 18 of 66 Version 1.0.3/2018
Medema Production A/S
Area Component Check and remedy
Suspension and
wheels (contd)
Front wheel
suspension.
Check that the guide rods and balls
are in good condition and properly
tightened.
Check the ball bearings in the front
wheels and guide spindles for play/
wear.
Front wheel tracking. See the sketch
for correct tracking if uneven tyre
wear shows that adjustment is
necessary.
Steering/Control
panel
Lights, indicators,
hazard warning and
horn
Check functioning and the condition
of the switches.
If an indicator is not working: Check
the connectors and the fuse in the
control panel.
Or change the bulb.
Seals Check that the rubber switch covers
are intact and in good condition.
Check that all the holes have plugs.
Fit new ones if necessary.
Check that the sign on the control
panel is straight.
Accelerator and
handlebars
Check that the accelerator
is mounted securely on the
potentiometer shaft.
Function test: Turn the scooter on
while the accelerator is activated.
The scooter must not be able to go.
The battery indicator should go up
and down.
With the scooter turned on, press the
accelerator forward a touch. When it
is released, the scooter should stop
completely and the brake should
click. It must not be possible to push
the scooter. Perform the same test
again, but pressing the accelerator
back.
Max. speed
potentiometer
Check that all the lamps come on
when the batteries are fully charged.
If there is no indication at all, try
another controller, as the signal
comes from there. If not, the card will
have to be replaced. If a single lamp
is not working, a diode is defective.
Check that ”True Charge calibration”
is set to 99m ohm. This ensures the
best indication of power consumption
in hilly terrain.

Service manual P9-0151-S 19 of 66 Version 1.0.3/2018
Medema Production A/S
Area Component Check and remedy
Motor / gear /
brake
(Transaxle)
Wear Check: That the motor runs smoothly
and evenly. If not, the carbon brushes
in the motor usually need to be
replaced. The minimum length of the
brushes is 10mm. See the Spare
Parts Catalogue for replacement.
Check: The rear wheel bearings in
the gear for wear. Lift the rear of the
scooter. Get hold of one wheel at
a time. Lift it up and down to see if
there is any play in the bearings in
the transaxle. If there is, the whole
unit should be replaced.
Power consumption Power consumption on a level road
with a tyre pressure of 2.8 bar and
75-100 kg on the seat:
10 km/h = 12 - 15 A
15 km/h = 17 - 20 A
Measure on one of the battery cables
using a clip-on ammeter.
Brakes and
disengagement
Check function
When the disengagement lever is up:
It must not be possible to push the
scooter.
It must be possible to drive normally
when the scooter is turned on.
When the disengagement lever is
down:
It must be possible to push the
scooter.
The scooter must not be able to
go. Error 9 should appear when the
accelerator is activated.
The brake must be able to hold the
scooter on a 15° (26%) slope with 75
- 100 kg on the seat.
If not, it must be adjusted or
replaced, depending on how much
wear there is.
Braking distance 10 km/h - 2.0 m (9)
15 km/h - 3.5 m (9)
The gures in brackets indicate the
normal braking parameter when the
scooter leaves the factory. It can be
changed with the programming unit
(forward deceleration). See below
for more information. Please note
that the braking distance must not
be longer than specied in order to
comply with ofcial requirements.
Service manual P9-0151-S 20 of 66 Version 1.0.3/2018
Medema Production A/S
Area Component Check and remedy
Steering column Play/wear Check the following:
- Universal joint
- Pins in steering shaft/front fork
- That the aluminium bottom section
of the steering column is rmly
secured to the steering shaft. (*)
Wear/rust on the bearings in the
steering column. Top support bearing.
The bearings in the head tube are
protected by seal rings. If the front
fork is a bit stiff, the seal rings can be
lubricated with a little grease.
(*) On models with an 8 mm bolt
going into the steering shaft from
the aluminium bottom section of
the steering column. The bolt can
work loose if the steering column
is twisted/knocked hard. This can
be remedied by drilling a hole for a
split pin between the steering shaft
and the aluminium section. Contact
Medema Production A/S.
Cables Check that the cables cannot
become trapped or be subjected
to strain when the handlebars are
turned or the steering column is
folded down.
Gas spring Check:
That the gas spring locks the steering
column securely.
Check that there is no play in the
release lever and the bolts/bushes
securing the gas spring.
Key switch / charging
socket
Check that the key switch does not
wobble.
Clean with a damp cloth or
compressed air if dirty. If the contacts
are corroded, clean them with
contact spray or replace the charging
sockets.
Chassis / seat /
covers
Footplate Check the plastic rivets securing the
mat. Fit new ones if necessary.
Seat post Check that it is properly secured and
in good condition.
Chassis / seat /
covers (contd)
Seat Check that:
The release lever locks the seat
properly.
The seat is rmly secured on the seat
frame/plate.
The seat tube is in good condition. If
necessary, lubricate the tube with a
little acid-free grease.
The armrests are in good condition.
Table of contents
Other Medema Scooter manuals

Medema
Medema Mini Crosser M1 User manual

Medema
Medema Mini Crosser M1 User manual

Medema
Medema Mini Crosses M2 4W Cabin User manual

Medema
Medema Mini Crosser M-MaxX User manual

Medema
Medema M Joy User manual

Medema
Medema Mobility Scooter User manual

Medema
Medema M1 joy User manual

Medema
Medema Mini Crosser X1 User manual

Medema
Medema MC 1122 Quantum User manual

Medema
Medema Mini Crosser M2 User manual


