Bio Green Compost Roller DUO70 User manual

COMPOST ROLLER®DUO70
Montageanleitung
Instruction manual
Istruzioni per il montaggio
Instructions de montage

2
Ax4 Bx2
Cx10
Dx1
Ex2
Fx4
Gx2
Hx10
Ix2
Jx4
Kx2
Lx6
Mx2
Nx8
Ox8
Px12
Qx2
Rx2
Es wird DRINGEND EMPFOHLEN,
das kurze Montageanleitungsvideo
auf YouTube anzuschauen.
www.biogreen.de/compostroller_cr70
!It is HIGHLY RECOMMENDED to watch the
short assembly instructions movie on
www.biogreen.de/compostroller_cr70
!
Si CONSIGLIA VIVAMENTE
di guardare il breve video con le istruzioni
per il montaggio su
www.biogreen.de/compostroller_cr70
!Il est FORTEMENT RECOMMANDÉ
de regarder le bref film comprenant les
instructions de montage sur
www.biogreen.de/compostroller_cr70
!
Montageanleitung…………………………………………......... 6-7
Instruction manual.…….…………………………………………8-9
Istruzioni per il montaggio ……………………………………10-11
Instructions de montage ………………………………………12-13
Herzlichen Glückwunsch!
Mit dem neuen Compost Roller® haben Sie eine gute Wahl getroffen, die sich für Ihren Blumen- und
Gemüsegarten jahrelang auszahlen wird. Mit Hilfe des neuen Compost Roller können Sie sich leicht
und kostengünstig schier endlose Vorräte an nährstoffreichem und gut duftendem Kompost
anlegen. Jede Ladung Kompost braucht nur wenige Tage bis zur Reifung - bei den meisten Materi-
alien tatsächlich nur 14 Tage - statt Monaten (oder sogar Jahren), die bei den meisten herkömmli-
chen Methoden benötigt werden.
INHALT:
1 2
3 4 5
6 7 8
9 10 11
3
Part H
Click
X10
UNTEN
DOWN
!!!
UP/OBEN/HAUT
Part P
1
2
5
4
3
Part P
Part B Part A
Click
Click
Click
Click
Click
Click
Click
Part A
Click
Click
Click
Click
Click
Click
Click
Click
Click
Click
Click
Click
Click
COMPOST ROLLER®DUO70
Montageanleitung | Assembly Instructions | Istruzioni per il montaggio | Instructions de montage
NEER
BAS
Click
Click
Click
Click
Click
Click
Click
Click
Click
15 16 17
4
X4 Part J Part D
Part R
Part K Part F
Part L Part F
Part G
Rechts
Right
Droite
Part L Part L
Part K Part F
Part L
Part G
Part F
Part L Part L
12 13 14
18 19 20
21 22 23
COMPOST ROLLER®DUO70
Montageanleitung | Assembly Instructions | Istruzioni per il montaggio | Instructions de montage
24 25 26
27 28
29 30
5
Part M
Part E
Part N+O
x8
Part I
Part Q
Part R
31
COMPOST ROLLER®DUO70
Montageanleitung | Assembly Instructions | Istruzioni per il montaggio | Instructions de montage
6
2-Kammer-
Trommel-
komposter
EMPFEHLUNG:
BEFÜLLEN SIE
DIE KAMMERN
NICHT ÜBER
2/3 IHRER
KAPAZITÄT
1
2
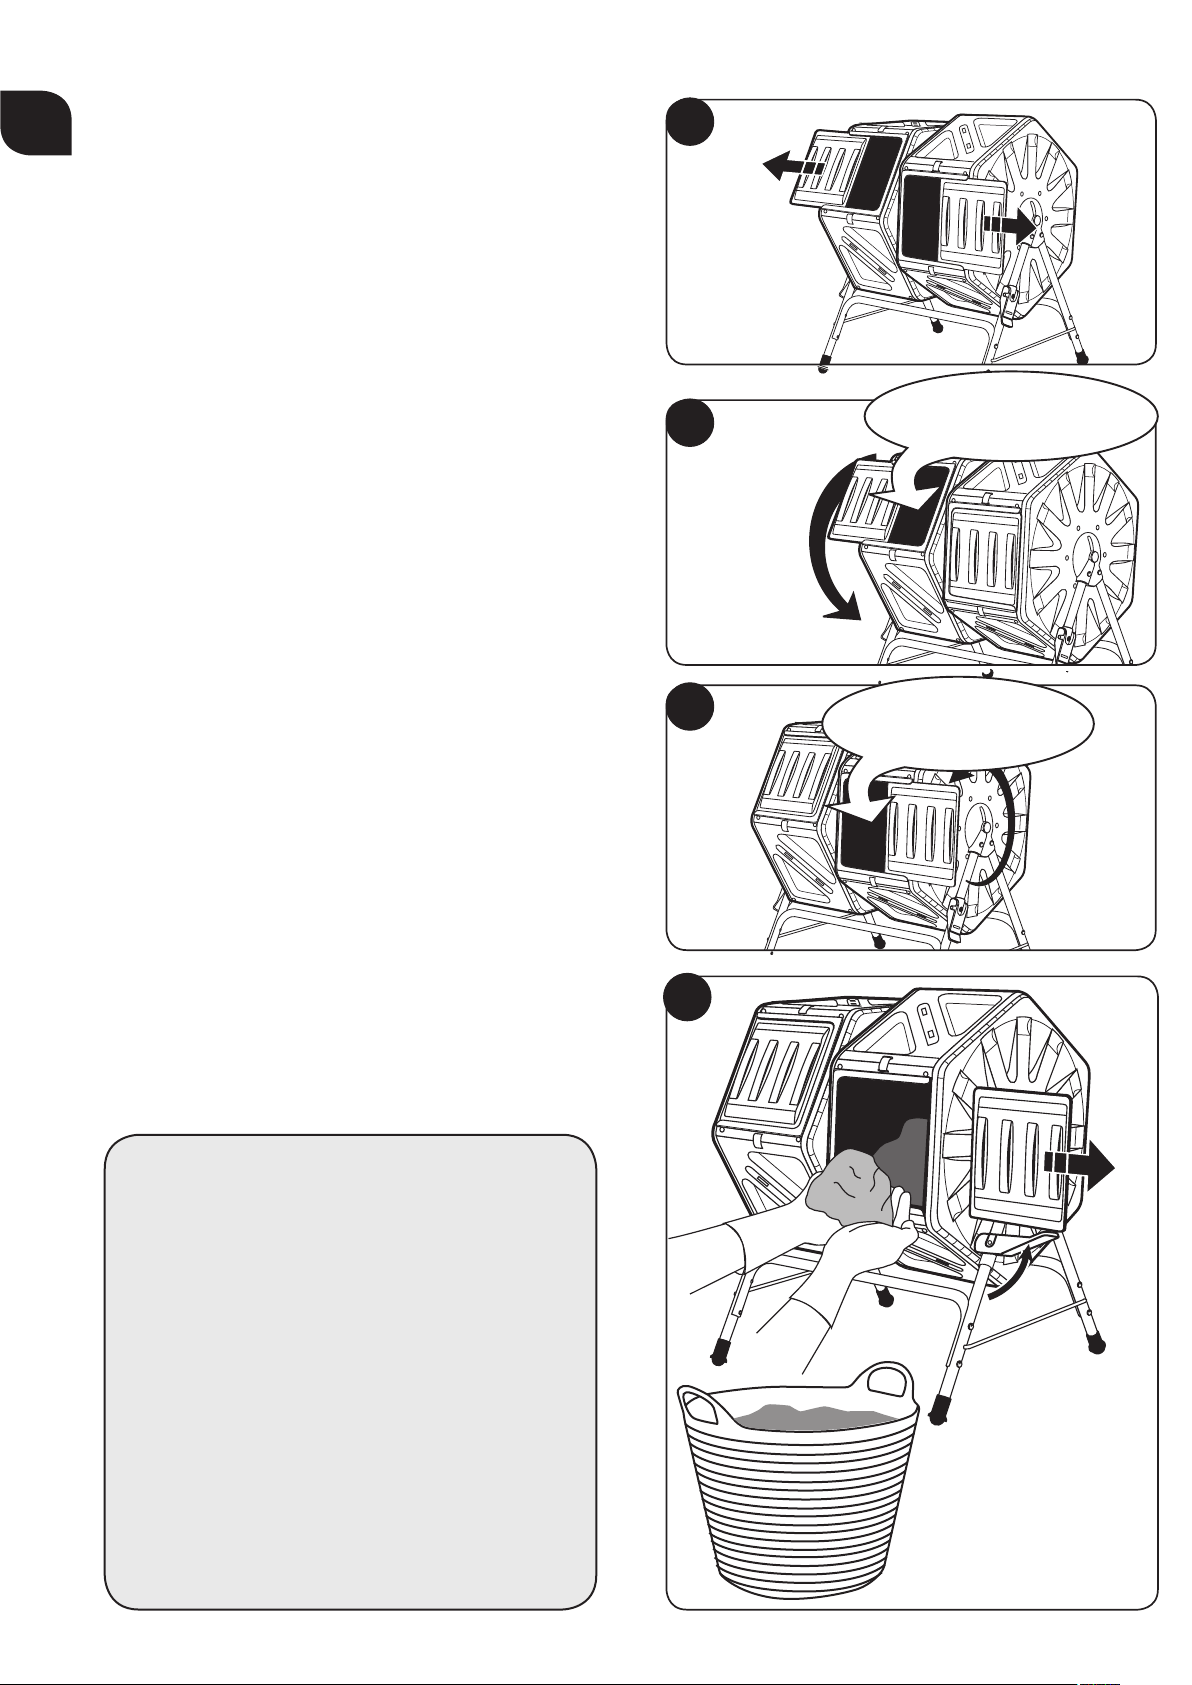
Geben Sie neues Material in Kammer Nr. 1.
5-10 volle Umdrehungen nach jederZuga-
be von Material oder alle 2-3 Tage.
Wenn Kammer Nr. 1
voll ist (Empfehlung: nicht mehr als 2/3),
geben Sie neues Material in
Kammer Nr. 2.
Wenn der Kompost fertig ist,
nehmen Sie die Kammertür
ab. Verriegeln Sie die Kam-
mer und entnehmen Sie den
Kompost.
Kompostierungsprozess
Den Prozess überwachen
Überprüfen Sie alle zwei bis drei Tage, ob Ihr
Kompost warm wird. Wenn Ihr Kompost warm ist,
vermehren sich die nützlichen Organismen und
zersetzen das Material. Durch fünf- bis zehnmaliges
Drehen des Komposters alle zwei bis drei Tage wer-
den die Materialien durchmischt und der Prozess
am Laufen gehalten. Drücken Sie eine Handvoll
Kompost zusammen, um sicherzustellen, dass das
Material nicht austrocknet. Wenn es sich wie ein
feuchter Schwamm anfühlt, ist der Feuchtigkeitsge-
halt gut, wenn es sich trocken anfühlt, geben Sie ein
wenig Wasser hinzu (aber nicht zu viel) und drehen
Sie den Komposter, um alles gut zu durchmischen.
Je nach den kompostierten Materialien sollte Ihr
Kompost nach vier bis acht Wochen fertig sein. Fer-
tiger Kompost enthält feines und grobes Material.
Um feine Blumenerde zu erhalten, sieben Sie den
Kompost. Verwenden Sie den groben Kompost als
Dünger für Pflanzen im Außenbereich oder direkt
im Garten! Sie können fertigen Kompost auch als
Starter für die nächste Ladung Kompost oder zur
Erwärmung einer Ladung verwenden, die zu schnell
abgekühlt ist.
Um den fertigen Kompost zu entnehmen, schieben
Sie die Kammertür auf und drehen Sie die Trommel,
so dass die Öffnung zu Ihnen zeigt. Verriegeln Sie
die Kammer und entnehmen Sie den Kompost.
Tipps zur Kompostierung
Drei Regeln der Kompostierung:
1. Hochwertige Materialien und das richtige Ver-
hältnis von grünem Material (Stickstoff)
und braunem Material (Kohlenstoff) –
zwei Teile grün zu einem Teil braun
2. Gleichbleibende Feuchtigkeit – sollte sich
wie ein feuchter Schwamm anfühlen
3. Gute Luftzirkulation – drehen Sie den Komposter
alle paar Tage, nachdem sich die Ladung er-
wärmt hat, um den Kompost zu lüften und damit
eine schnellere Zersetzung zu fördern.
1
2
3
4
DE
7
Aufstellen des Komposters
Wählen Sie zunächst einen Standort für Ihren
Komposter aus, der gut für den An- und Abtrans-
port des Materials geeignet ist – in der Regel in
der Nähe des Gartens. Wählen Sie einen ebenen
Untergrund mit genug Platz zum Drehen der
Trommeln und, wenn möglich, einen Standort
mit direkter Sonneneinstrahlung, so dass Ihr
Kompost besser erwärmt wird.
Für die Montage benötigen Sie nur einen Kreuz-
schlitz-Schraubendreher. Die vollständigen
Montageanleitungen sind beigefügt.
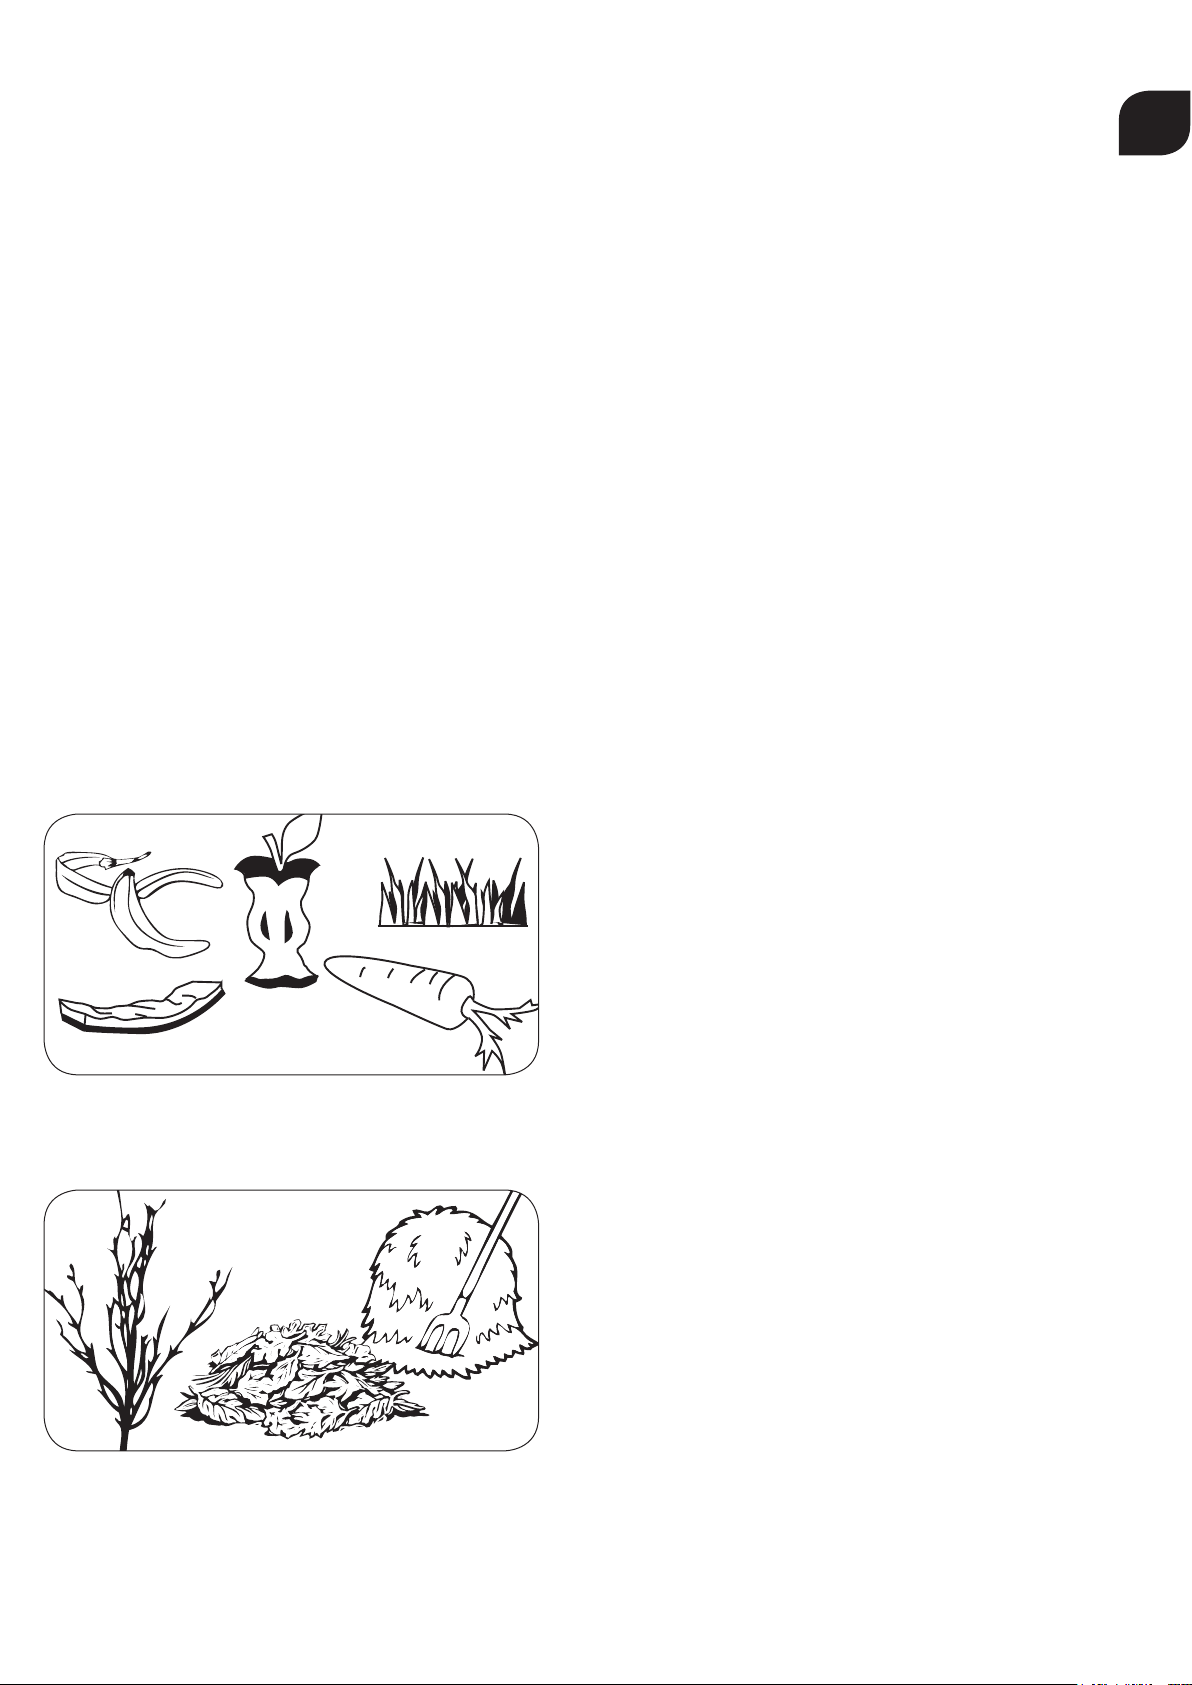
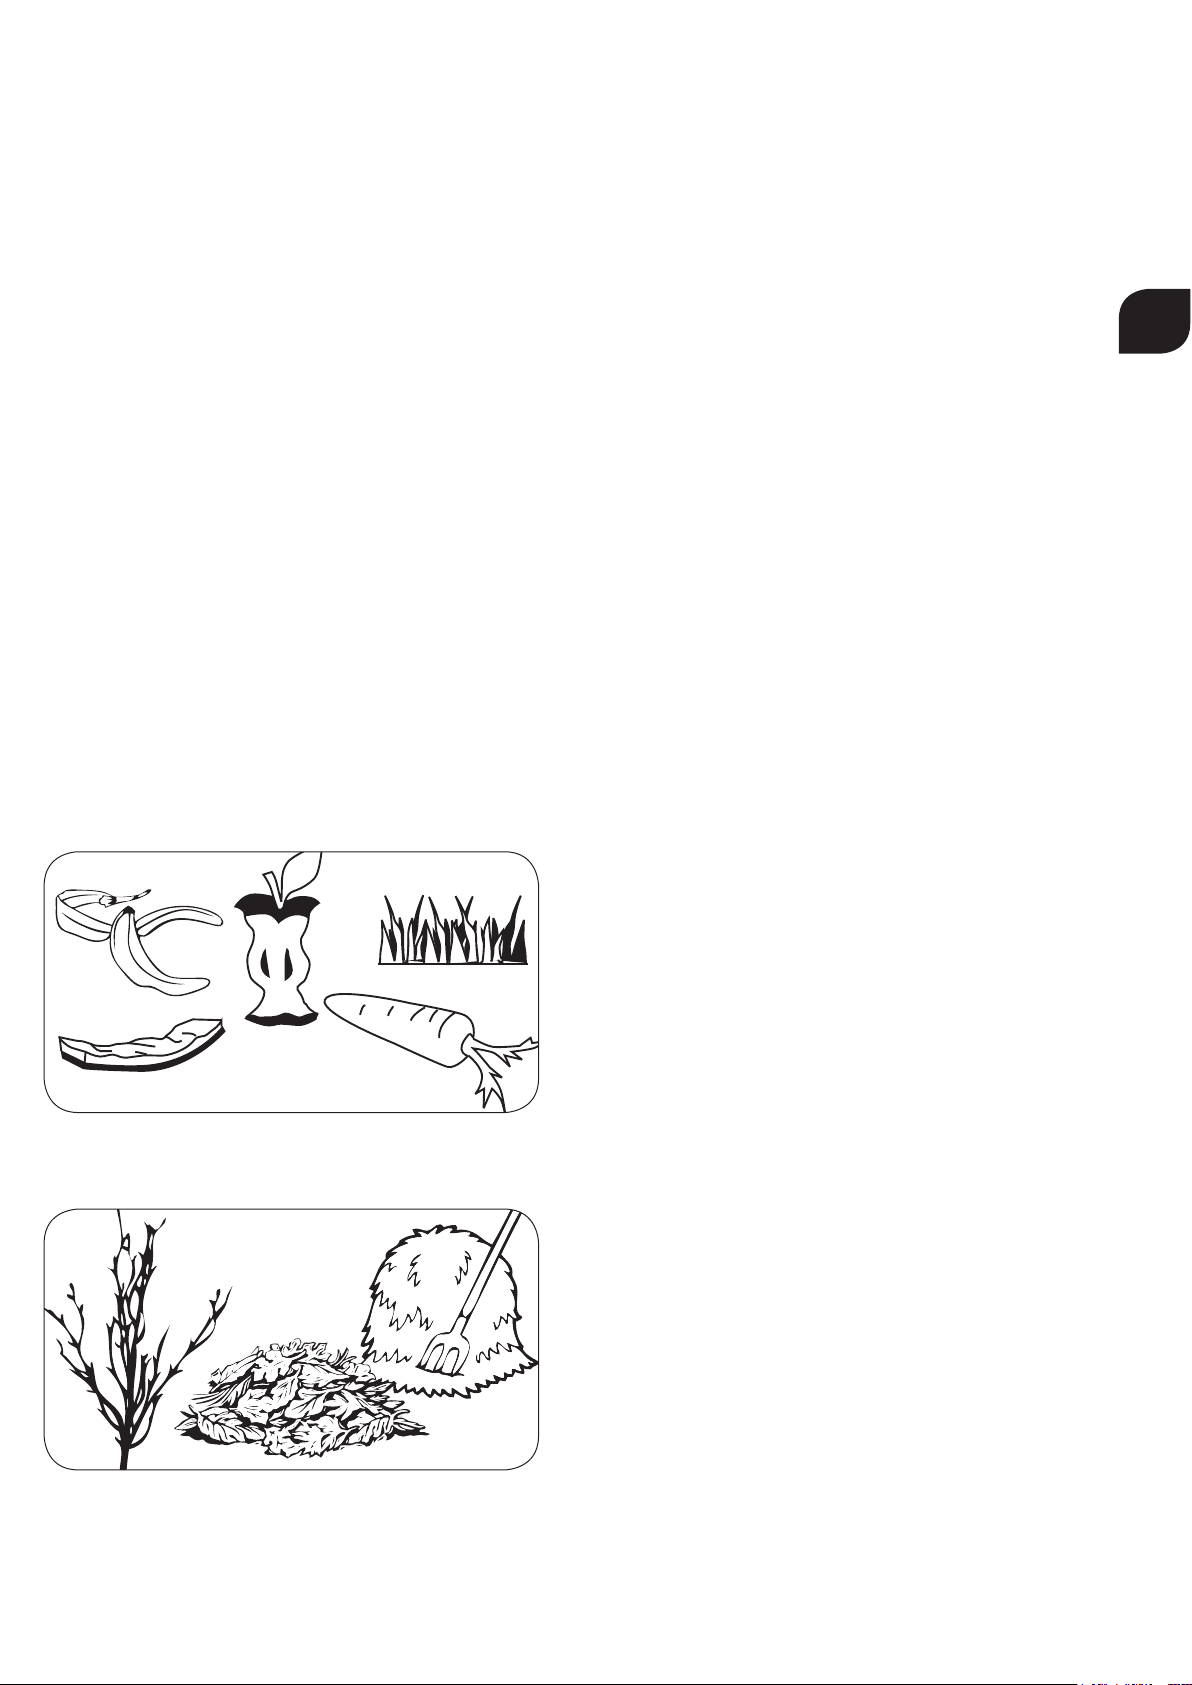
Was Sie kompostieren können
Der Kompostierungsprozess funktioniert am
besten, wenn feuchtes grünes Material (stick-
stoffreich) mit trockenem braunen Material
(kohlenstoffreich) in einem Verhältnis von etwa
zwei Teilen grün zu einem Teil braun gemischt
werden.
Grüne Materialien sind: Garten- und Zimmer-
pflanzen, Küchenabfälle, Rasenschnitt
Braune Materialien sind: Zweige, Sägespäne,
Laub, Stroh/Heu
Nicht kompostieren: Fleisch/Fett/Knochen,
Milchprodukte, Müll/Kunststoff, Holzasche,
invasive Pflanzen/Unkraut
Fehlersuche
1. Die Kompostmischung erwärmt sich nicht:
• Kompost ist zu feucht – trockenes
braunes Material hinzugeben
• Kompost ist zu trocken – Wasser
hinzugeben
• Mischverhältnis stimmt nicht – Grün/
Braun-Verhältnis überprüfen und
entsprechend ausgleichens
2. Geruch:
• Ammoniakgeruch bedeutet zu viel Stick-
stoff (grün) – trockenes braunes Material
hinzugeben
• Stechender Geruch (wie faule Eier)
bedeutet, der Kompost ist zu feucht bzw.
hat nicht genug Sauerstoff – trockenes
braunes Material hinzugeben, um die
Feuchtigkeit zu absorbieren, und den
Komposter drehen; Belüftung öffnen
3. Probleme mit Haustieren/Insekten:
• Nagetiere werden von Fleisch und
fetthaltigen Lebensmitteln angezogen –
solches Material nicht kompostieren
• Fliegen/Insekten werden von unbedeck-
ten Abfällen, insbesondere Küchenabfäl-
len, angezogen – mit braunem Material
oder fertigem Kompost vermischen oder
abdecken
Grasrecycling: Lassen Sie Rasenschnitt auf
dem Rasen liegen. Dies ist eine hervorragende
Stickstoffquelle und hilft bei der Wasserabsor-
bierung.
Kleines, zerschnitzeltes Material zersetzt sich
schneller. Fahren Sie mit dem Rasenmäher über
Tannennadeln oder Blätter und schneiden Sie
Küchenabfälle klein, um den Kompostierungs-
prozess zu beschleunigen.
Trouble shooting
1. Compost mix does not heat up:
• Mix is too wet - add dry brown
• Mix is to dry - add water
• Mix ratio is off - check green/brown ratio
and add accordingly
2. Odor
• Ammonia smell means too much nitrogen
(Green) - add dry brown.
• Putrid smell (Like rotten eggs) means
mix is too wet andqor not enough oxygen
- add dry browns to absorb excessive
moisture and turn composter - open air
vent.
3. Problems with pets/Insects
• Rodents are attracted to meat and fatty
foods - remove them
• Flies/Insects are attracted to uncovered
wastes, esprcialy kitchen scarps - mix or
cover with brown materials or nished
compost.
Grasscycling: Leave grass clippings on
your lawn or use them as much. This is
an excellent source of nitrogen and helps
absorb water
Small shredded materials decompose faster.
Run your lawnmower over pine needles or
leaves and cut up kitchen scarps to speed
the composting process.
Setting-up your composter
First select a location to install your composter
that is convenient to move materials to and from,
usually close to garden. Choose a at surface with
enough room to be able to rotate the composter
and if able, be sure to select a location in direct
sunlight, to help cook your compost.
To assemble, you will need onle Philips screw
driver. Complete assembly instructions are
included on inserted sheets.
What to put in your composter
The composting process works best by mixing
moist greens (nitrogen rich) with dry browns,
(carbon rich) in a ratio of approximately 2 parts
green to 1 parts browns.
Greens are: Garden and house planters, Kitchen
scraps, Grass clippings
Browns are: Twigs, Saw dust, Leaves, Straw/hay
Do not Compost: Meats/fats/bones, dairy
products, Trush/Plastic, wood ashes, Invasive
plant/weedts
DE

8
2 Chamber
tumbling composter
RECOMMENDED:
DO NOT FILL EACH
CHANBER, MORE
THEN 2/3 OF ITS
CAPACITY.
1
2
Add New material to Chamber No. 1.
Fully Rotating 5-10Xs after each deposit,
or every 2-3 days.
When Chamber No. 1
Is full. (Recommended: Not mor then 2/3)
Add New material to Chamber No. 2.
When Compost is ready.
Remove the Chamber door.
Lock the Chamber
and take out the compost
Composting Process
Checking the Process
After 2-3 days, check your mix to see if it is getting
hot. When your mix is hot, the beneficial organisms
are multiplying and doing their job decomposting
materials. Tumbling the composter 5-10 times every
2-3 days will mix the materials and keep the pro-
cess active. Squeeze a handful of compost to ensure
the materials are not drying out. If it feels like damp
sponge, the water level is fine, - If it feels dry, add a
little water (be careful not to add to much) and turn
the composter to mix well.
Depending on the materials you added your com-
post should be ready after 2-8 weeks. Finished
compost will contain fine and coarse material. For
a fine blend, sift the compost ti use in potting mixes,
Use the courser compost as a nutritious top dres-
sing around outdoor planterings or till directly into
your garden! You may also use finished compost as
a starter for your next batch, or to heat up a batch
that cooled to quickly.
To remove the finished compost, slide the chamber
door and turn the barrel so the door is facing to you.
Lock the chamber and take the compost out.
Composting Tips
3 Rules of Composting:
1. Quality Materials and proper ratio of greens
(Nitrogen to browns (Carbon) - approximately,
2 parts green to 1 part browns
2. Consistent moisture - mix should fell like a
damp sponge.
3. Good Air circulation - turn the composter every
few day after the batch heats up to help aerate
mix and encourage faster decomposting
1
2
3
4
EN

9
Setting-up your composter
First select a location to install your composter
that is convenient to move materials to and
from, usually close to garden. Choose a flat
surface with enough room to be able to rotate
the composter and if able, be sure to select a
location in direct sunlight, to help cook your
compost.
To assemble, you will need onle Philips screw
driver. Complete assembly instructions are
included on inserted sheets.
What to put in your composter
The composting process works best by mixing
moist greens (nitrogen rich) with dry browns,
(carbon rich) in a ratio of approximately 2 parts
green to 1 parts browns.
Greens are: Garden and house planters, Kitchen
scraps, Grass clippings
Browns are: Twigs, Saw dust, Leaves, Straw/hay
Do not Compost: Meats/fats/bones, dairy pro-
ducts, Trush/Plastic, wood ashes, Invasive plant/
weedts
Trouble shooting
1. Compost mix does not heat up:
• Mix is too wet - add dry brown
• Mix is to dry - add water
• Mix ratio is off - check green/brown ratio
and add accordingly
2. Odor:
• Ammonia smell means too much nitro-
gen (Green) - add dry brown.
• Putrid smell (Like rotten eggs) means
mix is too wet andqor not enough oxy-
gen - add dry browns to absorb excessive
moisture and turn composter - open air
vent.
3. Problems with pets/Insects:
• Rodents are attracted to meat and fatty
foods - remove them
• Flies/Insects are attracted to uncovered
wastes, esprcialy kitchen scarps - mix or
cover with brown materials or finished
compost.
Grasscycling: Leave grass clippings on your
lawn or use them as much. This is an excellent
source of nitrogen and helps absorb water
Small shredded materials decompose faster.
Run your lawnmower over pine needles or
leaves and cut up kitchen scarps to speed the
composting process.
Trouble shooting
1. Compost mix does not heat up:
• Mix is too wet - add dry brown
• Mix is to dry - add water
• Mix ratio is off - check green/brown ratio
and add accordingly
2. Odor
• Ammonia smell means too much nitrogen
(Green) - add dry brown.
• Putrid smell (Like rotten eggs) means
mix is too wet andqor not enough oxygen
- add dry browns to absorb excessive
moisture and turn composter - open air
vent.
3. Problems with pets/Insects
• Rodents are attracted to meat and fatty
foods - remove them
• Flies/Insects are attracted to uncovered
wastes, esprcialy kitchen scarps - mix or
cover with brown materials or nished
compost.
Grasscycling: Leave grass clippings on
your lawn or use them as much. This is
an excellent source of nitrogen and helps
absorb water
Small shredded materials decompose faster.
Run your lawnmower over pine needles or
leaves and cut up kitchen scarps to speed
the composting process.
Setting-up your composter
First select a location to install your composter
that is convenient to move materials to and from,
usually close to garden. Choose a at surface with
enough room to be able to rotate the composter
and if able, be sure to select a location in direct
sunlight, to help cook your compost.
To assemble, you will need onle Philips screw
driver. Complete assembly instructions are
included on inserted sheets.
What to put in your composter
The composting process works best by mixing
moist greens (nitrogen rich) with dry browns,
(carbon rich) in a ratio of approximately 2 parts
green to 1 parts browns.
Greens are: Garden and house planters, Kitchen
scraps, Grass clippings
Browns are: Twigs, Saw dust, Leaves, Straw/hay
Do not Compost: Meats/fats/bones, dairy
products, Trush/Plastic, wood ashes, Invasive
plant/weedts
EN

10
Compostiera
rotante
a 2 camere
SI CONSIGLIA DI
NON RIEMPIRE
LE CAMERE
PIÙ DEI 2/3 DELLA
LORO CAPACITÀ
1
2
Aggiungere materiale nuovo alla camera n. 1.
Effettuare una rotazione completa per 5-10 vol-
te, dopo ogni deposito oppure ogni 2-3 giorni.
Quando la camera n. 1
è piena (si consiglia di non superare i 2/3),
aggiungere materiale nuovo
alla camera n. 2.
Quando il compost è pronto,
rimuovere lo sportellino della
camera. Bloccare la camera
ed estrarre il compost
Processo di compostaggio
Controllo del processo
Dopo 2-3 giorni controllare che il misto sia caldo. Se
è caldo, ciò significa che gli organismi utili si stanno
moltiplicando e stanno decomponendo i materia-
li. Ruotare la compostiera per 5-10 volte ogni 2-3
giorni per mescolare i materiali e mantenere attivo
il processo. Prendere una manciata di compost e
strizzarla per assicurarsi che il materiale non si
stia seccando. Se ha la consistenza di una spugna
umida, il livello di acqua è ottimale; se ha una con-
sistenza secca aggiungere un po‘ d‘acqua (facendo
attenzione a non aggiungerne troppa) e ruotare la
compostiera per mescolare bene.
In base al materiale che è stato introdotto, il com-
post dovrebbe essere pronto dopo 2-8 settimane. Il
compost finito contiene materiale fine e grossolano.
Per ottenere un misto fine, passare al setaccio il
compost da usare nei terricci. Utilizzare il compost
più grossolano come strato di copertura nutritivo da
mettere intorno ai vasi per fiori da esterno o diret-
tamente nel giardino. Il compost finito può anche
essere utilizzato come base per iniziare un altro
lotto o per riscaldare un lotto che si è raffreddato
troppo velocemente.
Per rimuovere il compost finito, far scorrere lo spor-
tellino della camera e ruotare il cilindro in modo da
avere lo sportellino di fronte. Bloccare la camera ed
estrarre il compost.
Consigli per il compostaggio
3 Regole per il compostaggio:
1. Materiali di qualità e una giusta proporzione tra
parti verdi (azoto) e parti marroni (carbonio) -
circa 2 parti verdi e 1 marrone.
2. Umidità costante - il misto dovrebbe presentarsi
come una spugna umida.
3. Buona circolazione dell‘aria - ruotare la com-
postiera ad intervalli di pochi giorni dopo che il
lotto si è riscaldato, per favorire la ventilazione
del misto e accelerare il processo di decomposi-
zione.g
1
2
3
4
IT
11
Installazione della compostiera
Per prima cosa occorre scegliere un posto dove
installare la compostiera che sia comodo per
spostare il materiale all’interno compostiera e
fuori di essa, di solito in prossimità del giardino.
Scegliere una superficie piana abbastanza spa-
ziosa per ruotare la compostiera e, se possibile,
preferire un posto raggiunto dai raggi solari
diretti in modo da favorire il processo di „cottu-
ra“ del compost.
Per il montaggio occorre solo un cacciavite
Philips. Le istruzioni complete per il montaggio
sono riportate nei fogli acclusi.
Materiali da introdurre nella
compostiera
The composting process works best by mixing
moist greens (nitrogen rich) with dry browns,
(carbon rich) in a ratio of approximately 2 parts
green to 1 parts browns.
Sono materiali verdi: piante da giardino e ap-
partamento, avanzi di cucina, erba tagliata
Sono materiali bruni: rametti, segatura, foglie,
paglia/fieno
Non compostare: carne/grasso/ossi, prodotti
lattiero-caseari, spazzatura/plastica, cenere da
legno, piante infestanti/erbacce
Risoluzione dei problemi
1. Il misto di compost non si riscalda:
• Il misto è troppo umido - aggiungere
materiali bruni secchi
• Il misto è troppo secco - aggiungere
dell‘acqua
• Le proporzioni sono sbagliate - control-
lare il rapporto tra materiali verdi/bruni
e correggere
2. Odore
• Un odore di ammoniaca indica che è
presente troppo azoto (parte verde) -
aggiungere materiali secchi bruni.
• Un odore di marcio (come uova marce)
indica che il misto è eccessivamente
umido e/o non vi è abbastanza ossigeno
- aggiungere materiali secchi bruni per
assorbire l‘umidità eccessiva e ruotare
la compostiera, aprire il foro di ventila-
zione.
3. Problemi con animali domestici/insetti
• I roditori sono attirati da carne e cibi
grassi - eliminare questi rifiuti
• Le mosche/Gli insetti sono attirati da
rifiuti scoperti, specialmente avanzi di
cucina - mischiare o coprire con materi-
ali bruni o con del compost finito.
Riciclaggio dell‘erba: lasciare l‘erba tagliata sul
prato rasato o utilizzarla così com‘è. È un‘otti-
ma fonte di azoto e favorisce l‘assorbimento di
acqua.
Il materiale sminuzzato in piccoli pezzi si
decompone più velocemente. Passare il tagli-
aerba sugli aghi dei pini o sulle foglie e tagliare
a pezzi gli avanzi di cucina per accelerare il
processo di compostaggio.
Trouble shooting
1. Compost mix does not heat up:
• Mix is too wet - add dry brown
• Mix is to dry - add water
• Mix ratio is off - check green/brown ratio
and add accordingly
2. Odor
• Ammonia smell means too much nitrogen
(Green) - add dry brown.
• Putrid smell (Like rotten eggs) means
mix is too wet andqor not enough oxygen
- add dry browns to absorb excessive
moisture and turn composter - open air
vent.
3. Problems with pets/Insects
• Rodents are attracted to meat and fatty
foods - remove them
• Flies/Insects are attracted to uncovered
wastes, esprcialy kitchen scarps - mix or
cover with brown materials or nished
compost.
Grasscycling: Leave grass clippings on
your lawn or use them as much. This is
an excellent source of nitrogen and helps
absorb water
Small shredded materials decompose faster.
Run your lawnmower over pine needles or
leaves and cut up kitchen scarps to speed
the composting process.
Setting-up your composter
First select a location to install your composter
that is convenient to move materials to and from,
usually close to garden. Choose a at surface with
enough room to be able to rotate the composter
and if able, be sure to select a location in direct
sunlight, to help cook your compost.
To assemble, you will need onle Philips screw
driver. Complete assembly instructions are
included on inserted sheets.
What to put in your composter
The composting process works best by mixing
moist greens (nitrogen rich) with dry browns,
(carbon rich) in a ratio of approximately 2 parts
green to 1 parts browns.
Greens are: Garden and house planters, Kitchen
scraps, Grass clippings
Browns are: Twigs, Saw dust, Leaves, Straw/hay
Do not Compost: Meats/fats/bones, dairy
products, Trush/Plastic, wood ashes, Invasive
plant/weedts
IT

12
Culbuteur de
compost à
chambre double
RECOMMANDÉ:
NE PAS REMPLIR
CHAQUE HAMBRE
À PLUS DE 2/3 DE
SA CAPACITÉ
1
2
Ajoutez de nouveaux
éléments dans la chambre n° 1.
Rotation totale 5 à 10 fois après chaque
dépôt ou tous les 2-3 jours.
Lorsque la chambre n° 1
est pleine (recommandé: pas plus de 2/3)
ajoutez de nouveaux éléments
dans la chambre n° 2
Lorsque le compost est prêt
retirez la porte de la chamb-
re. Verrouillez la chambre et
sortez le compost.
Processus de compostage
Contrôle du processus
Après 2-3 jours, vérifiez votre mélange pour voir s‘il
se réchauffe. Lorsque votre mélange est chaud, les
organismes bénéfiques se multiplient et font leur
travail de décompostage des éléments. Le fait de
tourner le culbuteur de compost 5 à 10 fois tous les
2-3 jours fera en sorte que les éléments se mélan-
gent et maintiendra le processus actif. Pressez une
poignée de compost pour vous assurer que les
éléments ne se dessèchent pas. Si elle ressemble à
une éponge humide au toucher, le niveau d‘eau est
correct. Si elle est sèche, ajoutez un peu d‘eau (veil-
lez à ne pas en ajouter trop) et tournez le culbuteur
de compost pour bien mélanger.
Selon les éléments que vous avez ajouté, votre
compost devrait être prêt au bout de 2 à 8 semai-
nes. Le compost fini contient des particules fines et
grossières. Pour un mélange fin, tamisez le compost
dans des mélanges d‘empottage, utilisez le compost
plus grossier comme un terreau nutritif autour des
plantes d‘extérieur ou pour cultiver directement
dans votre jardin! Vous pouvez également utiliser
du compost fini comme base pour votre lot suivant
ou chauffer un lot qui s‘est refroidi trop rapidement.
Pour retirer le compost fini, faites coulisser la porte
et tournez le canon jusqu‘à ce que la porte soit face
à vous. Verrouillez la chambre et sortez le compost.
Conseils pour le compostage
3 règles du compostage
1. Éléments de qualité et bonne proportion de
vert (azote)-marron (carbone) - environ 2 parts
d‘éléments verts pour 1 part d‘éléments marron.
2. Humidité constante - le mélange doit ressemb-
ler à une éponge humide au toucher.
3. Bonne circulation de l‘air - tournez le culbuteur
de compost tous les deux jours après que le
lot s‘échauffe pour aider à aérer le mélange et
stimuler un décompostage plus rapide.
1
2
3
4
FR

13
Montage de votre c ulbuteur
de compost
Commencez par sélectionner un emplacement
où installer votre culbuteur de compost d‘où et
vers lequel les éléments peuvent être déplacés
de façon pratique, généralement à proximité
d‘un jardin. Choisissez une surface plane avec
suffisamment d‘espace pour permettre au
culbuteur de compost de tourner et, si possible,
veillez à choisir un endroit en plein soleil, cela
aidera à chauffer votre compost.
Pour le montage, vous aurez besoin unique-
ment d‘un tournevis Phillips. Les instructions
de montage complètes sont comprises dans les
fiches jointes.
Que mettre dans votre culbuteur de
compost
Le processus de compostage fonctionne de
façon optimale en mélangeant des éléments
verts (riches en azote) avec des éléments mar-
ron (riches en carbone) dans une proportion
d‘environ 2 parts de vert pour 1 part de marron.
Les éléments verts comprennent: Des plantes
de jardin et d‘intérieur, des déchets de cuisine,
de l‘herbe coupée
Les éléments marron comprennent: Les brin-
dilles, la sciure, les feuilles, la paille/le foin
Ne faites pas de compost avec les éléments
suivants: Viandes/graisses/os, produits lai-
tiers, plastique, cendres de bois, plantes enva-
hissantes/mauvaises herbes
Résolution de problèmes
1. Le mélange de compost ne chauffe pas:
• Le mélange est trop humide - ajoutez
des éléments marron secs
• Le mélange est trop sec - ajoutez
de l‘eau
• La proportion du mélange est incorrecte
- vérifiez la proportion verts/marrons
et ajoutez-en selon les besoins
2. Odeur
• Une odeur d‘ammoniaque signifie trop
d‘azote (verts) - ajoutez des éléments
marron secs.
• Une odeur putride (comme des œufs
pourris) signifie que le mélange est trop
humide et/ou qu‘il n‘y a pas assez
d‘oxygène - ajoutez des éléments mar-
ron secs pour absorber l‘humidité exces-
sive et tournez le culbuteur de compost
- ouvrez la sortie d‘air.
3. Problèmes avec les animaux/insectes
• Les rongeurs sont attirés par la viande et
les aliments gras - supprimez-les.
• Les mouches/insectes sont attirés par
les déchets non couverts, en particulier
les déchets de cuisine - mélangez ou
couvrez avec des éléments marron ou
du compost fini.
Herbicyclage: Laissez l‘herbe coupée sur votre
pelouse ou utilisez-la également. C‘est une
excellente source d‘azote qui aide à absorber
l‘eau.
Les petits éléments déchiquetés se décompo-
sent plus rapidement. Passez votre tondeuse sur
des aiguilles de pin ou des feuilles et coupez les
déchets de cuisine pour accélérer le processus
de compostage.
Trouble shooting
1. Compost mix does not heat up:
• Mix is too wet - add dry brown
• Mix is to dry - add water
• Mix ratio is off - check green/brown ratio
and add accordingly
2. Odor
• Ammonia smell means too much nitrogen
(Green) - add dry brown.
• Putrid smell (Like rotten eggs) means
mix is too wet andqor not enough oxygen
- add dry browns to absorb excessive
moisture and turn composter - open air
vent.
3. Problems with pets/Insects
• Rodents are attracted to meat and fatty
foods - remove them
• Flies/Insects are attracted to uncovered
wastes, esprcialy kitchen scarps - mix or
cover with brown materials or nished
compost.
Grasscycling: Leave grass clippings on
your lawn or use them as much. This is
an excellent source of nitrogen and helps
absorb water
Small shredded materials decompose faster.
Run your lawnmower over pine needles or
leaves and cut up kitchen scarps to speed
the composting process.
Setting-up your composter
First select a location to install your composter
that is convenient to move materials to and from,
usually close to garden. Choose a at surface with
enough room to be able to rotate the composter
and if able, be sure to select a location in direct
sunlight, to help cook your compost.
To assemble, you will need onle Philips screw
driver. Complete assembly instructions are
included on inserted sheets.
What to put in your composter
The composting process works best by mixing
moist greens (nitrogen rich) with dry browns,
(carbon rich) in a ratio of approximately 2 parts
green to 1 parts browns.
Greens are: Garden and house planters, Kitchen
scraps, Grass clippings
Browns are: Twigs, Saw dust, Leaves, Straw/hay
Do not Compost: Meats/fats/bones, dairy
products, Trush/Plastic, wood ashes, Invasive
plant/weedts
FR

14
COMPOST ROLLER®DUO70
Notizen

15
COMPOST ROLLER®DUO70
Notizen

Bio Green OHG | Marburger Str. 1b | 35649 Bischoffen-Oberweidbach
Germany/Allemagne
www.biogreen.de
Table of contents
Languages:
Other Bio Green Lawn And Garden Equipment manuals


Popular Lawn And Garden Equipment manuals by other brands

Sunforce
Sunforce SOLAR user manual

GARDEN OF EDEN
GARDEN OF EDEN 55627 user manual

Goizper Group
Goizper Group MATABI POLMINOR instruction manual

Rain Bird
Rain Bird 11000 Series Operation & maintenance manual

Cub Cadet
Cub Cadet BB 230 brochure

EXTOL PREMIUM
EXTOL PREMIUM 8891590 Translation of the original user manual


Vertex
Vertex 1/3 HP Maintenance instructions

GHE
GHE AeroFlo 80 manual

Land Pride
Land Pride Post Hole Diggers HD25 Operator's manual

Yazoo/Kees
Yazoo/Kees Z9 Commercial Collection System Z9A Operator's & parts manual

Premier designs
Premier designs WindGarden 26829 Assembly instructions

Snapper
Snapper 1691351 installation instructions