Biocontrol HHR 3000 PRO Operating and maintenance manual

HANDHELD READER HHR 3000 PRO V2
HANDHELD READER HHR 3000 PRO V2
HHR 3000 PRO
Programmers Manual
This paper is compatible from 3.30 versions of
HHR Manager and Operating System
D01B2.4 HHR 3000 PRO Manual 1/75

ONTENTS
Compliance with CC Rules and Regulations.......................................................................4
DESCRIPTION.......................................................................................................................5
How it works.......................................................................................................................5
INSTALLATION AND ESTABLISHING CONNECTION........................................................7
Establishing Connection with PC:......................................................................................7
Load New Application Menu..........................................................................................8
MANAGING HHR 3000 PRO ................................................................................................8
Programming Your HHR with HHR Operating System (HHR OS)....................................8
Code Pages...................................................................................................................9
Command Line Mode....................................................................................................9
OPERATING THE HHR Manager .......................................................................................10
Sending an Application Project........................................................................................10
Receive a User output database.....................................................................................11
HDS – HHR Development Script Language........................................................................12
General information.........................................................................................................12
Sections...........................................................................................................................13
HEADER Section.............................................................................................................17
Communication Possibilities........................................................................................19
rames Structures.......................................................................................................20
HEADER example:......................................................................................................21
TABLE Section.................................................................................................................22
Data type.....................................................................................................................25
GLOBAL Section..............................................................................................................28
MESSAGE Section..........................................................................................................30
Managing Leds and Sound Signal..........................................................................30
GSM Section....................................................................................................................32
Usage in Application Program.....................................................................................33
MACRO Section...............................................................................................................34
Keyboard.....................................................................................................................38
The keyboard rules:................................................................................................38
Creating a Macro and user functionality......................................................................40
MENU Section.................................................................................................................42
START SCREEN Section................................................................................................44
WARNING Section..........................................................................................................46
Appendix A : Quick Reference.............................................................................................49
Appendix B : unction List...................................................................................................52
Appendix C : Log..................................................................................................................55
The Log Rules..................................................................................................................58
Using Log.........................................................................................................................59
Appendix D : Bluetooth Mode..............................................................................................61
Bluetooth rame Structure...............................................................................................63
Establishing Connection HHR-PC...................................................................................64
Connecting HHR to PC with Bluetooth........................................................................64
Appendix E : Scales.............................................................................................................70
D01B2.4 HHR 3000 PRO Manual 2/75

RS232 Port......................................................................................................................70
Hardware details of RS232 cable................................................................................71
Tru-Test Scales................................................................................................................71
Hardware.....................................................................................................................71
Software.......................................................................................................................72
Iconix Scales....................................................................................................................72
Hardware.....................................................................................................................72
Software.......................................................................................................................73
Appendix : HHR-China code page character set..............................................................74
List of non-ASCII chars....................................................................................................74
List of ASCII chars included in HHR-China:....................................................................75
D01B2.4 HHR 3000 PRO Manual 3/75

ompliance with F Rules and Regulations
This device complies with Part 15 of the CC Rules. Operation is subject to the
following two conditions:
(1) this device may not cause harmful interference, and
(2) this device must accept any interference received, including interference that
may cause undesired operation.
Changes or modifications to the equipment not expressly approved by the party
responsible for compliance could void the user's authority to operate
the equipment.
NOTE: This equipment has been tested and found to comply with the limits for a
Class B digital device pursuant to Part 15 of the CC Rules. These limits are
designed to provide reasonable protection against harmful interference in a
residential installations. This equipment generates, uses and can radiate radio
frequency energy and, if not installed and used in accordance with the instructions,
may cause harmful interference to radio communications. However, there is no
guarantee that interference will not occur in a particular installation.
If this equipment does cause harmful interference to radio or television reception,
which can be determined by turning the equipment off and on , the user is
encouraged to try to correct the interference by one or more of the following
measures:
•Reorient or relocate the receiving antenna
•Increase the separation between the equipment and receiver
•Connect the equipment into an outlet on a circuit different from that to
which the receiver is connected
•Consult the dealer or an experienced radio/TV technician for help.
The reader must be kept 20cm away from the persons body when the GPRS is active.
HHR 3000 PRO v2 can work with following antennas:
•50007 Loose exchangeable or fixed long antenna, length 60 cm
•50008 Loose exchangeable or fixed short antena, length 8,5 cm
•50009 Loose exchangeable medium antenna, length 34 cm
•50010 Loose exchangeable XXL antenna, length 115cm
D01B2.4 HHR 3000 PRO Manual 4/75
DES RIPTION
HHR 3000 PRO enables customization functionality by writing user Application
Project. It contains definition of:
●Database (table with animal data) stored in HHR memory
●HHR menu items,
●HHR screens which would operate on user database.
HHR Manager PC program enables application project transfer between HHR and
PC.
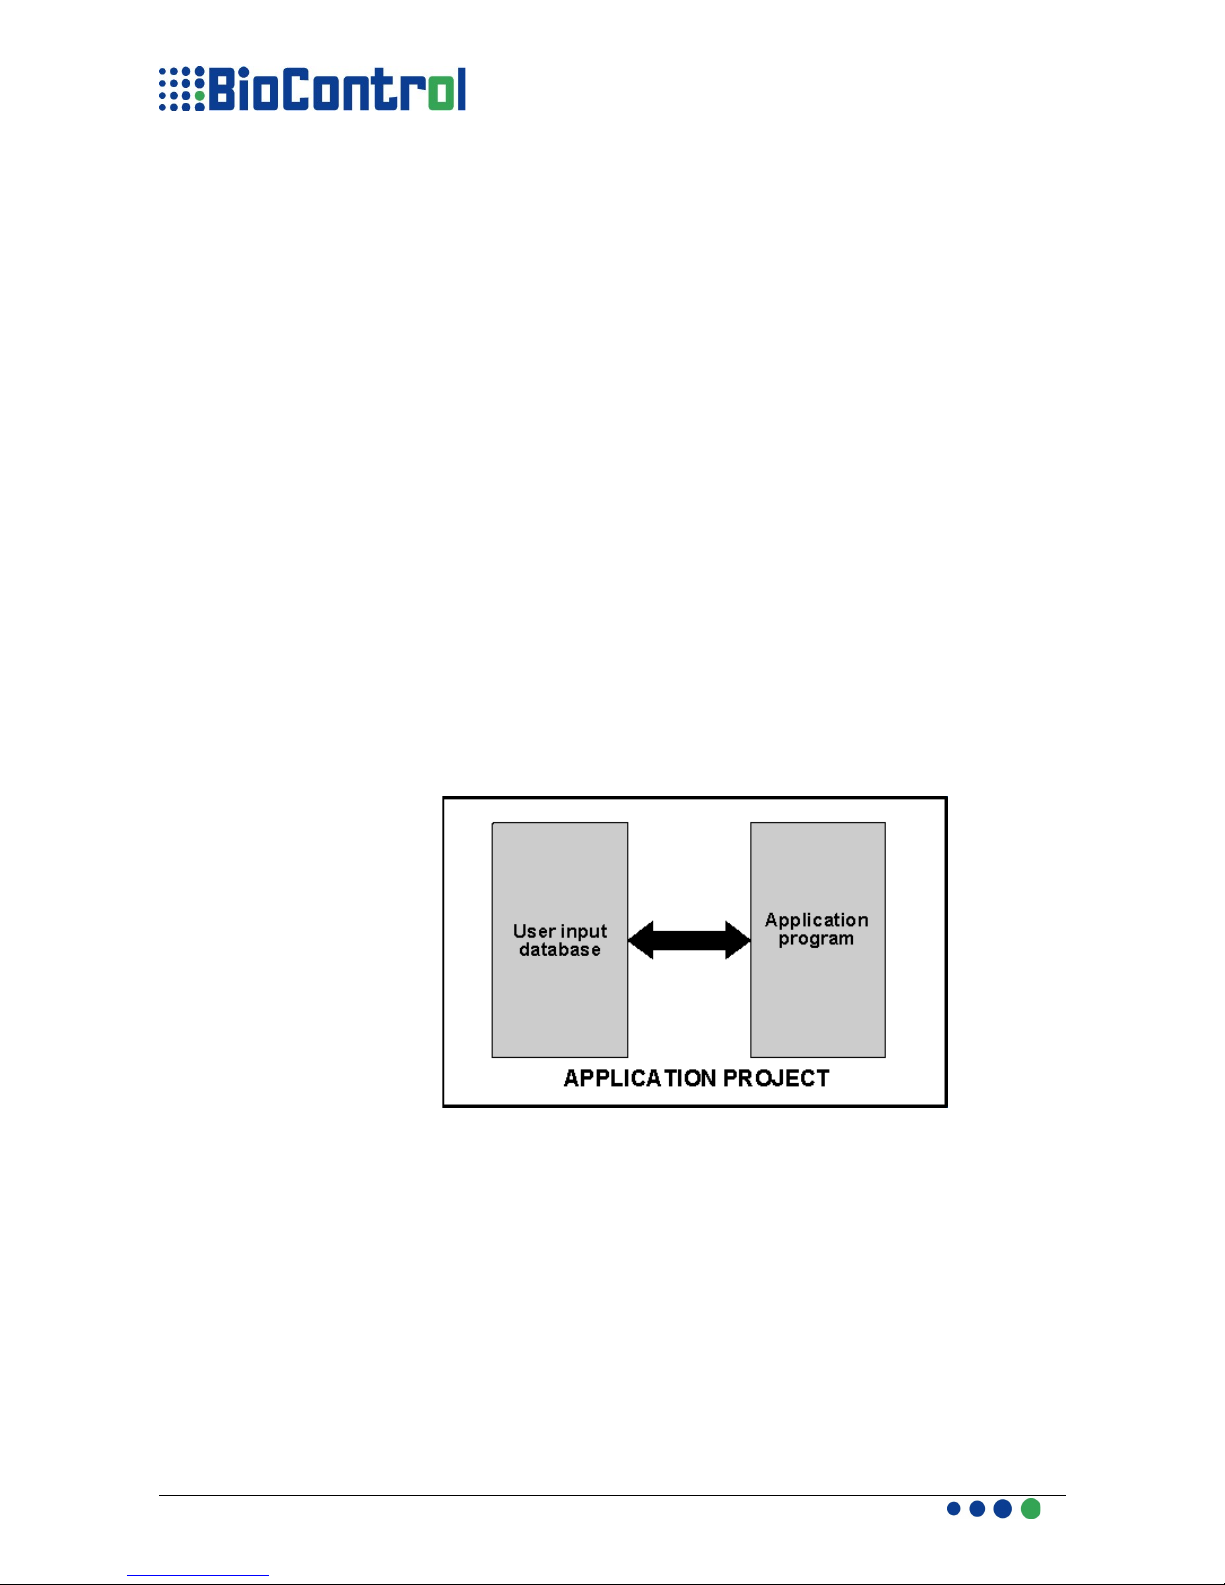
How it works
The Application Development System contains:
●HHR 3000 PRO reader
●Application Project
●HHR Manager PC program,
Application Project is based on Application Program written in simple HDS (Hhr
Development Script) language and user input database. Those 2 files combined
(compiled) by HHR Manager are Application Project.
The core of Application Program are macros defining LCD screens. Application
Program includes 8 sections – see chapter Sections.
HHR Manager is a PC program which combines Application Program and User
Database to Application Project. It is used also to transfer data between HHR and
PC.
Database definition in Application Program must match User database. It can be
empty at start, it is not obligatory to include it to Application Project.
Database can be filled during work with animals.
The structure of Application Development System.
D01B2.4 HHR 3000 PRO Manual 5/75

User output Database is a file containing User input database modified during work
with HHR 3000 PRO.
Input and output database files are text files with columns isolated by separator
defined in Application Program. Database programs (MS Access, MS Excel, Calc,
Base, etc.) enables to import text files with separators and convert it to workable table.
There is a possibility to include Log table to Application Project. Log is another
table which records are created during user-defined events (birth, death).
The structure of Log is defined in Application Program. Log is loaded from HHR to
PC together with modified database and will appear as a database text file.
Log example:
VID Event
name
Event
value
Date of event
1123456 Treat Med_1 2007/02/12;
8:00am
D01B2.4 HHR 3000 PRO Manual 6/75
User input Database
HHR Manager HHR
3000 PRO
Application Program
Application
Project
Log ile
(optional)
User output
Database
INSTALLATION AND ESTABLISHING ONNE TION
Installation of all needed software and drivers can be done by selecting 'Install' from
window appearing when user will insert HHR software CD into drive.
All needed software(HHR Manager and HHR Program Loader) are accessible from
Start->Programs->HHR 3000 PRO V2. You can find there also Manuals, Uninstaller
and Driver Repairing Tool.
The Driver Repairing Tool is PC application that fixes all problems with HHR drivers on
any PC; this tool is accessible from:
Start->Programs->HHR 3000 PRO V2/Repair HHR drivers
Please use it if you have any problems with establishing connection between HHR and
PC.
Driver Repairing Tool will appear in a DOS-styled window, please DO NOT LOSE
THE WINDOW, it will close itself when all operation will be finished.
Driver Repairing Tool is also accessible from CD provided with HHR, user can run this
Tool by selecting appropriate button in window.
Establishing Connection with PC:
Before connecting HHR to PC all software must be installed on PC.
●USB – To connect HHR and PC with USB interface simply connect HHR
and PC with included cable,
●Bluetooth – To connect HHR to PC with Bluetooth interface, you have to
find HHR as a Bluetooth Serial Port and pair HHR and PC. More detailed
description can be found in this document, Appendix D.
D01B2.4 HHR 3000 PRO Manual 7/75
! onnection Rules:
●or connection HHR with USB interface please use included HHR-USB cable;
●or connection HHR with RS232 interface please use included HHR-RS232
cable;
●Please DO NOT use standard RS232 cable for connection HHR-RS232, with
standard cable you will not connect HHR to any device with RS232 interface
and won't send any data.
To connect HHR to PC with USB cable plea e remember
to u e included cable and turn off RS232 and BlueTooth
module with RSOnOff and SetBTOnOff function .
●RS232 - To connect HHR to any device with RS232 interface, you have to
connect included RS232 cable to device and turn on RS232 module with
RSOnOff() function. Remember to turn RS232 module before connecting
HHR to PC with USB interface.
Load New Application Menu
Load New Application Menu allows user to select interface with which Master
Device will communicate with HHR. USB and BlueTooth interface are available,
default interface is USB.
This menu has main usage with cooperation with PDA, where BlueTooth is one of
communication option. There is no possibility to communicate with HHR from PC
with BlueTooth.
MANAGING HHR 3000 PRO
HHR 3000 PRO is equipped with newest HHR OS (operating system) which
enables to run the Application Program on HHR. Very important is to use
compatible version of HHR Manager and HHR OS. It is possible to update HHR
OS with a newer version of HHR Program Loader.
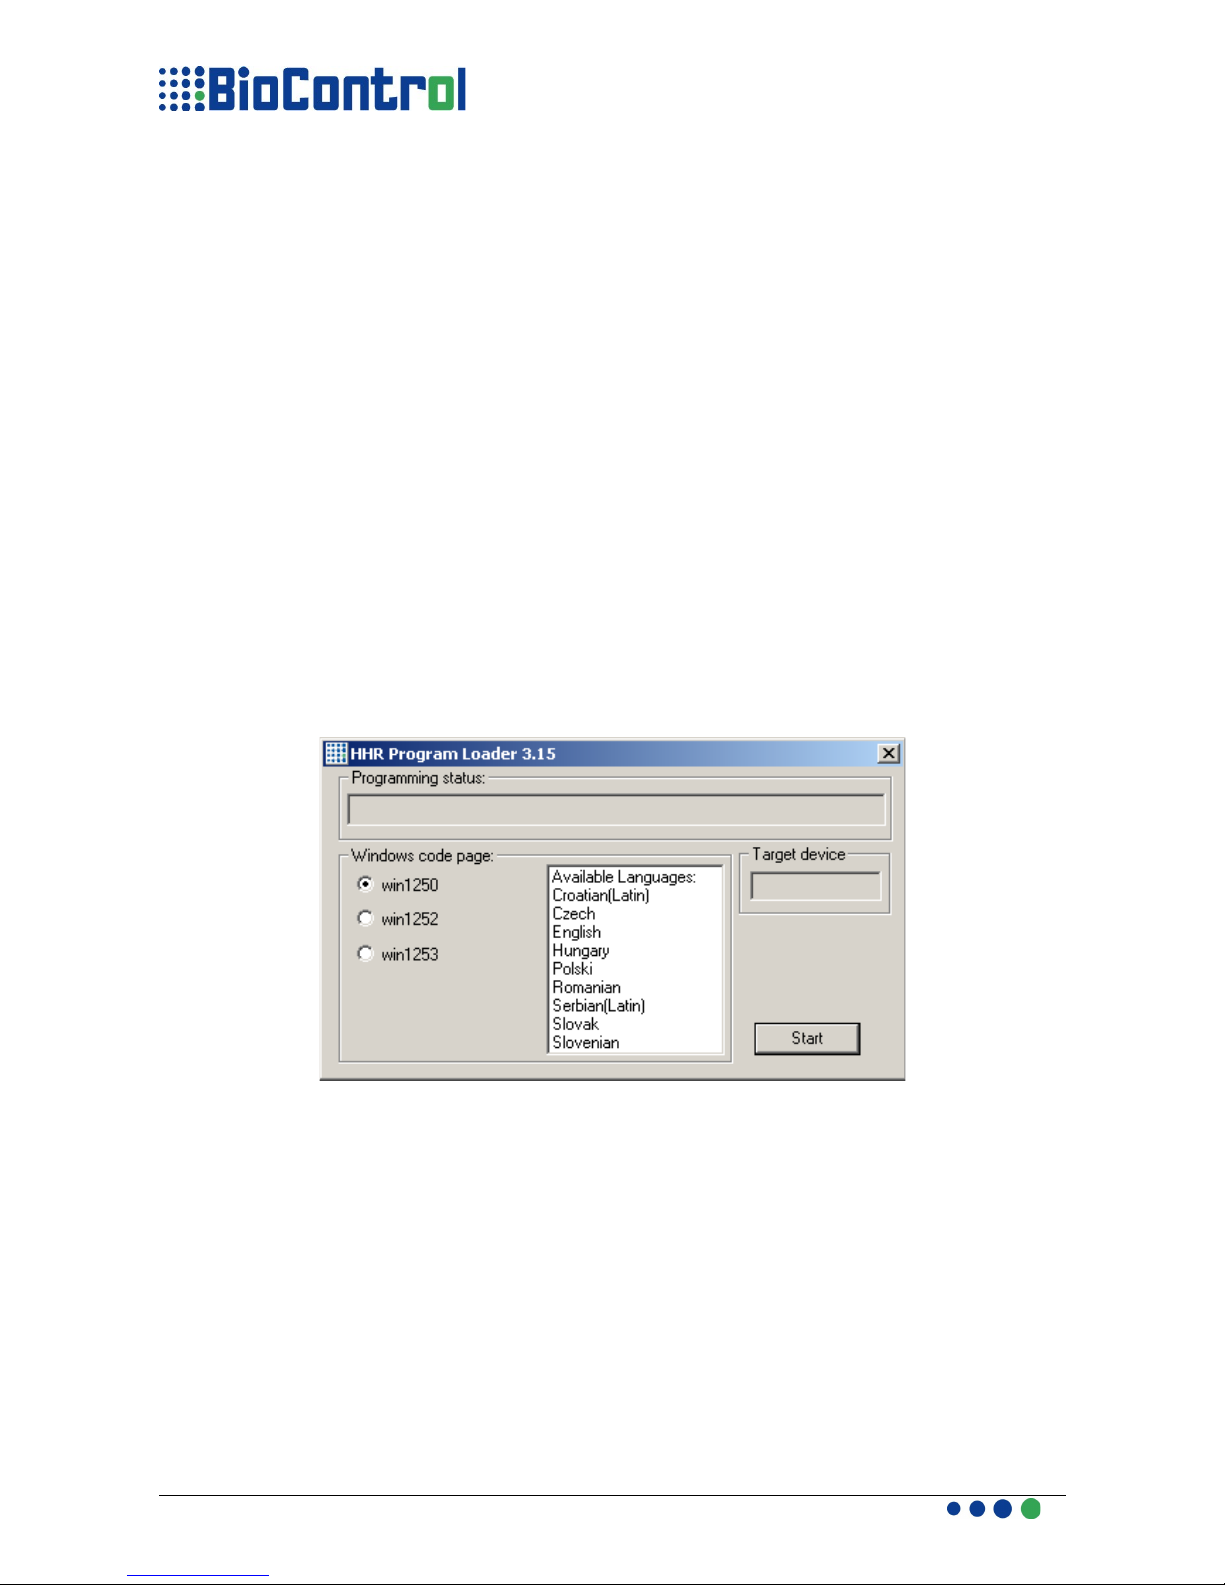
Programming Your HHR with HHR Operating System (HHR OS)
1. Run newest version of HHR Program Loader with “HHR Program
Loader .exe”, Important: HHR Manager and HHR Program Loader can't be
in the same catalog.
2. Connect HHR to USB port using included cable
3. Select appropriate Code page(language) and click Start Button.
4. Wait until “Programming succeed” appear in Programming Status field.
5. Disconnect Your HHR from USB port.
D01B2.4 HHR 3000 PRO Manual 8/75

Code Pages
The Code Page is set of characters using in some area of world,
It is possible to use 3 code pages for HHR:
●win1250 – Central Europe and English,
●win1252 – Western Europe and English,
●win1253 – Greek and English.
●HHR China – HHR-China char set includes 169 characters from non ASCII
region, for more details please look at Appendix .
You can select one of those code pages and use it in HHR.
Command Line Mode
It is possible to run HHR Program Loader from Command Line and update HHR
with hex file.
The syntax of command line takes only one parameter: the code page name or hex
file name. Hex file is a release of HHR OS released before May 1 2008.
Syntax:<path to Program Loader> <space> <program name>\<code page name or
hex file name>
Example:
“C:\HHR Program Loader.exe” \win1250
“C:\HHR Program Loader.exe” D:\Project\loader\HHR_PRO_3_nn.hex
D01B2.4 HHR 3000 PRO Manual 9/75

OPERATING THE HHR Manager
Sending an Application Project
1. Run newest version of HHR Manager,
2. Turn on HHR and connect it to PC with included USB cable, make sure
that both RS232 and Bluetooth modules are turned off.
3. Select the Application Program by pressing the Browse button beneath “A”
field,
4. Select Table file by pressing the Browse button beneath “B” field,
5. If App Program can operate on Log, you can send Log file by selecting
'Sending LOG' check box. If this check box is selected before compiling a
window will appear where user can select Log file.
6. Press the “E” button to connect(compile) selected files to Application
Project and send it to your HHR,
7. If definition of database in Application Program match User input database
and Application Program hasn't got any errors the compilation will be
successful and Application Project will be send to your HHR.
8. Wait until transmit of data ends and close HHR Manager.
Selecting the User input database isn't required, if you don't select it an empty
database will be sent to your HHR.
If compilation fails (point 4) errors will appear in Output Messages field (“C” field),
you can try to debug the Application Program at indicated line.
D01B2.4 HHR 3000 PRO Manual 10/75

Receive a User output database
1. Press the “D” button to receive the database,
2. Select the file(modify an old file, or create a new one) where User output
database will be written,
3. Select the User output database file type, and press Save,
4. When the receiving will be finished, User output database will be available
at location given in Output Message field (field “C”).
When user double clicks for .csv file MS Excel will open it and analyze data basing
on content of column. The problem with default recognition of data is that if any
number in MS Excel takes more then 12 chars it is displayed in exponential format.
To prevent it we have added a possibility to put a char before transponder number
which is classical example of numbers taking more then 12 chars.
To set this option you have to select Option->Settings; there user can turn on/off
this option and set the char which will be placed before every transponder number
which will be placed in Table or Log. As a default this option is turned off.
The matching definition of database and User input database term is a little bit
complicated. If you are not familiar with HDS rules, the most important is to make
the same amounts of lines in TABLE section and columns in User input database.
Remaining rules will be explained in HDS description.
D01B2.4 HHR 3000 PRO Manual 11/75
! Converting the MS Excel file to cvs or txt file is very simple, you have to use the
operation ile->Save as and there select the appropriate for you option (csv or txt) with
specified separator, it is important to declare the same separator in Application Program.
Converting from other programs like OpenOffice's Calc or SQL-based programs is
similar.
To import the csv type User output database file you have to double-click on file to import
it to MS EXCEL, if the file type is txt you have to use operation ile->Open and there select
appropriate for you type (txt) and use import wizard.
Importing User output database to other programs like OpenOffice's Calc or SQL-based
programs is similar.

HDS – HHR Development Script Language
General information
HDS has been developed especially for customizing your HHR in easy way with
wide range of possibilities.
Application Program written in HDS contains 9 sections, all of those sections are
necessary, but if you don't need any you can left it empty
Example, section with values:
GLOBAL
0:global1
1:global2
END
Example, an empty section:
GLOBAL
END
HDS allows you to put comments and empty lines in Application Program.
Comment are sign for HHR Manager that this line is a user-line and won't be taken
into account during compilation (connecting Application Program and User input
database).
The comment sign is double slash (//).
Example:
GLOBAL
1:global2
//2:global3
END
Empty line between script line and any white-characters (tabulator, spaces) at the
beginning of line are allowed.
IMPORTANT: white-characters aren't allowed between characters in line.
or example:
GLOBAL
0:global1
1:global2
//2:global3
2:global4
3:global2
4:global2
END
D01B2.4 HHR 3000 PRO Manual 12/75

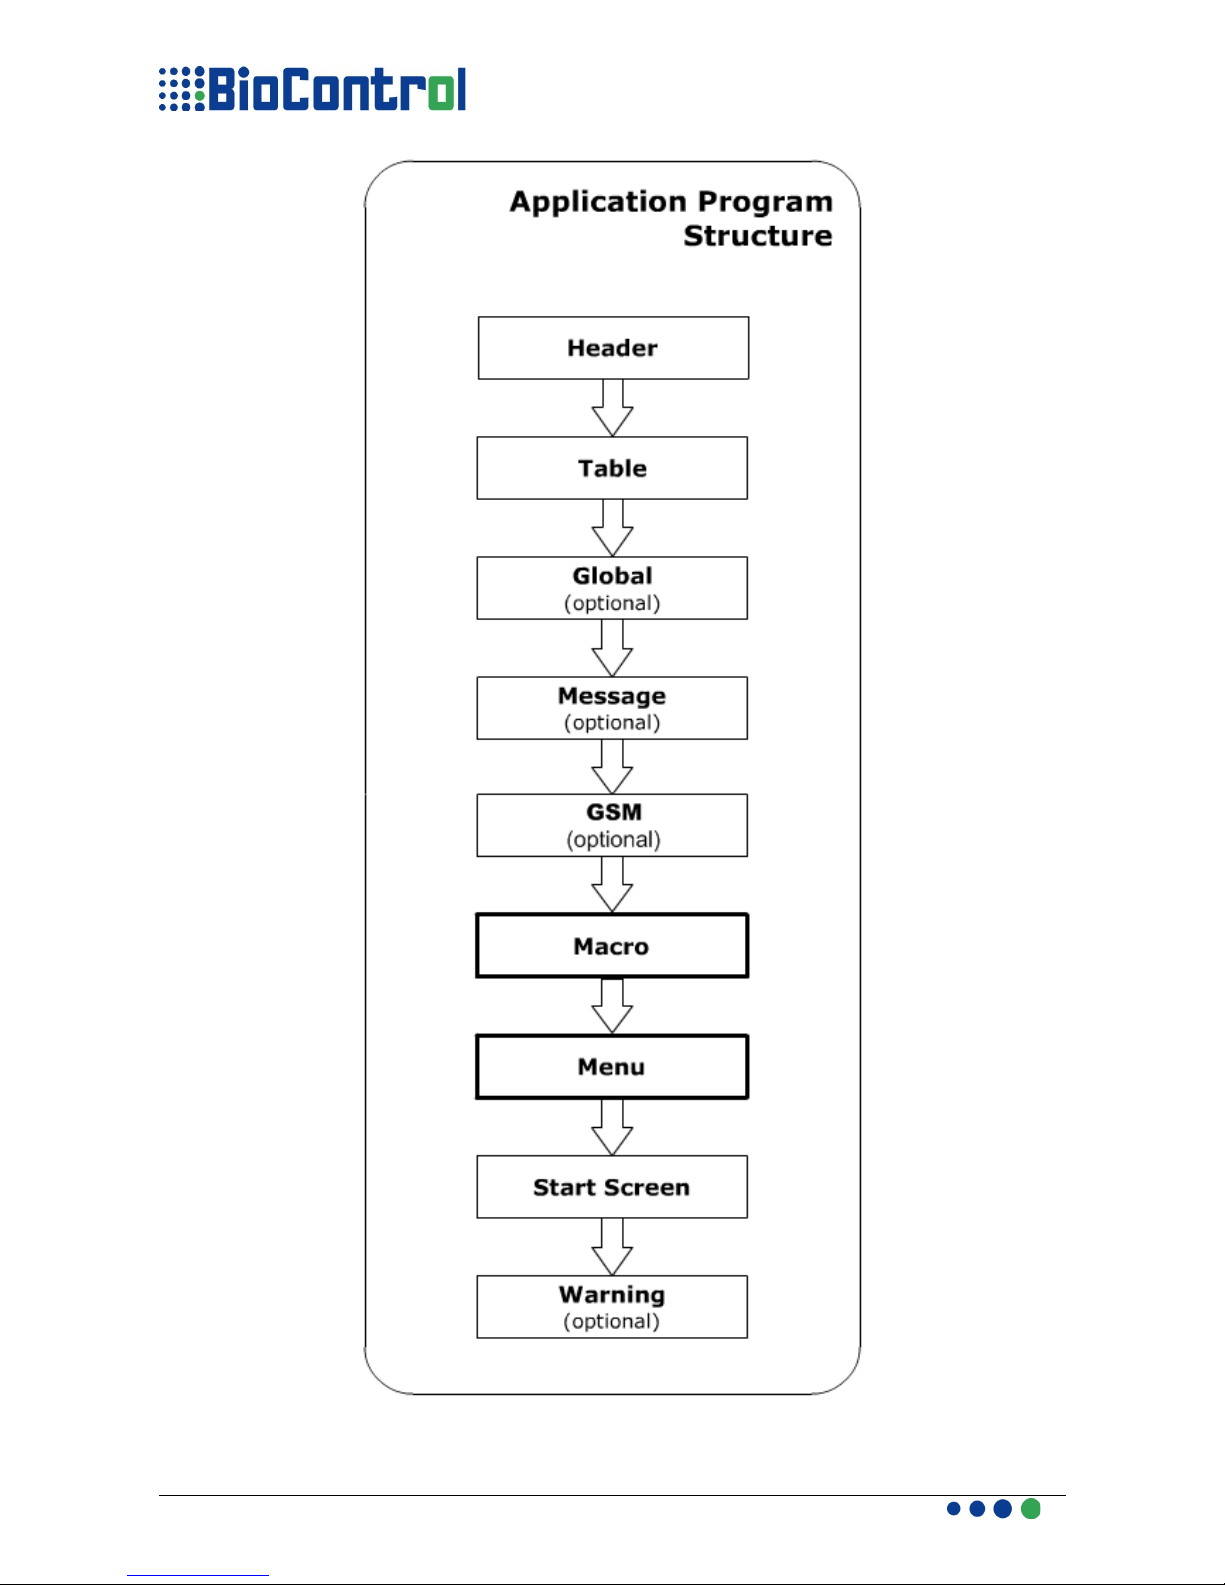
Sections
Application Program contains 10 sections:
●HEADER – the section where you declare general information about Application
Project, like project name, date/time format, loading date and time, etc
This section must be placed in every Application Program
●TABLE – the section where you declare database column by column which will
be used in Application Project. Each line contains 7 parameters describing one
database column.
Amount of lines in TABLE section must be equal to amount of columns in User
input database. Type of column (date, transponder no, etc) is defined, this type
must agree to data in User input database.
●LOG – this section describes a LOG table, syntax is analogical to TABLE section.
●GLOBAL – this section contains global constants for Application Program, you can
use those “Globals” to save memory by placing a number of Global instead of long
value (farm number or veterinary number etc.) in database. In this way more data
can be stored in your HHR.
●MESSAGE – this section contains messages that you want to appear on LCD at
specified time during work with HHR, user can define the time when messages will
be shown on screen. Messages, can be saved in database in similar way like
Globals, the number of message is saved in database instead of any long value.
In this way more data can be saved in your HHR. Messages can also be used for
driving LEDs and Sound signal in HHR V2.
●GSM - This section contains SMS structures that will be send from HHR.
●MACRO – this section is the core of Application Project. User defines here how
HHR should behave after entering to specified menu item. You can write as many
macro as you want but you must remember that every macro takes space in
memory and there is one memory for Application Program and User input
database.
●MENU – the section where user declares menu, sub-menu, etc.
HHR functionality for each menu(sub-menu) is related macro.
●START SCREEN – this section describes what will be displayed on HHR's LCD
just after turning on.
●WARNING – this section contains standards warnings(messages) like “Turn on”,
“Please wait”, or “Stored”, user can use standard warnings or define his own.
Globals, basing on parameter in HEADER section, can be loaded from file or it will
be included in Application Program.
If you choose to load Globals from file you have to place a “global in.txt” file in the
same catalog with Application Program.
During receiving database globals will be automatically loaded from a HHR
to “global out.txt” this file will be placed in the same catalog with User
Output Database.
GL_file indicates that globals will be loaded from a text file, and
GL_section points that globals will be included to Application Program
(HHR App will not be looking for any file containing globals)
D01B2.4 HHR 3000 PRO Manual 13/75

An example of Application Program with all sections:
// application: EXAMPLE
/////////////////////////////////////
HEADER
xxxxxx 01
09/02/2007
10:34:59
dd/mm/yyyy
:mm:ss
,
LOG_false
.
BT_false
GL_section
END
TABLE
MOTHEREID;R;1;1;1;0000 0000 0000;;
MOTHERVID;S;1;1;1;&&&&&;;
DATE;D;0;1;1;0000000000;;
GOAT1;S;0;1;1;&&&&&;;
GOAT2;S;0;1;1;&&&&&;;
MALE1;S;0;1;1;&&&&&;;
END
GLOBAL
0:001234144423223
1:001141423412331
END
MESSAGE
0:value not valid
1:reenter it
END
MACRO
begin_macro:LAMBING
begin_action_area
ReadNew(MOTHEREID)
FillExp(DATE,date())
end_action_area
begin_screen
PrintExp(46,0,0,count(*))
PrintText(115,0,0,"1.1")
DrawLine(0,6,127,6)
end_screen
begin_control_area
end_control_area
end_macro
END
MENU
M0:{Lambing,M1};{Settings,M2}
M1:LAMBING
M2:SETTING
END
START_SCREEN
begin_screen
PrintText(0,0,0,"TABLE:
EXAMPLE")
PrintText(30,20,5,"I D & T")
PrintVersion(20,55,0)
end_screen
END
WARNING
w_WAIT:Please/wait!
END
D01B2.4 HHR 3000 PRO Manual 14/75
D01B2.4 HHR 3000 PRO Manual 15/75

Following sections must be included in application program:
●Header
●Table
●Macro
●Menu
●Start Screen
Rest of the sections might be omitted in Application Program. If you don't want to
include any in above 5 sections left it empty.
Example:
START_SCREEN
END
IMPORTANT !
Sections must be placed in program in the order mentioned in the flow-chart
above. Every section in Application Program starts with section name (in
capital letters) and ends with END (also capital letters).
D01B2.4 HHR 3000 PRO Manual 16/75

HEADER Section
Header has general information about Application Project.
There are max 11 parameters in a header:
1. Name - Application Project name, it's used only for a user for project
identification, it takes 12 characters max.
2. Date – Project creation date, this parameter is also used for a user, it takes
12 characters max.
3. Time - Project creation time, used for a user, it takes 10 characters max.
4. Date Format – defines way of interpreting the Date type column and way
of displaying Date on LCD. It is important to define the same type of date in
User input database or User output database. Example: dd/mm/yyyy
5. Time Format – this parameter is analogical to “Date format”,
example : :mm:ss.
6. Database olumns Separator – defines character for separating columns
in User input database. If you don't include User input database to
Application Project “Database Separator” will be used in User output
database received from HHR. It can be comma, semicolon, tabulator(\t),
space(\s),...
7. LOG – defines whereas Log Table is used or not in the Application;
LOG_true indicates that Log Table will be used in application and
LOG_false that Log Table won't be used.
The size of characters in this parameter has got meaning.
8. Decimal Point – defines the decimal point used to separate integer part
from fractional part in User input database, it is used also during receiving
User output database.
9. Bluetooth – this parameters defines if Bluetooth in application program is
used or not. If enabled (BT_true) then HHR after every transponder read,
sends information through Bluetooth protocol to master device with
transponder number, date and time of reading.
Before reading (and sending) the Bluetooth connection must be made.
Other option of using Bluetooth is sending information from HHR 3000
PRO to master device at user's command, to use this property user have
to disable(BT_false) Bluetooth in HEADER section. Bluetooth essentials
are explained in Appendix D.
BT_true – Bluetooth enabled;
BT_false – Bluetooth disabled.
10. Global – this parameter defines whereas globals will be loaded from file or
it will be included in Application Program.
If you choose to load Globals from file you have to place a “global in.txt”
file in the same catalog with Application Program.
During receiving database globals will be automatically loaded from a HHR
to “global out.txt” this file will be placed in the same catalog with User
Output Database.
GL_file indicates that globals will be loaded from a text file, and
D01B2.4 HHR 3000 PRO Manual 17/75

GL_section points that globals will be included to Application Program
(HHR App will not be looking for any file containing globals)
The structure of “global in.txt” file
11. Animal Transponder – this parameter defines whereas only animal
transponder will be read by HHR, in other case a warning will appear on
HHR LCD. animal_true indicated that only animal transponders will be
read, animal_false indicates that HHR won't be checking whenever just
read transponder is an animal one.
12. Speed Mode – HHR is able to move to the next(previous) record when
user press down(up) arrow during editing a value in field. This option can
be enabled by SM_true, or disabled by SM_false.
The idea of Speed Mode is to change currently using record to another
one. The order on which records are changed is defined in
Sorting(col_name) function. So if you want to switch records by date, you
have to use Sorting(DATE) in Action Area.
13. Outgoing Frame Structure – HHR is able to send data(EID optionally with
date/time stamp), through RS232, Bluetooth or USB. Data is send when
transponder is read with Read() function.
Available frames:
●BioControl rame: label in HEADER: BioControl_frame
●ISO frame consisting EID: label in HEADER: ISO_EID_frame
●ISO frame consisting EID and Data Time Stamp: label in
HEADER: ISO_EID_DT_frame
If you are using Speed Mode you must be aware that none icons are available to
put in Screens, the functions which aren't allowed to use are:
●IconDelete
●IconAddRec
●Icon indCol
●IconConfirm
●AddRecConf
Parameters 1-8 must be placed in HEADER section, rest of parameters are
optional, if you don't define it, a default value will be used.
D01B2.4 HHR 3000 PRO Manual 18/75
0:global_1
1:vet_1
..

Communication Possibilities
HHR can send Transponder Number and DT stamp according to frames defined in
HEADER Section. The interfaces that are possible to use are:
●RS232
●USB
●BlueTooth
or RS232 and BlueTooth piggy-back modules are necessary. or sending data
over USB no external hardware is necessary but please keep in mind that the
device to which HHR will be connected must have USB Host(not every PDA has
UBS Host despite fact that it has USB.)
HHR will send transponder number and DT stamp according to frame structure
defined in HEADER if user use one of following functions:
●Read()
●Continue()
●ReadNew()
●EditReadNew()
●ReadSeek()
●EditReadSeek()
or details of connection between PC and HHR with BT please refer to Appendix
D.
If using USB interface, you must use HyperTerminal or similar software for
capturing messages send by HHR. To connect to HHR you must know the Virtual
Com Port Number(VCP), which HHR is using, to check it please right click on “My
Computer” and select “Properties”.
Next please go bookmark named “Hardware”, please select “Device Driver” button.
Please find and select “Ports (COM and LPT)” , click to '+' icon and find there
BioControl HHR Reader, Com port number will be in quotation marks. Please use
this com port number for configuration of HyperTerminal.
or assistance with handling HyperTerminal please refer to Appendix D.
The settings for VCP are: Speed - 115200, Data bits - 8, Parity - None,
Stop bit - 1, Handshaking - None.
If you are using RS232 interface please use HyperTerminal or similar to it software,
the default settings for configuration of port are the same as for USB. It can be
changed with SetRS functions.
D01B2.4 HHR 3000 PRO Manual 19/75
! To enable sending transponder number and DT stamp with HHR you must put
BT_true in HEADER Section

rames Structures
1. Bio ontrol frame(Bio ontrol_frame) - consist 3 values: transponder number,
current date, current time;
●irst character - “|”
●Transponder number which take 23 characters.
●Table separator declared in header section
●Current Date
●Table separator declared in header section
●Current Time
●End line characters, at C/C++ language it is “\r\n” (it take two characters
0x0D and 0x0A)
rame Example:
|12345678901234567890123;2007-02-06;23:59:59\r\n
2. ISO frame(ISO_EID_frame), sending only EID number according to ISO/
WD 24631-6
Syntax of frame:
3. ISO frame(ISO_EID_DT_frame), sending EID number and Date/Time
stamp according to ISO/WD 24631-6
Syntax of frame:
D01B2.4 HHR 3000 PRO Manual 20/75
Table of contents


