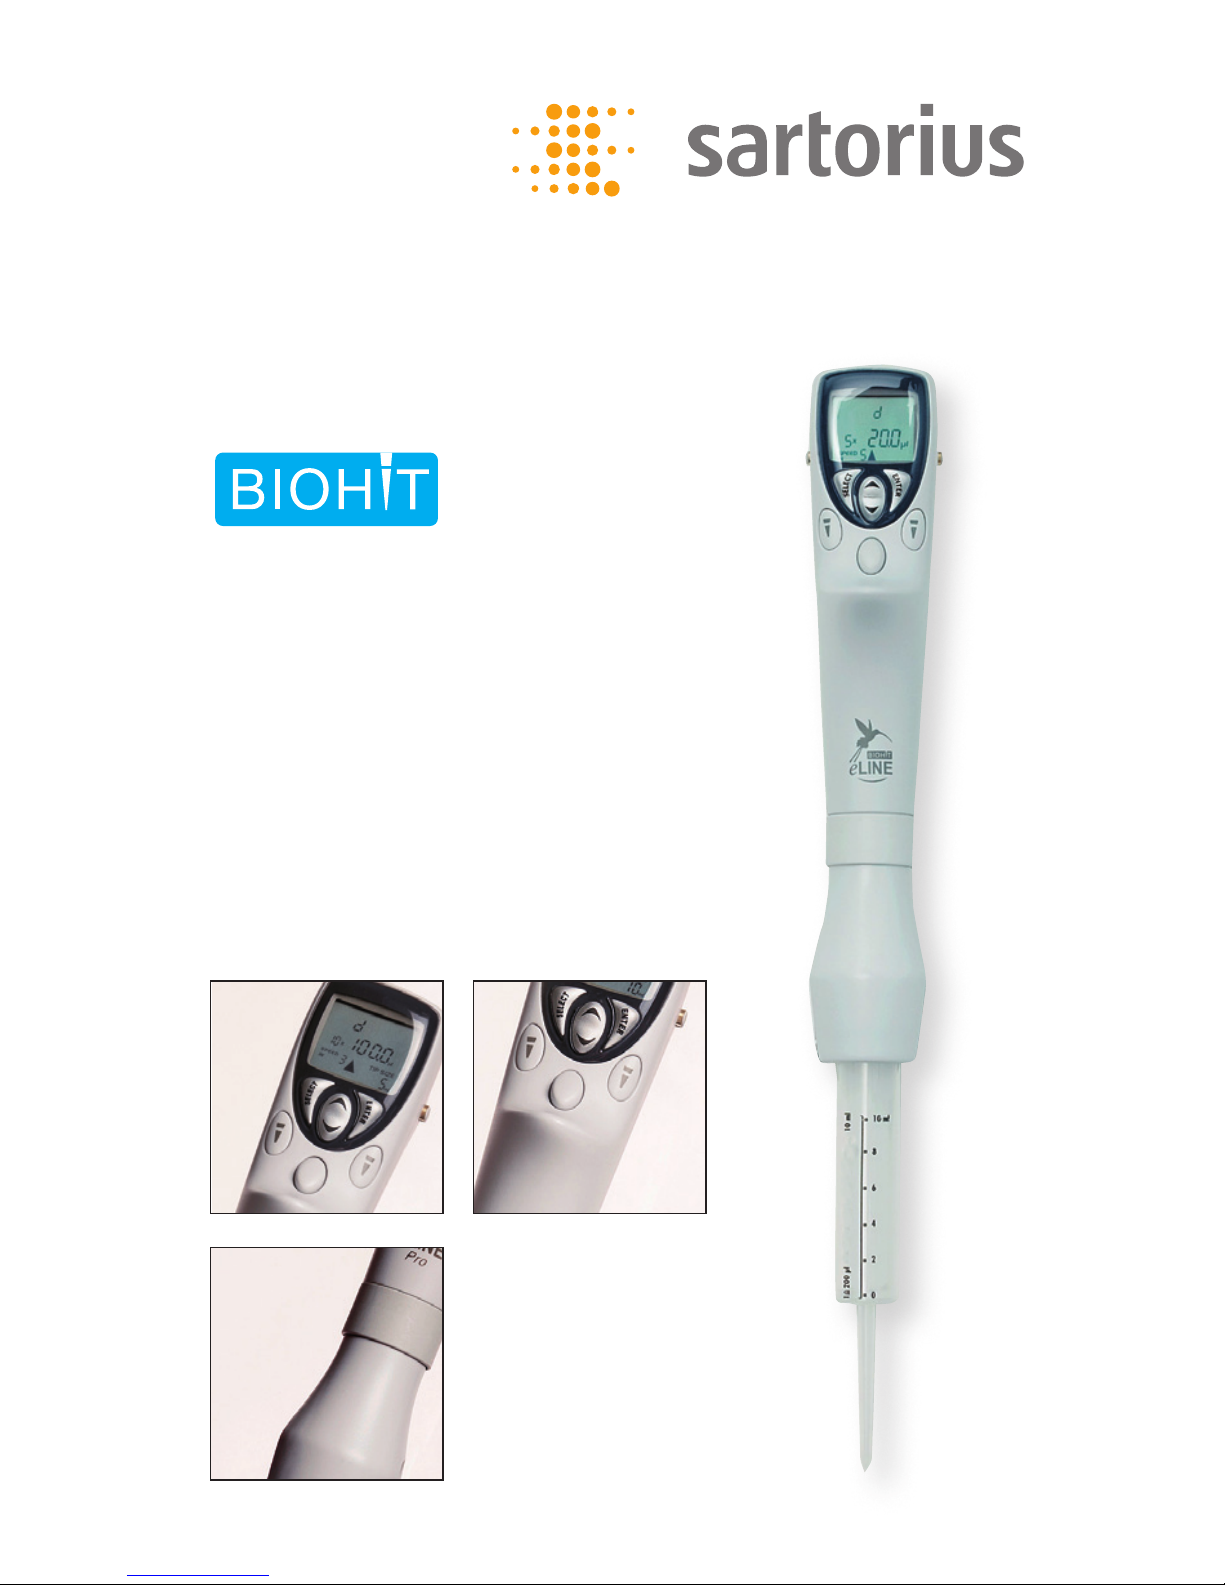
Biohit eLINE Dispenser Pro User manual
User Manual
Bedienungsanleitung
Mode d'emploi
Manual Usuario
Instruzioni d'impiego
eLINE®Dispenser Pro

User Manual ............................................................1
Bedienungsanleitung .......................................... 21
Mode d’ emploi..................................................... 41
Manual Usario ....................................................... 61
Instruzioni d’impiego .......................................... 81
Specifications ......................................................101
Huom! Suomenkielinen käyttöohje ladattavissa
osoitteesta: www.biohit.com
eLINE®Dispenser Pro

1
Contents
1. Intended use .......................................................................................................................................2
2. Biohit eLINE Dispenser Pro............................................................................................................2
3. Quick start...........................................................................................................................................3
3.1. Unpacking.............................................................................................................................3
3.2. Charging the Biohit eLINE Dispenser Pro before first use..................................4
3.3. Biohit eLINE Dispenser Pro operating instructions ...............................................5
3.3.1. Display....................................................................................................................................6
3.3.2. Keyboard...............................................................................................................................7
3.3.3. Reset Button........................................................................................................................7
3.3.4. Start Button.........................................................................................................................8
3.3.5 Tip Attachment and Ejection....................................................................................... 8
4. Charging of the Biohit eLINE Dispenser Pro ...........................................................................8
4.1.
Charging with the Charging Stand and Charging Carousel ............................... 9
4.2. Charging through direct charging system ............................................................ 10
4.3. Charging Recommentations ........................................................................................11
4.4. Electrical specifications.................................................................................................11
5. Programming principles ...............................................................................................................11
5.1. Programming map.......................................................................................................... 13
5.2. Main Modes ...................................................................................................................... 14
5.2.1. d-mode, Programming using TipGuide................................................................... 14
5.2.2. dST-mode........................................................................................................................... 14
5.3. OPT-mode.......................................................................................................................... 15
5.4. Custom Mode................................................................................................................... 17
6. Maintenance.................................................................................................................................... 18
6.1. Cleaning the pipette...................................................................................................... 18
6.2. Battery replacement...................................................................................................... 18
7. Troubleshooting.............................................................................................................................. 18
8. Warranty information..................................................................................................................20
9. Performance specifications .......................................................................................................20
10. Recycling instruction (WEEE) ....................................................................................................20

2
1. Intended use
Biohit eLINE Dispenser Pro is intended to be used in liquid
handling applications for dispensing liquids in volume range
of 0,1 µl to 50 ml. It is recommended to use Biohit Dispenser
Tips to ensure the best compatibility and performance with
eLINE Dispenser Pro.
This liquid handling device is designed and manufactured to
be used as general purpose laboratory equipment.
2. Biohit eLINE Dispenser Pro
The eLINE electronic pipettes offer you the latest technology
and innovations in the field of the hand held liquid handling
devices. The attractive and ergonomic design of the eLINE
pipettes together with electronic tip ejection operation take
the effort out of pipetting and reduce the risk of repetitive
strain injuries (RSI) that are common in mechanical pipetting.
The microprocessor controlled system and the superior
construction of the eLINE pipettes enables maximum liquid
handling performance with high levels of accuracy and
precision.
eLINE Dispenser
Cat. No. 73070X
X: 0=Without adaptor; 1=With AC-adaptor (EU, UK, US/JPN, AUS; KOR
and CHN plugs)
eLINE Dispenser Tips
Standard
Tip size (ml) Qty/Unit Order code
0,1 100 792017
0,2 100 792018
0,5 100 792019
1,0 100 792020
2,5 100 792021
5,0 100 792022
10,0 100 792023
25,0 25 792024
50,0 25 792025

3
Dispenser Test Package
0,5 20 792038
1,0 20
2,5 20
5,0 20
10,0 20
Sterile
Tip size (ml) Qty/Unit Order code
0,1 100 792026
0,2 100 792027
0,5 100 792028
1,0 100 792029
2,5 100 792030
5,0 100 792031
10,0 100 792032
25,0 25 792033
50,0 25 792034
Adapter
Adapter for 25 and 50 ml tips
Adapter 3792036
NOTE: The tips are disposable, do not reuse them!
3. Quick start
3.1. Unpacking
The Biohit eLINE Dispenser may be delivered with or without
an AC-adaptor, depending on the type of order. However, all
eLINE Dispenser packages contain:
- eLINE Dispenser
- Tilting piece
- Instruction manual
- Performance certificate in accordance with ISO 8655-5
- Demo package of the Sartorius Biohit eLINE Dispenser Tips
- 0.1 ml, 1 pc
- 0.2 ml, 1 pc
- 0.5 ml, 5 pcs

4
- 1.0 ml, 5 pcs
- 2.5 ml, 5 pcs
- 10.0 ml, 5 pcs
- 25.0 ml, 1 pc
- Adapter for 25 ml tip, 1 pc
Please check that all items are included and no damage has
occurred during shipment.
3.2. Charging the Biohit eLINE
Dispenser Pro before first use
The battery is protected against discharging during storage
with a plastic protector. Before use remove the plastic
protector.
1. Push the charging buttons simultaneuously in order to
open the battery cover
2. Remove the plastic protector
NOTE: It is recommended to charge the pipette for 12
hours before initial use. The pipette may only be charged
with original Charging Stand, Charging Carousel or eLINE
AC-adaptor (See Section 3.)
2.
1. 1.
5
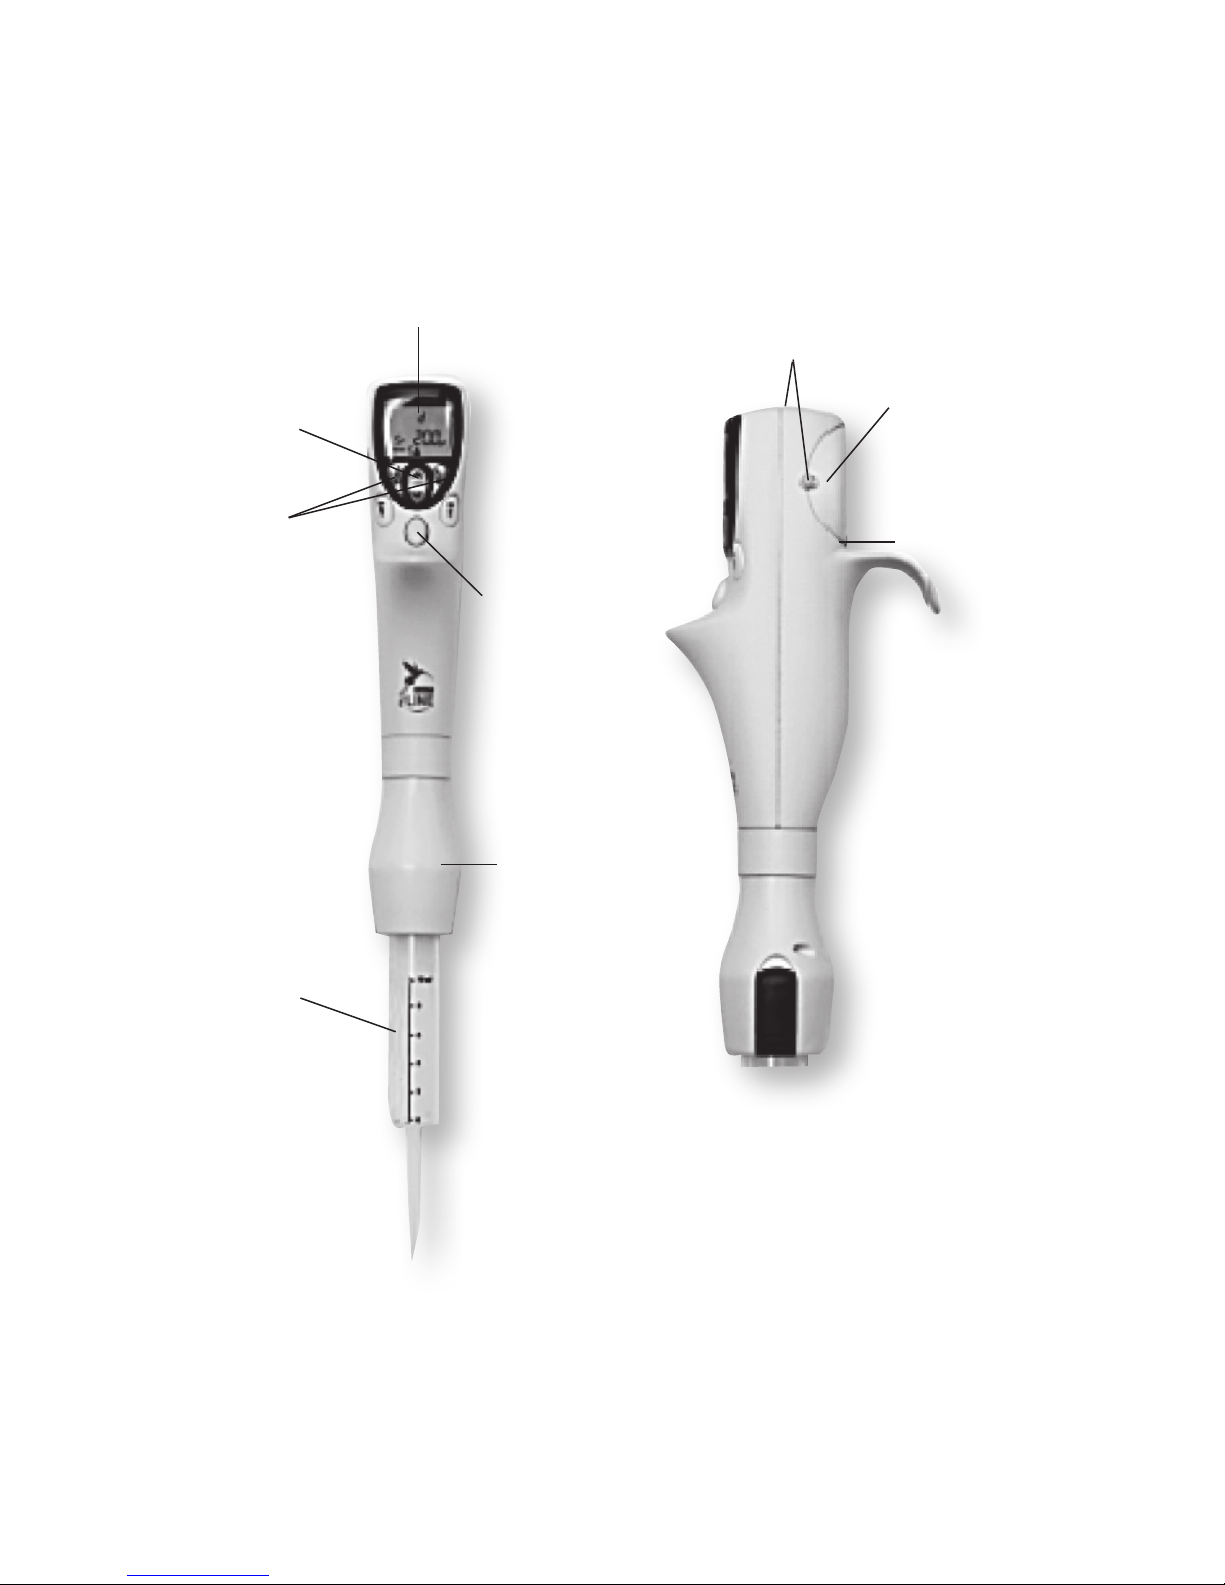
3.3. Biohit eLINE Dispenser Pro operating
instructions
The control and programming of the eLINE Dispenser is
performed using the display, keyboard, operating buttons
and tip.
Keyboard
Display
Start
button
Tip
ejection
buttons
Tip
connector
eLINE
Dispenser
Tip
Charging
contacts
Battery
cover
Reset
button
6
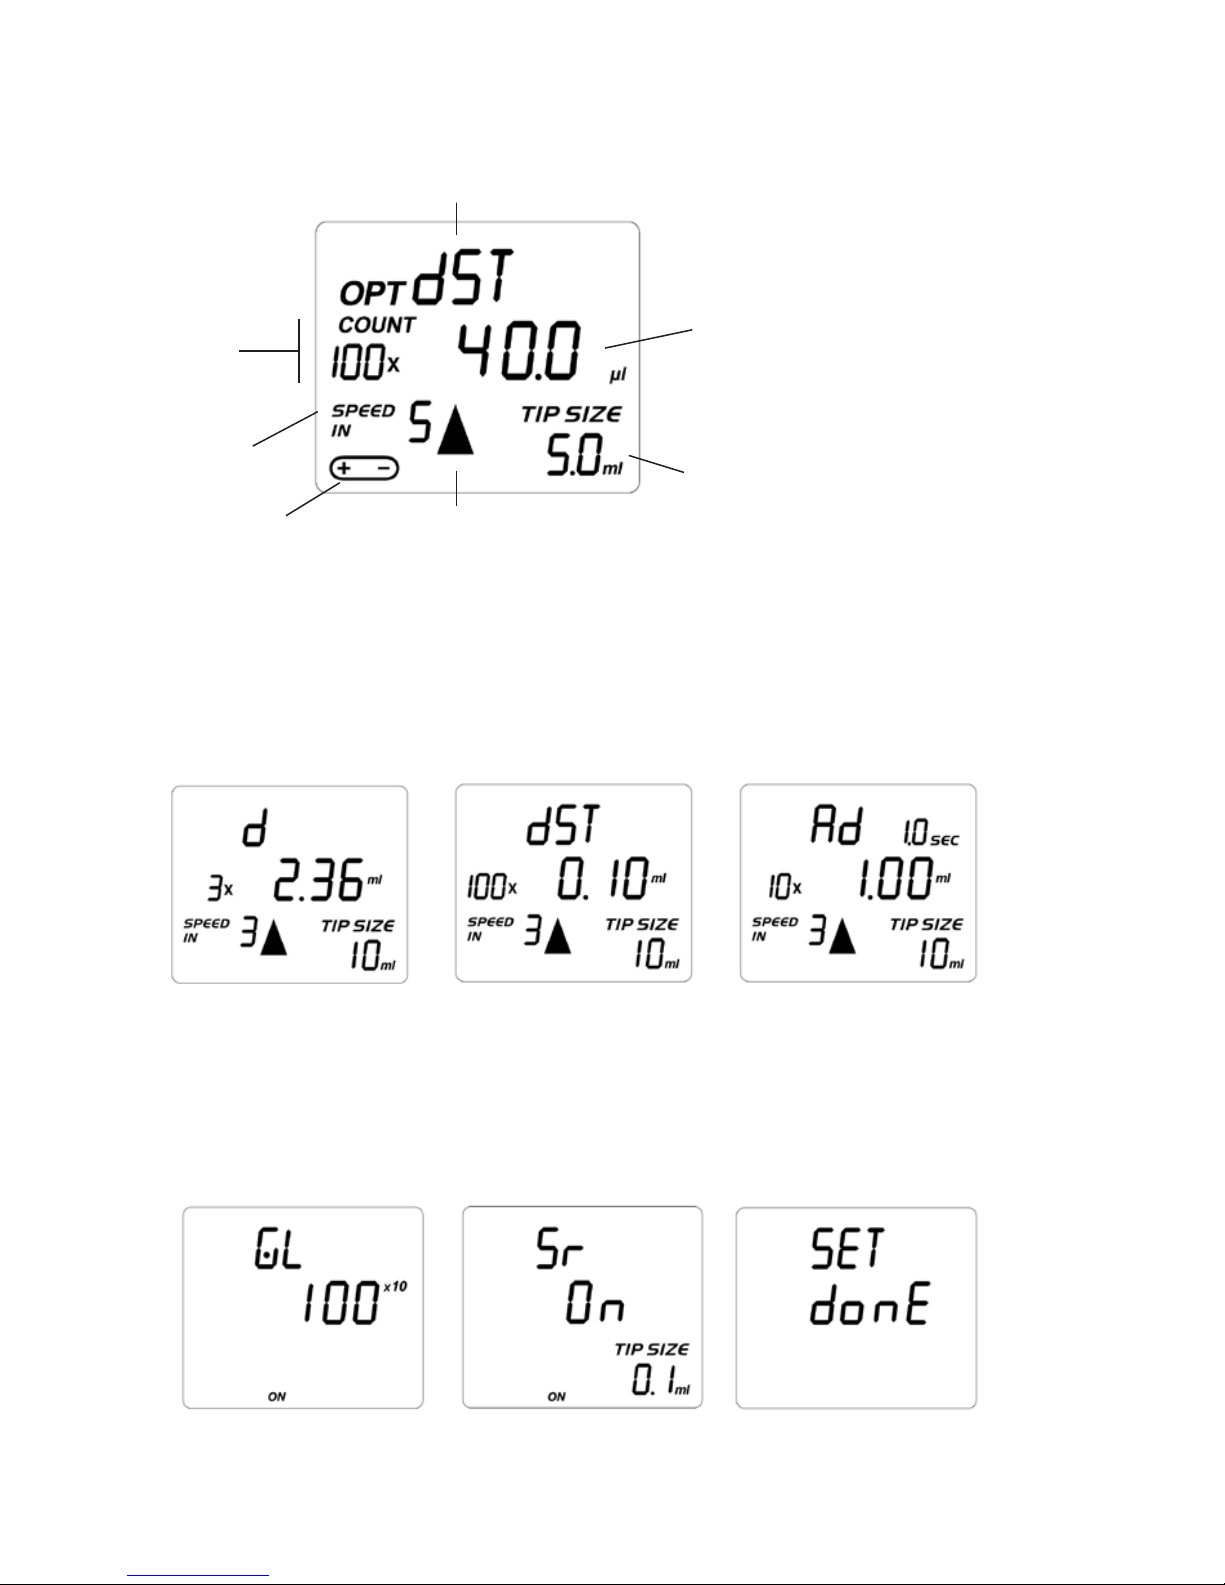
3.3.1. Display
NOTE: When the dispenser is not connected to the charging
unit the dispenser/display will automatically hibernate after
10 minutes. The dispenser can be switched on by pressing
any key.
Main Modes and Mode Symbols:
Custom mode (CST):
Main Modes/Operating
Mode symbols
Aspirating/Dispensing
direction
Battery
symbol
Speed
in/out
Aliquots/
counter
Volume
Selected tip
d=dispensing
d=(with TipGuide)
dST= dispensing
(user selects the
tip size)
P = pipetting
dd = diluting
Sd = sequential
dispensing
Ad = automatic
multidispensing
SA = multi-aspirating
GL Sr SET
7
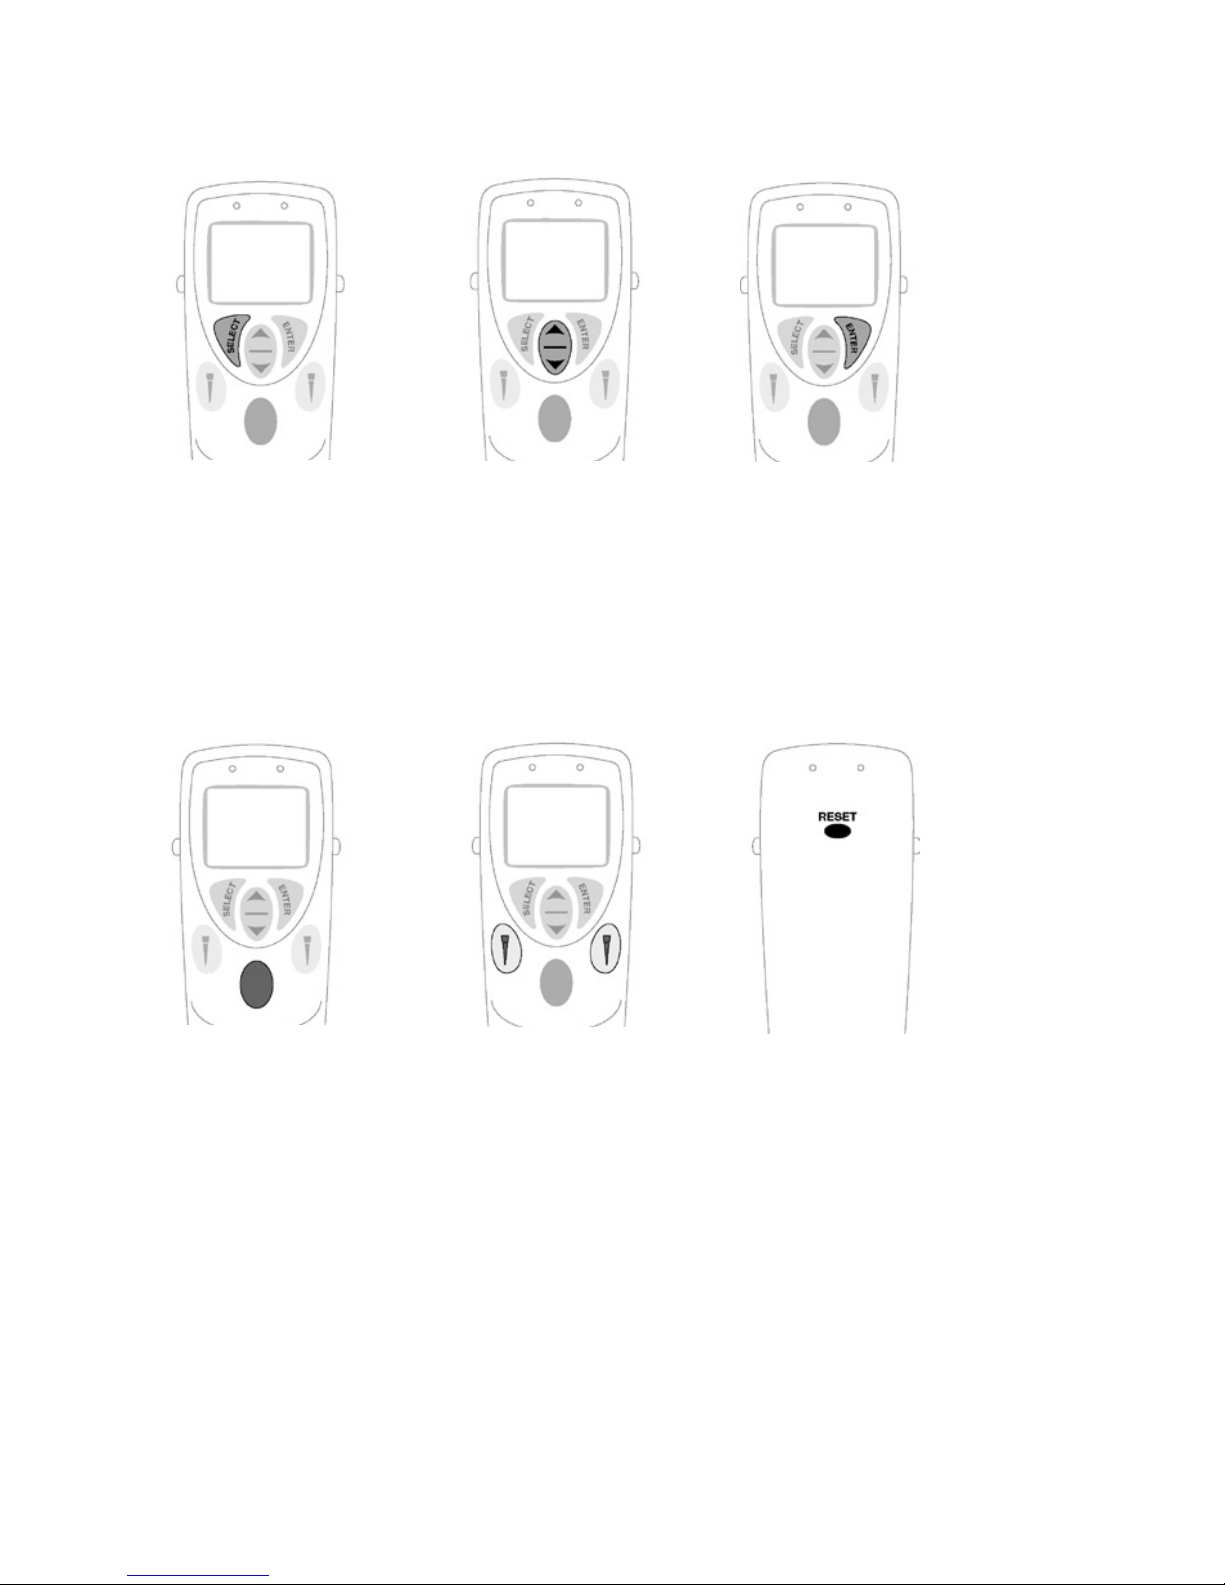
3.3.2. Keyboard
3.3.3. Reset Button
To reset the dispenser, press the reset button on the battery
cover. The display shows E and TIP in blinking form and
pressing the tip ejector button will reset the pipette to the
d-mode.
NOTE: The dispenser should never be reset during pipetting!
Resetting will cause the plunger to move to the home position
and it will empty the contents of the tip. The tip is also ejected
in the end.
Select
Start button
Arrow up/down
Tip ejection buttons
Enter
Reset button
- Press to go back to the Main
Modes or to the previous step.
- Activates the speed-function
during the programming
procedure.
- Press to select the
operating mode or to
make setting changes
(volume, aliquots, speed,
etc.)
- Press to confirm the
selections or setting
changes
- Triggers all piston
movements
- Press to remove tip - Press to reset the pipette
Operating buttons:
8
1
1
2
3.3.4. Start Button
The start button triggers the aspiration and dispensing
operations according to the selected operating mode. Only a
soft touch is required to operate the button.
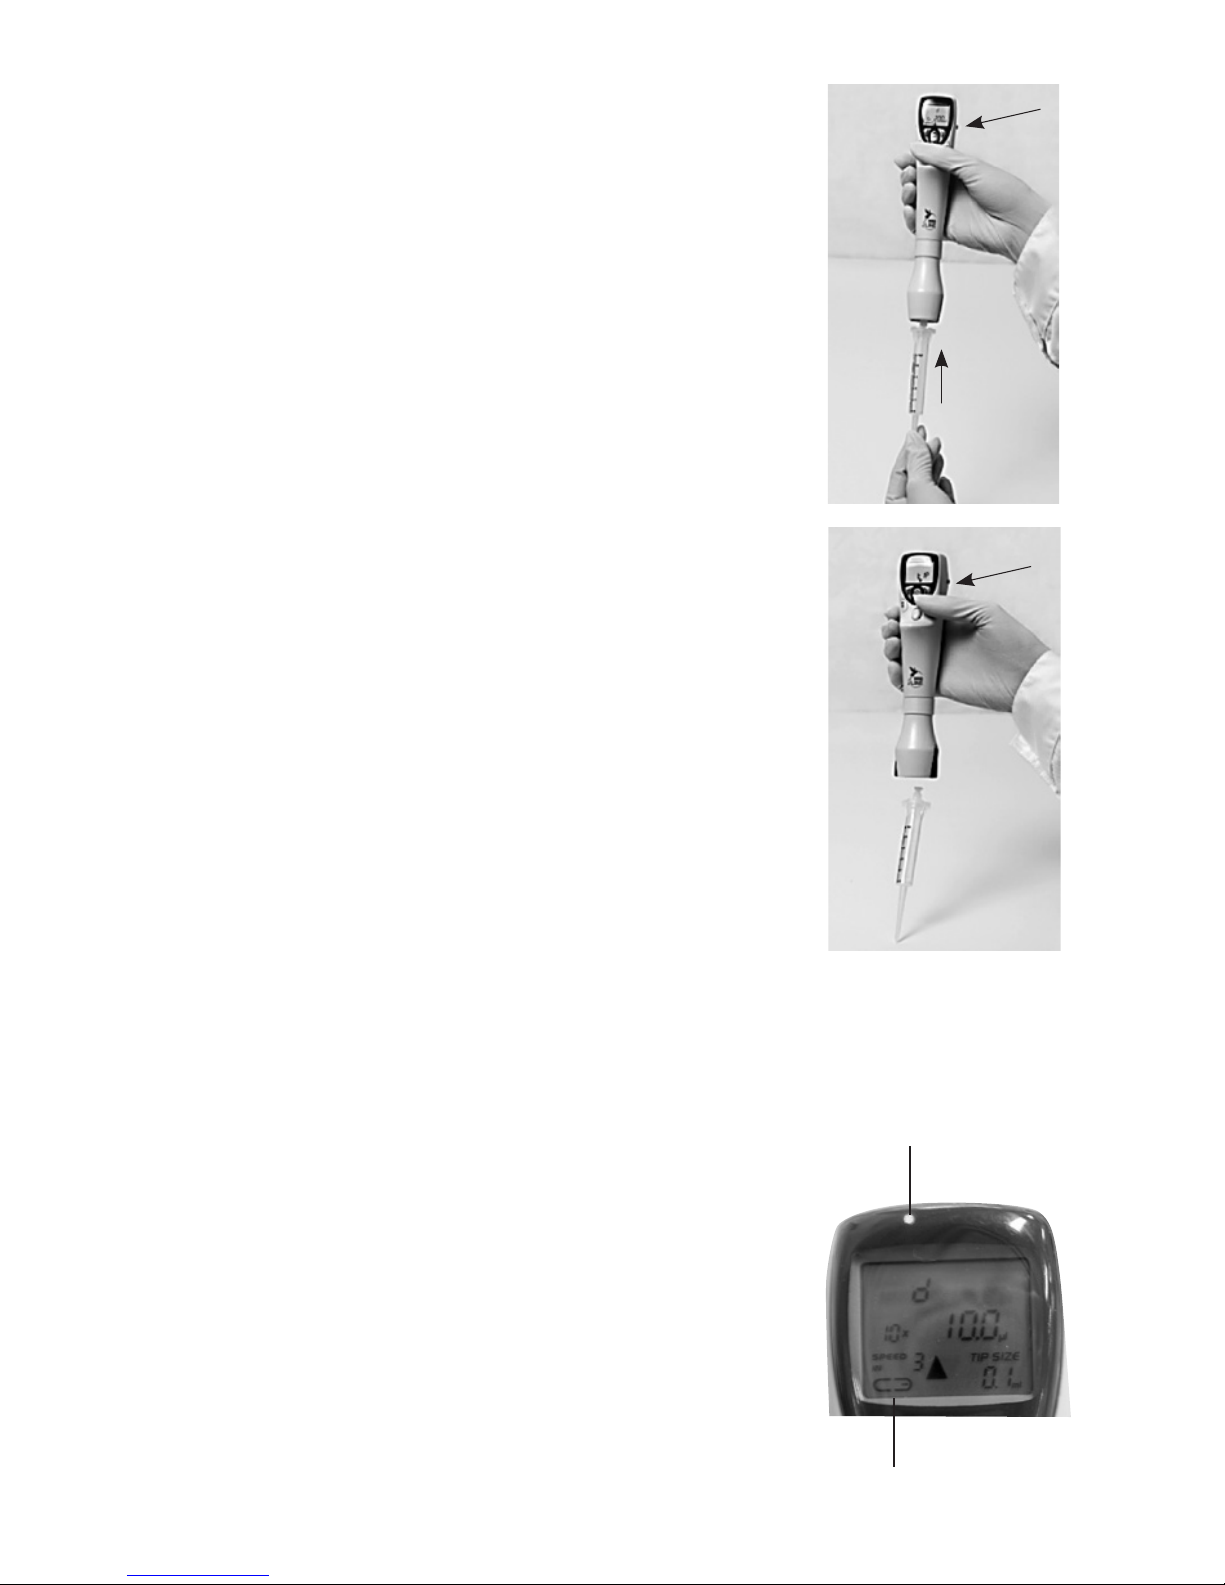
3.3.5. Tip Attachment and Ejection
Tip attachment
1. Push the tip into the tip connector. Make sure that the tip
is properly attached.
2. Confirm the tip size by double clicking the Start-button
according the instruction on the page 15.
Releasing the tip:
1. Press the Tip Ejection button. The tip is released
immediately.
NOTE: After the dispensing cycle has been completed a small
residual amount of fluid may have been left in the tip. During
the tip ejection it is possible that a part of the remaining fluid
comes out of the tip. Therefore it is recommended that the tip
ejection is performed above a waste container.
NOTE: When aspirating the liquid using the 25 or 50 ml tip,
let the tip stay in the liquid a few seconds after the plunger
has stopped moving. This way you will ensure that all liquid
has been aspirated into the tip.
NOTE: It is possible to work with aqueous liquids and liquids
with higher viscosity. However, it is recommended always
to choose the tip with the smallest applicable volume in
conjunction with high viscosity liquids. Please note, the
specifications are given in accordance with ISO8655-5.
4. Charging of the Biohit eLINE
Dispenser Pro
The eLINE Dispenser should be charged using the original
eLINE Charging Stand, Charging Carousel or AC-adapter.
When the dispenser is properly connected to the charger, the
led indicator lights up and stays on as long as the dispenser is
connected to the charger.
When the dispenser requires charging, the battery symbol and
“lo bat”-text will appear in the display. You need to confirm
Led indicator
Battery symbol
9
that by pressing “enter”, only after that you can complete your
work, and/or start charging the dispenser. Please note that if
“enter” is not pressed the dispenser will not start charging,
even placed in charging stand/connected to AC-adaptor.
NOTE: In case you continue to work with the dispenser after
the low bat-alarm, the battery will eventually be completely
discharged. Then the battery-symbol and led indicator start
to blink, and there is no response from operating buttons.
Charge the dispenser.
Initial charging of 5 minutes is required before use, if the
battery is totally discharged. During that time the “Load”-text
is displayed and you can’t use the dispenser.
When the text disappears from the display, you can continue
to work with the dispenser keeping it still connected to the
charger.
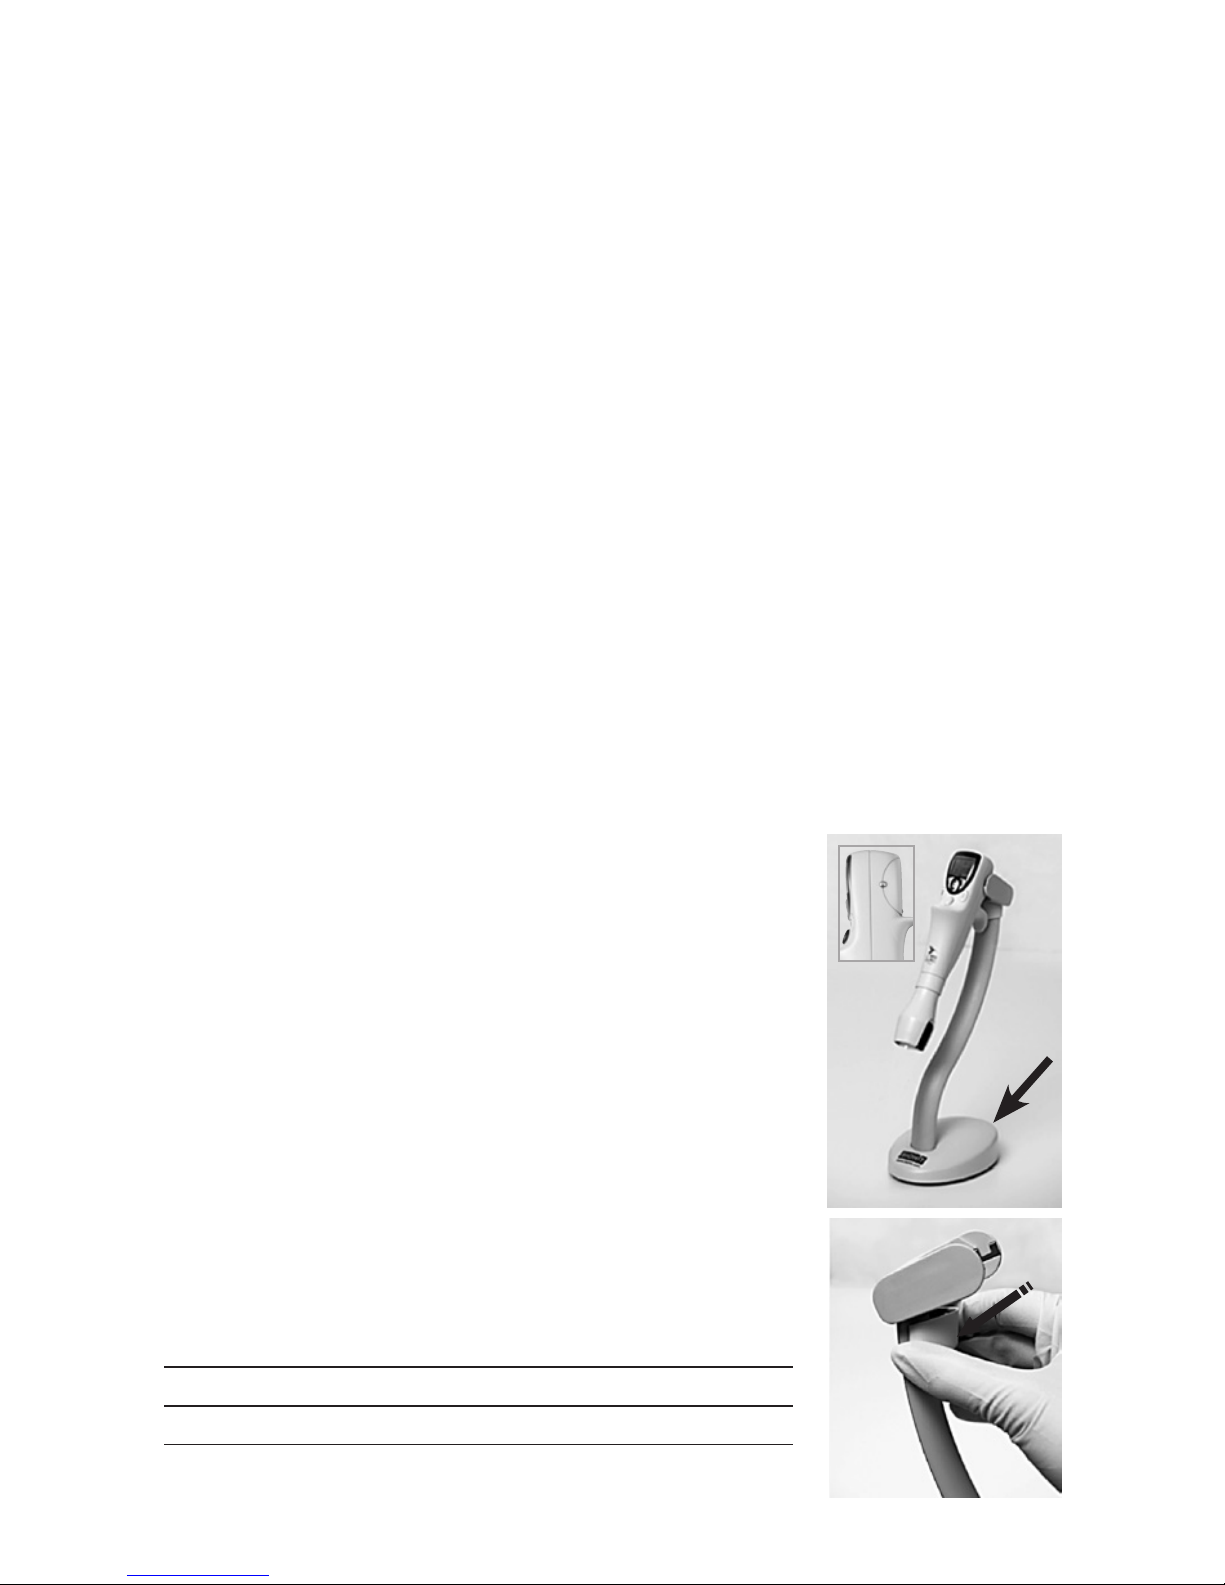
4.1.
Charging with the Charging Stand and
Charging Carousel
The Charging Stand and Carousel are desktop charging units.
The Charging Stand accommodates one eLINE Dispenser and
Charging Carousel four eLine Dispensers.
The Charging Stands and Carousels operate through the metal
contacts placed in the sides of the Dispenser and the head of
the Charging unit.
Before operating the AC-adaptor must be connected to the
socket at the rear of the Charging Stand as well as to the
electrical outlet. Before connecting the AC-adapter to the
electrical outlet, check that its voltage setting corresponds
to the voltage setting of your electrical outlet.
NOTE:The Charging Carousel is used to charge the dispenser
without the tip. If you need to charge the dispenser with the
tip attached, you can use the Charging Stand with the Tilting
Piece mounted.
Cat. No. Product
730981 Charging Stand for one pipette
730991 Charging Carousel for 4 pipettes
Includes Universal AC-adaptor (with EU, UK, US/JPN, AUS, KOR and CHN
plugs)
10
1. Check that the plastic protector is removed and the
battery cover is properly closed
2. Place the dispenser into the Charging unit. Make sure
that the metal contacts at the sides of the dispenser are
properly fitted to the tracks of the metal contacts in the
Charging head.
3. When charging, the battery-symbol and the led indicator
will be displayed. The charging time for completely
discharged batteries is 6 hours (initial charge 12 hours).
4.
When the battery is fully charged the battery-symbol
disappears from the display. Otherwise the display will stay
on and other information on the display will be visible.
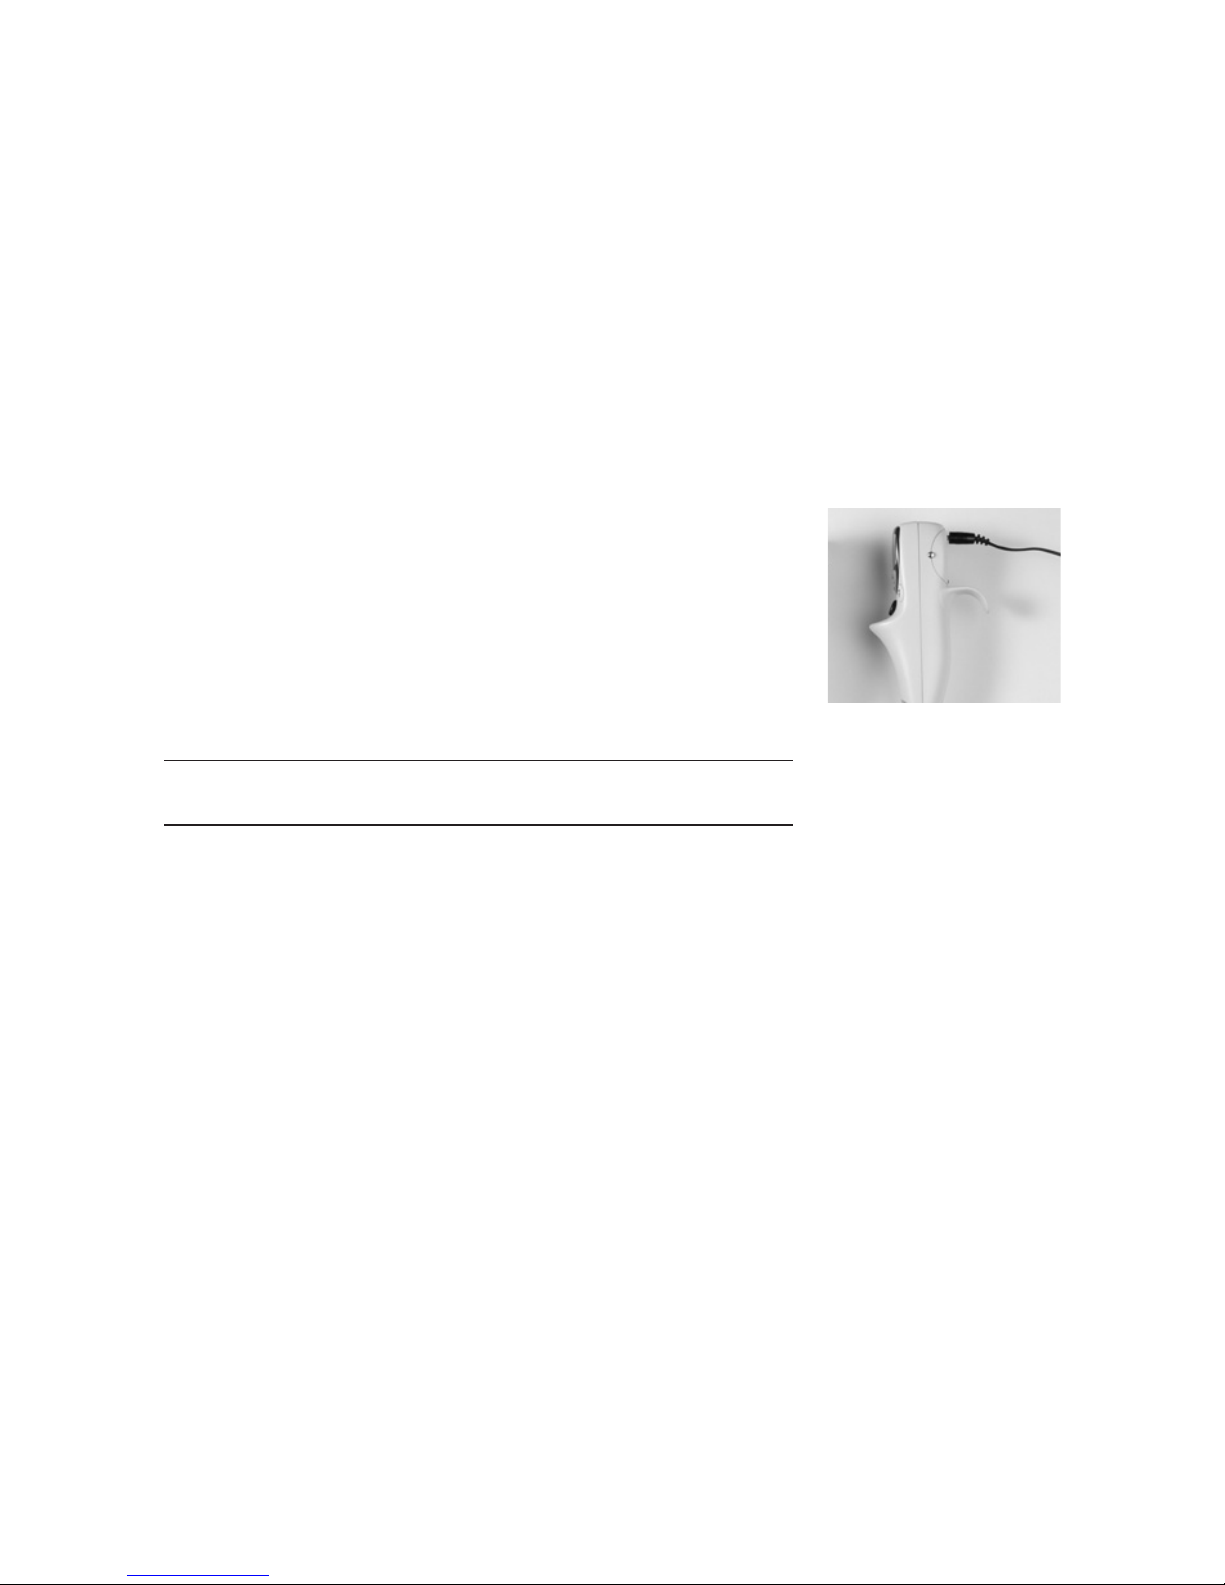
4.2. Charging through direct charging
system
The AC-adaptor supplied with the Biohit eLINE Dispenser or
Charging Stand can be used for direct charging of the Biohit
eLINE Dispenser. The socket for the AC-adaptor is placed at
the back of the dispenser.
Cat. No. Product
731600 Biohit eLINE Dispenser AC-adaptor
(with EU, UK, US/JPN, AUS, KOR and CHN plugs)
1. Before connecting the AC-adaptor to the electrical outlet,
check that its voltage settings corresponds to the voltage
settings of the electrical outlet.
2. Check that the battery protector is removed and the
battery cover is properly closed.
3. Connect the AC-adaptor to the electrical outlet as well as
to the socket at the back of the dispenser
4. The charging time is 6 hours for the completely discharged
battery.
5. When the battery is fully charged the battery-symbol
disappears from the display. Otherwise the display will
stay on and other information on the display will be
visible.
NOTE: It is possible to continue pipetting while the eLINE
Dispenser is charged through the AC-adaptor. With fully
discharged battery 30 minute initial charging is recommended
before continuing the pipetting.

11
4.3. Charging Recommentations
When the eLINE Dispenser is not in use it is recommended
to keep it always in the charging unit. This ensures that the
battery is kept fully charged and the pipette is always ready
for use.
However, during long storage periods (holidays etc.) it is
recommended to disconnect the Charging Stand and Carousel
from the mains outlet.
It is also advisable to remove the battery pack from the
dispenser. This protects the batteries against discharging
during the long storage period.
NOTE: The battery won’t get damaged when the dispenser is
kept on the charging unit: the charging process is intelligently
controlled by a microprocessor.
NOTE: If battery is kept as full as possible, it will lengthen
its lifetime.
4.4. Electrical specifications
Battery
- Rechargeable NiMH battery back with protection circuit
- 4.8 V, 500 mAH
- Charging time 6 hours for empty batteries
- Initial Charging 12 hours
AC-adaptor for Charging Stand or direct charging
-Input voltages and main plug according to local requirements
-Output voltage 8 VDC, 740 mA
AC-adaptor for Charging Carousel
-Input voltages and main plug according to local requirements
-Output voltage 10,5 VDC, 1600 mA
5. Programming principles
The eLINE Dispenser features ten different operating modes
which are divided in to the three Main Modes (d, dST/OPT) and
Custom Mode (CST).
Main Modes: Operating Modes:
d d (user selects the aliquot size and the
number of dispensings)

12
dST d (user selects the tip size)
OPT P, dd, Sd, Ad, SA
Custom Mode:
CST GL (Good Laboratory Practice: select the
service and the reminder intervals)
Sr (select the desired tip range)
SET (returns default settings)
Programming is performed by using the Select-, Enter, Arrow-
and Start-keys. The main mode range is selected with the
Select-key, after that the desired operating mode is selected
by pressing the Arrow-key and the selection is confirmed with
Enter-key.

13
5.1. Programming map
Main Modes Custom Mode
Main Modes ddST OPT
P
Start
programming
See the instructions
from the chapter 4.2
dd
Sd
Ad
SA
Start
pipeting
Start
programming
See the instructions
from the chapter 4.2
Start
pipeting
+Custom Mode GL Sr SET
Start
programming
See the instructions
from the chapter 4.3
Start
pipeting
Tip confirmation after tip ejection
Tip ejection If you want to
change the tip size,
not the mode
if you want to
continue with the
same tip size and the
mode
If you want to
change the tip size
and the mode
2 x
Change
- the tip size
- the aliquot volume
- the number of aliquots
according the mode you have
previously used
Change the mode, tip
size, aliquot volume and
the number of aliquots
2 x
2 x

14
2. Select
the aliquot
volume
1. Select d-mode
from the Main
modes
3. Select the
number of the
aliquots
3. Select the
aliquot
volume
1. Select dST-
mode from
the Main modes
2. Select the
tip size
5.2. Main Modes
5.2.1. d-mode, Programming using TipGuide
TIpGuide is unique built-in tool making the programming as
easy, safe and convenient as possible. The Tip Guide selects
the opitimal tip based on desired aliquot volume and number
of aliquots.
Multiple dispensing by selecting the aliquot, Tip guide
4. The Tip Guide display will show the best option for the
tip size. If there are other options the “TIP SIZE”-text is
blinking. Other options can be observed by pressing
the Arrow-key. Attach the tip to the dispenser before
confirming the programming by double clicking the Start-
button.
NOTE: If you want to change the speed, press the Select-
key and make the desired changes to the speed before you
confirm the tip size.
5.2.2. dST-mode
Multiple dispensing by selecting the tip
4. Select the aliquots. Attach the tip to the dispenser before
confirming the programming by double clicking the Start-
button. NOTE: If you want to change the speed, press the
Select-key and make the desired changes to the speed
before you confirm the number of dispensing
15
The programming of this dispensing-mode is based on the
increment of the chosen tip size.
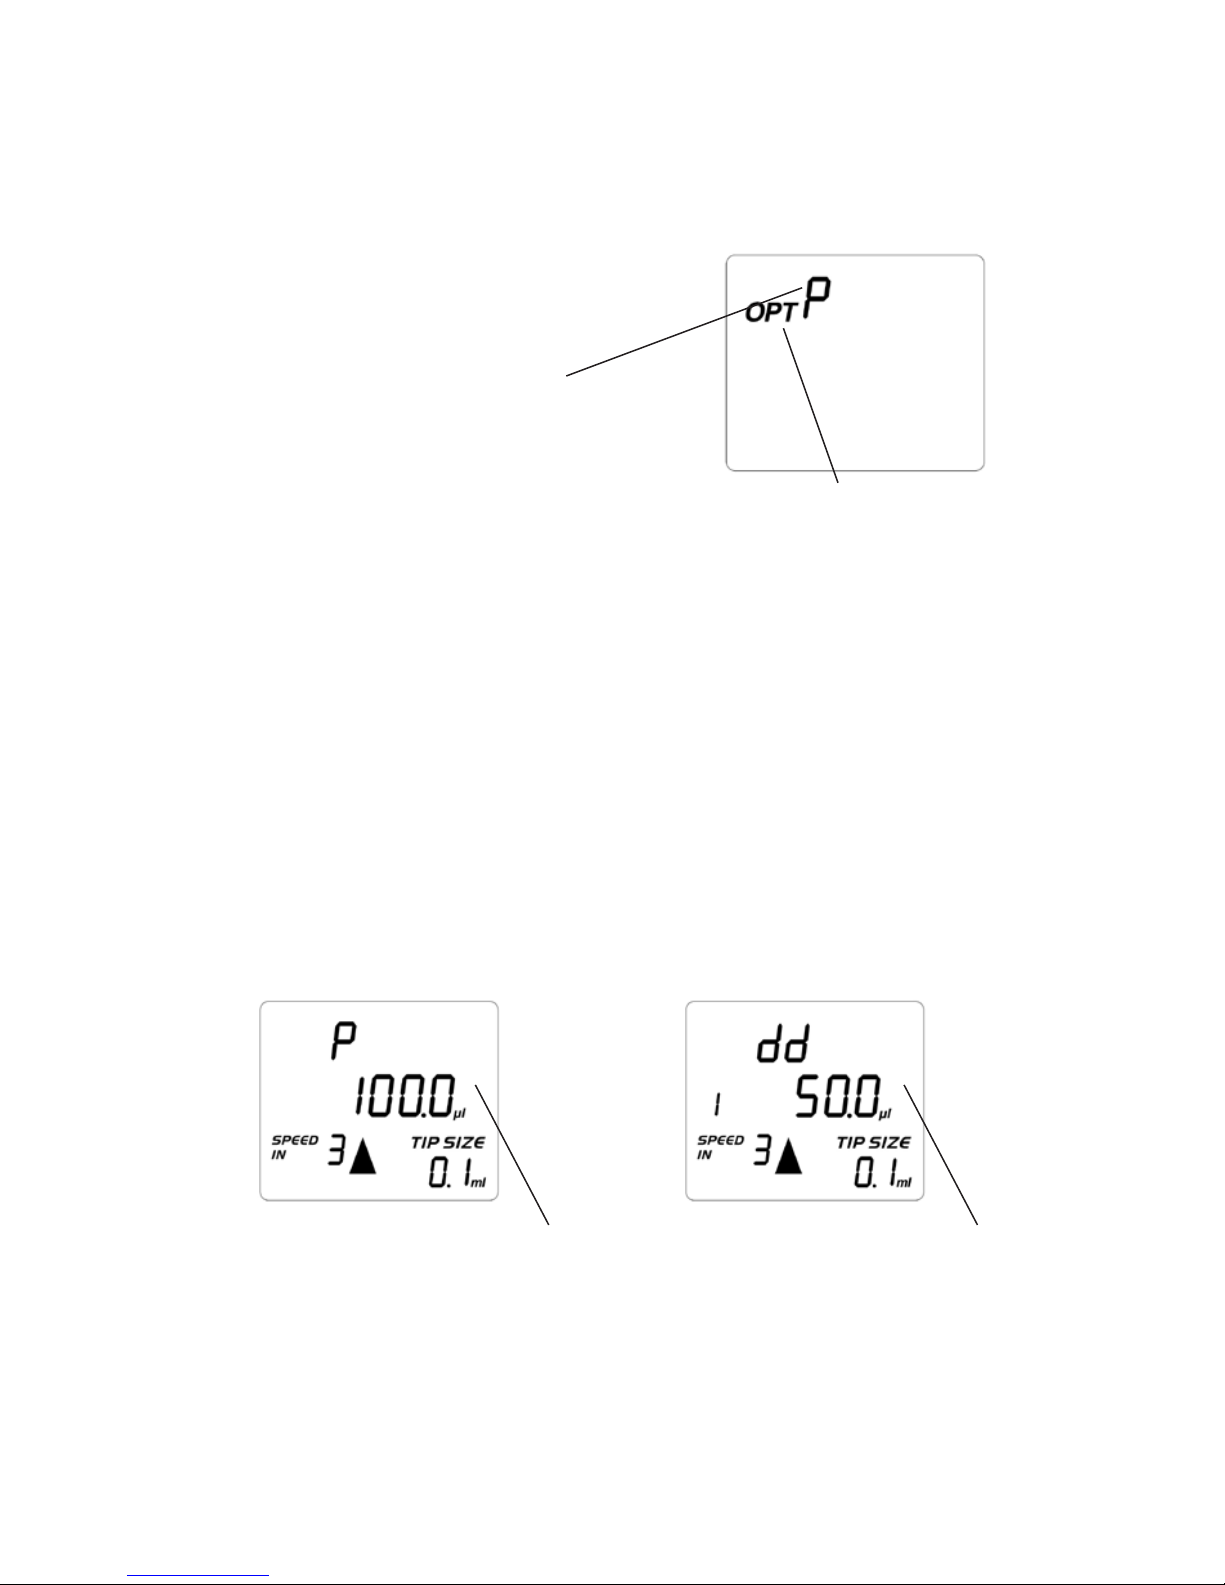
5.3. OPT-mode
Options-modes P, dd, Sd, Ad and SA
2. Choose the desired Operating mode:
P = pipetting
dd = diluting
Sd = sequential dispensing
Ad = automatic multi-dispensing
SA = multi-aspirating 1. Choose OPT-mode
from the Main modes
range
P = pipetting
dd = two different solutions separated with air gap are
aspirated and then dispensed together
Sd = a series of different volumes of same solution can be delivered in
any desired order
Ad = the pipette performs repetitive dispensing of a selected volume
automatically at the spesified interval. The sum of the dispensing
aliquots and an automatically selected excess volume is aspirated
into the tip. The excess volume is needes to ensure equal operating
conditions for each dispensing step
SA = the pipette performs consecutive aspiration operations of the
programmed volume. This mode allows e.g. emptying a microwell
plate, sample pooling and other special applications
P dd
3. Choose the volume. Attach the tip
to the dispenser before confirming
the programming by double clicking
the Start-button. Note: If you want
to change the speed, press the
Select-key and make the desired
changes to the speed before you
confirm the volume.
3. Choose the desired volumes. Attach
the tip to the dispenser before
confirming the programming by
double clicking the Start-button.
Note: If you want to change the
speed, press the Select-key and
make the desired changes to the
speed before you confirm the
volumes.

16
Sd Ad
4. Choose the volumes. Attach the tip
to the dispenser before confirming
the programming by double clicking
the Start-button. Note: If you want
to change the speed, press the
Select-key and make the desired
changes to the speed before you
confirm the number of the portions.
3. Choose the dispensing pace. Attach
the tip to the dispenser before
confirming the programming by
double clicking the Start-button.
Note: If you want to change the
speed, press the Select-key and
make the desired changes to the
speed before you confirm the pace.
5. Choose
the volume
4. Choose
the aliquots
3. Choose
the aliquots
SA
4. Choose the aliquots. Attach the tip to
the dispenser before confirming the
programming by double clicking the Start-
button.
NOTE: If you want to change the speed, press
the Select-key and make the desired changes
to the speed before you confirm the number
of the portions
3. Choose
the volume
17
5.4. Custom Mode
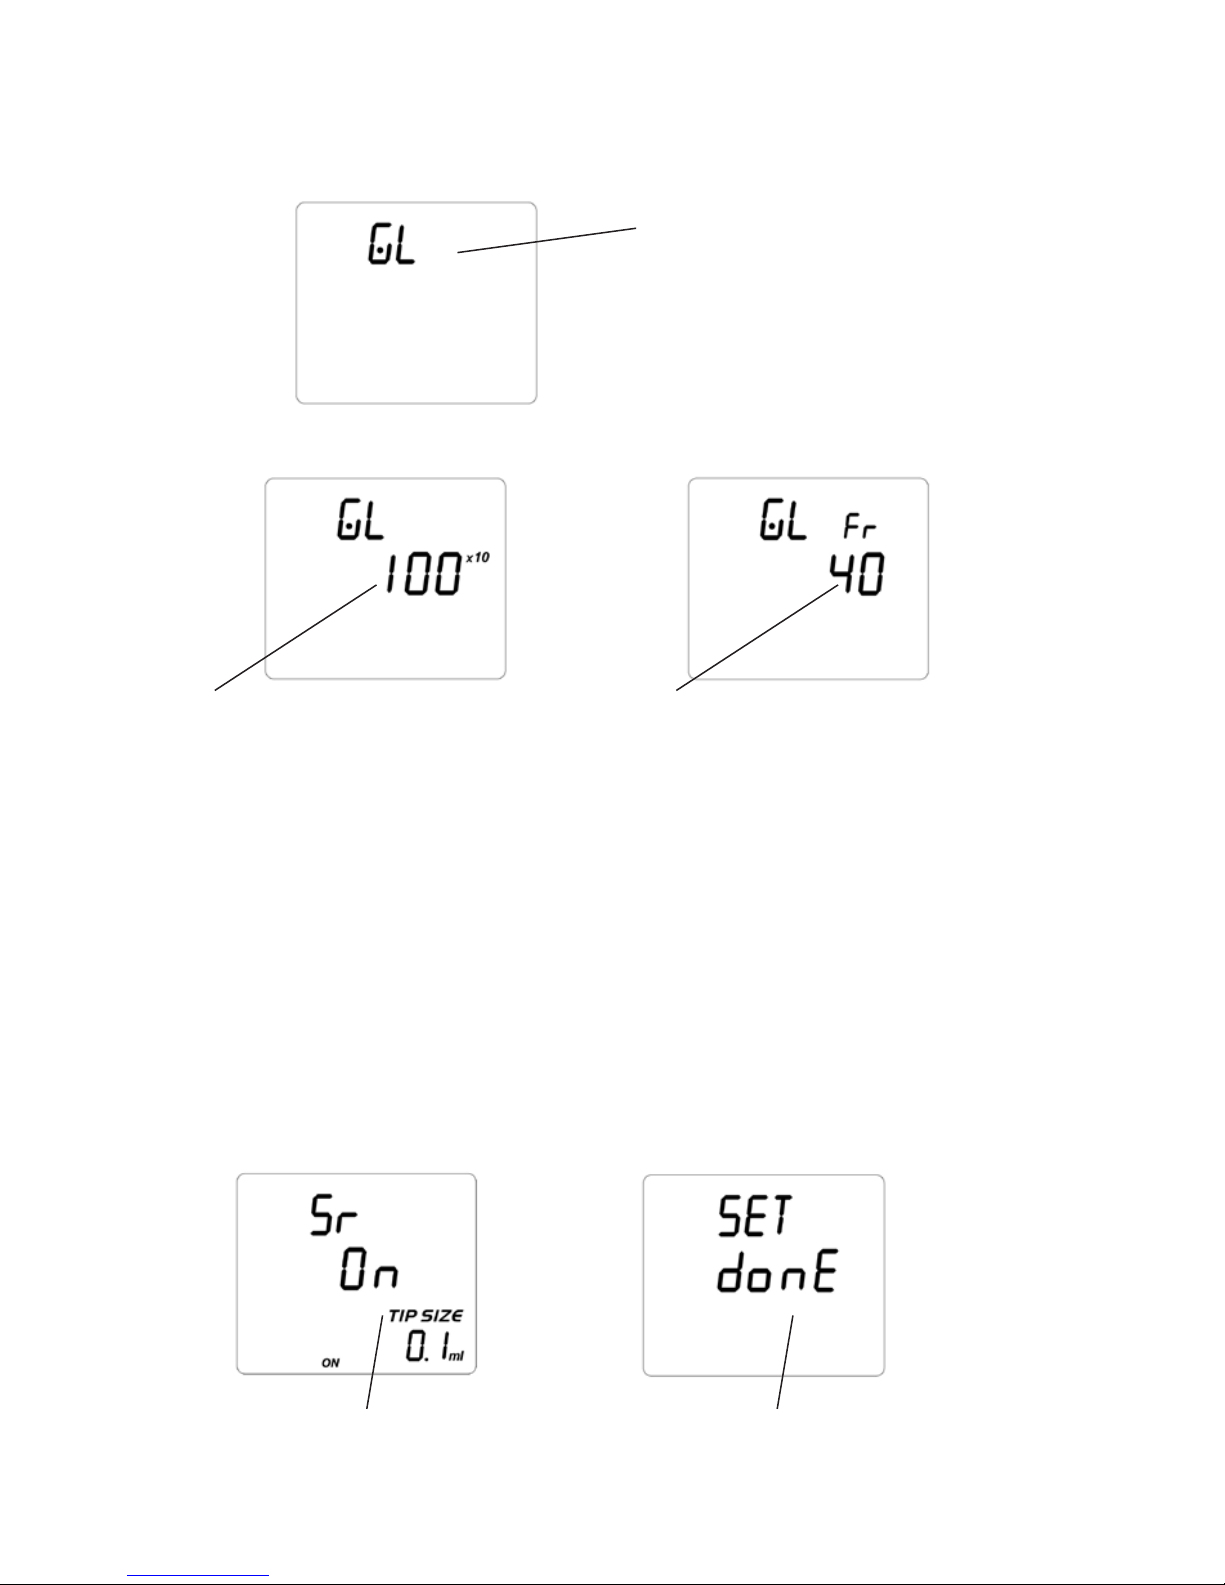
Operation modes GL, Sr and SET
- When pipette alarms the service (GL-text and the number
of cycles are shown in the display), clear the alarm-signal
by pressing the Enter-key a few seconds.
- After the service is done, press the Select-key (RES-text is
displayed) and Enter-key to start the counting again with
the same service and alarm intervals
- If you want to change the intervals, program the GL again
according the intstructions above
Sr (Select tip range) SET
1. Push Enter and Start-keys
2. Choose the desired operation
mode:
GL
Sr
SET
GL (Good Laboratory practice)
3. Select the service interval (number
of pipeting cycles whereupon the
pipette alarms service)
4. Select the alarm interval
(number of pipeting cycles
whereupon the pipette reminds
about the service)
3. Scroll the tip range and accept or
reject the tip with Select-key
3. Press the Enter-key. The default
settings will be valid after the
“donE”-text appears in the display.

18
6. Maintenance
6.1. Cleaning the pipette
To ensure trouble-free operation it is recommended to apply
regular maintenance and cleaning to eLINE Dispenser.
To clean and decontaminate the outer surface use ethanol
(70%), isopropanol (60%) or mild detergent and a soft lint-
free cloth. Gently clean the surface of the pipette with the
moistened cloth and wipe dry.
NOTE: Remove the battery pack from the pipette prior the
cleaning! It is recommended always to use gloves when
cleaning the pipette. Do not let the liquid enter the pipette
handle!
6.2. Battery replacement
The design of the Biohit eLINE pipettes enables fast and easy
battery replacement. The battery replacement pack includes 4
NiMH batteries fixed to the battery cover. If the batteries do
not hold a sufficient charge for proper operation follow these
steps for replacement of the battery pack.
1. Hold the pipette in a horizontal position with the display
facing up.
2.
Press the two charging contacts simultaneously to release
the battery pack.
3. Place the new battery pack into the compartment and
close the battery cover by pressing it lightly.
NOTE: The battery cover pack fits in to the compartment one
way only. If the pack is inserted incorrectly the battery cover
will not close properly.
NOTE: Only use battery packs supplied by the manufacturer.
The use of any other type of battery will immediately void
the warranty!
7. Troubleshooting
The eLINE Dispenser have a onboard monitoring program to
control the performance of each pipetting action. If any error
message appears to the display it means that the Dispenser
has been unable to perform the attempted action properly.
In case of an error the display will show ER and PRSS ENT.
message. To clear the message please follow these steps:
Table of contents
Other Biohit Dispenser manuals

Popular Dispenser manuals by other brands


Nordson EFD
Nordson EFD Ultimus I quick start guide

GP PRO
GP PRO Georgia-Pacific 59798 reference guide

Graco
Graco Reactor H-40 Elite Electrical diagrams

hygn.me
hygn.me Station 3 Assembly instruction

KWC
KWC RODAN RODX602E Installation and operating instructions

Prince Castle
Prince Castle 398-CN Quick reference guide

Graco
Graco PRECISIONSWIRL 310554V Instructions-parts list

Rack-A-Tiers
Rack-A-Tiers Wire Tub manual

InSinkErator
InSinkErator Invite H770-SS owner's manual

Cornelius
Cornelius 2230 C4-100 manual

Cornelius
Cornelius IDC PRO 255 Operator's manual

Cornelius
Cornelius IntelliBlue R134 Kuwait Series operating instructions