BioNano Genomics Irys User manual

Irys®User Guide
Document Number: 30047
Document Revision: A
07/28/2015
For Research Use Only. Not Intended For Diagnostic Purposes.
Copyright © 2015 BioNano Genomics Inc. All Rights Reserved.

Irys® User Guide
ii
Contents
Legal Notices ................................................................................................................................................................4
Revision History ...........................................................................................................................................................5
SafetyWarnings ............................................................................................................................................................6
Chapter 1 Overview......................................................................................................................................................7
1.1 Introduction.......................................................................................................................................................7
What's New! ................................................................................................................................................................7
Audience and Intended Use........................................................................................................................................7
1.2 Irys Overview ....................................................................................................................................................7
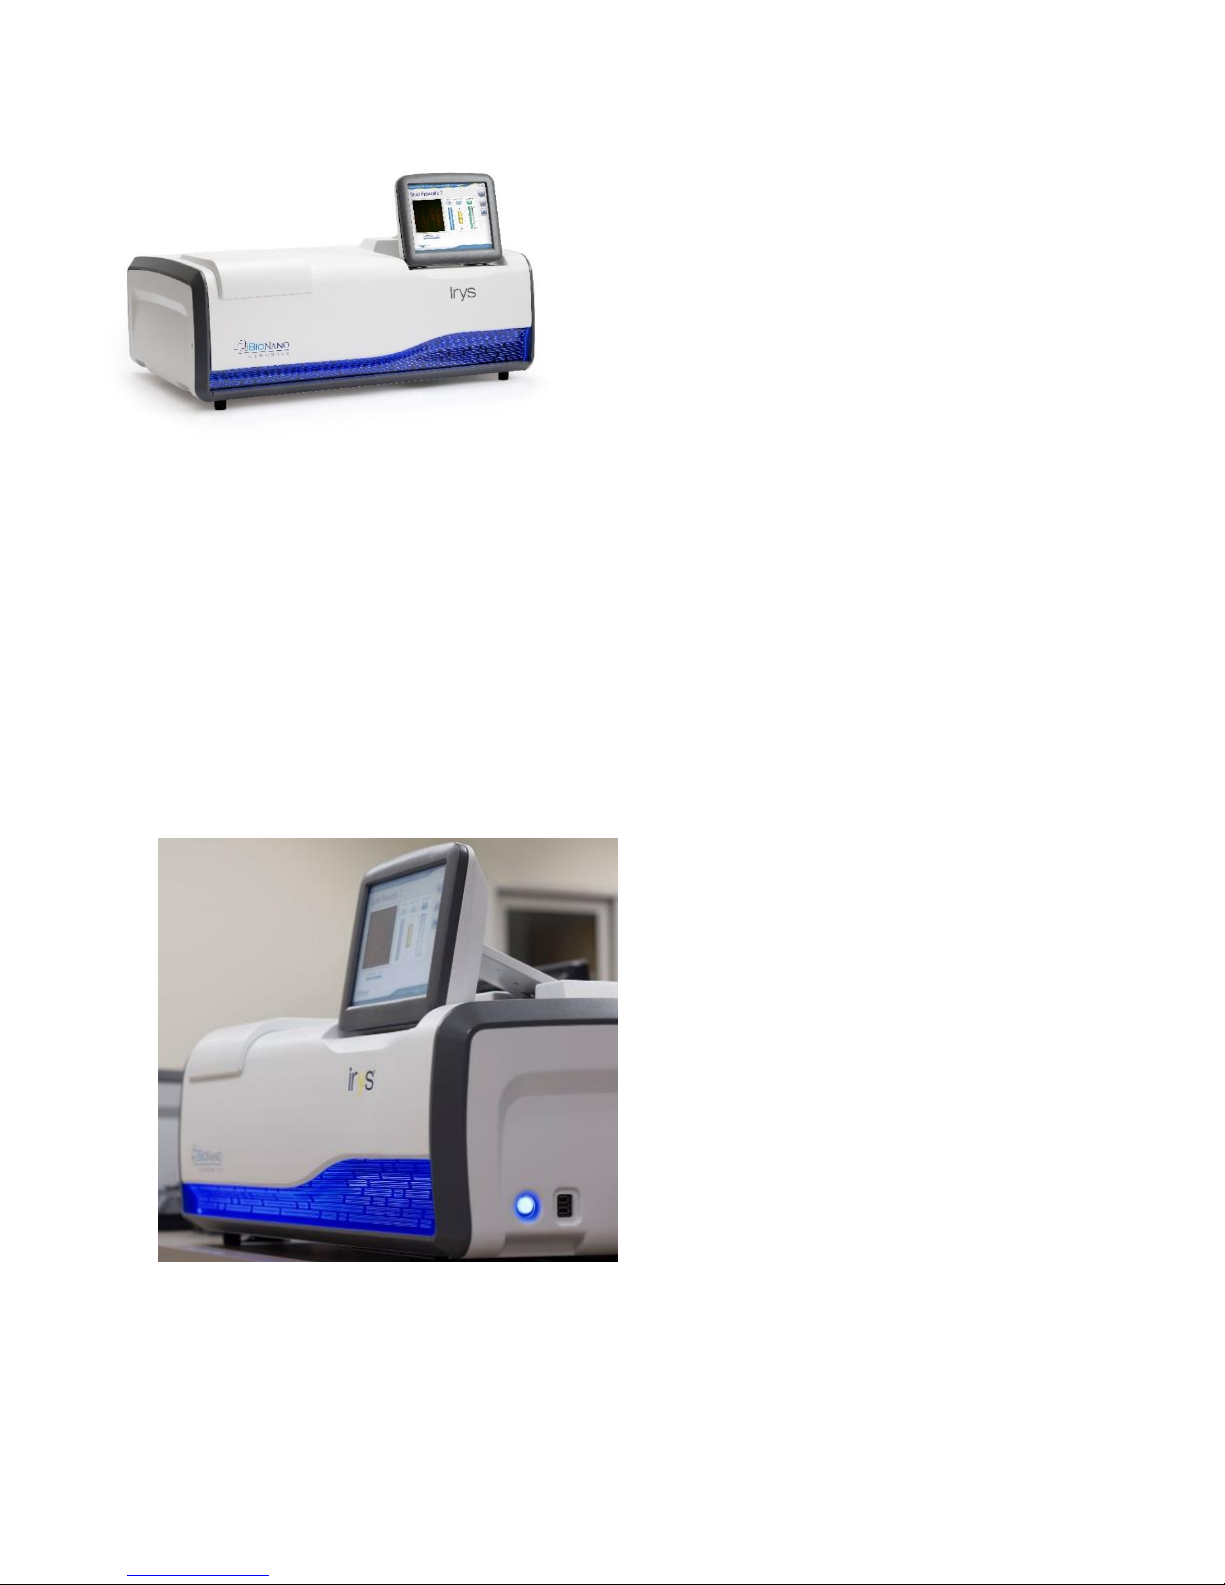
Irys Description............................................................................................................................................................7
Irys Exterior.................................................................................................................................................................9
Front............................................................................................................................................................................9
Right Side....................................................................................................................................................................9
Rear Panel...................................................................................................................................................................9
Irys Inside..................................................................................................................................................................10
1.3 IrysWorkstation Configuration......................................................................................................................11
Data Network Connections and Power .....................................................................................................................11
Computer System Workflow......................................................................................................................................12
1.4 First Use ..........................................................................................................................................................12
1.5 User Supplied Consumables.........................................................................................................................13
IrysChip .....................................................................................................................................................................13
IrysPrep.....................................................................................................................................................................13
1.6 Run Type Recipes (M2, M3, M3xandOptimized) ..........................................................................................13
Chapter 2 Irys Instrument Control Software............................................................................................................14
2.1 Best Practices.................................................................................................................................................14
2.2 Irys ICS Main Screen Overview.....................................................................................................................14
Select User Screen ...................................................................................................................................................14
Chapter 3 Starting a Project......................................................................................................................................15
3.1 Irys System ProjectWorkflow Overview.......................................................................................................15
3.2 Sample Preparation Summary ......................................................................................................................15
IrysPrep Plug Lysis Long DNA Isolation (BNG PN 30026).......................................................................................15
IrysPrep Labeling-NLRS (BNG PN 30024)...............................................................................................................16
IrysPrep Human Blood Protocol (BNG PN 30033)....................................................................................................16
3.3 IrysChip Preparation Summary.....................................................................................................................16
Preparing IrysChip.....................................................................................................................................................16
3.4 Instrument Preparation Summary.................................................................................................................16
System Startup..........................................................................................................................................................16
3.5 Logging In .......................................................................................................................................................18
Select Existing User or <Add New User> .................................................................................................................19
Configuring the User Settings and Remote Data Storage Location .........................................................................19
Chapter 4 Performing a Run......................................................................................................................................20
4.1 Loading the Sample........................................................................................................................................20
Load Inlets.................................................................................................................................................................21
Load Outlets..............................................................................................................................................................22
Cleaning and Oiling the Objective.............................................................................................................................22
Forward .....................................................................................................................................................................23
Sample Detect...........................................................................................................................................................23
4.2 Barcode............................................................................................................................................................24
Forward .....................................................................................................................................................................24
4.3 Focus & Register ............................................................................................................................................25
4.4 Select Recipe ..................................................................................................................................................26

Irys® User Guide
07/10/2015
For Research Use Only. Not Intended For Diagnostic Purposes.
3
4.5 Scanning Flowcell...........................................................................................................................................27
4.6 Results.............................................................................................................................................................28
Forward .....................................................................................................................................................................29
4.7 Clean................................................................................................................................................................29
4.8 After a Run ......................................................................................................................................................30
Load Another Sample ...............................................................................................................................................30
Shutting down the Instrument ...................................................................................................................................30
Chapter 5 Optimized Recipes....................................................................................................................................31
5.1 Creating an Optimized Recipe.......................................................................................................................31
Getting Started:..........................................................................................................................................................31
Workflow....................................................................................................................................................................31
Optimization Setup....................................................................................................................................................32
Labels A through G ...................................................................................................................................................33
Step 1: Selecting a Base Recipe...............................................................................................................................33
Step 2: Focusing .......................................................................................................................................................34
Step 3: Initial Loading................................................................................................................................................34
Loading Step: Concentration.....................................................................................................................................35
Loading Step: Spike..................................................................................................................................................35
Loading Step: Bump..................................................................................................................................................36
ConcentrationTime Optimization..............................................................................................................................37
Loading Step: BumpTime Optimization....................................................................................................................37
Selecting Yes Pathway .............................................................................................................................................39
LoadTime Optimization.............................................................................................................................................39
Example Scan...........................................................................................................................................................41
Selecting No Pathway...............................................................................................................................................41
Save Recipe..............................................................................................................................................................42
Chapter 6 Data Analysis ............................................................................................................................................44
6.1 DataTransfer for Analysis..............................................................................................................................44
Appendices .................................................................................................................................................................45
1.1 Appendix A - Irys Maintenance .....................................................................................................................45
Introduction................................................................................................................................................................45
Basic instrument care................................................................................................................................................45
Routine Maintenance ................................................................................................................................................45
1.2 Appendix B -Troubleshooting.......................................................................................................................47
1.3 Appendix C –GUI Navigation Buttons .........................................................................................................48
Navigation Buttons....................................................................................................................................................48
1.4 Appendix D -Terms ........................................................................................................................................49
1.5 Appendix E - SMS Domain Names................................................................................................................50
Technical Support.......................................................................................................................................................51

Irys® User Guide
4
7/10/2015
For Research Use Only. Not Intended For Diagnostic Purposes.
Legal Notices
For Research Use Only. Not Intended For Diagnostic Purposes.
This material is protected by United States Copyright Law and International Treaties. Unauthorized use of this
material is prohibited. No part of the publication may be copied, reproduced, distributed, translated, reverse-
engineered or transmitted in anyform or byany media, or byanymeans, whether now known or unknown, without
the express prior permission in writing from BioNanoGenomics.Copying,under the law, includes translating into
another language or format. The technical data contained herein is intended for ultimate destinations permitted by
U.S. law. Diversion contrary to U. S. law prohibited. This publication represents the latest information available at the
time of release. Due to continuous efforts to improve the product, technicalchanges may occur that are not reflected
in this document. BioNano Genomics reserves the right to make changes in specifications and other information
contained in this publication at anytimeand without prior notice. Please contact BioNano Genomics Customer
Support for the latest information.
BIONANO GENOMICS DISCLAIMS ALLWARRANTIES WITH RESPECT TO THIS DOCUMENT, EXPRESSED
OR IMPLIED, INCLUDING BUT NOT LIMITED TO THOSE OF MERCHANTABILITYOR FITNESS FOR A
PARTICULAR PURPOSE. TO THEFULLEST EXTENT ALLOWED BY LAW, IN NO EVENT SHALL BIONANO
GENOMICS BE LIABLE,WHETHER IN CONTRACT,TORT,WARRANTY, OR UNDER ANY STATUTE OR ON
ANY OTHER BASIS FOR SPECIAL, INCIDENTAL, INDIRECT, PUNITIVE, MULTIPLEOR CONSEQUENTIAL
DAMAGES IN CONNECTIONWITH OR ARISING FROM THIS DOCUMENT, INCLUDING BUT NOT LIMITED TO
THE USETHEREOF,WHETHER OR NOT FORESEEABLE AND WHETHER OR NOT BIONANO GENOMICS IS
ADVISED OF THE POSSIBILITYOF SUCH DAMAGES.
Patents
Products of BioNano Genomicsmaybe covered by one ormore U.S. or foreign patents.
Trademarks
The BioNano Genomics logo and names of BioNano Genomics products or services are registered trademarks or
trademarks owned by BioNano Genomics in the United States and certain other countries.
BioNano Genomics®, Irys®, IrysView®, IrysChip®, IrysPrep® and IrysSolve® are trademarks of BioNano
Genomics, Inc. All other trademarks are the sole property of their respective owners.
No license to use anytrademarks of BioNano Genomics is given or implied. Users are not permitted to use these
trademarks without the prior written consent of BioNano Genomics. The use of these trademarks or any other
materials, except as permitted herein, is expressly prohibited and may be in violation of federal or other applicable
laws.
© Copyright 2015 BioNano Genomics, Inc. All rights reserved.

Irys® User Guide
07/10/2015
5
For Research Use Only. Not Intended For Diagnostic Purposes.
Revision History
Table 1: Current Revision History
Part Number 30047 Revision A
Date
Summary
Initial Release
07/28/2015
Released per CO 0131
•Created a reformatted, rebranded workflow-styled Irys User Guide.
Replaces PN 30028.
•V1.6 New Features include:
•GenerateOptimized Recipe creation
•Multicolor live molecules
•All-flowcell abort, customize recipe and cycle number
•Z Stage, autofocus,system tests
•Power supply, Micos Z Stagemotor, general bug fixes

Irys® User Guide
6
7/10/2015
For Research Use Only. Not Intended For Diagnostic Purposes.
SafetyWarnings
This guide is written and organized for use by individuals skilled in the operation and function of chemical, high
voltage, and industrial light sources and their subsystems, particularly excimer lasers. It is assumed that this skill
and knowledge will be used whenfollowing the procedures outlined in this guide.
Following is an explanation warnings and symbols:
SafetyWarnings
Thisproducthas a lasersystem classification of Class1 which usesfour embeddedClass 3B lasers.
With nominal outputs of 300 mW (532 nm), 140 mW (637 nm), 75 mW (473 nm) and 90 mW (785 nm)
optical power (nominal wavelength).
A Class 1 laser is safeunderall conditions of normaluse.
A Class 3B laser is hazardous if the eye is exposed directly, but diffuse reflections suchas those from paper or other
matte surfaces are not harmful. Protective eyewear is typically required where direct viewing of a class 3B laser
beam may occur. Class-3B lasers must be equipped with a keyswitch and a safety interlock. DO NOT OPEN the
frontcover of theIrys Instrument as you maycome in contact with a Class 3B Laser.
1. Do not connect any item to the Irys Instrument unless specifically stated within this manual or if you are instructed
to do so by BioNano GenomicsTechnical Support.
2. Do not use adjacent to or stacked with other equipment such that it is difficult to operate or disconnect from
power.
3. Do not attach the power cord to an extension cord or to a multiple portable socket.Doing so may compromise
shielding and/or grounding.
Table 2: Symbols
Warning:Indicates a warning concerning operationsthat maylead to
personal injury or potential damage to the Irys instrument if not performed
correctly.
Standby: The switch does not fullydisconnect the device from its power
supply but places in standby state.
USB Connectivity
Ethernet Connectivity

Irys® User Guide
07/10/2015
7
For Research Use Only. Not Intended For Diagnostic Purposes.
Chapter 1 Overview
1.1 Introduction
Complex genomes are composed of multiploid chromosomal DNA with each individual chromosome ranging from
hundreds of thousands to hundreds of millions of base pairs in length. Once extracted from cells, these long
biopolymer molecules form tight ball-like coils that are difficult to image and analyze. Irys uses a patented method
of DNA linearization to unravel the DNA and then image it in the NanoChannel Array, allowing the structure of the
genome to be imaged and then analyzed at the molecular level.
The Irys System is a groundbreaking technologyfor performing single molecule and whole genome mapping and
analysis in a nanoscale fluidic environment designed to enable the identification of biological samples on a
molecule-by-molecule basis. It is suitable for a variety of applications including whole-genome sequence scaffolding
and structural variation (SV) region mapping, identification, and quantitation. The Irys System uses a
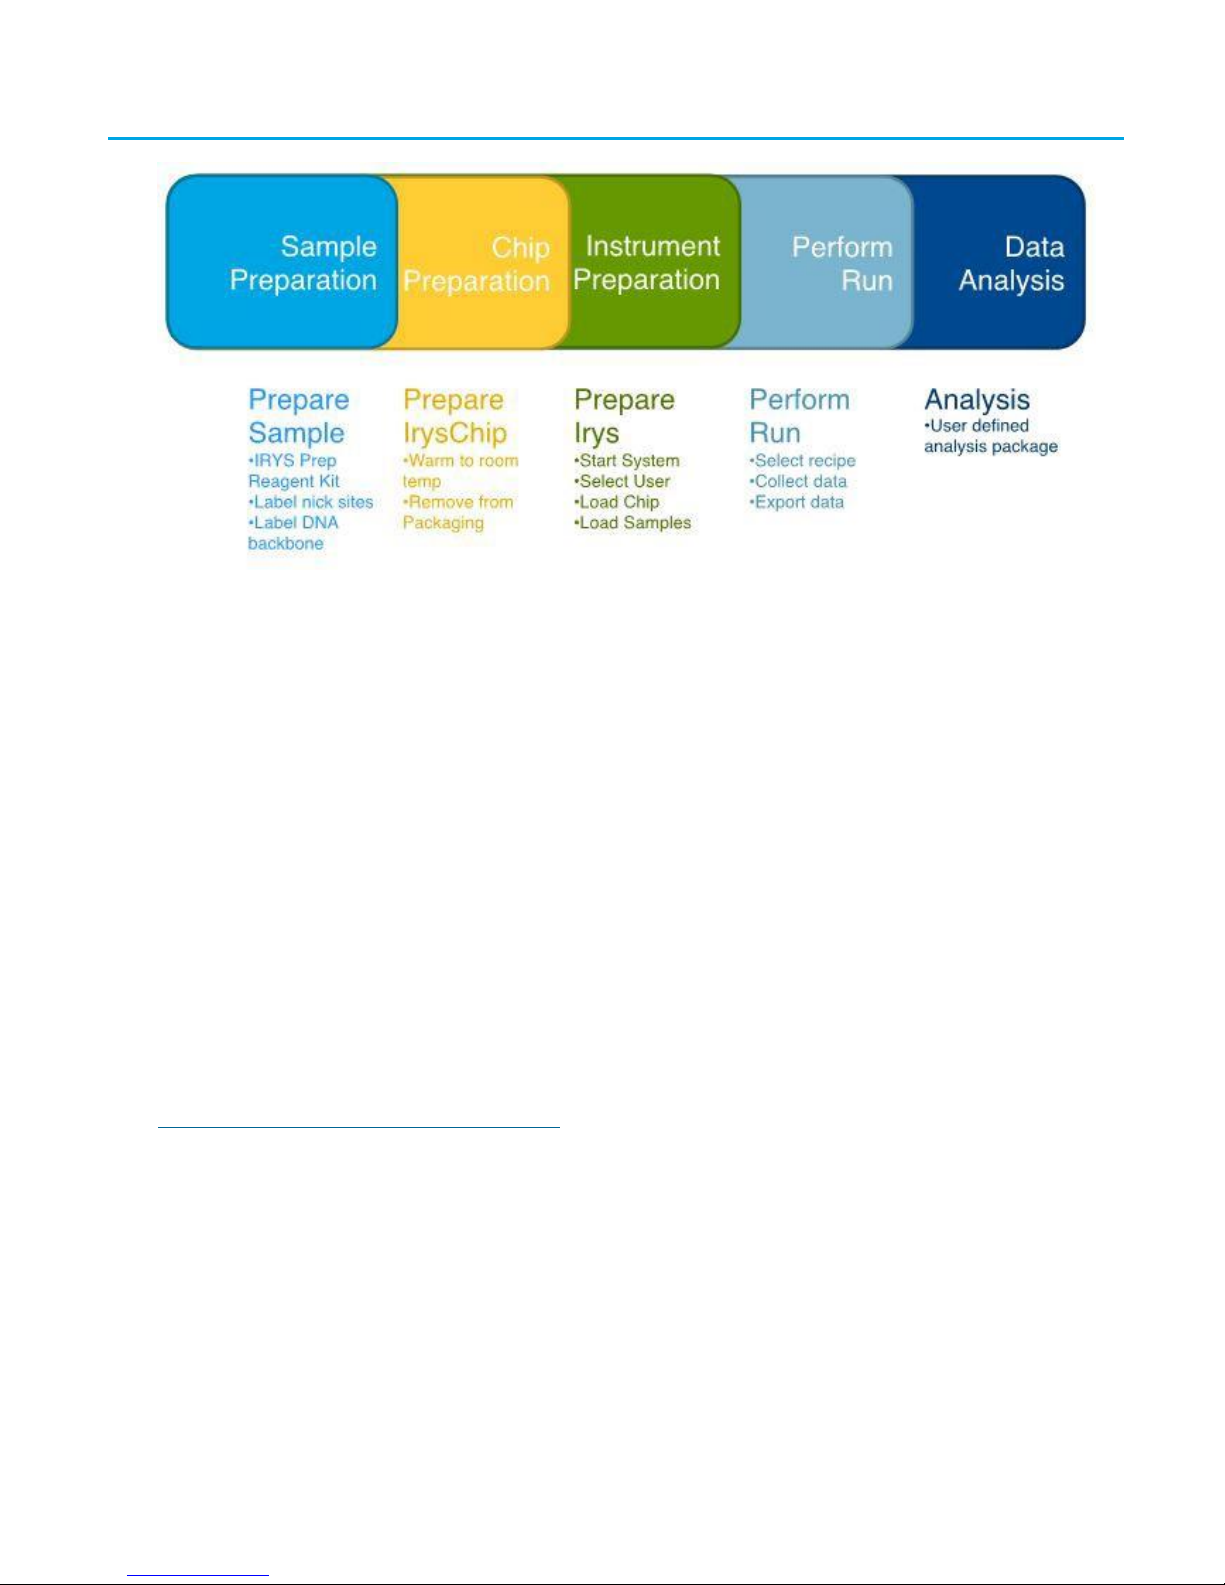
straightforward and flexible process, and consists of five main steps:
1. Sample preparation —Performed using the IrysPrep sample preparation kit for your specific application.
2. Chip preparation —Performed on the Irys.
3. Molecule imaging —Performed on the Irys.
4. Data viewing and genome analysis—Performed using IrysView.
5. Data analysis —Data analysis starts with AutoDetect, the image detection software, which is performedoff-
instrument.Furtherdata analysisis performedoff-instrument using IrysView and IrysSolve software
applications.
What's New!
•New version recipes enable 2-color.
•Version M3 and M3x are new base recipes.
•M3 and M3x Generate Optimized recipes are new user-defined configurations to improve workflow for
throughput.
•Graphical user interface enhancements include additional options for file saving in the ScanFlowcell
window.
Audience and Intended Use
Thisguidecontainsinformation about theIrys system.It providesan overviewof instrumentcomponentsand
software features, and full instructions for performing a run.
This guide is for laboratory personnel and other individuals responsible for:
•Operating the instrument
•Performing runs
•Performing instrument and component maintenance
•Training personnel on the instrument
Irys is intended for RESEARCH USE ONLY(RUO) and is not for use in diagnostic procedures.
1.2 Irys Overview
Irys Description
Irys is an epi-fluorescent imager capable of detecting single DNA molecules in submicron channels etched into a
silicon substrate. The system is comprised of optical and mechanical components that are designed and optimized
to provide imaging capabilities for single molecule analysis.

Irys® User Guide
8
7/10/2015
For Research Use Only. Not Intended For Diagnostic Purposes.
The system is specifically designed to work with the IrysChip. The IrysChip provides a flowcell for preparing and
controlling the sample for imaging. Onlyverysmall amounts of fluorescently labeled sample is needed for loading.
The IrysChip is then placed on an automated stage for imaging. During the imaging process, a low-voltage electric
field is used to concentrate and flow the sample through the flowcell.
Fluorescent labels bound to the sample are excited bysolid-state lasers that are directed to the underside of the
NanoChannel Arraybymirrors, dichroic filters, lenses, and a high numerical aperture objective lens. The optical
components are carefullyselected and placed to optimize energy transmission that is captured via a high-
sensitivity, low noise EM-CCD camera. This powerful combination of lasers, optics, and camera coupled with a
proprietary autofocus system and proprietarysoftware, maintains focus while capturing images at an extremelyfast
frame rate. Fluorescent samples can be imaged in multiple color channels with high signal-to-noise discrimination
with coordinate color data in real time.
Single Molecule Confinement and Molecular Linearization
TheIrysinstrumentis specificallydesignedtodetectfluorescentmoleculardatafromwithinalinearNanoChannel
etchedintosilicon.EachNanoChannelpermitsonlyasinglemoleculeto travel throughtheflowcell in astraight line
preventing fluorescent data overlap while reducingfluorescentnoise caused bysamplebuffer or substrate auto-
fluorescence.
Consistent, Disposable, High Capacity Flowcell
Taking advantage of semiconductor manufacturing, the IrysChip is designed for single use disposability.This
avoidsthecomplicationsof samplecontamination,backgroundfluorescenceand flowcellclogging,andreduces
data collection time.And with thousands of identical, parallelNanoChannels in eachflowcell,tens of thousands
of target molecules can be confined and imaged at the same time with nearly identical environments for each
molecule.
Size Independent, Solution Phase Analysis
IrysChips are not preconfigured for any specific type of sample or pre-loaded with any specific type of buffer or
polymer, avoiding any practical limit to the length of molecule that can be investigated. Samples are loaded in an
aqueous buffer that maintains the samples’ original state and remains in this aqueous state throughout the
analysis.This avoids surface phenomena from affecting or biasing results and allows for small molecule
interactions (like protein binding events) to be investigated.
Guided Optimized Recipe Creation
Theusercanexit Generate Optimized Recipe byclickingtheback arrowto returnto theSelectRecipescreen or
the Abort button to return to the User Select screen.If the user was creating two Generate Optimized Recipes and
already finished saving one, the saved recipe will be available in the Select Recipe screen.A dialog box warns the
user that going back will cancel the Generate Optimized Recipe creation.
Multicolor Live Molecules
From single quantum dots or fluorophores to thousands of large polymeric molecules like DNA, the Irys can image
any type of fluorescentmolecule that can be confined within the IrysChip. Samples that contain a wide range of
sizes (from less than 2 kilobase pairs to greater than 1 Megabase pair of DNA), fluorescent intensities or colors
can be analyzed in the same run on the same flowcell.
Independence of Recipe and Cycle Number
With selectable multi-laser excitation and emission filters and the solid-state, semi-conductor quality of the
IrysChip, the Irys ensures consistent results across a wide array of sample and feature types.
Irys® User Guide
07/10/2015
9
For Research Use Only. Not Intended For Diagnostic Purposes.
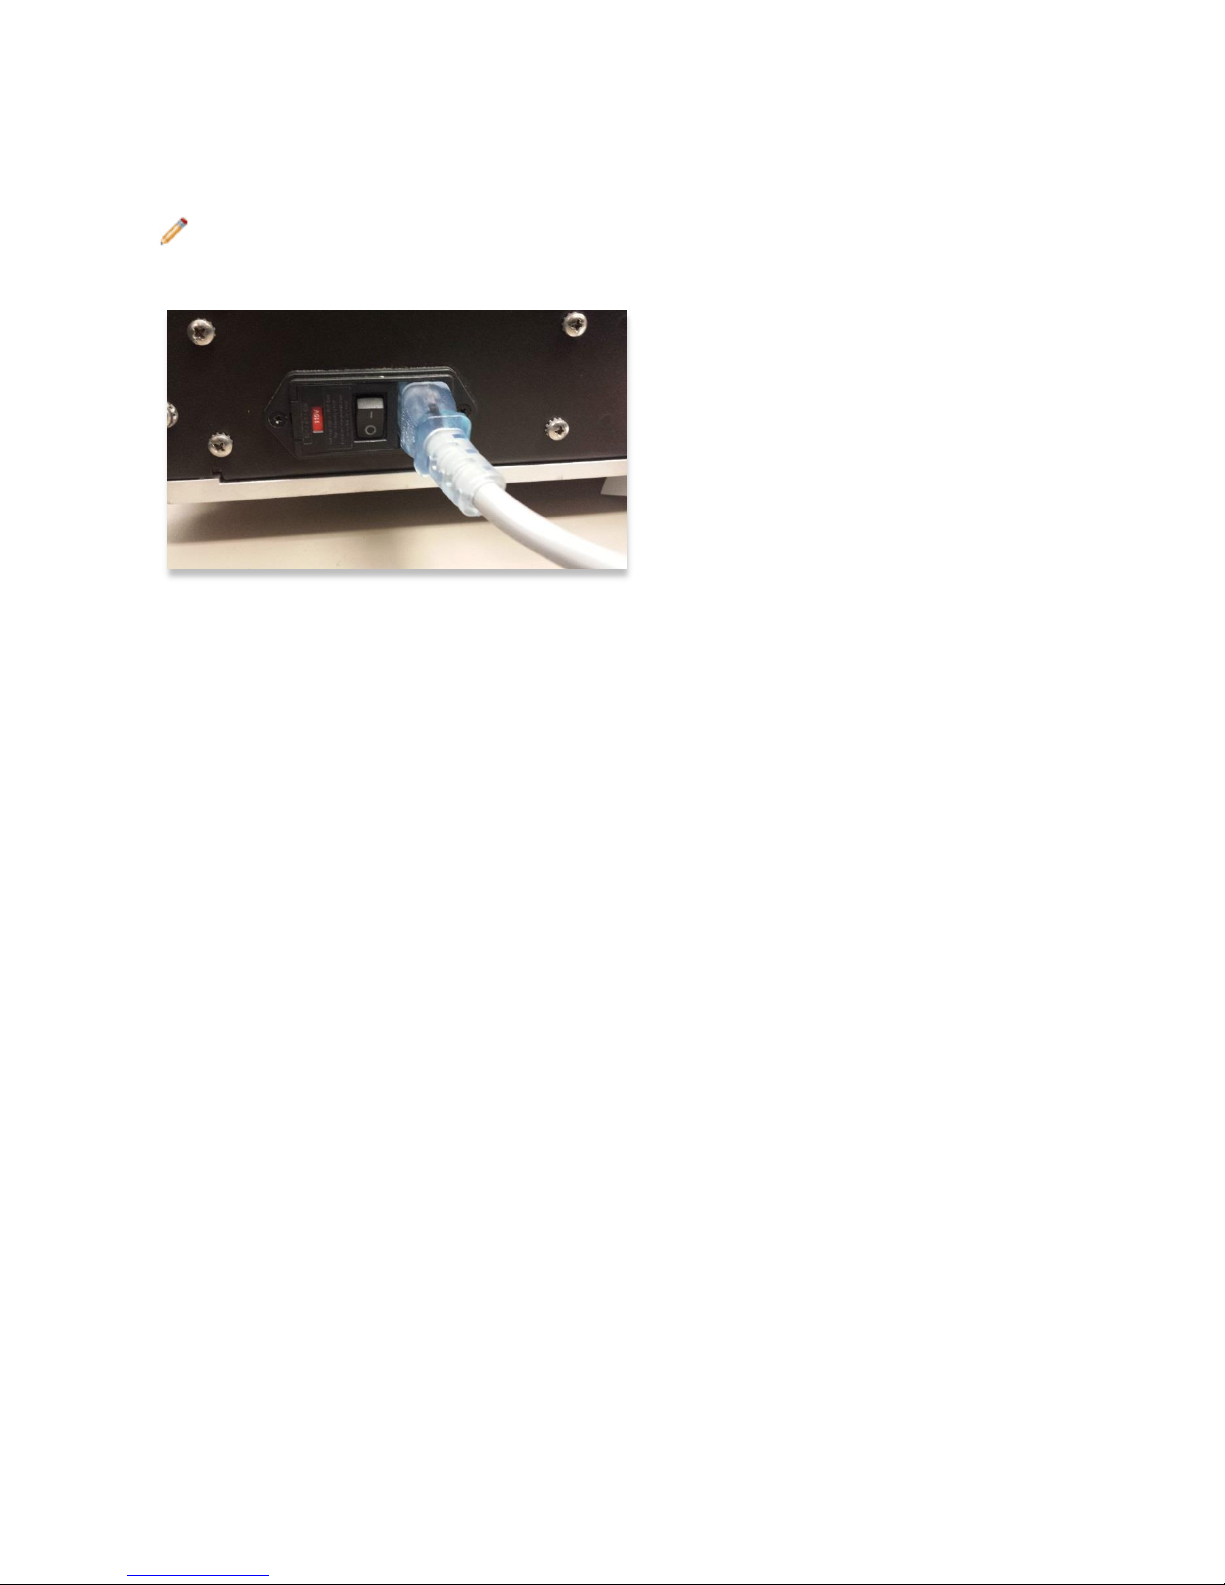
Irys Exterior
Figure 1: Irys Exterior
Front
Touch Screen Monitor: perform instrument configuration and run setup. The graphical user interface touch screen
monitor has been designed with large buttons and follows an easy workflow facilitating the instrument’s operation
and run execution.
Sample Loading Door and XY Stage: The sample loading door is accessible during the workflow using the touch
screen monitor, and can be manually opened.
Right Side
Power button: The ON/OFF button is located on the right-hand-side of the instrument.
USB: Two USB 2.0 ports are located on the right-hand-side next to the power button.Field Service Engineers
periodically use USB to perform instrument software updates.
Figure 2: Right-side view of Irys showing USB ports and power button
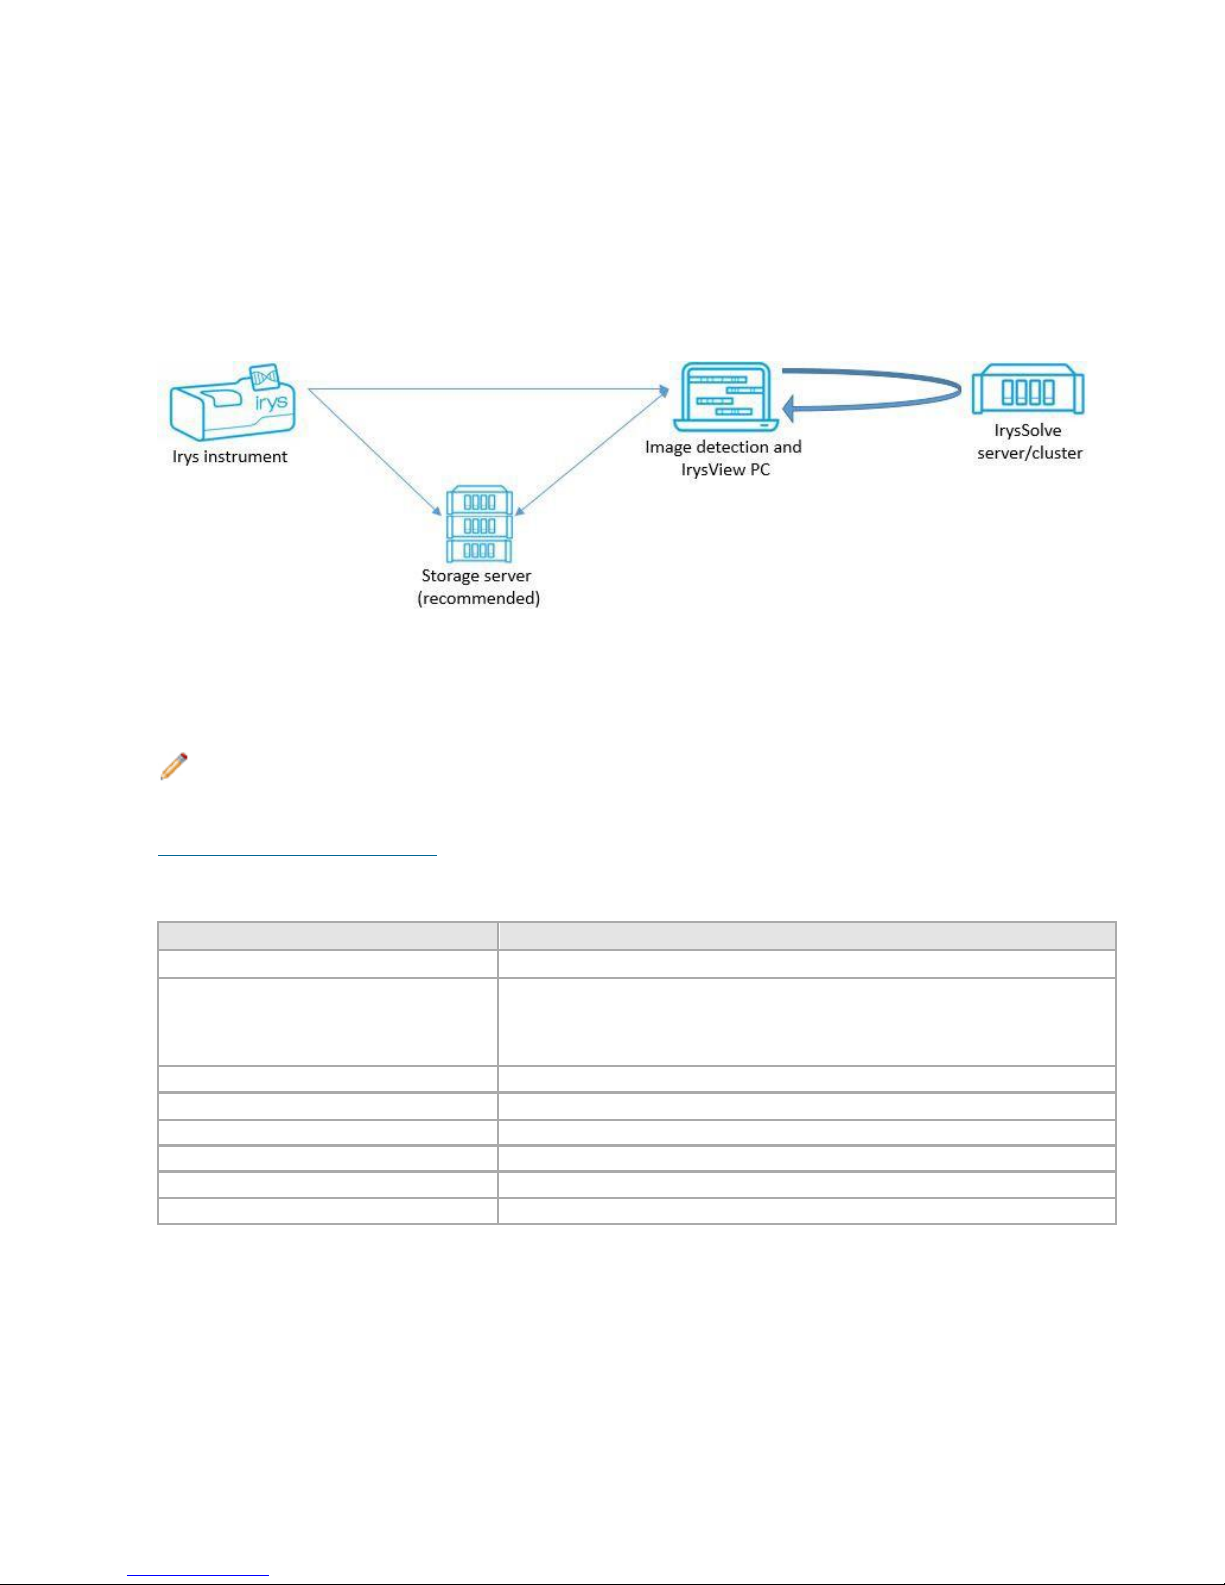
Rear Panel
Power Connectors: Irys requires a single 100 to 240 VAC/50 to 60 Hz (+/- 10%) rated at 1.5KVA power connection
with a dedicated ground. The main power switch and the power source connection are located on the rear panel.
The main power switch mustbe turned to the ONposition before the power button on the right-hand-side of the
instrument can operate.
Irys® User Guide
10
7/10/2015
For Research Use Only. Not Intended For Diagnostic Purposes.
Ethernet Connectors –The Ethernet connection is located on the rear panel. The instrument must be connected to
a network server via the 1 gigabit Ethernet port beforesystem operationcanbegin.This portis providedfordata
archivalandsubsequentin-depth data analysis with BioNano Genomics IrysViewsoftware suite.Dataarchival
canbe automatedor done manuallydepending upon user preference.
Note: The user’s network may need to be pre-configured to allow instrument to successfully connect to
network.This will be coordinated before installation with the Field Service Engineer.
Figure 3: Image of rear view of Irys showing power switch and connector and Ethernet connection port
Irys Inside
Keycomponents:
1. Ultra-low noise EM-CCD camera
2. High Speed Filter Wheel
3. Automated XY Stage
4. Lasers
5. Automated Autofocusing System
6. Image Controller
7. Electrode Bundle
1. Ultra-low noise EM-CCD camera
EM-CCD camera has single photon detection capability combined with >90% QE (quantum efficiency). This frame
transfer format delivers unequalled thermoelectric cooling, industry-lowest clock induced charge noise, and
operates at 35 frames/sec (full resolution) while offering distinct speed advantages and minimizes vertical smear.
2. High Speed Filter Wheel
A high-performance servo motor with rare-earth magnets and backlash-free power transfer with filter distance
travels at 23 to 30 microseconds between positions.
3. Automated XY Stage
Stages with slotted base plates and dovetail slides designed to reduce shock and vibration provide greater stability.
4. Lasers
Laser platform ismade of component-based lasers at 473 nanometer wavelength and an integrated controller and
power source. Beam asymmetryis <= 1:1.2, with a beam divergence of < 1.1 and a pointing stabilityof < 30 urads
(after two hours of warm-up). Peak to peak noise is < 0.5%megahertz(after five minutes of warm-up). Laser beam
safety is Class 3B with a Level 4 electrostatic discharge protection. Laser optimal temperature operating conditions
are 10 to 50°C with a shock tolerance of 30 grams/6 microseconds.

Irys® User Guide
07/10/2015
11
For Research Use Only. Not Intended For Diagnostic Purposes.
5. Automated Autofocusing System
Automated Autofocusing System provides continuous nanometer scale focusing control.
6. Image Control Board
Image control board synchronizes all excitation, imaging and stage movements.
Table 3: Imaging Compartment Specifications: Illumination
Specification
Dimension
Illumination modes
Fluorescence excitation (primary), brightfield (auxiliary, for registration)
Excitation light source type
Lasers, closed-loop power controlled diode and DPSS
Number of excitation wavelengths
3 (1 molecule stain channel and 2 label channels)
Excitation wavelengths
473 nm, 532 nm, 637 nm
Brightfield source type
LED
Table 4: Imaging Compartment Specifications: Imaging
Specification
Dimension
Imaging modes
Widefield fluorescence (primary), brightfield (auxiliary, for registration)
Emission bands
525 ± 25 nm
579 ± 20 nm
679 ± 20 nm
(configurable)
Camera
TE-cooled back-illuminated EMCCD, 512x512 pixels, <1e- read noise
Objective
100 X NA = 1.4 oil-immersion
Focusing
Hardware autofocus
7. Electrode Bundle
The electrode bundle mates with the IrysChip to control the motion of molecules in the NanoChannels using
electric fields.
1.3 Irys Workstation Configuration
Data Network Connections and Power
Your information technology (IT) resource is responsible for:
•Preparing a stable and sustainable network connection speed of > 10 MB/sec
•Providing internet connection for BioNano GenomicsTechnical Support services
•Connecting an uninterrupted power supply battery backup system (UPS) or line conditioner
•Allowing local administration rights for software installation and firewall modification
•Ensuring Port 21 is open for outbound communications and remote technical support
•Ensuring TCP connections to ports 80, 443 or 8200 are open for outbound communications and real-
time monitoring
Irys ICS, AutoDetect, and IrysView share data using a networked drive and a server for data storage. The
IrysSolve analysis pipeline processes data on a separate, larger Linux-based compute resource.
•Irys ICS: Irys ICS (Instrument control software) performs the runs based on the recipe selected and
parameters specified in the Select Recipe screen.
•AutoDetect: AutoDetect processes image files generated by Irys ICS and creates assemble-ready
digitized molecule and label files for further analysis through IrysView and IrysSolve.
•IrysView: Genomics analysis software used to analyze and visualize data generated by Irys.
Irys® User Guide
12
7/10/2015
For Research Use Only. Not Intended For Diagnostic Purposes.
•IrysSolve Computational Solutions: IrysSolve is the data analysis pipeline which performs automated de
novo assembly and structural variation detection in an integrated pipeline and outputs visualization-
ready assemblies in IrysView.
Computer System Workflow
Irys ICS requires one computer to process image detection and visualization of the genome maps using IrysView;
and one computer in aclusteror cloud-basedenvironmentto perform data assemblyusingIrysSolve.
ThetypicalIrys workflow includes Irys,adedicatedcomputerfor image detection and analysis through IrysView,
a dedicated computer for IrysSolve, and a storage server.
Figure 4: Computer SystemWorkflow
1.4 First Use
A Field Service Engineer will complete performance testing to ensure proper installation.Calibration protocols and
setting adjustments are performed during the installation and training sessions.
Note: Do not attempt to move the instrument without the assistance of a BioNano Field Service Engineer.
Moving the instrument carries a high risk of misaligning the optics of the instrument, which will result in a substantial
degradation in imaging quality. If you require relocation of your instrument, please contact
support@bionanogenomics.com.
Table 5: Environment Specifications
Environment Specifications
Dimension
Operating temperature range
20 to 27° Celsius
Dimensions:
Height
Depth
Width
35.6 cm (14 inches)
65 cm (25.5 inches)
86.4 cm (34 inches)
Mass
77.3 kg (170.5 pounds)
Operating altitude above sea level
0 to 2000 m (0 to 6562 feet)
Operating humidity range
15 to 65 % relative humidity
Sample environment operating temperature
Room temperature
Shipping and storage temperature range
-28 to 50° Celsius
Shipping and storage humidity range
0 to 90 % relative humidity

Irys® User Guide
07/10/2015
13
For Research Use Only. Not Intended For Diagnostic Purposes.
Table 6: Electrical Specifications
Electrical Specifications
Dimension
Operating supply voltage
100 to 240 VAC
Line frequency
50/60 hertz
Power
≤ 250 watts
Power connector
Region-specific power cord supplied
Fuse type
T3A
1.5 User Supplied Consumables
IrysChip
At the heartof the Irys technologyis a disposableNanoChannel fluidic IrysChip within which DNA molecules move
and are confined in an orderly, linear format. Each IrysChip (FC-020-01) has two flowcells capableof processing
two DNA samples.
Table 7: IrysChip
Catalogue Number
Product
FC-020-01
IrysChip v2 (1 chip)
IrysPrep
IrysPrepreagentsareusedforDNAextractionandlabeling to prepare samples for imaging.Each IrysPrep Kit
(RE-011-10) comes with enough material to perform 10 1X-nick label repair stain reactions (each requires 300 ng
of raw DNA).
Table 8: IrysPrep
Cat #
Product
RE-011-10
IrysPrep 1-Color Assembly Reagent Kit (10 reaction)
RE-111-10
IrysPrep DNA Stain (10 reaction)
Other User-Supplied Consumables
The following table lists any other user-supplied materials needed to run the Irys workflow.
Table 9: Consumables
Material
Reference or Catalog Number
AmScope Sparkle Microscope Optical Lens
Cleaner
Cat #CLS or equivalent non-ammonia, non-alcohol cleaner, or high-purity methanol or
isopropanol for cleaning the Objective
Microscope immersion oil
Zeiss Immersol®518 F halogen-free
1.6 Run Type Recipes (M2, M3, M3xand Optimized)
There are three base recipes in Irys: M2 - legacy recipe; M3 - new high throughput recipe; M3x - modified high
throughput recipe. There is also the ability to create Optimized Recipes (A and B). When any base or optimized
recipe is selected, the user can customize laser colors and concentration time for individual flowcells.
Irys® User Guide
14
7/10/2015
For Research Use Only. Not Intended For Diagnostic Purposes.
Chapter 2 Irys Instrument Control Software
2.1 Best Practices
Turn off when not in use.
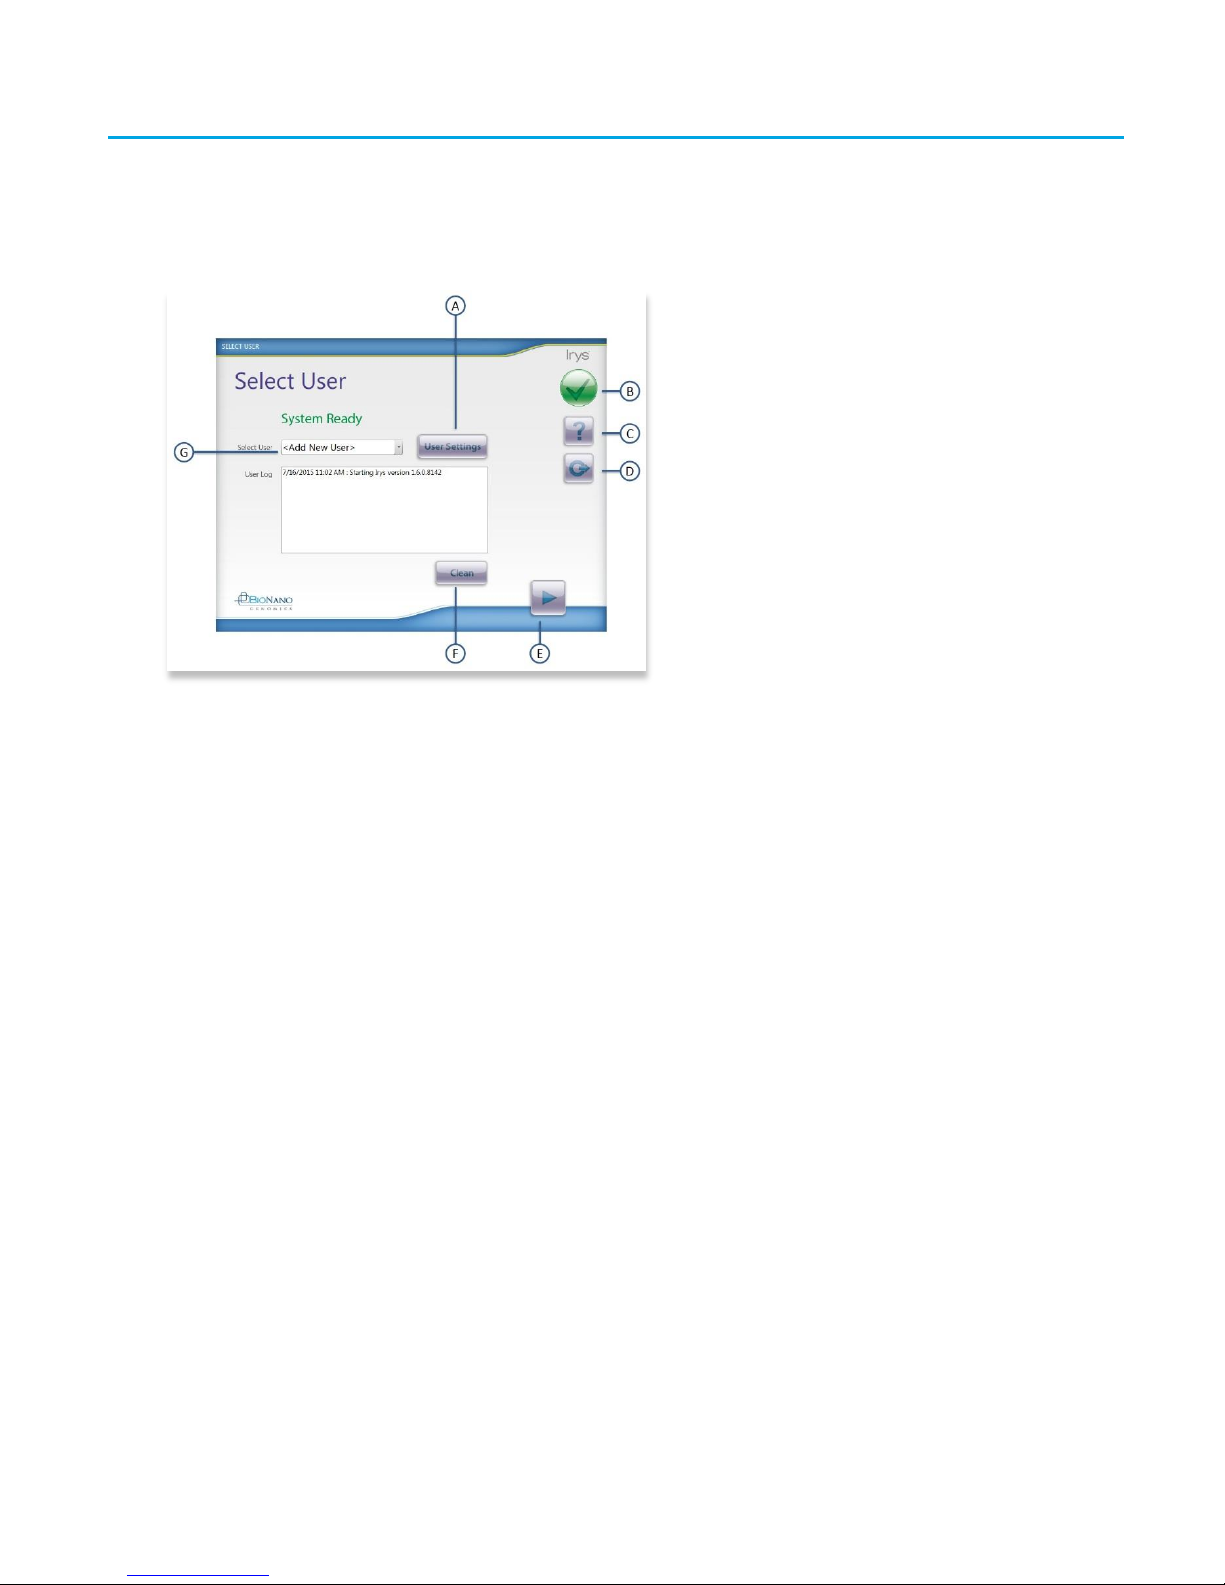
2.2 Irys ICS Main Screen Overview
Figure 5: Select User Screen
Select User Screen
The Select User screen is the opening screen to log in and proceed to set up a run, add new users, or select or
modify an existing user. The screen also serves as a focal point for shutting down the application. Labels A through
F are:
A. User Settings:Pressingthe User Settings button accesses alist of logged users from which to log in,or
provides the menu to create a new user.
B. Status of Events: Pressing the green check mark accesses the Events screen. Here users willfind a list of
events, warnings and errors that may have occurred on the instrument while the application was in use. The
green check mark changes to a red exclamation mark or an hour glass to communicate when the instruments’
status changes. For more information, see the Troubleshooting section. The Events log is available from all
views throughout Irys ICS accessing it does not interrupt any work being done in Irys ICS.
C. Help: Pressing the question mark accesses the online user guide.
D. Exit: Pressing this button returns user to the Select User screen. While on the Select User screen, pressing
this buttonsafelyshutsdowntheIrysICSapplication.
E. Navigation Arrows: TheForward arrow button proceeds the workflow to the nextstep. The Back arrow button
returns the user to the previous screen.
F. Clean: The Clean button initiates the cleaning cycle. This resides here as a precautionary button in case the
previous user neglected to clean after their run (not recommended).
G. Select User: Select a User name from the drop-down menu or leave <Add New User> highlighted and
proceed to the User Settings button to create a newuser profile.
Irys® User Guide
07/10/2015
15
For Research Use Only. Not Intended For Diagnostic Purposes.
Chapter 3 Starting a Project
Figure 6: Workflow Overview
3.1 Irys System Project Workflow Overview
The workflow is divided into 5 discrete steps:
1. Sample Preparation: Samplesmust be prepared in advance according to IrysPrep instructions.
2. Chip Preparation:The IrysChip is stored at -20ºC.The IrysChip must be warmed to room temperature before
performingtherun.Oncewarmed,anymoistureontheIrysChippackagingmustbe driedoffbeforeremoving
the IrysChip.
3. Instrument Preparation: After the sample has been prepared and the IrysChip is at room temperature, the
instrumentcanbe turnedon and the run preparation begun.Auseris assignedto therun data,the IrysChip is
loaded into the instrument, and sample information is saved.The sample is then loaded into the IrysChip
following the on-screen instructions.
4. Performing the Run: After all sample information is entered and the sample is loaded, the run recipe is
chosen and the run is started.The instrument will verify run and data qualityas the run proceeds.
5. Data Analysis: After the run completes, the IrysChip is removed and the sample data are exported off Irys to a
workstation for further analysis with IrysViewand IrysSolve software.
3.2 Sample Preparation Summary
Samples must be prepared in advance according to IrysPrep reagent kit instructions. Log into
www.bionanogenomics.com/support/Forums/ to access the current protocol.
IrysPrep Plug Lysis Long DNA Isolation (BNG PN 30026)
The IrysPrep Plug Lysis protocol involves immobilizing a low complexity biological material (animal cells, nuclei
from plant and animal tissue, or bacteria) in an agarose matrix for subsequent Proteinase K digestion followed by
RNAse treatment and washes. The plug is then melted and the agarose matrix is digested in order to recover
megabase-containing genomic DNA, which is further cleaned by drop dialysis.
As you will note in the IrysPrep Plug Lysis protocol, you will need to allow 2 to 3 hours of pre-processing of tissue to
harvest nuclei before embedding in agarose before the Proteinase K digestion step and before stabilizing the DNA
in plugs. RNA removal and DNA recovery occur on the second day. DNA quantitation is performed on the third day
following overnight equilibration at room temperature to achieve DNA homogeneity.

Irys® User Guide
16
7/10/2015
For Research Use Only. Not Intended For Diagnostic Purposes.
IrysPrep Labeling-NLRS (BNG PN 30024)
The IrysPrep Labeling-NLRS assay provides sequence-specific labeling of megabase-containing gDNA for Irys
mapping at the single molecule level. Sequence specificity is provided bythe Nickase. Labeling is carried out by a
limited-drive nick translation process in the presence of a fluorophore-labeled nucleotide. The labeled nicks are
repaired to restore strand integrity. The labeled DNA is stained for backbone visualization (NLRS). Labeled nicks
are seen as dots on a string.
IrysPrep Human Blood Protocol (BNG PN 30033)
The IrysPrep Human Blood Protocol targets recovery of white blood cells using differential red blood cell lysis.
The resulting whiteblood cells are quantitated, immobilized in agarose plugs, and subjected to plug lysis treatment
for megabase DNA recovery.White blood cell quantitation enables targeting the proper number of cells per plug to
stay within the optimalrange for plug lysis.
3.3 IrysChip Preparation Summary
The IrysChip is stored at -20ºC. The chip must be warmedto room temperature before performing the run.Once
warmed, dry off any moisture on the chip packaging before removing the chip.
Preparing IrysChip
1. Allow the IrysChip to warm up in its pouch and allow it to equilibrate to room temperature for at least 30
minutes prior to use.
Note: Removing the IrysChip from its pouch before it has warmed to room temperature will cause
performance problems or chip failure.
2. While the IrysChip is warming, turn on the Irys instrument if it is not yet on.
3. Wipe off any external moisture from the pouch before opening.
4. Prior to loading the IrysChip onto the stage, inspect the underside of the chip for dust or other debris which can
impact optical performance. A lens paper should be used to gentlywipe the underside of the chip if necessary.
Note: Do not touch the underside of the IrysChip with anything other than a lens paper. Do not use dusting
gas to clean the IrysChip.
3.4 Instrument Preparation Summary
Follow the instrument boot-up process to initialize software and hardware components.
System Startup
1. Connect the power and communication cables.
2. Open the system LCD display by lifting the front edge of the display untilit is inafullup-rightposition.Then,
rotatethe bottom of the screenuntilit is in a convenient viewing position.
3. Turn ON the instrument using the main power switch located on the lower right-hand side.

Irys® User Guide
07/10/2015
17
For Research Use Only. Not Intended For Diagnostic Purposes.
Figure 7: PowerUp
During the power up, the touch-screen LCD should illuminate.The instrument will execute a boot-up sequence
and launch to the LCD’s desktop. SelecttheIrys Instrument Control Software (ICS) application icon located on the
desktop to launch Irys ICS.
Upon launching Irys ICS, the system will perform self-diagnostics (initialize hardware, validate firmware, validate
hardware, and perform stage calibration) during which time the system start-up screen displays.
Figure 8: Irys Startup Screen

Irys® User Guide
18
7/10/2015
For Research Use Only. Not Intended For Diagnostic Purposes.
3.5 Logging In
After initialization, the Select User screen displays for logging in. Here you can create a newuser or select the
user’s name to log in. If a password is required, a pop up window will ask for the password.
Figure 9: SelectUser Screen
Figure 10 EnterPassword (optional)
Entering the incorrect password will denyaccess. If the user does not require a password, Irys will automatically
log in as the selected user.The system is designed to allow each user to create a password in order to prevent
users from accidentally logging in as the wrong user and overwriting another’s files. It is not a security feature; the
password log is not a hidden file.
Irys® User Guide
07/10/2015
19
For Research Use Only. Not Intended For Diagnostic Purposes.
Select Existing User or <Add New User>
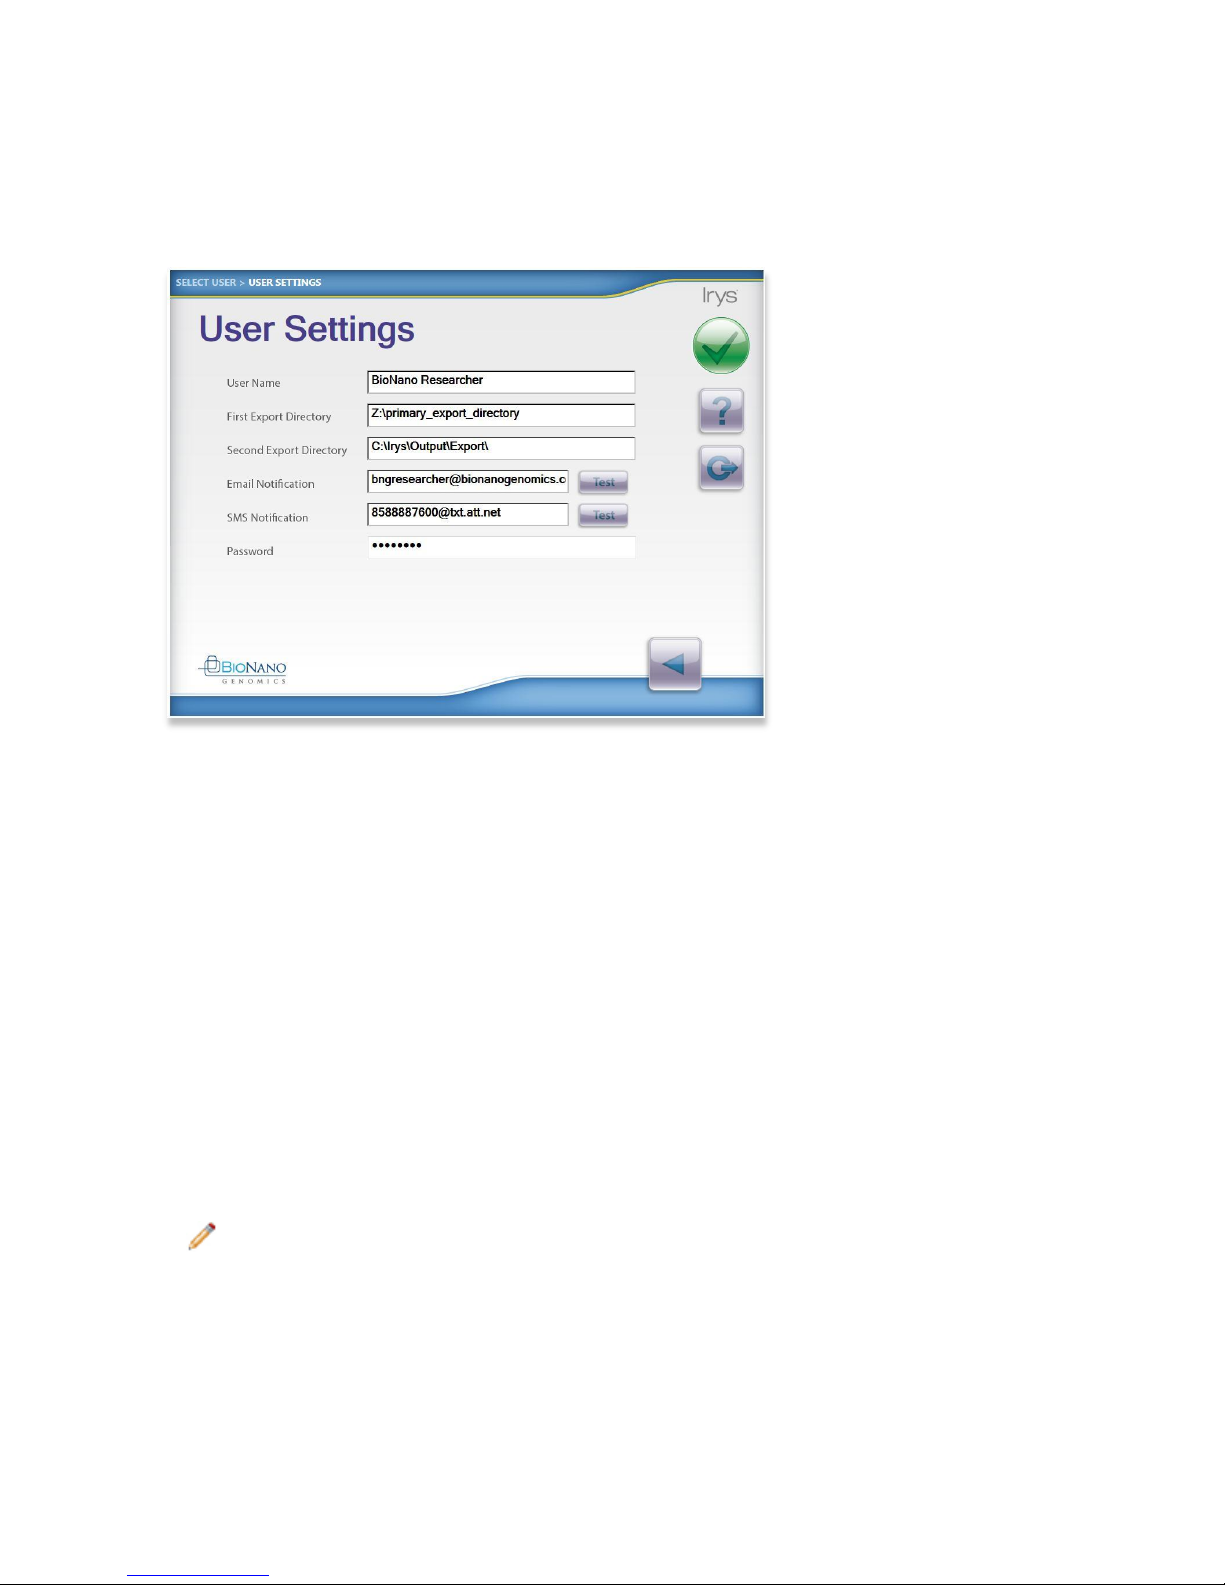
Click on the <Add New User> drop-down menu item to create a new UserName. Once selected, the User Settings
screen opens to configure user-specific settings for the new user, after which time the new User Name willappear
in the SelectUserdrop-downmenuand in the workflow settings.
Figure 11: User Settings
Configuring the User Settings and Remote Data Storage Location
Data transfer to an external client server occurs automatically during and after a run as long as a server location
has been specified. In order to export data from the instrument to an external workstation, the remote data storage
location must bemapped to the instrument.
1. First Export Directory: This location is the primary location Irys ICS willattempt to exportdatato.Thedirectory
canbe a localor remote destination.If the destination is a remote location, Irys ICS will require network
connectivity in order to export data to remote locations.
2. Second Export Directory: This location is the backup location Irys ICS will attempt to export data to when
unable to export to the first location.
3. Email Notification: In order to receive email notifications on the status of the instrument or events of interest, a
user may opt to enter an email address where Irys ICS will send messages to.The user can test this
functionality with the “Test” button.
4. SMS Notification: In order to receive notifications on the status of the instrument or events of interest to a
cellular device, a user may opt to enter an SMS address where Irys ICS will send messages to.The user can
test this functionality withthe“Test” button.Thisaddressis aten*digitnumberfollowed bytheprovider domain.
ExampleforT-Mobile USA: XXXXXXXXXX@tmomail.net
Note: Maybe country specific. See the Appendix F for most popular USA carrier’s SMS address or a free
web link to query your carrier’s code.
5. Password: A user mayprovide a password for account protection.This field is optional but willbe required for
this user login until turned off. This is not intended as a securityfeature.

Irys® User Guide
20
7/10/2015
For Research Use Only. Not Intended For Diagnostic Purposes.
Chapter 4 Performing a Run
1. After selecting the user, press the Forward arrow button to proceed to the Load Sample screen.
Note: There will be a delay in going from the Select User screen to the Load Sample screen while the
system calibrates.
2. The XYStage will eject and the Objective will rise.
Figure 12: Proceed to Load Sample Screen
4.1 Loading the Sample
Once the XY Stage is fullyejected, place the emptyIrysChip onto the XYStage cutout with the label side up. There
is onlyone orientation. Secure the IrysChip in place by sliding the lock bars over the corners of the chip.
Figure 13: Load IrysChip
Table of contents
Other BioNano Genomics Laboratory Equipment manuals


