Bionova IC10/20FR User manual
Rev.26 | November 2018
IC10/20FR
Innovation in technologies for Infection Control

IC10/20FR Page 3
Bionova® IC10/20FR Auto-reader has been designed for
the incubation of the following Self-Contained Biologi-
cal Indicators (IBs):
• Rapid Readout Self-Contained Biological Indicators:
BT110 for Ethylene Oxide sterilization control, BT220
and BT221 for Steam sterilization control, BT102 for
Formaldehyde sterilization control and BT95 for Plasma
or Vaporized Hydrogen Peroxide sterilization control.
• Super Rapid Readout Self-Contained Biological Indi-
cators: BT222 and BT223 for Steam sterilization control
and BT96 for the control of Plasma or Vaporized Hydro-
gen Peroxide sterilization control.
• Ultra Rapid Readout Self-Contained Biological Indica-
tors: BT224 for Steam sterilization control.
Microorganisms contained within the Biological Indi-
cators vary depending on the sterilization process for
which they have been designed, therefore, incubation
temperatures dier depending on the indicator. Indica-
tors for Ethylene Oxide (EO) sterilization control, should
be incubated at 37ºC, while those involved in the mo-
nitoring of the rest of the sterilization processes should
be incubated at 60ºC.
Simultaneous incubation of Bls for EO proces-
ses control within Bls monitoring the other pro-
cesses, is not possible.
Bionova® IC10/20FR Auto-reader allows easy and rapid
Description of use
Constituent parts
15
16
detection of positive and negative Biological Indica-
tors. Six incubation programs are available: 4 hours at
37ºC, 3 hours at 60 ºC, 2 hours at 60 ºC, 1 hour at 60 ºC,
30 minutes at 60 ºC and Instant/Ultra (20 min.) at 60 °C.
A positive result can also be evidenced by culture me-
dium color change to yellow, read the instructions for
use of each indicator for more information. The choice
to perform or not the extended incubation to conrm
by color change depends on the internal protocols of
each laboratory or hospital.The auto-reader allows se-
lection of incubation time programs for two zones in an
independent way. Zone 1 includes positions 1 to 6, and
zone 2 comprises positions 7 to 12.
The Bionova® IC10/20FR Auto-reader contains a special
cavity to run quantitative readings of the Chemdye®
PRO1 System, destined to surface cleaning and conta-
mination control.
Bionova® IC10/20FR auto-reader not only allows the
detection of results, but also provides a printed ticket
to record them. In addition, the auto-reader can be
connected to computers by USB. This allows linking the
results with the Bionova® Traceability Software for Auto-
matic Reading and Traceability of Rapid, Super Rapid
and Ultra Rapid Biological Indicators and Hygiene Mo-
nitoring System. To download the latest version of the
software, go to: http://www.terragene.com.ar/produc-
tos/infection-control/incubators/software-downloads/
?lang=en, from there you can also download the user
manual.
1
1
2
3
10
11
9
12
14
13
8
6
712

IC10/20FR Page 4
Safety information
To avoid risks and damaging the equipment
-Do not place the auto-reader in an environ-
ment exposed to direct sunlight or high inten-
sity light lamps.
-Do not place the auto-reader near devices that
emit electromagnetic elds.
-Do not use the equipment on vibrating surfa-
ces.
-Do not pour any liquid inside.
-Do not immerse into any liquid.
-Use indoors only.
-Disconnect the power cord before cleaning.
-Do not use abrasive, corrosive cleaners or di-
sinfectans.
-In case of technical fault, contact the manufac-
turer for support. Please, do not try to open or
repair the auto-reader on your own, since this
will imply the loss of product warranty and
could lead to a major and irreversible damage.
-Make sure that the auto-reader is connected
to a properly rate power cord.
To reduce the risk of using incompletely ste-
rilized loads:
-Make sure to use each BI with its incubation
and reading program:
BT110 (green top) with 4 hs. (37 ºC) program.
BT220 (brown top) with 3hs. (60 ºC) program.
BT221 (blue top) with 1 h. (60 ºC) program.
BT222 (violet top) with 1 h. (60 ºC) program.
BT223 (light blue top) with 30 min. (60 ºC) program.
BT224 (aquamarine top) with 20 min at 60 ºC
Instant/Ultra program.
BT102 (red top) with 2 hs. (60 °C) program.
BT95 (white top) with 2 hs. (60 °C) program.
BT96 (grey top) with 30 min at 60ºC program.
-Check that culture medium completely wets
the spore carrier.
-Do not remove the BI until the equipment re-
ports the nal readout result, check the impre-
sion of the ticket.
To avoid the risk of injury, because of glass
fragments generated after the glass ampou-
le inside the BI tube is crushed:
-Cool the BI during the indicated time before
crushing the ampoule.
-Do not handle the BI excessively since this mi-
ght cause the glass ampoule to burst.
-Wear safety glasses and gloves when remo-
ving the BI from the sterilizer.
-Wear safety protective glasses and gloves to
crush the ampoule and to press the cap of BI.
-Do not use your nger for crushing BI.
To avoid a potencially hazardous situation:
avoid contact with the hot surface of the metal
auto-reader block.
Symbols
References
Operating relative humidity.
Operating environmental temperature.
Caution, warning.
Caution: Risk of electric shock.
Caution: Hot surface.
Important, attention.
Manufacturer.
Serial number.
Direct current.
Product denomination.
80 %
30 %
10 ºC
30 ºC
REF
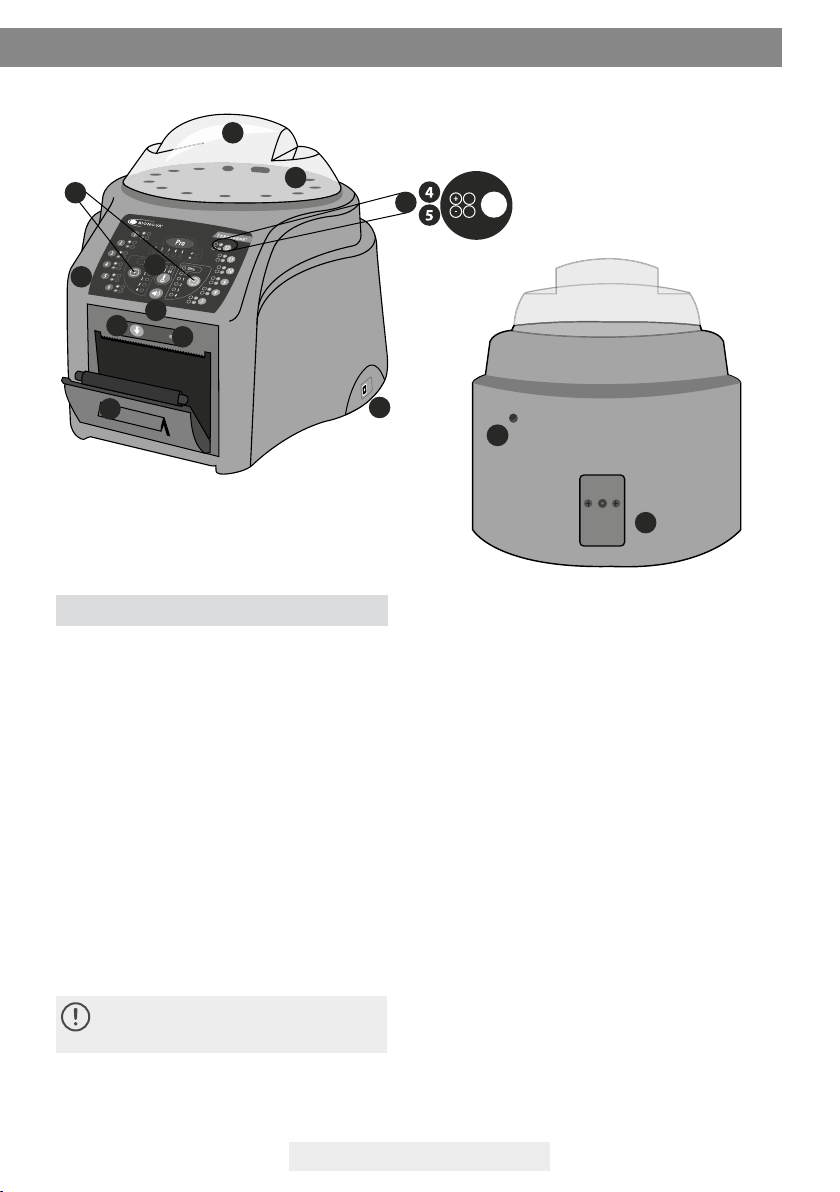
Protective cover.
Red light/Positive indicator/Position Light.
Green Light/Negative indicator/Position Light.
Reading position number.
Program selector.
Temperature Selector.
Alarm Cancellation Button.
Thermal printer.
Printer’s light.
Paper’s traction button.
Cavity for paper.
USB port.
Input for power source plug (12V DC).
Control Panel.
Incubation area for 12 BIs. Protein pen detec-
tion. BIs Ampoule crusher.
1
2
3
4
5
6
7
8
9
10
11
12
13
14
15
16 Hole for external temperature control.

IC10/20FR Page 5
Power supply specications
Environment operating conditions
Terragene® recommends using a UPS instead of stabi-
lizers, since the former has two functions: it stabilizes
and provides a continual power source during energy
cuto.
Serial/Batch Number
For easy identication, each IC10/20FR Auto-reader
has a unique serial number and a batch number prin-
ted on a label found at the bottom of the auto-rea-
der and on its packaging. Please, register your serial
number and batch number in this manual for future
reference:
Safety information
Record Table
Use the following table to record rmware updates.
NOTE: manufactury rmware is printed on a label found
on the bottom of the auto-reader and on its packaging.
To avoid BIs from absorbing uorescent re-
sidues: avoid BIs direct contact with chemical
indicators or tapes.
Do not use this product in a manner not speci-
ed by Terragene® S.A., otherwise the protec-
tion provided by the product might be aec-
ted.
Do not replace the power supply cord for other
not provided within the product.
Only personnel authorized by Terragene® S.A
can access the inside of the auto-reader and
its components. Parts or components inside
the machine should not be manipulated by the
user.
Input parameters
Voltage range
Frequency
Current
Output parameters
Voltage
Current
Operating
Condittion
(100-240)
50/60
0,2
Values
12
4
Units
Volts
Hertz
Ampers
Units
DC Volts
Ampers
Environmental conds.
Altitude
Operation temperature
Relative humidity
Installation/overvoltage
Degree of contamination
Storage temperature
Voltage
Functional conds.
3500 (máx.)
10-30
30-80
category II
2
0 - 50
12
Units.
Meters
ºC
%
°C
DC volts
Serial Number:
Batch Number:
Date Version Operator
Please, register your manufactory rmware in this ma-
nual for future reference:
Manufactury Firmware:

IC10/20FR Page 6
Instructions for use
Start-up to be incubated in each zone.
To change the time program, press the button o f
the correspondent zone as many times as needed to
choose the right setting.
5- Wait for temperature of the machine to be stable.
Once is stable, the indicator of the desired temperatu-
re will remain steady.
Do not put any biological indicator in the rea-
ding positions until the auto-reader does not
conrm temperature stability.
The auto-reader will keep the selected incubation pro-
gram during the reading process. The system does not
allow to modify the incubation program once the rea-
ding process has begun, unless the reading is nished.
6-Start readings once the blue temperature selec-
tion’s light remains stable, this indicates that incu-
bation temperature was reached. Once the selected
temperature has been reached and remains stable,
after turning on the equipment, a one-time automa-
tic check of the Biological Indicators and Protein Pen
incubation positions will be carried out. Indicating
lights of each well will turn on bringing the result, a
green light will show a satisfactory result while
a red light will indicate error.
When the equipment detects an error in any position,
a ticket indicating the day, time and position involved
will be printed. To guarantee the reliability of the re-
sults, these positions will be deactivated, thus preven-
ting their use. To evidence this, the red light of
that position will remain blinking indenitely, in order
to indicate that the position has been disabled.
For a correct automatic check, the protective
cover of the auto-reader should be in its place.
Read BIs instructions for use. Before placing
the vials in the auto-reader, press the top to
seal the tube. Crush the ampoule (using the
ampoule crusher within the box of BIs or the
one located within the incubation area of the
auto-reader) and make sure that the liquid has
completely wet the spore carrier placed at the
bottom of the biological indicator plastic tube.
Do not remove or change placement of BI once
the reading process has begun. If this occurs,
results may be invalidated.
Use a non-sterilized biological indicator as a
positive control every time a processed indica-
tor is incubated. For more information refer to
the Positive Control section of this user guide.
7-Place the rapid BI in a reading position and wait for
the result. Reading will start automatically. Immediate-
ly after placing the BI in a position, an alarm will sound
indicating that reading has successfully began and the
position LED will blink until the result is informed.
NOTE: If the auto-reader does not run automatically, it
might indicate that the auto-reader temperature is not
steady yet (check the temperature indicating light to
1-Place the auto-reader on a rm surface, free from
vibrations, away from sunlight, currents of hot or cold
air, chemicals and corrosive or ammable substances.
Do not place the equipment in a way that disconnec-
tion of the plug from the power supply could be di-
cult. Leave a gap of at least 10 cm from the wall. Do
not move the auto-reader periodically or during its
use. Connect the auto-reader to a secure and stable
electrical power source.
Do not wet or heat the auto-reader. If liquid is
spilled on the auto-reader, disconnect it and
dry it immediately. Before turning on, verify
that all reading positions are empty.
2-Turn on the machine by connecting the end of the
AC power supply to the mains and then connect the
other end of the source (plug) on the rear of the IC10/
20FR unit. The printer’s paper indicator light will turn
on, if this light becomes intermittent, this means that
the thermal paper must be loaded, or that the printer
cover is not tightly closed. Otherwise, the light will
remain stationary.
The machine will start running the last time and tem-
perature set-up.
If the auto-reader has an out-of-date Firmware
version, the settings might not be saved.
3-Synchronize IC10/20FR with local time using Biono-
va® software available at http://www.terragene.com.ar/
productos/infection-control/incubators/software-down-
loads/ ?lang=en. For this, connect a PC to the USB plug
of the auto-reader and start the program. The Bionova®
IC10/20FR will be synchronized with the time and time
zone in the PC. Synchronization can be done as long as
there is not an ongoing reading. See other congura-
tion methods in the Time setting mode section.
All equipment is manufactured with the fo-
llowing settings:
- Time zone: UTC +0:00
- Printing language: English
For changing time zone, refer to Time zone change
mode section. For changing printing language, refer
to Printing language section.
4- Check that the incubation temperature is correct.
To change it, press the button for 3 seconds.
Lights corresponding to 37 °C and 60 °C will start blin-
king, indicating that a temperature program must be
selected. For temperature selection, press the button
to select 37 ºC or 60 ºC. After 4 seconds the tempe-
rature modication will be accepted.
For 37 ºC, the IC10/20FR auto-reader will automati-
cally select the 4 hrs. nal reading program in both
halves of the incubation area (1-6 and 7-12).
For 60 ºC, Instant/Ultra (20 min.), 30 min., 1, 2 or 3 hrs.
program can be selected. It’s possible to select die-
rent programs for each half or the same for both, de-
pending on the indicator´s nal reading characteristics.
Check that the time setting is appropriate for the BIs

IC10/20FR Page 7
Rapid Readout
The indicator used as positive control should show
a positive result (red light ). The processed BI
results are not valid until the biological indicator used
as positive control shows a positive result . A
processed BI with a positive result, indicates a failure
in the sterilization process. A negative result, (green
light ) after 20 min. (60 °C), 30 min. (60 ºC), 1 h.
(60 ºC), 2 hs. (60 °C), 3 hs. (60ºC) 4 hs. (37 ºC) according
to the used program, indicates that the sterilization
process was eective.
Take action on any positive result inmediately. A posi-
tive result indicates a sterilization process failure may
have ocurred. Determine the cause of the positive
BI following current facility policies and procedures.
Always retest the sterilizer and do not use the sterili-
zer for processing loads until 3 consecutive BI results
are negative.
Visual Readout
The Rapid readout system allows the conrmation of
results by color change after 48 hours or 7 days incu-
bation analysis (if 7-day readout is made, an humidi-
ed auto-reader will be required to avoid media dry
out). If the sterilization process was not successful, the
growth media contained in the indicator will turn to
yellow. If the sterilization process was successful, the
media will remain unchanged.
The color of the growth media in the BI used as
positive control must turn to yellow during the
process of incubation for the results to be valid.
Record the positive ones and discard them im-
mediately as shown in the biological indicators
instructions for use.
Instructions for use
remain steady) or that the incubation position is disa-
bled due to an error in the initial autotest.
8-If the incubator detects a positive result, the red light
and the audible alarm will turn on. This will indicate
that the sterilization process to which the BI was sub-
ject, has failed. 30 seconds after removing the IB from
the incubation position, the alarm and the red light will
turn o automatically and the position will be available
to start a new reading.
The negative BIs will be informed with a green light in
the corresponding position. This will indicate that the
sterilization process to which it was subject has been
successful. The green light will remain on for up to 30
seconds after the BI is withdrawn from the reading po-
sition.
The incubator will inform results within 20 min (60 °C),
30 min. (60 ºC),1 h. (60 ºC), 2 hs. (60 °C), 3 hs. (60 ºC) or
4 hs. (37 ºC), according to the program selected. These
periods of incubation are the time-limits used by the
equipment to inform the uorescence nal readout.
9-Every time a positive result is detected, it will be
informed through the printing of the corresponding
ticket and with an audible alarm. The alarm can be can-
celled by pressing the button .
10-To register the tickets, press paper’s traction button,
take the paper and press up for the paper to be cut
with the serrated edge of the printer.
NOTE: If the paper runs out, printer’s blue light will
start blinking (see Replacement of the paper roll in the
printer). The incubator will save the last 12 results, for
re-printing, follow the Reprinting of the last results ins-
tructions.
POSITIVE CANCELEDNEGATIVE
Positive control
The positive control should belong to the same
batch of the processed BI.
Use a non-sterilized biological indicator as a
positive control every time a processed indica-
tor is incubated.
Incubate the processed biological indicator
and the indicator used as positive control as
long as specied in the instructions.
Press the cap to seal the tube and crush the ampoule,
make sure the media completely wets the carrier. Wri-
te a C(for control) and the date on the label. The posi-
tive control can be placed in any well of the Bionova®
IC10/20FR Auto-reader.
It is a good practice to use a positive control, this
helps ensuring:
- Correct temperature is reached
-Viability of spores has not been altered due to im-
proper storage temperature, humidity, or proximity
to chemicals.
-Capability of the media to promote rapid growth.
-Proper functioning of Bionova® IC10/20FR Auto-reader.
Interpretation of results
Disposal
Dispose Bls after use, according to your healthcare
and safety regulations (see BIs instructions for use).
Chemdye® PRO1MICRO reading system
Chemdye® PRO1MICRO reading system consists of
an incubation position that allows the quantitative
analysis of the products destinated to evaluate clea-
ning and contamination control.
Hygiene monitoring systems

IC10/20FR Page 8
Instructions for use
Approximate amounts of
BSA expressed in µg
1 µg 2 µg
3 µg
4 µg
5 µg
12345
IC10/20FR can run a quantitative analysis of PRO1MI-
CRO Hygiene monitoring system, adjusted by a BSA
(Bovine Seric Albumin) calibration curve. This analysis
ensures the traceability of the control of surface cle-
aning.
The method has a detection limit of 1 µg and a sensi-
tivity of 0.3 μg.The result is indicated with a resolution
of 0.1μg, and its accuracy is ± 0.5μg (IC95%), in the
range of 0 to 5μg, and ±0.7μg (IC95%), in the range of
5 to 10 μg with a range of 10 μg.
Readings will be able to initiate once the incuba-
tion temperature has been selected and is stable.
The lights corresponding to the selected tempe-
rature (37 ºC or 60 ºC) will blink until the tempe-
rature is reached, and then stay stable. PRO1MI-
CRO readings must be performed at 60 ºC.
Reading Process:
1-Press and hold the button for 1 second to en-
ter the reading program. A beep will sound. Then wait
three seconds to conrm the selection. The auto-rea-
der will emit two beeps indicating that a program has
been selected.
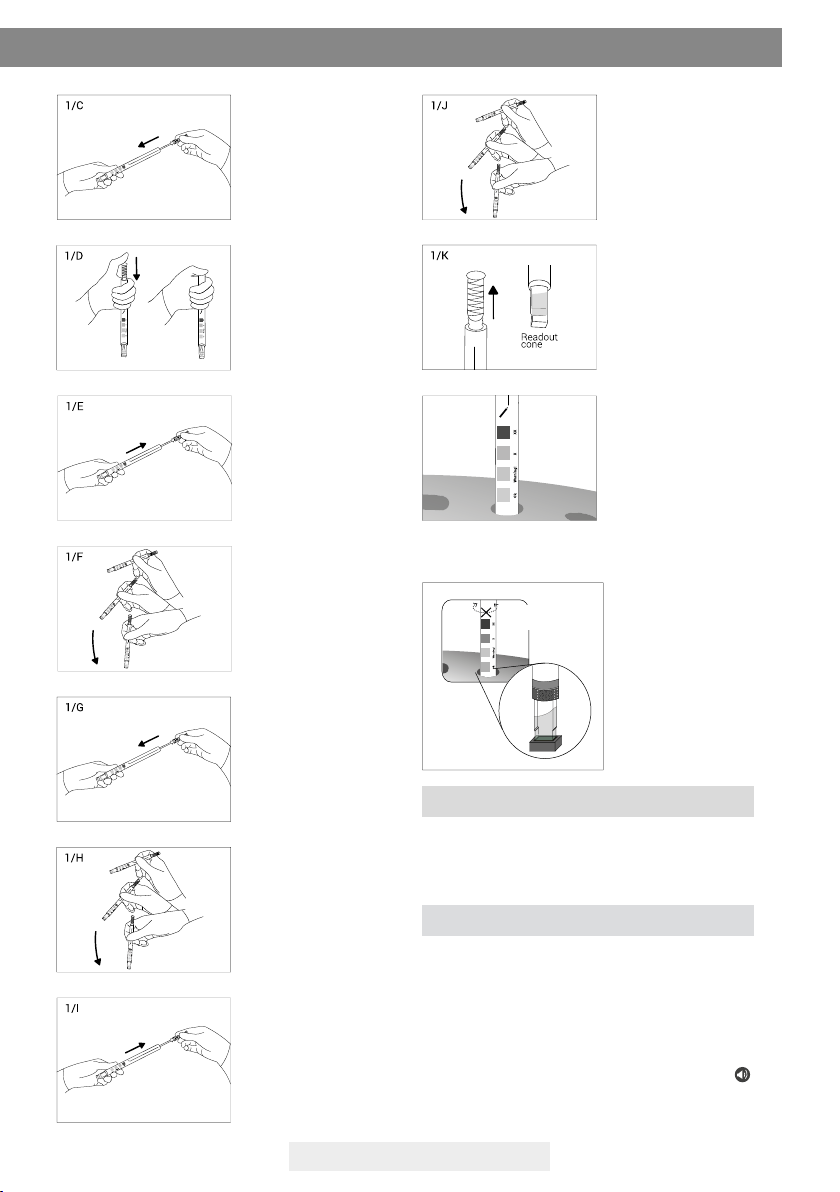
2-Use the PRO1MICRO pen to take the sample from
the surface to be analyzed. For this, follow directions
described in Figure 1 (Also explained on PRO1MI-
CRO’s directions for use).
3-Once the solutions contained within the device
have been correctly mixed, proceed with incubation
(remember that the reading cone must not contain
the swab). For this, insert the pen on the incubation/
reading position (Figure 2). Make sure to place PRO-
1MICRO as it is indicated on the auto-reader label.
When it is inserted in the correct position, it cannot
be rotated (Figure 2).
4-Press and hold the button for 2 seconds
to iniciate the incubation and reading process (15
minutes 60 °C). The lights and will start
blinking.
Do not move or remove the pen from its position
during the reading process, this can cause erro-
neous readings or even cancellation of the same.
If the auto-reader detects that the protein pen
has not been placed properly in the reading
position, a ticket will be printed indicating:
"Pen not detected. Check result visually".
It is not possible to reuse an already incubated
protein pen.
5-Once the incubation process is complete, an audible
alarm indicates the end of the program.The sample is
read and the protein value is calculated based on a
BSA (Bovine Seric Albumin) calibration/standard cur-
ve.Then, the auto-reader will print a ticket conrming
the calculated protein concentration. If the value is
below the selected threshold, a green light will
appear, indicating a negative result, if it is by above
the selected threshold, a red light will appear,
indicating a positive result. In both cases, one of the
lights of the PRO panel will indicate the approximated
rank of concentration calculated between 1 to 5 µg; if
the value exceeds the 5 µg all the lights on the panel
they will light up. The threshold to determine a po-
sitive or negative result can be congured using the
Bionova® traceability software.The conguration pro-
cess is outlined in the Bionova® traceability software
manual. The factory-set threshold is 1µg.
NOTE: 30 seconds before the end of the program, the
auto-reader will emit an alarm that will last until the
reading is complete, notifying the operator that the
incubation time will be fullled. The color of the so-
lution can be used for a qualitative reading only if the
pen is removed once the program nalizes. If the pen
is not removed at that time, the color of the solution
will continue to evolve.
Read the directions for use of each product and
be aware of the sensibility limits.
Figure 1
Remove the swab
from the device.
Carefully apply 2
drops of moisturizer
on the swab.
Swab thoroughly
the desired surface
Cuantitative Results: For IC10/20FR-2.10 (March
2017) rmware version or higher (others versions
could report dierent values).
IC10/20FR Page 9
Instructions for use
Place swab back
into the device.
Place swab
downwards rmly
to activate.
Slide swab
downwards.
Shake for
15 seconds.
Slide swab
upwards.
Slide swab
upwards.
Shake vigorously
and collect solution
in the readout cone.
Shake vigorously
and collect solution
in the readout cone.
Readout cone
without swab.
Figure 2
Insert the pen on the
incubation/reading
position.
Impossible
to rotate
Audible alarm
The auto-reader is equipped with several alarm func-
tions that indicate dierent states after the incubation.
In the case of the biological indicators, an alarm will
go o whenever the Bionova® IC10/20FR Auto-rea-
der emits a positive result. This will allow the user to
immediately detect a positive result without visually
verifying the result on the equipment.
The alarm can be cancelled by pressing the button .
The hygiene monitoring system, is equipped with
an alarm that the auto-reader will set o 30 seconds
before the program cycle ends and will last until
Incubate and read.
1/K
1/L
After reading, discard the hygiene indicators according to
the sanitary regulations of your country. The hygiene indi-
cators used cannot be reused (read the Instructions for use
of Chemdye® PRO1 MICRO Hygiene Monitoring System).
Disposal

IC10/20FR Page 10
Instructions for use
Canceling a reading
When a BI is removed from it’s position during incu-
bation process, an audible alarm will sound to indica-
te the tube should be returned to its corresponding
position.
If the indicator is not returned to the reading position
within 10 seconds from its removal, the reading will
be canceled and the auto-reader will print out a ticket
conrming the cancellation.
In the hygiene monitoring system, the user can can-
cel the reading by pressing the button of the
chosen position and the button for three seconds.
The device will cancel the reading and the auto-rea-
der will print out a ticket conrming the cancellation.
Replacement of the paper roll
The printer uses thermal paper rolls.
Thermal paper specications
Reprinting of results
The auto-reader allows reprinting of the last 12 results
by uorescence readout and the last result of hygiene
monitoring reading. For printing the results, press the
button for 5 seconds.
1. To replace the paper
roll, pull the handle of
the printer’s door.
2. Open the printer’s
cover and remove the
spent roll.
3. Place the new paper
roll with the outer side
up.
4. Close the printer co-
ver by pressing on the
sides of the lid.
Remaining incubation time
The Bionova® IC10/20FR Auto-Reader also allows veri-
fying the remaining incubation time in every reading
position. Whenever a reading process is in course,
press and hold the button for ve seconds, a
ticket will then be printed containing the following in-
formation: reading position, incubation program and
remaining incubation time.
Recommended paper: JUJO AF50KSE3 or similar (or-
der code ICTP).
Paper width : 58 mm
Maximum paper thickness: 60 g/m2
Maximum diameter size: 50 mm
NOTE: This feature is available starting from the IC10/
20FR Rev. 2.5 Firmware version.
For the detailed procedure for updating the rmware, plea-
se refer to the Firmware Update section of this user guide.
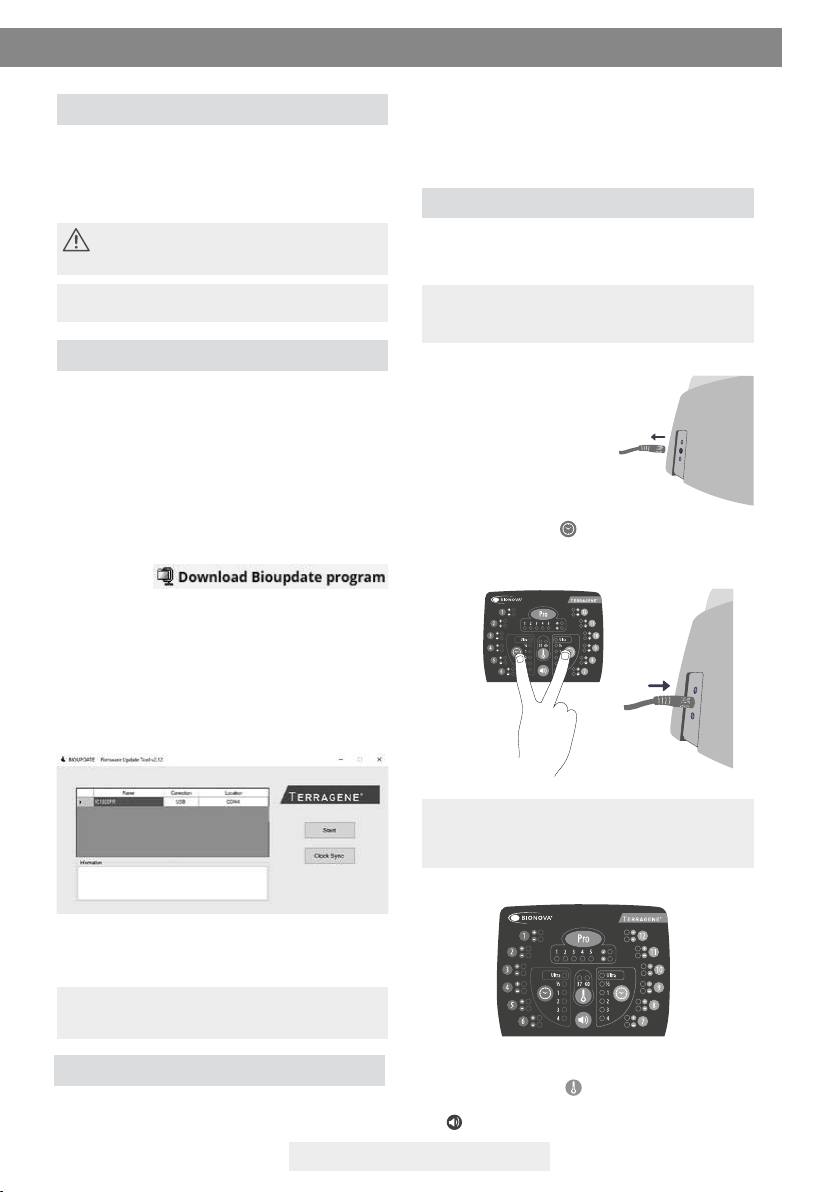
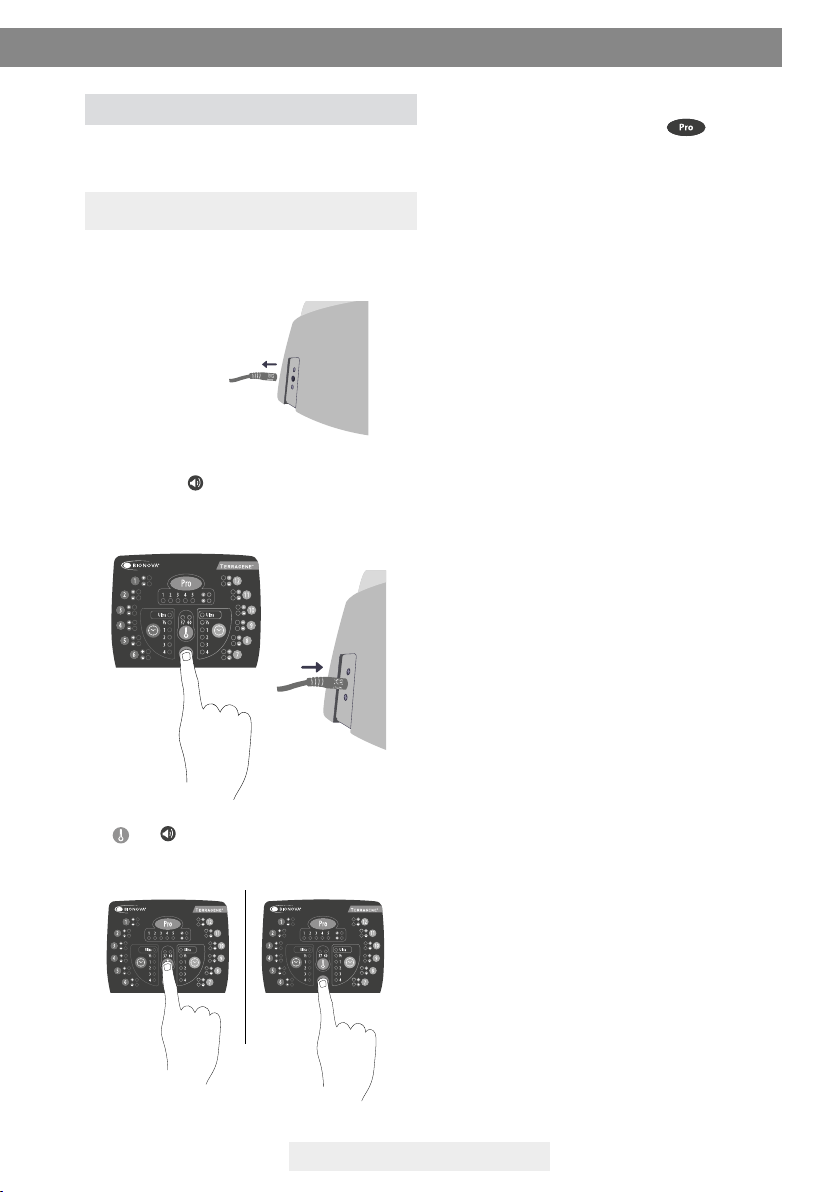
Temperature monitoring
The Bionova® IC10/20FR Auto-reader contains an in-
ternal temperature control. If the temperature falls
outside of the specied range (37±2 or 60±2 ºC), the
blue temperature led light will start to twinkle.
Temperature can be externally monitored by using
a Bionova® TB- IC1020 thermometer or other similar.
The Auto-Reader IC10/20FR has a special hole for pla-
cing the thermometer which is located at the back of
the device.
the reading is complete, notifying the operator that
the incubation time will be fullled. The color of the
solution can be used for a qualitative reading only
if the pen is removed once the program nalizes. If
the pen is not removed at that time, the color of the
solution will continue to evolve.
IC10/20FR Page 11
Instructions for use
Care and cleaning
Firmware update
The IC10/20FR Auto-reader allows updating the r-
mware periodically (program that controls the device
and denes its diferent functionalities) through the use
of the Bioupdate Software. This software veries, by
using the internet, the latest rmware version available
for IC10/20FR Auto-reader; downloads it and installs it
in a few seconds without the loss of any device data.
The Bioupdate Software must be downloaded, only
once, from the following web site: http://www.terra-
gene.com.ar/productos/infection-control/incubators/
software-downloads/ ?lang=en.
Download le:
UPDATE PROCEDURE:
Before starting the process, make sure that the Biono-
va® software is closed. Turn o the auto-reader for ve
seconds, then turn it on and follow this steps:
1- Connect the auto-reader to a PC using a USB cable
and make sure to have an internet connection.
2- Open Bioupdate program.
3- Select the device and press Start button to update.
4- Wait until the software indicates that update pro-
cess has been completed. The auto-reader will print
a ticket indicating the new version of the Firmware.
NOTE: This process must be repeated every time that
a new rmware version is available, this will be infor-
med in the website.
The equipment calibration procedure is described in
the attached software manual Bionova® Traceability
Calibration
Clean the exterior surface of the Bionova® IC10/20FR
Auto-reader with a damp cloth moistened with an
small amount of detergent. Do not clean interior com-
ponents. If additional cleaning of the wells is required,
contact your distributor or manufacturer.
Always unplug the IC10/20FR Auto-reader and
allow it to cool before cleaning. Do not immer-
se the unit in liquid.
NOTE: Bionova® IC10/20FR Auto-reader does not need
routine maintenance.
This function allows you to advance or delay the in-
ternal auto-reader clock in order to adopt a dierent
time zone.
NOTE: Remember that it is possible to synchronize
the time with the Bioupdate® software and Bionova®
traceability software.
Time zone change mode
Enter Time zone change mode
De-energize the auto-reader.
Press and hold both buttons simultaneously and
energize the equipment. A beep will be emitted to
indicate access to Time zone change.
NOTE: when entering Time zone change mode a
green light will turn on in one of the incubation/
reading position. This number corresponds to the cu-
rrent auto-reader time.
Time zone change
To advance time, press button as many times as
hours you need to advance. To delay time press but-
ton as many times as hours you need to delay.
Software for Automatic Reading and Traceability of
Rapid
, Super Rapid and Ultra Rapid Biological Indicators
and Hygiene Monitoring System. You can also download
it from http://www.terragene.com.ar/productos/infec-
tion-control/incubators/software-downloads/ ?lang=en.
IC10/20FR Page 12
Cancel time zone change
To cancel time zone change process without saving
the changes, disconnect power source.
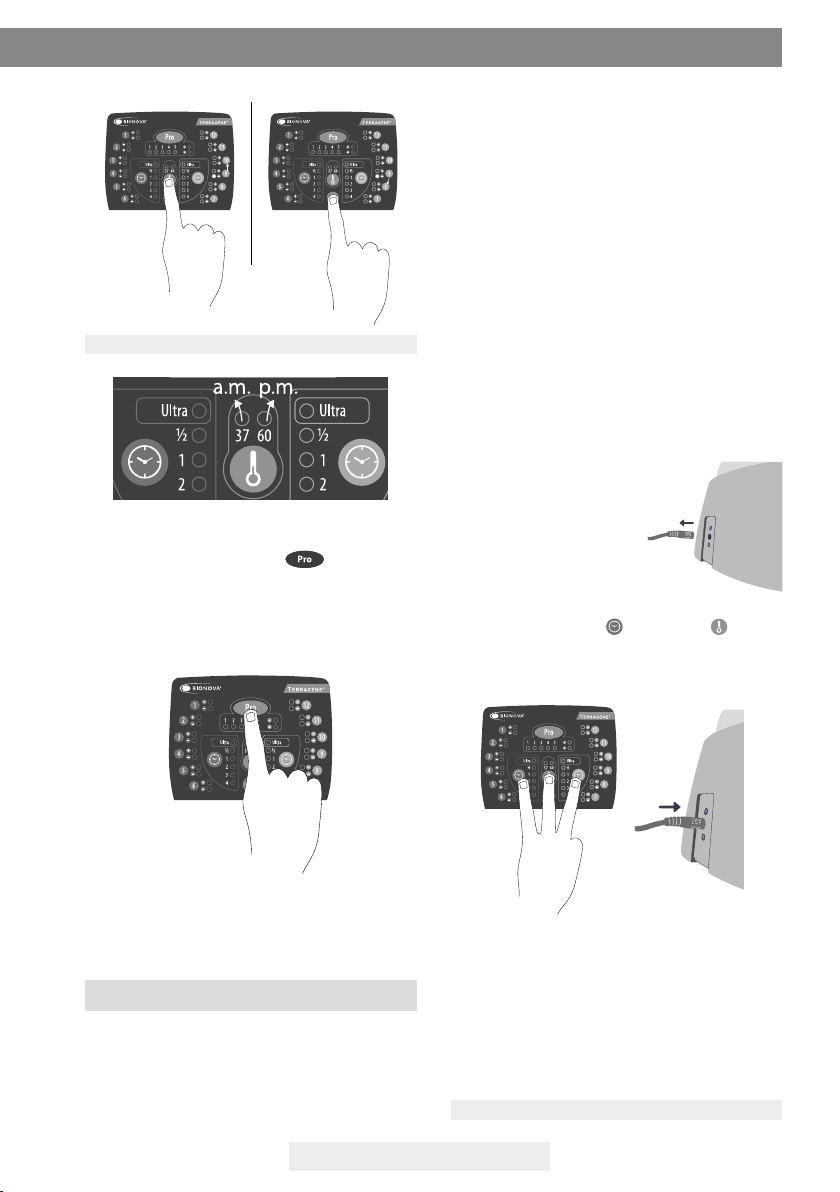
Enter Time setting mode
De-energize the auto-reader.
Time setting functionality allows you establish a spe-
cic time regardless of auto-reader current time.
Press and hold both buttons and button
simultaneously and energize the equipment. A beep
will be emitted to indicate access to Time setting
mode.
NOTE: 37 °C light indicates a.m. 60 °C light indicates p.m.
Complete time zone change
To save changes press and hold button (Figure
4) for three seconds. A beep will sound indicating that
process has been completed successfully. A ticket
with the new set time will be printed.
Figure 4
Time setting mode
Instructions for use
Advance Delay
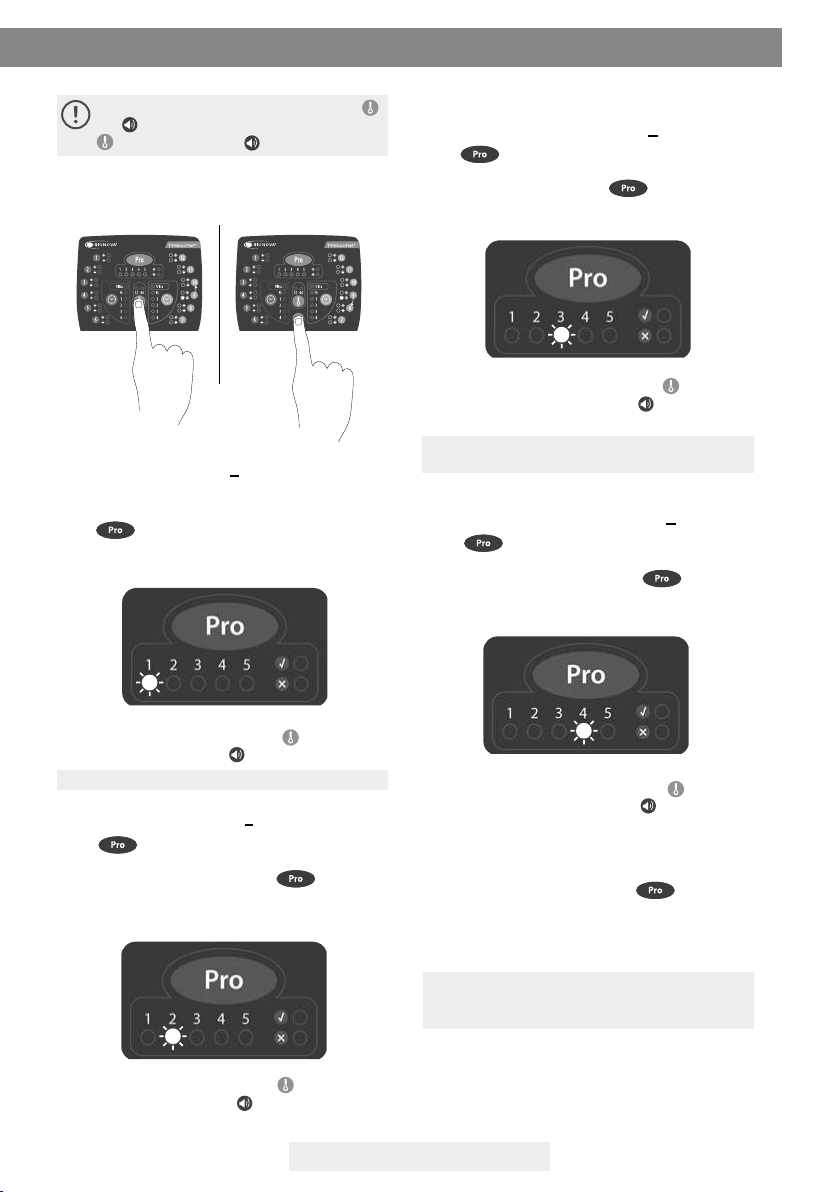
Hours setting
Lights corresponding to 1 to 10 incubation/reading
positions indicate the digit value which is set. Lights
from 1 to 9 indicate digit value from 1 to 9. Light 10
indicates 0 value.
In time setting mode, light 1 from PRO sector will turn
on to indicate ten hour modication and incubation
light corresponding to the 10th position will turn on to
indicate setting started.
NOTE: 24-hour format.
Modication of the time using the Bioupdate®
Software
Connect the auto-reader via the USB port to a PC and
start-up the program. Select the Bionova® IC10/20FR
Auto-reader and press the Clock Sync button, the
auto-reader will be synchronized with the PC's clock.
Synchronization can only be done as long as there is
not an ongoing reading.
Change the time using the Bionova® Traceability
Software
Connect the auto-reader via the USB port to a PC
and start-up the program. The Bionova® IC10/20FR
Auto-reader will be synchronized with the PC's clock.
Synchronization can only be done as long as there is not
an ongoing reading.
Change the time using the panel
IC10/20FR Page 13
- Hours setting: Ten hours (Hh:mm)
The blue light number 1 corresponding to PRO sector
should be on. If any other light from PRO sector is on,
press button as many times as necessary to
turn on the blue light number 1. This indicates ten
hour setting.
To increase ten hours value, press button. To re-
duce ten hours value, press button. (See Figure 5).
NOTE: the possible values for ten hour are 0, 1 and 2.
- Hours setting: Unit hours (hH:mm)
Press button to turn on the blue light num-
ber 2. This indicates unit hours setting. If any other li-
ght from PRO sector is on, press button as
many times as necessary to turn on the blue light
number 2.
To increase unit hours value, press button. To de-
crease unit hours value, press button. (See Figure 5).
To increase ten minutes value, press button. To
decrease ten minutes value, press button. (See Fi-
gure 5).
NOTE: possible values for ten minutes are 0, 1, 2, 3,
4 y 5.
Minutes setting
- Minutes setting: Ten minutes (hh:Mm)
Press button to turn on the blue light number
3. This indicates ten minutes setting. If any other light
from PRO sector is on, press button as many
times as necessary to turn on the blue light number 3.
Figure 5
To change hours and minutes digits, use
and buttons. To increase digit value press
; to decrease press (see Figure 5).
Instructions for use
- Minutes setting: Unit minutes (hh:mM)
Press button to turn on the blue light num-
ber 4. This indicates unit minutes setting. If any other
light from Pro sector is on, press button as
many times as necessary to turn on the blue light
number 4.
To increase unit minutes value, press button. To
decrease unit minutes value, press button. (See Fi-
gure 5).
Finish hours setting
To save changes press and hold button (see
Figure 4) for three seconds. A beep will sound, PRO
green light will turn on and a ticket with the new set
time will be printed to indicate the procedure has
been completed successfully.
NOTE: If the modication has not been done correct-
ly, the auto-reader will emit 3 beeps and the red light
from PRO sector will turn on. Repeat the procedure.
Cancel hours setting
To cancel hours setting procedure without saving the
changes, disconnect power source.
Increase Decrease
IC10/20FR Page 14
Finish printing language change
To save changes press and hold button for
three seconds. A sound will be emitted indicating
that process has been completed successfully. A tic-
ket with the new language will be printed.
Press and hold button and energize the equip-
ment. A sound will be emitted to indicate Access to
Printing language change mode.
Use and buttons to select the position number
corresponding to language code.
Instructions for use
Enter to Printing language change mode
De-energize the auto-reader.
This function allows you to change the auto-reader
printing language.
Printing language change mode
NOTE: each language has a code number assigned:
1: English | 2: Spanish | 3: Portuguese | 4: Turkish

IC10/20FR Page 15
Troubleshooting chart
Fault Possible cause Action
The auto-reader does not start
The auto-reader gives an error
in one position during “Auto-
test”.
The auto-reader gives an error
in the “Autotest”.
The auto-reader does not run a
BI reading.
The red light of that position is
blinking.
The auto-reader does not run a
BI readout in any position.
The auto-reader does not run
Chemdye® PRO1 MICRO readings.
The red light of that position is
blinking.
When initiating the PRO incu-
bation program the machine
makes a sound but it does not
initiate.
The auto-reader does not allow to
change the incubation program.
The printer does not print and
the printer indicating light blinks.
The printer releases unprinted
paper.
The Bionova® traceability sof-
tware does not detect the au-
to-reader.
The update of the auto-reader
fails.
Power source is not connected.
A BI is placed in the position at
the moment of starting the au-
to-reader.
Soil particles might be obstruc-
ting the light path between the
sensors.
The autotest gives an error in
that position, which becomes
disabled.
The incubation temperature is
not stable.
The autotest gives an error in
the PRO position, which beco-
mes disabled.
The incubation temperature is
not stable.
Ongoing reading.
The printer cover is not tightly
locked.
Printer without paper.
Paper roll is placed in the wrong
direction.
The auto-reader is turned o or
the USB cable is disconnected.
The auto-reader is connected to
the Bionova® traceability software.
Check that the power source is con-
nected to the power supply and
that the plug is connected to the au-
to-reader.
Check that every position is empty at
the moment of starting the auto-rea-
der.
Ensure cleanliness of the incubation
position. Use of air is recommended.
Do not use solid objects that could
damage internal components. Res-
tart the auto-reader.
Make sure that the position is empty
when starting the auto-reader. Res-
tart the auto-reader.
Wait for temperature to be stable.
Make sure that the PRO position is
empty when starting the auto-reader.
Restart the auto-reader.
Wait for temperature to be stable.
Wait for the readings to nish.
Check that the cover is tightly closed.
Place a new paper roll in the right di-
rection.
Check the paper roll direction.
Check that the auto-reader is turned
on, the USB cable is connected and
the COM port is correctly installed and
accepted by the operative system.
Close the program, restart the au-
to-reader and try again.

IC10/20FR Page 16
Warranty
Terragene® S.A. guarantees both the quality of the
product material components and the quality of its
manufacturing process. Should any material or ma-
nufacturing faults be detected within the warranty
period (1 year from the time of purchase), the only
obligation of Terragene® S.A. will be product repairing
or substitution.
Limitation of liability
Technical assistance
Terragene® S.A. shall not be liable for any loss or da-
mage that may result from the unsuitable use of the
equipment, negligence or user’s full responsibility.
Terragene S.A
Ruta Nacional Nº 9, Km 280 - CP 2130.
Parque Industrial Micropi- Alvear-Santa Fe-Argentina.


Rev.26 | Noviembre 2018
IC10/20FR
Innovación en tecnologías para el Control de Infecciones

IC10/20FR Pág. 20
La Auto-lectora Bionova® IC10/20FR ha sido diseñada
para la incubación de los siguientes Indicadores Bioló-
gicos (IBs) Autocontenidos:
• IBs Autocontenidos de Lectura Rápida: BT110 para el
control de esterilización por Óxido de Etileno, BT220 y
BT221 para el control de esterilización por Vapor, BT102
para el control de esterilización por Formaldehído y
BT95 para el control de esterilización por Plasma de Pe-
róxido de Hidrógeno.
• IBs Autocontenidos de Lectura Súper Rápida: BT222 y
BT223 para el control de esterilización por Vapor y BT96
para el control de esterilización por Plasma de Peróxido
de Hidrógeno.
• IBs Autocontenidos de Lectura Ultra Rápida: BT224
para el control de esterilización por Vapor.
Los microorganismos contenidos dentro de los indi-
cadores biológicos varían de acuerdo al proceso de
esterilización para el cual han sido diseñados, por ello,
las temperaturas de incubación son diferentes según el
indicador. Los indicadores para el control de esteriliza-
ción por óxido de etileno (OE), deben ser incubados a 37
°C, mientras que aquellos para el control de los restantes
procesos de esterilización deben incubarse a 60 °C.
No es posible la incubación simultánea de IBs
para el control de procesos por OE junto con IBs
para el control de los demás procesos.
La incubadora Bionova® IC10/20FR permite la detección
Descripción de uso
Composición
rápida y fácil de indicadores biológicos positivos y nega-
tivos. Dispone de 6 programas de incubación: 4 hs. a 37
°C, 3hs. a 60 °C, 2 hs. a 60°C, 1 h. a 60 °C, 30 min. a 60 °C e
Instant/Ultra (20 min.) a 60 °C. Un resultado positivo tam-
bién puede evidenciarse a través del cambio de color del
medio de cultivo al color amarillo, lea las instrucciones de
uso de cada indicador para más información. La elección
de realizar o no la incubación extendida para conrma-
ción por cambio de color depende de los protocolos in-
ternos de cada laboratorio u hospital.
La auto-lectora permite la selección de programas de
tiempo de incubación de manera independiente para
dos zonas. La zona 1 incluye las posiciones 1 a 6 y la zona
2, las posiciones de 7 a 12.
La Auto-lectora IC10/20FR Bionova® contiene una cavi-
dad especial para realizar lecturas cuantitativas del Sis-
tema Chemdye® PRO, destinado al control de limpieza y
contaminación de supercies.
La Auto-lectora IC10/20FR Bionova® no sólo permite la
detección de los resultados, también proporciona un
ticket impreso para su registro. Además, la Auto-lectora
IC10/20FR Bionova® puede conectarse a una PC por un
puerto USB. Este permite vincular los resultados con el
Software de Trazabilidad Bionova® para la Lectura Auto-
mática yTrazabilidad de Indicadores Biológicos Rápidos,
Súper Rápidos, Ultra Rápidos y Sistema de Monitoreo de
Higiene. Para descargar la última versión del software
ingrese en: http://www.terragene.com.ar/productos/
control-de-infecciones/incubadoras/descargas-de-sof-
tware/, desde allí también podrá descargar el manual
de uso del mismo.
15
16
1
1
2
3
10
11
9
12
14
13
8
6
712
Other manuals for IC10/20FR
1
Table of contents
Languages:
Other Bionova Laboratory Equipment manuals

Popular Laboratory Equipment manuals by other brands


Fluke
Fluke ii900 user manual

Showa Denko
Showa Denko Shodex Asahipak NH2P-50 10E Operation manual

REITEL
REITEL ROTOGRIND NT operating instructions

Showa Denko
Showa Denko Shodex IC NI-424 Operation manual

Prior Scientific
Prior Scientific OptiScan II ES111 operating instructions

BioLAB
BioLAB BFSD-502 Operation manual


