Bionova IC10/20FR User manual

WARNING: this product contains dry natural rubber
Rev. 31 | February 2022
Bionova® IC10/20FR
Auto-reader
for Rapid, Super Rapid and Ultra Rapid
Biological Indicators and Hygiene
Monitoring systems


Bionova® IC10/20FR
Index
4 Composition
4 Product description
5 Indications for use
5 References
5 Safety information
5 Symbols
6 Operating conditions
6 Power supply specications
6 Environment operating conditions
6 Regulatory Compliance
6 Product Compatibility and Incubation programs
6 Bionova®IC10/20FR Incubation Programs
7 Bionova®IC10/20FR Auto-reader compatible indicators
7 Instructions for use
7 Start-up
8 Remaining incubation time
8 Canceling a reading
8 Interpretation of results
9 Positive control
9 Disposal
9 Reprinting of results
9 Audible alarm
9 Temperature monitoring
9 Thermalpaperspecications
9 Replacement of the paper roll
10 Set-up mode
10 Date format and time zone selection mode
11 Time setting mode
12 Printing language selection mode
13 Hygiene monitoring systems
13 Readout of PRO1 Indicators
15 Interpretation of results of PRO1 indicators
16 Disposal
16 Audible alarm
17 Cancel a reading
17 Additional features
17 Firmware update
17 Bionova® Cloud Environment
17 Threshold Mode selection for PRO1 Indicators
18 ISO 15883-5:2021 Threshold Mode
18 ISO15883-5Workow
20 Bionova®Cloud Surface Eye Mobile App advanced features
20 Cleaning and maintenance
21 Troubleshooting
22 Warranty
22 Term
22 Limitation of liability
22 Technical assistance

4 Bionova® IC10/20FR
Composition
Product description
Bionova®IC10/20FR Auto-reader has been designed for the
incubation and automatic readout of Terragene®Rapid, Super
Rapid and Ultra Rapid Self-contained biological indicators
(SCBIs) appropriate for sterilization and environmental
disinfection process control applications, and for the
incubation and automatic readout of Hygiene Monitoring
System Indicators (Protein Pen) appropriate for surface
cleaning and contamination control applications.
Bionova® IC10/20FR allows two dierent incubation
temperatures, 37 °C or 60 °C. Microorganisms contained
within the SCBIs vary depending on the sterilization process
for which they have been designed, therefore, incubation
temperatures and incubation times dier depending on the
SCBI being used. Bionova®IC10/20FR allows two independent
time settings selections. One of them for conguring the
incubation time for positions 1 to 6, and the other for postions
7 to 12.
SCBIs for Ethylene Oxide (EO), should be incubated at
37ºC,whilethoseusedforthemonitoringoftherestofthe
sterilizationprocessesshouldbeincubatedat60ºC.
Simultaneous incubation of SCBIs for monitoring EO processes
along with SCBIs for monitoring other sterilization processes is
not possible.
Please check the Product Compatibility and Incubation
programs section for more information about Incubation
Programs and new available Indicators for your Bionova®
IC10/20FR.
Bionova®IC10/20FR Auto-reader allows easy and rapid
detection of positive and negative SCBIs, using advanced
uorescence techniques. A uorescence result can also be
visually evidenced by culture medium color change when
performing extended incubations. Due to the high sensitivity
ofthe uorescenceresults, theoption toperform ornot an
extended incubation depends on the internal protocols of
each laboratory or hospital. Read the instructions for use of
the SCBI for more information.
Bionova®IC10/20FR Auto-reader also provides a printed ticket
each time an incubation is completed for recording the results.
This allows for easy result management, for documentation
compliance and safekeeping.
Please refer to the Product compatibility and incubation
programs section for more information about the incubation
settings of your Auto-reader.
12
1
2
3
4
5
6
7
8
9
10
11
12
13
14
15
16

Bionova® IC10/20FR 5
Indications for use
United States of America
Terragene®Bionova®IC10/20FR Reader Incubator incubates
at 60 °C and reads the Terragene®Bionova®SCBI (BT220,
BT221, BT222, and BT223) for uorescent results at 30
minutes (BT223), 1 hour (BT221, BT222), and 3 hours (BT220).
Outside the United States
Terragene®Bionova®Reader Incubator IC10/20FR incubate
at 60 °C and 37 °C, and read the Terragene®Bionova®SCBIs
and the Terragene®Chemdye®Hygiene Monitoring System
Indicators at the times prescribed in the User Manuals.
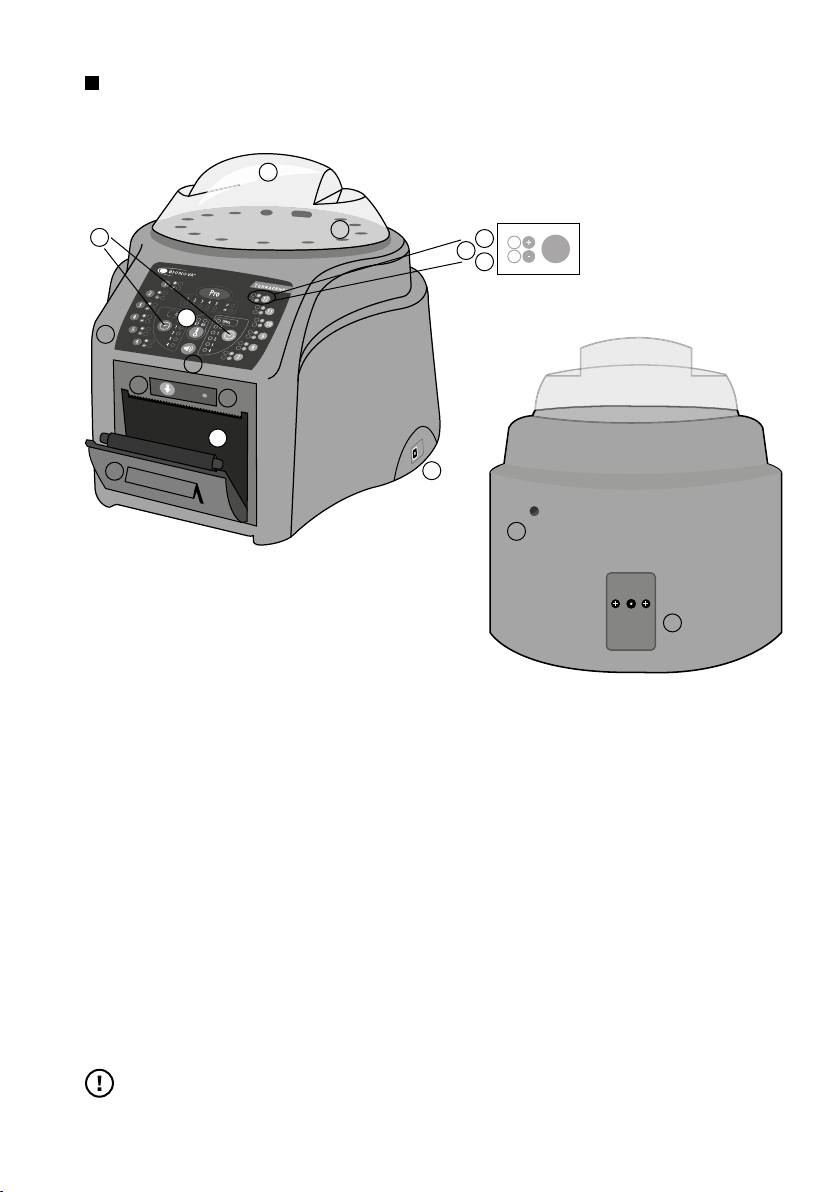
References
1 Protective cover
2 Incubation Area for 12 SCBIs and 1 Protein Pen. SCBI
Ampoule Crusher
3Control Panel
4Red Light / Positive Indicator
5Green Light / Negative Indicator
6Incubation Position Number
7Incubation Time Selection Buttons
8Incubation Temperature Selection Button / Time Left
9Alarm Cancellation Button
10 Thermal Printer
11 Printer's Paper Indicator Light
12 Paper’s traction button
13 Cavity for Paper
14 USB Port
15 Input for Power Supply Plug (12Volts DC)
16 Hole for External Temperature Control
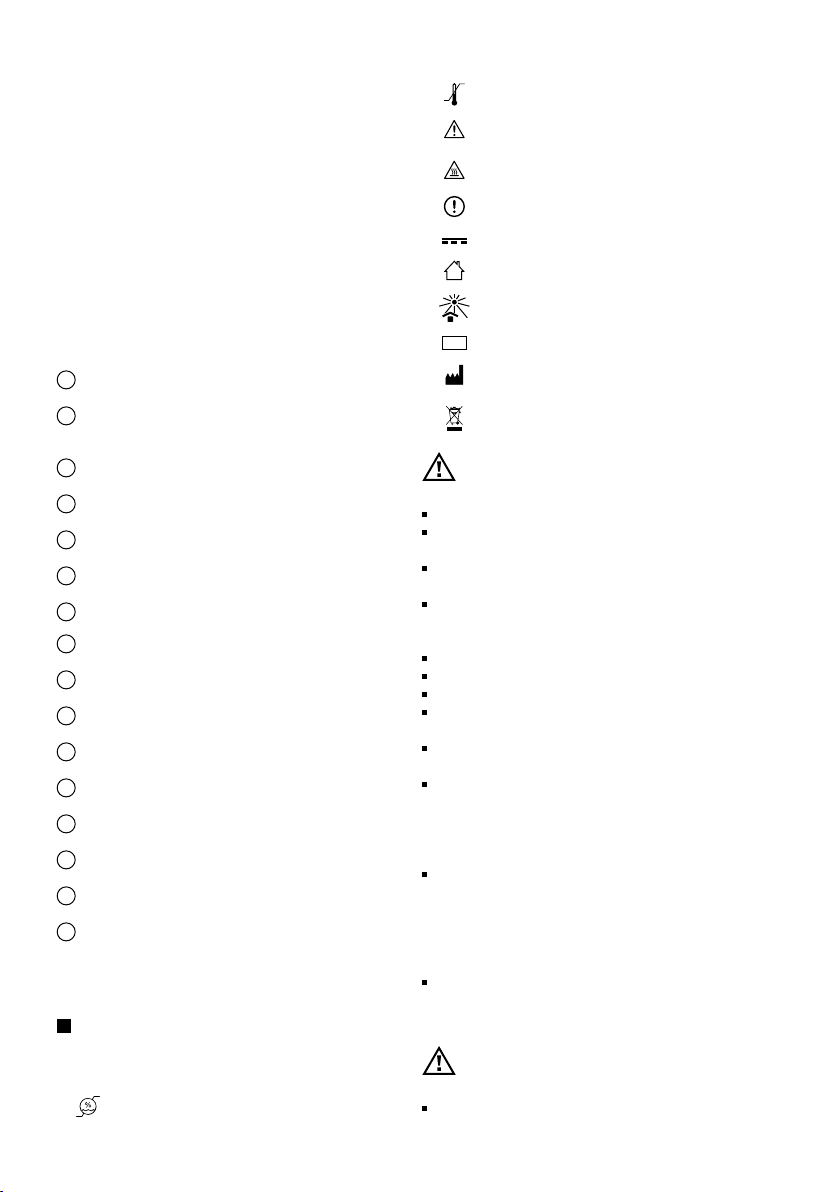
Operating temperature
Caution, Warning, Attention - Refer to the
instructions for use
Caution: Hot surface
Important
Direct current
For indoor use only
Keep away from sunlight
Batch code
Manufacturer
Separate collection for waste of electrical and
electronicequipment
To avoid risks and/or damaging the device:
For indoor use only.
Do not place the incubator in a room exposed to direct
sunlight or to high luminous intensity lamps.
Do not place the incubator near devices that emit strong
electromagneticelds.
Do not use the incubator on leaned surfaces or on surfaces
that are subject to shocks, vibrations, temperature or high
relative humidity.
Disconnect the power cord before cleaning.
Do not use abrasive, corrosive cleaners or disinfectants.
Donotimmerseintoanyliquid.Donotpouranyliquidinside.
Make sure the incubator is connected to an appropriate
electrical mains outlet socket.
Use only the included power supply (AC power adapter),
power supply's AC plug, power supply cords, and USB cable.
Verify that all the included elements are in good condition
on daily basis. If any of them is damaged, discontinue their
use. The use of cables, adapters, cords, and/or power supplies
dierent from the ones included may cause res, electrical
shocks, or even physical injuries.
Do not plug any devices into the Incubator's USB port other
than a personal computer (PC). The PC has to be compliant with
IEC60950-1, IEC 62368-1 or comparable, with safety extra-low
voltages on its USB ports. Ask a qualied technician to verify
device compatibility. Attaching any other device to the USB port
may damage the incubator and may not be safe for the user.
Do not attempt to repair the incubator by yourself, that could lead
to major and irreversible damages to the device. In case of device
malfunction, contact your local distributor for further assistance.
To reduce the risk of using incompletely sterilized loads:
Please read, understand, and follow the Instructions for use
Safety information
Symbols
Operating relative humidity
10 ºC
30 ºC
LOT
80 %
30 %

6 Bionova® IC10/20FR
Safety information
of each SCBI before its incubation.
Do not remove the SCBI before the incubator reports the
nalreadoutresult.Checkaresultticketisprinted.
Check that culture medium completely wets the spore carrier.
To avoid the risk of injury, related to glass fragments
produced when crushing the glass ampoule inside the
SCBI tube:
Cool the SCBI during the indicated time before crushing the
ampoule.
Do not handle the SCBI excessively since this might cause the
glass ampoule to burst.
Wear safety gloves and glasses when removing the SCBI from
the sterilizer, pressing the SCBI's cap, and crushing the SCBI's
ampoule.
DonotuseyourngerforcrushingSCBI.UsetheAmpoule
Crusher instead.
To avoid a potentially hazardous situation:
Avoid contact with the hot metal block inside each incubation
position.
Donotinsertyourngers,oranyotherelement,insidethe
incubation positions.
Place only compatible indicators inside the incubation
positions.
To avoid SCBIs from absorbing fluorescent particles:
Avoid direct contact between the SCBIs and Chemical
Indicators or Tapes before the SCBI incubation.
IMPORTANT
Do not use this product in a manner not specied by
Terragene®S.A., otherwise the protection provided by the
productmightbeaected.
Only Terragene®S.A. authorized personnel can access or
service the internal components of the Incubator. Parts or
components inside the Incubator should not be manipulated
by the user.
Operating conditions
Power supply specifications
Input parameters Operating conditions Units
Voltage range (100-240) Volts
Frequency50/60Hertz
*Current 0,2 Amperes
Output parameters Values Units
Voltage 12 DC Volts
**Current 4 Amperes
* 1 Ampere in USA and Canada.
** 3 Amperes in USA and Canada.
Terragene®S.A. recommends the use of UPS instead of
voltagestabilizers,sincethey fullltwofunctions:to stabilize
and maintain the energy during a power outage.
Environment operating conditions
Environmental Operating Units
conditions conditions
Altitude 3500 (máx.) Meters
Operation temperature 10-30 Celsius
Relative Humidity 30-80 %
Installation/overvoltage category II
Degree of contamination 2
Storage temperature 10-30 Celsius
Voltage 12 DC Volts
Regulatory Compliance
Bionova®IC10/20FR Auto-reader Incubator complies with the
following standards and directives:
Electrical Safety IEC 61010-1
IEC 61010-2-010
Low Voltage Directive
2014/35/EU
Electromagnetic EN 61326-1
Compatibility (EMC) EMC Directive 2014/30/EU
European Commission RoHS Directive 2011/65/EU
WEEE Directive 2012/19/EU
Bionova®IC10/20FR Auto-reader Incubator do not represent
photobiological risk and do not generate dangerous optical
radiation in any of its normal operation conditions as per the
requirementsofIEC62471Standard.
Designed under Quality Management System standards ISO
13485:2016/NS-EN ISO 13485:2016.
Product Compatibility and
Incubation programs
Bionova® IC10/20FR Incubation
Programs
The following incubation programs are available for your
Bionova®IC10/20FR. Verify which incubation programs are
available for your country checking the Indications for Use
section.

Bionova® IC10/20FR 7
Safety information
Instructions for use
Start-up
1|Place the Bionova®IC10/20FR Auto-reader Incubator
on a rm surface, free from vibrations, away from direct
sunlight, currents of hot or cold air, chemical and corrosive
or ammable substances. Do not place the Incubator in a
way that disconnection of the power supply's AC plug from
mainscouldbedicult.Leaveaspaceofatleast10cmfrom
the Incubator to the closest wall. Do not move the Incubator
periodically or during its use. Connect the Incubator to a
secure and stable electrical mains outlet socket.
Do not wet or heat the device. If liquid is spilled on the
Incubator, disconnect it and follow the instructions on the
Cleaning and maintenance section.
2|Power on your Bionova®IC10/20FR by connecting the
power supply's AC plug to mains and then connect the plug
at the other end of power supply to the rear of the Incubator.
The last incubation program used (time and temperature
combination) will be selected by default.
Before power on, verify that all incubation positions are empty.
If the Printer's paper indicator light starts blinking after
powering on the Incubator, check that the printer's door is
tightly closed and that the printer has paper, if not follow the
instructions on the Replacement of the paper roll section.
3|Set the incubator internal clock to correspond to your local
time.SeecongurationmethodsintheTime setting mode section.
All devices are manufactured with the following settings:
Time zone: UTC +0:00
Printing language: English
If you want to change the time zone, or the printing language
refer to Modication of time zone, or Modication of printing
language on the Set-up mode section.
4| Select the appropriate incubation temperature for the SCBI
you are planing to use, according the SCBI’s Instructions for
use. Press and hold the temperature selection button for 3
seconds to enter the temperature selection mode. Press
again to select the desired temperature. After 4 seconds the
temperaturemodicationwillbeacceptedautomatically.
5| Select the appropriate incubation time for the SCBI you are
planning to use by pressing the left incubation time selection
button (for selecting the incubation time for incubations positions
1to 6), or the right incubation time selection button ((for selecting
the incubation time for incubations positions 7 to 12).
Please refer to the Product Compatibility and Incubation
programs section to know more about the temperature and time
combinations (incubation programs) available for your device.
5|Wait until the temperature stability indicator light stops blinking
for the incubator to reach a steady working temperature.
!
Do not place an indicator in an incubation position before the
incubation temperature is stable.
6|Once the temperature stability indicator light remains
stable, a one-time automated test to check each position
internal status will be carried out (auto-test). Once the test is
complete, the position status indicator light will turn green to
indicate that the position can be used to perform readings, or
it will turn red to indicate that an error has occurred.
When the incubator detects an error in a position, the position
will be disabled to guarantee the reliability of the results and it
cannot be used to perform any further readings.
To indicate that a position has been disabled, the position
Temperature Time Incubation
selection selection program
60ºC 20min(Ultra) 20minat60ºC
30 min 30 min at 60 °C
1 hs 1 hour at 60 °C
2 hs 2 hours at 60 °C
3 hs 3 hours at 60 °C
PRO (7 min) PRO at 60 °C
37ºC 4hs 4hoursat37°C
To select the appropriate incubation program for the Indicator
you are planning to use, follow each Indicator’s Instructions
for use.
Select the appropriate incubation program before the
incubation of any Indicator.
Bionova® IC10/20FR Auto-reader
compatible indicators
We develop new Indicators for extending the features of
our incubators regularly. Please visit www.terragene.com/
IC1020FR to nd out all compatible indicators for your
device.

8 Bionova® IC10/20FR
Instructions for use
statusindicatorlightwillturnredandblinkindenitely.
!
For the correct performance of the auto-test, keep the
protective cover closed when the auto-test is running.
7| After the auto-test is complete, readings can be initiated on
any incubation position if the position is not disabled. Place
an indicator in an SCBI reading position. The reading process
will start automatically after placing the SCBI. The incubator
willemitanaudiblenotication,indicatingthatareadinghas
successfully begun, at the same time the position status lights
will start blinking. Close the protective cover and wait until a
readout result is obtained.
!
Read and follow the SCBI’s instructions for use. Before placing
an SCBI in the incubator, press the top to seal the tube. Crush
the internal ampoule (either using the incubator’s ampoule
crusher or the ampoule crusher included in the SCBI’s box).
Make sure that culture medium completely wets the spore
carrier at the base of the SCBI’s tube and agitate.
!
Do not remove or change the SCBI’s placement once a reading
process has begun or the reading will be cancelled. See the
Canceling a reading section for further details.
!
If the Auto-reader does not start a reading immediately
after placing an SCBI in a reading position, refer to the
Troubleshooting section for more information.
8|When a positive result is detected in an incubation position,
the position status indicator light will turn red, an audible
alarm will activate, and a ticket will be printed. Once the
SCBI is removed, the alarm and the red light will turn o
automatically after 30 seconds. The position will be available
to start a new reading once the position status indicator light
turnso.PleaserefertotheInterpretationofresultsformore
information.
!
Press the button to cancel the audible alarm.
Note: The incubation time setting denes the upper time
limitinwhichanincubatorcaninformauorescencereadout.
Nevertheless, the incubator can detect and inform a positive
result before the selected time limit as part of its normal
operation. Please refer to the Product compatibility and
incubation settings section for more information.
When a negative result is detected in a reading position, the
position status indicator light will turn green and a ticket will be
printed.OncetheSCBIisremoved,thegreenlightwillturno
automatically after 30 seconds. The position will be available to
start a new reading once the position status indicator light has
turnedo.PleaserefertotheInterpretation of results section
for more information.
9|EverytimetheAuto-readerinformsauorescencereadout
result (positive, negative, or canceled), a ticket will be printed
to register the result. Pull upward for the paper to be cut with
the serrated edge of the printer.
Note: If there is no paper for ticket printing, the printer’s
paper indicator light will start blinking. To replace the paper,
follow the instructions in the Replacement of the paper roll
section. The incubator will save the last 13 results, for re-
printing, follow the Reprinting of the last results instructions.
POSITIVE NEGATIVE CANCELED
Remaining incubation time
The Bionova®IC10/20FR Auto-Reader also allows you to verify
the remaining incubation time in every reading position by
ticket printing.
Whenever a reading process is in course, press and hold the,
press and hold the buttonforveseconds.Aticketwill
print, informing reading position, incubation program and
remaining incubation time.
Canceling a reading
When an SCBI is removed from a position during the
incubation process, an audible alarm will be enabled. At the
same time, the red positive indicator light will start to blink
to indicate that the SCBI should be returned into its original
reading position.
If the SCBI is not placed back after 10 seconds of being
removed, the reading will be canceled automatically and a
ticket will be printed.
Interpretation of results
If a positive result is obtained (red light ) when
incubating an exposed SCBI, this indicates that the
sterilization process to which the SCBI was exposed has
failed. This result is valid if a positive result is obtained for the
positive control SCBI.
Take action immediately if a positive result is obtained when

Bionova® IC10/20FR 9
incubating an exposed SCBI. Please refer to the sterilizer
instructions for use for more information.
If a negative result is obtained when incubating an exposed SCBI
(green light ), this indicates that the sterilization process
to which the SCBI was exposed has been successful. This result is
valid if a positive result is obtained for the positive control SCBI.
!
A positive result should always be obtained by the incubator
when incubating a positive control SCBI. Refer to the Positive
control section for more information.
Positive control
A positive control is a non-sterilized SCBI used as a reference
during the incubation process. The use of a positive control is
a recommended practice as it helps to ensure:
The correct incubation temperature is reached.
Viability of spores has not been altered due to improper
storage temperature, humidity, or proximity to chemicals.
The aptitude of the media to promote rapid growth and
uorescencegeneration.
Proper functioning of the incubator.
For the incubation of a positive control SCBI, rst press the
cap to seal the SCBI and crush the ampoule, making sure
the media completely wets the spore carrier. Identify the
control SCBI on its label. Place the positive control in an empty
incubation position and incubate as described in the SCBI
instructions for use.
!
The positive control and the exposed SCBI should belong to
the same batch.
Disposal
Discard the SCBIs according to your country’s sanitary
regulations. Positive SCBIs can be sterilized before discarding
following the SCBI instructions for use. It is not possible to use
or incubate an SCBI more than once.
Reprinting of results
The auto-reader allows reprinting of the last 13 results. For
printing the results, press the button for 5 seconds.
Audible alarm
An audible alarm will sound every time a positive result is
detected by the incubator. The alarm allows the user to
immediately detect a positive result without the need to
Instructions for use visually check the device. The alarm can be canceled by
pressing the button.
Temperature monitoring
The Bionova®IC10/20FR Auto-reader features an automated
internal temperature control. If the incubation temperature
fallsoutsideofthespeciedrangeof37±2ºCor60±2ºC,the
temperature stability indicator light will start to blink.
The incubation temperature can be externally monitored
by placing an external thermometer in the hole for external
temperature control located at the back of the device.
Thermal paper specifications
Recommended paper: JUJO AF50KSE3 or similar (order code
ICTP).
Paper width : 57 mm
Maximum paper thickness: 60 g/m2
Maximum diameter size: 50 mm
Replacement of the paper roll
1|To replace the paper roll, pull the handle of the printer’s
door.
2|Open the printer’s cover and remove the spent roll.
3|Place the new paper roll with the outer side up.

10 Bionova® IC10/20FR
4|Close the printer cover by pressing on the sides of the lid.
Set-up mode
Date format and time zone
selection mode
This feature allows to change the date format on the Auto-
reader’s ticket and to set the auto-reader’s internal clock
forwardorbacktoadoptadierenttimezone.
Note: Please note that the time can be synchronized both
with the Bioupdate®Software and with Bionova®Traceability
Software.
Enabling date format selection mode
Turnothedevice.
Press and hold both buttons simultaneously and Turn on
the device.
Note: When the date format selection mode has been
enabled sucesfully, the green light indicator corresponding to
incubation position one will start to blink. In addition, a ticket
with the current date will be printed in order to set a reference
value.
Instructions for use
Date format selection
There are three types of date format: DD/MM/YY, MM/DD/YY
and YY/MM/DD. Press the or button to move back and
forth between each of the 3 available options. After 2 seconds,
a ticket with the selected format will be printed to set a
reference.
Saving selected date format
To save changes press and hold button for 3
seconds. A beep will indicate that the process has been
completed successfully. A ticket with the new date format will
be printed. The green light indicator of incubating position one
will stop blinking.
Time zone selection mode
Once the date format has been modied and saved, the
incubator will enter Time Zone selection mode automatically.
The current date (with the previously selected format) and the
current time will be printed to set a reference.
Note: When the Time zone selection mode is enabled, the
green light will turn on to the incubation position number
corresponding to the current time zone on the device.
Time zone selection
To add hours, press the button as many times as
necessary. To subtract hours, press the button as many

Bionova® IC10/20FR 11
times as necessary. After 2 seconds, a ticket will be printed,
informing the selected time zone.
Add Substract
Note: 37 °C light indicates AM. 60 °C light indicates PM.
Save time zone selection
To save changes press and hold button for three
seconds. A beep will indicate that process has been completed
successfully. A ticket with the new set time will be printed.
Discarding date format selection or time zone selection
To discard the changes, unplug the incubator from the power
source.
Time setting mode
Timesettingfunctionalityallowsyouestablishaspecictime
regardless of auto-reader current time.
Modification of the time using the Bioupdate® Software
Connect the auto-reader via the USB port to a PC and start-
up the program. Select the Bionova®IC10/20FR Auto-reader
and press the Clock Sync button, the auto-reader will be
synchronized with the PC's clock. Synchronization can only be
done as long as there is not an ongoing reading.
Instructions for use Change the time using the panel
Enabling Time setting mode
Turnothedevice.
Press and hold both buttons and button
simultaneously and Turn on the device.
Hours setting
Lights corresponding to 1 to 10 incubation positions indicate
the digit value which is set. Lights from 1 to 9 indicate digit
value from 1 to 9. Light 10 indicates 0 value.
In time setting mode, light 1 from PRO sector will turn
on to indicate ten hour modication and incubation light
corresponding to the 10th position will turn on to indicate
setting started.
Note: 24-hour format.
!
To change hours and minutes digits, use and buttons.
To increase digit value press ; to decrease press .
Increase Decrease

12 Bionova® IC10/20FR
Hours setting: Ten hours (Hh:mm)
The blue light number 1 corresponding to PRO sector should
be on. If any other light from PRO sector is on, press
button as many times as necessary to turn on the blue light
number 1. This indicates ten hour setting.
To increase ten hours value, press button. To reduce ten
hours value, press button.
Note: The possible values for ten hour are 0, 1 and 2.
Hours setting: Unit hours (hH:mm)
Press button to turn on the blue light number 2. This
indicates unit hours setting. If any other light from PRO sector
is on, press button as many times as necessary to
turn on the blue light number 2.
To increase unit hours value, press button. To decrease
unit hours value, press button.
Minutes setting
Minutes setting: Ten minutes (hh:Mm)
Press button to turn on the blue light number 3. This
indicates ten minutes setting. If any other light from PRO
sector is on, press button as many times as necessary
to turn on the blue light number 3.
To increase ten minutes value, press button. To decrease
Instructions for use ten minutes value, press button.
Note: Possible values for ten minutes are 0, 1, 2, 3, 4 and 5.
Minutes setting: Unit minutes (hh:mM)
Press button to turn on the blue light number 4. This
indicates unit minutes setting. If any other light from Pro
sector is on, press button as many times as necessary
to turn on the blue light number 4.
To increase unit minutes value, press button. To decrease
unit minutes value, press button.
Finish hours setting
To save changes press and hold button for three
seconds. A beep will sound, PRO green light will turn on and a
ticket with the new set time will be printed to indicate the
procedure has been completed successfully.
Note: If the modication has not been done correctly, the
auto-reader will emit 3 beeps and the red light from PRO
sector will turn on. Repeat the procedure.
Cancel hours setting
To discard the changes, unplug the incubator from the power
source.
Printing language selection
mode
This function allows you to change the auto-reader printing
language.
Note: Each language has a code number assigned:
1: English | 2: Spanish | 3: Portuguese | 4: Turkish |
5: French | 6: Romanian
Enabling Printing language selection
Turnothedevice.

Bionova® IC10/20FR 13
Press and hold button and turn on the device.
Press and buttons to select the position number
corresponding to language code.
Finish printing language selection
To save changes press and hold button for three
seconds. A sound will be emitted indicating that process has
been completed successfully. A ticket with the new language
selection will be printed.
Instructions for use
Hygiene monitoring systems
IC10/20FR Auto-reader features one incubation position
designed for the automatic readout of Chemdye®Hygiene
Monitoring System PRO1 Indicators (PRO1 Protein Pen
Indicators) appropriate for surface cleaning and contamination
control applications. The readout of PRO1 indicators allows
you to perform a quantitative analysis to determine the
amount of protein found in sample adjusted by a BSA (Bovine
Seric Albumin) reference curve. The protein quantitative
analysismethodhasadetectionlimitof1μgwithasensitivity
of0.5μgandamaximumdetectionrangeof50μg.Theresults
are indicated with a resolution of 0.1 μg, with an accuracy
greaterthan90%inthewholequanticationrange(IC95%).
!
Verify which incubation programs and indicators are available
for your country and application checking the Indications for
Use section.
Readout of PRO1 Indicators
Please follow the instructions below to carry out the incubation
and readout of PRO1 indicators on your device.
1|Select your preferred Protein Quantication Threshold
Mode for your Auto-reader between the two Threshold
modes available: Threshold based on HTM01-01 Standard, or
Threshold based on ISO 15883-5:2021 standard.
For selecting a Threshold mode and a Threshold value, please
follow the indications detailed on Threshold Mode selection on
Bionova®Cloud Environment section.
All devices are manufactured with the following settings:
Default Threshold Mode: HTM 01-01
Default Protein Threshold: 1 µg
MakesurethattheselectedProteinQuanticationThreshold
Mode is according to your needs before performing an
incubation. The Threshold Mode can not be changed during
ongoing readings.
2|Press and hold the button for 1 second to enable
the position’s readout mode. The Auto-reader will emit a short
beeping sound and the 1 µg quantitative protein level led
indicator will blink for a moment. After that, two short beeping
sounds will be emitted indicating that the incubation position
is enabled and ready to start an incubation.
!
PRO1 incubation position will only be available if the
Temperature is stable at 60 °C and the Temperature Stability
Indicator stops blinking. Do not place an indicator until the
temperature is stable.
3|Use a compatible Chemdye®PRO1 indicator to take a
sample from the surface to be analyzed. Make sure to follow
the indicator’s instructions for use while taking the sample. A
summary of the swabbing process is also detailed one Figure 1.
4|After a sample from the swabbing surface has been taken,
place the PRO1 indicator into the enabled incubation position.
Insert the indicator fully inside the incubation position, as
shown on the Auto-reader’s label. When the indicator is on the
correct position, the indicator can not be rotated. (Figure 2).
Make sure that the solution is correctly mixed and the reading
cone has a sucient amount of solution before starting an
incubation.
Make sure that the indicator’s swab is not inside the reading
cone before starting an incubation.
5|Once the indicator is placed on the incubation position,
press and hold the button for 1 second to start the
incubation and readout process. Once the process start, the

14 Bionova® IC10/20FR
Hygiene monitoring systems
positive and negative indicators will start to
blink and will keep blinking throughout the whole incubation
and readout process. Wait until the incubation and readout
process is completed before removing the indicator.
Do not move or remove or change the Indicator placement
once a reading process has begun, as it could lead to errors in
the incubation and/or readout process.
6|Once the incubation and readout process is completed, the
positive and negative indicators will stop
blinking and the Auto-reader will indicate the µg of protein
quantityfoundinthesamplebyturningonthecorresponding
Quantitative Protein Level LED Indicator. A ticket will be
printedaswelldetailingtheproteinquantityalongwithother
useful information related to the readout process.
The protein quantity found on the sample is also used to
obtain and inform a readout result depending on the Protein
QuanticationThresholdModeandthresholdvaluesselected
on your Auto-reader. Please refer to the Interpretation of
results of PRO1 indicators section for more information.
After a Readout result is informed remove the indicator from
the incubation position an press the button once to
reset the incubation position to its stand-by state.
Note: The color of the solution on the PRO1 indicator can
be used for a qualitative reading only if the protein pen is
removed when the program ends. An audible alarm will be
seto30secondsbeforetheendoftheincubationprogram
to warn the operator that the incubation time is close to be
completed. If the protein pen is not removed as soon a result
is informed the color of the solution will continue to evolve.
Figure 1
A
Remove swab and add the moisturizer
B
Swab the desired surface by applying a strong pressure
C
Place the swab back into the device
D
Activate
E
*Reference
volume
Shake downwards vigorously until the solution turns to green
and reaches the readout cone reference volume
F
Shake for 15 seconds with the swab inside the readout cone
G
Slide swab upwards without completely removing
H
Again, shake downwards vigorously and reach the readout
cone reference volume

Bionova® IC10/20FR 15
I
*Reference
volume
Readout cone without swab
J
Incubate immediately and read
Figure 2
Impossible
to rotate
Insert the pen on the incubation/reading position
Interpretation of results of PRO1
indicators
OnceaPRO1Indicatorreadoutprocessisnished,theAuto-
readerwillinformtheequivalentµgofproteinquantityfound
on the sample using a BSA (Bovine Seric Albumin) calibration
curve through the Quantitative Protein Level LED Indicators
and through a printed ticket.
The protein quantity found on the sample is also used
to obtain and inform a readout result depending on the
Threshold mode and threshold values selected on your Auto-
reader. Such readout result can be either Positive or Negative
for HTM01-01 Threshold Mode, or Negative, Alert, or Action for
ISO 15883-5 Threshold Mode.
Note: To select a Threshold mode and its values please
refer to the Threshold Mode selection on Bionova®Cloud
Environment section.
Readout results for HTM01-01 Threshold Mode
Hygiene monitoring systems
HTM01-01 Threshold Mode is the default Protein
QuanticationThresholdmodeofyourAuto-reader.
HTM01-01 guidelines indicates the use of a single protein
quantitythresholdtoevaluatecleaningecacy.Theguidelines
recommends that the residual protein level upper limit of
acceptable protein contamination after processing is 5 µg BSA
equivalent per instrument side, indicating as well that lower
levels may be recommended for particular applications.
Important: Refer to the HTM01-01 guidelines for detailed
information on how to implement the standard to your processes.
If HTM01-01 Threshold Mode is selected as the readout
threshold mode on your Auto-reader, each time a readout is
completedtheproteinquantitywillbeinformedthroughthe
Quantitative Protein Level LED Indicators and a printed ticket:
POSITIVE NEGATIVE CANCELED
Approximate amounts of
BSAexpressedinμg
12345
1 µg 2 µg
3 µg
4 µg
5 µg
Iftheprotein quantitydetectedon thesampleislower than
the selected threshold, a Negative readout result will be
informed and the Auto-reader will turn on the Green LED
indicator.Ifthequantitydetectedisgreaterthantheselected
threshold, a Positive readout result will be informed and the
Auto-reader will turn on the Red LED indicator. The readout
result will be detailed on the printed ticket as well.
Furthermore, if the Auto-reader is connected to the Bionova®
Cloud Environment, the readout results can be found on the
Hygiene Monitoring > Finished web page of Bionova® Cloud
Web interface.
Take action immediately whenever a POSITIVE Readout
Result is informed as this indicate that the protein quantity
founddoesnotcomplywiththeuserdenedqualitystandards
set for the cleaning process.

16 Bionova® IC10/20FR
Hygiene monitoring systems
Readout results for ISO 15883-5 Threshold Mode
The ISO 15883-5:2021 standard indicates the use of two
dierent protein quantity thresholds to evaluate cleaning
ecacy:AnActionthreshold,andanAlertthreshold.ISO15883-
5 based thresholds are expressed as ratios in µg/cm2 units that
relatesproteinquantityfoundinasample(µg)andtheswabbing
surface (cm2) on which the sample was taken. According to the
standard,eachthresholdhasdierentimplications:
Alert threshold: The alert levels are the target levels of
cleaning ecacy that the cleaning process should achieve.
Recommended threshold value 3µg/cm2. Lower values may be
recommended for particular applications.
Action threshold: The action levels are the maximum criteria
for acceptable cleaning ecacy during testing of a sample.
Recommended threshold value 6.4µg/cm2. Lower values may
be recommended for particular applications.
Values between the two thresholds should be investigated,
butareconsideredtopasscleaningrequirements.
Important: Refer to the ISO 15883-5:2021 standard for
detailed information on how to implement the standard to
your processes.
If ISO 15883-5 Threshold Mode is selected as the readout
threshold mode on your Auto-reader, each time a readout is
completedtheproteinquantitywillbeinformedbytheAuto-
reader through the Quantitative Protein Level LED Indicators
and through a printed ticket:
Approximate amounts of
BSAexpressedinμg
12345
1 µg 2 µg
3 µg
4 µg
5 µg
Also,asaquickvisualcueoftheproteinquantityfoundonthe
sample, the device will turn on the Red LED Indicator if the
proteinquantity is above1 µg, or theGreen Indicator ifthe
proteinquantityisbelow1µg.
Important: Please keep in mind that according to ISO 15833-
5:2021 standard the protein quantity found in a sample
(in µg) needs to be related to the swabbed surface area to
obtain a readout result (in µg/cm2) that can be comparable
with the selected Alarm and Alert thresholds (also in µg/cm2).
Once the protein quantity in the sample has been obtained
by the Auto-reader, and the swabbed surface information has
been obtained with the Bionova®Antinova APP. The information
isnallylinkedtogetherbytheBionova®Cloud Environment to
inform the readout result. Please refer to ISO 15883-5:2021 on
Bionova®Cloud Environment section for a step by step guide to
upload and link data on Bionova Cloud Environment.
Once the data has been linked, the readout result will be
shown on the Hygiene Monitoring > Finished tab of Bionova®
Cloud Web Interface. Depending on the threshold values
selected, the informed readout result can be as follows:
Iftheproteinquantityfoundontheswabbedsurface(µg/cm2) is
below the Alert Threshold. The readout result will be informed
as NEGATIVE.
Iftheproteinquantityfoundontheswabbedsurface(µg/cm2)
is above the Alert Threshold but below the Action Threshold.
The readout result will be informed as ALERT.
If the protein quantity found on the swabbed surface (µg/
cm2) is above the Action Threshold. The readout result will be
informed as ACTION.
Take action immediately whenever an ACTION Readout
Result is informed as this indicate that the protein quantity
founddoesnotcomplywiththeuserdenedqualitystandards
set for the cleaning process.
Disposal
Discard the PRO1 indicator according to your country’s sanitary
regulations. It is not possible to use or incubate a PRO1 indicator
more than once. Please refer to the PRO1 instructions for use.
Audible alarm
An audible alarm will sound every time a positive result is
detected in your Auto-reader. The alarm allows the user
to immediately detect a positive result without the need to
visually control the device. The alarm can be canceled by
pressing the button .
Cancel a reading
The user can cancel a reading by pressing the button
and the button for three seconds. The device will cancel
the reading and the auto-reader will print out a ticket
conrmingthecancellation.

Bionova® IC10/20FR 17
Additional features
Firmware update
Bionova®IC10/20FR Auto-reader allows the update of its
rmware (program inside the Auto-reader that controls and
denes its dierent features) by using Bionova®Bioupdate
rmwareupdate utility. Bionova®Bioupdate connects to the
Internet to verify, download, and install, the latest rmware
version available for your Auto-reader. The update process
only lasts a few seconds and is carried out without the loss
of any Auto-reader’s data. Please visit www.terragene.com/
software to download Bionova®Bioupdate.
Update process
Before updating the device, make sure that the Bionova®
Cloud Agent is closed. Power Off the Incubator for five
seconds, afterwards Power On the Incubator and follow the
next steps:
1|Using the included USB cable, connect your Auto-reader to
a PC where Bionova®Bioupdate has been previously installed.
Make sure the PC has a working Internet connection.
2|Run Bionova®Bioupdate.
3|Select the Auto-reader from the list and press the Start
button to update.
4|Wait until the software indicates that update process has been
completed. The Auto-reader will print an update conrmation
ticket. If it was already up to date, the ticket will not be printed.
Note: This process must be repeated every time that a new
rmware version is available, this will be informed in the
Terragene S.A. Website.
Bionova® Cloud Environment
The new Bionova®Cloud environment is a Cloud based solution
that integrates the information generated by Terragene®
electronic devices with an easy-to-use Web App for the
traceability of sterilization and disinfection control applications.
The Bionova®Cloud environment is composed by two main
components: the Bionova®Cloud Traceability Software which
is a Web Based application, and the Bionova®Cloud Agent
which is a Microsoft™ Windows App that acts as an interface
between the Terragene®compatible devices and the web
based application.
Bionova®Cloud Traceability Software allows to manage
and store the readout results of Self-contained biological
indicators and Hygiene Monitoring System Indicators in a
secure and user-friendly way.
Bionova®Cloud Traceability Software allows matching the
information of an Indicator result with the sterilizer or washing
machine used, the operator, cycle characteristics, and all
relevant information for allowing each institution achieve
reliable documentation compliance and safe-keeping.
The Bionova®Cloud Agent handles all communications with
Terragene®compatible electronic devices and the Host PC
where the Agent App runs.
Bionova®Cloud Agent then acts as an interface between
the Terragene®compatible devices and the Bionova®Cloud
Traceability software and sends the information generated
from the devices to the Microsoft™ Azure powered Cloud
server where the Traceability Software Web App runs and
stores the information.
The user can then access to the Cloud saved information
through any device with a compatible web browser.
To access to the Bionova®Cloud Environment please visit
www.terragene.com/bionova-cloud.
Threshold Mode selection for
PRO1 Indicators
Bionova®Cloud Environment allows the selection of the
ProteinQuanticationThresholdModeandThresholdvalues
throughout its web interface.
Important: Threshold Mode selection is only available for the
latestsrmwareversions.UpdateyourAuto-reader’srmware
before carrying out any of the steps below. Please refer to the
Firmware update section for more information.
1|Connect your Auto-reader to a PC where Bionova®Cloud
Agent is installed.
2|Run and Log-in to the Bionova®Cloud Agent. Wait until the
Agent lists the incubator.
3|Access as the Administrator user to the Bionova®Cloud
Environment Web interface.

18 Bionova® IC10/20FR
4|Go to the Conguration > Parameters section tab on the
Bionova®Cloud Web Interface left side menu.
5|Select the Threshold working mode for your Auto-reader:
HTM01-01 or ISO 15883-5. Save the selected mode clicking
on the SAVE button.
6|Select the Threshold values for the selected mode. Save the
selected Threshold values by clicking on the SAVE button.
If the process is carried out successfully your Auto-reader will
print a ticket detailing the Threshold Mode selected.
ISO 15883-5:2021 Threshold
Mode
The new ISO 15883-5:2021 Standard implements new
recommendations for taking action based on the ndings of
hygiene monitoring indicators. One of the major features of
this new revision of the standard is that the protein quantities
measured when swabbing an instrument must be related to
the swabbing surface in which the sample was taken for correct
decisionmakingoverdecontaminationandwashingequipment.
To obtain an estimation of the Swabbing surface area, the
new Bionova®Cloud Surface Eye Mobile App was designed.
The Surface Eye Mobile App is a new proprietary application
developed by Terragene compatible with Android OS that
allows the user to obtain an estimation of an instrument’s
swabbed surface using complex machine learning
technologies in a few simple steps. The App also implements
seamlessly integration with the Bionova®Cloud Environment.
Linkingproteinquanticationreadoutdata(inµg)informedby
an Auto-reader, and swabbing surface data (in cm2) informed
by the Surface Eye App, throughout the Bionova®Cloud
Environmentallowsthecreationofratiosofproteinquantities
and swabbing surface area (in µg/cm2) that can be compared
with ISO 15388:2021 style thresholds.
ISO 15883-5 Workflow
Take the following steps for linking protein quantication
readout data and swabbing surface data through the Bionova®
Cloud Environment.
A) Set-up
1|Set-up your Auto-reader for ISO 15883-5 Threshold Mode.
Bionova® Cloud Environment Please refer to the Threshold Mode selection on Bionova®
Cloud Environment section for more information.
2|Download the Bionova®Cloud Surface Eye APP from Google
Play Store on your Android compatible device.
Important: Make sure your Android device has a working
camera for the Surface Eye App to work as intended.
B) Login and authentication
1|Log-in to the Bionova®Cloud Agent on the PC connected to
your PRO1 Indicator Auto-reader.
2|Log-in to the Bionova®Cloud Surface Eye APP with the same
credentials used on the Bionova®Cloud Agent.
3|Log-in to the Bionova®Cloud Web Interface with the same
credentials used on the Bionova®Cloud Agent.
C) Swabbing and surface estimation
1|Set the instrument to be swabbed over the Surface Eye
Card. Please keep in mint that the swabbing area must be
fully contained on the card for the Surface Eye APP to properly
estimate the swabbing surface area.
2|Tap on the icon, and align the 3 position markers
from your phone screen with the 3 position markings on the
Surface Eye card. Once the position markers are aligned, the
App will take a photo automatically.
3|Select the area of the instrument to be swabbed and tap
on the icon.

Bionova® IC10/20FR 19
4|The APP will automatically select and estimate the surface
(cm2) of the selected swabbing area.
It is a good practice to standardize the swabbing area for each
instrument.Deningandusingthesameswabbingareafora
given instrument allows the sampling process to be repeatable
through time and deliver valuable statistical information.
Important: According to ISO 15883-5:2021 Standard, the
recommended values for the Alert and Action threshold
are 3 µg/cm2 and 6,4 µg/cm2, respectively. As both ratios
relate protein quantity of a sample to the swabbing surface
from which the sample is taken, please make sure to use
standardized surfaces on the range of 1 to 7 cm2. The use of
higher swabbing surfaces (>7,6 cm2) imply that the protein
quantitytodenetheactionthresholdwouldbeabovethe50
µgofthePRO1HygieneMonitoringSystemquantizationrange
and thus cannot be properly used.
5|Deneaninstrumentcodeandadescriptiontofullyidentify
theswabbingareaandthesurfaceacquisitiondetails.
Note: Choose a descriptive code and description for the
instrument so its easier to link the surface data with the
protein readout information later on the Bionova Cloud
Environment.
6|Check the Both sides check-box if you plan to swab both
sides of the instrument. Checking the button will duplicate
the selected swabbing area to account for the double sided
swabbing procedure.
7|Once ready, tap the icon. The APP will upload all the
surface information to your Bionova®Cloud Environment
account.
Bionova® Cloud Environment
8|ThesurfaceacquisitiondetailscanbeeditedfromtheApps’
home menu swiping the instrument code to the left.
D) PRO1 Indicator incubation and readout
1|Follow the instructions for use of your PRO1 Indicator to take
a protein sample of the selected instrument.
Important: Make sure to swab evenly the same surface area
that was selected on the Surface Eye App.
Important: Make sure you swab both sides of the instrument
if the “Both sides” check-box was selected on the Surface Eye
APP.
2|Carry out the incubation and readout of the PRO1 Indicator
as described on the Hygiene monitoring systems section of this
manual. Wait for a readout result to be informed.
E) Linking protein readout information and swabbing
surface information
1|Once the Readout result is informed by the Auto-reader.
Go to the Hygiene Monitoring > Finished tab on the Bionova®
Cloud Web Interface right side menu and ll in the PRO1
Indicator readout information.
2|Click on the Assign Area button and select the surface
acquisitiondatadetailsoftheswabbedsurface.
Important: Make sure the surface acquisition information
corresponds to the protein readout data so that the correct
ratios can be obtained. To check if the surface information
is the correct one, click on the magnifying glass to view
the swabbing surface image saved on he Bionova®Cloud
environment.
3|Click the Conrm button to save the details, or the Conrm
and move to saved button to save the details and move the
readout to the Bionova®Cloud Database accessible through

20 Bionova® IC10/20FR
Dashboard > Saved section tab on the Bionova®Cloud Web
Interface left side menu.
Bionova® Cloud Surface Eye
Mobile App advanced features
Redefining the swabbing area of an instrumentRedefining the swabbing area of an instrument
You can redene a previously saved surface area of an
instrument on the Surface Eye app, and take a new photo to
assign a new swabbing area to the instrument. For this swipe
left on the instrument code, and tap the icon. Take a new
photo and select the new swabbing area.
Editing an instrument code and description
You can edit the details of any of the instrument codes
previously saved on the Surface Eye app. For this swipe left on
the instrument code, and tap the icon.
Conversion of ISO 15883-5 thresholds
Once a swabbing surface area has been saved and assigned
to an instrument on the Surface Eye App, the details of the
surface can be accessed by taping the instrument code.
On the details screen, the Alert and Action Thresholds (in
µg/cm2) as dened on the Bionova®Cloud Environment,
are converted and shown to the user as protein quantity
thresholds (µg) for the selected surface.
This allows for direct visual comparison between the protein
quantityfoundonthesampleasinformedontheAuto-reader
printedticket,and theprotein quantitiesthatcorrespond to
thealertandactionthresholdsforthedenedswabbingarea.
Bionova® Cloud Environment
Cleaning and maintenance
Cleaning and decontamination of external surfaces
Disconnect the power supply cable and the USB cable from
the Auto-reader. If the device is hot, wait until it has cooled
down before handling it.
Cleantheexternal surfaces of thedeviceusing a microber
cloth moistened with a solution of mild dish washing
detergent and water. Wring the cloth so it is damp but not
dripping before cleaning, and wipe the outer surfaces of the
Auto-reader. Afterwards, moisten a clean microber cloth
with water only, and repeat the procedure until all traces
of detergent are removed from the external surfaces of the
device. After cleaning, allow the Auto-reader to air dry for at
least 1 hour before connecting the power supply cable or the
USB cable again.
This cleaning procedure can be followed whenever considered
appropriate.
This cleaning procedure must be followed every time a spill
occurs on any of the external surfaces of the Auto-reader.
If further cleaning is required, or if you have doubts about
the cleaning agents you may use, please contact your local
distributor.
Do not clean the internal parts of the device.
Do not pour or immerse the device into any liquid. Do not
allowanyliquidtoruninsidethedeviceduringitscleaning.
Maintenance
Bionova® IC10/20FR Auto-reader does not require routine
maintenance.
Other manuals for IC10/20FR
1
Table of contents
Other Bionova Laboratory Equipment manuals