manuals.online logo
Brands
  1. Home
  2. •
  3. Brands
  4. •
  5. biOrb
  6. •
  7. Aquarium
  8. •
  9. biOrb LIFE 30 User manual

biOrb LIFE 30 User manual

ENGLISH
UK 01603 710339
US 877-928-7333
FR 0811 850 113
DE 0800-181-9091
[email protected]
www.reef-one.com
30L / 8US Gals = 36Kg / 80lbs
45L / 12US Gals = 54Kg / 120lbs
60L / 16US Gals = 72Kg / 160lbs
This guide will help you understand how
your aquarium works and how to create a
healthy environment for your fish. Please
read these instructions carefully before
filling your aquarium with water. This is not
a toy, adult supervision is recommended.
Removing the serial number or
dismantling your aquarium will invalidate
your guarantee.
L
L
LL
5
123
4
678
1. Carefully remove contents from the
box and check. Choose a suitable
location for your aquarium noting all the
advice above and place your aquarium
on a strong and level surface.
Remember the aquarium needs a
power source within reach.
2. Remove plastic wrapper from filter
cartridge (A) then offer up cartridge to
base of bubble tube (B), locate tabs and
twist in a counterclockwise direction
ensuring all cartridge tabs are fully
located. New cartridges are available
from a biOrb dealer.
3. Remove the light unit and lid from the
biOrb then take the bubble tube and
filter cartridge assembled in step 2 and
insert into the biOrb. Turn the bubble tube
clockwise until it locks in position. When
correctly located, the bubble tube and filter
will remain in place.
4. Wash the ceramic media supplied
thoroughly before placing around the filter
body, ensuring none remains on top. Use
only ceramic media supplied, do not use
aquarium gravel. Discard any pieces
smaller than a pea.
5. Connect the airline to the pump as
shown and place in a suitable position.
Positioning the pump higher than the
aquarium water level will prevent water
leakage or damage to pump should valve
failure occur.
Setting up your aquarium
6. Plug the pump and light unit plug into
the separate sockets on the transformer
supplied, then plug the transformer into
the power source and turn on. The pump
should be left running 24hrs a day, only
switch it off during filter cartridge
changes and cleaning.
7. Fill the aquarium with tap water to
approximately 3”/7.5cm above the
top of the bubble tube and add the
Water Conditioner.
8. Leave the aquarium running for at
least 24 hours before adding the
Biological Booster and then you will be
ready to add your first fish. Do not
immerse the light unit in water.
AVOID
HOT AREAS
IMPORTANT:
AVOID SUNLIGHT
NOT ON OR NEAR
ELECTRICAL ITEMS
3’’- 7.5cm
DO NOT MOVE
WHEN FULL
Downloaded from www.watergardeningdirect.com
30/45/60
ENGLISH
UK 01603 710339
US 877-928-7333
FR 0811 850 113
DE 0800-181-9091
[email protected]
www.reef-one.com
2
3
4
Caring for your aquarium
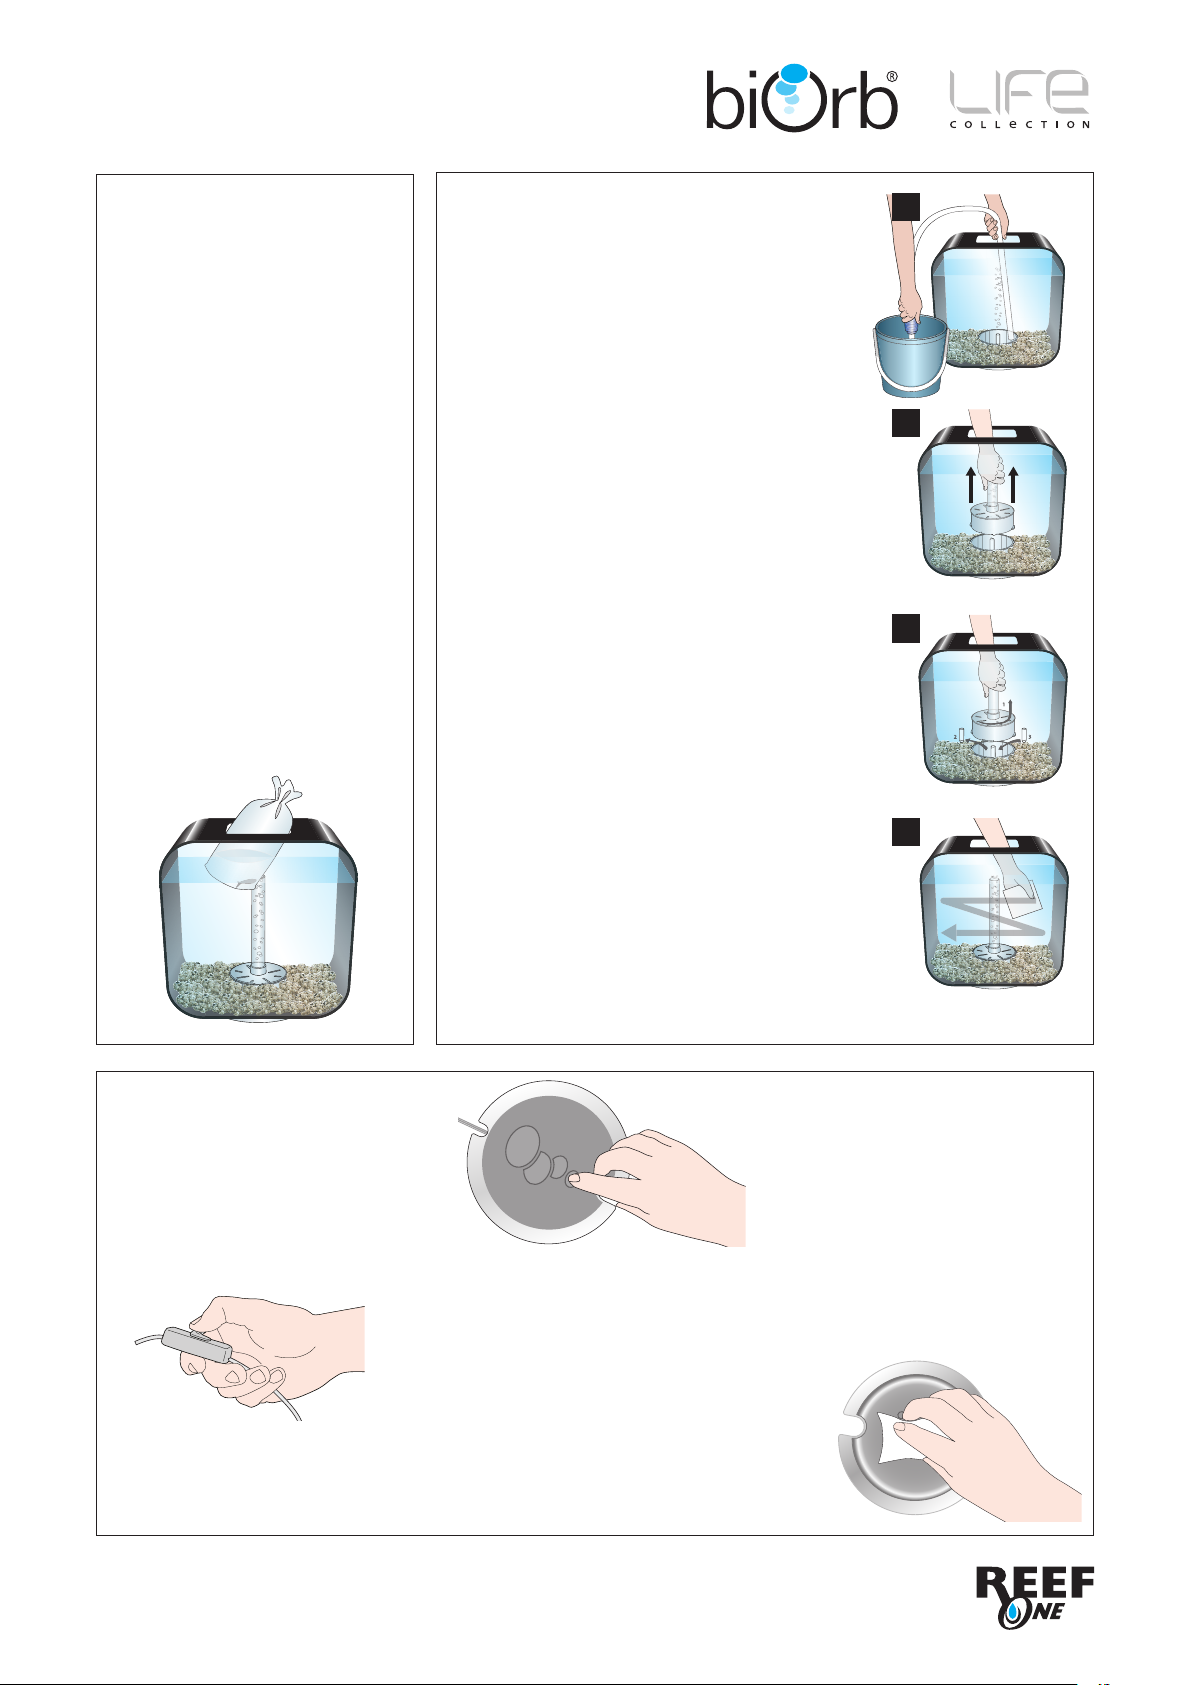
1. Every 2 weeks a 30% water change is desirable to
reduce pollution in the water. Use a sachet of water
treatment in 4 litres/1 US Gallon of tap water.
A Cleaner Pump (not supplied) is an easy way to
remove debris and siphon out the water. After setting
up never use tap water to clean the ceramic media,
this will kill biological filtration.
2. Every 6 weeks a new filter cartridge will be required
to maintain the water condition. The cartridge and
instructions are in the Service Kit.
Green Water is caused by algae growth. Some algae is
natural in healthy aquariums. owever, if your aquarium
water quickly turns green it may be caused by too much
light, overfeeding, too many fish or high levels of nitrate
and phosphate in the tap water.
3. The Air Stone in the base of the aquarium will
eventually become blocked restricting the flow of
bubbles into the aquarium, the Air stone should be
replaced every 6 months.
The Air Pump will wear out over time and could
become noisy, reducing the flow of bubbles even after
changing the air stone. Replace immediately after
failure, to avoid problems.
4. Cleaning the aquarium requires care to prevent
scratching. Never use household detergents, polishes or
scouring pads. The outside of the bowl can be wiped
with a soft cloth or purchase a Plastic Scratch Remover
& Polish kit. The inside should be cleaned with a
Cleaning Pad.
J
The Light
1. Turn the light on at the switch (fig 1).
The blue LED will flash until one of the 5
lighting modes is selected (the mode will
repeat at this time every day, to change
this simply repeat these steps at a
different time).
1
24hr Lighting Modes
1xFlash= 1 hr sunrise - 6 hrs daylight - 1 hr sunset.
2xFlash= 1 hr sunrise - 8 hrs daylight - 1 hr sunset.
3xFlash= 1 hr sunrise - 10 hrs daylight - 1 hr sunset.
4xFlash= 1 hr sunrise - 12 hrs daylight - 1 hr sunset.
5xFlash=Test or demonstration 60 second cycle.
During the sunrise and sunset the blue LED
and white LEDs will be lit together until one
or the other fades out. The selected mode
will repeat automatically every 24 hours
Choosing and
introducing fish
Do not crowd with decor or over stock
with fish. When introducing fish, add
gradually at a rate of 2 every 28 days.
This will encourage a population of filter
bacteria in the ceramic media that will
keep the water clean. Adding fish too
quickly may cause the water to be
polluted and unsafe for fish. When
adding fish follow instructions from
your aquatic shop to ensure the fish are
gently acclimatised to their new home.
Feed each fish 4-6 of the pellets
supplied per day, do not overfeed.
CAUTION: Overfeeding will harm fish
and pollute water.
except in the event of a power cut or if
the mode is changed. If you have any
problems while selecting a mode, re-set
by switching off the power (fig 1).
Cleaning the light is easy and is a good
idea to keep your aquarium looking at its
best. Simply wipe the lens with a Cleaning
Pad. Your long life LEDs typically last for
over 50,000 hours and should never need
replacing.
2. To select a lighting mode. Press and
hold the mode button (fig 2) for the
required number of flashes. ie. mode 4 -
press and hold for 4 flashes.
Fig 1
Fig 2
Downloaded from www.watergardeningdirect.com

This manual suits for next models

2

Other biOrb Aquarium manuals

biOrb CLASSIC User manual

biOrb

biOrb CLASSIC User manual

biOrb HALO 30 User manual

biOrb

biOrb HALO 30 User manual

biOrb 60 User manual

biOrb

biOrb 60 User manual

Popular Aquarium manuals by other brands

Synergy Reef Acclimation Fallout Shelter manual

Synergy Reef

Synergy Reef Acclimation Fallout Shelter manual

TMC Reef Skim 100nano instructions

TMC

TMC Reef Skim 100nano instructions

Ultra Reef UZ-120 instruction manual

Ultra Reef

Ultra Reef UZ-120 instruction manual

TMC Aquarium AQUARAY MiniLED 500 Instructions for installation and use

TMC Aquarium

TMC Aquarium AQUARAY MiniLED 500 Instructions for installation and use

TMC aquaGro CO2 Compact Diffusers manual

TMC

TMC aquaGro CO2 Compact Diffusers manual

Dupla 80210 user manual

Dupla

Dupla 80210 user manual

WATSEA TOP FLOW 303 quick guide

WATSEA

WATSEA TOP FLOW 303 quick guide

Red Sea REEFER 425 Assembly manual

Red Sea

Red Sea REEFER 425 Assembly manual

Waterbox ALU 2420 Assembly manual

Waterbox

Waterbox ALU 2420 Assembly manual

Ferplast CAYMAN SCENIC Series user manual

Ferplast

Ferplast CAYMAN SCENIC Series user manual

ViaAqua Acro-Cal AC-10 manual

ViaAqua

ViaAqua Acro-Cal AC-10 manual

Hobby AQUA COOLER Series Instructions for use

Hobby

Hobby AQUA COOLER Series Instructions for use

Red Sea Reefer XXL 750 Assembly manual

Red Sea

Red Sea Reefer XXL 750 Assembly manual

EHEIM LEDcontrol+e 4200140 operating instructions

EHEIM

EHEIM LEDcontrol+e 4200140 operating instructions

Reef Factory kH keeper manual

Reef Factory

Reef Factory kH keeper manual

Hobby Biotherm 2000 manual

Hobby

Hobby Biotherm 2000 manual

Zoo Med BETTATHERM BH-10 instructions

Zoo Med

Zoo Med BETTATHERM BH-10 instructions

Red Sea REEFER 250 Assembly manual

Red Sea

Red Sea REEFER 250 Assembly manual

manuals.online logo
manuals.online logoBrands
  • About & Mission
  • Contact us
  • Privacy Policy
  • Terms and Conditions

Copyright 2025 Manuals.Online. All Rights Reserved.