Biotechne ProteinSimple Sally Sue User manual

page 1
Sally Sue and Peggy Sue
User Guide
Copyright © 2017 ProteinSimple. All rights reserved.
ProteinSimple
3001 Orchard Parkway
San Jose, CA 95134
Toll-free: (888) 607-9692
Tel: (408) 510-5500
Fax: (408) 510-5599
email: [email protected]
web: proteinsimple.com

Sally Sue and Peggy Sue User Guide
P/N 031-110
Revision 7, July 2017
For research use only. Not for use in diagnostic procedures
Patents and Trademarks
ProteinSimple's Simple Western technology is covered by issued and pending patents in the U.S. and other
countries. For more information please see http://www.proteinsimple.com/Intellectual_Property.html.
ProteinSimple and the ProteinSimple logo are trademarks or registered trademarks of ProteinSimple. Other
marks appearing in these materials are marks of their respective owners.

page i
Sally Sue and Peggy Sue User Guide
Chapter 1:
Let’s Get Started. . . . . . . . . . . . . . . . . . . . . . . . . . . . . 1
Welcome . . . . . . . . . . . . . . . . . . . . . . . . . . . . . . . . . . . . . . . . . . . . . 2
Simple Western Assays. . . . . . . . . . . . . . . . . . . . . . . . . . . . . . . . 2
Chapter 2:
Getting Your Lab Ready . . . . . . . . . . . . . . . . . . . . 3
Introduction . . . . . . . . . . . . . . . . . . . . . . . . . . . . . . . . . . . . . . . . . . 4
Space Requirements . . . . . . . . . . . . . . . . . . . . . . . . . . . . . . . . . . 4
Physical Specifications. . . . . . . . . . . . . . . . . . . . . . . . . . . . . . . . 5
Electrical Requirements . . . . . . . . . . . . . . . . . . . . . . . . . . . . . . . 6
Environmental Requirements. . . . . . . . . . . . . . . . . . . . . . . . . 6
Software and Computer Requirements . . . . . . . . . . . . . . . 7
General Guidelines and Information. . . . . . . . . . . . . . . . . . 7
Intended Use. . . . . . . . . . . . . . . . . . . . . . . . . . . . . . . . . . . . . 7
Lifting and Moving the System: Lift Sally Sue and
Peggy Sue Correctly . . . . . . . . . . . . . . . . . . . . . . . . . . . . . . 7
Chapter 3:
Sally Sue and Peggy Sue. . . . . . . . . . . . . . . . . . . . 9
Instrument Overview . . . . . . . . . . . . . . . . . . . . . . . . . . . . . . . . 10
External Components. . . . . . . . . . . . . . . . . . . . . . . . . . . 10
Internal Components . . . . . . . . . . . . . . . . . . . . . . . . . . . 14
Auxiliary Module. . . . . . . . . . . . . . . . . . . . . . . . . . . . . . . . . . . . . 28
Removing and Installing Bottles . . . . . . . . . . . . . . . . 29
Connection Panel . . . . . . . . . . . . . . . . . . . . . . . . . . . . . . . 30
Chapter 4:
Operating Sally Sue and Peggy Sue. . . . . . 33
Before You Throw the Switch . . . . . . . . . . . . . . . . . . . . . . . .34
Power Up . . . . . . . . . . . . . . . . . . . . . . . . . . . . . . . . . . . . . . . . . . . .34
Starting a Run: Size-based Assays (Sally Sue and Peggy
Sue). . . . . . . . . . . . . . . . . . . . . . . . . . . . . . . . . . . . . . . . . . . . . . . . . .34
Step 1 - Get Ready . . . . . . . . . . . . . . . . . . . . . . . . . . . . . . .34
Step 2 - Start the Run. . . . . . . . . . . . . . . . . . . . . . . . . . . .35
Step 3 - Post-Run Procedures . . . . . . . . . . . . . . . . . . . .42
Starting a Run: Charge-based Assays (Peggy Sue
Only). . . . . . . . . . . . . . . . . . . . . . . . . . . . . . . . . . . . . . . . . . . . . . . . .43
Step 1 - Get Ready . . . . . . . . . . . . . . . . . . . . . . . . . . . . . . .43
Step 2 - Start the Run. . . . . . . . . . . . . . . . . . . . . . . . . . . .43
Step 3 - Post-Run Procedures . . . . . . . . . . . . . . . . . . . .50
Stopping a Run . . . . . . . . . . . . . . . . . . . . . . . . . . . . . . . . . . . . . .51
Waste and Water Bottles. . . . . . . . . . . . . . . . . . . . . . . . . . . . .51
Controlling Sally Sue and Peggy Sue . . . . . . . . . . . . . . . . .52
Starting a New Run . . . . . . . . . . . . . . . . . . . . . . . . . . . . .52
Opening Trays . . . . . . . . . . . . . . . . . . . . . . . . . . . . . . . . . .53
Cleaning . . . . . . . . . . . . . . . . . . . . . . . . . . . . . . . . . . . . . . . .53
Cleaning After a Run Error. . . . . . . . . . . . . . . . . . . . . . .55
Self Test . . . . . . . . . . . . . . . . . . . . . . . . . . . . . . . . . . . . . . . . .56
Viewing and Changing System Properties. . . . . . .57
Viewing Error and Test Logs . . . . . . . . . . . . . . . . . . . . .58
Instrument Status Modes . . . . . . . . . . . . . . . . . . . . . . . . . . . .59
Table of Contents

page ii
Sally Sue and Peggy Sue User Guide
Shutdown . . . . . . . . . . . . . . . . . . . . . . . . . . . . . . . . . . . . . . . . . . . 59
Chapter 5:
Maintenance and Troubleshooting . . . . . . 61
Software Updates. . . . . . . . . . . . . . . . . . . . . . . . . . . . . . . . . . . .62
Maintenance . . . . . . . . . . . . . . . . . . . . . . . . . . . . . . . . . . . . . . . . 62
Daily . . . . . . . . . . . . . . . . . . . . . . . . . . . . . . . . . . . . . . . . . . . . 62
Monthly. . . . . . . . . . . . . . . . . . . . . . . . . . . . . . . . . . . . . . . . . 62
Yearly . . . . . . . . . . . . . . . . . . . . . . . . . . . . . . . . . . . . . . . . . . . 64
Instrument Cleaning . . . . . . . . . . . . . . . . . . . . . . . . . . . . 65
Pipet Wash. . . . . . . . . . . . . . . . . . . . . . . . . . . . . . . . . . . . . . 65
Cleaning the Manifold . . . . . . . . . . . . . . . . . . . . . . . . . . 67
Gripper Cleaning. . . . . . . . . . . . . . . . . . . . . . . . . . . . . . . .68
System Decontamination. . . . . . . . . . . . . . . . . . . . . . . 68
Preparation for Storage or Shipment . . . . . . . . . . . . . . . . 70
Storage . . . . . . . . . . . . . . . . . . . . . . . . . . . . . . . . . . . . . . . . . 70
Shipment Preparation . . . . . . . . . . . . . . . . . . . . . . . . . . 71
Spare Parts . . . . . . . . . . . . . . . . . . . . . . . . . . . . . . . . . . . . . . . . . . 71
Troubleshooting . . . . . . . . . . . . . . . . . . . . . . . . . . . . . . . . . . . . . 71
Chapter 6:
General Information . . . . . . . . . . . . . . . . . . . . . . . 73
Compliance . . . . . . . . . . . . . . . . . . . . . . . . . . . . . . . . . . . . . . . . . 74
Safety Guidelines . . . . . . . . . . . . . . . . . . . . . . . . . . . . . . . . . . . . 74
Door Interlock. . . . . . . . . . . . . . . . . . . . . . . . . . . . . . . . . . . 75
System Trays . . . . . . . . . . . . . . . . . . . . . . . . . . . . . . . . . . . . 75
Auxiliary Module Reservoirs . . . . . . . . . . . . . . . . . . . . . 75
Chemical Hazards . . . . . . . . . . . . . . . . . . . . . . . . . . . . . . 76
Chemical Waste Hazards . . . . . . . . . . . . . . . . . . . . . . . 77
Waste Production and Disposal. . . . . . . . . . . . . . . . . 78
Safety Data Sheets . . . . . . . . . . . . . . . . . . . . . . . . . . . . . . 79
Instrument Safety Labels. . . . . . . . . . . . . . . . . . . . . . . . 79
Customer Service and Technical Support . . . . . . . . . . . .80
Legal Notices . . . . . . . . . . . . . . . . . . . . . . . . . . . . . . . . . . . . . . . .81
Sally Sue and Peggy Sue Disclaimer of Warranty81
Compass Software and Authorization Server
License Agreement . . . . . . . . . . . . . . . . . . . . . . . . . . . . . .81


page 2 Chapter 1: Let’s Get Started
Sally Sue and Peggy Sue User Guide
Welcome
Congratulations on bringing Sally Sue™ or Peggy Sue™ into your lab! We welcome you as a new user and are
excited to be a part of your work. This user guide will provide you with information on how Simple Western
assays work as well as other useful operating and installation information.
To help you get the most from Sally Sue and Peggy Sue, we've added some attention phrases to guide you
through the user guide:
NOTE Points out useful information.
IMPORTANT Indicates information necessary for proper operation of Sally Sue and Peggy Sue.
CAUTION Cautions you about potentially hazardous situations that could result in injury to you or
damage to Sally Sue and Peggy Sue.
!WARNING! Warns you that serious physical injury can result if the listed precautions aren’t followed.
Simple Western Assays
A Simple Western assay is an automated Western - no gels, no transfer devices, no blots, no film and no man-
ual analysis.
Simple Westerns take place in a capillary. Sally Sue and Peggy Sue automate all steps of the process for you
including sample loading, protein separation, immunoprobing or labeling, washing, detection and data
analysis. Up to 12 samples can be analyzed simultaneously in a single cycle and up to 8 cycles (96 samples)
can be processed in a single run.
Sally Sue performs Simple Western size-based assays (Immunoassay and Total Protein assay) and Peggy Sue
can do both size-based and charge-based assays. All you have to do is pipette your samples, separation
reagents and immunoreagents into the plate, load the capillaries and press start.


page 4 Chapter 2: Getting Your Lab Ready
Sally Sue and Peggy Sue User Guide
Introduction
This chapter will help you prepare the lab for Sally Sue or Peggy Sue. Please have the space, electrical, vac-
uum and environmental requirements ready prior to scheduling your installation.
NOTE: Please wait for the ProteinSimple representative to unpack and install Sally Sue or Peggy Sue. Don’t
try to lift or unpack either of them on your own, you could cause injury to yourself or damage to the sys-
tem.
Space Requirements
You’ll need a lab bench or table that can support 200 lbs (91 kg) and that has enough space for both the
instrument and computer. There should be sufficient clearance for both heat ventilation and to provide
access if Sally Sue or Peggy Sue ever need service.
IMPORTANT
Sally Sue and Peggy Sue need a stable surface and must remain level to work properly. The lab
bench or table can’t shift or wobble under heavy weight. Also, anti-vibration tables can’t be used as
they can alter the instrument level when Sally Sue or Peggy Sue are running.
Table 2-1: Recommended space requirements for Sally Sue and Peggy Sue.
Dimension Meters Feet
Width 2.13 6.98
Depth 0.91 2.99
Height 1.00 3.28

Physical Specifications page 5
Sally Sue and Peggy Sue User Guide
Physical Specifications
For indoor use only. Use up to altitudes of 1524 meters (5000 feet).
Table 2-2: Physical specifications.
Dimension Meters Feet
Peggy Sue
Width 0.94 3.08
Width with doors open 1.27 4.17
Depth 0.61 2.00
Height 0.84 2.76
Auxiliary Module
Width 0.33 1.08
Depth 0.30 1.00
Height 0.51 1.67
Tubing between Auxiliary Mod-
ule and instrument
3.00 9.84
Computer Workstation
Width 0.66 2.17
Depth 0.76 2.49
Height 0.41 1.35

page 6 Chapter 2: Getting Your Lab Ready
Sally Sue and Peggy Sue User Guide
Electrical Requirements
Sally Sue and Peggy Sue need a dedicated, grounded circuit capable of delivering the appropriate current
and voltage for your country. The power requirements for select countries are listed below:
Table 2-3: Power requirements.
In addition to these requirements, we recommend the grounded circuits terminate at the receptacles, and
receptacles must be located within 10 ft (3 m) of the instrument.
Environmental Requirements
Sally Sue and Peggy Sue like a consistent temperature in the lab. They work best when conditions stay
within these ranges:
Table 2-4: Environmental requirements.
Region Volts (AC) Frequency (Hz) Amps
US and Canada 120 60 5.5
Europe 240 50 2.7
Japan 100 50/60 6.5
Requirement Specification
Operating temperature range 18 - 24 °C (64 - 75 °F)
Operating humidity range 20-60% relative, non-condensing

Software and Computer Requirements page 7
Sally Sue and Peggy Sue User Guide
Software and Computer Requirements
Sally Sue and Peggy Sue bring their own computer to the lab with Compass for Simple Western pre-
installed. Compass software is used to run assays and analyze resulting data. Just in case you need it, a CD
containing Compass for Simple Western also comes in the box. If you don't want to analyze your data at the
instrument workstation in the lab, Compass software can also be installed on a separate workstation, such as
your desktop computer. Your computer must meet the minimum requirements listed in the table below to
run the software and process data.
Table 2-5: Computer requirements.
General Guidelines and Information
Intended Use
NOTE: Sally Sue and Peggy Sue are for research use only. Not for use in diagnostic procedures.
Lifting and Moving the System: Lift Sally Sue and Peggy Sue Correctly
IMPORTANT
Take all the standard precautions when lifting or moving Sally Sue or Peggy Sue. Since they each
weigh 82 kg (180 lbs), two or more people are needed to lift them onto the lab bench.
Component Minimum Recommended
Operating system Windows 7
Processor Core 2 Duo
Memory 2 GB
Free disk space 10 GB

page 8 Chapter 2: Getting Your Lab Ready
Sally Sue and Peggy Sue User Guide


page 10 Chapter 3: Sally Sue and Peggy Sue
Sally Sue and Peggy Sue User Guide
Instrument Overview
Sally Sue’s and Peggy Sue’s individual hardware components are described in this section.
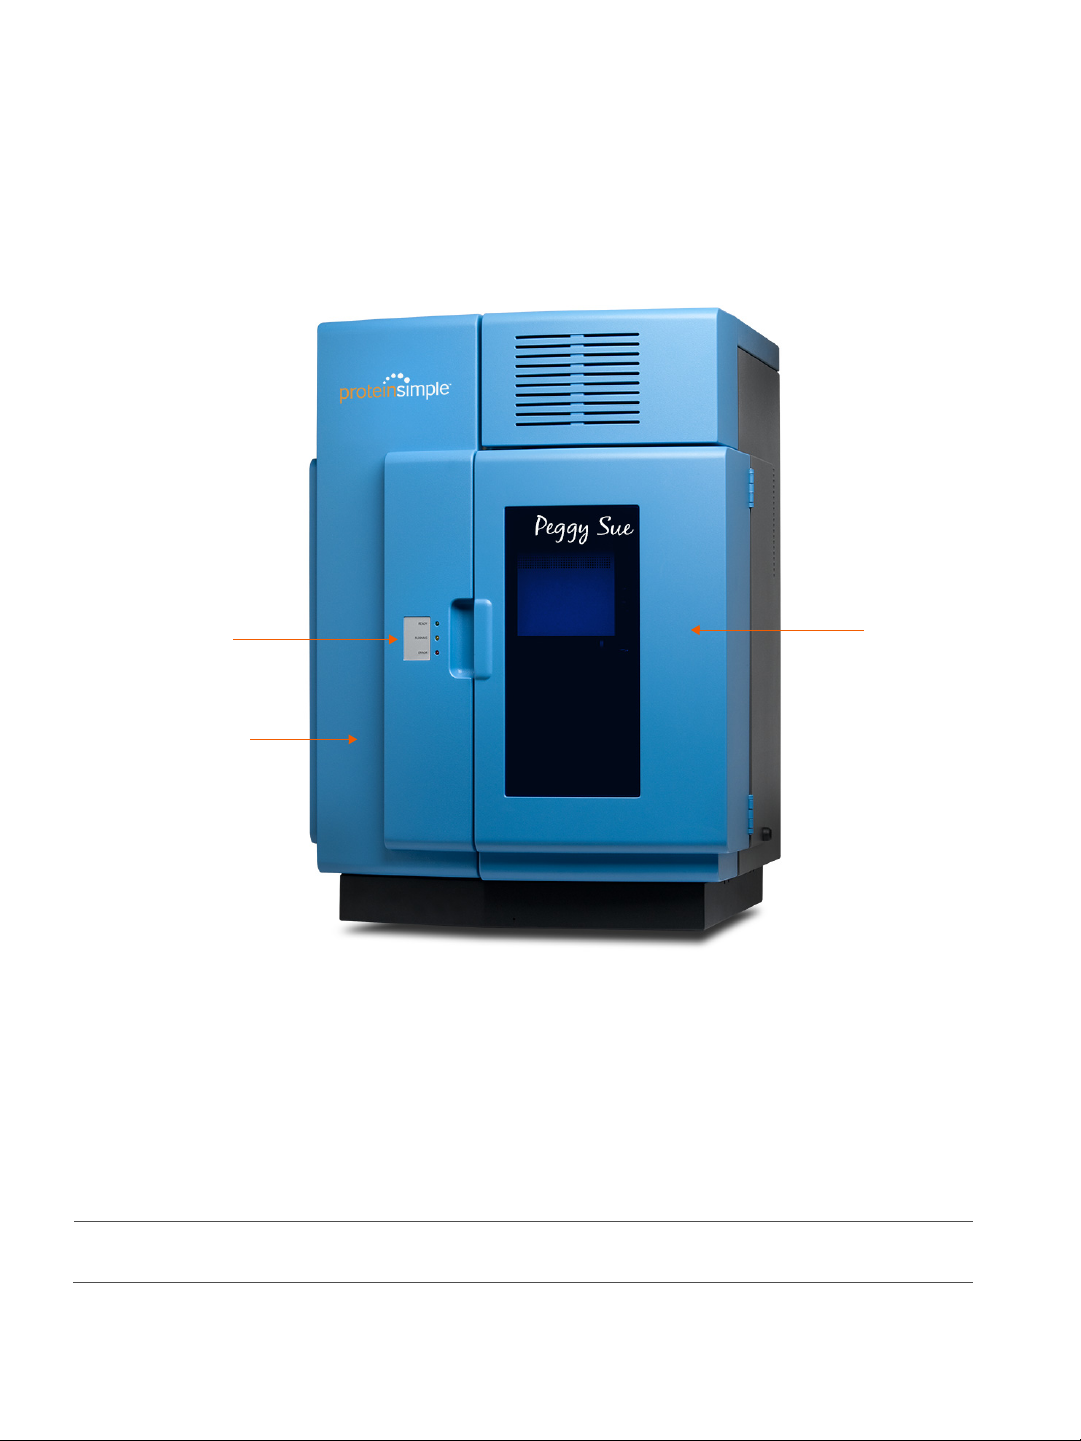
External Components
System Door
System Door
Status Lights
(Left)
(Right)
Instrument Overview page 11
Sally Sue and Peggy Sue User Guide
System Doors
Sally Sue’s and Peggy Sue’s doors give you access to the inside of the instrument to load samples, reagents
and capillaries. To open the doors, make sure the green System Status Ready Indicator is on. Using the
handle to the right of the System Status Indicators, pull the right door open first. Open the left door by
pulling forward on the top and bottom latches. To close the doors, close the left door first and make sure
both latches engage, then close the right door. The right door uses a magnet so it closes properly.
NOTE: Sally Sue’s and Peggy Sue’s doors must be closed before starting a run or cleaning protocol.
System Door
System Door
Status Lights
(Left)
(Right)

page 12 Chapter 3: Sally Sue and Peggy Sue
Sally Sue and Peggy Sue User Guide
Door Interlock
A door interlock engages once you’ve started a run to prevent the doors from being opened during the run.
This prevents you from being exposed to any dangerous interactions with the robot as well as protecting
you from exposure to high voltage and UV light. The yellow indicator light will be on when the instrument is
running and the door interlock is engaged.
When the system status is ready (green) and the doors are open, the robot's system tray, Z-stage motors and
UV power supply are disabled.
!WARNING!
Don’t override the door interlock. The interlock protects you from exposure to UV light and a poten-
tial pinch hazard that could be caused by moving system trays.
Status Lights
The LEDs on Sally Sue’s and Peggy Sue’s front panel tell you what their doing:
•Ready (green): Sally Sue and Peggy Sue are powered on and ready for use.
•Running (yellow): We’re running an assay or a cleaning protocol.
•Error (red): We've detected an error. To get more information, check the Status window of the Run
Summary Screen in Compass for Simple Western.

Instrument Overview page 13
Sally Sue and Peggy Sue User Guide
Leveling Feet
Four leveling feet are located at the base of the instrument. Sally Sue and Peggy Sue must be level to oper-
ate properly. When they are installed, the ProteinSimple representative will make adjustments to make sure
Sally Sue and Peggy Sue are level, and their level will also be checked during preventive maintenance visits.
The level status of Sally Sue and Peggy Sue are monitored internally and reported to you through Compass
for Simple Western.
NOTE: If Sally Sue or Peggy Sue need to be moved from their original install location or require leveling,
please see “Leveling the Instrument” on page 64 for leveling procedures or contact ProteinSimple Techni-
cal Support.
Leveling Foot
page 14 Chapter 3: Sally Sue and Peggy Sue
Sally Sue and Peggy Sue User Guide
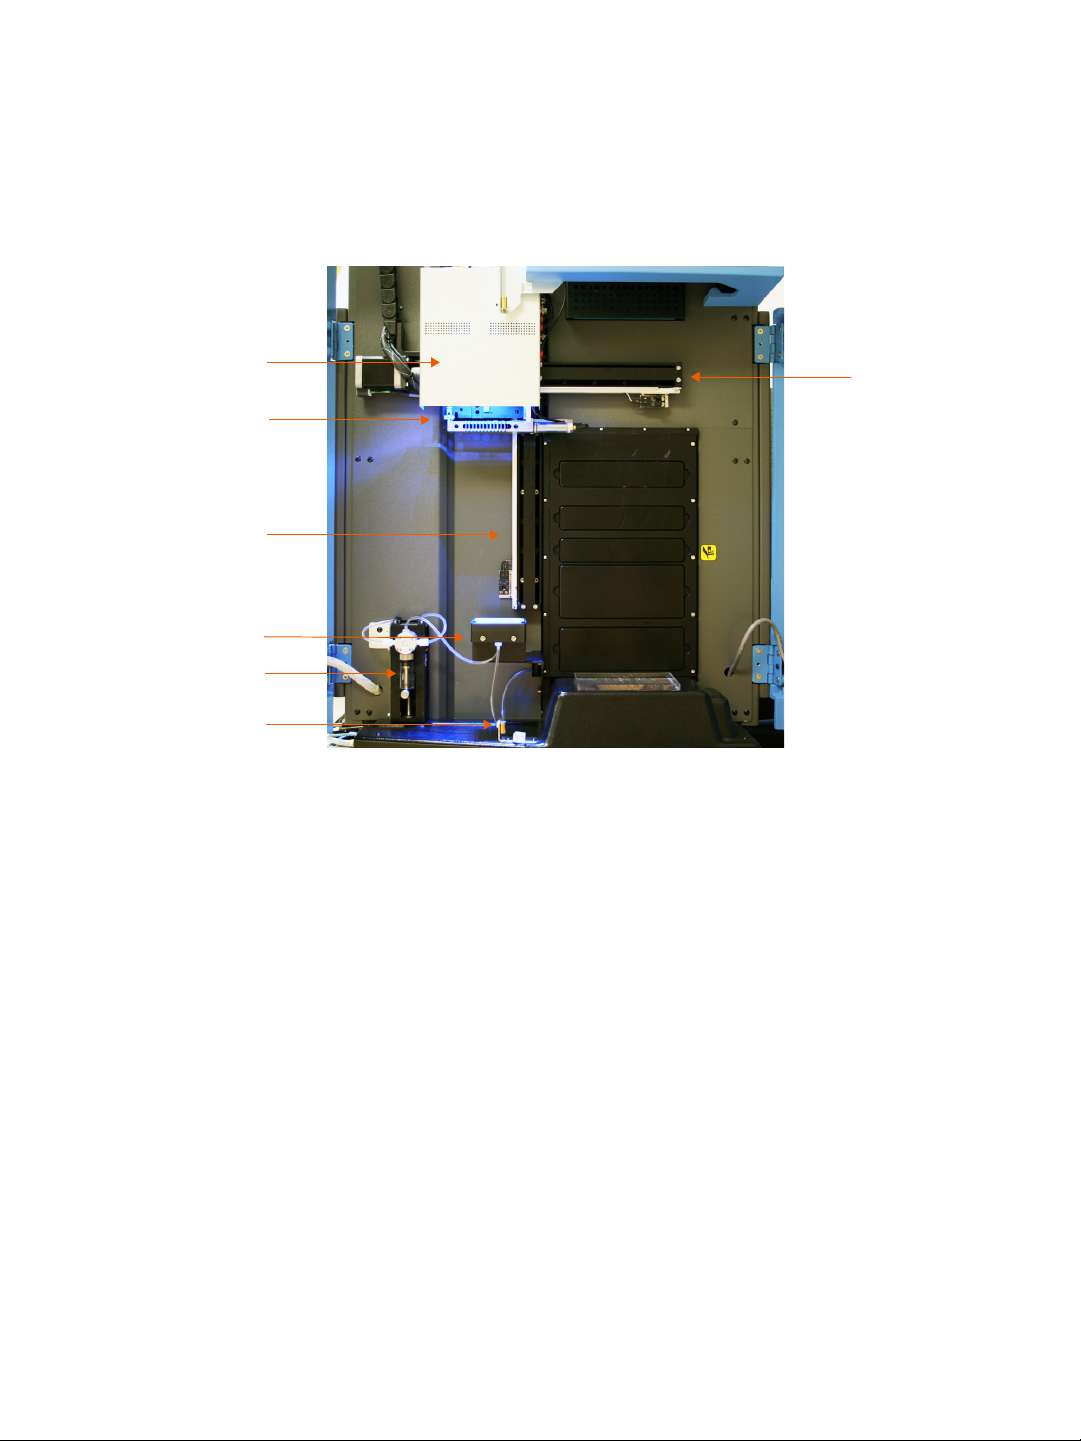
Internal Components
Head Assembly
Fluidic components in the head assembly handle all bulk reagent dispensing and sample tray reagent load-
ing. Pneumatic components provide control for the gripper, which is used to pick up and transfer capillaries.
Gripper
The gripper sits at the base of the head assembly, and is used to transfer capillaries between system trays.
The gripper picks up 12 capillaries at a time from the capillary box and moves them to and from each tray
during each cycle in a run. The gripper rotates 90 degrees to allow vertical transfer and horizontal placement
of capillaries.
Head Assembly
Gripper
Robot Z-Stage
Syringe Pump
Door Latch
Robot X-Stage
Manifold

Instrument Overview page 15
Sally Sue and Peggy Sue User Guide
X-Z Stage Robot
The X-Z stage robot moves the head assembly to and from the sample, resource, incubator, separation and
capillary discard trays during the run. It also moves the pipettor that’s used to transfer fluids and perform
washes inside the instrument.
Syringe Pump
The syringe pump pipettes DI water, reagents in the resource tray cups, and also assists in washing the man-
ifold head per the assay protocol.

page 16 Chapter 3: Sally Sue and Peggy Sue
Sally Sue and Peggy Sue User Guide
Ionizer Fans
Anti-static ionizer fans are located inside Sally Sue’s or Peggy Sue's right door. They’re used to circulate ion-
ized air inside the system. The uniform static charge they provide makes sure capillaries are always trans-
ferred properly between system trays during a run.
This manual suits for next models
1
Table of contents
Other Biotechne Laboratory Equipment manuals


