BioZone AQUAZONE 2/1G User manual

AQUAZONE BASIC OZONE GENERATORS
USER MANUAL
Thank you for the purchase of your new Ozone Generator. The unit is manufactured from high quality
materials to an efficient design providing a device with reliable operation and a long service life.
Optional Extras available: Weatherproof option, timer, flow meter, air pumps, air drier with silica gel beads,
air stones, Y-piece, ozone test kit for water, silicone tubing and venturi.
Please read the instructions in the user manuals carefully and check the packing list to
ensure all items are in the kit before installation. Product image and specifications may
vary.

●Ozone module that can be disassembled and cleaned
●Air cooling system
●4 metres ozone resistant silicone tubing (ozone friendly delivery pipe)
●Non return valve
FUNCTIONS
●To aerate and freshen stale water
●Kill e-coli and other bacteria continuously
●Oxidise iron, manganese and tannins
●Oxidise Hydrogen sulphide (H2S)
●Remove odour
2

AQUAZONE BASIC EXTERNAL FEATURES
3

AQUAZONE BASIC INTERNAL FEATURES
SAFETY
Prior to switching on the unit, please note the following important information:
Ensure your understanding of the unit and have read the operating instructions and technical
Specifications.
●Check completed installation and ensure all connections are tight and secure.
●Switch off power to the unit before opening.
●The maximum allowable concentration in a work area is 0.1ppm. A faint Ozone smell will be
●detected.
●Follow these instructions to reduce the risk of serious injury and to reduce risk of damaging the unit
CONCEPT
Ozone generators produce ozone from oxygen in the air using the corona discharge principle in which ozone
is produced from the oxygen in the air or pure Oxygen using an electrical charge.
4

Electrical energy is used to create the ozone molecules. An ozone molecule is a normal oxygen molecule,
O2, with an additional oxygen molecule attached to make O3. The ozone generator within your machine
provides the required energy field and produces O3 that can be controlled and used. Ozone can be added to
water by your machine in two ways:
●Venturi – Uses water pump pressure to create a vacuum thus sucking the ozone into the water.
●Diffuser stone – Forced air flow through the diffuser stone to create Ozone bubbles in the water.
The venturi is not included in the unit and is priced separately depending on your requirements.
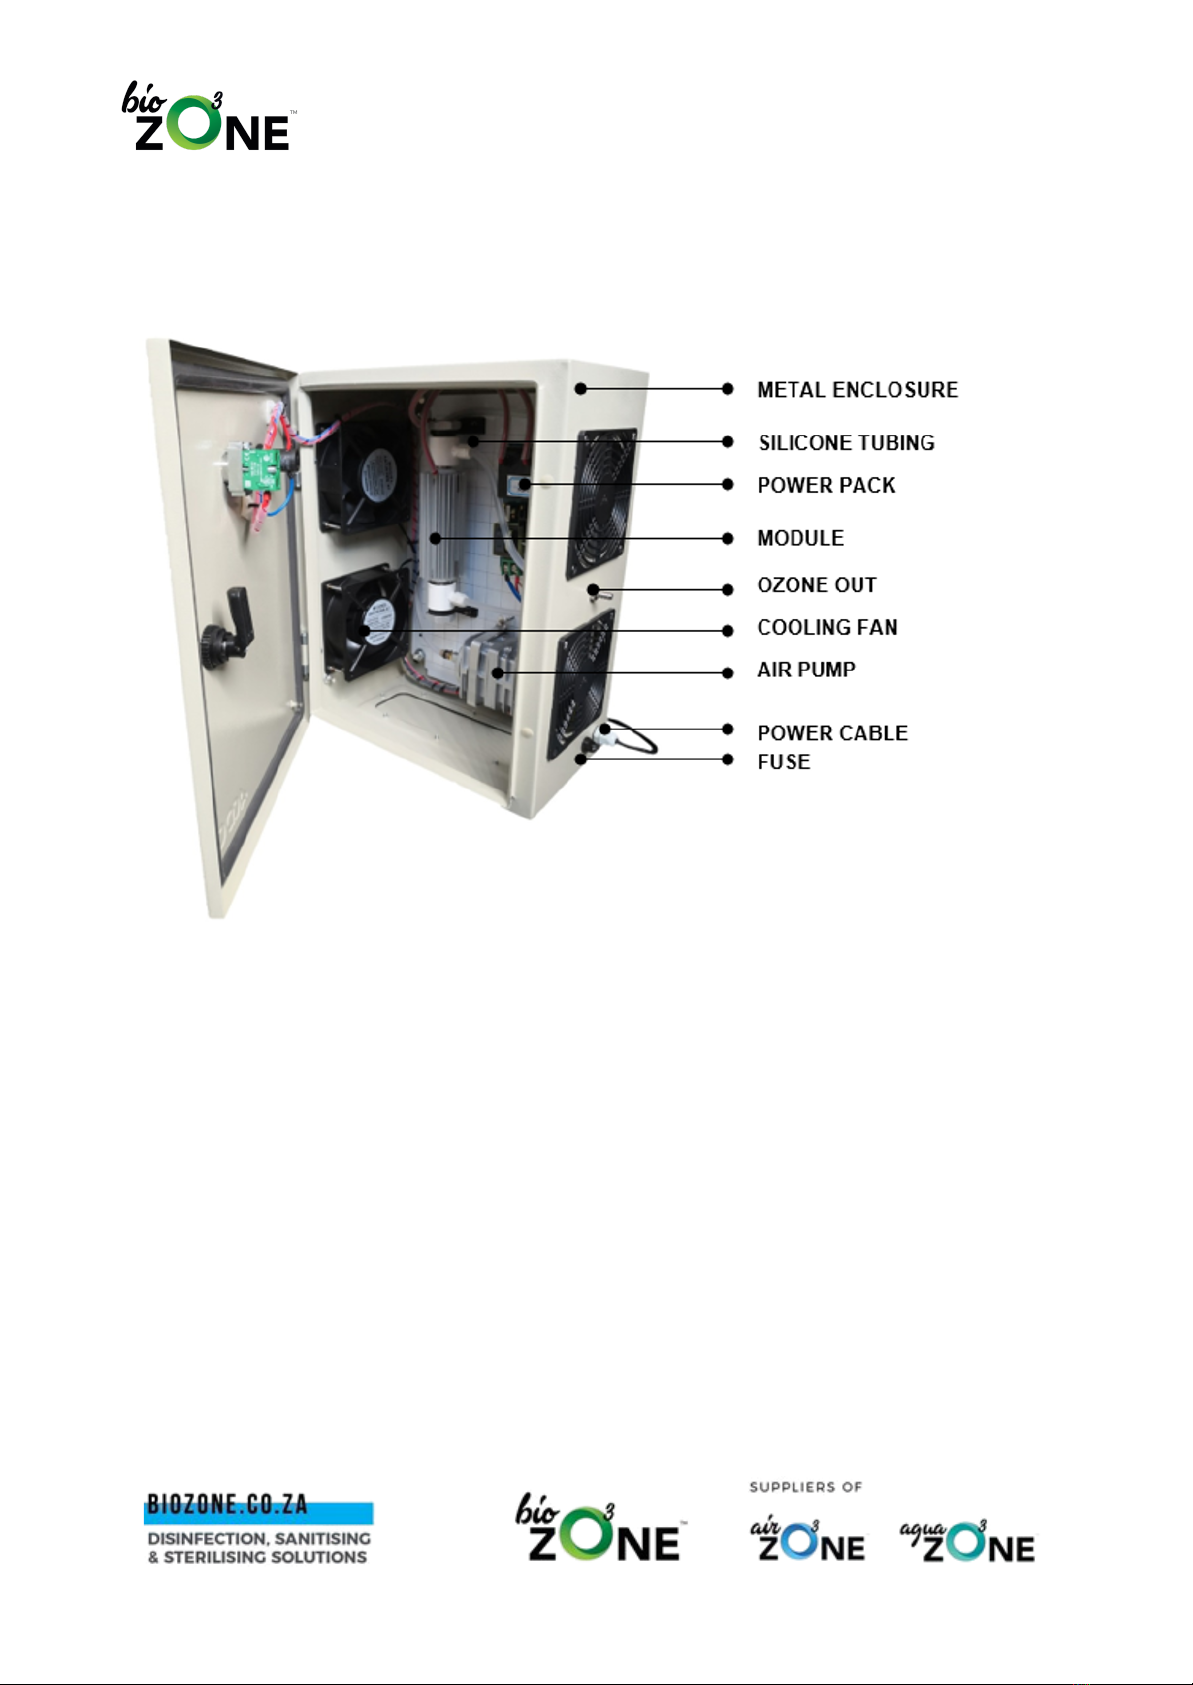
INSTALLATION GUIDE
Before switching on, check the following
●The main voltage is 220-240V.
●The ozone pipe is securely connected to a diffuser system or venturi/injector.
●The venturi is creating a suction and air is flowing from the air filter through the modules and to the
venturi by means of the flow meter. Set the flow meter to 3-8 litres per minute.
Then, proceed as follows:
●Turn the ozone generator on.
●Main switch on. From this point on, the ozone generator is producing ozone.
●Switching off the ozone generator.
●Switch off the main switch and the whole system will shut down.
●A timer on the unit - (optional extra) will then allow the user to adjust the times for the ozone bubbling
system to operate.
CAUTION
If ozone-carrying lines are to be opened, clear them with ozone-free gas first.
To prevent a backflow of water into the generator:
●Install the Ozone generator above the surface of the water you want to treat.The set-up location for
the ozone generator must be in a cool dry and clean place. The ozone generator can be wall or skid
mounted.
●Install a non-return valve on the gas feed line from the Ozonator to the diffuser/venturi.
●Loop the Ozone feed line 2 or 3 times into a circle of approximately 300mm Installation of circulation
system with treated water tanks
●Stainless steel circulation pumps with Teflon seals are essential if there is residual Ozone in the
water. This applies if you are treating water tanks.
●Only UPVC, PVC and stainless steel fittings and piping can be used.
●Ensure that the venturi is installed in the right direction as indicated by the arrow on the venturi.
●The circulation or filling pump should be installed to be able to empty 2 tanks equally..
●The venturi will ensure that the ozone is injected for both the circulation and the filling programmes.
5

●As soon as either the filling tap or the solenoid opens the pump and the ozone generator will be
switched on automatically.
OZONE GENERATING ELEMENTS
The “heart” of the ozone generator is the ozone generator tube and the dielectric which is powered from a
high voltage transformer. A part of the discharge energy is used for the production of ozone. The remainder
of the energy is released in the form of heat. Therefore it is important that the ozone-generating element and
the electronic components are kept cool. The ozone generator is cooled by air using a built-in fan. The inlet
of the fan as well as the outlet vents on the side of the ozone generator should not be covered, blocked or
placed too close to a wall in order to avoid overheating of the electronic elements.
FEEDGAS
The unit draws air from the atmosphere through the corona tubes (ozone generators). To achieve maximum
results from your unit, ensure that the feed gas meets the following recommended criteria
●The dew point must be lower than -40C (233K).
●The feed gas must be hydrocarbon-free.
Moisture decreases the production of ozone. Hydrocarbons (e.g. methane) can form CO2 and water with
ozone. Using air as a feed gas, water can react with ozone to form nitric acid resulting in the
formation of nitrogen oxide. This might damage the electrodes.
AIR DRIER - Optional Extra
The Aquazone air drier unit works on the basis of the silica gel material removing the moisture
out of the air as it passes through the plastic container. In wet atmospheric conditions the gel
will absorb moisture and change colour. As humidity varies greatly with location, the installation
of air dryers is an option on some ozone generators. When this happens the silica gel must
either be heated up and dried or replaced. The heating up can be done in the oven, microwave
oven or direct sunlight. First remove the drier from the body of the generator by pulling the two
plastic connections out from the side panel connection. To remove the silica gel for drying,
unscrew the end cap, perforated plate and foam rubber insert. Place the silica gel into a glass
or ceramic container and gently heat up until the colour changes back indicating removal of
moisture.
AQUAZONE BASIC PACKING LIST
PRODUCT
IMAGE
ITEM DESCRIPTION
NO. OF ITEMS
LIMITED SPECIFICATIONS
6

Aquazone BioBubbler
User Manual
Safety data sheet for
Ozone
1
Installation instructions
Aquazone Basic
1
Refer to detailed specifications
Silicone tubing
4m
Material:ozone resistant silicone tubing
Colour: opaque
Dimensions:8mm OD / 5 mm ID
Non return valve 1/4
inch
1
Material:PVDF
Colour: White
OD 6mm
ID 4mm
Length: 39mm
7

SPECIFICATIONS
Weatherproof
MODEL
AQUAZONE
2/1G
AQUAZONE
BASIC 4G/2G
AQUAZONE
BASIC 7G/7.5G
AQUAZONE
BASIC 10G/5G
AQUAZONE
BASIC 20G/10
AQUAZONE
BASIC 40G/20G
Voltage Hz
220V/50
220V/50
220V/50
220V/50
220V/50
220V/50
Power Watts
58
75
123
147
236
400
Rated ampere
0.08
0.16
0.31
0.42
0.73
1.46
Flowmeter 10
lpm
Optional
Optional
Optional
Optional
Optional
Optional
Air Drier
Optional
Optional
Optional
Optional
Optional
Optional
Ozone output
on air
1gph@10lpm
2gph@10lpm
3.5gph@15lpm
5gph@15lpm
10gph@30lpm
20gph@30lpm
Ozone output
on O2
3.7gph@2lpm
7gph@3lpm
18.3gph@6lpm
36.6gph@12lpm
Ozone
concentration
mg/litre
21
30.8
38
43.3
50.8
101.60
Internal air
pump lpm
35 lpm
35 lpm
35 lpm
35 lpm
35 lpm
35 lpm x 2
Enclosure
Metal
Powder coated
grey
Metal
Powder coated
grey
Metal
Powder coated
grey
Metal
Powder coated
grey
Metal
Powder coated
grey
Metal
Powder coated
grey
Enclosure
size
300x250x200mm
400x300x200mm
500x400x200mm
500x400x200mm
600x400x260mm
700x500x260mm
Cooling fan
120X120mm
120X120mm
120X120mm
120X120mm
150x150mm
150x150mm
Weight kgs
7kg
7kg
8.5kg
10kg
18kg
32kg
Outlet s/s OD
mm
S/S6mmOD
Stainless Steel
S/S6mmOD
Stainless Steel
S/S6mmOD
Stainless Steel
S/S6mmOD
Stainless Steel
S/S6mmOD
Stainless Steel
S/S6mmOD
Stainless Steel
8

SPECIFICATIONS
Standard plastic enclosure
MODEL
AQUAZONE BASIC
4G
AQUAZONE BASIC
7G
AQUAZONE BASIC
10G
AQUAZONE BASIC 20G
Voltage Hz
220V/50
220V/50
220V/50
220V/50
Power Watts
75
123
147
216
Rated ampere
0.16
0.31
0.42
0.73
Flowmeter 10 LPM
Optional
Optional
Optional
Optional
Drier
Optional
Optional
Optional
Optional
Ozone output on air
2 gph@10 LPM
3.5 gph@15 LPM
5 gph@15 LPM
10 gph@30 LPM
Ozone output on O2
3.7 gph@2 LPM
7 gph@3 LPM
9.1 [email protected] LPM
18.3 gph@6 LPM
Ozone concentration
mg/litre
30.8
38
43.3
50.8
Internal air pump LPM
45 LPM
45 LPM
45 LPM
45 LPM
Enclosure
Plastic
Plastic
Plastic
Plastic
Enclosure size
38x30x18cm
38x30x18cm
38x30x18cm
46x38x18cm
Cooling fan
120mm x 120mm
120mm x 120mm
120x120mm
120x120mm
Weight kgs
5kg
6kg
8kg
10kg
Outlet s/s OD mm
S/S6mmOD
S/S6mmOD
S/S6mmOD
S/S6mmOD
NOTE
●Ideally after the water has been ozonated, the water should be fed through a filter to remove the
oxidised components.
●In the tank treatment system the oxidised iron will settle on the bottom of the tank and will have to be
removed every 3 months or so.
●As a general guideline in a 1000 litre tank, bubbling 1 gram of ozone every hour into the tank will
translate to 1 mg/litre of ozone.
●Depending upon bacteria contamination and iron, tannin or manganese levels it would be good to
operate the BioBubbler ozone system for 2 hours every 6 hours relating to 8 hours ozone injection
per day.
●Use only ozone-resistant pipes and connection elements made from stainless steel, silicon, hard
PVC,
9

●Teflon PTFE) or PVDF
SERVICING
●At approximately three monthly intervals, more extensive servicing may be required.
●A suitably trained person should do this
●Disconnect the ozone generator from the mains.
●Disconnect all pipes from ozone tubes and make sure that there is no moisture or dirt inside the
tubes.
●If there is any moisture or dirt in the tube, clean and dry or replace the tube with a new one.
●When it is done return all pipes to the original positions.
●Check all pipes for leaks and cracks and replace them if needed.
●Check all pipe connections and tighten or repair if needed.
●Check all electrical equipment for any faults.
●Clean the filter pads and replace them if necessary.
●Clean and lubricate all cooling fans.
●Remove dust from the inside of the generator.
●Should you require servicing to be done by our technicians please send the unit to our office in North
Riding, Johannesburg, for assessment and quote. Our technicians may also service on-site however,
this will be quoted accordingly for call out, on-site labour and travel costs.
●For technical assistance or further enquiries please contact us on +27 11 791 4403 or
WARRANTY
12 Month warranty is provided from the date of purchase against factory defect, however the warranty is
voided by the following;
●The generator was damaged by water / moisture damage.
●Damage caused by unauthorised modification.
●Damage caused by misuse and not following the instructions on the user manual.
●A valid invoice for proof of purchase cannot be provided.
●The serial sticker has been removed from the ozone generator.
●Biozone is not liable for systems failures due to tampering with controls and equipment installed.
●To service this unit please send the unit to our office in North Riding, Johannesburg, for assessment
and a service quote.
10

CONTACT US
11
This manual suits for next models
5
Table of contents
Other BioZone Water Filtration System manuals