biozoom VITALITY CHECK MSRRS SCN05 User manual

User Manual

biozoom copyright© 2021 2
CONTENT
1
HOW TO GET STARTED .............................................................................3
2
SAFETY .....................................................................................................3
3
INTENDED USE..........................................................................................4
4
SYSTEM REQUIREMENTS........................................................................... 5
5
DOWNLOAD OF VITALITY CHECK APP........................................................5
6
PACKAGE CONTENT...................................................................................5
7
PRODUCT DESCRIPTION ............................................................................5
8
CHARGING OF BATTERY.............................................................................7
9 TURNING THE DEVICE ON AND OFF............................................................8
10
STEPS FOR PERFORMING A MEASUREMENT...............................................9
10.1 HOW TO CONNECT SCANNER WITH PHONE/TABLET ...........................9
10.2 PERFORMING MEASUREMENTS....................................................... 12
11
MEASUREMENT BASICS........................................................................... 16
PREPARATION BEFORE STARTING A MEASUREMENT ................................ 16
PERFORMING MEASUREMENTS............................................................... 16
GENERAL ASPECTS INFLUENCING THE LEVEL OF MEASURED RESULTS ........ 18
12
TROUBLESHOOTING................................................................................ 19
13
MAINTENANCE AND CLEANING ............................................................... 21
14
TECHNICAL SPECIFICATION ...................................................................... 22
15
CERTIFICATIONS...................................................................................... 23

biozoom copyright© 2021 3
1
How to get started
Please read the chapters of this manual in the ranked order carefully to correctly learn the handling of the
device.
Before you can make a measurement, you must download the
VITALITY CHECK
app onto your phone
or tablet (chapter 5) and you must charge the battery of your device (chapter 8). With a too low charging
level, it is impossible to activate the device successfully.
The chapter 10 describes all necessary steps to do measurement. This includes preparations, for example
how to connect the scanner with your phone/tablet. Before you conduct your first measurement please
read the general instruction for a successful and precise measurement in chapter 11.
When the scanner is switched on, the light of the status indicators always informs you about the present
status. If the indication is not identical with the descriptions in chapter 10, please go to the chapter 12
and check the information on the indicated status. As an automatic timeout will switch the scanner off in
some situations, please memorize the configuration of lighting before searching in the chapter 12.
2
Safety
Read the safety instructions carefully before using the
VITALITY CHECK
. Retain these
instructions for future use.
•
Only use the scanner as described in the manual.
•
Do not stare into the lights the device uses to measure. Keep your hand on the sensor during
the complete measurement. Staring into the active lights can cause permanent or non-
permanent damage to your eyes.
•
Do not use the device near water or spill liquid of any kind on the device as this may cause a
short circuit, a fire, or an electric shock which could cause serious injury, death, and property
loss.
•
Do not use or store the device in extreme temperatures (for example, do not leave it in a car
that is in direct sunlight). The device might overheat and may present a burn and fire risk and
cease to function.
•
Do not drop the device or allow objects to fall on as this might cause a damage to the battery
which might cause an explosion resulting in serious injury, death, and property loss.
•
Do not dispose of the device in fire as this might cause an explosion resulting in serious injury,
death, and property loss.
•
Do not use the device in an aircraft as Federal Aviation Ad- ministration (FAA) and Federal
Communications Commission (FCC) regulations prohibit the use of wireless devices while in the
air. Turn off the device before boarding an aircraft. Using the device on an aircraft might affect
aircraft instrumentation, communication, and performance; might disrupt the network; might
otherwise be dangerous to the operation of the aircraft, its crew, and its passengers; and might
be illegal.
•
Do not disassemble the device.
•
Most modern electronic equipment is shielded from radio frequency (RF) signals. However,
certain electronic equipment might not be shielded against the RF signals from the device. Keep
the device away from medical devices, including pacemakers and hearing aids, as they might
malfunction and cause serious injury or death to the user and others.

biozoom copyright© 2021 4
•
Do not use the device in health care facilities as there may be equipment that could be sensitive
to external
RF energy.
•
The
VITALITY CHECK
contains an internal, Lithium-Ion battery which my only be replaced
by an exact replacement available from the manufacturer. The replacement must be carried
out by the manufacturer or a skilled electrician.
•Use only certified USB Type-C™ cables and suitable USB chargers to charge or power the
product. Charging is carried out with 5V an approximately 500mA.
•Do not charge in a high moisture environment.
WARNING
DO NOT CHARGE THIS PRODUCT IN TEMPERATURE OUTSIDE AMBIENT OF (+5°C TO +40°C)
•Do not cover the device or charger while charging.
CAUTION
RISK OF EXPLOSION IF BATTERY IS REPLACED BY AN INCORRECT TYPE.
DISPOSE OF USED BATTERIES ACCORDING TO THE INSTRUCTIONS
•
Disposal
Do not dispose of the device with unsorted waste. Improper disposal may be harmful to the
environment and human health. Please refer to the local waste authority for information on
return and collection systems in your area.
This device must not be disposed of as normal household waste. Instead, it should be disposed
of by returning it to the point of sale, or to a municipal recycling collection point.
3
Intended Use
The
VITALITY CHECK
may only be used for the purpose mentioned in this user guide.
ATTENTION!!
The
VITALITY CHECK
is not a medical product and is not intended to diagnose, treat, cure or prevent
any disease.
Measure on uninjured bare skin only!

biozoom copyright© 2021 5
4
System requirements
•USB charging device (can be a wall charger, car charging adapter, USB port of PC. The port
must provide at least 500mA of current)
•2.4 GHz WiFi connection, 54 MBps min.
•Internet connectivity
•iPhone with IOS 12 or newer or Android phone with OS version 8 or newer
5
Download of VITALITY CHECK App
To use the
VITALITY CHECK
the App for IOS or Android must be downloaded onto your
smartphone or tablet. Please use the following link for downloading:
Android: https://play.google.com/store/apps/details?id=net.biozoom.vitalitycheck2020
IOS:
https://apps.apple.com/de/app/biozoom-vitality-check/id1552854204
6
Package content
•
VITALITY CHECK
scanner
•Quick Start Guide
7
Product Description
The
VITALITY CHECK
scanner enables the non-invasive measurement of biomarkers in human skin
and blood. The technological basis is the MSRRS (Multiple Spatially Resolved Reflection Spectroscopy)
measurement. MSRRS enable the optical detection of non-homogeneously distributed biomarkers in
different depth of the tissue, when the user is placing his/her hand on the sensor.
The scanner consists of a lid and the base. To open the scanner, hold the base and turn the lid
counterclockwise by a few degrees (Figure 1).
Figure 1
open
open

biozoom copyright© 2021 6
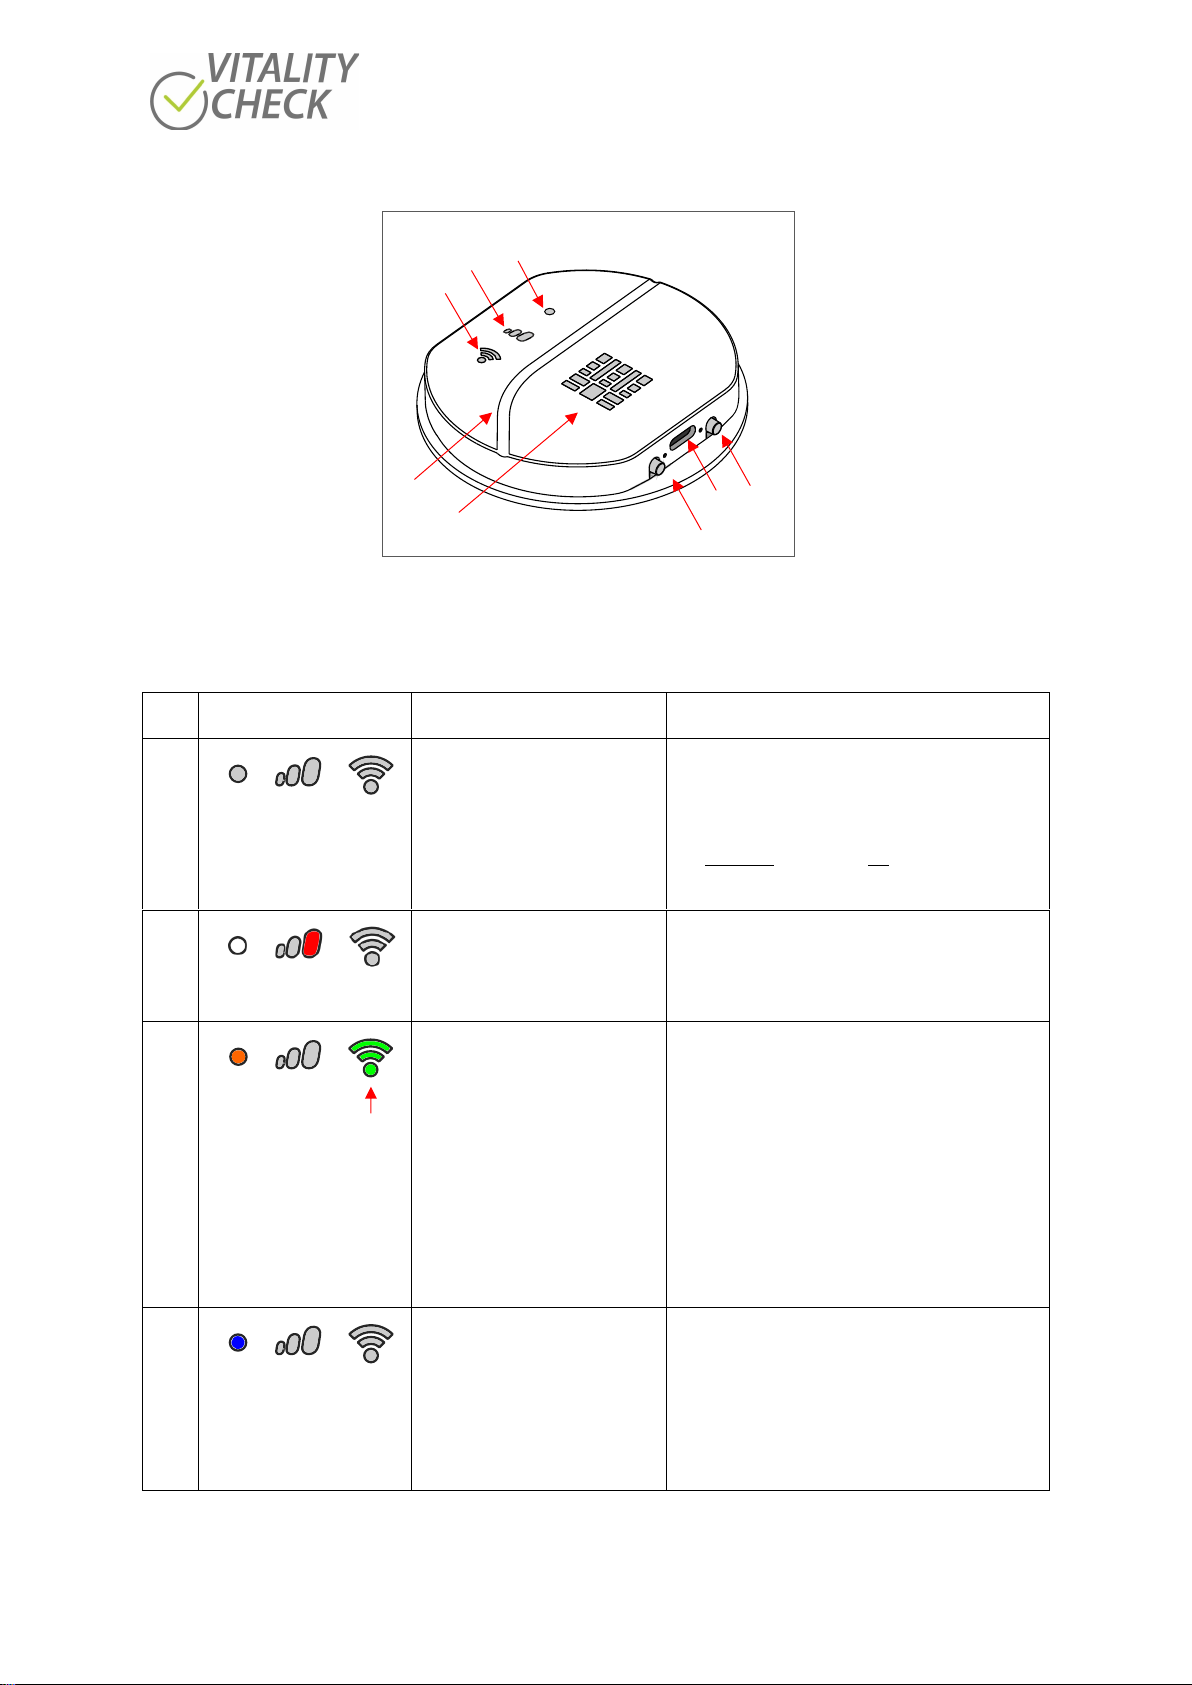
The base of the
VITALITY CHECK
is shown in (Figure 2). The base consists of an On/Off button (1), a
connectivity button (3), the USB-C socket (2), the sensor area (8) and several indicators (4, 5, 6).
•On/Off button (1): power on when pressing, hold pressed to force power off.
•USB-C socket (2) to charge the scanner.
•Connectivity button (3): hold pressed to enter initialization mode. More details see chapter 10.1
•The status indicator (4): multicolor LED. Please see chapter 12 for details.
•Progress indicator (5): To indicate the progress of the measurement the progress indicator (6)
consists of three symbols and lights up in green while measuring. The three symbols will switch
on one after the other until all symbols lit. When the measurement is finished the light will be
switched off. More details please see chapter 12.
•The WIFI indicator (6) light up in green and shows the device connectivity status. More details
please see chapter 12.
•Groove (7) to align the hand when measuring.
•When measuring the LEDs of the Sensor area (9) will switched on one after the other
Figure 2
To indicate a present status, the LED of the status indicator (4) shows the following colors:
•Red color: error or problem
•Blue color: In this mode the scanner opens a WIFI network (see chapter 10.1).
•Cyan color: update mode
•White: USB connected, disconnect USB to enter measurement mode
The progress indicator (5) shows the progress. The displayed information has different meaning for
every status. See chapter 12 for more information.
4
6
5
8
7
1
2
3

biozoom copyright© 2021 7
WiFi indicator (6) can have the following status:
•Not lit: The scanner is not connected with your smartphone or tablet
•Green color: The scanner is connected with your smartphone or tablet
•Flickering: Scanner is sending data to your smartphone
8
Charging of battery
Most standard chargers equipped with a USB Type-C™ connector are suitable to charge the scanner (see
chapter 14 for more details). Once a charger is connected and the scanner is switched on, the battery will
be charged, and the big symbol of the progress indicator lights red. If the battery is fully charged the device
will stop charging automatically and the red light is switched off.
Attention!!
Please charge the
VITALITY CHECK
scanner before its first use.
1.
Plug the USB CTM cable into the charging port.
2.
Connect the cable to a USB charger or USB port.
3.
Switch the scanner on. The status indicator lights white. If you do not switch it on the battery
cannot be charged.
4.
While charging, a red LED is switched on. The LED is switched off when the battery is charged.
The LED is located in the biggest symbol of the progress indicator / Figure 3
5.
After about 3 hours, the device should be disconnected.
Figure 3
Attention!!
Performing a measurement and charging of the battery at the same time is not possible because charging
can influence the quality of the measurement. Please remove the USB cable before starting a
measurement.
USB Type-CTM
Progress indicator lights in red
to indicate the charging
of the device
Status LED lights white
biozoom copyright© 2021 8
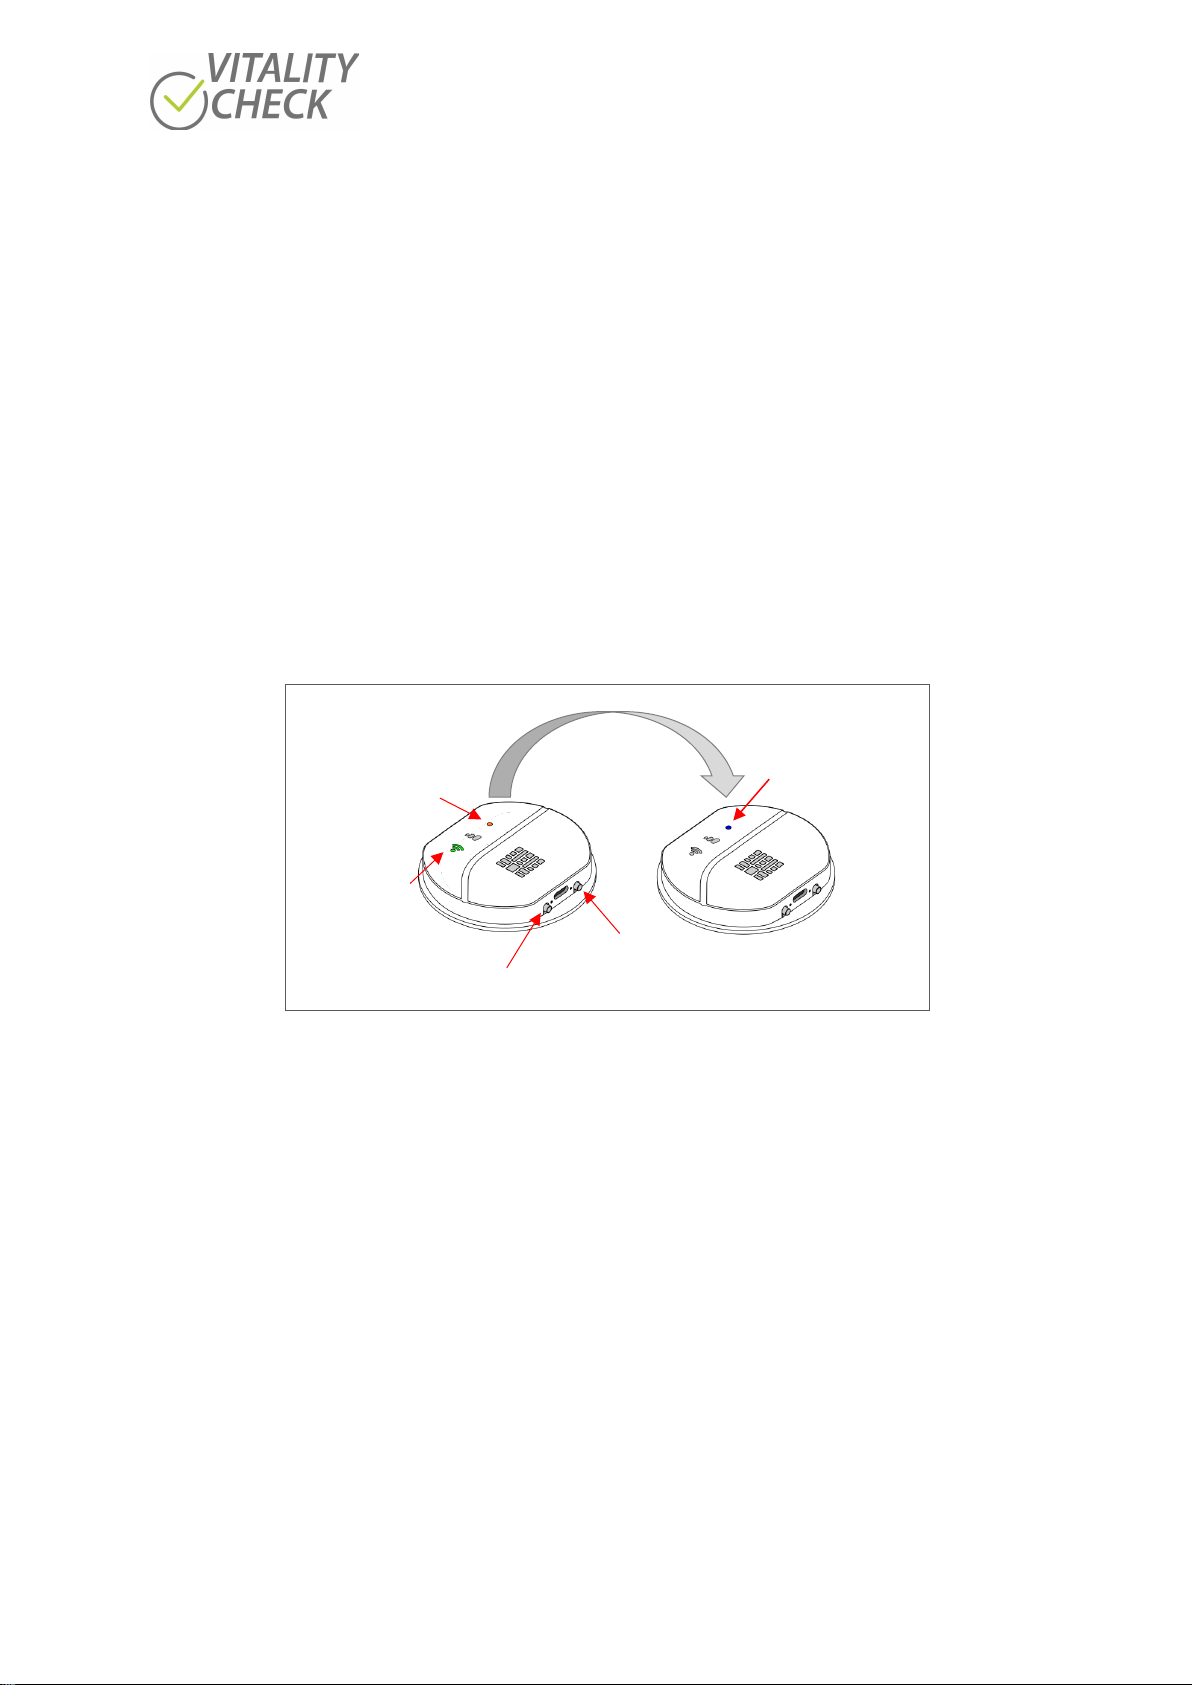
9 Turning the device ON and OFF
When the
VITALITY CHECK
is switched off, no LED is lit. If an LED is lit please switch the device off by
a long press (ca. 15 sec.) on the ON/OFF button, before performing the following installation steps.
After receiving the scanner, please download the
VITALITY CHECK
app on your phone/tablet, start
the app and follow the instruction. Switch the scanner on when the app requests you to do so. If the status
indicator lights orange or the WIFI indicator is lit or flickering green you must press the button “CHANGE
MODE” in the app (see setup wizard in the app menu). The app will request you now to press the
connectivity button of the scanner until the status indicator lights blue (Figure 4). The blue color indicates
that the scanner has opened a WIFI hotspot. Now it is possible to connect the scanner to your
phone/tablet. The complete procedure how to connect the scanner with your phone/tablet is described
in chapter 10.1.
If you switch the scanner ON and you have made measurements already the status indicator will light
blue. After opening the app scanner and phone/tablet will be connected automatically because the app
has stored the last connection data. You can directly proceed doing a measurement.
Figure 4
When switching the scanner on while charging the battery or when the battery has been charged before
and the scanner is still connected with a USB cable, the status indicator lights white and one symbol of
the progress indicator lights red (see Figure 3). Under this condition the scanner does not open its WiFi.
Please disconnect the USB cable if you like to measure.
If the device does not switch on, the battery may be completely empty. In this case, please charge the
battery (chapter 8).
After pressing connectivity
button status indicator
lights blue
Press connectivity button for ca. 4 sec.
Status indicator
lights orange
WiFi indicator is
blinking green
ON/OFF button

biozoom copyright© 2021 9
10
Steps for Performing a Measurement
The
VITALITY CHECK
scanner is a sophisticated device, which takes over 1000 measurement points
per single measurement. The calculation of the result needs significant computing power, which cannot
be done on the scanner itself. Therefore, the app sends the encrypted data via internet to a central server
for calculation of the result. The calculated result is transferred to the app the same way. Typically, the
phone/tablet will automatically choose an internet connection. It may use an existing WIFI network or a
cellular connection to send the data to the server.
For the communication between scanner and phone/tablet the scanner opens a WIFI hotspot. The
phone/tablet must use a WIFI connection to the hotspot to receive the measured data from the scanner.
Since a phone/tablet can handle only one WIFI connection at the same time the app may need to change
the WIFI connection between connecting to the scanner and connecting to the internet several times.
The connection data are stored in the app, so changing from the scanner WIFI to the WIFI used to connect
your phone to the internet does not require you to enter passwords or network names. But depending
on the version of operating system you will be asked for permission (iPhones and Android 10 and newer
phones typically ask for permission, older phones may not).
If you have established the communication between scanner and phone/tablet once, you can conduct
measurements without going through the connection procedure again. If you always use the same
scanner, you only need to open the app, switch on the scanner, and press the NUTRITION button in the
app.
The connection procedure between scanner and phone/tablet is described below. Please read the manual
of your phone/tablet if you do not know how to connect it with the internet.
10.1 How to Connect Scanner with Phone/Tablet
The connecting operation is easy and supported by the
VITALITY CHECK
app. Switch your
phone/tablet on. When opening the app, the first time a “Setup wizard” is opened automatically (If you
want to run the setup wizard again, you can find it in the main menu). Please follow the instructions step
by step until you can select and start a measurement.
The following screen shots concerns only to the connection procedure of the “Setup wizard”. Starting a
measurement procedure is descripted in chapter 10.2.
The image of “Step 1” (see below) is displayed on the phone/tablet when the
VITALITY CHECK
app is
opened the first time after downloading. The other steps follow in the pictured order one by one. The app
will request you to switch the scanner on (step 7) and to enter the name of the scanners WIFI by scanning
the QR-Code of the scanners serial number (see backside of the scanner) or by typing in the serial number
manually (step 10 or step 10.1). When connecting a scanner to a phone/tablet the app will download a
firmware update automatically if necessary (step 11 –step 14).
Some of the steps are alternative steps and are displayed only when necessary. The connection process
is fast and simple and must furthermore be performed only once if you always use the same scanner.
biozoom copyright© 2021 10
Step 1 Step 2 Step 3 Step 4
Language selection Permission to connect Permission to connect Connection
to scanner WIFI to scanner WIFI permitted
Step 5 Step 6 Step 7 Step 8
Request to connect Remove the lid/cover Switch scanner on Check scanner
the scanner from the scanner status
Step 8.1 Step 9 Step 10 Step 10.1
Check scanner Identification enables Permission to scan Identification by
status connection with phone QR-code typing serial
number
Press “ALLOW”
Drop down
menu to
select
language
Push this
button at
your scanner
to switch the
scanner on
Press
“NEXT”
if status LED
lights blue
Press
“NEXT”
Press
“SCAN”
for
scanning
QR-Code
Press
“MANUALLY”
to type the
number
If have used
QR-Code press
“ALLOW”
Press “NEXT”
Press
“CONNECT A
SCANNER”
If you have
pressed
“MANUALLY”
use the serial
number, its
printed on
the label of
the scanner
Press
“REQUEST
PERMISSION”
If status
indicator
does not
light blue,
press
“CHANGE
MODE”

biozoom copyright© 2021 11
Step 11 Step 12 Step 13 Step13.1
Trying to connect Check of scanners Firmware up-to-date Firmware is not
to the scanner Firmware up to date
Step 13.2 Step 13.3 Step 14 Step 15
Firmware will be Firmware is now Connection scanner Start page for
updated up to date, with phone successful conducting
restart scanner measurements
If you like to connect a different scanner with your phone/tablet after you have connected a first one at
an earlier time, please press on the three bars sign in the upper left corner of the
VITALITY CHECK
app to select and start the “Setup wizard” manually (Figure 5). Follow the instructions to connect the
additional scanner now with the phone/tablet. The Setup wizard guides you finally to an app page for
selecting and starting a measurement.
Figure 5
Attention!!
Please note that the
VITALITY CHECK
app stores only the last connection data. Therefore, you must
conduct the connection operation again when you have connected a second scanner with your
phone/tablet and you like to use now the first scanner once again.
Press “NEXT”
The scanner
number will
be displayed
here
Press
“LET´S GET
STARTED”
Press
“NEXT”
Press
“NUTRITION”
to enable the
selection of the
antioxidant
measurement
Press
“START
UPDATE”
Sign

biozoom copyright© 2021 12
10.2 Performing Measurements
Attention!!
Before you measure the first time please read the general recommendations for a correct measurement
listed in chapter 11 “Measurement Basics”. Following the rules of this chapter is essential to receive a
correct result.
To carry out the following steps, the
VITALITY CHECK
app must have been started the first time and
the connecting process has been performed successfully and the app is displaying the image of “Step 15”
(see above). When pressing the “NUTRITON” button you can select the FULL or the LIGHT version of
antioxidants measurement on the following screen.
The FULL measurement is what you typically use. It will measure your nutrition with a precision which is
good enough to make changes in your nutrition visible after just a few weeks of a changed diet. The LIGHT
version can be used for a quick check when you are in a hurry. It is not recommended for new users,
because it cannot detect, ifyour hand did not contact the sensor in the ideal way during the measurement.
Before using the LIGHT mode, please also consider using FULL mode without “Wifi query”, which offers
you the precision of the full mode within less time than FULL (see description below). After selecting one
of these options the app tries to connect scanner and phone/tablet via the WIFI of the scanner (Figure 6).
One important difference between FULL and LIGHT measurement is the number of measurements you
need to take. FULL includes four measurements LIGHT only one. Furthermore, in FULL measurement
mode the quality of placing the hand on the sensor can also be evaluated. This is important because a
non-optimal placement of the hand can influence the result. Both features of the FULL measurement
improve the precision of the calculated result (more details see below).
Figure 6
When scanner and phone/tablet are connected the app requests you to place the ball of the thumb on
the sensor by aligning the hand with the line of the sensor precisely. The scanner will now check if your
hand is present. Every time the scanner checks for your hand it will flash with orange LEDs. The
measurement will only start if the hand is placed on the sensor. An automatically timeout will stop the
orange blinking after 60 seconds if the user has not placed his hand on the sensor. If the sensor has
detected the placement of the hand the measurement starts, and the smallest symbol of the progress
indicator stops blinking and lights permanently in green. At that time, the hand should not be moved on
the sensor to avoid a miss reading. The progress indicator LEDs on the scanner shows the progress. A
green bar on the app indicates the progress too (Figure 7).
Statusanzeige leuchtet blau
Scanner hat ein WIFI
geöffnet
Wählen Sie FULL- oder LIGHT-Messung der Antioxidantien

biozoom copyright© 2021 13
Figure 7
When the measurement is in progress also the second symbol of the progress indicator will light up after
some time. The green bar in the app shows, how much of the measurement data has arrived at the
phone/tablet. The WIFI indicator flashes once for every packet of data transferred. The measurement is
finished when all three symbols of the progress indicator are lighting green and the app request you to
take off your hand from sensor. If you do not remove your hand the data will not be send to the server.
When taking your hand off, the app tries to connect to the internet. Therefore, the phone/tablet
disconnects from the scanner and the WIFI indicator turns off. Only the status indicator still lights in blue
(Figure 8).
Figure 8
Your phone/tablet will connect to an existing WIFI or alternatively use a cellular connection to the
internet. After successful connection, the app informs you that the data has been sent to the server. When
the result is available the result is sent to the website of
VITALITY CHECK
to display it.
When measuring for the first time, you must allow the app to send your measurement result to the
website. To avoid this procedure for the next time please press the button “Don’t ask again”. Then press
“Next” to get the result. (Figure 9)
WIFI-Anzeige
leuchtet grün
Fortschrittsanzeige, kleinstes
Symbol leuchtet grün
Scanner hat ein
WIFI geöffnet
4 LED leuchten
nacheinander orange
WIFI-Anzeige
leuchtet grün
Fortschrittsanzeige
leuchtet grün
Statusanzeige
leuchtet blau
Statusanzeige
leuchtet blau
WIFI-
Zugangspunkt
ist geschlossen
biozoom copyright© 2021 14
Figure 9
When you have selected the antioxidant FULL measurement (see second image in Figure 6) you must
make four measurements in succession (Figure 10). This greatly reduces the chances of measurement
errors, as measurements where the contact between your skin and the scanner was not ideal, can be
eliminated. It also means, that you must perform the same procedure four times before you get the final
result.
Figure 10
The app offers two modes to do the four measurement steps.
In the standard mode, the data of each individual measurement is evaluated directly after the
measurement. This mode is recommended for new users, because it enables the assessment of the hand
placement on the scanner for each measurement directly after the measurement is done. In many
situations the server will notice if you have not placed the hand on the sensor properly and you will get a
message with recommendations. Following these recommendations carefully will give you more precise
results and give you a better insight on your nutrition (Figure 10). Based on this information the user can
improve his handling of the measurement process step by step.
After some time, users typically have enough experience and have learned the perfect use of the scanner.
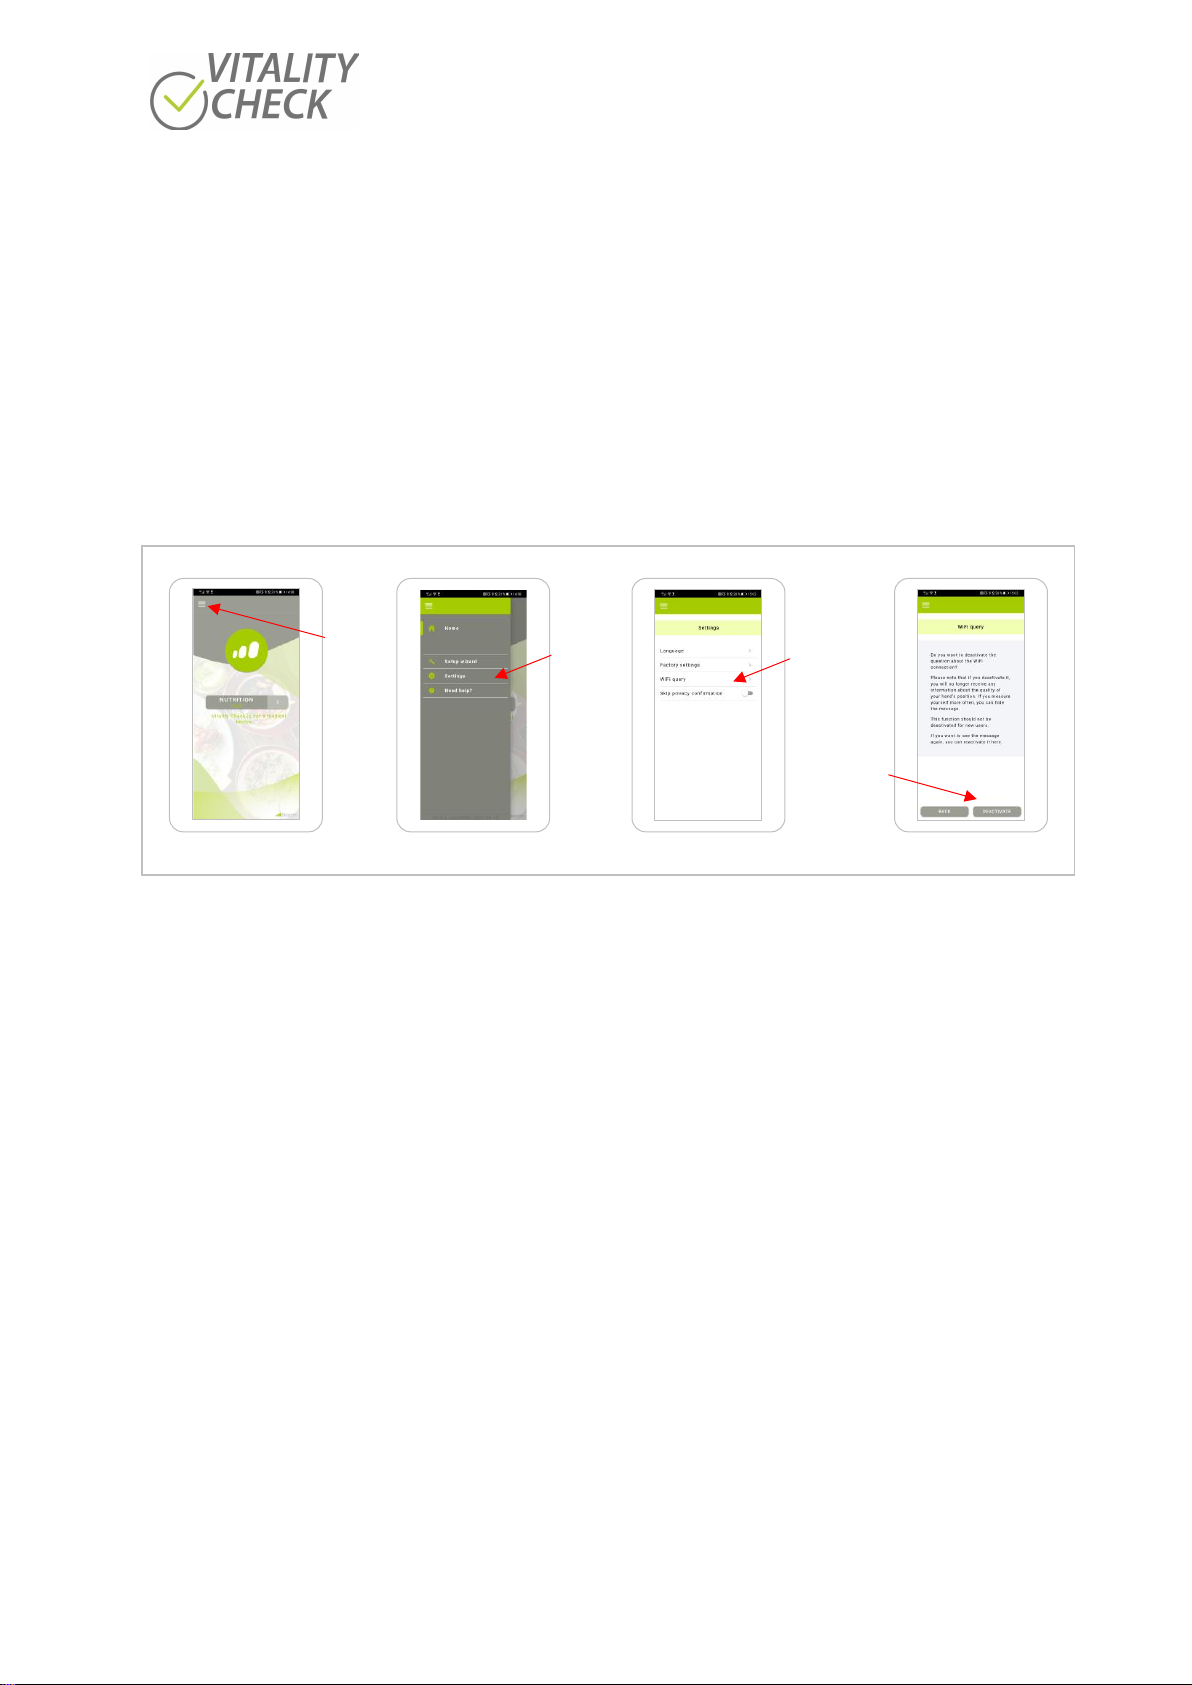
This is the ideal time to change the modes. This can be done in the settings menu under “Wifi query”
(Press on the three-bar symbol in the upper left corner of the app and select “Settings” and then select
“WIFI query”. Then press the button “DEACTIVATE”, Figure 11).
Vorhandenes WIFI
Server
Cellular 4G/LTE
Alternative Data Exchange
0,7/4
Messungen
sind vollendet
Um die
Messung zu
wiederholen
„Nochmal
Versuche“
drücken
biozoom copyright© 2021 15
If you deactivate this option, the app will first complete all four measurements and then send the data to
the server for evaluation. This will significantly reduce the time needed for a FULL measurement, because
the smartphone does not need to change the Wifi connection from scanner to internet that often. It will
also reduce user interaction, as Phones/tablets with IOS operation system or Android 10 and higher
always requests the user to confirm that the change of Wifi connection is tolerated by the user.
The drawback of this configuration is that the user is not informed right away, if the placement of the
hand was incorrect and incorrect single measurements cannot be repeated in this mode. If the placement
of the hand was incorrect for only one of the four measurements the app requests the user to repeat all
four measurements. Of course, you can activate the “WIFI query” again.
It is recommended that the user starts with the standard configuration and select the alternative only
after he has learnt the optimal handling.
Figure 11
Drücke
„Einstellu
ngen“
Drücke
“WLAN
Verbindungs
anfrage”
Drücke
“Menü”
Drücke
“Deaktivieren”

biozoom copyright© 2021 16
11
Measurement basics
The
VITALITY CHECK
is a sensitive sensor that is able to detect certain nutrient substances in the
human skin. It is strongly recommended to read and follow the tips below to get as precise and reliable
results as possible.
Preparation before starting a measurement
•Rest your body before starting measurement.
If you do physical exercise right before the measurement, you can often see an effect on your
antioxidant measurement as well as on heart rate variability that does not reflect your general
level. If you want the maximum measurement precision, allow your body to rest 20 minutes
between exercise and measurement.
•Measure at the same time each day to get consistent results. The antioxidant level may change
during the day.
During sleep your body relaxes and recovers. You can see that in the antioxidant value as well.
Most people have a higher value in the morning and during the activity and stress of the day the
value drops and is lowest in the evening. With some people, it goes up right after they had healthy
food and a lunchbreak. The changes between morning and evening typically have a magnitude of
0.1 to 0.5. You can also find differences between Monday and Friday because of workload or job-
related stress and the recovering at the weekend.
•Measure with dry skin only. If you washed your hands with soap and dried them up thoroughly,
there is still some water that remains on the skin for a while. It will have a small effect on the
measurement, so it is better to wait 30 minutes after washing hands to get the most precise
results.
•Measure on unhurt, healthy, untreated, bare, and dry skin only to get consistent results. If you
suffer from any skin diseases, the sensor will probably not be able to measure correctly, because
it is calibrated for healthy skin only.
Skin treatments of any kind, e.g., skin care products, cosmetics, sun protection, tattoos, will
influence the measurement. Hair will also have an influence. Therefore, we recommend
measuring on the base of your right hand’s thumb.
Performing measurements
•Measure in sitting position with the scanner lying on the table (Figure 12)
•Rest your elbow on the table for controlling the pressure when placing the hand on the sensor.
Apply no additional force, the weight of your hand/arm is enough.
You can get to the ideal contact pressure by letting the hand rest on the sensor with its own
weight. Do not use the muscles of the arm to lift the hand or to press it onto the sensor. The ideal
contact pressure is approximately equivalent to 800g of weight which is about two pounds. The
reason for this is, that your blood contains antioxidants. If you press against the sensor too hard,
you push some blood out of the skin and change the effective antioxidant level. The sensor has a
function that compensates the effect of the contact force. So, you do not need to worry to get a
perfect contact pressure. But if your contact pressure is ideal you still get a little bit better result.
Pushing blood out of the skin will make the measurement of heart rate variability completely
(HRV) impossible (relevant only for models which measure HRV).

biozoom copyright© 2021 17
Seating position - sensor on the table Rest the elbow on the table - no additional
force when measuring
Figure 12
•Lay your right hand softly on the sensor by using the groove to align the hand precisely. Measuring
always the exact same spot helps you to see the effect of a change in nutrition and lifestyle
correctly, as the concentration of nutrient substances varies a little bit between different surface
areas of your hand (Figure 14, Figure 14).
•Do not move your hand or shift weight during measurement.
It is important to hold your hand still during the measurement. The scanner does a set of different
measurements and compares the results. If the hand moves between the measurements or the
contact to the scanner varies the comparison works less well. The measurement starts
automatically as soon as it detects your skin. To make sure not to move your hand after the
measurement has started, avoid correcting the position of the hand on the scanner after the skin
touches the scanner.
Use the groove to align the hand precisely Do not move your hand while measuring
Figure 13

biozoom copyright© 2021 18
Figure 14
•Avoid bright light on your hand while measuring (sunlight, bright artificial light). Cover the hand if
necessary.
Bright light is able to get through your hand. You can try that by switching on the LED flashlight of
your smartphone and putting a finger on top of it. You can see that especially red light can get all
the way through your finger. Sunlight is even stronger and can get through all of your hand. That
is why the biozoom sensor does refuse to measure in direct sunlight. If you want the maximum
precision, you can help the sensor by making sure no bright light hits the back of your hand while
measuring. Normal ceiling light typically is no problem.
General aspects influencing the level of measured results
The scanner measures the presence of certain nutrition substances in your tissue. The substances
measured are carotenoids. These are substances which naturally occur in fruit and vegetable. They are an
excellent marker for the quality of your nutrition and your antioxidant level.
Everything you eat and drink, including normal food, drinks and nutritional supplements influence your
results. Your results are also influenced, by how much nutritional supplements are consumed by your
body. Your body requires these substances to defend itself against free radicals which can be generated
in many ways. Examples are: smoking, radiation such as strong sunlight, stress and strong physical
exercise. Even though a complete list of all influences would exceed the scope of this document, a few
important examples have listed her:
•Note that prolonged exposure to sunlight or the use of sunbed may temporarily lower your
antioxidant value.
•Influence of wearing gloves.
If you wear gloves at work,be aware that there sometimes is a significant effect on the antioxidant
concentration. You will get better results if you always measure before work.
Ball of the thumb of right hand
cover the sensor area completely
Hand is aligned on
the groove
Groove
Position of sensor area
when the hand is aligned
precisely on the groove

biozoom copyright© 2021 19
•Note that illness may lower your antioxidant value.
If you have a cold or some other illness it means stress for your body. Be aware that usually your
antioxidant values go down in such a case because your body uses up some of the nutrient
substances the scanner measures. Wait until you have recovered before you compare two results.
•Reasonable physical exercise supports your antioxidant level, but strong physical exercise may
temporarily lower your antioxidant value.
•Note that smoking result in a constant lower level of antioxidant value compared to non-smoking.
•Note that excessive consumption of alcohol may lower the antioxidant value temporarily.
•Be aware that there are several other effects which can influence the nutrition substances
measured by the scanner.
12
Troubleshooting
Below you find a table summarizing all functions and status indication relevant for the use of the
scanner. If you face an unexpected behavior of the scanner this table helps you to understand it. If
further actions are necessary, this table inform about this.
For unexpected events not listed in the table please carry out the following steps:
1. Switch the scanner off by holding the ON/OFF button pressed for 15 seconds.
2. Restart the app.
3. Switch on again by pressing the ON/OFF button for 1 second.
Since the scanner will indicate its status by lighting of a specific color or a combination of colors of different
indicators the table below has a ranking based on colors.
biozoom copyright© 2021 20
1 On/Off button
2 USB-C socket
3 Connectivity button
4 Status indicator
5 Progress indicator
6 WiFi indicator
7 Groove
8 Sensor area
Figure 15
No.
Indicator
Condition
Situation
1
Scanner off
Press button (1) shortly to switch the scanner on.
Never press button (3) in parallel for switching
the scanner on because scanner will change to
the update mode.
For switching the scanner off press button (1) ca.
15 seconds
2
Scanner is switched on.
Charging battery via USB, or
USB cable connected to
computer
Remove USB-C cable to make a measurement.
Scanner will be switched off after removal of
USB-C cable.
3
blinking
or constantly
green
Scanner´s firmware is prior to
2021
Scanner is switched on, status
indicator lights orange and WIFI
indicator lights green or is
blinking green
Follow the instructions of the setup wizard of the
app when connecting the scanner to the
smartphone/tablet. (see step 8 in chapter 10.1).
When you start the app for the first time, you
will automatically be in setup mode. If you want
to connect a new scanner to your
smartphone/tablet, you must start the setup
wizard yourself. To do this, press the three lines
in the top left of the app and select it from the
pull-down menu. Then follow the instructions of
the app again.
4
Scanner’s WIFI is activated
Connection with phone/tablet is possible now.
If a connection has already been established with
this phone/tablet before, a new connection is
automatically established when another
measurement is conducted.
4
6
5
8
7
1
2
3
Table of contents
Other biozoom Test Equipment manuals


