BIRD RIDES Bird Air User manual
Get started.

Placeholder
TAIL LIGHT
STOMP BRAKE
LEVER
NECK
LOCKING
SLEEVE
CHARGING
PORT
HEADLIGHT
HANDLEBAR
KICKSTAND
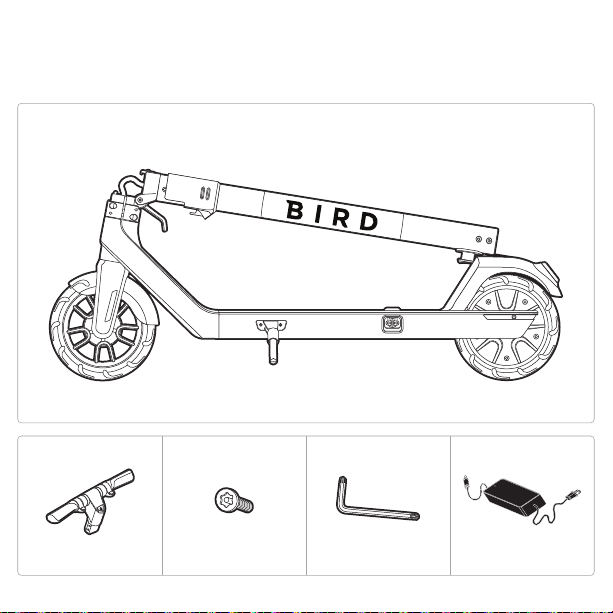
Assembly Materials
x 4
SCREWS
x 1
HANDLEBAR ASSEMBLY
BIRD AIR VEHICLE (FOLDED)
x 1
ALLEN WRENCH
x 1
CHARGER AND PLUG
Assembly
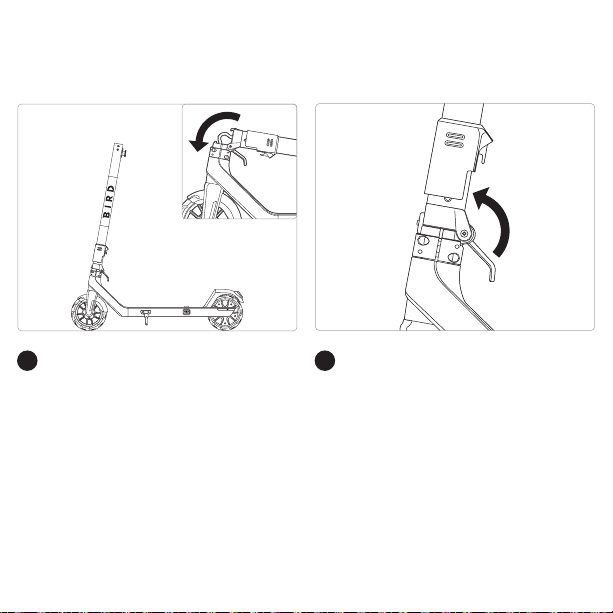
LIFT THE NECK
Lift the vertical tube (neck) from the top and
move it to an upright position.
1ROTATE THE NECK INTO PLACE
Rotate the lever at the base of the neck up
while holding the neck in place. The lever must
be completely locked in the upright position.
2

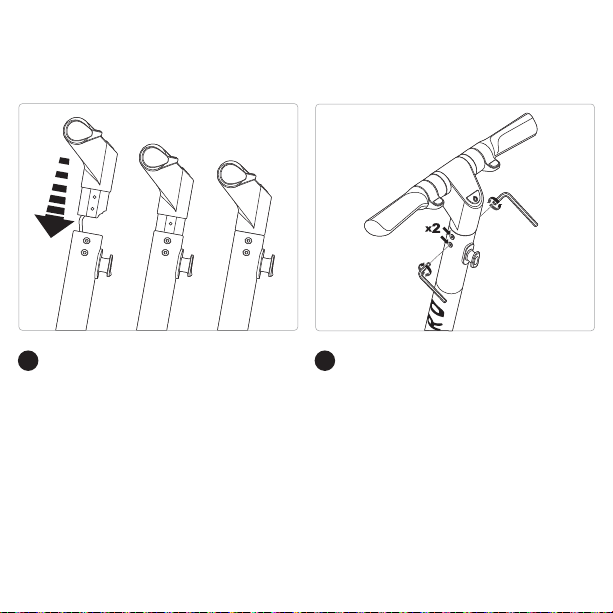
SLIDE THE LOCKING SLEEVE DOWN
Slide the locking sleeve down until it clicks into
place with the lever.
3CONNECT THE HANDLEBAR ASSEMBLY
Take the handlebar assembly and connect its
connector (green) to the Bird Air connector at
the top of the neck.
Align the connectors using the arrows as visual
aids. Once arrows are aligned push them
together to connect.
4
SLIDE THE HANDLEBARS INTO PLACE
Slide the handlebar assembly down into the
neck with the wires inside. The middle part of
the handlebars should slope down toward the
rear of the vehicle.
Push the handle bar down, until it’s fully seated
in the neck.
5INSTALL THE (4) SCREWS
Pick up the (4) screws and the Allen wrench.
Then, find the (4) screw holes at the top of the
neck, near the handlebar assembly.
There are two holes each on opposite sides of
the neck.
Use the Allen wrench to install the (4) screws.
Tighten the screws until they are snug and
then rotate an additional ¼ turn.
6

Charging
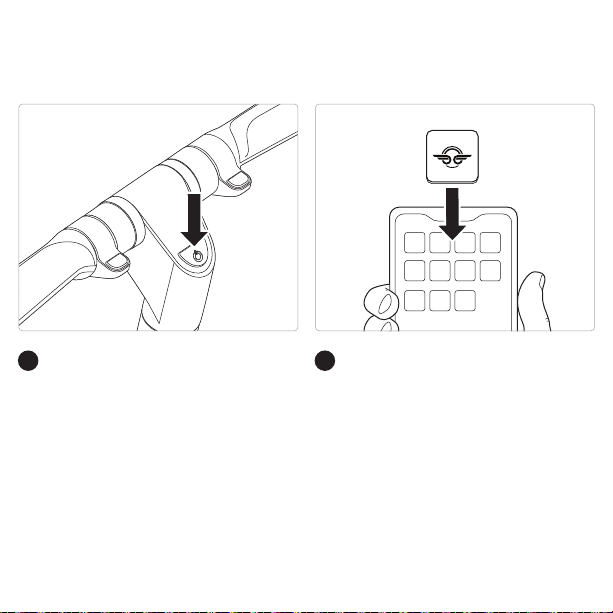
CONNECT THE POWER ADAPTER
Once you’ve assembled your Bird Air, it’s time
to charge. Use the included power supply and
connect it to the charging port.
1FINISH CHARGING
When fully charged, a green light on the power
supply indicates the charge is complete.
Disconnect the power supply from the
charging port before riding.
2
Do not attempt to charge if the charging port or power adaptor is wet.
WARNING:
Only use charger specified by the manufacturer.
MANUFACTURER: DONGGUAN ANGDI TECHNOLOGY CO LTD, MODEL: BC266420200
WARNING:
Ambient temperature must be 32-104°F (0-40°C)″during charging.
The battery will not charge outside of these temperature limits.
WARNING:
Risk of Fire: Do not attempt to disassemble the charger.
No user serviceable parts.
WARNING:
Riding
POWER ON
To turn the Bird Air on or off, hold down the
Power button for at least 2 seconds at the
bottom of the dash display (center console of
the handlebar assembly).
The vehicle will audibly “beep” when it is
powered on or off. Additionally, the dash
display will activate.
1DOWNLOAD THE BIRD APP
Download and install the Bird App on your
smartphone to gain wireless access to the
dash display controls. Follow the in-app
instructions to pair with the vehicle.
2
2 secs
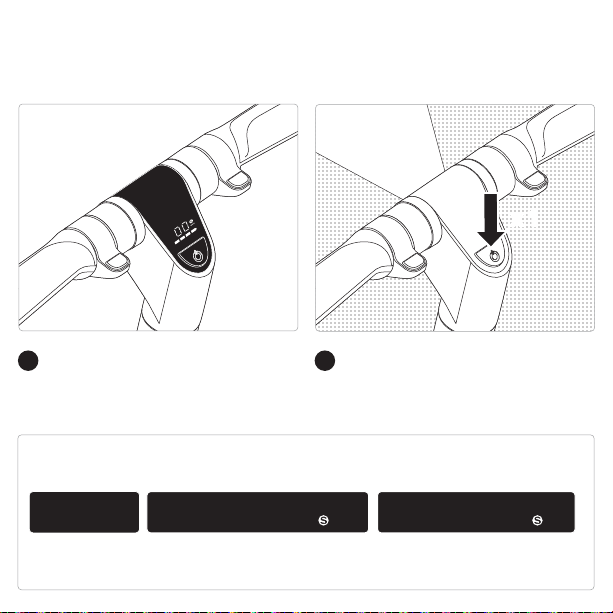
TURN ON THE HEADLIGHT
Press the power button once to turn the
headlight on and off.
4
CHECK THE DASH DISPLAY
The Bird Air uses a dash display screen to show
the speed (miles per hour or kilometers per
hour) and charge level.
3
The dash display shows the speed mode the Bird Air is in. There are 3 different speed modes:
To switch between the three modes, double-tap the power button. Double-tapping will always cycle
in order of Takeoff, Glide, and Fly speed.
x 1x 1
TAKEOFF
Max speed of
9 mph/15 km/h
GLIDE
Max speed of 12-12.5 mph/20 km/h,
indicated by a yellow circle
F LY
Max speed of 16 mph/26 km/h,
indicated by a red circle
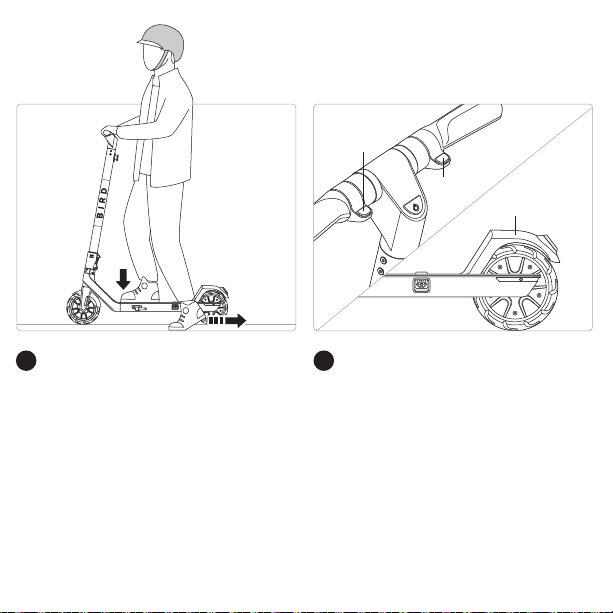
STARTING
To start a ride, first, make sure to fold in the
kickstand. Kick to start the Bird Air by having
one foot on the vehicle and one foot on the
ground. Push the vehicle with at least two kicks
before boarding it to ride.
Press the throttle (accelerator) down at the
right handlebar to accelerate the scooter.
5STOPPING
Use the brake at the left handlebar to
decelerate or stop the vehicle. Additionally, it is
possible to use the stomp brake as a brake for
the vehicle.
6
THROTTLE
BRAKE
STOMP BRAKE
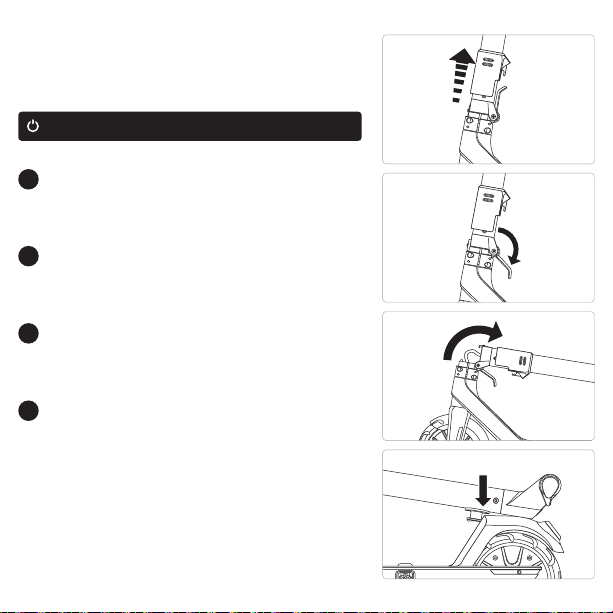
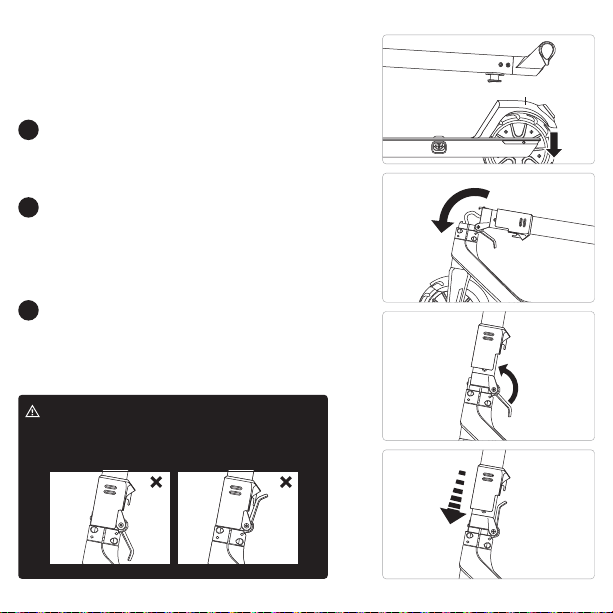
Folding
SLIDE THE LOCKING SLEEVE UP
Take hold of the locking sleeve and slide the sleeve up
from the lever.
1
ROTATE THE LEVER DOWN
While holding the locking sleeve in place atop the
lever, rotate the lever down.
2
FOLD THE NECK DOWN
Take hold of the neck and fold it down 90 degrees until
the handlebar assembly is just above the stomp brake.
3
LOCK THE NECK INTO THE FENDER
Push the neck down atop the stomp brake until the
black tab at the base of the handlebar assembly meets
with the stomp brake.
Hold the stomp brake down, then push the neck further
into the fender until the black tab locks into place.
Let go of the stomp brake and neck. It is now possible
to lift the scooter from the neck.
4
The Bird Air can be folded for convenience.
Ensure the Bird Air is powered off before attempting to fold it.
Unfolding
RELEASE THE TAB
Push down the stomp brake to free the tab at
the base of the handlebar assembly.
1
SET THE NECK AND LEVER
Lift the neck 90 degrees to the upright
position on the vehicle.
Push the lever at the base of the neck up.
2
SLIDE THE LOCKING SLEEVE DOWN
Slide the locking sleeve down into the lever,
making sure it clicks into place. The lever must
be completely locked in the upright position.
3
Reverse the folding process to unfold the Bird Air. STOMP BRAKE
WARNING:
Failure to follow unfolding instructions could
result in unintentional folding. Ensure that the
lever is upright and the sleeve is locked in place.

Battery
Range
Charging
App
Firmware
Connectivity
Splash Resistant
Lights
Braking
Wheels
Top Speed
Hill Grade
Weight Limit
Storage Temperature
Operating Temperature
Input Voltage
Charging Temperature
5.2 Ah (10S2P)
Up to 15.5 miles
Fast charge port
iOS and Android
Over-the-Air updates
Bluetooth
Chassis IP34 , Motor IP67 , Battery IP67
Front LED, automatic rear LED
Throttle and foot
7.9″Semi-solid
16 mph
8% grade
220 lb (100 kg)
14 –104°F (-10-40°C)
14 –104°F (-10-40°C)
Length x Width x Height
Weight
38.6" X 18.1" X 45.1" (981 mm X 460 mm X 1145 mm)
25.35 lb (11.5 kg)
100-240AC, Output Voltage = 42VDC, Output Current: 2.0 Amps,
Charger Manufacturer: DONGGUAN ANGDI TECHNOLOGY CO LTD, Model: BC266420200
(Only Use Charger Provided)
Specifications
Charger Specifications
Dimensions
32-104°F (0-40°C)

- Use a soft, wet cloth to wipe the mainframe clean. Hard to remove dirt can be scrubbed with a
toothbrush, then cleaned with a soft wet cloth.
- Do not wash your Bird Air with alcohol, gasoline, acetone, or other corrosive solvents. These
substances may damage the appearance and internal structure of your Bird Air. Do not wash your
Bird Air with a power washer or hose.
- Warning – Make sure your Bird Air is powered OFF and the charging cable is unplugged before
cleaning; otherwise you may damage the electronic components.
- Storage Temperatures: 14–104°F (-10-40°C)
- Do not store or charge the battery at temperatures outside of the stated limits (see specifications).
Do not puncture the battery. Refer to your local laws and regulations regarding battery recycling
and/or disposal.
- A well maintained battery can perform well even after many miles of riding. Charge the battery
after each ride to avoid draining the battery completely. When used at room temperature (70°F
[22°C]) the battery range and performance is best.
- Warning: Do not attempt to disassemble the battery. Risk of fire. No user serviceable parts.
- Warning: Do not ride when the ambient temperature is outside of the operation temperature (see
specifications), because low/high temperature will limit the maximum power/torque. Doing so
could cause personal injury or property damage due to slips or falls.
Cleaning and Storage
Battery Pack Maintenance

Bird Rides
406 Broadway Avenue #369
Santa Monica, CA 90401
Questions? We’ve got answers.
Visit support.bird.co for help.
+1 (866) 205-2442

Instructions & Safety Guidelines
Before each use, conduct a basic safety inspection of the Bird Air, including: (i) trueness
of the wheels & condition of tires; (ii) safe operation of all brakes and lights; (iii) good
condition of the frame; (iv) sufficient battery charge power; and (v) any sign of damage,
unusual or excessive wear, or other open and obvious mechanical problem/maintenance
needs.
Components shall be maintained and repaired in accordance with the manufacturer’s
specifications and using only the manufacturer’s authorized replacement parts with
installation performed by dealers or other skilled persons.
Do not modify the scooter as it will void your warranty and introduce potential safety
issues. Read and understand all safety warnings listed on the product label.
• Recommended age: 16+ years old.
• Maximum weight: 220.0 lb (99.8 kg). No more than one rider should ride at a time.
• Risk of injury or death from loss of control, collisions, and falls. Helmets and other
protective equipment are highly recommended and may be required by law.
• Be sure to read the User Manual local to your region found on support.bird.co.
• Product warranty for your region can be found by visiting support.bird.co
• Comply with local laws and regulations when riding this product. Do not ride where
prohibited.
• Ensure the intended area of operation is safe. Do not ride in the snow, in the rain, or on
roads which are wet, muddy, icy, or that are slippery for any reason. Do not ride over
obstacles. Avoid sharp bumps, drainage grates, and sudden surface changes.
• Avoid streets and surfaces with water, sand, gravel, dirt, leaves, and other debris.
• The scooter should not be used for racing, stunt riding, or other maneuvers.

• Avoid contact with moving parts. Ensure hands, feet, hair, clothing, and other body
parts stay clear of moving parts like the motor or front wheel.
• ALWAYS keep both hands on the handlebar when riding.
• You should not ride the Bird Air:
• if under the influence of alcohol or drugs,
• if you have a heart condition, are pregnant, have head, back, or neck ailments which
limit your ability to ride safely,
• if you have any mental or physical conditions that may make you susceptible to injury
or impair your physical dexterity or mental capabilities to recognize, understand, and
perform all of the safety instructions and to be able to assume the hazards inherent
with the Bird Air.
• DO NOT attempt to disassemble the battery. Risk of fire.
• Never modify the electrical system as this may result in a risk of electric shock,
electrocution, or fire.
• DO NOT attempt to charge a vehicle while wet.
• DO NOT ride or attempt to charge a vehicle that has been submerged in water or if
there is risk of water intrusion into the battery compartment, even if the vehicle is no
longer wet. Contact Bird for further instructions.
• To prevent electric shock when cleaning, remove the charger plug from the outlet
and wipe vehicle with a dry cloth. Only use the charging cable provided by the
manufacturer.
• Only store in dry areas. Never store in wet conditions.
• Devices are not intended for use at elevations greater than 2000 m above sea level.
• Prolonged Exposure to UV Rays, Rain and the Elements May Damage the Enclosure
Materials, Store Indoors When Not in Use.
Instructions & Safety Guidelines

Federal Communications Commission (FCC) Compliance Statement for USA
This device complies with part 15 of the FCC rules. Operation is subject to the following two
conditions: (1) This device may not cause harmful interference, and (2) this device must accept
any interference received, including interference that may cause undesired operation.
Note: This equipment has been tested and found to comply with the limits for a Class B digital
device, pursuant to part 15 of the FCC Rules. These limits are designed to provide reasonable
protection against harmful interference in a residential installation. This equipment generates,
uses, and can radiate radio frequency energy; if not installed and used in accordance with the
instructions, it may cause harmful interference to radio communications. There is no guarantee
that interference will not occur in a particular installation. If this equipment does cause harmful
interference to radio or television reception, which can be determined by powering the
equipment off and on, the user is encouraged to try to correct the interference by using any of
the following measures:
• Reorienting or relocating the receiving antenna.
• Increasing the separation between the equipment and receiver.
• Connecting the equipment into an outlet on a circuit different from that to which the receiver is
connected. Consult the dealer or an experienced radio/TV technician for help.
This equipment complies with FCC radiation exposure limits set forth for an uncontrolled
environment.
Caution: Changes or modifications not expressly approved by the party responsible for
compliance could void the user’s authority to operate the equipment.

Disclosure for Users in
the State of California
as required by CA Vehicle Code 407.5
YOUR INSURANCE POLICIES MAY NOT
PROVIDE COVERAGE FOR ACCIDENTS
INVOLVING THE USE OF THIS SCOOTER. TO
DETERMINE IF COVERAGE IS PROVIDED, YOU
SHOULD CONTACT YOUR INSURANCE
COMPANY OR AGENT.
YOU MAY NOT MODIFY OR ALTER THE EXHAUST
SYSTEM OF THIS SCOOTER CAUSE IT TO AMPLIFY OR
CREATE EXCESSIVE NOISE PER VEHICLE CODE
SECTION 21226, OR TO FAIL TO MEET APPLICABLE
EMISSION REQUIREMENTS PER VEHICLE CODE 27156.

Table of contents
Other BIRD RIDES Scooter manuals


