Bixion III User manual

BIXICON III
USER GUIDE
25.4.2022

1 Comparison between BixiCon III and BixiCon II .......................................................................... 3
2 Technical parameters ................................................................................................................ 4
3 Description ............................................................................................................................... 5
4 How it works ............................................................................................................................. 6
5 Booting and configuration ........................................................................................................ 7
6 The first start ............................................................................................................................ 8
7 Configuration ............................................................................................................................ 9
8 Time-lapse intervals ................................................................................................................ 18
9 Camera Settings ..................................................................................................................... 19
10 Diagnostic ............................................................................................................................... 20
11 Units management (BIXION BOARD) ....................................................................................... 21
12 Troubleshooting ...................................................................................................................... 24
13 Important safety instructions .................................................................................................. 25

1 COMPARISON BETWEEN BIXICON III AND BIXICON II
BixiCon III
Previous version
Size
92mm x 60mm x 31mm
88mm x 86mm x 31mm
Accessories
Integrated Wi-Fi configuration
External configuration dongle
Integrated Wi-Fi connectivity + external antenna
External Wi-Fi dongle + antenna
Integrated LTE connectivity + external antenna
External LTE
System
Higher processor performance –> faster system
start-up
Consumption 0.1-3.8 W
Consumption 0.2 - 4 W
Rescue mode: re-installation SW, default config
reset, factory reset
Clearer and more responsive interface
Easier access to the configuration mode
External modem support (USB stick)
Storage
SD card up to 128 GB
SD card up to 64GB
SSD disk connected via USB
Other features
Automatic change of summer / winter time
Monitoring coming soon - notifications,
statistics, graphs, logs.

2 TECHNICAL PARAMETERS
Brand
BIXION (www.bixion.com)
Model
BixiCon III
Power supply
8–24 V
Power consumption
0,1W – sleep mode
1,5W – running mode
3,8W – when LTE modem connected, uploading files
Dimensions
92mm x 60mm x 31mm
Weight
162g
Default IP (LAN)
192.168.1.111
Communication interface
Ethernet, LTE (GSM), WIFI
Operation temperature *
between -30 °C to 70 °C
* The temperature sensor is inside the aluminium body. So, the shown temperature is affected also by the heat of the
BixiCon intervalometer. This temperature should be maximally 90 - 95 °C and during the hot days this temperature could
be between 50 – 65 °C.
CONSUMPTION EXAMPLES
In the following figure, you can see that power consumption of the unit is highly dependent on the power consumption
of the camera especially in powersave mode. Therefore, in powersave mode it is necessary to set sleeping mode on the
camera properly.
The consumption was measured under ideal conditions (temperature, humidity, steady LTE or Wi-Fi signal)

3 DESCRIPTION
BixiCon (BIXION Controller) is a programmable intervalometer with special features. It is able to trigger a camera, get the
pictures from it and upload them to network storage. The main features are:
• A programmable intervalometer capable of taking pictures within less than a minute after another for each day
of a week.
• Various storage options: BIXION Drive, FTP, Google Drive, Dropbox.
• Common DSLR and point-and-shoot cameras support.
• Low power sleep mode (suitable for solar and battery power).
• Ethernet, WIFI or LTE internet connection.
• POE power supply (DC 8 - 24V).
• Shutter release or USB trigger.
• Local storage and fail-safe reupload in case of connection loss.
• Uploading pictures on the background while shooting.
• Voltage monitoring suitable for solar powering.
• Internal and meteorological sensors (temperature, humidity).
• Built-in power output for the camera.

4 HOW IT WORKS
BixiCon unit provides a better overview of your time-lapse photo sets. The unit is able to operate in two basic modes
described in the following chapters.
POWER-SAVE MODE
In this mode, the unit is sleeping most of the time and therefore, has minimum power consumption. Depending on the
schedule, it turns on in order to take or upload photos. When uploading is activated, the unit turns a 3G modem on to
get internet connection and starts uploading pictures. If the previous uploading was interrupted, it will try to reupload
again. It is suitable for e.g. solar / battery powered stations.
When sleeping, the unit is not available for management via the web interface (because it is actually turned off in sleep
mode). However, the configuration settings can be changed online. Every time the unit turns on and connects to the
internet, it goes through the website looking for new settings. If it finds any, it is automatically downloaded and then
applied.
NORMAL MODE
In this mode, the unit is still running. It’s connected to the internet permanently and the pictures are uploaded to the
internet storage right after each shot. Real-time configuration is available every time the unit is turned on and connected
to the internet.

5 BOOTING AND CONFIGURATION
The booting process is indicated by the green LED light. It takes approximately 30 seconds. The end of booting is
indicated by two short beep sounds. Then, the green LED starts to blink for 10 seconds. In this moment, the buttons are
activated, waiting for the user input:
• Press and hold the reset button for 3 seconds. The orange LED starts blinking. Release the button. The orange
LED is on. The green LED is on. After a while, the green LED starts blinking. This action activates the
configuration mode (see below).
If no button is pressed, the unit goes into the operational mode (normal or powersave). In the normal mode, the green
LED signalizes that the unit is turned on. In the powersave mode, both LEDs are off to reduce power consumption.
It is also possible to access the configuration mode during the unit run. In normal mode, just press and hold the reset
button for 3 seconds. The unit beeps and green LED starts blink. In powersave mode just press and hold both buttons
(set and reset button) approximately for 3 secs. The both LEDs turn on and the unit is going to start in configuration
mode. It takes approximately 30 seconds.
Configuration mode allows the user to change the configuration of the unit via the web interface. In this mode, ethernet
connection is activated. The unit is accessible via IP address. You can activate the configuration in the booting process, or
it can be activated anytime by pressing and holding the reset button for at least 3 seconds. The unit beeps and the green
LED starts blinking. The configuration mode is activated. To quit the configuration mode, you must restart the unit
(manually) or use the reset button again.

6 THE FIRST START
There are two ways of accessing the BixiCon unit.
• Every unit has a built-in configuration modem. In the configuration mode, the unit is accessible via a WIFI access
point named “BIXICON-serial” where serial is the serial number of the unit. You can get connected with your
laptop or even with a smartphone or tablet. In this case, the unit’s IP address is 10.10.10.10 - put these numbers
into your browser’s address bar to get access.
• Plug the ethernet cable from your computer and power source cable in. After booting sound signal, switch the
unit into the configuration mode (see the previous chapter). The IP address of the computer should be set
within the same network range (e.g. 192.168.1.20, netmask 255.255.255.0). By default, the unit has a static IP
address 192.168.1.111.
Open your web browser and type 192.168.1.111 (respectively 10.10.10.10) to the address bar. Now you should see the
configuration website of the unit. Default login is admin, password admin.

7 CONFIGURATION
The unit can be configured via our own web interface. The website is responsive and can be loaded on various devices
with different screen resolutions.
UNIT OVERVIEW
The first page of the user interface is dashboard, where you can easily see basic information of the unit. Also, you can
find other useful information here and check the process of your time-lapse project.
On the status page, you can see the information that will tell you whether your unit is working properly or not.
• Serial shows information about the unit - the serial number and installed software.
• Solar unit shows BIXION charger information.
• Sensor gives you unit information.
• Storage shows information about the connected local storage. The local storage is necessary for other features.
o Save all pictures.
o Fail-save backup.
• Connection status shows the internet connection status.
• Unit status gives you information about the time-lapse process.
o System shows the actual time on the unit and uptime.
o Shooting shows the shutter method and the time of the last taken picture.
o Uploading shows the type of the remote storage and time of the last uploaded picture.

• Total shots and pictures upload show complex information on time-lapse.
o Total shots -> shot – the number of successful shots.
o Total shots -> fail – the number of failed shots.
o Pictures uploaded -> uploaded – the number of successfully uploaded files.
• Pictures uploaded -> upload tries – the number of unsuccessful uploads (including attempts for reupload).
o Pictures uploaded -> uploaded – the number of successfully uploaded files.
o Pictures uploaded -> upload tries – the number of unsuccessful uploads (including attempts for
reupload).
BASE UNIT SETTINGS
The base settings include the unit name and the time zone of the unit’s location. The name is user’s identification of the
unit. Daylight saving time is involved in the time zone settings. That can cause changing of light conditions due to the
time difference. Unit power mode selection is described in the following chapter.
BIXION cloud option allows the unit to communicate with BIXION servers and enables online services (remote
management, unit monitoring etc.). Ping server identifies local or global servers, depending on the availability, for the
unit to test its online status. For local network with no access to the internet, it is possible to use the name of the local
server and its IP address. When the unit gets the internet access, it is recommended to test connection availability using
a public server.

UNIT POWER MODES
The unit power mode (normal or powersave) can be set with the button Unit power mode according to the description
in chapter 3. When in normal mode, the unit is permanently connected to the internet. When it comes to powersave
mode, the unit is periodically connecting to the configuration website (see the remote management in chapter 7).
In normal mode, no special settings are required. In powersave mode, it is possible to set different times in which the
unit is turning on and check the configuration on the server, as well as to pictures.
Tick the upload picture checkbox if uploading is required at this particular time. If you do not do it, the unit only checks
the website and applies configuration update if available. Afterwards the unit goes to sleep again.
Warning: It is allowed to add maximal 64 records of powersave’s actualization time and shooting intervals together.

INTERNET CONNECTION
The unit has a built-in LTE and WIFI modem. You can select the preferred internet connection – LAN, LTE or WIFI. Unit
can be connected to LAN and WIFI or LTE simultaneously. Please, be aware that LTE or WIFI connection has a higher
priority than LAN connection, so pictures will be uploaded via WIFI or LTE connection even if the LAN is configured and a
cable is connected.
You can see the status of internet connections on the dashboard.
LAN
The unit supports both DHCP and a static IP address. Tick the DHCP checkbox for dynamic host IP configuration.
LTE
For LTE configuration, you need to know your APN and number from your GSM provider. Without this information, the
connection will not be successful. It is necessary to accept these changes by clicking on the Apply changes button.

• Access point name (APN) is the name of the gateway among GPRS, 3G or 4G mobile. Ask your GSM provider for
the correct APN. You can also find it on the internet (e.g. http://www.vysoo.com/apn.php).
• Number is the dial number. Mostly set to *99# or *99****1# if not, ask your GSM provider.
• User and password can be left blank, in most cases.
Warning: PIN protection of the SIM card must be turned off.
WIFI
For WIFI connection, it is necessary to know SSID and password of the wireless network. With SSID you can find the list of
the nearest WIFI sites through the scan button. Choose your network name and set its password.
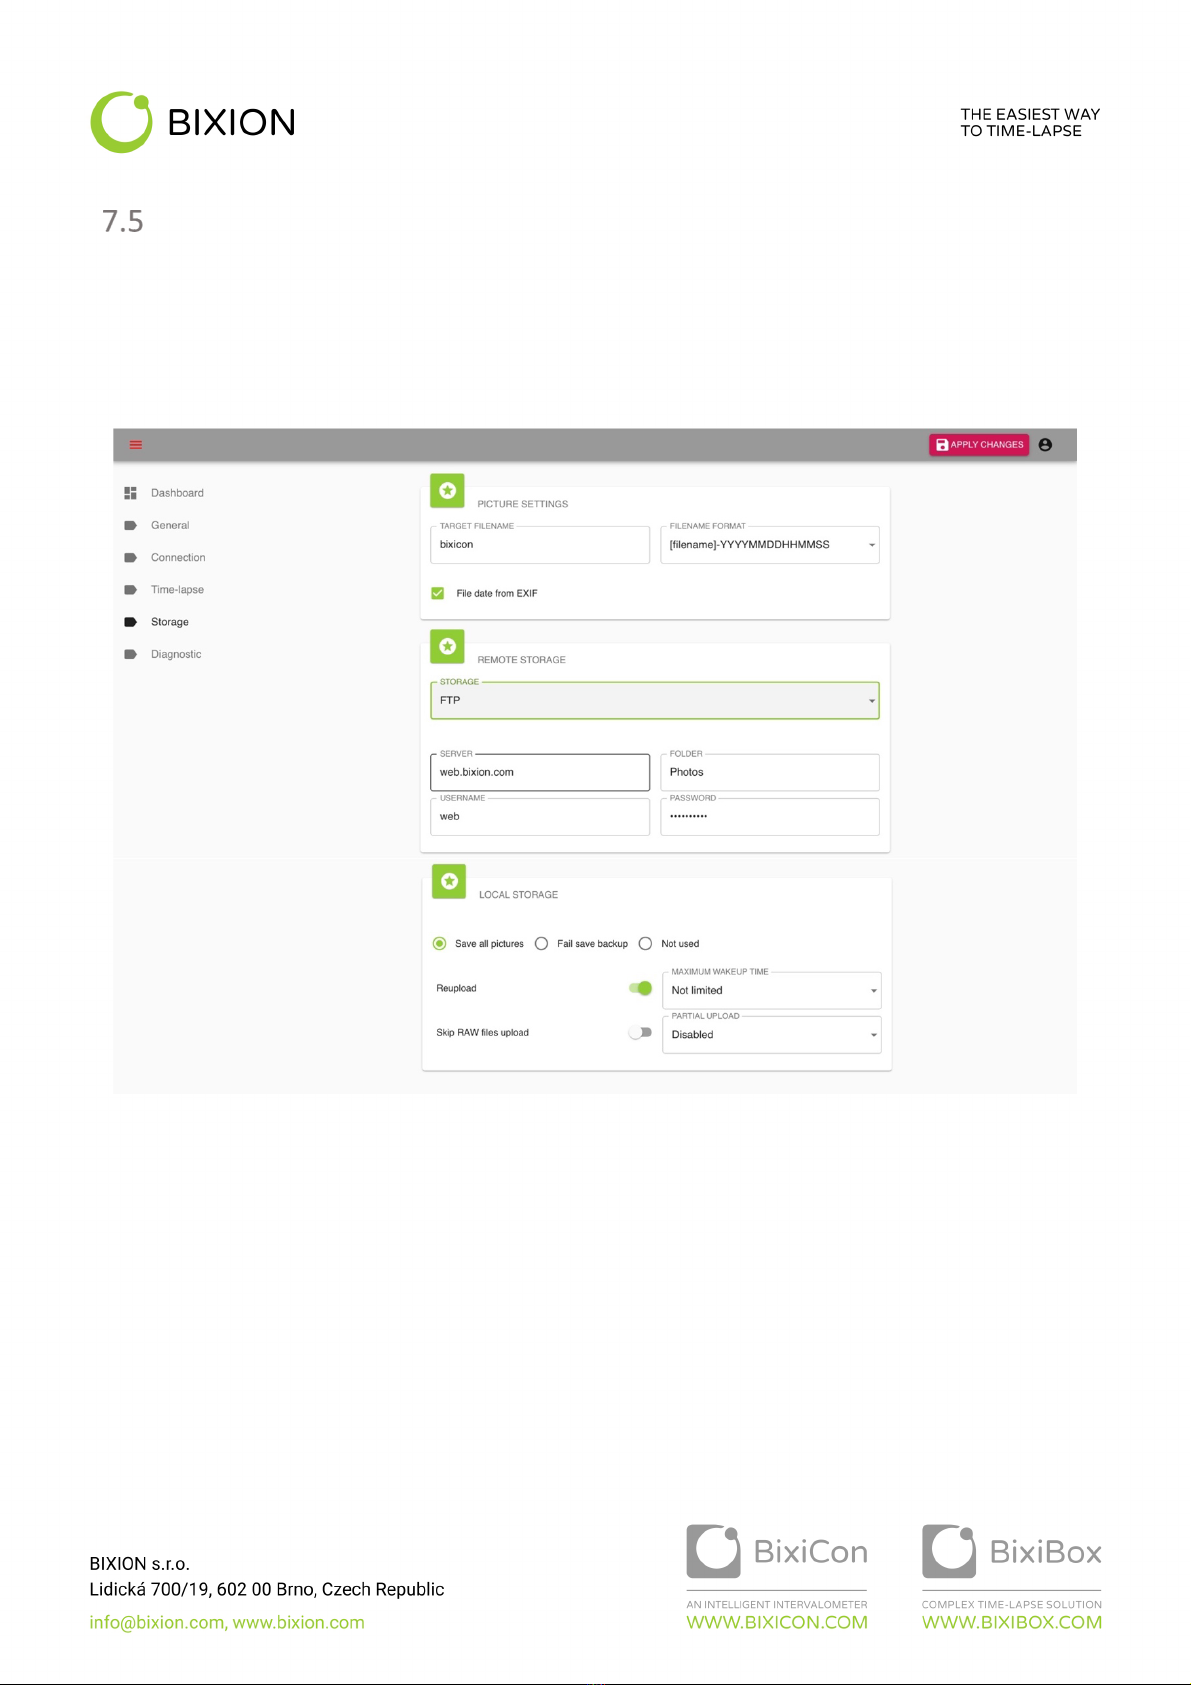
STORAGE
In the storage section, you can choose the way and place of storing your pictures. You can set the base name of the
picture, as well as the format. If you want to use the camera time (written in EXIF information of the pictures) check File
date from EXIF. Otherwise, the BixiCon unit is able to count the time of the picture automatically. The correct time is
counted from camera and unit time.
The taken pictures can be sent to one internet storage or saved to local storage. If you want to use the local storage, you
have to put an SD card to the unit or connect it to an SSD Disk via micro USB - USB OTG cable. On your SD card, you can
save all pictures or use it only as fail-save backup. The system support SD cards up to 128 GB.
Recommendation: It is recommended to use local storage to save all pictures instead of the camera SD card due to
possible communication problems with the camera in case there is a lot of saved pictures.
The pictures can also be uploaded to internet storage where you can easily work with them. The BixiCon unit offers four
options where the photos can be stored.
Warning: If you use format only with a [filename] one picture is still rewriting.

BIXION Drive
In order to use this storage, it is required to order BIXION cloud service. Everything comes together with Time-lapse
browser. Contact us for more information.
FTP
Configuration of the FTP storage is easy. Just enter the URL of your FTP server, the folder where you want to upload
pictures and credentials. That’s it.

Google Drive
To set Google drive storage, you have to admin access.
• On the unit choose Google Drive storage.
• Click on the Link Account button.
• Click on the “here” link. The Google account page will be open.
• Login to your google account.
• Now you can see that BixiCon unit wants to access to your Google Account. Please check See, edit, … option to
allow BixiCon unit creates folders and files under your Google Drive and click to Continue.
• Copy the code and put it to authorization code field on the BixiCon unit. Click on Next.
• Fill in the folder name in the BixiCon unit. The folder will be created automatically on your Google Drive before
any pictures is uploaded.
• Click Apply Changes on the BixiCon unit

Dropbox
• On the BixiCon unit, set Dropbox as your storage
• Click on the Link Account button and follow instruction
o Click to the link to redirect to Dropbox. Click on Allow and copy the key to the BixiCon unit
Authorization code, then click to next.
• Your unit is now connected to Dropbox.
• Save and reboot the unit.
• Pictures are uploaded to your Dropbox folder: Apps/BixiCon uploader/Your_folder_name

8 TIME-LAPSE INTERVALS
The time-lapse intervals can be set easily through a simple form where you can choose the interval, period and days on
which this interval is active. It is possible to set additional params to intervals like rush interval and choose if the interval
will be uploaded or not.
To add a new interval, click on the plus button. Then the dialog window for entering interval parameters will be
displayed. If you want to edit an interval that already exists, just click on it.
Recommendation: It is strongly recommended to use intervals shorter than 60 seconds with the unit in a powersave
mode. Or at least verify that the camera is able to shoot at these intervals in normal mode.
Warning: It is allowed to add maximal 64 records of powersave’s actualization time and shooting intervals together.

9 CAMERA SETTINGS
The unit supports two types of camera triggers – shutter release cable and USB. The USB trigger is available in normal
operational mode only. To connect shutter release, it is necessary to have an appropriate cable.
If the Keep images checkbox is ticked, pictures are stored on the camera’s SD card. Otherwise, the pictures get deleted
immediately after being downloaded from the camera.
Recommendation: It is recommended to save photos only on the unit’s local storage. A large number of pictures saved
on the camera’s SD card can causes problems with communication between the camera and the unit.
Recommendation: It is strongly recommended to use SSD disk or USB stick as a local storage than common SD card. The
common SD cards could have limited service life.
The Powered from unit option can be used if the camera is powered straight from the unit’s power source. If the camera
is frozen or blocked and does not communicate at all, the unit can restart the camera and then it tries to detect it again.
The unit also offers the possibility to change some of the camera’s properties.
Clicking on the Load camera parameters button reloads the camera’s properties. If it is changeable, a list of choices will
appear as well. The Save camera parameters button applies the settings to the camera. The result can be immediately
shown if you do a shot test and download the picture.
Warning: The parameters can be deleted when the camera is turned off.

10 DIAGNOSTIC
On the Diagnostics tab, there are also tests related to the current configuration of the unit. Here, it is possible to check
the internet connection, access to FTP, storage etc. If any test fails, click the REPORT button and you can get more
information on the reason why the test was not successful.
Table of contents


