BLACK DECKER BDXPA0004 User manual

1
INSTRUCTION MANUAL
CATALOG NUMBERS
Thank you for choosing BLACK+DECKER!
PLEASE READ BEFORE RETURNING THIS PRODUCT FOR ANY REASON.
If you have a question or experience a problem with your BLACK+DECKER
purchase, go to http://www.blackanddeckerelectrical.com
If you can’t find the answer or do not have access to the Internet, call
1-844-746-6688 from 9 a.m. to 5 p.m. EST Mon.-Fri. to speak with an agent.
Please have the catalog number available when you call.
BDXPA0004
SSAVE THI MANUAL FOR FUTURE REFERENCE.
Indoor Wireless Remote Control Outlets
ON OFF
ON OFF
OFF
OFFON
ON
4H 1H
3H 2H
-1-
-2-
-3-
-4-

2
ENGLISH
English (original instructions) 3
Español (traducido de las instrucciones originales) 8

3
Important Safety Guideline
SAVE THESE INSTRUCTIONS FOR FUTURE REFERENCE.
Definitions: Safety Alert Symbols and Words
This instruction manual uses the following safety alert symbols and words to alert you to
hazardous situations and your risk of personal injury or property damage.
DANGER: Indicates an imminently hazardous situation which, if not avoided, will
result in death or serious injury.
WARNING: Indicates a potentially hazardous situation which, if not avoided, could
result in death or serious injury.
CAUTION: Indicates a potentially hazardous situation which, if not avoided, may
result in minor or moderate injury.
(Used without word) Indicates a safety related message.
NOTICE: Indicates a practice not related to personal injury which, if not avoided, may
result in property damage.
WARNING: PLEASE READ THIS INSTRUCTION MANUAL THOROUGHLY AND
COMPLETELY BEFORE INSTALLATION & USE. FAILURE TO DO SO COULD
CAUSE DAMAGE TO PROPERTY, SERIOUS INJURY OR DEATH, AND VOID YOUR
WARRANTY.
For California residents
/
Pour les résidents de la Californie
/
Para residentes en California
WARNING:Cancerand ReproductiveHarm -
www.P65Warnings.ca.gov.
AVERTISSEMENT: Cancer et Troubles de l'appareil reproducteur -
www.P65Warnings.ca.gov.
ADVERTENCIA:Cáncer y Daño Reproductivo-
www.P65Warnings.ca.gov.
s

4
Indoor Wireless Remote Control Outlets
1
2
2. Plug the receiver into a standard AC electrical wall
socket. Plug the appliance into the receiver outlet.
OFFON
4H 1H
3H 2H
-1-
-2-
-3-
-4-
OFFON
OFFON
OFFON
3
3.
Before using the outlet with remote control, please pair
as follows:
A.
Plug the outlet into the wall socket. When the
receiver indicator light begins flashing, press any ON
or OFF button to pair the outlet to a corresponding
number on the remote control.
B.
When first using and pairing outlets to the remote
control, please plug-in and pair one outlet at a time.
If successfully paired, but you wish to unpair and tie the outlet to another button on the remote,
long-press the receiver button on the left side of the outlet [shown in figure under step 3] until
the indicator light starts flashing [approximately 4 seconds]. You may then press any new ON
or OFF button on the remote control. When the new pairing is successful, the indicator light on
the outlet will stop flashing.
C.
1.
Step A: Locate the battery compartment on the back of
the remote. Push down and away to slide the
compartment cover off.
Step B: Remove the plastic battery tab from the battery
compartment in the back of the remote control to
activate the pre-installed battery.
Step C:
Slide the compartment cover on the remote and
click securely into place. Your remote is now
ready to use.
WARNING:
Danger of explosion if battery is incorrectly replaced. When replacing battery,
replace it with the same or equivalent type CR2032. Observe correct polarity (+ and –) when
replacing batteries. Do not store or carry batteries so that metal objects can contact exposed
battery terminals.
DANGER:
DO NOT INGEST BATTERY; CHEMICAL BURN HAZARD. This product contains
a coin/button cell battery. If the coin/button cell battery is swallowed, it can cause severe internal
burns in just 2 hours and can lead to death.
Keep new and used batteries away from children. If the battery compartment does not close
securely, stop using the product and keep it away from children.
If you think batteries might have been swallowed or placed inside any part of the body, seek
immediate medical attention.
Please do not plug anything in receiver that should not be left unattended.
WARNING:
Note: Regardless of whether the light is ON or OFF, when random mode is selected the light
will turn OFF.

5
4.
OFFON
4H 1H
3H 2H
-1-
-2-
-3-
-4-
OFFON
OFFON
OFFON
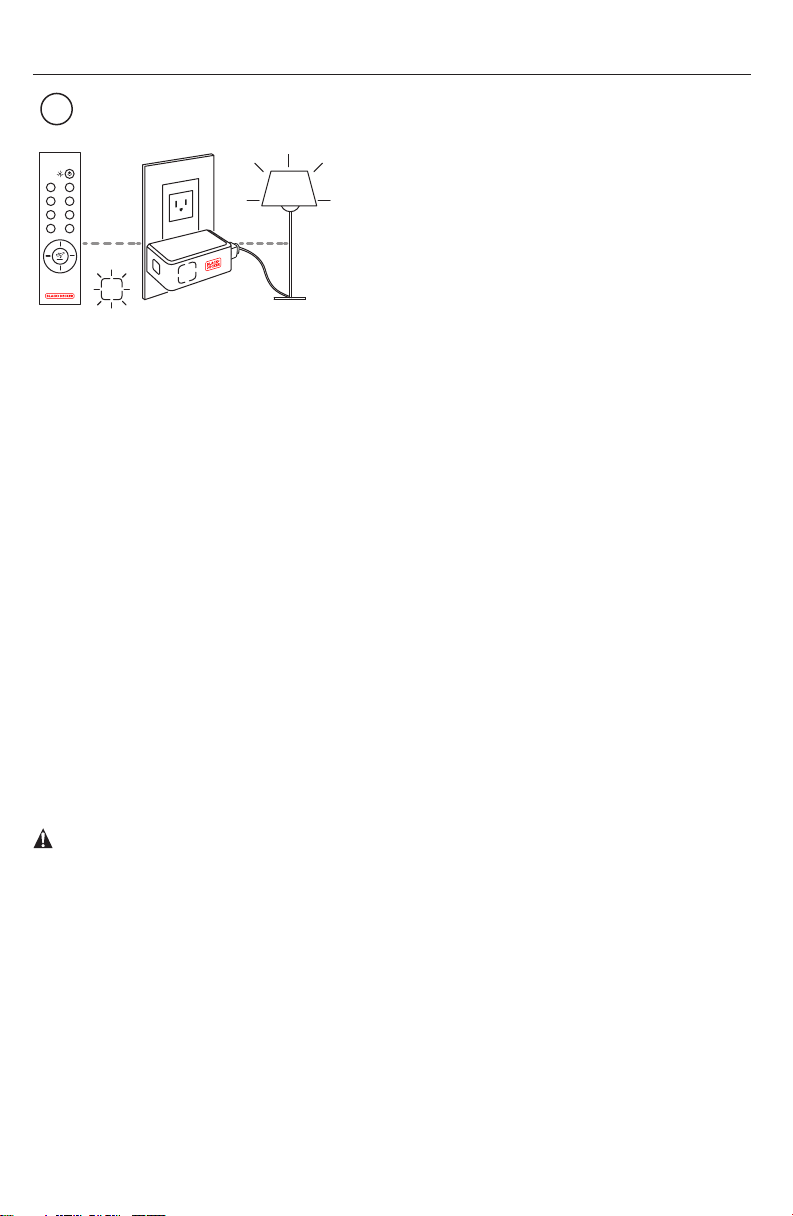
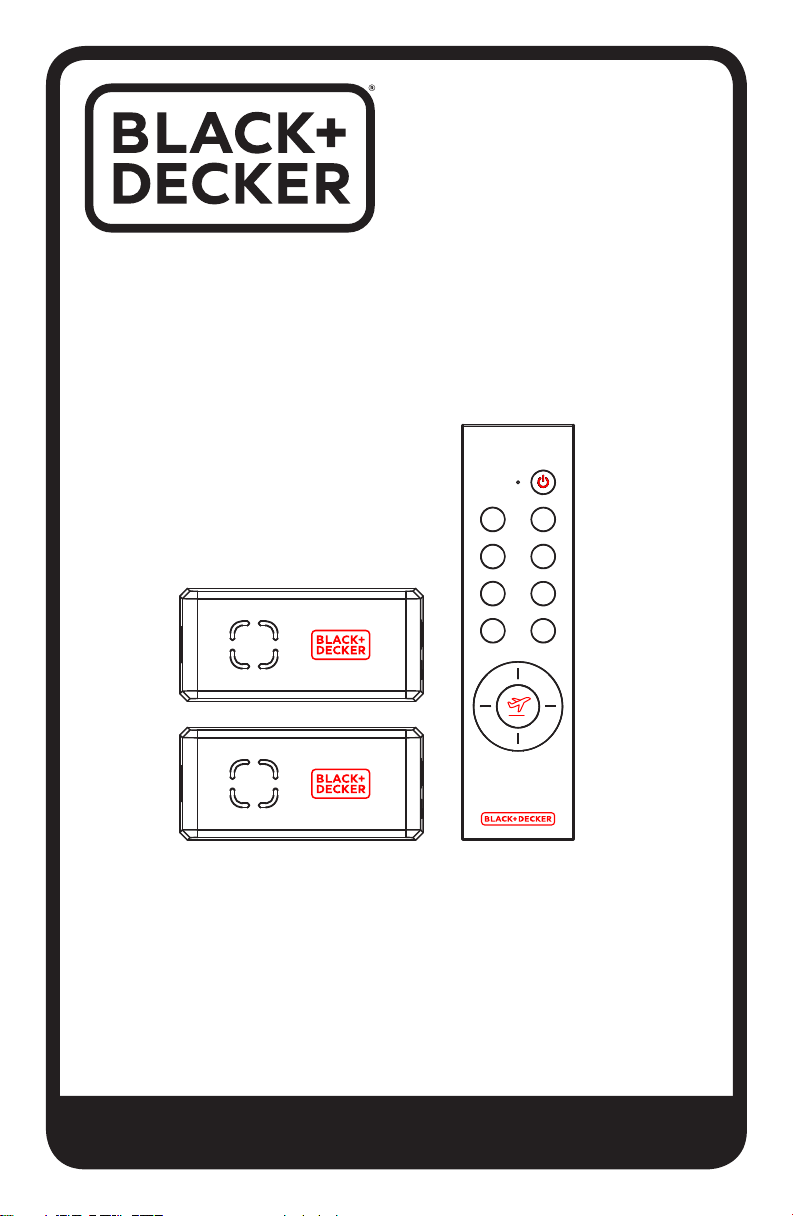
To turn all outlets ON or OFF at the same time, press the
power button located at the top right corner of the remote.
To manually turn ON or OFF one outlet, press ON or
OFF
button on the remote control for numbers 1-4. To
utilize countdown timer mode, manually press 1H/2H/3H
or 4H. The light indicator will flash softly to indicate the
light is on
countdown timer mode and the chosen duration.
The remote
can control all receivers' countdown timer
mode together at the same time. To override countdown
timer mode, simply press the manual ON/OFF button
linked to the outlet. The countdown timer mode will only
shut down the connected device after the time selected
is up.
To utilize random mode, manually press the airplane logo button in the center of the remote.
The light indicator will flash softly and the outlet will turn ON randomly within 4-8 hours for 15 -
45 minutes each cycle. The remote can control all receivers' random mode together at the same
time. To override, simply press the manual ON/OFF button linked to the outlet.
4
Indoor Wireless Remote Control Outlets
Power input: 125V/60Hz
Power output: 1875W/15A (Max.)
Transmitter frequency: 433.92MHz
Remote transmitter battery: DC CR2032,
3V battery 1pc
Transmission range: up to 100ft
Specifications:
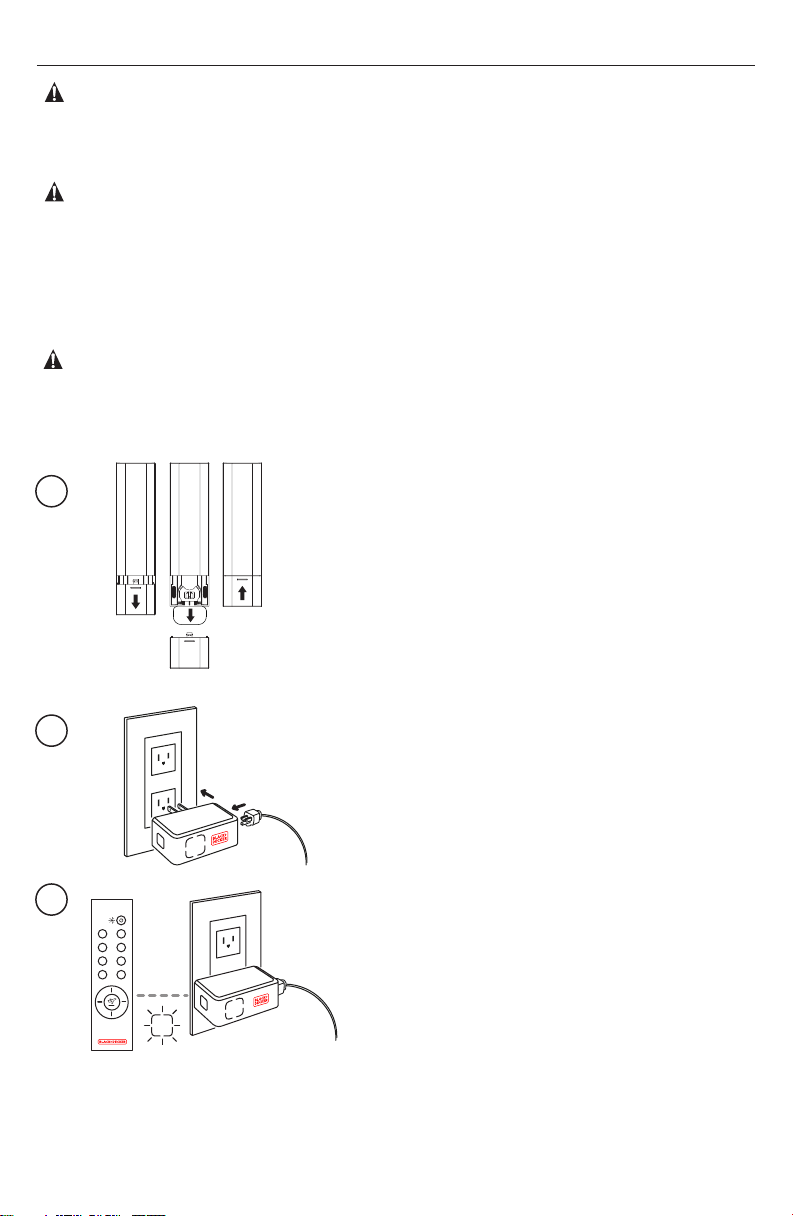
Remote Battery Replacement:
If operation of the receiver units becomes erratic, it may be necessary to replace the battery
in the hand-held remote unit. To do this, first remove the battery compartment cover. Press
the tray release button on the back of the remote. Next, remove the depleted battery and
discard according to local ordinances. Be sure to correctly install the new battery. Replace
battery compartment cover and test by using it to control the Indoor Remote Outlets.
1. Appliances to be connected to the remote control socket MUST NOT exceed the
voltage and current ratings as in “Specifications”.
2. Operation is subject to the following two conditions:
(1) this appliance may not cause harmful interference, (2) this appliance must accept
any interference received, including interference that may cause undesired operation.
3. Only for indoor use and storage.
4. Low transmitter battery may lower the distance between the transmitter and the receiver.
CAUTION:

6
Indoor Wireless Remote Control Outlets
In the event of malfunction or breakdown, grounding provides a path of least resistance for
electric current to reduce the risk of electric shock. The remote control outlet must be
connected to a cord having an equipment-grounding conductor and a grounding plug. The
plug must be plugged into an appropriate outlet that is properly installed and grounded in
accordance with all local codes and ordinances.
Improper connection of the equipment grounding conductor can result in a risk
of electric shock. The conductor with insulation having an outer surface that is green with or
without yellow stripes is the equipment grounding conductor. If repair or replacement of the
cord or plug is necessary, do not connect the equipment-grounding conductor to a live
terminal. Check with a qualified electrician or service person if the grounding instructions are
not completely understood, or if in doubt as to whether the remote control outlet is properly
grounded. Do not modify the plug connected to the remote control outlet – if it will not fit the
outlet, have a proper outlet installed by a qualified electrician.
FOR GROUNDED, CORD-CONNECTED REMOTE CONTROL OUTLET RATED LESS
THAN 15A AND INTENDED FOR USE ON A NOMINAL 125V SUPPLY CIRCUIT
The remote control outlet is for use on a nominal 125V circuit, and should be connected to a
grounding outlet that looks like that illustrated in sketch a. A temporary adaptor, which looks
like the adaptor illustrated in sketch b, may be used to connect this plug to a 2-pole recepta-
cle as shown in sketch b if a properly grounded outlet is not available. The temporary
adaptor should be used only until a properly grounded outlet can be installed by a qualified
electrician. The green colored rigid ear, lug, and the like, extending from the adaptor must be
connected to a permanent ground such as a properly grounded outlet box cover. Whenever
the adaptor is used, it must be held in place by the metal screw.
Grounding Instructions
DANGER
:
NOTE: IN CANADA, THE USE OF A TEMPORARY ADAPTOR IS NOT PERMITTED BY
THE CANADIAN ELECTRICAL CODE. Ensure that the remote control outlet is connected to
an outlet having the same configuration as the plug.

Indoor Wireless Remote Control Outlets
7
1 YEAR LIMITED WARRANTY
IMPORTANT: Proof of Purchase is required to obtain warranty service.
Paragon Group USA Inc. warrants to the original owner that our products will be free from
defect in workmanship and material for a period of ONE YEAR from the date of purchase.
Should any unit(s) prove to be defective during this period, Paragon Group USA Inc. will be
responsible for replacement of the defective unit(s) only. Paragon Group USA Inc. is not
responsible for labor charges or any incidental or consequential expenses.
Not Covered – Batteries are not covered by this warranty. Repair service, adjustment and
calibration due to misuse, abuse or negligence are not covered by this warranty. Unautho-
rized service or modification to this product or of any furnished components will void this
warranty in its entirety.
This warranty does not include reimbursement for inconvenience, installation, set-up time,
loss of use, postage, unauthorized service, or other products used in conjunction with
BLACK+DECKER
products.
Copyright 2021 Black&Decker
BLACK+DECKER and the BLACK+DECKER Logo are
trademarks of Stanley Black Decker, Inc. or
an affiliate thereof and are used under license.
Ph: 1-844-746-6688
www.blackanddeckerelectrical.com
E-mail: [email protected]
Imported by:
Paragon Group USA,
Englewood, NJ, 07631
USA
C

8
BDXPA0004
ENCENDER APAGAR
ENCENDER APAGAR
APAGAR
APAGARENCENDER
ENCENDER
4H 1H
3H 2H
-1-
-2-
-3-
-4-
MANUAL DE INSTRUCCIONES
NÚMEROS DE CATÁLOGO
¡Gracias por elegir BLACK+ DECKER!
LEA ANTES DE DEVOLVER ESTE PRODUCTO POR CUALQUIER RAZÓN.
Tomacorriente con control remoto
inalámbrico para interiores
CONSERVE ESTE MANUAL PARA REFERENCIA FUTURA.
Si tiene alguna pregunta o problema con su compra de BLACK+DECKER,
diríjase a http://www.blackanddeckerelectrical.com.
Si no puede encontrar la respuesta o no tiene acceso a internet, llame al
1-844-746-6688 de 9a.m. a 5p.m. (EST), de lunes a viernes para hablar con un agente.
Tenga a mano el número de catálogo cuando llame.

9
3
8
Español (traducido de las instrucciones originales)
English (original instructions)
ESPAÑOL

10
Definiciones: Símbolos y palabras de alerta de seguridad
For California residents/Pour les résidents de la Californie/Para residentes en California
WARNING:CancerandReproductiveHarm
www.P65Warnings.ca.gov.
AVERTISSEMENT: Cancer et Troubles de l'appareil reproducteur -
www.P65Warnings.ca.gov.
ADVERTENCIA:Cáncer y Daño Reproductivo
www.P65Warnings.ca.gov.
Este manual de instrucciones utiliza los siguientes símbolos y palabras de alerta de
seguridad para alertarlo de situaciones peligrosas y del riesgo de lesiones personales o
daño a la propiedad.
PELIGRO: Indica una situación peligrosa inminente que, si no se evita, resultará en la
muerte o en una lesión grave.
ADVERTENCIA: Indica una situación peligrosa potencial que, si no se evita, podría
resultar en la muerte o en una lesión grave.
PRECAUCIÓN: Indica una situación peligrosa potencial que, si no se evita, es posible
que resulte una lesión menor o moderada.
(Utilizado sin palabra) Indica un mensaje relacionado con la seguridad.
AVISO: Indica una práctica no relacionada con una lesión personal que, si no se evita,
es posible que resulte en daño a la propiedad.
ADVERTENCIA: LEA ESTE MANUAL DE INSTRUCCIONES MINUCIOSA Y COM-
PLETAMENTE ANTES DE LA INSTALACIÓN Y EL USO. EN CASO DE QUE NO LO
HAGA PODRÍA CAUSAR DAÑO A LA PROPIEDAD, LESIONES GRAVES O LA
MUERTE, Y DEJAR SIN EFECTO LA GARANTÍA.
CONSERVE ESTAS INSTRUCCIONES PARA REFERENCIA FUTURA.
Guía de seguridad importante

Nota: Independientemente de si la luz está ENCENDIDA o APAGADA, cuando se
seleccione el modo aleatorio, la luz se APAGARÁ.
Paso A: Ubique el compartimiento de la batería en la
parte posterior del control remoto. Presione
hacia abajo y hacia afuera para sacar la tapa
del compartimiento deslizándola.
Paso B:
Quite la pestaña de plástico del compartimiento
de la batería en la parte posterior del control
remoto para activar la batería que viene instalada.
Paso C:
Deslice la tapa del compartimiento del control
remoto hasta que haga “clic” en el lugar correcto.
Su control remoto está listo para ser usado.
3. Antes de utilizar el tomacorriente con control remoto,
emparéjelo de la siguiente forma:
A. Enchufe el tomacorriente a la toma de la pared Cuando la
luz indicadora del receptor comience a encenderse y
apagarse, presione el botón ON (encendido) u OFF
(apagado) para emparejar el tomacorriente con el número
correspondiente del control remoto.
B. Cuando utilice y empareje por primera vez los tomacorrien-
tes con el control remoto, enchufe y empareje uno a la vez.
Si lo emparejó de la forma correcta, pero desea desemparejar y unir el tomacorriente a otro botón
del control remoto, mantenga presionado el botón en el lado izquierdo del tomacorriente [vea la
figura debajo del paso 3] hasta que la luz indicadora comience a encenderse y apagarse [aproxi-
madamente 4 segundos]. Luego, puede presionar cualquier botón ON (encendido) u OFF
(apagado) nuevo en el control remoto. Cuando el nuevo emparejamiento resulta exitoso, la luz
indicadora en el tomacorriente dejará de encenderse y apagarse.
11
Tomacorrientes con control remoto inalámbrico para interiores
1
2
C.
1.
No enchufe nada que no pueda dejar sin supervisión en el receptor.
ADVERTENCIA:
2.
Enchufe el receptor en una toma eléctrica de
pared estándar de CA.
Enchufe el aparato en el tomacorriente del receptor.
PELIGRO:
NO INGIERA LA BATERÍA; PELIGRO DE QUEMADURA QUÍMICA. Este
producto contiene una batería tipo botón. Si se traga la batería tipo botón, puede causar
quemaduras internas graves en solo dos horas y esto puede llevar a la muerte.
Mantenga las baterías nuevas y las usadas fuera del alcance de los niños. Si el compar-
timiento de la batería no cierra de forma segura, deje de usar el producto y manténgalo fuera
del alcance de los niños.
Si cree que alguien podría haberse tragado las baterías o que podría haberlas puesto dentro
de alguna parte del cuerpo, busque atención médica de inmediato.
ADVERTENCIA:
Peligro de explosión si se pone mal la batería. Cuando cambie la
batería, reemplácela con el mismo tipo o un tipo equivalente a CR2032. Observe que la
polaridad (+ y –) sea la correcta cuando la cambie. No guarde o traslade las baterías de
manera que los objetos metálicos puedan entran en contacto con las terminales expuestas
de dicha batería.
OFFON
4H 1H
3H 2H
-1-
-2-
-3-
-4-
OFFON
OFFON
OFFON
3

Para ENCENDER o APAGAR todos los tomacorrientes al
mismo tiempo, presione el botón de encendido ubicado en
la esquina superior derecha del control remoto. Para
ENCENDER o APAGAR de forma manual un tomacorri-
ente, presione el botón ENCENDER u APAGAR del
control remoto para los números del 1 al 4. Para utilizar el
modo de temporizador con cuenta regresiva, presione de
forma manual 1H /2H /3H o 4H . La luz indicadora se
prenderá y apagará suavemente para indicar que está en
modo de temporizador con cuenta regresiva en la
duración elegida. El control remoto puede controlar el
modo de temporizador con cuenta regresiva de todos los
receptores juntos al mismo tiempo.
12
4.
Tomacorrientes con control remoto inalámbrico para interiores
Alimentación de corriente eléctrica: 125 V/60 Hz
Salida de corriente eléctrica: 1875W/15A (Máx.)
Frecuencia del transmisor: 433.92 MHz
Batería del transmisor con control remoto:
Una batería DC CR2032, 3 V
Rango de transmisión: hasta 100 ft (30 m)
Especificaciones:
Reemplazo De La Batería Del Control Remoto:
2. Su funcionamiento está sujeto a las siguientes dos condiciones:
3. Únicamente para uso y almacenamiento en interiores.
4. Si el transmisor tiene poca batería, puede disminuir la distancia entre el transmisor y
el receptor.
PRECAUCIÓN:
Para anular el modo de temporizador con cuenta regresiva, simplemente presione el botón ENCEND-
ER/APAGAR manual vinculado con el tomacorriente. El modo de temporizador con cuenta regresiva
únicamente apagará el dispositivo conectado después de que pase el tiempo seleccionado.
Para utilizar el modo aleatorio, presione de forma manual el botón con el logo de avión en el
centro del control remoto. La luz indicadora se encenderá y apagará suavemente, y el tomacor-
riente se ENCENDERÁ de manera aleatoria entre 4 y 8 h para ciclos de entre 15 y 45 min cada
uno. El control remoto puede controlar el modo aleatorio de todos los receptores juntos al
mismo tiempo. Para anularlo, simplemente presione el botón ON/OFF (encendido/apagado)
manual vinculado con el tomacorriente.
Si falla el funcionamiento de las unidades receptoras, es posible que tenga que reempla-
zar la batería de la unidad portátil del control remoto. Para hacer esto, primero quite la
tapa del compartimiento de la batería. Presione el botón para liberar la bandeja de la
parte posterior del control remoto. Luego, quite la batería agotada y deséchela conforme
a las normas locales. Asegúrese de instalar la batería nueva de forma correcta. Vuelva a
poner la tapa del compartimiento de la pila y pruébelo usándolo para controlar los
tomacorrientes con control remoto para interiores.
1. Los aparatos que se vayan a conectar a la toma del control remoto NO DEBEN
exceder las clasificaciones de voltaje y corriente mencionados en “Especificaciones”.
(1) Este aparato no puede causar interferencia dañina; y (2) este aparato debe aceptar
cualquier interferencia recibida, lo que incluye interferencia que puede causar un funcio-
namiento indeseado.
OFFON
4H 1H
3H 2H
-1-
-2-
-3-
-4-
OFFON
OFFON
OFFON
4

13
Tomacorrientes con control remoto inalámbrico para interiores
En caso de mal funcionamiento o avería, la toma a tierra brinda un camino de menor
resistencia para la corriente eléctrica para reducir el riesgo de descarga eléctrica. El
tomacorriente con control remoto debe estar conectado a un cable que tenga un equipo
conductor y un enchufe con conexión a tierra. El enchufe debe estar conectado a un
tomacorriente adecuado, que esté instalado de manera correcta y que tenga conexión a
tierra conforme a los códigos y normas locales.
La conexión incorrecta del conductor de conexión a tierra del equipo puede
generar riesgo de descarga eléctrica. El conductor aislado que tiene una superficie externa
color verde con o sin rayas amarillas es el conductor de conexión a tierra del equipo. Si es
necesario reemplazar o reparar el cable o el enchufe, no conecte el conductor de conexión a
tierra del equipo a una terminal en vivo. Si no comprende completamente las instrucciones
de conexión a tierra o si tiene dudas acerca de que el tomacorriente con control remoto tiene
la conexión a tierra correcta, verifíquelo con un electricista o una persona de reparación. No
modifique el enchufe que está conectado al tomacorriente con control remoto. Si no entra en
el tomacorriente, haga que un electricista calificado instale un tomacorriente adecuado.
PARA TOMACORRIENTE CON CONTROL REMOTO CON CABLE CALIFICADO EN
MENOS DE 15 A Y QUE ESTÁ DESTINADO AL USO EN UN CIRCUITO DE
ALIMENTACIÓN NOMINAL DE 125 V.
El tomacorriente con control remoto es para el uso en un circuito de voltaje nominal de 125
V y debe conectarse a un tomacorriente de conexión a tierra que luce como la imagen
ilustrada a. Se puede utilizar un adaptador temporal, que luce como el adaptador que se
muestra en la imagen ilustrada b para conectar dicho enchufe a un receptáculo bipolar, tal
como se muestra en la imagen b, en caso de que el tomacorriente con conexión a tierra
adecuado no esté disponible. El adaptador temporal solo debe utilizarse hasta que un
electricista calificado instale un tomacorriente con conexión a tierra adecuado. La pestaña,
la oreja o el elemento parecido de color verde que se extiende desde el adaptador debe
estar conectado a tierra de forma permanente, como, por ejemplo, a la tapa de la caja del
tomacorriente conectado a tierra de forma correcta. Siempre que se utilice el adaptador,
debe fijarse en su lugar mediante un tornillo de metal.
Instrucciones de conexión a tierra
NOTA: EN CANADÁ, CONFORME AL CÓDIGO ELÉCTRICO DE CANADÁ NO SE
PERMITE EL USO DE UN ADAPTADOR TEMPORAL. Asegúrese de que el tomacorriente
con control remoto esté conectado a un tomacorriente que tenga la misma configuración
que el enchufe.
PELIGRO:
CLAVIJA DE CONEXIÓN
A TIERRA
CAJA DE
TOMACORRIENTE
CON CONEXIÓN
A TIERRA
ADAPTADOR

Tomacorrientes con control remoto inalámbrico para interiores
14
GARANTÍA LIMITADA DE UN AÑO
IMPORTANTE:
Se requiere el comprobante de venta para obtener el servicio de garantía.
Paragon Group USA Inc. garantiza al dueño original que nuestros productos no tendrán
defectos de mano de obra ni en los materiales durante un período de UN AÑO desde la
fecha de compra.
Si cualquier unidad resulta defectuosa durante este período, Paragon Group USA Inc. será
responsable únicamente del reemplazo de la unidad defectuosa. Paragon Group USA Inc.
no se hace responsable por los costos de los beneficios laborales o gastos incidentales o
consecuentes.
Sin cobertura: Esta garantía no cubre las baterías. Esta garantía no cubre los servicios de
reparación, ajuste y calibración debido al mal uso, al abuso o a la negligencia. La reparación
o modificación no autorizada de este producto o de cualquier componente suministrado
dejará completamente sin efecto esta garantía.
Esta garantía no incluye reembolso por inconvenientes, instalación, tiempo de armado,
pérdida de uso, envío, reparación no autorizada u otros productos utilizados junto con los
productos
BLACK+DECKER.
Todos los derechos reservados a Black & Decker, 2021©
BLACK+DECKER y el logotipo de BLACK+DECKER son
marcas registradas de Stanley Black Decker, Inc. o
una filial de dicha empresa, y se utilizan con licencia.
Tel.: 1-844-746-6688
www.blackanddeckerelectrical.com
Importado por:
Paragon Group USA,
Englewood, NJ, 07631
EE. UU.
Table of contents
Languages:
Other BLACK DECKER Remote Control manuals
Popular Remote Control manuals by other brands

Directed Electronics
Directed Electronics Avital 5303 Owner's Guide Addendum

Apex Digital
Apex Digital RCU-200 operating manual

Chamberlain
Chamberlain Security+ 953CB owner's manual

SmartLine
SmartLine Dekora quick start guide

Innovator
Innovator TS6 instruction manual

Hitachi
Hitachi PC-ARFP1E instruction manual