Black Horse BH-08D User manual

- 1 -
Black Horse -Car Black Box
Dual Cameras with 1080P
USER’S Manual

- 2 -
Preface:
Thank you for purchasing the FHD Digital Car driving recorder. This product is based
on maintaining the original appearance of the original car, and hard evidence for
today's traffic accident specially developed a fashion, beautiful, convenient and
durable multi-vehicle driving recorder, can record your life lit by lit and it s the best
choice for escort for your trip.
Product Overview:
The product is a FHD Digital Car driving recorder, It could record high resolution
video 360 degree with dual front and back lens and with multi-function of
G-sensor,SOS,ADAS safety aids,audio storage,videomAV output etc. Compared with
the traditional video, the product is exclusive design, elegant appearance, does not
affect the overall appearance, humanized design concept allows you to enjoy the
noble class treatment!
Warm prompt:
●This user manual will detail how to use, operation, technical specifications and
precautions. Before use, please read this manual thoroughly and fully understand,
Please keep this manual, we hope our products can meet your needs and long-term
service to you!
Using this product, enjoying the real high quality life.
●This manual in the prinng process, the machine because of the appearance,
software or hardware repair process leads to the same part of the manual operation
of non-conformance, the Company has maintained the final interpretation!
●Do not put the machine into the damp working condition, this machine have no
waterproof function, so please make the machine no pour water or exposed to rain
water.
●Do not try open the shell or try repair by yourself, if the accessories for this
machine have any problem, please do to the professional maintenance station to
repair.
●Do not use the thrill chemical substance, clean solvent or cleaner to clean this
machine, please use the moist soft cloth to clean.
●Do not use this machine under the condion that the dust and density is too large,
to avoid affecting the video.
●Please care the environment, don t discard this machine randomly; do not throw
this machine into fire, otherwise will have an explosion.
●Please pay aenon to clean the lens surface, use the moist soft cloth clean the
lens then use, to avoid the video is not so good.

- 3 -
Content
A) Structure
B) Instruction of buttons and ports
C) Instruction of start-up
D) Instruction of Basic operations(Record/Photography/Playback)
E) Instruction of menu setting
F) Specification
G) FAQ

- 4 -
A) Structure
1)AV-OUT 2)
AV IN(Back len interface)
3)Holder Connector 4)
Car char er interface
5)AV-OUT /USB port 6)Power
7)OK 8)MENU
9)Up 10)Down
11) MODE 12)Indicator
13)SPEAKER 14)MIC
15)Reset 16)TF Slot
17)Len
AV IN(Back len interface)
Car char er interface

- 5 -
B) Instrcution of buttons and ports
B u t t o n N a m e
Button Function Instruction for Use
Power Power on/off 1.Power on
:
Short press to turn on and the red indication lamp light.
2. Power off
:
Long press to turn off and the red indication lamp out.
Reset Reset 1.short press to turn on again when the machine stand y
OK
Confirmation
Video
start/stop/photograph
function
Menu confirmation
1
:
In the video mode
:
short press to start record, short press again
to stop record
2
:
In the photograph mode
:
short press to confirm make photo
3
:
In the menu mode
:
set and confirm
Menu
Photograph/record/
play ack, all functions
setting
1. In the video mode: short press once to switch video setting; short
press twice to switch system setting.
2. In the photograph mode: short press once to switch photograph
setting; short press twice to switch system setting;
3.In the video/photo play ack mode: short press once to switch
play ack setting; short press twice to switch system setting;
Up
Choose up
Turn on/off the audio
recording function
1. In the menu mode
:
Up
2. In the video mode
:
short press to turn on/off the audio recording
Down Choose down 1. In the menu mode
:
Down
Mode
Switch among
photograph/
record/play ack
1.In the video mode: Switch among photograph/ record/play ack.
2.Screenshot
:
In the video mode, short press mode utton could
screenshot the current figure.
SOS
Emergency
Button
Press to lock the file 1. Press to lock the file when under the video status.
TF Card Slot TF Card Slot 1
;
Insert the TF Card into this Slot
HDMI
Interface High definition output
1.Sonnect the HD television y HDMI ca le, in the video mode, view the
video/photos; in the photograph mode, make photos, view video and
photos.
AV Slot AV Output or GPS
Output
1.The AV slot can’t e acted as AV output if the machine e set with
GPS, only acted as GPS output.
2.The AV slot can’t e acted as GPS output if the machine e set without
GPS, only acted as AV output.
Holder
Interface Install holder 1.Install the holder on the machine
USB Output storage/charging 1
:
Connect USB ca le for auto recording, and view the video/photo.
2
:
Connect USB ca le for auto charging

- 6 -
C) Start-up Instruction
1.Charging:Charge by connecting the cigarette lighter
2.Auto power on/off:
After the car connect with the car power, this machine support auto video record when the
car startup, auto power off and save the video when the car shut down.
2.1: the car startup- cigarette lighter connect power- auto power on and video record.
2.2: the car shut down - cigarette lighter disconnect power- auto power off and save
the video.
(PS: The key for power on/off: 1. The car power connect the cigarette lighter; 2.the
car start on/shut down, the cigarette lighter must have the two actions of
electrify/outage)
Attention: very few cars the cigarette lighter have no outage after the car shut
down; if there is no two actions of electrify/outage, then the machine can t auto
power on/off, if such condition happened please consult 4 S shops or car beauty
shops for modify to solve the problem.
D) Instruction of Basic operations(Record/Photo raphy/Playback)
Video Mode:
Short press mode button to switch to video mode, there is a video recording icon shown on
the top left corner of the LC ; short press OK button to start recording, the red video
indication light start to flash, that is the VR is under recording.
Video process: Power on——enter video mode——short press OK button to
record——short press OK button again to stop recording.

- 7 -
Image Instruction
(1) Record Indication
(2)Record time
(3)GPS (Grey: Not connected, Red: Connect error or no GPS singal , White: OK)
(4) Audio Recording On/Off indication (White: On, Grey: Off)
(5) MIC On/Off (White: On, Grey: Off)
(6) Motion Detection On/off (White: On, Grey: Off)
(7) SD CARD (Grey: No TF card, Red: Card error, White: OK)
(8) Used in the model with Infrared Light
(9) Date and Time
Photography Mode:
Turn on into recording mode, when recording or standby ,Press Up button to
photography.
Video/Photo Playback
Turn on into recording mode, Press OK button to stop recording, then press Mode button to
Playback mode, he playback icon will be shown on the LC top left corner.
1.Short press up/down button to selecting the file section(locked section/ regular
file section);
2.Short press OK button to enter the playback section, then short press up/down
button to selecting the file, press OK button again to enter single file playback(press
OK button again to start playback the video)。
3.when video play, press UP/DOWN/MODE button to Pause, stop, fast forward, fast
rewind, on a file, the next file. Press OK button for action.
(Attention:Under the video status, press MODE button to screenshot the current
video; first stop recording, then press MODE button twice to switch the playback
mode)
Playback process: Power on——enter playback mode——press MODE button twice
to switch the playback mode——press up/down button to enter the section and
press OK button to choose——.
press OK button to enter single file playback(press OK button again to start playback
the video)。
- 8 -
E) Instruction of menu settin
(1)Menu Interface
Instruction Operation
[1]、Menu
[2]、Menu Name
[3]、Sub Menu
1、 MENU button into menu interface;
2、 Enter the MENU, then short press the MENU button to enter the
next MENU items ;
3、 UP DOWN to select sub menu;
4、 OK to enter;
5、 MODE to exit;
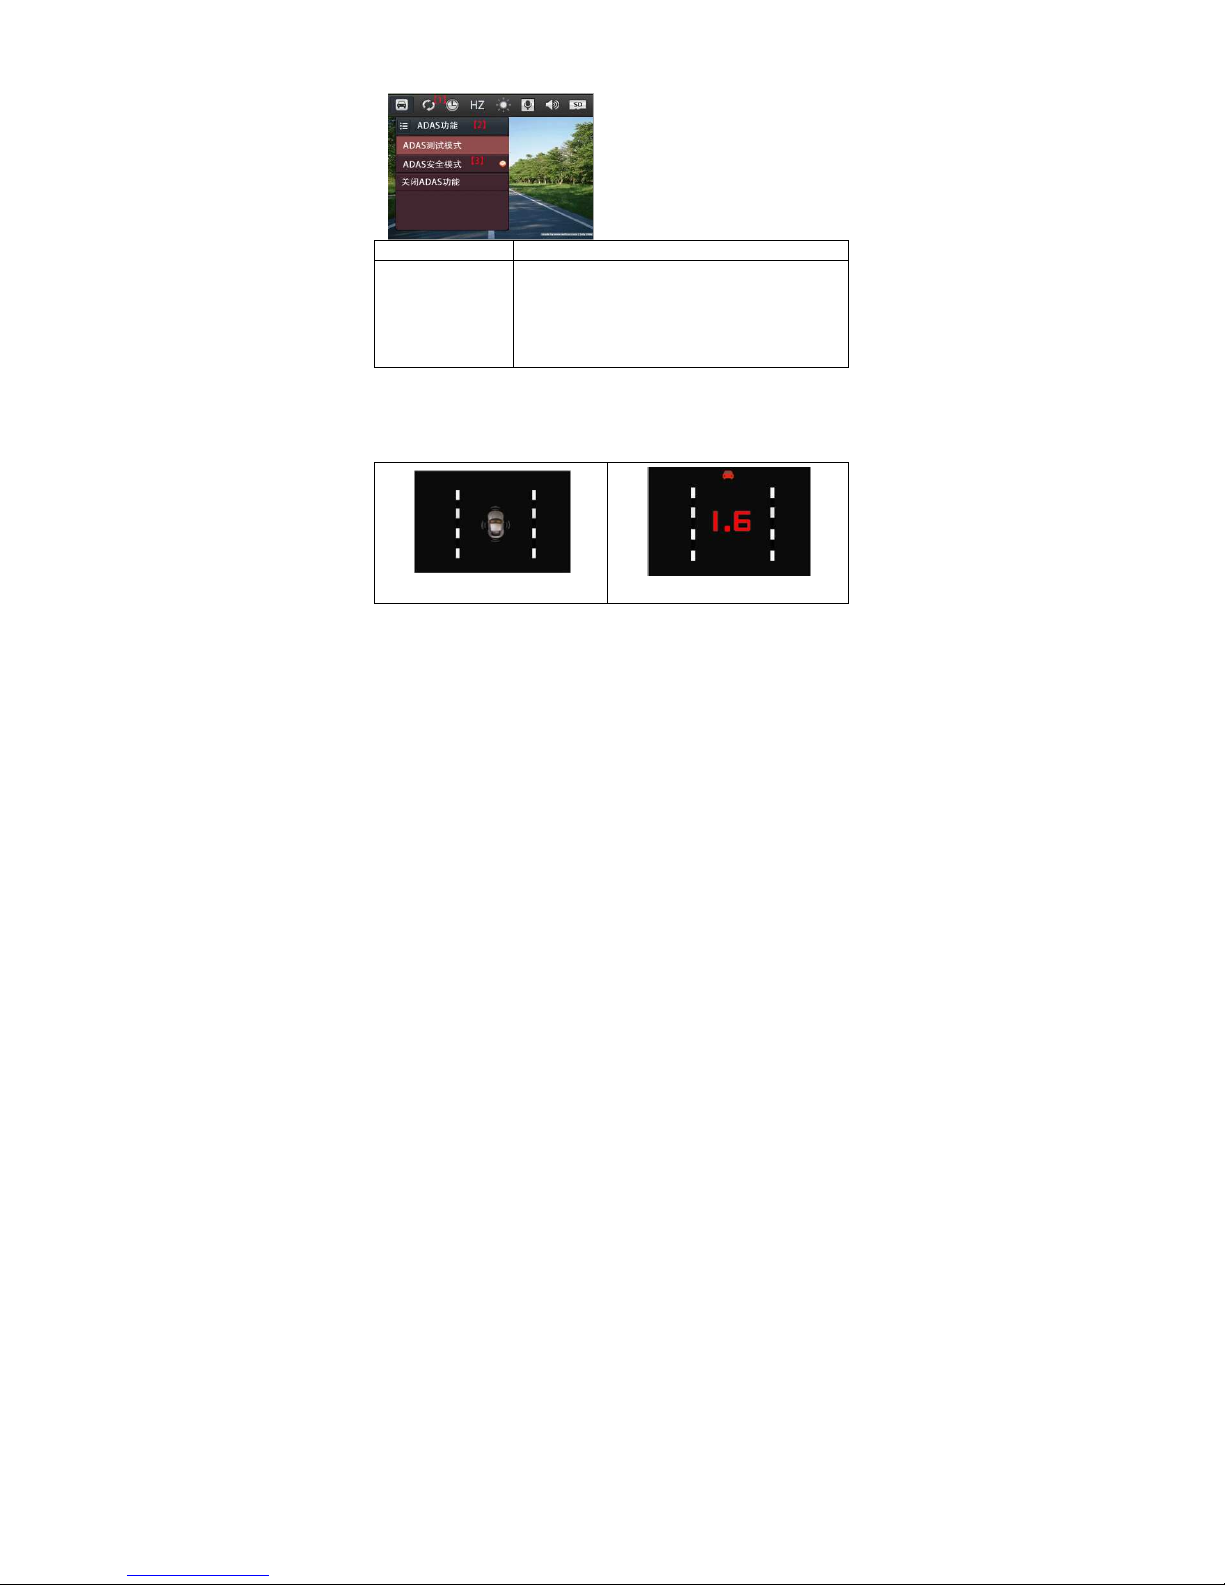
( )ADAS Safety Aids
When the speed reached more than 20 km/h and choose to enter the safe mode,
will start the ADAS warning function.Then when the vehicle is off track or when
there is a risk of collision with the front/rear vehicle (less than 2 seconds), will issue
a warning sound and screen prompts warning information.As pictures below:
[1]
[2]
(1) Safe Driving
(2) Safe Alert
(3) Playback Preview

- 9 -
Instruction Operation
[1]、Current Folder
[2]、Delete
[3]、File List
[4]、Current file/ Files in total
[5]、Choose folder list
1、
Up/Down to sele t file,Ok to Play,Mode to
return to preview
2、MENU-
>Folder Option Menu
Menu
(4) Video Playin
Instruction Operation
1、Play video(Last one, exit,
pause, next one)
2、Time and files of playing
3、Fast forward fast rewind play
speed of files
4、Current file/ Files in total
1、
Play up/down a video options, OK play video
options, MODE to stop play, ba k to the preview
MODE
2、MENU->sele t videos
(5) Photo View
Instru tion 操作:
[1].Current File/Files in total 1、
Up/Down Key to sele t file
2、
Mode to playba k mode
Up/Down to sele t file,Ok to Play,Mode to
>Folder Option Menu
->Delete
Play up/down a video options, OK play video
options, MODE to stop play, ba k to the preview
Up/Down Key to sele t file
Mode to playba k mode

- 10 -
F ) Menu Instruction
Record Mode
Menu Options Instruction
ADAS
1.
【
ADAS Test Mode
】
2.
【
ADAS Safe Mode
】
3.
【
ADAS OFF
】
1.Test mode will test traffic information on to the video file,
no alert
;
2
.
No operation into the safety monitoring model after 5
seconds, danger warning information, Press any key to
exit
。
3.OFF ADAS
ADAS Warning
Distancce
【
Far
】【
Middle
】【
Close
】
Select the warning distance
Video recording
time
【
1min
】【
3mins
】【
5mins
】
Select loop record of
the time of each singal video
Frequency
【
50HZ
】【
60HZ
】
If the voltage is 220 v in the country, the choice, 50 hz
【
voltage is 110 v, choose 60 hz
only effective efore the camera, rear view camera please
chose frequency selection switch to the corresponding
location).
Audio Recording
【
On
】【
Off
】
Set audio recording at the same time when the video
record .Screen displays the
corresponding [on] and [close]
position.
Format
.
【
Yes
】
Choose to enter format confirmation screen
1.Press confirm utton to enter the next option
2.Choose "confirm" to format,
all files will e deleted
3.Choose "cancel", exit not format
Volume
【
Low
】【
Middle
】【
High
】
【
Off
】
Set the volume
1.Test mode will test traffic information on to the video file,
No operation into the safety monitoring model after 5
seconds, danger warning information, Press any key to
the time of each singal video
If the voltage is 220 v in the country, the choice, 50 hz
】
voltage is 110 v, choose 60 hz
】
【
(note: this setting
only effective efore the camera, rear view camera please
chose frequency selection switch to the corresponding
Set audio recording at the same time when the video
corresponding [on] and [close]
Choose to enter format confirmation screen
:
1.Press confirm utton to enter the next option
:
all files will e deleted
。
3.Choose "cancel", exit not format

- 11 -
Time&Date
Choose after confirmation of time into the interface;
1. MODE utton to exit without saving;
2. The Menu utton to choose a;
3. The up/down utton to increase/decrease the selected
item
4. Again
under the Menu utton to choose a;OK utton to
save.
Language
【
English
】【 】
【
Simplified Chinese
】
【
Traditional Chinese
】
【
POCCNN
】
Select Language
。
Motion etection
【
On
】【
Off
】
Open after motion detecting, detect the moving o ject will
automatically record,
not record after the first 5 seconds
without moving odies.Icon into a motion detecting state.
G-Sensor
【
Low
】【
Middle
】【
High
】
In the video mode, if detect the intense shock or collision
triggered the G Sensor, trigger the image of 15 seconds
efore and af
ter images of 15 seconds, a total of 30
seconds will e saved, loop video will not cover this
video.Triggered after the video status to
Auto off screen
【
10s
】【
30s
】【
60s
】【
Off
】
Choose the time to off screen when no recording.When
safe mode started,off
screen function will e forced to off
Auto turn off
【
1min
】【
3mins
】【
5mins
】
【
off
】
Set no utton press for some time when no
recording,camera will automatically turn off.
Factory Setting
【
Implement
】
Choose to enter the default Settings
Choose
"implementation" the restore default Settings, the
system date, language, etc will e restored to the default.
G) Specification
Product Feature FullHD Recording
Choose after confirmation of time into the interface;
1. MODE utton to exit without saving;
3. The up/down utton to increase/decrease the selected
under the Menu utton to choose a;OK utton to
Open after motion detecting, detect the moving o ject will
not record after the first 5 seconds
without moving odies.Icon into a motion detecting state.
In the video mode, if detect the intense shock or collision
triggered the G Sensor, trigger the image of 15 seconds
ter images of 15 seconds, a total of 30
seconds will e saved, loop video will not cover this
video.Triggered after the video status to
。
Choose the time to off screen when no recording.When
screen function will e forced to off
Set no utton press for some time when no
recording,camera will automatically turn off.
Choose to enter the default Settings
screen.
"implementation" the restore default Settings, the
system date, language, etc will e restored to the default.

- 12 -
Dual Cams With front and back len
Angle 170°ultra wide angle
LCD Screen(size type resolution) 3.0"LCD 16:9 960x240
Video Size 1920x1080P
Video Format TS(H.264)
Video Frames TV Output 30fps,TV OUTPUT:PAL NTSC
Photo Size 2M
Photo Format JPG
MIC Speaker Built-in
Power Input DC Car Charger output 5V 2A
Language Simplified Chinese Traditional Chinese English Russin etc
GPS Support
LDWS FCWS LDWS+ FCWS+ADAS
Size 99x56x37mm
Indicator Blue light
Memory Card TFCard(Max support 64GB)
Built-in memory No
USB 1:storage 2.Connect AV
Power Interface 5V 2A
H) Frequently Asked Questions
Under normal operating conditions, if there is problems with the device, please
refer to the following methods to solve.
Cannot take picture and record
Please check whether there is enough space for of TF card, or if it is locked.

- 13 -
Stopping automatically while recording
Due to the huge amount of HD video data, please use high-speed C10 TF card with
SDHC compatible, there will be the mark of C10 on the TF card.
There is “wrong file” shown on LCD when replay the photo/video
Uncompleted files because of TF card storage error, please format your TF card.
Fuzzy image
please check if the lens stay with dirt, fingerprints, please cleaned lens with paper
before shooting.
Dark image when when shooting the scene of sky or water
There will have an impact on the exposure when the big difference between the
scene. Please adjust the “EV” in the menu setting.
The color is not good in the cloudy or indoor
Please check the “white balance” is Auto or not in the menu.
Horizontal stripes interference in the image,
This is due to the wrong setting of light frequency error, please set the frequency
60HZ or 50HZ according to the local power supply.
Hang off
Please reset to recover when device hangs off.


