BLADEZ Zephyr User manual

OWNER’S MANUAL
Zephyr
Important: Read all instructions carefully before using this product. Retain this owner’s manual for future reference.
BH North America | 620 N. 2nd Street, St. Charles, Missouri 63301 | p.636.487.0050| www.bhnorthamerica.com

TABLE OF CONTENTS
Title Page
Introduction 03
Labels and Warnings 04
Safety Information 05
Exercise Instruction 06
Training Guidelines 07
Suggested Stretches 11
Assembly Instructions 13
Maintenance and Cleaning 19
Exploded View Drawing 20
Parts List 22
Warranty 23

3
CONGRATULATIONS
Congratulations on your purchase of Bladez Fitness equipment. We hope you appreciate
the style, quality, and value that exercisers around the world have come to expect from
Bladez Fitness.
If you have any questions, concerns or product issues please call our Customer Service
Team at 1-866-325-2339 or email us at CustomerSupport@BHNorthAmerica.com.
Carefully read through the instructions contained in this manual. ey provide you
with important information about assembly, safety, tness and use of the machine.
Please read ALL the safety information contained on the following page.

4
WARNING LABELS

5
SAFETY INFORMATION
PRECAUTIONS
is equipment has been designed and constructed to provide maximum safety.
Nevertheless, certain precautions should be taken when using exercise equipment.
Read the whole manual before assembling and using the machine. Please observe the
following safety precautions:
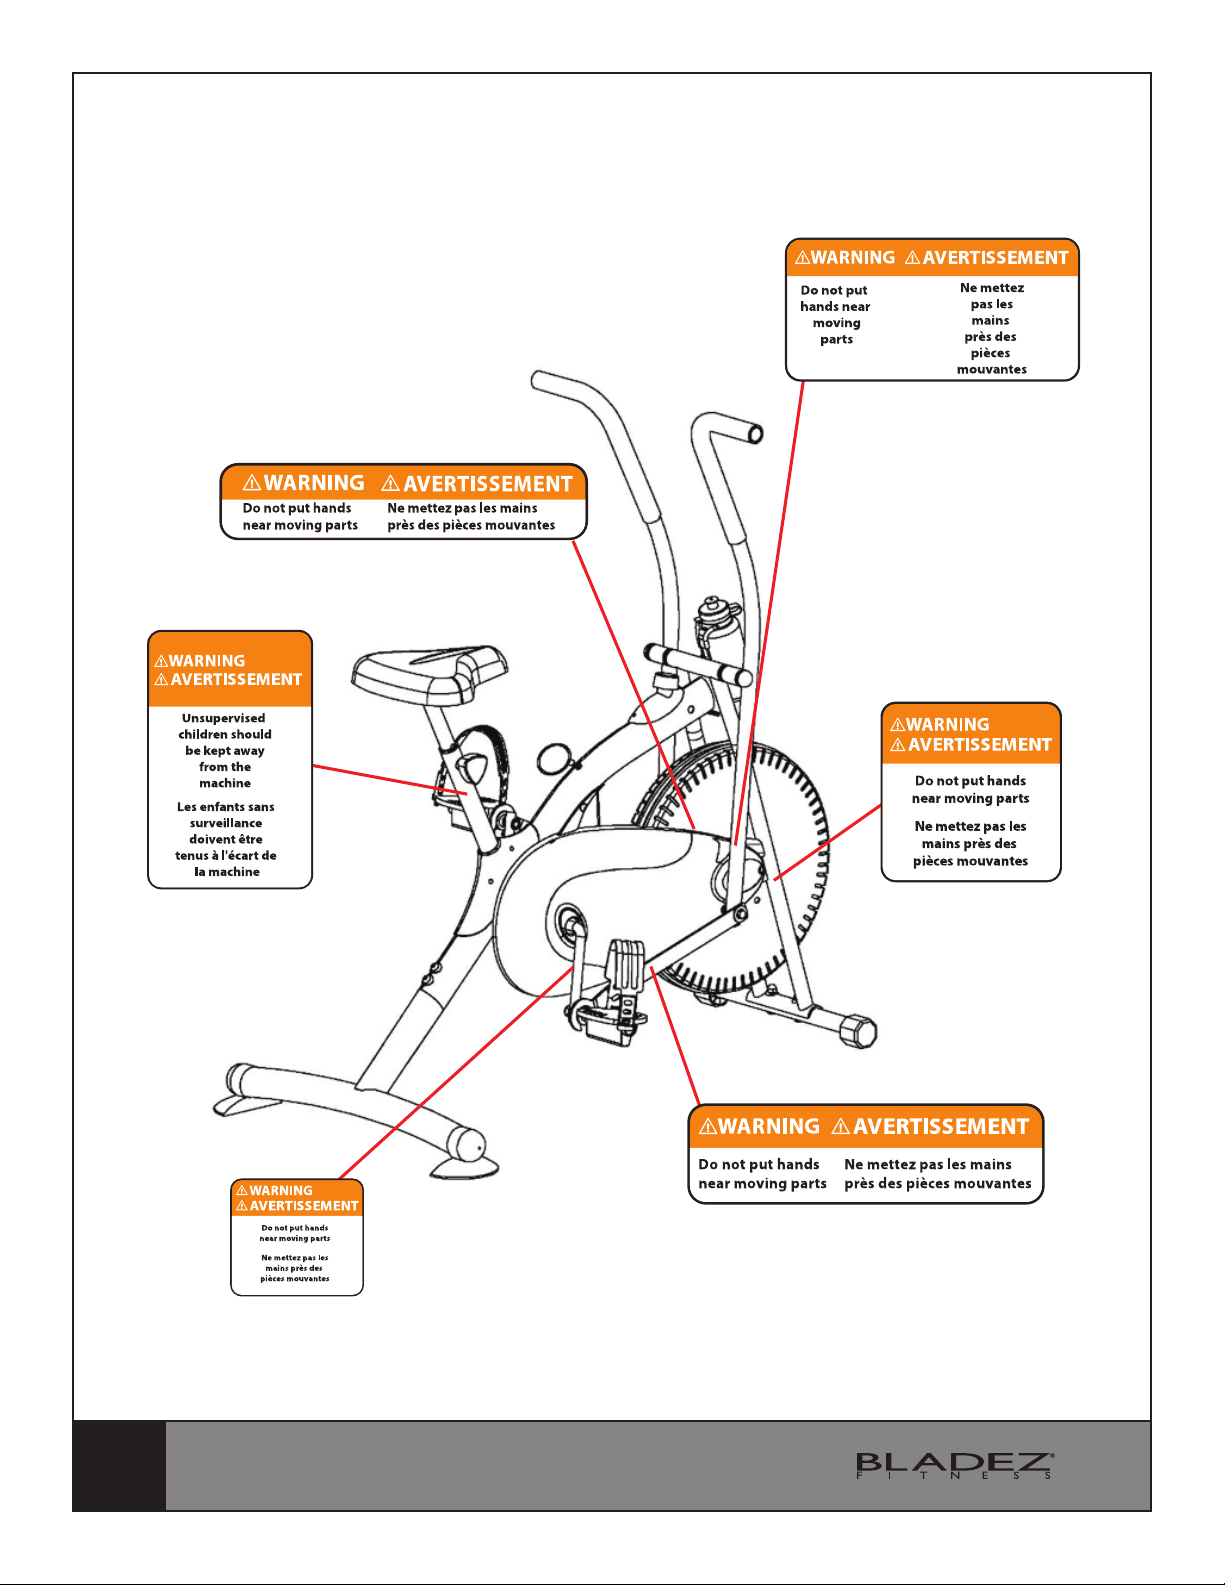
1. Keep children and pets away from this equipment at all times. DO NOT leave them unsupervised in the room
where the machine is kept.
2. If you experience dizziness, nausea, chest pains or any other symptom while using this machine STOP the
exercise. SEEK IMMEDIATE MEDICAL ATTENTION!
3. Use the machine on a level and solid surface. Adjust the feet for stability.
4. Keep your hands away from any of the joints and moving parts.
5. Wear clothing suitable for doing exercise. Do not wear baggy clothing that might get caught in the machine.
Always wear athletic shoes when using the machine and tie the laces securely.
6. is machine must only be used for the purposes described in this manual. DO NOT use accessories that are not
recommended by Bladez Fitness. Read manual prior to use and follow all warnings and instructions.
7. Do not place sharp objects near the machine.
8. Any person with physical or coordination limitations should not use the machine without the assistance of a
qualied person or doctor. Misuse of this machine may result in serious injury.
9. Do warm-up stretching exercises before using the equipment.
10. Do not use the machine if it is not working correctly.
11. Before using the machine, thoroughly inspect the equipment for proper assembly.
12. Keep a perimeter of 3 feet (1 meter) around the machine before operating the equipment.
13. Use only authorized and trained technicians if a repair is needed.
14. Please follow the advice for correct training, as detailed in the Training Guidelines.
15. Use only the tools provided to assemble this machine.
16. Replace warning labels if damaged, illegible or removed.
17. is machine was designed for a maximum user weight of 220 lbs (100 kgs)
18. e machine can only be used by one person at a time.
19. Before use, inspect the brake strap for signs of wear. If any appear, discontinue use, and contact a service center
for repair.
20. Worn or damaged components shall be replaced immediately or the exercise bicycle removed from service until
the repair is made.
21. is exercise bicycle is for consumer use only.
22. Only manufacturer supplied components shall be used to maintain or repair this equipment.
23. Consult your doctor before beginning use of this machine or any exercise program.
24. Read all instructions before using any exercise equipment.
25. Keep these instructions in a safe location for future use.
Caution: Consult your doctor before beginning to use the machine or any exercise program. Read all
of the instructions before using any exercise equipment.
KEEP THESE INSTRUCTIONS SAFE FOR FUTURE USE.

6
Use of the machine oers various benets; it can improve tness, muscle tone and when
used in conjunction with a calorie controlled diet, it can help you lose weight.
1. Consult your doctor before starting any exercise program. It is advisable to
undergo a complete physical examination.
2. Work at the recommended exercise level. Do not over exert yourself.
3. If you feel any pain or discomfort, stop exercising immediately and consult your
doctor.
4. Wear appropriate clothing and footwear for the exercise; do not wear loose
clothing; do not wear leather soled shoes or footwear with high heels.
5. It is advised that you do warm-up stretches before working out.
6. Get on the equipment slowly and securely.
7. Select the program or workout option that is most closely aligned with your
workout interests.
8. Start slowly and work your way up to a comfortable pace.
9. Be sure to cool down after your workout.
10.Resistance adjustment and braking. e resistance during exercise is controlled
by the tension knob. Turn clockwise (+) to increase resistance and turn
counterclockwise (-) to decrease resistance. is bike is equipped with an
emergency brake as well. Pull up on the Red Ring located on the top crossbar to
immediately stop the bike with maximum braking power.
EXERCISE INSTRUCTION

7
TRAINING GUIDELINES
Exercise is one of the most important factors in the overall health of an individual.
Listed among its benets are:
• Increased capacity for physical work (strength endurance)
• Increased cardiovascular (heart and arteries/veins) and respiratory eciency
• Decreased risk of coronary heart disease
• Changes in body metabolism, e.g. losing weight
• Delaying the physiological eects of age
• Reduction in stress, increase in self-condence, etc.
ere are several components of physical tness and each is dened below.
STRENGTH
e capacity of a muscle to exert a force against resistance. Strength contributes to power and speed.
MUSCULAR ENDURANCE
e capacity to exert a force repeatedly over a period of time, e.g. it is the muscular endurance of
your legs to carry you 10 km without stopping.
FLEXIBILITY
e range of motion of your joints. Improving exibility involves the stretching of muscles and
tendons to maintain or increase suppleness, and it provides increased resistance to muscle injury or
soreness.
CARDIO-RESPIRATORY ENDURANCE
e most essential component of physical tness. It is the ecient functioning of the heart and
lungs.
AEROBIC FITNESS
Is an exercise of relatively low intensity and long duration, which depends primarily on the aerobic
energy system. Aerobic means "with oxygen", and refers to the use of oxygen in the body's metabolic
or energy-generating process. Many types of exercise are aerobic, and by denition are performed at
moderate levels of intensity for extended periods of time.
ANAEROBIC TRAINING
Is an exercise intense enough to trigger anaerobic metabolism. is means “without oxygen” and
is the output of energy when the oxygen supply is insucient to meet the body’s long term energy
demands. (For example, a 100 meter sprint.)

8
OXYGEN UPTAKE
e eort that you can exert over a prolonged period of time is limited by your ability to deliver
oxygen to the working muscles. Regular vigorous exercise produces a training eect that can increase
your aerobic capacity by as much as 20 to 30%. An increased VO2 Max indicates an increased ability
of the heart to pump blood, of the lungs to ventilate oxygen, and of the muscles to take up oxygen.
THE TRAINING THRESHOLD
is is the minimum level of exercise which is required to produce signicant improvements in any
physical tness parameter.
OVERLOAD
is is where you exercise above your comfort level. e intensity, duration and frequency of exercise
should be above the training threshold and should be gradually increased as the body adapts to the
increasing demands. As your tness level improves, the training threshold should rise. Working
through your program and gradually increasing the overload factor is important.
PROGRESSION
As you become more t, a higher intensity of exercise is required to create an overload and therefore
provide continued improvement.
SPECIFICS
Dierent forms of exercise produce dierent results. e type of exercise that is carried out is specic
to the muscle groups being used and to the energy source involved. ere is little transfer of the
eects of exercise, i.e. from strength training to cardiovascular tness. at is why it is important to
have an exercise program tailored to your specic needs.
REVERSIBILITY
If you stop exercising or do not do your program often enough, you will lose the benets you have
gained. Regular workouts are the key to success.
WARM-UP
Every exercise program should start with a warm-up where the body is prepared for the eort to
come. It should be gentle and preferably use the muscles group to be involved later. Stretching
should be included in both your warm-up and cool down, and should be performed after 3-5
minutes of low intensity aerobic activity or calisthenic type exercise.
WARM DOWN OR COOL DOWN
is involves a gradual decrease in the intensity of the exercise session. Following exercise, a large
supply of blood remains in the working muscles. If it is not returned promptly to the central
circulation, pooling of blood may occur in the muscles.

9
HEART RATE
As you exercise, your heart beat increases. is is often used as a measure of the required intensity of
an exercise. You need to exercise hard enough to condition your circulatory system, and increase your
pulse rate, but not enough to strain your heart.
Your initial level of tness is important when developing an exercise program for you. When starting,
you can get a good training eect with a heart rate of 110-120 beats per minute (BPM). If you are
more t, you will need a higher threshold of stimulation.
To begin with, you should exercise at a level that elevates your heart rate to about 65 to 70% of your
maximum. If you nd this is too easy, you may want to increase it, but it is better to lean on the
conservative side.
As a rule of thumb, the maximum heart rate is 220 minus your age. As you increase in age, your
heart, like other muscles, loses some of its eciency. Some of its natural loss is won back as tness
improves. e following table is a guide to those who are “starting tness.”
Age Target Heart Rate 25 30 35 40 45 50 55 60 65
10 Second Count 23 22 22 21 20 19 19 18 18
Beats per Minute 138 132 132 126 120 114 114 108 108
PULSE COUNT
e pulse count (on your wrist or carotid artery in the neck, taken with two index ngers) is done
for ten seconds, taken a few seconds after you stop exercising. is is for two reasons: (a) 10 seconds
is long enough for accuracy, (b) the pulse count is to approximate your BPM rate at the time you are
exercising. Since heart rate slows as you recover, a longer count isn’t as accurate.
e target is not a magic number, but a general guide. If you’re above average with your tness, you
may work comfortably a little above that suggested for your age group. e following table is a guide.
Age Target Heart Rate 25 30 35 40 45 50 55 60 65
10 Second Count 26 26 25 24 23 22 22 21 20
Beats per Minute 156 156 150 144 138 132 132 126 120
Don’t push yourself too hard to reach the gures on this table. It can be very uncomfortable if you
over exercise. Let it happen naturally as you work through your program. Remember, the target is a
guide, not a rule, a little above or below is just ne.
Two nal comments: (1) don’t be concerned with day to day variations in your pulse rate, being
under pressure or not enough sleep can aect it; (2) your pulse rate is a guide, don’t become a slave
to it.

10
MUSCLE SORENESS
For the rst week or so, muscle soreness may be the only indication you have that you are on an
exercise program. is, of course, does depend on your overall tness level. A conrmation that you
are on the correct program is a very slight soreness in most major muscle groups. is is quite normal
and will disappear in a matter of days.
If you experience major discomfort, you may be on a program that is too advanced, or you have
increased your program too rapidly.
If you experience PAIN during or after exercise, your body is telling you something. Stop exercising
and consult your doctor.
WHAT TO WEAR
Wear clothing that will not restrict your movement in any way while exercising. Clothes should be
light enough to allow the body to cool. Excessive clothing that causes you to perspire more than you
normally would gives you no advantage. e extra weight you lose is body uid and will be replaced
with the next glass of water you drink. Always wear a pair athletic shoes.
BREATHING DURING EXERCISE
Do not hold your breath while exercising. Breathe normally as much as possible. Remember,
breathing involves the intake and distribution of oxygen, which feeds the working muscles.
REST PERIODS
Once you start your exercise program, you should continue through to the end. Do not break o
halfway through and then restart at the same place later on without going through the warm-up stage
again. e rest period required between exercises may vary from person to person.

11
Head Rolls
Rotate your head to the right for one count while feeling the stretch
up the left side of your neck. Next, rotate your head back for one
count, stretching your chin to the ceiling. Rotate your head to the
left for one count, and nally, drop your head to your chest for one
count.
Shoulder Lifts
Lift your left shoulder up toward your ear for one count. en lift
your right shoulder up for one count as you lower your left shoulder.
Side Stretches
Open your arms to the side and continue lifting them until they are
over your head. Reach your left arm as far upward as you can for one
count. Feel the stretch up your left side. Repeat this action with your
right arm.
Quadriceps Stretch
With one hand against a wall for balance, reach behind you and pull
your left foot up. Bring your heel as close to your buttocks as possible.
Hold for 15 counts and repeat with right foot up.
SUGGESTED STRETCHES

12
Inner igh Stretch
Sit with the soles of your feet together with your knees pointing
outward. Pull your feet as close into your groin as possible. Gently
push your knees towards the oor. Hold for 15 counts.
Toe Touches
Slowly bend forward from your waist, letting your back and
shoulders relax as you stretch toward your toes. Reach down as far
as you can and hold for 15 counts.
Hamstring Stretches
Sit with your right leg extended. Rest the soles of your left foot
against your right inner thigh. Stretch toward your toes as far as
possible. Hold for 15 counts. Relax and then repeat with left leg
extended.
Calf/Achilles Stretches
Lean against a wall with your right leg in front of the left and your
arms forward. Keep your left leg straight and the right foot on the
oor; then bend the right leg and lean forward by moving your hip
toward the wall. Hold, then repeat on the other side for 15 counts.
SUGGESTED STRETCHES

13
ASSEMBLY INSTRUCTIONS

14
STEP 1
FRONT AND REAR STABILIZERS
Attach the Front stabilizer (2) to the Main frame (1) using Carriage bolt (A), Arc washer
(B) and Acorn nut (C). Attach the foot pads (11) to both sides of the Rear stabilizer (3)
and then insert the Rear stabilizer (3) to the tube of main frame, and the x it with Allen
bolt (D) and Arc washer (B).

15
STEP 2
ATTACHING THE HANDLEBARS
Fix the Connection arm (5L/R) to the Handlebar (4L/R) with Hex bolt (G), Flat washer (F)
(H) and Nylon nut (E). Attach the Shaft (28) to the Main frame (1) as shown and then x
connecting arm assembly with Flat washer (F) and Nylon nut (E), then cover with Nut cap
(26).

16
STEP 3
PEDALS
Insert left Pedal shaft (25L) of left Pedal (25L) through end of left Connecting arm(5L), Flat
washers (I), and Alloy bushing (18) as shown, secure to the Crank (19) with left Nylon nut
(20L) and Spring washer (29) accordingly. Assemble right side in the same way.

17
STEP 4
ATTACH THE SADDLE
Attach the Saddle (9) to the Seat post (7) with Flat washer (H) and Nylon nut (E) provided;
Insert Seat post (7) into Main frame (1) and lock at desired height with Tri-knob (J).

18
STEP 5
ATTACHING THE WATER BOTTLE HOLDER
Secure the water bottle holder (17) in place of Main frame (1) with Cross screw (22) and Flat
washer (24), put the Water bottle (21) in the holder.
When you do not use the bike, use the L-shape pin (6) to x the fan wheel for safety.
e unit is equipped with wheels (96), which make it easier to move. e two wheels at the
front of the unit make it easier to place the unit in to any chosen position by lifting the rear
slightly. Store your unit in a dry place, preferably not subject to changes in temperature.
MOVEMENT AND STORAGE

19
Care has been taken to assure that your equipment has been properly adjusted and
lubricated at the factory. It is not recommended that the user attempt service on the internal
components. Instead, seek service from an authorized service center. However, you may
clean the outer surface. Use a soft cloth, dampened with warm water. Do not use aerosol
sprays or pump bottles as they may deposit sediments upon the console surface. e use
of harsh chemicals will destroy the protective coating and cause a static build-up that may
damage the some of the components.
• Before use, inspect the brake strap for signs of wear. If any appear, discontinue use, and
contact a service center for repair.
• Worn or damaged components shall be replaced immediately or the exercise bicycle
removed from service until the repair is made.
• is exercise bicycle is for consumer use only.
• Only manufacturer supplied components shall be used to maintain or repair this
equipment.
MAINTENANCE AND CLEANING

20
EXPLODED VIEW DRAWING
Table of contents
Languages:
Other BLADEZ Exercise Bike manuals

BLADEZ
BLADEZ Echelon GS User manual

BLADEZ
BLADEZ SXPRO User manual

BLADEZ
BLADEZ TRANSOM User manual

BLADEZ
BLADEZ PTS68 Master Bike User manual

BLADEZ
BLADEZ U300 User manual

BLADEZ
BLADEZ E500 User manual

BLADEZ
BLADEZ R300 User manual

BLADEZ
BLADEZ U500i User manual

BLADEZ
BLADEZ R400 User manual

BLADEZ
BLADEZ VeloPro HW3017B User manual

BLADEZ
BLADEZ Stratum GS User manual

BLADEZ
BLADEZ Synchro GS User manual

BLADEZ
BLADEZ Spinpower HW3017 User manual

BLADEZ
BLADEZ VeloPro HW3018B User manual

BLADEZ
BLADEZ Master GS User manual

BLADEZ
BLADEZ U250 User manual

BLADEZ
BLADEZ U500i User manual

BLADEZ
BLADEZ U300 User manual

BLADEZ
BLADEZ Fusion GS User manual

BLADEZ
BLADEZ AEROPRO H930 User manual