Blatchford SBWTTCP22 User manual

Instructions for Use
Navodila za uporabo
Инструкции за употреба
Upute za uporabu
Návod na použitie
Használati útmutató
Οδηγίες χρήσης
Lietošanas pamācība
Naudojimo instrukcija
Kasutusjuhend
PK2
EN 2
SL 17
BG 32
HR 47
SK 62
HU 77
EL 92
LV 107
LT 122
ET 137
Silcare Breathe Walk Cushion Liner
Silcare Breathe Walk Locking Liner
Instructions for Use
SBWTTCP22 - SBWTTCP40
SBWTTLP22 - SBWTTLP40

938461PK2/2-0822
2
Contents
Contents.................................................................................................................................................................2
1 Description and Intended Purpose ....................................................................................................................3
2 Safety Information....................................................................................................................................................4
3 Construction ...............................................................................................................................................................5
4 Function........................................................................................................................................................................6
5 Maintenance...............................................................................................................................................................6
5.1 Cleaning the Device...........................................................................................................................................7
5.2 Cleaning the Valve (Locking liner only.)......................................................................................................7
5.3 Cleaning the Residual Limb.............................................................................................................................7
6 Limitations on Use....................................................................................................................................................8
7 Choosing the Correct Size......................................................................................................................................8
8 Casting/Scanning a Locking Liner.......................................................................................................................9
9 Casting/Scanning a Cushion Liner................................................................................................................... 10
10 Trimming the Device............................................................................................................................................. 11
11 Donning the Device .............................................................................................................................................. 11
12 Fitting the Valve...................................................................................................................................................... 12
13 Fitting the Spacer................................................................................................................................................... 12
14 Fitting Advice........................................................................................................................................................... 13
14.1 Cushion Liner..................................................................................................................................................... 13
14.2 Locking Liner ..................................................................................................................................................... 13
15 Technical Data ......................................................................................................................................................... 14
16 Ordering Information ........................................................................................................................................... 15
EN

938461PK2/2-0822
3
These instructions are for use by the practitioner.
Please read these instructions carefully before tting the device.
The term device is used throughout these instructions for use to refer to Silcare Breathe Walk
Cushion and Silcare Breathe Walk Locking Liner unless otherwise stated.
Ensure that the user understands all instructions for use, drawing particular attention to the
maintenance and safety information.
Application
This device is an interface component for use only as part of a lower limb prosthesis.
Intended for single user.
The device is manufactured from biocompatible materials. The cushion liner provides a perforated
cushioned socket interface which allows moisture to pass through the perforations keeping the
skin dry. In addition to this, the locking liner’s silicone valve provides vacuum suspension during the
gait cycle by controlling the airow through the perforations on the distal cap.
To optimize comfort ensure that the user is instructed in the correct way to handle and don/do
the device. See Section 11 Donning the Device.
Also ensure that they are made aware of how to maintain the device and to keep it clean for
maintaining hygiene as set out in these instructions. See Section 5 Maintenance.
Activity Level
The device is best suited for low to moderate activity users. If used on more active users device
life may be compromised.
Contraindications - Cushion Liner
• Conical residual limbs:
• This device may not be optimally contoured to t conical residual limbs.
• Users whose suspension sleeve causes a bulk around their knee may be better suited with
an alternative type liner.
• Users with poor hand or cognitive function might nds donning and cleaning dicult.
• Poor hygiene.
Contraindications - Locking Liner
• Conical residual limbs:
• Can cause failure of the vacuum suspension.
• Reduce skin contact with the silicone inside the device and make a less eective seal.
• Deep scars distally:
• Can cause failure of the vacuum suspension.
• Reduce skin contact with the silicone inside the device and make a less eective seal.
• Short residual limbs: These can cause failure of the silicone side of the device. After donning, if
the unperforated fabric is on or above the patella tendon, the silicone is subject to more stress
during knee exion.
• Users with poor hand or cognitive function might nds donning and cleaning dicult.
• Poor hygiene.
1 Description and Intended Purpose

938461PK2/2-0822
4
2 Safety Information
This warning symbol highlights important safety information.
The user should be advised to contact
their practitioner if their condition
changes.
Any deterioration in residuum condition
or any change in sensation should be
reported to the practitioner.
Make sure that any damaged skin or
open wounds are properly and suitably
dressed to prevent direct contact with
the device.
Wearers with sensitive skin, diabetics
and vascular cases should be extra
vigilant and may need to apply
lubricant to sensitive areas. We
recommend a routine visual check and
if required the user should consult their
medical practitioner.
For other medical conditions the
user should follow the advice and
recommendation of a physician or a
medical practitioner regarding skin
care.
Enlarged perforations can cause tissue
damage. If the perforations enlarge,
stop using the device.
If distal oedematous swellings
corresponding to distal perforations in
the liner occur, use of the liner should
be discontinued and the swellings
reported to the practitioner.
Do not use alcohol sprays, household
cleaners, or abrasives. These cleaning
materials could damage the device and
irritate skin.
Do not pull or stretch the device.
Fingernails, sharp jewelry, and the
locking pin can tear the device.
If the device is torn, stop using
it and contact a Blatchford sales
representative
Sockets with sharp proximal edges can
damage the device.
Take care when handling the device
to avoid possible contamination with
materials such as breglass which
will stick to the device and cause skin
irritation.
When donning a sock, clothing and
the prosthetic limb, be aware that the
device can build up a static charge.
To avoid danger of suocation, keep the
device away from babies and children.
Keep the device away from direct heat
sources.
Only use the device in combination
with corrosion resistant components.
Do not overtighten the locking pin.
Clinical Benets
• Provides cushioning for the residual limb in the socket.
• Distributes in-socket pressure more evenly, compared to other materials and alternative
cushioning solutions.
• Improvements in residual limb health and wound healing, compared to non-perforated liners.
• Improved heat dissipation, compared to other temperature regulation solutions.
• Removes sweat from skin-liner interface.
• Patients reported a preference for their perforated liners, compared to non-perforated liners.
• Reduces the need to remove prosthesis throughout the day to dry residual limb, compared to
non-perforated liners.
• The locking liner provides a means of suspension.

938461PK2/2-0822
5
3 Construction
Principal Parts
• Fabric (polyamide and lycra)
• Main Body (silicone)
• Distal Cap (silicone)
• Valve (silicone)
• Washer (nylon)
• Umbrella (nylon)
• Spacer** (silicone)
• Retaining Screw* (nylon)
• Casting Dummy (silicone)
Distal cap
Retaining
Screw*
Casting
Dummy
Spacer**
Washer
Valve
Perforated Fabric
Unperforated Fabric
* For transportation only. Do not use for tting.
** For use with some locks. (See Section 13 Fitting the Spacer.)
Main Body
Umbrella
Distal cap
Perforated Fabric
Main Body
Unperforated Fabric
Cushion Liner
Locking Liner
938413

938461PK2/2-0822
6
4 Function
Cushion
The device, used in connection with an air-tight suspension sleeve and corrosion resistant
components, provides control, secure connection and cushioning between the limb and the
socket. The perforations and the corrosion resistant expulsion valve of the device allow moisture
to escape during stance.
Locking
The device provides control, secure connection and cushioning between the limb and the socket.
The perforations of the device allow moisture to escape during stance.
During stance, the valve opens to allow moisture and air to escape through the perforations
in the distal cap. During swing, the valve closes and stops air from re-entering the device, thus
creating a vacuum, which both improves proprioception and reduces pistoning.
5 Maintenance
Advise users to report the following to their practitioner:
• Tears in the fabric or the silicone
• Tissue damage on the residual limb
• Distal oedematous swellings
• Enlarged perforations
• Changes in either body weight or activity level
• Deterioration/changes to the residual limb
• Changes in the performance of the device.
• Moisture in the distal end of the device.
• Loss of vacuum.
Note… Perspiration discolors some socket materials.

938461PK2/2-0822
7
5.1 Cleaning the Device
Inspect residual limb before and after prosthetic limb use or at least daily.
Any deterioration in residuum condition should be reported to the practitioner.
1. Clean the skin daily with an unperfumed, pH balanced soap.
2. Rinse the skin with clean water to remove all residues.
3. Dry residual limb.
4. Apply lotion to dry skin, as recommended by a practitioner.
Make sure that any damaged skin or open wound is properly and suitably dressed to
prevent direct contact with the device.
Wash the inside of the device daily to avoid any build up of bacteria.
Take care handling the device when it is inside out to avoid picking up dust, grit and
other contamination which could cause irritation to the skin.
Dry thoroughly before use.
Do not tumble dry.
Washing by Hand:
1. Invert the device so that its silicone side points externally.
2. Clean the silicone and the distal cap with a solution of water and unperfumed, pH balanced soap.
3. Invert the device so that its silicone side points internally.
4. Clean the valve and carefully clean the distal cap. (Locking liner only.)
5. Fill the device with warm water while both holding the proximal end closed and squeezing
the distal end to ush the water through the perforations.
6. Rinse the device with clean water to remove all residues.
7. Either pat dry the device with a lint-free cloth, or leave it to air dry. Take care when drying
and handling the device.
Note… Always dry the device with the silicone side of the device pointing internally. Otherwise, the
device can stretch and become distorted.
Machine Wash:
Suitable for machine washing at 30°C.
Do not invert the device for machine washing.
5.2 Cleaning the Valve (Locking liner only.)
Make sure the distal end perforations are not clogged and that there is no contamination/debris
trapped under the valve.
1. During hand wash squeeze water through the distal perforations.
2. Carefully, slightly lift valve and wipe clean underneath with a clean piece of cloth.
3. Check correct operation/function of valve.
5.3 Cleaning the Residual Limb

938461PK2/2-0822
8
Intended Life
A local risk assessment should be carried out based upon activity and usage.
Environment
Avoid exposing the device to corrosive elements such as acids, industrial detergents, bleach or
chlorine. The use of creams or lotions with this device should be used with caution as these can
cause the device to soften and stretch or distort.
Keep away from sharp objects (such as jewelry,
ngernails).
Exclusively for use between -15˚C and 50 ˚C (5˚F to
122˚F).
It is important that the correct size is specied to
ensure proper t and comfort in use.
1. Measure the circumference of the residual limb
4cm up from its distal end.
2. If the circumference of the residual limb matches
one of the sizes in the table, choose the next size
down.
3. If the circumference of the residual limb is
between one of the sizes in the table, choose the
smaller size.
4cm
6 Limitations on Use
7 Choosing the Correct Size
Circumference
Measured (cm) 20-23.5 23.6-25 25.1-26.5 26.6-28 28.1-30 30.1-32 32.1-34 34.1-36 36.1-40 40.1-42
Available Sizes 22 23.5 25 26.5 28 30 32 34 36 40
Valve Size
(Locking Liner) Small Medium Large Extra Large

938461PK2/2-0822
9
8 Casting/Scanning a Locking Liner
Before you begin
Allow the user to wear the device for 10minutes.
(See Section 11 Donning the Device.)
If a scanning method is used
Fit/trim the casting dummy to the size of the distal end of the liner, see 938413.
To reduce the amount of distal pressure within the nal socket, the model should be lengthened
by 10-12mm (depending upon redundant tissue etc.).
If a casting method is used
Fit/trim the casting dummy to the size of the distal end of the liner, see 938413.
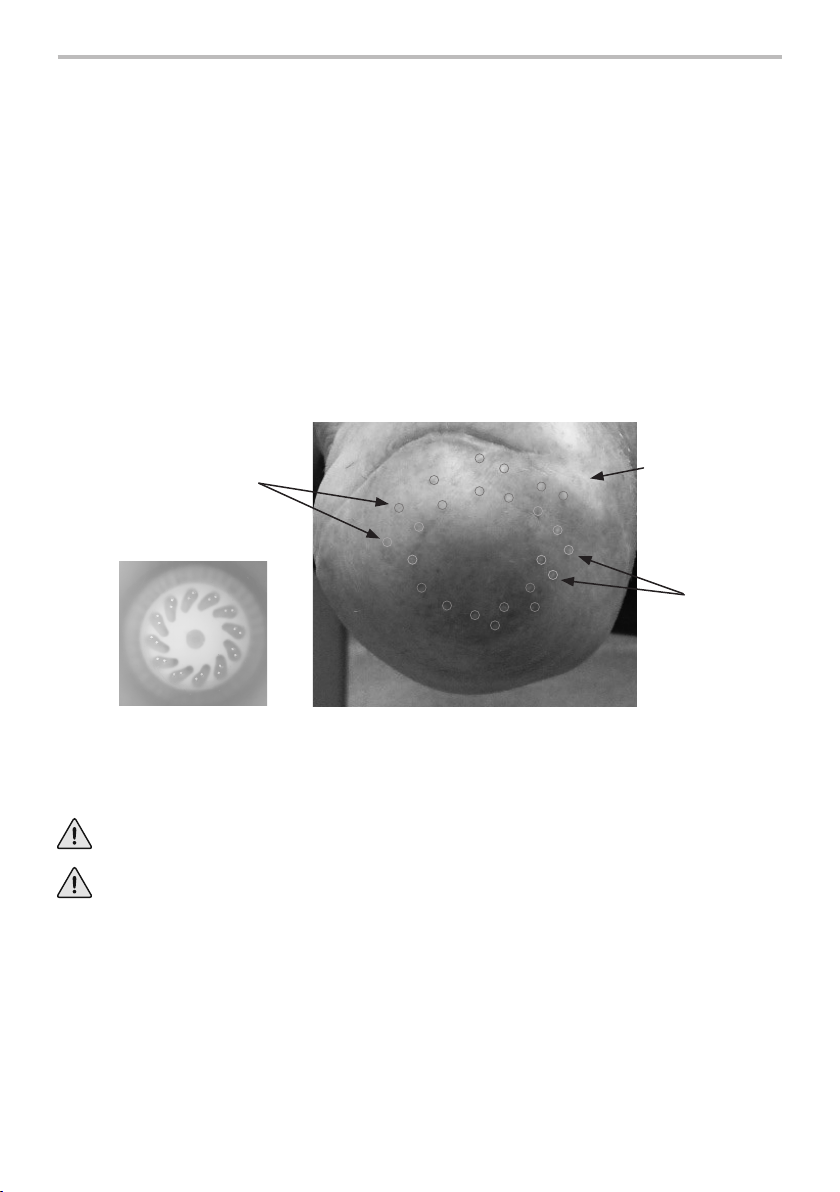
We recommend using a casting method that accentuates weight bearing areas such as the
medial condylar are in conjunction with applying tension to the distal pin; otherwise excessive
distal contact may result in the nal socket, giving rise to oedematous swellings corresponding
to the distal perforations as shown below.
Additionally, when fabricating a diagnostic socket, we recommend a 5mm pelite spacer is used
to further extend/lengthen the socket. When you are satised with the t of the socket (by
adding any necessary socks) the spacer can, if necessary, be removed if excess distal contact
gives rise to distal oedematous swellings.
The softness of the silicone can mask the amount of distal contact that is occurring, this
will only be evident when oedematous swellings are observed.
The use of a diagnostic socket is strongly recommended to assess the amount of distal
pressure/contact that is occurring.
Oedematous
Swellings
Residual Limb
Distal End Surface
Distal End of Liner
(Inside view)
Oedematous
Swellings
938413
938461PK2/2-0822
10
9 Casting/Scanning a Cushion Liner
Before you begin
Allow the user to wear the device for 10minutes.
(See Section 11 Donning the Device.)
If a scanning method is used
To reduce the amount of distal pressure within the nal socket, the model should be lengthened
by 10-12mm (depending upon redundant tissue etc.).
If a casting method is used
We recommend using a casting method that accentuates weight bearing areas such as the
medial condylar are and displaces redundant tissue distally; otherwise excessive distal contact
may result in the nal socket, giving rise to oedematous swellings corresponding to the distal
perforations as shown below.
Additionally, when fabricating a diagnostic socket, we recommend a 5mm pelite spacer is used
to further extend/lengthen the socket. When you are satised with the t of the socket (by
adding any necessary socks) the spacer can, if necessary, be removed if excess distal contact
gives rise to distal oedematous swellings.
The softness of the silicone can mask the amount of distal contact that is occurring, this
will only be evident when oedematous swellings are observed.
The use of a diagnostic socket is strongly recommended to assess the amount of distal
pressure/contact that is occurring.
Oedematous
Swellings
Residual Limb
Distal End Surface
Distal End of Liner
(Inside view)
Oedematous
Swellings

938461PK2/2-0822
11
Where possible try to avoid abrupt changes of contour and sharp edges which could
cause tears in the silicone and fabric.
1. Invert the device so that its silicone side points externally.
2. Align the locking pin with the long axis of the residual
limb. (Locking liner only.)
3. Roll the device on the residual limb while releasing any
trapped air.
After donning the device, allow the user to wear it for 10 minutes. If the user feels numbness,
tingling or any unusual sensation within 10 minutes, do the following:
4. Do the device, and wait until normal sensation returns.
5. Don the device again.
6. If the user feels numbness, tingling or any unusual sensation again, stop using the device.
Before you begin
Fit the valve to the locking liner. (See Section12
Fitting the Valve.)
Care must be taken during donning/dong
not to damage the device with ngernails,
sharp jewelry or the locking pin.
Do NOT pull or stretch the device.
10 Trimming the Device
The device may be trimmed to suit as required but never below the socket trim line.
We recommend using a rotating disc cutter to achieve a bevelled edge.
Avoid trimming through the perforations.
Trim the proximal edge of the device to suit the shape of the user’s socket.
If necessary, trim the proximal edge of the device in a wave pattern to reduce shear stress.
11 Donning the Device
1.
2.
3.4.
938461PK2/2-0822
12
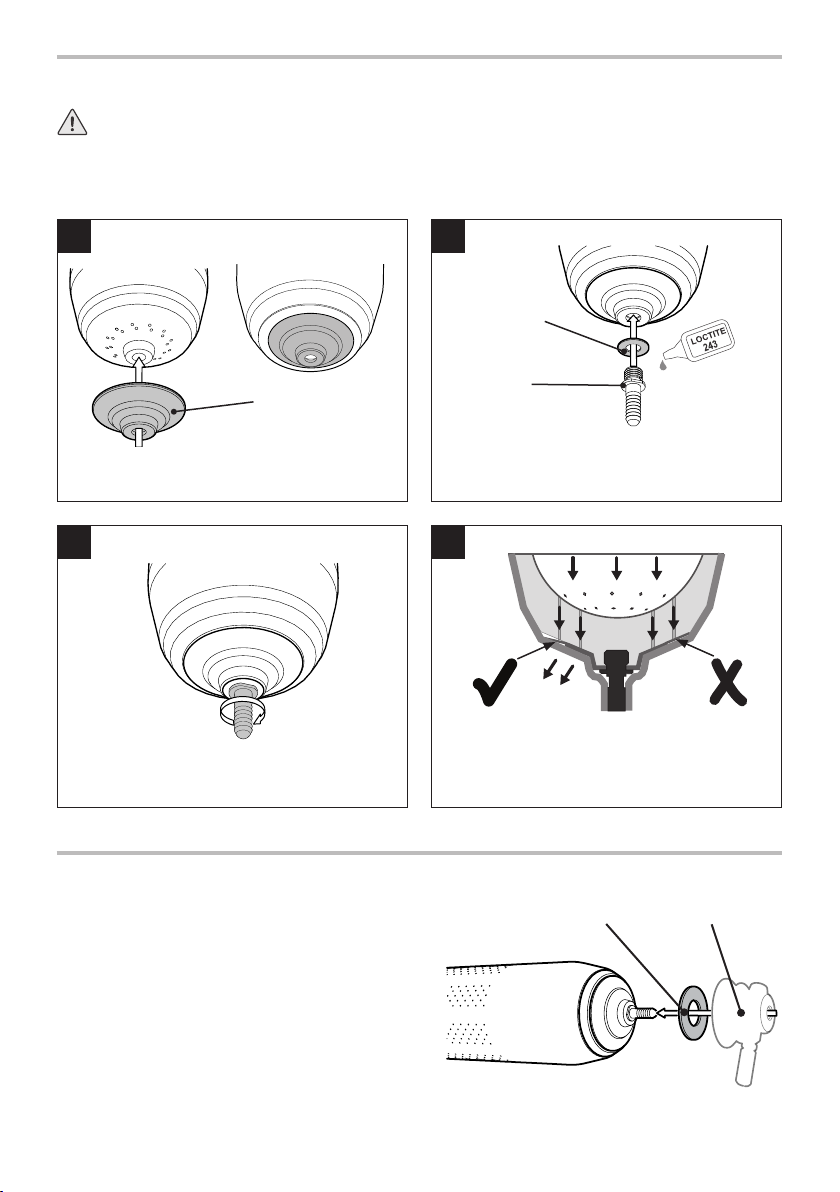
Put the washer between the locking pin and the
valve. Apply Loctite243 to the threads of the
locking pin.
Put the valve on the distal cap.
Conrm sucient clearance in socket for valve to
operate correctly.
Torque the locking pin to 3Nm, or tighten it with
your ngers by either 1/8 to 1/4 of a turn.
12 Fitting the Valve
Do not overtighten the locking pin.
We recommend using a locking pin that has a shoulder of between 13.5mm and 19mm
indiameter.
Valve
Locking Pin
Shoulder
Washer
Spacer Pin Lock
Fit the spacer between the lock and the
valve only if the lock prevents the valve from
opening.
13 Fitting the Spacer

938461PK2/2-0822
13
14 Fitting Advice
14.1 Cushion Liner
14.1.1 Moisture Collects Inside the Distal end of the Device
Cause Solution
The perforations are clogged. Clean the device. (See Section 5.1 Cleaning the
Device.)
14.1.2 Any Discoloration is Noticed on the Residuum
Cause Solution
Incorrectly tting device. Contact your practitioner.
14.1.3 Oedematous Swellings Corresponding to Distal Perforations:
Cause Solution
Excessive distal contact. Reduce end contact by addition of extra socks
or lengthen/remake socket.
14.2 Locking Liner
14.2.1 Moisture in the Distal End of the Device
If moisture collects inside the distal end of the device, refer to the following table:
Cause Solution
The distal perforations are clogged. Clean the device. (See Section 5 Maintenance.)
The socket does not have enough space in its
distal end for the valve to open.
Put the spacer between the pin lock and the
valve. (See Section 13 Fitting the Spacer.)
If unsuccessful remake socket ensuring
sucient clearance for the valve to operate
(See Section 12 Fitting the Valve - box 4.)
The internal shape of the lock-body is
stopping the valve from opening.
Put the spacer between the pin lock and the
valve. (See Section 13 Fitting the Spacer.)
14.2.2 Loss of Vacuum
If the device loses vacuum, refer to the following table:
Cause Solution
The valve is damaged. Stop using the device, and contact a
Blatchford sales representative.
Debris beneath the valve preventing correct
seal.
Clean the valve. (See Section 5.2 Cleaning the
Valve (Locking liner only.)
The locking pin is not aligned with the long
axis of the residual limb.
Re-align the locking pin with the long axis of
the residual limb.

938461PK2/2-0822
14
15 Technical Data
Principal Materials polyamide, lycra, silicone
Shore Hardness 30-35 Shore 00
Component Weight (size 28) 695g (1lb 8oz)
Activity Level Low to Moderate
Size Range
(see Section 7 Choosing the Correct Size)
22-40cm
Length
(See Dimensions)
435mm
Internal Length
(See Dimensions)
420mm
Operating and
Storage Temperature Range
-15˚C to 50˚C (5 ˚F to 122˚F)
Locking Liner Only
Matrix Length Approx. 10cm
Distal End Attachment M10
Requires Locking Pin With a Shoulder*
Locking Pin Shoulder Diameter 13.5-19mm
*Locking Pin Not Supplied
15.2.1 Separation of the Valve from the Distal Cap
If the valve falls o the distal cap, refer to the following table:
Cause Solution
The valve is not tted correctly. Make sure that the washer is between the
pin and the valve. (See Section 12 Fitting the
Valve.)
Note… Do not over-tighten the locking pin/lock rod.
15.2.2 Oedematous Swellings Corresponding to Distal Perforations
Cause Solution
Excessive distal contact Reduce end pressure by addition of extra
socks or lengthen/remake socket

938461PK2/2-0822
15
Cushion Liner
Locking Liner
16 Ordering Information
Order Example
SB W TT C P 25
Silcare
Breathe Walk Transtibial C - Cushion
L - Locking Parallel Size*
(22-40)
Part Part Number
Small Valve Kit 559015
Medium Valve Kit 559016
Large Valve Kit 559017
Extra Large Valve Kit 559018
Casting Dummy 559019
Note… Spare parts in this table are to be used with locking liners only.
Available from size 22 to size 40*:
SBWTTCP22 to SBWTTCP40
or SBWTTLP22 to SBWTTLP40
*SBWTTCP23 is for size 23.5. SBWTTCP26 is for size 26.5.
435mm
3.7mm 7mm2.9mm 14.6mm
Dimensions
435mm
3.7mm 7mm2.9mm 14.6mm

938461PK2/2-0822
16
Liability
The manufacturer recommends using the device only under the specied conditions and for
the intended purposes. The device must be maintained according to the instructions for use
supplied with the device. The manufacturer is not liable for any adverse outcome caused by any
component combinations that were not authorized by them.
CE Conformity
This product meets the requirements of the European Regulation EU 2017/745 for medical
devices. This product has been classied as a class I device according to the classication rules
outlined in Annex VIII of the regulation. The EU declaration of conformity certicate is available at
the following internet address: www.blatchford.co.uk
Compatibility
Combination with Blatchford branded products is approved based on testing in accordance
with relevant standards and the MDR including structural test, dimensional compatibility and
monitored eld performance.
Combination with alternative CE marked products must be carried out in view of a documented
local risk assessment carried out by a Practitioner.
Warranty:
The device is warranted for 6 months.
The user should be aware that changes or modications not expressly approved could void the
warranty, operating licenses, and exemptions.
See Blatchford website for the current full warranty statement.
Reporting of Serious Incidents
In the unlikely event of a serious incident occurring in relation to this device it should be
reported to the manufacturer and your national competent authority.
Environmental Aspects
This product is fabricated from silicone rubber and fabric that cannot be easily recycled: please
dispose of it responsibly as general waste, as per local waste handling regulations.
Retaining the Packaging Label
You are advised to keep the packaging label as a record of the device supplied.
Medical Device Single Patient – multiple use
Trademark Acknowledgements
Silcare Breathe and Blatchford are registered trademarks of Blatchford Products Limited.
Manufacturer’s Registered Address
Blatchford Products Limited, Lister Road, Basingstoke RG22 4AH, UK.

938461PK2/2-0822
17
Vsebina
Vsebina................................................................................................................................................................. 17
1 Opis in namen uporabe....................................................................................................................................... 18
2 Varnostne informacije .......................................................................................................................................... 19
3 Konstrukcija.............................................................................................................................................................. 20
4 Delovanje.................................................................................................................................................................. 21
5 Vzdrževanje.............................................................................................................................................................. 21
5.1 Čiščenje pripomočka ...................................................................................................................................... 22
5.2 Čiščenje ventila (samo zaporni vložek) .................................................................................................... 22
5.3 Čiščenje krna okončine.................................................................................................................................. 22
6 Omejitve uporabe.................................................................................................................................................. 23
7 Izbira pravilne velikosti......................................................................................................................................... 23
8 Oblikovanje/skeniranje zaklepnega vložka.................................................................................................. 24
9 Oblikovanje/skeniranje oblazinjenega vložka............................................................................................. 25
10 Obrezovanje pripomočka ................................................................................................................................... 26
11 Nameščanje pripomočka .................................................................................................................................... 26
12 Nameščanje ventila ............................................................................................................................................... 27
13 Namestitev distančnika ....................................................................................................................................... 27
14 Nasvet za namestitev............................................................................................................................................ 28
14.1 Oblazinjeni vložek............................................................................................................................................ 28
14.2 Zaporni vložek................................................................................................................................................... 28
15 Tehnični podatki..................................................................................................................................................... 29
16 Podatki za naročanje............................................................................................................................................. 30
SL

938461PK2/2-0822
18
Ta navodila so predvidena za zdravnika.
Pred nameščanjem pripomočka pozorno preberite ta navodila.
Izraz pripomoček se v teh navodilih za uporabo uporablja za oblazinjeni vložek Silcare Breathe
Walk in zaporni vložek Silcare Breathe Walk, razen če je navedeno drugače.
Preverite, ali je uporabnik razumel vsa navodila za uporabo, pri čemer ga še posebej opozorite na
informacije o vzdrževanju in varnosti.
Uporaba
Pripomoček je vmesniška komponenta, predvidena izključno kot del proteze za spodnje okončine.
Predviden je za enega uporabnika.
Pripomoček je izdelan iz biološko združljivih materialov. Oblazinjen vložek je perforiran,
oblazinjen vmesnik ležišča, ki omogoča prehajanje vlage skozi perforacije in tako ohranja kožo
suho. Poleg tega silikonski ventil zapornega vložka zagotavlja vakuumsko vzmetenje med
ciklusom hoje, saj nadzira pretok zraka skozi perforacije na distalni kapici.
Da bo udobje optimalno, je treba uporabnika seznaniti s pravilnim ravnanjem ter nameščanjem/
snemanjem pripomočka. Glejte poglavje 11 Nameščanje pripomočka.
Uporabnika je treba seznaniti tudi s pravilno nego in čiščenjem pripomočka, da zagotovite
ustrezno higieno, kot je določeno v teh navodilih. Glejte poglavje 5 Vzdrževanje.
Stopnja aktivnosti
Pripomoček je najbolj primeren za uporabnike z nizko do zmerno stopnjo aktivnosti.
Če pripomoček uporablja več aktivnih uporabnikov, to slabo vpliva na pripomoček.
Kontraindikacije – oblazinjeni vložek
• Stožčasti krni:
• Ta pripomoček se morda ne bo optimalno prilegal stožčastim krnom.
• Za uporabnike, čigar ovoj vzmetenja se nagrbanči okrog njihovega kolena in ga odebeli,
je morda primernejša druga vrsta vložka.
• Uporabniki z oslabljeno funkcijo rok ali kognitivno funkcijo lahko imajo težave pri
nameščanju in čiščenju.
• Slaba higiena.
Kontraindikacije – zaporni vložek
• Stožčasti krni:
• Lahko onemogoči vakuumsko povezavo.
• Zmanjša stik kože s silikonom v pripomočku, zato je tesnjenje manj učinkovito.
• Globoke rane distalno:
• Lahko onemogoči vakuumsko povezavo.
• Zmanjša stik kože s silikonom v pripomočku, zato je tesnjenje manj učinkovito.
• Kratki krni okončin: lahko vodijo do odpovedi silikona na strani pripomočka. Če je po
namestitvi neperforirana tkanina na ali nad kito pogačice, bo silikon med krčenjem kolena
bolj obremenjen.
• Uporabniki z oslabljeno funkcijo rok ali kognitivno funkcijo lahko imajo težave pri
nameščanju in čiščenju.
• Slaba higiena.
1 Opis in namen uporabe

938461PK2/2-0822
19
2 Varnostne informacije
Ta opozorilni simbol označuje pomembne varnostne informacije.
Uporabniku je treba svetovati, da se
naj obrne na svojega zdravnika, če se
njegovo stanje spremeni.
Vsako poslabšanja v stanju krna ali
morebitne spremembe v občutku je
treba sporočiti zdravniku.
Poskrbite, da bo morebitna
poškodovana koža ali odprta rana
ustrezno povita, da preprečite
neposreden stik s pripomočkom.
Uporabniki z občutljivo kožo, sladkorni
bolniki ali osebe z žilnim obolenjem
morajo biti še posebej previdni in si
morajo občutljiva območja po potrebi
mazati. Priporočamo redni kontrolni
pregled in po potrebi posvetovanje z
zdravnikom.
Za druga zdravstvena stanja mora
uporabnik glede nege kože upoštevati
nasvete in priporočila zdravnika ali
zdravstvenega tehnika.
Povečane perforacije lahko poškodujejo
tkivo. Če se perforacije povečajo,
prenehajte uporabljati pripomoček.
Če se pojavi distalna edemska oteklina,
ki se ujema z distalnimi perforacijami
vložka, je treba vložek prenehati
uporabljati in o oteklinah obvestiti
zdravnika.
Ne uporabljajte alkohola, razpršil,
gospodinjskih čistil ali abrazivnih
sredstev. Ti čistilni materiali bi lahko
poškodovali pripomoček in dražili kožo.
Ne vlecite ali raztezajte pripomočka.
Nohti, oster nakit in zaporni zatič
lahko pretrgajo pripomoček. Če se
pripomoček pretrga, ga prenehajte
uporabljati in stopite v stik s prodajnim
zastopnikom za Blatchford.
Ležišča z ostrimi proksimalnimi robovi
lahko poškodujejo pripomoček.
Pri ravnanju s pripomočkom bodite
previdni, da preprečite morebitno
kontaminacijo zaradi materialov, kot
so steklena vlakna, ki se prilepijo na
pripomoček in dražijo kožo.
Pri obuvanju nogavic, oblačenju in
nameščanju proteze pazite, ker se lahko
pripomoček statično naelektri.
Da preprečite nevarnost zadušitve,
pripomoček hranite izven dosega
dojenčkov in otrok.
Pripomočka ne hraniti v bližini
neposrednih virov toplote.
Pripomoček uporabljajte samo
v kombinaciji s komponentami,
odpornimi proti rjavenju.
Varovalnega zatiča ne zategnite
premočno.
Klinične prednosti
• Deluje kot blažilnik za krn v ležišču.
• Enakomerneje razporedi pritisk v ležišču v primerjavi z drugimi materiali in rešitvami blaženja.
• Izboljšanje zdravstvenih težav in celjenja rane na krnu okončine v primerjavi z
neperforiranimi vložki.
• Izboljšano odvajanje toplote v primerjavi z drugim rešitvami za uravnavanje temperature.
• Odvaja znoj med kožo in vložkom.
• Nekaterim bolnikom so bili perforirani vložki ljubši od neperforiranih.
• V primerjavi z neperforiranimi vložki zmanjša potrebo po odstranitvi proteze čez dan, da bi
se krn posušil.
• Zaporni vložek deluje vzmetno.

938461PK2/2-0822
20
3 Konstrukcija
Glavni deli
• Tkanina (poliamid in lycra)
• Glavno ogrodje (silikon)
• Distalna kapica (silikon)
• Ventil (silikon)
• Tesnilo (najlon)
• Priključni nastavek (najlon)
• Distančnik** (silikon)
• Zadrževalni vijak* (najlon)
• Model za oblikovanje (silikon)
Distalna kapica
Zadrževalni
vijak*
Model za
oblikovanje
Distančnik**
Podložka
Zraka
Perforirana tkanina
Neperforirana tkanina
* Samo za prevoz. Ne uporabljajte za nameščanje.
**Za uporabo z različnimi pritrdilnimi sistemi.
(Glejte poglavje 13 Namestitev distančnika.)
Glavno ogrodje
Priključni nastavek
Distalna kapica
Perforirana tkanina
Glavno ogrodje
Neperforirana tkanina
Oblazinjeni vložek
Zaporni vložek
938413
This manual suits for next models
3
Table of contents
Languages:


