Blaupunkt A 05 User manual

Einbauanleitung
Fitting Instructions
Instructions de
lstruzioni di montaggio
Monteringsanvisning
edienungsanleitung
Operati
Bstruzioni d’uso
lnstrucciones de montaje
de montagem lnstrucciones de

English
Preparatory steps
Inserting CDs into the changer magazine (fig. 1).
Do not insert more than one CD into a slot (the disc will be
damaged).
It is not necessary to load all of the slots.
Note:
l
Do not play 8-cm disks, neither with nor without
adapter.
l
Keep the door of the unit closed. Otherwise, foreign
matter can enter into the set and contaminate the
lenses in the player.
Removing a CD from the magazine (fig. 2).
Inserting the changer magazine
l
Move the door to the left to open the magazine (fig. 3).
l
Insert the loaded CD magazine until the stop is reached
(fig. 4).
l
Move the door to the right
Removing the changer magazine
Exchange the magazine only when the car radio is switched
Attention:
l
It is absolutely necessary to move the door fully to the
left (fig. otherwise the changer and the magazine
can be damaged.
l
Press the EJECT button (fig. 5).
The magazine will be transported into the take-out position.
Notes on moisture condensation
On a rainy day or when the temperature varies
considerably moisture may condense on the focussing lens
and the unit will not operate properly.
In this case remove the disc and wait for about one hour
until the moisture has evaporated.
Notes on CD
A
contaminated or damaged CD can produce drop-outs in
playing. To optain optimum sound, handle the disc as
follows: Keep the CD clean, and handle the disc by its
edge only.
Do not touch the surface, without label!
If required, clean the disc with an optional cleaning cloth.
Wipe the disc surface from the middle towards the edge!
Do not use any solvants such as benrine, thinner, antistatic
spray or a conventional cleaning agent intended for analog
discs!
Do not stick paper or tape on the labeled surface!
Do not expose the disc to direct sunlight or high
temperatures. Do not leave the discs in a car parked in the
sun.
High temperatures in the car can damage the disc.
Notes on the changer magazine
Do not expose. the magazine to high temperatures and
humidity.
Store the magazine where it is not exposed to direct sunlight
(not on the dashboard or rear shelf)!
Do not insert more than one disc into a slot. Otherwise, the
disc and the CD changer can be damaged!
Protect the magazine against vibration!
Technical data
Frequency response:
5 20 000 Hz
Wow and flutter: below measurable limit
Signal-to-noise ratio:
94
Operating temperature:
-10 to
Modifications reserved

Mitgelieferte Befestigungsteile lSupplied Mounting Hardware lMateriel de montage fourni l
Ferreteria de suministrada lComponenti di fissaggio fornitura
Meegeleverde montagematerialen lmonteringsdetaljer lde fornecidos
0
A X2 0
3
x4 0
D X2 E X2 0
F X4
Zur besonderen Beachtung
der Wahl des Einbauortes ist folgendes beachten:
Der Tank darf durch die Blechschrauben nicht werden.
Unter der auf die das montiert werden keine oder Rohrleitungen befinden.
Ersatzreifen, Werkzeug usw. durch die Blechschrauben nicht werden. Achten Sie darauf,
die Herausnahme des Ersatzreifens, Werkzeugs usw. nicht durch das behindert wird.
.lnstallieren Sie das nicht an einem Ort,
der Temperaturen 55” C in einem in der Sonne geparkten ausgesetzt ist.
der in der von (Heizung usw.) befindet.
der Regen oder Feuchtigkeit ausgesetzt ist.
der oder Schmutz ausgesetzt ist.
der Vibrationen ausgesetzt ist.
.sicheren und stabilen Einbau verwenden Sie die mitgelieferten Befestigungsteile.
,
Precautions
Choose the mounting location carefully, observing the following:
The fuel tank must not be damaged by the tapping screws.
There should be no wire harnesses nor any tubes located under the place where you are going to install the unit.
The spare wheel, tools or other equipment in or under the trunk must not be blocked or damaged by the screws
or the unit itself.
Do not install the unit at a place,
which is exposed to temperatures of more than C (e.g. in a car parked in sun).
which is close to hot air (heating, etc.).
which is exposed to rain or humidity.
which is exposed to dust or dirt.
which is exposed to considerable vibrations.
Be sure to use only the supplied mounting hardware for a safe and secure installation.

Horizontaler Einbau lHorizontal Installation Installation horizontale de I’appareil lhorizontal l
Montaggio orizzontale lHorizontale montage Horisontell montering lMontagem horizontal

Vertikaler Einbau
l
Vertical installation
l
Installation
l
vertical
l
Montaggio vertlcale
l
montage
l
Vertikal montering
l
Montagem vertical

Einbau lSuspended Installation lInstallation suspendue lMontaggio sospeso l
Hangende montage lmontering lMontagem suspensa

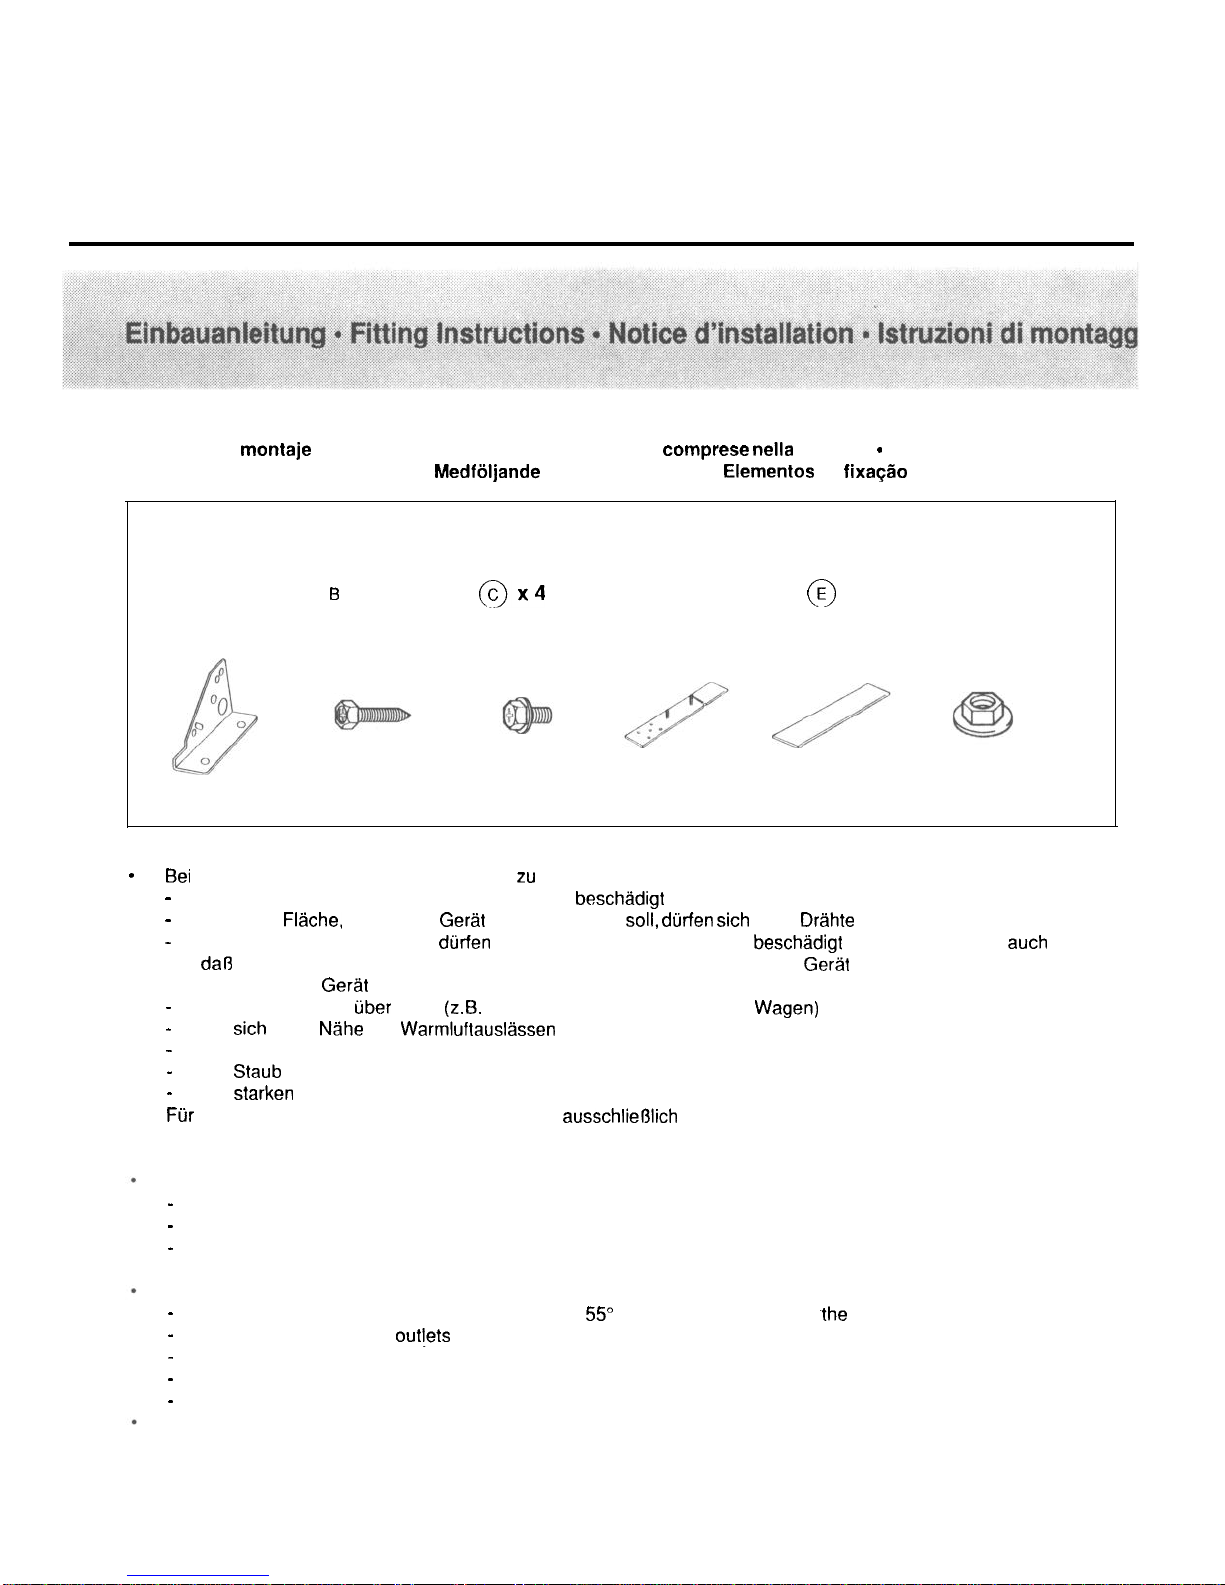
der Montage unter der Heckablage oder im Kofferraum Sie folgende
Sie den Befestigungsort so die Einheit horizontal montiert werden kann.
Achten Sie darauf, die Einheit die Federn, den Arm usw. des Kofferraumdeckels nicht behinden.
When the unit is to be installed under the backshelf or in the trunk, note the following:
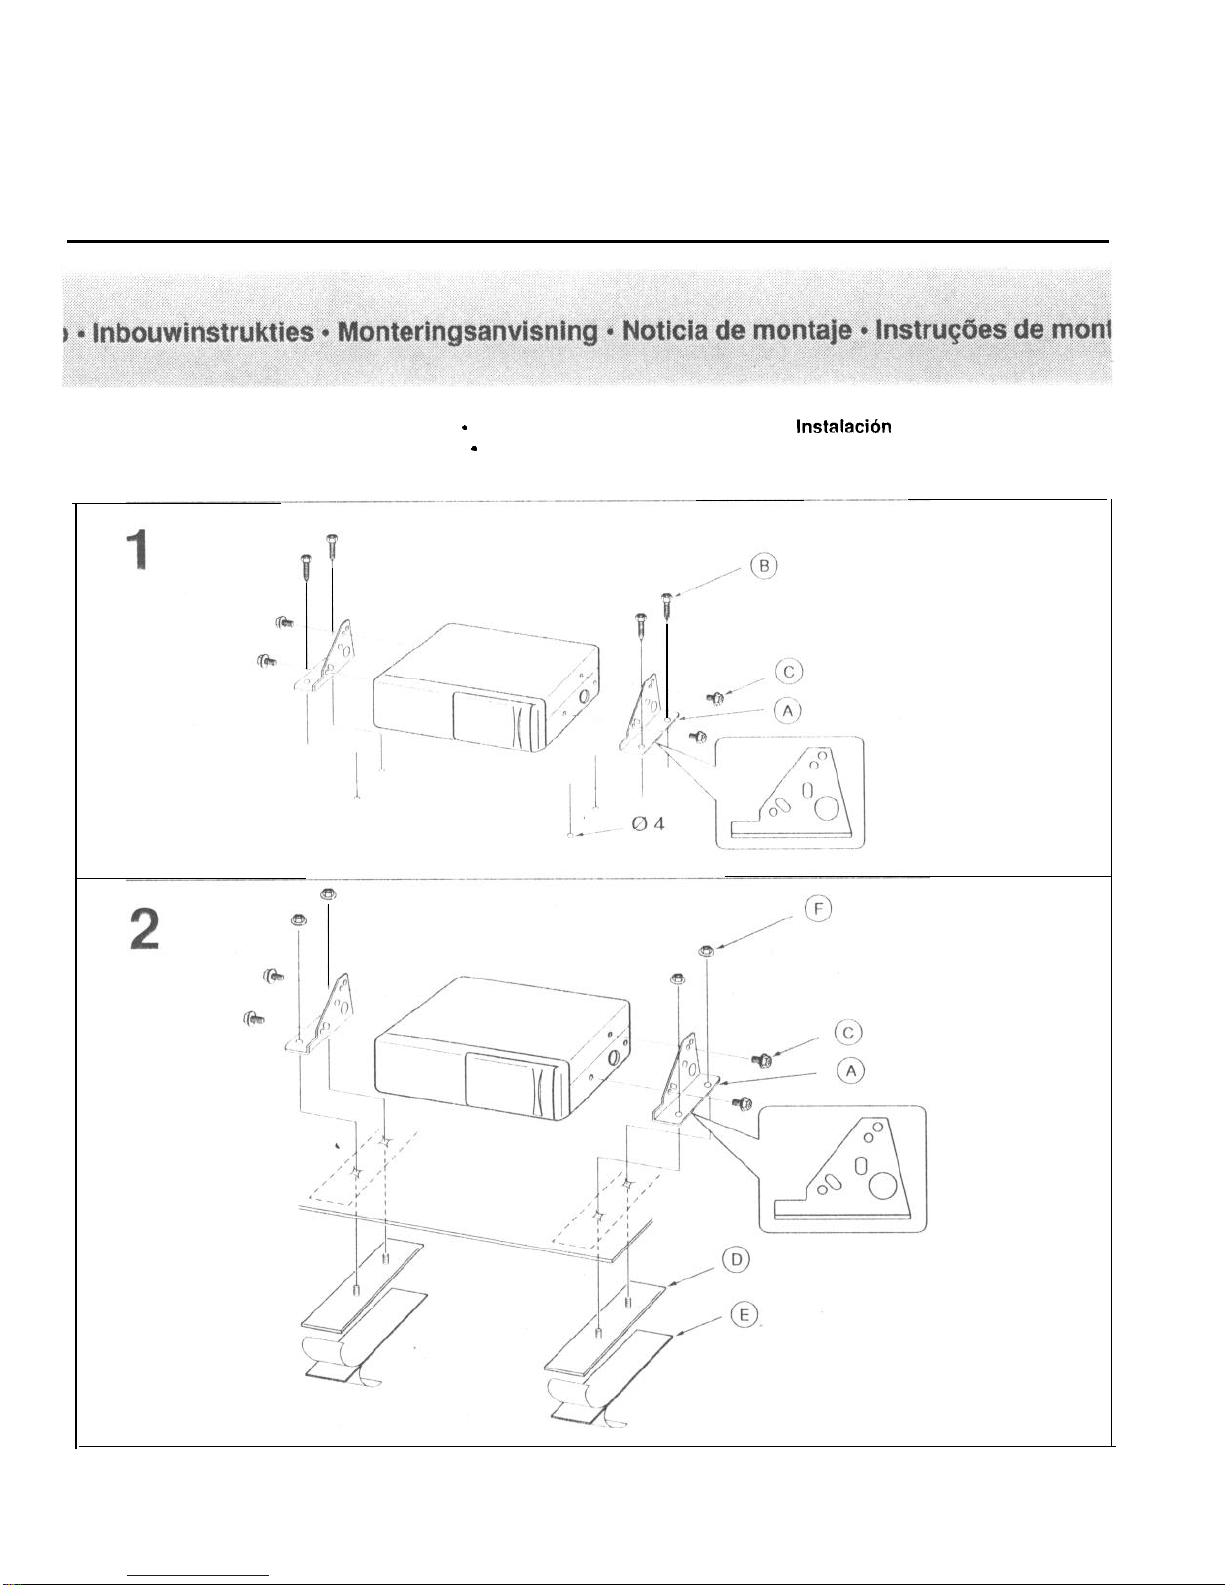
Choose the mounting location carefully so that the unit can be installed horizontally.
Make sure that the unit does not hinder the movement of the torsion bar spring etc. of the trunk flap.
Si I’appareil le plateau arriere ou dans le par exemple, prendre d’abord les precautions suivantes.
Bien choisir I’emplacement pour pouvoir installer I’appareil I’horizontale.
Verifier que I’appareil ne gene pas le mouvement du ressort du entre autres.
Cuando desee instalar la unidad en la bandeja trasera o dentro del portaequipajes, tenga en cuentra lo siguente:
Elija cuidadosamente el lugar de montaje de forma que la unidad pueda instalarse horizontalmente.
de que la unidad no el movimiento del resorte de la de torsion, el brazo etc., de la del
portaequipajes.
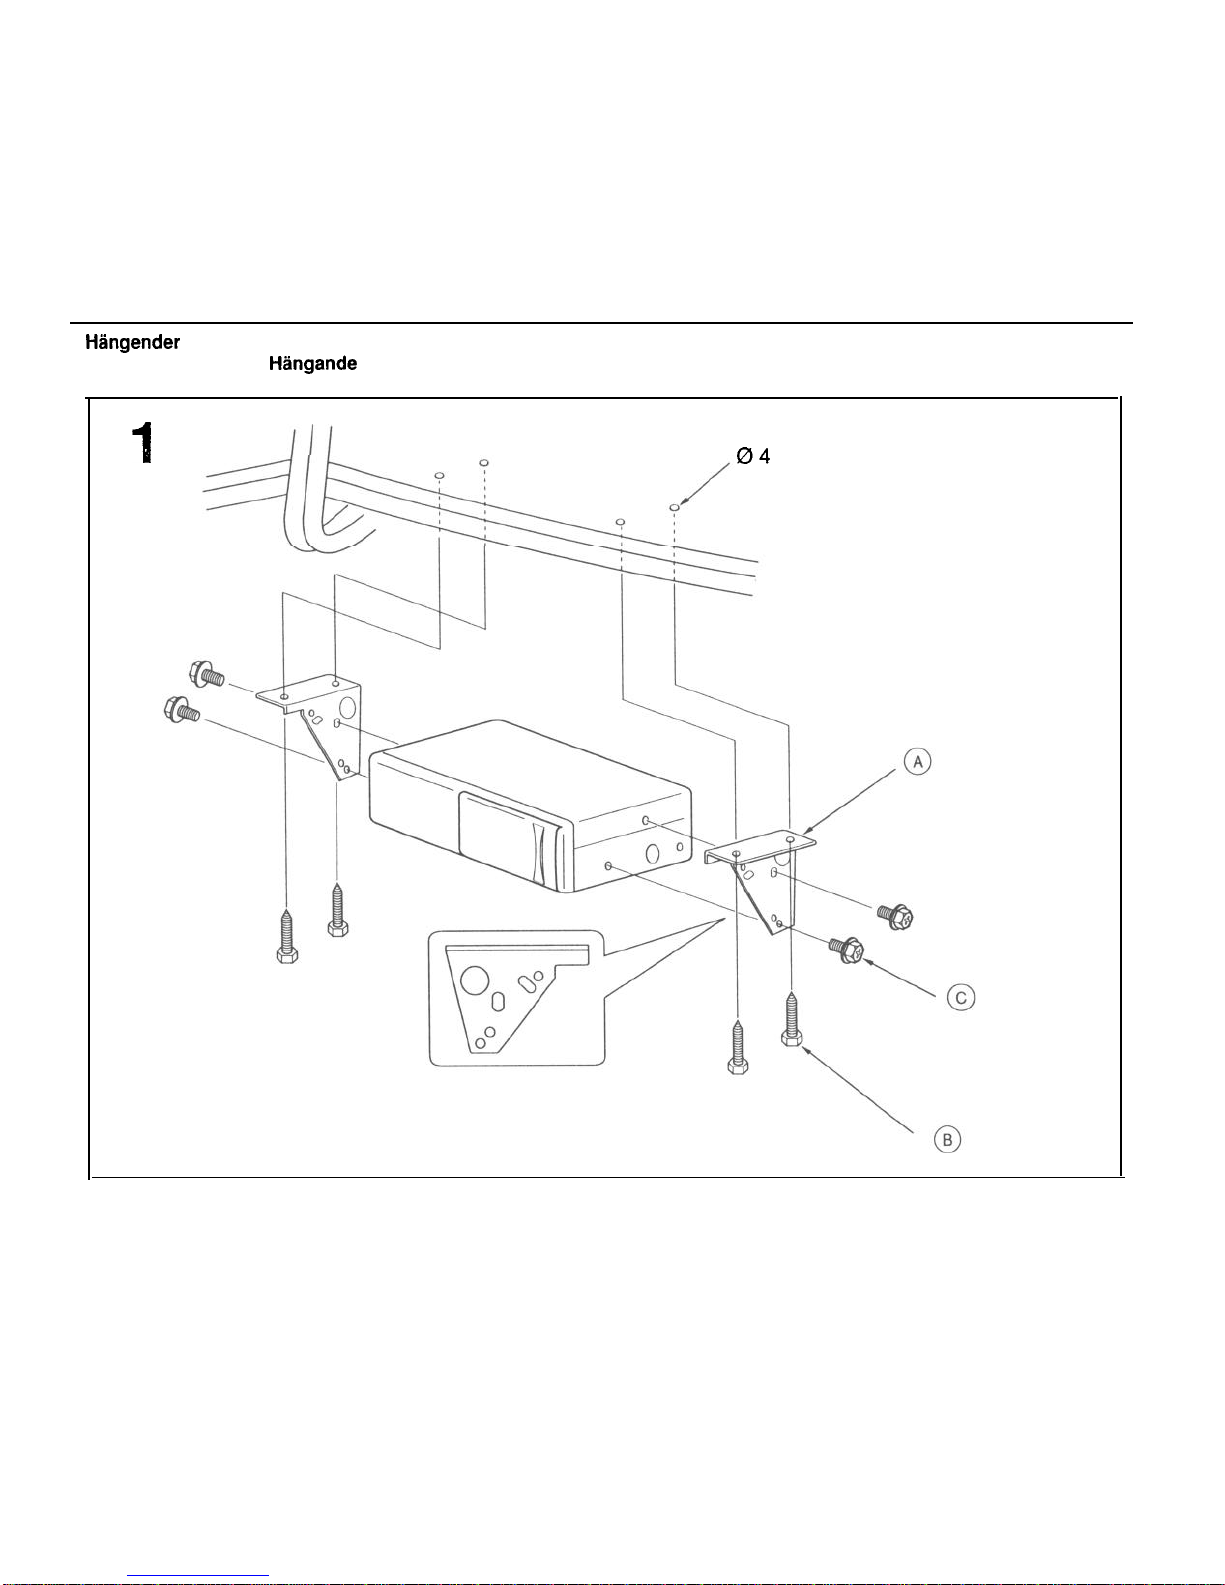
Nel di un montaggio sospeso ripiano posteriore oppure nel vano bagagli osservare seguenti misure di sicurezza:
Scegliere con luogo di fissaggio in modo I’apparecchio possa essere montato in posizione orizzontale.
Fare attenzione al I’apparecchio non ostacoli le braccio del coperchio del portabagagli.
Bij montage onder de hoedenplank (of anderszins in de kofferruimte) de inbouwplaats zo kiezen dat de
wisselaar horizontaal gemonteerd kan
De wisselaar mag de vrije beweging van verenlarmen van achterklep of kofferdeksel niet belemmeren.
monteras under hatthyllan i bagageutrymmet det viktigt att pa
noga hanger horisontellt.
Se noga till att bagageluckans stag ej hindras.
No de uma montagem suspensa sob o ou na observe as seguintes medias de seguranca:
Escolha o local de atenciosamente que a unidade possa ser montada horizontalmente.
que a unidade impessa as molas e o da
Winkeleinstellschalter lAngle’adjustment switches lCommutateurs de d’angle lConmutadores de adjuste de
llnterruttori di regolazione dell’angolatura lVinkelinstlllningsomkopplare lSchakelaars voor installatiehoek l
Interruptor de adjuste do
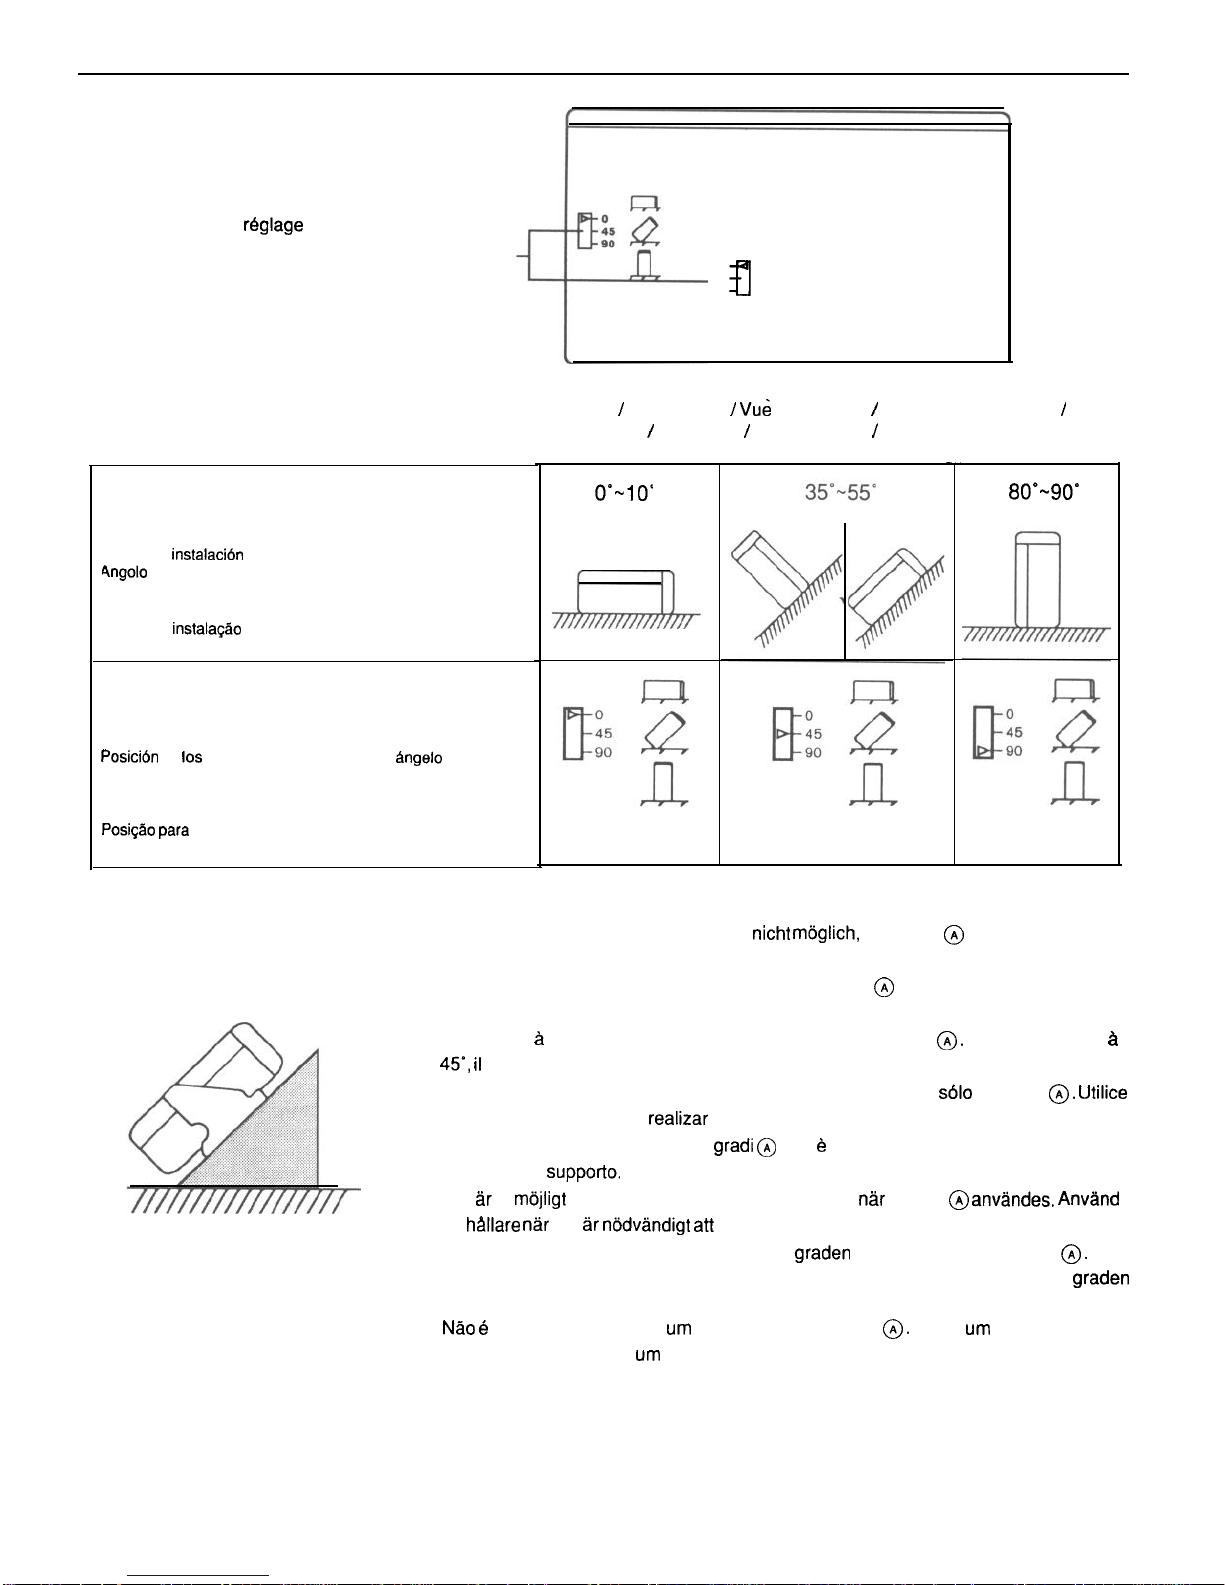
Die Winkeleinstellschalter an der Unterseite entsprechend des Einbauwinkels
des CD-Autowechslers eingestellt werden. Beide Schalter werden auf die gleiche Position eingestellt. Wenn die Schalter nicht
richtig eingestellt sind, und andere Fehlfunktionen eintreten.
The angle adjustment switches on the bottom panel are to be set ac cording to the angle of installation of the CD auto changer.
Set both of the two switches to the same position. If the switches are not set properly, sound skip or other malfunction may
occur.
Les commutateurs de d’angle qui se trouvent sur le panneau du fond doivent places dans la position correspondant
Tangle d’in stallation du de CD. Les deux commutateurs doivent dans la position. Si ces commutateurs
ne sont pas convenablement peut y avpir des de son ou d’autres de fonctionnement.
Los conmutadores de ajuste de ubicados en el panel inferior debe ran ajustarse el de del
cambiador de discos Ponga ambos conmutadores en la misma Si conmutadores mal
ajustados, el sonido o producirse un mal funcionamiento.
Gli interruttori di regolazione dell’angolatura del pannello posteriore vengono regolati sull’angolo di installazione del CD
Ambedue si devono trovare stessa posizione. Se non fossero rego lati bene, la riproduzione potrebbe
o si potrebbero avere altri di funzionamento.
Vinkelinstallningsomkopplarna, pa undersidan, in pa den position som monteras i.
omkopplarna pa position. Om omkopplarna ej stalls i kan ljudbortfall och andra

Winkeleinstellschalter
Angle adjustment switches
Commutateurs de d’angle
Conmutadores de adjuste de angulo
lnterruttori di regolazione dell’angolatura
Vinkelinstallningsomkopplare
Schakelaars voor installatiehoek
Interruptor de adjuste do angulo
0
49
90
Einbauwinkel
Installation angle
Angle d’installation
Angulo de
di installazione
Uonteringsvinkel
Installatiehoek
Angulo de
Winkeleinstellschalter-Position
Angle adjustment switch position
Position des cotateurs de reglage dangle
de conmutadores de ajuste de
Posizione interruttore di regolazione
Vinkelinstallingsomkopplare-position
Stand van de schakelaar overeenkomstig met de installatiehoek
OS interruptores de ajuste do angulo
Bodenansicht Bottom view de dessous Vista del panel inferior
Visione dal basso Undersida Onderpaneele Vista do painel inferior
Der Einbau in einem Winkel von 45’ ist wenn nur verwendet wird.
Eine Halterung verwenden wenn der Einbau in einem Winkel von 45’ notwendig ist.
It is not possible to install at an angle of 45 deg. if only is used. Use a support when
it is required to install at an angle of 45 deg.
L’installtion une inclinaison de 45’ est impossible en utilisant Pour I’installation
faut utiliser un support.
No es posible realizar una instalacion con un angulo de 45’ si se utiliza
un soporte cuando quiera una instalacion con un angulo de 45’.
L’installazione ad un angolo di 45 non possibile. Se esso fosse necessario,
servirsi di un
Det ej att montera med 45 graders lutning endast
en det montera med en vinkel pa 45 grader.
U kunt het toestel niet met een hoek van 45 installeren bij gebruik van
Gebruik een ondersteuningsbeugel wanneer u het toestel met een hoek van 45
wenst te installeren.
possivel instalar corn angulo de 45’ utilizado Utilize apoio se for
necessario instalar corn angulo de 45’.

l
an ein Blaupunkt-Autoradio mit Disc-Management-System.
l
to a Blaupunkt car stereo with Disc Management System.
l
un autoradio de Blaupunkt Disc Management.
l
a un autorradio Blaupunkt con Disc Management System.
l
ad un’autoradio Blaupunkt dotata di un sistema Disc-Management.
l
op een Blaupunkt autoradio met DSC (Disc Management System).
l
till en Blaupunkt bilstereo med Disc Management System.
l
a auto-radio Blaupunkt corn sistema Disc-Management.
Achtung Hinweis
Zur Vermeidung von trennen Sie vor dem
den der Autobatterie ab.
Caution
Before making connections, disconnect the ground pole of
the car battery to avoid short circuits.
Attention
Avant d’effectuer les connexions, debrancher le fil de
masse de la batterie de voiture pour un court-circuit.
Antes de realizar las conexiones, desconecte polo de
masa de la bateria del evitar cortocircuitos.
Attenzione
Per evitare corti staccare di
batteria dell’auto prima di iniziare con collegamento.
Let op!
Voorkom kortsluiting! Alvorens te sluiten eerst de
van de accu loskoppelen.
Varning
For att undvika kortslutning bilbatteries minuspol vara
under monterings- och inkopplingstiden.
evitar separe por 0 contact0
de da bateria do veiculo antes da montagem.
Achten Sie darauf, das mitgelleferte
kabel verwenden. Verwendung sines anderen
Kabels auftreten.
Note
Be sure to use the supplied extension cord. Using a cord
other than supplied one may cause noise.
Note
S’assurer d’utiliser cable de rallonge fourni. D’autres
cables risqueraient de causer des parasites.
de utilizar el cable de suministrado.
Si otro cable que no sea el suministrado, pueden
producirse ruidos.
Utilizzare esclusivamente la prolunga fornita. Utilizzando
altre prolunghe possono verificarsi disturbi.
Opm.
Gebruik uitsluitend de meegeleverde verlengkabel. Bij
gebruik van een andere kabel kunnen stooringen optreden.
Information
endast den medlevererade
Vid anvandning av andra kablar finns risk for stbrningar.
Utilize sempre o fio de fornecido. Ao utilizar
outro fio, surgir interferencias.
Blaupunkt-Werke
Bosch Telecom
KH-CNKD 3 D94 162 010
PM
Other manuals for A 05
1
Table of contents
Other Blaupunkt CD Player manuals

Blaupunkt
Blaupunkt BB6 User manual

Blaupunkt
Blaupunkt CDC-A08 User manual

Blaupunkt
Blaupunkt San Francisco CD70 User manual

Blaupunkt
Blaupunkt CDC M7 User manual

Blaupunkt
Blaupunkt MS35BT User manual

Blaupunkt
Blaupunkt CDC A03 User manual

Blaupunkt
Blaupunkt CDC A03 Specification sheet

Blaupunkt
Blaupunkt CDC A071 User manual

Blaupunkt
Blaupunkt Arlech CP-2990 User manual

Blaupunkt
Blaupunkt IDC-A09 Specification sheet