Blaze PowerZone Connect 122 User manual
QUICK START GUIDE
DSP AMPLIFIERS
PowerZone Connect 122 • 252 • 254 • 504
Carton Contents
• Amplier unit • Output connector x 1 or 2
• Mains power cable • Adhesive rubber feet x 4
• Input connector x 2 • Document pack
• GPIO socket connector
Support
• A full user manual that includes information
on installation, mounting accessories and
amplier operation is available online. Go to
www.blaze-audio.com, or scan the QR code
to go directly to our support page.
Wireless Network Control Connection
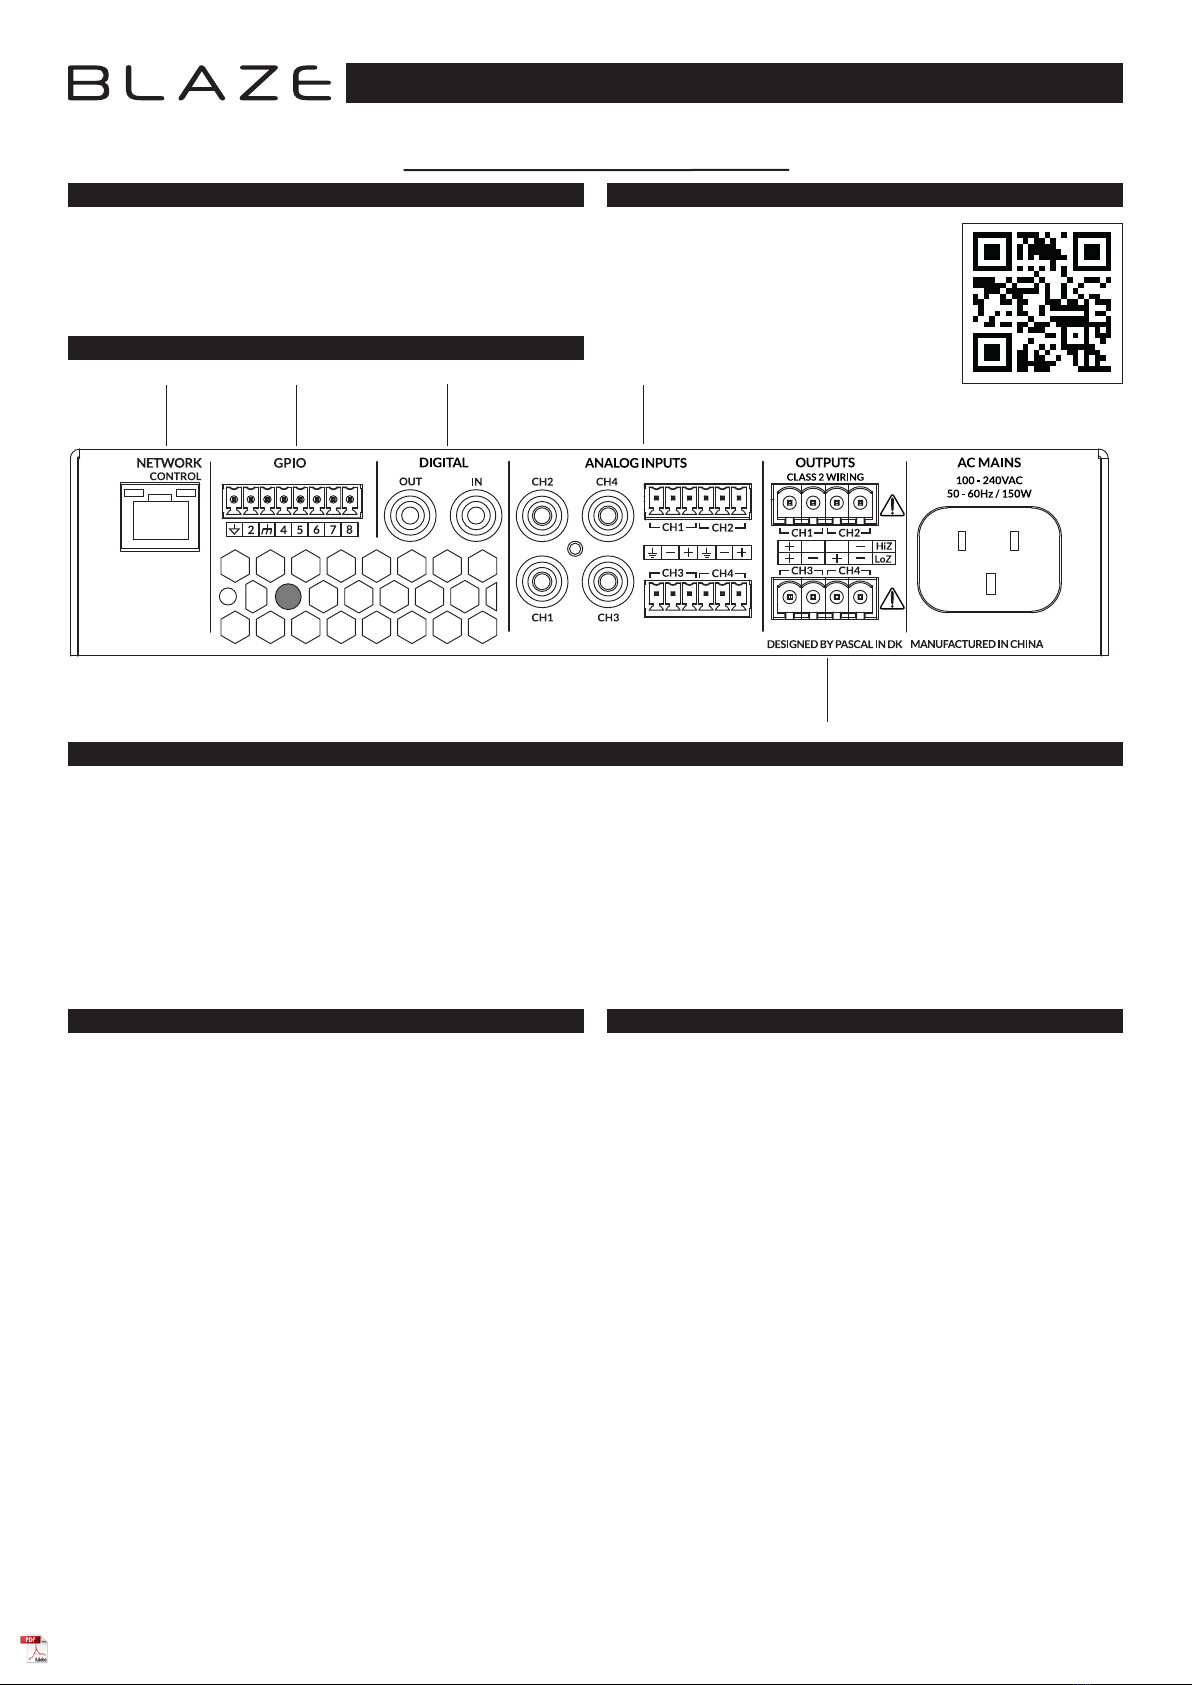
Connection Sockets
Wired Network Control Connection
• High or low impedance speaker connection options can
be selected independently for each output channel via the
PowerZone Control Web App.
• Analogue input sensitivity can be adjusted independently for
each channel via the PowerZone Control Web App.
• S/PDIF digital audio I/O routing can be congured via the
PowerZone Control Web App.
Installation Notes
Network
Control
Congurable
GPIO
Congurable
S/PDIF Audio I/O
Audio Inputs
Balanced: Euroblock - Unbalanced: RCA Phono.
Congurable
Speaker Outputs
• GPIO (General Purpose Input/Output) options can be
congured via the PowerZone Control Web App.
• Ensure that rack or other conned installation does not
restrict the airow required for safe and reliable operation of
the equipment. It is important to ensure that the 40°C maximum
operating temperature for the equipment is not exceeded.
A mobile, laptop or desktop device with WiFi functionality and a
web browser is required.
Follow the steps below.
1. Connect the PowerZone Connect amplier to mains power
using the supplied mains cable and wait for the front panel WiFi
indicator to illuminate green.
2. Use a mobile, laptop or desktop device to search for available
WiFi networks. Connect to, ‘Blaze (product serial number)’ using
the password, ‘password’. The amplier serial number can be
found on its rear panel.
3. Open a mobile, laptop or desktop device web browser and enter
the following IP address: 192.168.4.1. The amplier conguration
web interface page will open in the browser app to enable
amplier conguration as required.
It is strongly recommended that the PowerZone Connect
amplier WiFi password is changed following initial wireless
connection.
A laptop or desktop device with Ethernet functionality, a web
browser and a network scanning app is required.
Follow the steps below.
1. Connect the PowerZone Connect amplier Network Control
socket directly to a laptop or desktop device - or through a switch.
2. Connect the PowerZone Connect amplier to mains power
using the supplied mains cable and wait for the front panel
Network indicator to illuminate green to indicate that the
amplier has network connectivity.
3. The default LAN IP address of the amplier is 192.168.64.100.
Congure your laptop or desktop device to a xed IP address
in the same IP range, ex. 192.168.64.10, with Subnet mask
255.255.255.0 (or prex 24) and set Gateway to 192.168.64.1.
4. Open a laptop or desktop device web browser and enter the
address http://192.168.64.100/ - The amplier conguration
web page interface will open to enable amplier conguration as
required.
*Product shown as example is PoweZone Connect 4 Channel version (504)

This symbol is intended to alert
the user to the presence of
uninsulated “dangerous voltage”
within the product’s enclosure
that may be of sufcient
magnitude to constitute a risk
of electric shock to persons.
Ce symbole a pour but d’attirer l’attention de l’utilisateur sur la présence, à
l’intérieur du boîtier de l’appareil, d’une «tension dangereuse» non isolée,
qui pourrait être sufsamment puissante pour représenter un risque
d’électrocution pour les personnes.
This symbol is intended to
alert the user to the presence
of important operating and
maintenance (servicing)
instructions in the literature
accompanying the appliance.
Ce symbole a pour but d’attirer l’attention de l’utilisateur sur la présence,
dans la documentation qui accompagne l’appareil, d’instructions importantes
relatives à son utilisation et sa maintenance (entretien).
Consignes de sécurité importantes
1. Veuillez lire ces instructions.
2. Conservez ces instructions.
3. Respectez tous les avertissements.
4. Suivez toutes les instructions.
5. N’utilisez pas cet appareil près de l’eau.
6. Nettoyez uniquement avec un chiffon sec.
7. N’obstruez pas les ouïes de ventilation. Installez l’appareil en respectant
les instructions du fabricant.
8. Éloignez l’appareil des sources de chaleur: radiateurs, bouches de
soufage, fours et autres (y compris les amplicateurs).
9. Pour réduire le risque d’électrocution, le cordon d’alimentation doit être
connecté à une prise de courant avec une mise à la terre de protection.
10. Respectez le dispositif de protection de mise à la terre de la prise secteur.
Une prise polarisée est équipée de deux ches, l’une plus large que l’autre.
Une prise avec borne de terre est équipée de deux ches et d’une borne de
terre. La che large, ou la borne de terre, est garante de votre sécurité. Si
la che secteur fournie avec l’appareil ne correspond pas à la prise secteur
de votre installation, faites remplacer cette dernière par un électricien.
11. Disposez les câbles de sorte qu’ils ne puissent pas être piétinés, coincés ou
pincés; une attention toute particulière doit être accordée au niveau des
prises secteur et de l’embase secteur de l’appareil.
12. Ne débranchez pas l’appareil en tirant sur le cordon. Utilisez la che.
13. Débranchez cet appareil du secteur lors des orages ou des longues
périodes d’inutilisation.
14. Conez toute réparation à un technicien qualié. L’intervention d’un
technicien est nécessaire dans les cas suivants: le cordon d’alimentation
ou la prise secteur sont endommagés, des corps étrangers ou du liquide
se sont introduits dans l’appareil, l’appareil a été exposé à la pluie ou à
l’humidité, l’appareil montre des signes de dysfonctionnement ou est
tombé.
15. Le coupleur de l’appareil, ou la che secteur, est le dispositif de
déconnexion du secteur et doit rester facilement accessible après
l’installation.
Important Safety Instructions
1. Read these instructions.
2. Keep these instructions.
3. Heed all warnings.
4. Follow all instructions.
5. Do not use this apparatus near water.
6. Clean only with a dry cloth.
7. Do not block any ventilation opening. Install in accordance with the
manufacturer’s instructions.
8. Do not install near any heat sources such as radiators, heat registers,
stoves, or other apparatus (including ampliers) that produce heat.
9. To reduce the risk of electrical shock, the power cord shall be connected
to a mains socket outlet with a protective earthing connection.
10. Do not defeat the safety purpose of the polarized or grounding type
plug. A polarized plug has two blades with one wider than the other. A
grounding type plug has two blades and a third grounding prong. The wide
blade or the third prong are provided for your safety. If the provided plug
does not t into your outlet, consult an electrician for replacement of the
obsolete outlet.
11. Protect the power cord from being walked on or pinched particularly at
plugs, convenience receptacles, and the point where they exit from the
apparatus.
12. Do not unplug the unit by pulling on the cord, use the plug.
13. Unplug this apparatus during lightning storms or when unused for long
periods of time.
14. Refer all servicing to qualied service personnel. Servicing is required
when the apparatus has been damaged in any way, such as power supply
cord or plug is damaged, liquid has been spilled or objects have fallen into
the apparatus, the apparatus has been exposed to rain or moisture, does
not operate normally, or has been dropped.
15. The appliance coupler, or the AC Mains plug, is the AC mains disconnect
device and shall remain readily accessible after installation.
This equipment must be earthed.
FCC Compliance
This device complies with part 15 of the FCC Rules. Operation is subject to the
following two conditions:
1. This device may not cause harmful interference.
2. This device must accept any interference received, including interference
that may cause undesired operation.
Note: This equipment has been tested and found to comply with the limits
for a Class B digital device, pursuant to part 15 of the FCC Rules. These limits
are designed to provide reasonable protection against harmful interference
in a residential installation. This equipment generates uses and can radiate
radio frequency energy and, if not installed and used in accordance with the
instructions, may cause harmful interference to radio communications.
However, there is no guarantee that interference will not occur in a particular
installation. If this equipment does cause harmful interference to radio
or television reception, which can be determined by turning the equipment off
and on, the user is encouraged to try to correct the interference by one
or more of the following measures:
- Reorient or relocate the receiving antenna.
- Increase the separation between the equipment and receiver.
- Connect the equipment into an outlet on a circuit different from that to which
the receiver is connected.
- Consult the dealer or an experienced radio/TV technician for help.
AVIS
RISQUE DE CHOC
ELECTRIQUE.
NE PAS OUVRIR
CAUTION
RISK OF ELECTRIC SHOCK
DO NOT OPEN
QUICK START GUIDE
DSP AMPLIFIERS
PowerZone Connect 122 • 252 • 254 • 504
Blaze Audio, Pascal A/S, Ellekaer 6, DK-2730 Herlev, Denmark. [email protected]. www.blaze-audio.com
Rev 2.24/11/2021
Class 2 Wiring
Exposed high voltage on the speaker terminals. Touching the
uninsulated terminals or wiring may result in an unpleasant
sensation
Class 2 Câblage
Haute tension exposeé sur les bornes des haut-parleurs. Toucher
les bornes ou le câblage non isolés peuvent entraîner une sensation
désagréable
Other manuals for PowerZone Connect 122
4
This manual suits for next models
3
Other Blaze Amplifier manuals

Blaze
Blaze PowerZone Connect 1002 Troubleshooting guide

Blaze
Blaze PowerZone Connect 122 User manual

Blaze
Blaze PowerZone Connect 122 User manual

Blaze
Blaze PowerZone Connect 122D Troubleshooting guide

Blaze
Blaze PowerZone Connect 122 User manual

Blaze
Blaze PowerZone Connect 122 User manual

Blaze
Blaze PowerZone Connect 2004D Troubleshooting guide


