BleBox RainSensor User manual

Download the free wBox application. If you have an Android mobile device,
you will nd the application in the Play Store. For iOS devices the application
is in the App Store.
By using your mobile phone or tablet, connect it to the device wireless
network. To do this, enter to your smartphone or tablet settings, then
go to setting of the WiFi network and nd the network name „rainSen-
sor-xxxxxxxxxx” where xxxxxxxxxx is the serial number of the device. Con-
nect to this network.
Turn on the wBox application. You will see your device on the main screen.
In order to add it to your application account, select “Add device to account”.
If you are the installer and do not want to assign the device to your account,
select “Use only once”.
You can also set the conguration using the web browser of your phone / ta-
blet. After connecting to the wireless network of the controller, turn on the
browser and go website www.blebox.eu
rainsensor
MINIATURE RAIN SENSOR
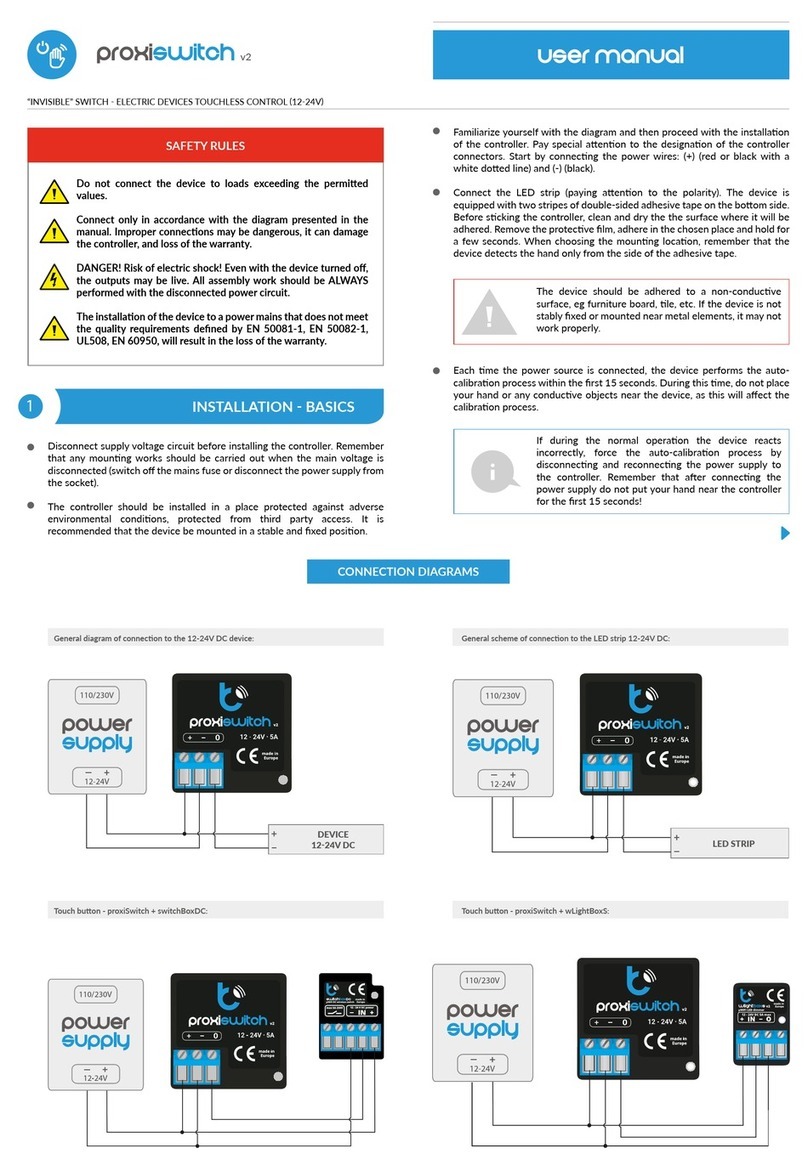
Connect only in accordance with the diagram presen-
ted in the manual. Improper connections may be dange-
rous, it can damage the controller, and loss of the warranty.
DANGER! Risk of electric shock! Even with the device turned off,
the outputs may be live. All assembly work should be ALWAYS
performed with the disconnected power circuit.
The installation of the device to a power mains that does not meet
the quality requirements de ned by EN 50081-1, EN 50082-1,
UL508, EN 60950, will result in the loss of the warranty.
1INSTALLATION - BASICS
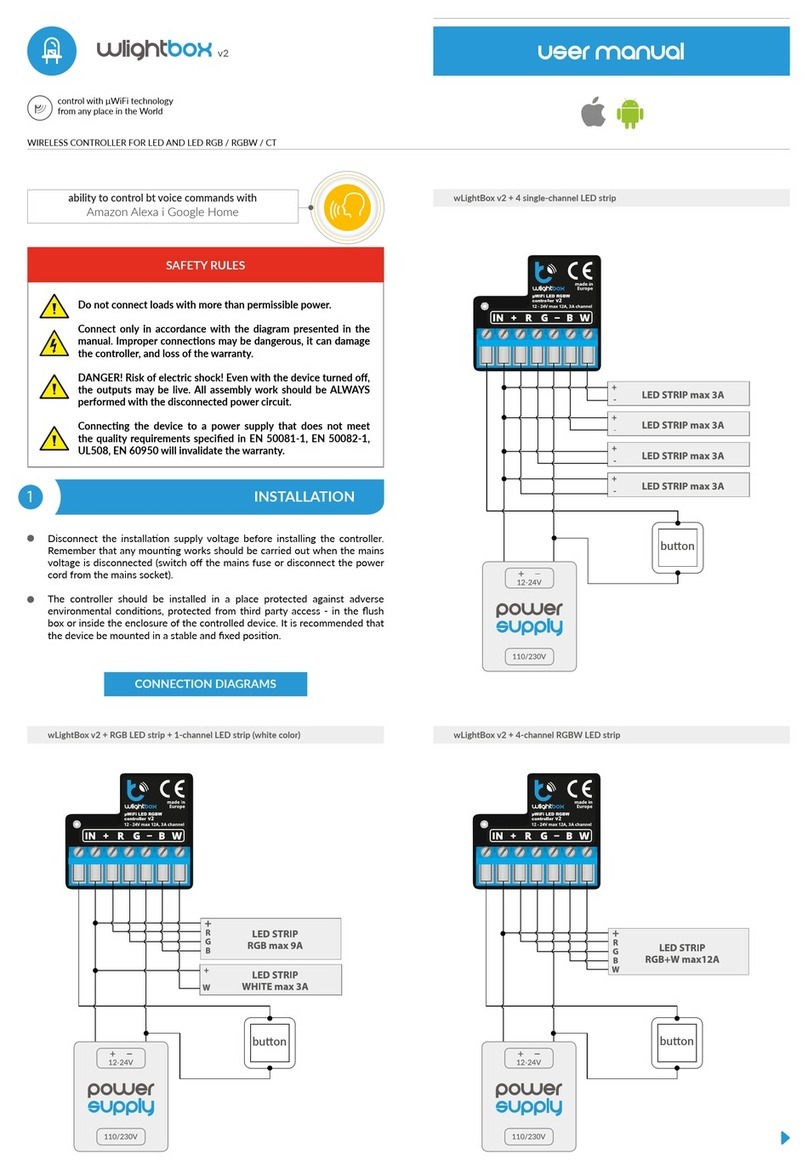
Disconnect supply voltage circuit before installing the controller. Remember
that any mounting works should be carried out when the main voltage is dis-
connected (switch off the mains fuse or disconnect the power supply from
the socket).
The controller should be installed in a place protected against accidental
damage, in a place directly exposed to rainfall. Prolonged exposure to acid
rain or salt seawater may shorten the life of the sensor. Remember that me-
tal elements (cables, large tting elements) negatively affect the range of the
device, and thus the comfort of use. The device should be mounted horizon-
tally. Arrange the cable in such a way that the stream of water owing down
it does not drip directly towards the controller - it is best to direct the cable
downwards or arrange the cable in a U-shape directly in front of the contro-
ller. The mounting bracket can be rotated, which allows the cable to be led
out from the long or short side of the device.
Familiarize yourself with the diagram and then proceed to the installation.
Pay particular attention to the color marking of the cable cores, two color
versions are possible: black, red and yellow, or white, brown and green. The
+ 24V power supply connect to the red / brown wire, ground to the black /
white wire.
If the controller should send a signal about rainfall detection to another ex-
ternal device (e.g. the windRainSensor controller or other window actuator
control unit) via the cable, connect the rainfall signaling output, i.e. the yellow
/ green wire and the common black / white ground wire to the external de-
vice. The signaling output is an open-drain type and behaves in a similar way
to the relay contacts. In case of rain detection, the output pin is internally
shorted to the common ground (black / white wire) and remains shorted for
the entire period of rain and for some time after its end (time set in options).
When inactive, i.e. when no rain is detected, the signaling output is in a high
impedance state. If you are not using a control output, insulate the yellow /
green wire to avoid short circuit.
After making sure that the device has been connected in accordance with the
diagram and that if the rainfall output is not used, the yellow / green wire is
properly insulated, turn on the device by turning on the power supply (swit-
ching on the mains fuse or connecting the power cord to the socket).
FIRST START
SAFETY RULES
L
N
made in Europe
OPCJONALNE
12-24V DC
Basic connection
Wind&RainSensor connection
Connection to other automation
system
2
CONNECTION SCHEME
user manual
OPTIONAL
OPTIONAL
VCC (12-24V DC )
GND
DESZCZU
ENTRY
RAIN

DEVICE SETTINGS
ACTIONS
NOTIFICATIONS
Go to the device settings (the “Settings” icon in the top right corner of the
screen). In the “Name and icon” section you can change the name of the de-
vice under which it is displayed in the wBox application. In the “Device Se-
ttings” section it is possible to turn off the LED diode built into the device.
Rainfall, especially in the nal stages, is discontinuous. The “Sustain time”
option allows to maintain the rainfall signaling for some time, despite the
drying of the sensor surface. This is to lter out multiple end-of-rain noti-
cations. Default value: 5min.
The controller allows you to display a system notication on a phone with
the wBox application installed on the particular trigger, eg. when it starts
raining.
Notications only work when the controller has a stable Internet access
and the “Remote access” option is enabled (default setting).
Notications are added similarly to “Actions” - ll in the form elds and in
the “Execute” tab select “Notication” as “Result”. Conrm with the “Save”
button.
When adding an action in the “When” tab select “Starts raining” or “Stops
raining” as “Trigger type”.
In the “Execute” tab select “Control other device” as “Result”, conrm. Click
on the “Select device” icon. The device will search the network for compa-
tible devices and display them in a list. Choose the device you want to con-
trol. If the device is not listed you must use the general API control method
described below or update the rmware in target device.
Then in the “Call API” eld enter the API command that the driver will call.
The most popular API control commands /s/ for switchBox and shutterBox
are presented below:
Switching on the circiut via switchBox: 1
Switching off the circuit via switchBox: 0
Opening the awning via shutterBox: u
Closing the awning via shutterBox: d
By default, the action will be triggered once, when the trigger condition is
met. It is also possible to repeatedly call a given action by selecting one of
the repeat options and setting the interval.
If the device was not on the found list or you want to control another devi-
ce in the network, select “Call URL” as “Action type”.
In the “URL” eld, enter the API command preceded by the http protocol
prex and the IP address of the wBox device which will be controlled. The
IP address can be found in the device settings. Caution! All the controllers
must be in the same subnet, usually the subnet of a home router.
The most popular API commands for switchBox and shutterBox are pre-
sented below. It was assumed that the IP address of the device which will
be controlled is: 192.168.1.123
Switching on the circuit via switchBox: http://192.168.1.123/s/1
Switching off the circuit via switchBox: http://192.168.1.123/s/0
Opening the awning via shutterBox: http://192.168.1.123/s/u
Closing the awning via shutterBox: http://192.168.1.123/s/d
In the “Summary” tab name the action, check its correctness and conrm
the entry with the “Save” button.
A detailed description of how to control other controllers of the wBox se-
ries is available in the “Extended instructions for wBox devices”, while all
the technical documentation API of the wBox controllers is available at:
http://technical.blebox.eu
The added action will be displayed on the list. By expanding its details it is
possible to preview the status of its last execution.
4
5
6
3WIFI CONNECTION AND SERVICE CONNECTION
(AP) SETTINGS
Go to the WiFi network settings (“Settings” icon in the top right corner of
the screen, “Connection” section), where you can connect the device to the
home WiFi network to be able to control the device via it or from anywhere
in the world. To do this, select the network name from the list of availa-
ble networks and press “Connect”. If required, enter your WiFi password.
When connecting the device to the home network, the phone / tablet may
disconnect from the device’s network.
After reconnecting the phone to the controller’s WiFi network, check the
“WiFi Client status” and “Remote access status” elds. The controller is
equipped with a network connection supervision system which in case of
problems with connection to the WiFi or the Internet will report the pro-
blem and its possible causes. If the network is working properly both elds
will be set to “Connected”.
In order to communicate with the device from outside the local WiFi ne-
twork, from anywhere in the world, via the wBox application, the device
automatically connects to the BleBox cloud system service by default. The
remote access system is fully encrypted and secure, the data are transmit-
ted by European servers from reputable companies. It is possible to disable
the remote access service - after clicking the “Congure” button, toogle
the switch next to the “Remote access” option. Remember that disabling
“Remote access” will result in no access to the controller from outside the
local network as well as disabling the notications and external integration
systems, therefore we recommend that you leave this option enabled (de-
fault setting). event log
Enabling the “Event log” option will cause the device to record events (e.g.
about sent notications set in the “Actions” section) in the BleBox cloud
system. This allows the history of the events to be viewed later also when
the controller is ofine.
After completing the WiFi network conguration, you can disconnect from
the device network and connect the phone / tablet directly to your home
WiFi network. Control from the wBox application will work in the same
way as when the phone / tablet is connected to the device’s network. If as a
user you leave the local network, eg leaving your home or enclosing mobile
data, the wBox application will signal this status as “Remote mode”. In this
case, you will have access to the device data, but for security reasons set-
tings options will not be available.
In the “Service connection (AP)” section, you can change the name
and give the password of the WiFi network emitted by the devi-
ce. Remember that changing the network name or password can
cause disconnection with the device immediately after clicking
the “”Save”” button, so you should reconnect to the WiFi network.
It is also possible to completely disable the access point emit-
ted by the device. To do this move the “Access point” slider to
the off position and conrm the selection with the ”Save” button.
Attention! If the controller does not have a stable connection to the WiFi
network (“WiFi client status”: “Connected”, without any error warnings),
restarting the access point will not be possible - in this situation, the only
solution is to reset the controller to the factory settings. Disabling the ac-
cess point is recommended only after the complete driver conguration
and making sure that the entire system is working properly.”
In order for the notication to be displayed on the phone it is necessary to
allow the controller to display notications. Go to the main menu of the
wBox application, to the “Notications” tab. Then go to the settings (the
“Settings” icon in the upper right corner of the screen). Find the device on
the list and select “Action notication” from the drop-down list next to the
device name. You can also select other types of available notications or
μPortal notications. Conrm the change of preferences with the “Save”
button in the upper right corner of the screen.
If notications are not displayed despite their conguration check in the
phone system settings (Android / iOS) whether the wBox application is
authorized to display system notications.
The controller allows you to send control commands to other BleBox
controllers via the WiFi network through the API. Each action will be
deployed on particular trigger, eg. when it starts raining.

TIME AND LOCATION OF THE DEVICE
Go to settings, to the “Time and location” section. In the “Device time” tab, se-
lect your region and location from the list, conrming the changes with the
“Save” button. The device will synchronize its time with the NTP time server
(if the controller is in a WiFi network with Internet access) or will download
the time from the phone / tablet. Since the controller does not have a clock
backup battery, the clock resets itself when the power is disconnected. Hence,
it is recommended that the controller is always connected to a WiFi network
with internet access so that it can automatically synchronize its clock. This is
especially important in controllers that have the function of working with the
schedule.
You can specify the location of the controller using your smartphone or tablet.
In the “Device location” tab click the “Set location” button. The application will
ask whether to share the location - allow. The approximate coordinates of
your location should appear in the “Coordinates” box. If the “Set location” but-
ton ashes red with “Error” or the “Coordinates” eld has not changed the va-
lue from “Not set” to numerical data there has been a failure in retrieving the
location. You should then make sure that the phone / tablet has a GPS module
and that the wBox application has access rights to download the location in
the phone settings. Setting the location is especially important in controllers
that have the function of working with the schedule, in which the schedule is
based on sunrise and sunset.
7
SOFTWARE UPDATE
HELP
8
9
In order to update the software in the controller it must be connected to
the home WiFi network (see “WiFi connection settings” section) which is
connected to the Internet. Go to settings, to the “Details, update and help”
section and click the “Check for update” button. If an update is available the
button changes to “Download new software”. After clicking it, wait about 1
minute without closing the interface or taking any other actions. The device
will download the latest software and then reboot. You can read the device
ID, hardware and software versions in the device details.
The latest versions of the manual, additional informations and materials
about products are available on our website: blebox.eu
General questions: info@blebox.eu
Service and technical support: [email protected] “
Before contacting our service, if it is possible, prepare the “Service key” of
the given controller available in its settings, in the “Details, update and help”
tab. By clicking the icon, the key will be copied to the phone’s clipboard. Pre-
pare also the “Installation key” of the wBox application, available in the main
application menu, in the “Settings” tab.
Factory reset manual is available at: blebox.eu/start/reset
Attention! Factory reset does not remove the controller
from the user account assigned to it. The device must
be independently removed from the account - select
“Manage devices” from the main menu of the wBox
application, then select the device and click the “Remove
device” button. Alternatively, you can log into the portal.
blebox.eu system, go to the “Devices” tab, choose the
device and select “Remove device” from the top-right
“Actions” menu.
power supply 12 - 24V DC
energy consumption < 1W (stand-by), <1,5W (at heating)
number of control outputs 1
type of control outputs open-drain, ground control
maximum load 6W
type of measurement rainfall detection (start and end)
sensor heating automatic, energy saving function
ambient temperature in the
measuring range from 0°C to 50°C
controller operating temperature from -20°C to 50°C
dimensions 50 x 35 x 16 mm2
housing
plastic, covered with a polyurethane
composition not containing halogens,
self-extinguishing for thermal class B
(130°C)
type and length of the cable 5m, LIYY 3x0.25 mm2
mounting method
holes in the mounting bracket or a
self-adhesive element (tape), mounting
bracket adapted to rotate the direction
of the cable exit, horizontal installation
in a place exposed to rain
protection level IP55
protection inverted polarization, ESD
antenna integrated
communication standard μWiFi, compatible with WiFi, 802.11g
transmission type bi-directional, encrypted
encryption WPA2-PSK and authenticated encryp-
tion with associated data (AEAD)
modes
direct connection (as Access Point),
Wi-Fi connection via a stan- dard
router, connection with access from
any location in the world (requires only
access to the Internet)
radio frequency 2.4 GHz
API open
compatible devices and systems
Apple iPhone, Apple iPad, iPad Mini,
Android, computers and mobile devices
supporting HTML5
TECHNICAL SPECIFICATIONS
www.blebox.eu
made in Eurpe
for more information visit www.blebox.eu
or send an email to: [email protected]
technical support is available
Other BleBox Home Automation manuals
