Blucave BPM-6-1 User manual

1
5
2
6
3
7
4
8
YOUR BLUCAVE POWER
MODULE:
POWER MODULE
ORIGINAL INSTRUCTIONS
MODEL NO: BPM-6-1
Mounting/Portable..................................................
Mounting to the Rail...............................................
Removing from the Rail..........................................
Carrying....................................................................
Operation.................................................................
Extending the Power Cable....................................
Retracting the Power Cable...................................
Work Light and Power Strip Storage.....................
Cleaning/Servicing.................................................
General Safety Warnings........................................
1
1
1
1
2
2
3
4
5
15
POWER MODULE
1. Carry Handle
2. Locking Knob
3. Overload Reset Button
4. Power Outlet Socket
FOR INDOOR USE ONLY
5. Extendable Cord
6. Main Power Switch
7. Over Temperature Reset
Button
MOUNTING/PORTABLE
Caution: Always ensure the Power Module is unplugged/
removed from the power supply. If the Power Strip and
Work Light have been inserted, always check they have
been securely docked before carrying or mounting/
removing the Power Module.
MOUNTING TO THE RAIL
Place the handle in the carry/unlocked position as
shown on page 6. Attach to the Rail as shown on pages
7 & 8. Place handle in the storage/locked position as
shown on page 9.
Caution: Always ensure the Power Module handle is in
the locked position before using.
REMOVING FROM THE RAIL
Place the handle in the carry/unlocked position as
shown on page 6. Remove from Rail by reversing steps
shown on pages 7 & 8.
CARRYING
Always carry the Power Module with the handle in the
carry position as shown on page 6. Ensure the Power
Cord is retracted while carrying.
OPERATION:
SWITCHING ON/OFF
When used portably place the Power Module on its side
for greatest stability. See page 10.
Unwind the power cord from the cord wrap.
See page 11.
Plug the power cord into the power supply (and switch it
on if it’s switchable).
Push the on/off switch so the ‘I’ is depressed to turn
the power on. Push the on/off switch so the ‘0’ is
depressed to turn the power off.
EXTENDING THE POWER CORD
Caution: Always fully extend the power cord before use.
The retractable cord is driven and released by a spring
that can rewind the cable automatically. It is fitted with
a ratchet that makes it easy to extend and retract the
cord. While extending the cord the ratchet will rotate.
Every half turn of the reel you will hear the ratchet
rotate (every alternate half turn you will not hear the
ratchet rotate). The cord can be locked at any time the
ratchet can be heard. When the cord is extended to your
desired length, extend it slightly more until you hear
the ratchet. Gently release the tension on the cord to
be sure it has locked. Once locked you may release the
cord. Do not let go of the cord until you are sure it has
locked.
RETRACTING THE POWER CORD
To retract, extend the cord until the ratchet isn’t heard.
Hold and walk the cord back into the Power Module
while it is retracting.
Caution: Do not let go of the power cord while it is
retracting.
Warning: Never retract during the operation.
WORK LIGHT &
POWER STRIP STORAGE:
NOTE: Work Light and Power Strip NOT Included.
WORK LIGHT
The BluCave Work Light can be docked in the left
storage cavity of your Power Module. See page 12.
Insert until it is flush against the support posts. To
secure in place, turn the locking knobs 90º as shown on
page 14.
POWER STRIP
Insert the plug of the BluCave Power Strip into the
socket located in the right storage cavity of your Power
Module. Place the power cord into the cavity and
position the Power Strip over the two support posts
as indicated on page 13. To secure in place, turn the
locking knobs 90º as shown on page 14.
CLEANING/SERVICING:
Only use a moist cloth. Never use solvents and never
allow any liquids to get inside the Power Module (never
immerse any part of the product in liquid).
All maintenance should be performed by an Authorised
Service Centre. To find your nearest Authorised Service
Centre please contact the distributor as detailed on the
reverse of these instructions.
Note: BluCave or its distributors will not be responsible
for any damage or injuries caused by the repair of the
product by an unauthorised person or by mishandling or
misuse.
WELCOME:
CONGRATULATIONS
YOU’RE NOW A
BLUCAVER!
You’re one of the growing community who have
embraced the BluCave work zone!
The Power Module is one of the many
complimentary Booster items designed to ‘boost’
your BluCave.
REMEMBER:
Comply with all safety precautions and
instructions when using your BluCave products.
• When in doubt always ask for advice.
• Always wear protective clothing.
• Always work in an uncluttered environment.
TIP:
The BluCave Power Strip and Work Light
conveniently dock inside the Power Module for
storage and portability.
ENJOY:
Need some inspiration or support? The BluCave
website opens-up a whole new world of DIY.
You can ask for help, gain real time product
information, share ideas and receive regular
updates on special BluCave offers.
AUDIO MODULE:
The Audio Module has radio and MP3 connectivity
to keep you entertained while you work or even at
your next BBQ or outdoor activity.
SHELF:
The BluCave Shelf provides extra storage and
adds more functionality to your workspace. Dock
the BluCave Work Light, Power Strip and Battery
Charger under the Shelf to power and illuminate
your work bench.
Visit BluCave.com to view the complete work zone.
DID YOU KNOW…
The Power Module has a 6 meter retractable power
cable and an internal on/off switch.
SYMBOL
W Watts
Kg Kilograms
g Grams
dB(A) Decibels (A weighted)
m/s² Vibration
Hz Hertz
V Volts
A Amps
min-1 Revolutions or reciprocations per minute
n0 No load speed
Pa Pascals
mm Millimeters
Double Insulated Construction
4
5
6
3
1
2
7
Power Module BPM-1800 EU ENREV 06.indd 1 22/06/2004 2:08:37 AM

10
11
13
14
16
17
9 12 15
WARNING - To reduce the risk of injury during
operation, always read the instructions.
Always wear hearing protection. The effects of
noise can cause hearing loss.
Always wear a dust mask. When working with
wood and other materials, harmful dust may be
generated. Working with asbestos containing
materials is not permitted!
Always wear safety glasses. When working with
electric power tools, sparks, splinters, chips and
dust particles may be generated and these can
cause loss of sight.
WARNINGS
WARNING Read all safety warnings and all
instructions. Failure to follow the warnings and
instructions may result in electric shock, fire and/or
serious injury.
Warning! When using mains-powered equipment, basic
safety precautions, including the following, should
always be followed to reduce risk of fire, electric shock,
personal injury and material damage.
Read the whole manual carefully and make sure you
know how to switch the cord reels off, in an emergency,
before operating the reel.
Save these instruction and other documents supplied
with these reels for future reference.
1. WORK AREA SAFETY
a. Keep work area clean and well lit. Cluttered or dark
areas invite accidents.
b. Consider work area environment. Do not expose the
cord reel to high humidity or rain. Do not use the cord
TECHNICAL DATA
Power Module MODEL: BPM-6-1
Amps 12
Conductor Area 3 x 1.5mm2
Cord length 6m
Voltage 230V 50Hz
Max Power Cable Extended 3,000W
Max Power Cable Retracted 1,000W
Weight 5.75 kg
BluCave products are for private use only and are not
suitable for Commercial/Professional/Continuous Use.
The values given are valid for nominal voltages of 230V.
For lower voltage and models for specific countries these
values can vary.
reel in damp or wet conditions.
2. ELECTRICAL SAFETY
a. Power tool plugs must match the outlet. Never modify
the plug in any way. Do not use any adapter plugs with
earthed (grounded) power tools. Unmodified plugs and
matching outlets will reduce risk of electric shock.
b. Avoid body contact with earthed or grounded surfaces,
such as pipes, radiators, ranges and refrigerators.
There is an increased risk of electric shock if your body
is earthed or grounded.
c. Do not abuse the cord. Never use the cord for carrying,
pulling or unplugging the Power Module. Keep cord
away from heat, oil, sharp edges or moving parts.
Damaged or entangled cords increase the risk of
electric shock.
d. Retract the cord after use.
3. SERVICE
a. Have your Power Module serviced by a qualified repair
person using only identical replacement parts. This will
ensure that the safety of the power tool is maintained.
b. If the cord is damaged, it must be replaced by the
manufacturer or an authorised electrician in order to
avoid a hazard.
EC-Declaration of conformity
We, the undersigned Batavia GmbH, Blankenstein 180,
NL-7943PE Meppel, declare by our own responsibility that
the product Power Module, Item-No 7060528, Model Nr.
BPM-6-1, is according to the basic requirements,which
are defined in the European Directives Electromagnetic
Compatibility 2004/108/EC (EMC).
For the evaluation of conformity, the following
harmonized standards were consulted:
EN61242:1997+A1:2008
DIN VDE0620-1:2010
Meppel, 01 July 2012
Meino Seinen, QA Representative
Batavia GmbH, Blankenstein 180,
7943 PE Meppel, Netherlands
Symbols
The following symbols are important for reading and
understanding the operating instructions. Please take
note of the symbols and their meaning. The correct
interpretation of the symbols will help you to use the
machine in a better and safer manner.
Distributed by:
Batavia GmbH
Blankenstein 180
7943 PE Meppel - Netherlands
Office phone: +31 (0) 522 820200
www.batavia.eu
This symbol indicates that, at the end of its useful
life, this product must not be disposed of with
normal household waste. To prevent possible
harm to the environment or human health from
uncontrolled waste disposal please recycle this
product responsibly. If in doubt contact your local
council.
For Indoor Use ONLY
WARRANTY:
This Batavia product comes with a 2 year warranty.
Dear Client, all Batavia products have undergone a strict
quality process. If for any reason this product is not
working or damaged, please contact our Client Service
Centre. Please retain your original receipt of purchase.
The Batavia warranty covers all defects in workmanship
or materials for a two year period from the date of
purchase. The Batavia warranty does not cover any
malfunction, or defect resulting from misuse, neglect,
alteration, or repair.
Deutschland | Kundenservice
Montag bis Freitag von 9 bis 17 Uhr
01805 937832*
Other European countries | Customer Services
Monday till Friday from 8 am until 4 pm
00800 66477400
Website: www.batavia.eu | Email: [email protected]
*Nur €0,14 /Minute aus dem dt. Festnetz,
max. €0,42/Minute aus den Mobilfunknetzen.
© Demain International P/L 10/2011BPM-6-1-EN REV 06
BLUCAVE.COM
WORK LIGHT & POWER STRIP NOT INCLUDED.
Power Module BPM-1800 EU ENREV 06.indd 2 22/06/2004 2:08:40 AM
Popular Control Unit manuals by other brands
PVA
PVA SV200 Operation manual

Erica Synths
Erica Synths Black Series manual
HYDAC FILTER SYSTEMS
HYDAC FILTER SYSTEMS CTM-EB 1000 Series Operating and maintenance instructions
Mitsubishi
Mitsubishi Melsec-A AJ65SBT user manual
Beninca
Beninca KTE operating instructions
Danfoss
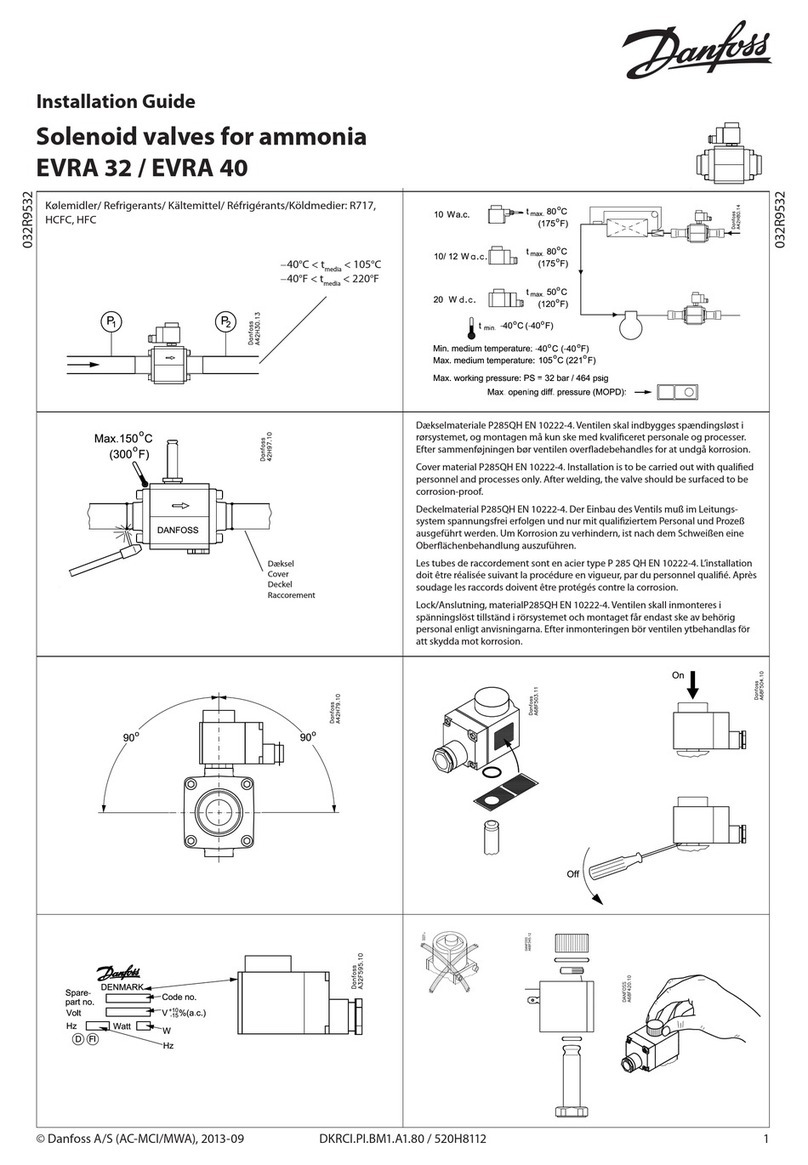
Danfoss EVRA 32 installation guide

