Blue Diamond 91566-99427 User manual

Operation and Maintenance Manual
Multi-Purpose Cutter
888-376-7027 | BlueDiamondAttachments.com
Register your
WARRANTY
within 30 days
of purchase
91566 – 99427

Blue Diamond® Attachments2
Thank you for your decision to purchase a Blue Di-
amond® Multi-Purpose Cutter. To ensure maximum
performance of your equipment, it is mandatory that you
thoroughly study the Operator’s manual and follow the
recommendations. Proper operation and maintenance
are essential to maximize equipment life and prevent
personal injury.
Operate and maintain this equipment in a safe man-
ner and in accordance with all applicable local, state,
and federal codes, regulations and /or laws. Follow all
on-product labeling and instructions.
Make sure that all personnel have read this Operator’s
Manual and thoroughly understand safe and correct
operating, installation and maintenance procedures.
Blue Diamond is continually working to improve its
products. Blue Diamond reserves the right to make any
improvements or changes as deemed practical and pos-
sible without incurring any responsibility or obligation
to make any changes or additions to equipment sold
previously.
Although great care has been taken to ensure the
accuracy of this publication, Blue Diamond makes no
warranty or guarantee of any kind, written or expressed,
implied or otherwise with regard to the information
contained within this manual. Blue Diamond assumes
no responsibility for any errors that may appear in this
manual and shall not be liable under any circumstances
for incidental, consequential or punitive damages in con-
nection with, or arising from the use of this manual.
Keep this manual available for frequent reference. All
new operators or owners must review the manual before
using the equipment and annually thereafter. Contact
your Blue Diamond Attachments Dealer for assistance,
information, or additional copies of the manual. Contact
www.bluediamondattachments.com or call 888-376-
7027 for a complete list of dealers in your area.
Serial Number Location:
Please record attachment information in the space pro-
vided for future reference.
Model Number:_____________________________
Serial Number: _____________________________
Dealer Name: ______________________________
Dealer Number:_____________________________
Date of Purchase:___________________________
The serial number plate is located on the left side, just
forward of the attachment mounting plate.
Always use your serial number when requesting infor-
mation or when ordering parts.
NOTE: The directions left, right, front and rear, as
mentioned throughout this manual, are as viewed from
the operator’s position.
Introduction: Owner Information
Revision Date: 07.19.2023

3Blue Diamond® Attachments
Table of Contents
1. Introduction..................................................................................4-6
1.1 General Safety Information......................................................4
1.2 Qualified Operators................................................................. 5
1.3 Attachment Information.......................................................... 6
2. Safety ...........................................................................................7-9
2.1 General Safety Information.....................................................7
2.2 Qualified Operators................................................................ 8
3. Operation .................................................................................10-19
3.1 Work Area Safety ....................................................................10
3.2 Tractor Requirements............................................................10
3.3 Attachment Installation..........................................................11
3.4 Operation................................................................................. 17
3.5 Right of Way or Roadway Mowing ..................................... 18
3.6 Transporting Safety ...............................................................18
3.7 Storage .....................................................................................19
4. Maintenance ..........................................................................20-22
4.1 Maintenance Safety...............................................................20
4.2 Greasing..................................................................................20
4.3 Blade Servicing......................................................................20
4.4 Service Schedule ..................................................................22
5. Parts.........................................................................................23-32
5.1 Main Frame Components – 44” Deck............................... 23
5.2 Main Frame Components – 32” Deck..............................25
5.3 Motor Assembly ....................................................................26
5.4 Safety Decals.........................................................................30
6. Warranty ....................................................................................... 33
Blue Diamond® Attachments4
1.1 General Safety Information
Blue Diamond® Attachments cannot anticipate
every possible circumstance that might involve
a potential hazard. The warnings in this manual
and on the unit are, therefore, not all-inclusive. If
a method of assembly, operation, or maintenance
not specifically recommended by us is used, you
must satisfy yourself that it is safe for you and for
others. You should also ensure that the unit will not
be damaged or be made unsafe by the methods
that you choose.
The information, specifications, and illustrations in
this manual are based on the information that was
available at the time this material was written and
can change at any time without notice.
• Read and follow instructions in this manual
and the machine’s Operators Manual before
operating.
• The manual must always remain with the
machine and be available for operators. In case
of loss or damage, request a new copy from
your dealer or from Blue Diamond.
• Strictly follow all rules prescribed by the safety
pictograms/decals applied to the machine.
Ensure that all safety pictograms/decals are
legible. If pictograms/decals are worn, they
must be replaced with new ones obtained
from Blue Diamond and placed in the position
indicated by this manual.
1. Introduction
DANGER
Failure to comply with the following safety
instructions can and will result in serious injury and
possibly even death if they are not understood and
followed.
WARNING
CAUTION
The signal word CAUTION on the machine and
in the manuals indicates a potentially hazardous
situation which, if not avoided, may result in minor
or moderate injury. It may also be used to alert
against unsafe practices.
WARNING
The signal word WARNING on the machine and
in the manuals indicates a potentially hazardous
situation which, if not avoided, could result in
death or serious injury.
DANGER
The signal word DANGER on the machine and
in the manuals indicates a hazardous situation
which, if not avoided, will result in death or serious
injury.
SAFETY ALERT SYMBOL
This SAFETY ALERT SYMBOL identifies important
safety messages on the equipment and in the
owner’s manual. When you see this symbol, be
alert to the possibility of personal injury and
carefully read the message that follows.
IMPORTANT
The signal word IMPORTANT identifies
procedures which must be followed to avoid
damage to the machine.
WARNING
DO NOT assemble, operate, or maintain the unit
until you read and understand the information
contained in this manual.

5Blue Diamond® Attachments
• Before using the machine, make sure that
all safety devices are installed and in good
working conditions. In case of damage or
shields, replace them immediately. A cutter
maintained or operated improperly can be
dangerous to the user and bystanders causing
serious injury or death.
• It is absolutely forbidden to remove or alter
safety devices.
• Do not modify the cutter or safety devices in
any way. Do not weld the unit. Unauthorized
modifications may impair its function and
safety. Personal injury or death can result from
unauthorized modifications.
If the cutter has been altered in any way from
the original design, Blue Diamond® does not
accept any liability for injury or warranty.
• Before starting, and during operation of the
attachment, make sure there are no people
or animals in the operation area; the machine
can project material from the back with risks of
serious injury or death.
• Never allow riders on the tractor, cutter, or
hitch at any time. Falling or crushing hazards
can result in severe injuries or death.
• Pay maximum attention to avoid any accidental
contact with rotating parts of the machine.
• During operation, adjustment, maintenance,
repairing, or transportation of the machine, the
operator must always use appropriate Personal
Protective Equipment (PPE) including but not
limited to safety glasses, gloves, and hearing
protection.
• Do not operate the attachment or machine
while wearing loose fitting clothing that can be
entangled or caught in parts of the machine.
• Do not operate the implement when tired, not
in good condition, or under the influence of
alcohol or drugs.
• If the use of the machine is required at night
or in conditions of reduced visibility, use the
lighting system of the tractor and possibly an
auxiliary lighting system.
1.2 Qualified Operators
Safe Operation Needs a Qualified
Operator
Operator Training
• Anyone who is using and/or maintaining the
cutter must read, clearly understand, and
follow ALL safety, operation, and maintenane
information presented i this manual, other
related OEM manuals, and the safety signs.
• Check the rules and regulations at your
location. The rules may include an employer’s
work safety requirements. Regulations may
apply to local driving requirements or use
of a Slow Moving Vehicle (SMV) emblem.
Regulations may identify a hazard such as a
utility line.
• The new operator must start in an area without
bystanders and use all the controls until he or
she can operate the machine safely under all
conditions of the work area.
1. Introduction
AVOID SERIOUS INJURY OR DEATH
Operators must receive instructions before
operating the machine. Untrained operators can
cause serious injury or death.
For an operator to be qualified, he or she must
not use drugs or alcoholic drinks which impair
alertness or coordination while working. An
operator who is taking prescription drugs must
get medical advice to determine if he or she can
safely operate a machine and the equipment.
For an operator to be qualified, he or she must
have read and understood the instructions of
this manual, he or she must make adequate
preparation for the proper use of the machine,
and he or she must hold a driving license.
In case of doubt regarding the use of the machine
and/or the interpretation of this manual, the
operator must contact either their dealer or Blue
Diamond.
DANGER

Blue Diamond® Attachments6
1.3 Attachment Information
Congratulations on your choice of a Blue
Diamond® Attachments cutter. This equipment
has been designed and manufactured to meet the
needs of discerning users.
The Blue Diamond® multi purpose cutter is
designed to cut grass, weeds, and light brush.
Many features incorporated into this cutter are
the result of suggestions made by customers like
you. Read this manual carefully to learn how to
operate the oset mower safely and how to set it
to provide maximum cutting eciency.
The multi purpose cutter are designed for light-
duty applications such as weed, grass, and light
brush up to 3” diameter. The cutters can be used
to mow under a fence line or it can be turned
vertically to mow the sides of hedgerows and tree
lines.
The cutter uses a single spindle with two
free-swinging blades, which reduce the shock of
impact when a stationary object is contacted. A
shear key in the input shaft protects the motor
from damage.
Intended Use
Do not use this cutter for any other purpose than
its intended use; cutting grass, weeds, and light
brush in an in-line or oset application.
The multi-purpose cutter can also be used in a
vertical configuration for mowing along hedge
rows and tree lines.
Disposal of Equipment at End of Useful
Life
The Blue Diamond® Attachments cutter has been
designed for the specific purpose of cutting grass,
weeds, and light brush. When this unit is no longer
capable of doing its designed purpose, it should
be dismantled and scrapped. Do not use any
materials or components from this unit for any
other purpose.
Unanswered Questions
If you have any questions not answered in this
manual or if you require additional copies or if the
manual is damaged, please contact your dealer.
1. Introduction
7Blue Diamond® Attachments
2.1 Safety Guidelines
Operating Safety
• Read and follow instructions in this manual
and the machine’s Operator’s Manual before
operating.
• Under no circumstances should young children
be allowed to work with this equipment.
• This equipment is dangerous to persons
unfamiliar with its operation.
• Do not use the cutter if any parts are damaged.
If the oset mower has a defect, immediately
stop using it and remedy the problem before
continuing.
• The safety shield found on the multipurpose
cutter is designed to reduce the risk of
throwin objects; however, the cutter deck
and safety shield cannot prevent all objects
from escaping theblade enclosure in every
mowing configuration, especially when cutting
vertically.
• The cutter can throw objects up to 300 feet. To
avoid serious injury or death, keep all thrown
object shielding in place. Inspect area for
potential thrown objects before cutting.
• DO NOT operate in a work area that has
not been inspected for foreign debris and
obstacles.
• Remove any foreign objects and clearly mark
any objects that cannot be removed.
• Check for overhead and / or underground lines
before operating equipment (if applicable).
• In addition to the design and configuration
of equipment, hazard control and accident
prevention are dependent upon the
awareness, concern, prudence and proper
training of personnel involved in the operation,
transport, maintenance and storage of
equipment.
• Check that the attachment is securely fastened
to the machine.
• Make sure all the machine controls are in the
NEUTRAL before starting the machine.
• Operate the equipment only from the
operator’s position.
• When learning to operate the equipment, do it
at a slow rate in an area clear of bystanders.
• The equipment must be used ONLY on
approved machines.
• DO NOT make any adjustments or repairs on
the equipment while the machine is running.
• DO NOT operate equipment in poor visibility
conditions such as fog, darkness, or any
conditions that limit clear visibility less than
300 feet (100 m) in front of and to the sides of
the equipment.
• When conditions make it necessary to slow
ground speed, shift to a lower gear rather
than reducing engine speed. The engine will
maintain rated speed and keep cutter running
at optimum cutting speed.
• Wear safety glasses, gloves, hearing protection
and other protective clothing when required.
2. Safety
WARNING
Safety precautions and warnings are provided
in this manual and on the unit. If these hazard
warnings are not heeded, bodily injury, or death
could occur to you or to other persons.

Blue Diamond® Attachments8
Personal Protection Equipment
When using this cutter, wear appropriate personal
protective equipment (PPE). This list may include,
but is not limited to:
• Ear Protection
• Hearing Protection
• Protective shoes with slip resistant soles
• Protective goggles, glasses, or face shield
• Protective clothing and gloves
• Safety vest (when operating near roads)
Machine Requirements and Capabilities
• The machine’s operator’s cab should be
equipped with a thermoplastic polycarbonate
or similar material front window, and similar
protection on the sides of the operator’s cab
before operating the equipment.
• The tractor should be equipped with a Roll
Over Protective Structure (ROPS) and a seat
belt. A crushing hazard can ocur if the driver
is ejected from the seat while the tractor is
in motion. Fasten the seat belt whenever the
tractor is moving.
• Keep bystanders clear of moving parts and the
work area. Keep children away.
• Use caution on slopes and near banks and
ditches to prevent overturn.
Fire Prevention Safety
• Flamable debris (leaves, grass, etc.) must
be removed regularly. If flammable debris
is allowed to accumulate, it can cause a fire
hazard. Clean often to avoid this accumulation.
• Carry a fire extinguisher on the tractor at all
times to extinguish possible fires encountered.
• The equipment’s hydraulic motor compartment
must be inspected every day and cleaned
if necessary to prevent fire hazards and
overheating.
• All fuels, most lubricants, and some coolant
mixtures are flammable. Flammable fluids that
are leaking or spilled onto hot surfaces or onto
electrical components can cause a fire.
Hydraulic System
• Check hydraulic tubes, hoses and fittings for
damage and leakage. Never use open flame
or bare skin to check for leaks. Hydraulic tubes
and hoses must be properly routed and have
adequate support and secure clamps. Tighten
or replace any parts that show leakage.
• Always clean fluid spills. Do not use gasoline or
diesel fuel for cleaning parts. Use commercial
nonflammable solvents.
2. Safety

9Blue Diamond® Attachments
2.2 Safety Decals
General Safety Decal Information
Good safety practices require that you familiarize
yourself with the various safety signs, the type
of warning, and the area or particular operation
related to that area that requires your Safety
Awareness.
Pay close attention to the safety signs and
instructional labels attached to the machine and
the cutter. If the cutter is missing a label or a label
has become unreadable, replace the label before
operating the cutter.
Safety Instructions and Instructional
Labels
1. Keep safety signs or instructional labels clean
and legible at all times. Use a clean, damp
cloth to clean safety labels.
2. Replace any missing or hard-to-read safety
signs or instructional labels.
3. Use care when washing or cleaning the
equipment not to remove or damage the
labels. When using a pressure washer to clean
the cutter avoid spraying too close to decals;
high-pressure water can enter through very
small scratches or under edges of decals
causing them to peel or come o.
4. Locations for the labels and replacement part
numbers are shown in the parts section on
page 29.
5. Replacement parts must have replacement
labels attached during installation and/or
before the oset mower is used.
6. Labels are available from your authorized
dealer at no charge.
How to Install Replacement Safey
Decals
1. Clean and dry the installation area.
NOTE: Do not install the signs if the temperature is
below 50°F (10°C).
2. Determine the exact position before you
remove the backing paper.
3. Remove the backing paper.
4. Align the sign over the specified area and
carefully press the sign to the part/frame.
NOTE: Small air pockets can be pierced with a
pin and smoothed out using the piece of backing
paper.
2. Safety

Blue Diamond® Attachments10
3.1 Work Area Safety
• Never operate the cutter in darkness or foggy
conditions where you cannot clearly see at
least 300 feet in front and to the sides of the
tractor and oset mower.
• Make sure that you can clearly see and identify
passersby, steep slopes, ditches, drop-os,
overhead obstructions, power lines, debris,
and foreign objects. If you are unable to clearly
see these type of items, stop operating the
oset mower.
• Do not operate the multi purpose cutter, or
drive the tractor into material that is burning,
or areas that recently burnt and may contain
hot embers. Burning material, sparks, and
coals could be thrown from the oset mower to
areas of vegetation that might ignite.
• Carry a fire extinguisher on the tractor at all
times to extinguish possible fires encountered.
• Do not operate the multi purpose cutter on a
tractor with an under-frame exhaust.
• Before turning, slightly raise the cutter o the
ground.
• After the cutter is hydraulically disengaged, the
motor can free-wheel for several minutes. Stay
clear of the blades until they come to complete
stop.
• Large, dense, or wet vegetation may need
to be cut in two or more passes to achieve a
uniform cut.
• Stay alert and watch for trees, low hanging
limbs, power lines, and other overhead
obstacles as well as solid ground objects.
• Avoid cutting in reverse.
3.2 Tractor Requirements
The tractor used to operate the oset mower
must have the power capacity to lift, push, and
hydraulically operate the oset mower.
Depending on the model the tractor will need
either:
9 – 14 GPM or oil flow
15 – 20 GPM or oil flow
The recommended tractor is a 3000 pound
tractor with rear ballast (such as a mower deck) to
oset the weight on the front of the tractor. Also
recommended are tractor tires that are “filled” or
solid to prevent puncture from the brush.
This unit WILL NOT work on a skid steer machine.
Operating the multi purpose cutter with a tractor
that does not meet the following requirements
may cause tractor or oset mower damage and be
a potential danger to the operator and passersby.
Always review the “controls” section of the tractor
operator’s manual to be familiar with the location,
settings, and function of the tractor controls.
Be familiar with all controls before using this
equipment.
• Approved Roll–Over Protective Structure
(ROPS) or ROPS cab and seat belt.
• Tractor Safety Devices; Slow Moving Vehicle
(SMV) emblem, lighting.
3. Operation
WARNING
Always refer to the tractor owner’s manual to
ensure compatibility and maximum safety.
WARNING
Using the cutter on a skid steer will void the
warranty and have potential for serious injury to
the user or bystanders.
11Blue Diamond® Attachments
3.3 Attachment Installation
Entering The Operator’s Position
Use the attachment safety treads, handles and
steps (on the machine) to enter the operator’s
position.
When in the operator’s position, lower safety seat
bar, start the engine and release the parking brake.
Leaving The Operator’s Position
Park the machine/attachment on a flat level
surface.
Place all controls in neutral, engage the park
brake, stop the engine and wait for all moving
parts to stop. Leave the operator’s position.
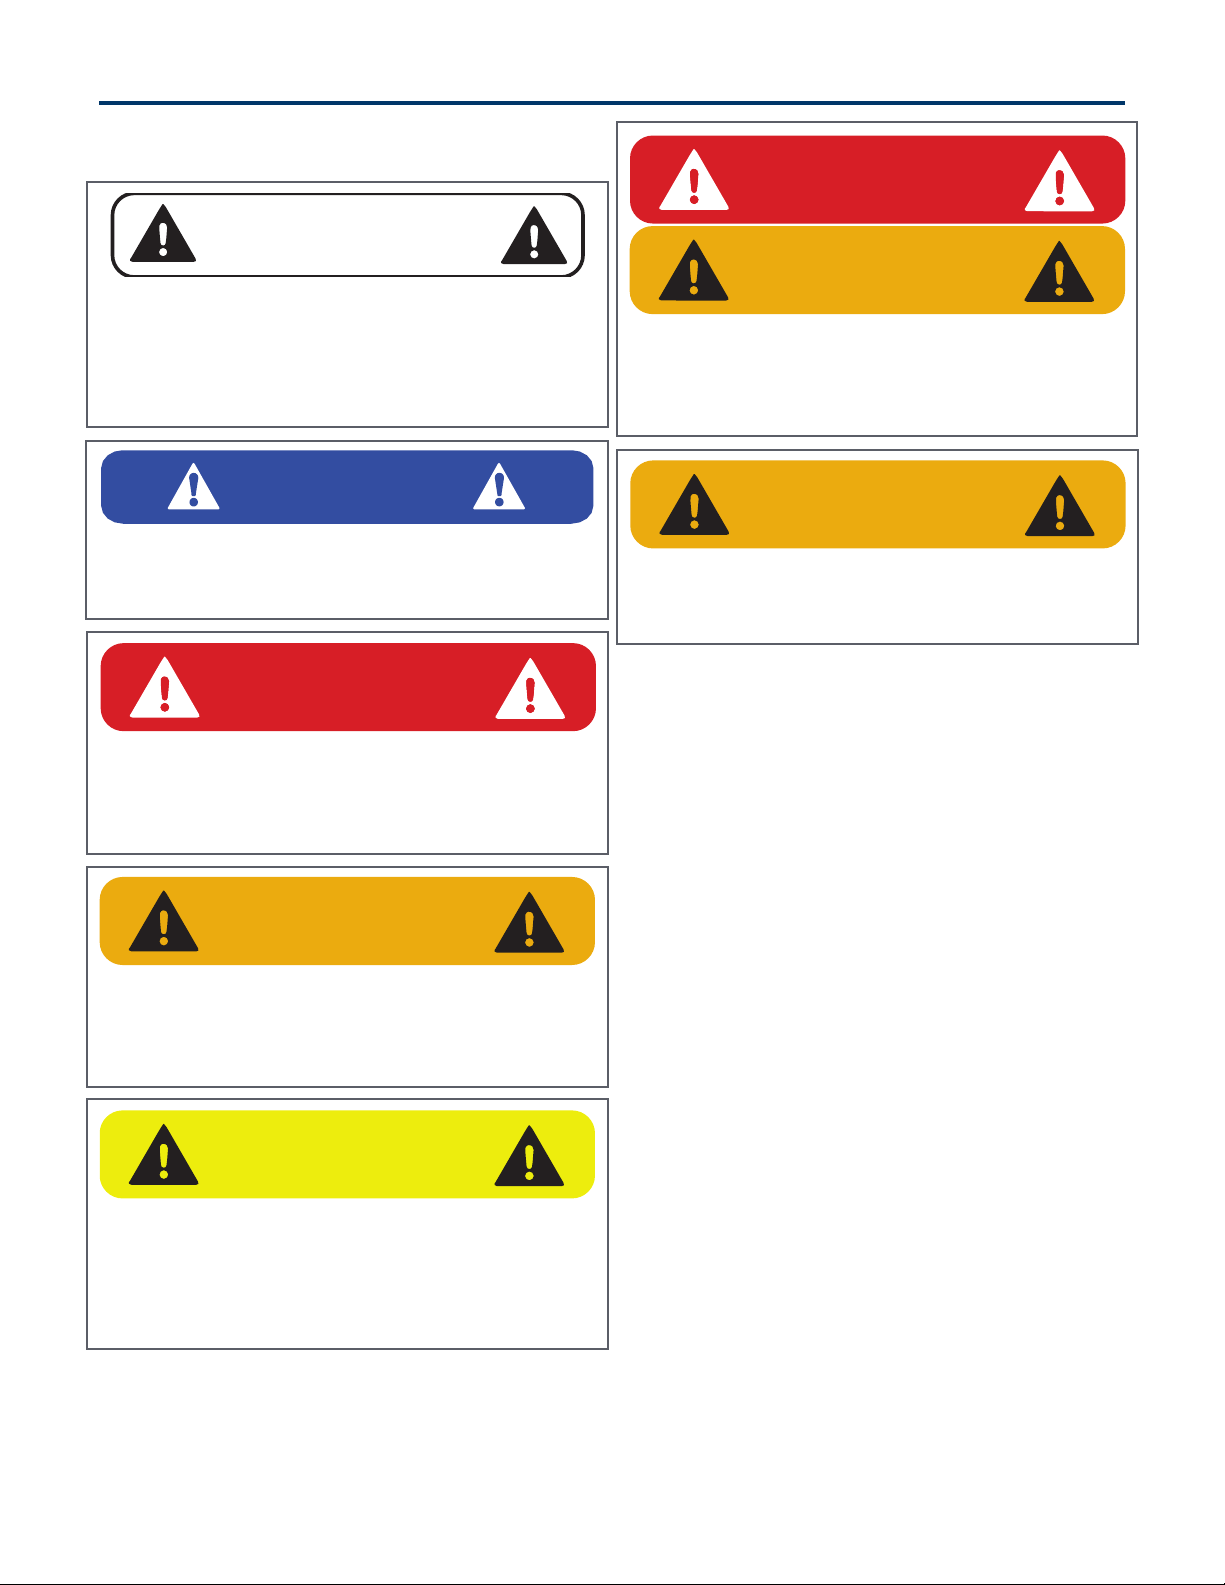
Connecting Attachment To The Machine
Use caution when connecting the cutter to the
tractor. The multi-purpose cutter should be
securely resting at ground level or setting on
blocks. Keep hands and feet from under the deck
and clear of pinch points between the tractor hitch
arms and tractor hitch pins.
1. Connect the mower to the loader arms [Figures
1& 2].
Figure 1
Figure 2
3. Operation
WARNING
AVOID SERIOUS INJURY OR DEATH
• Always park on a flat level surface.
• Lower lift arms and place attachment flat on
the ground.
• Place all controls in NEUTRAL.
• Engage the park brake.
• Stop the engine and remove the key.
• Wait for all moving parts to stop.
SEE MACHINE’S OPERATOR’S MANUAL FOR
ADDITIONAL INFORMATION.
IMPORTANT
See the machine’s Operator’s Manual for detailed
information on operating the loader. WARNING
CRUSH HAZARD
Crush hazard between loader’s quick attachment
plate and mower. Do not allow anyone to stand
between the loader and implement during
connecting operations.
Blue Diamond® Attachments12
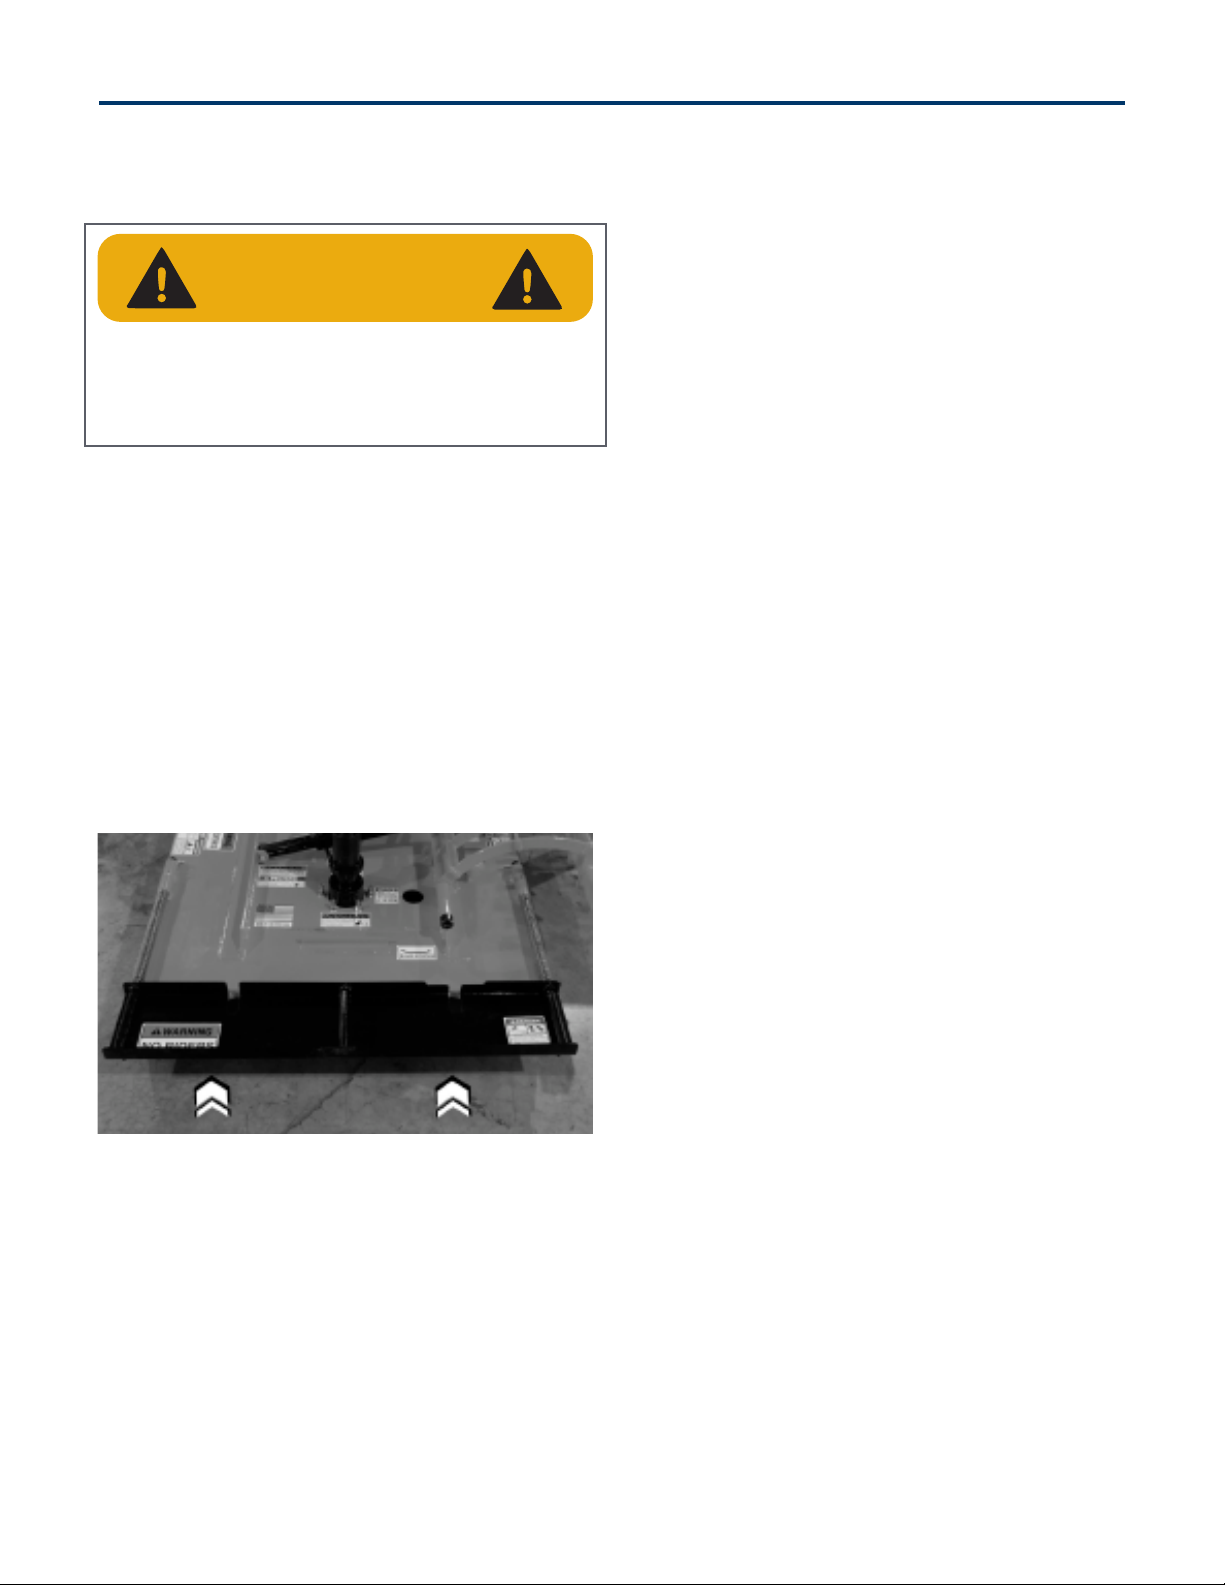
Connecting Attachment to the Machine
Cont’d
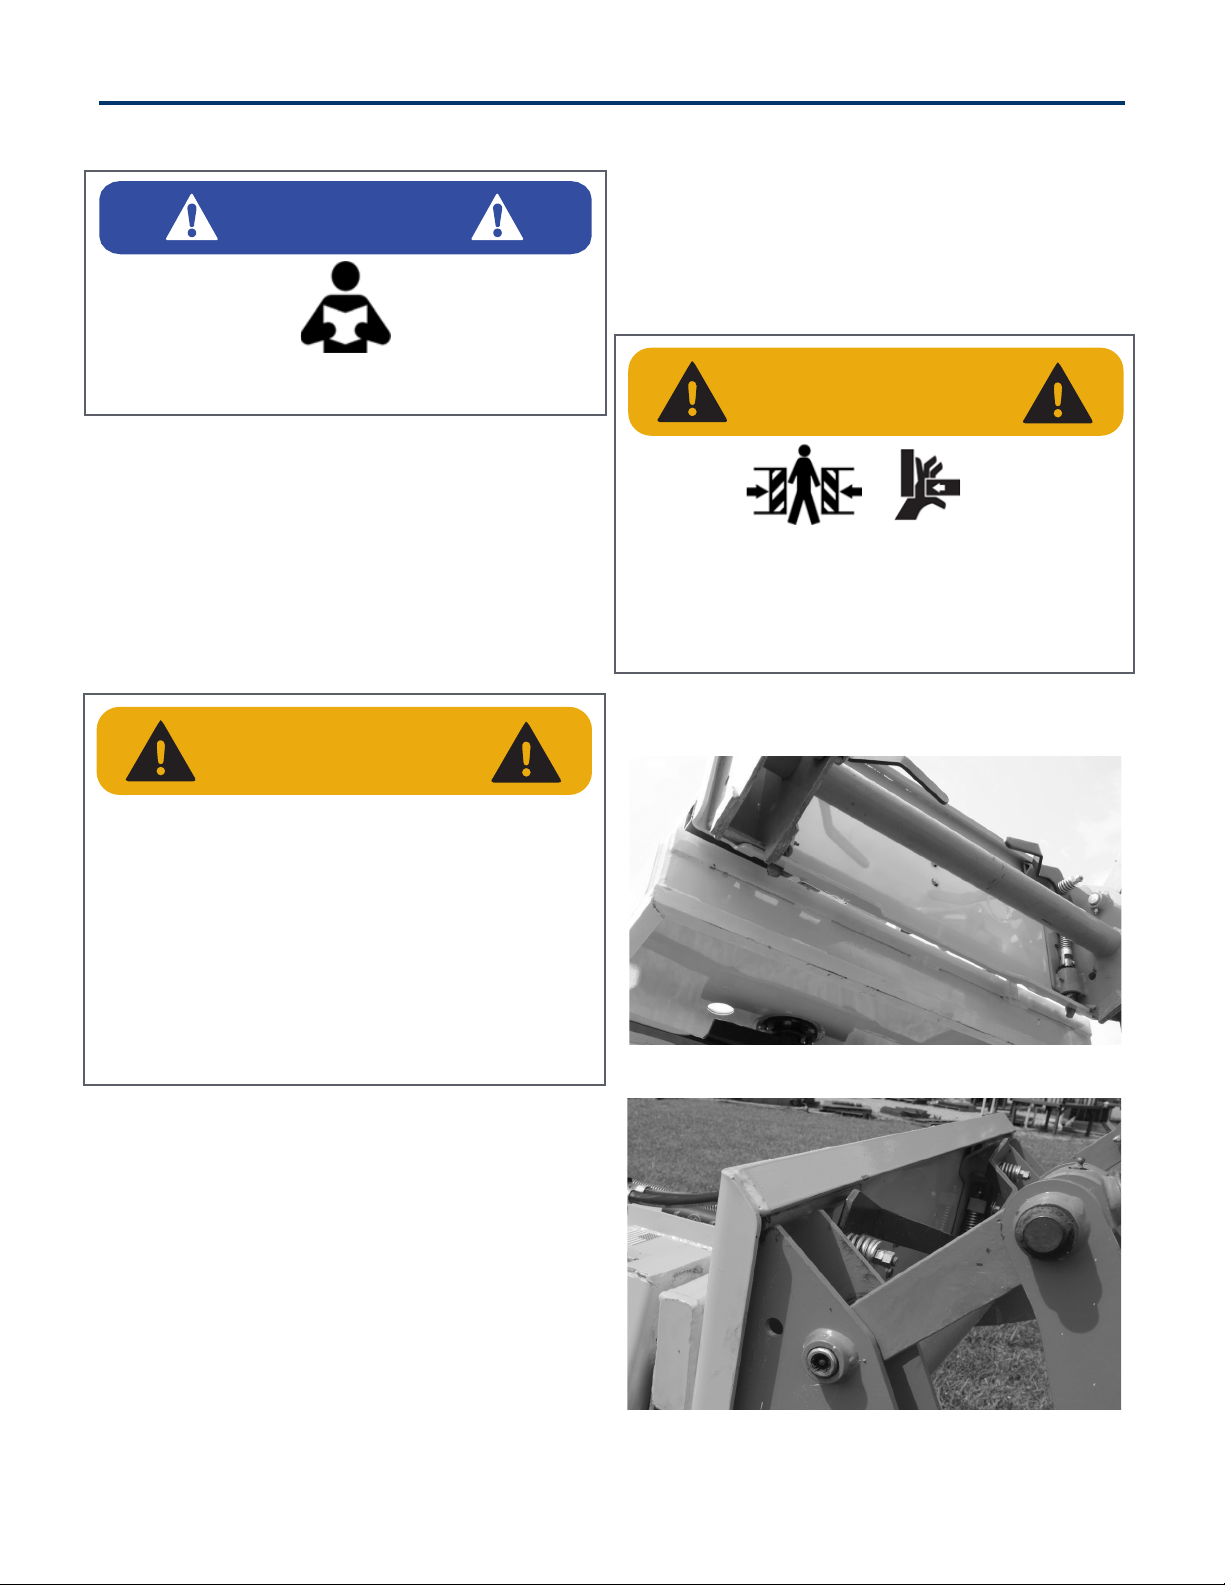
2. Lock the mower to the lift arms.
Figure 3
3. Turn OFF the tractor engine and dismount.
4. Connect a user-supplied hydraulic supply hose
from the tractor supply manifold valve to the
hose routed to the right port of the hydraulic
motor. The pump port configuration is from the
tractor’s viewpoint.
NOTE: The hose MUST be 5/8 inch diameter. DO
NOT use smaller or larger diameter hoses.
Figure 4
5. Connect the left return port on the motor to a
user supplied hose (5/8 inch diameter) routed
to the tractor’s reservoir.
The return hose must have free–flow back into
the pump reservoir and not be ported through
the tractor’s manifold valve. DO NOT connect
into the tractor’s rear remote return valve.
NOTE: An optional Hose Kit is available consisting
of two male QD couplings, two female QD
couplings, two 5/8” diameter hoses, and two pump
fittings.
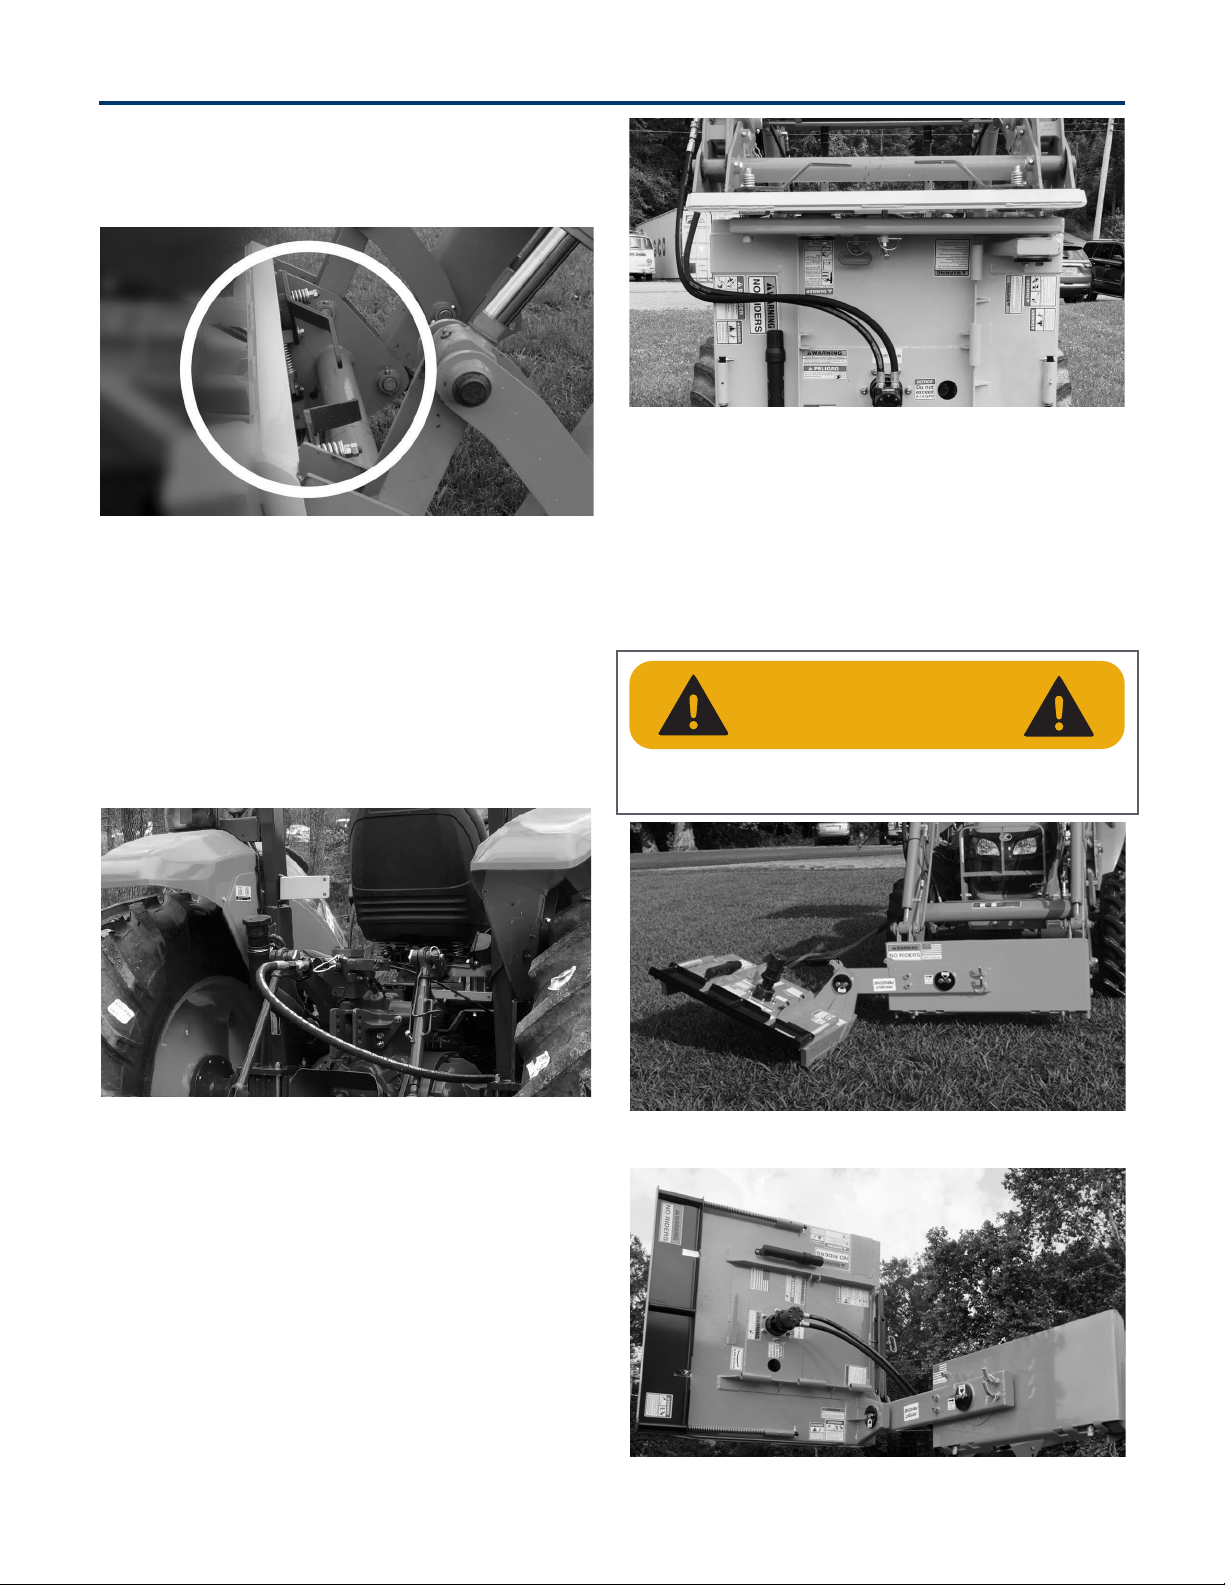
Figure 5
6. Start the mower and check for rotation.
Make sure the pump is turning in the correct
direction. Hooking up the hoses to the wrong
port will make the cutters operate in a reverse
direction.
7. Place the mower in the desired cutting
configurations.
Figure 6: Horizontal oset mowing configuration
Figure 7: Vertical mowing configuration
3. Operation
WARNING
DO NOT put hands or feet under the oset mower
deck while the blades are rotating.

13Blue Diamond® Attachments
3.3 Attachment Installation
Cont’d
Horizontal Oset Mowing Configuration
1. Disconnect the supply hose from the tractor’s
manifold valve.
2. Disconnect both the supply and return hoses
to the mower.
3. Place the ends of the hoses in a place they will
not be contaminated by dirt.
4. Remove the red-handled t-pin from the
outermost side of the cutter deck.
5. Slide the locking tupe out of the mounting
plate and rotate the cutter deck around to the
oset position.
6. Replace locking tube in the hole it was
previously in.
3. Operation

Blue Diamond® Attachments14
7. Replace the red-handled t-pin.
8. Remove the second red-handled t-pin from the
cutter deck and float arm.
9. Take the outside edge of the deck and
reposition it into the oset position.
10. Select the proper hole for the desired cutting
position. Replace the red-handled t-pin.
11. Reconnect supply hoses to the mower and the
tractor.
3. Operation

15Blue Diamond® Attachments
3.3 Attachment Installation
Cont’d
Vertical Mowing Configuration
1. Begin by following Steps 1 – 9 of the Horizontal
Oset Mowing Configuration on pages 13 – 14.
2. Position the mower deck 90 degrees to the
front of the tractor. Replace the red-handled
t-pin into the fixed 90 degrees position hole.
3. Reconnect supply hoses to the mower and to
the tractor.
Other Mowing Configurations
NOTE: Use the top hold of the float bar to utilize
the “floating” position seen below.
3. Operation

Blue Diamond® Attachments16
Disconnecting Attachment from the
Machine
1. Place the mower flat on the ground. If a
perpendicular configuration was used, place
the mower in a flat configuration before
disconnecting it.
2. Shut o the tractor, set the parking brake, and
remove the key.
3. Operate the tractor’s hydraulic levers to
release all pressure.
4. Unhook the supply (pressure) hose from the
rear of the tractor (manifold valve).
5. Unhook both hose quick disconnect fittings at
the front of the tractor. Make sure the fittings
are kept clean.
6. Lower parking stand (when applicable).
7. Release from the mower.
Mower Checklist
Ecient and safe operation of the oset mower
requires that every user read and understand
the operational instructions and all related safety
instructions outlined in this manual.
This Initial Setup Checklist is provided for the user/
owner. It is important for both personal safetyand
to maintain the mechanical condition of the multi-
purpose cutter that this checklist is followed.
Althouth there are no operational restrictions
on the multi-purpose cutter when used for the
first time, it is recommended that the following
mechanical items be checked.
1. After 1/2 hour of operation: Tighten all
fasteners if necessary. Lubricate all grease
fittings.
2. After 10 hours of operation, go to the normal
servicing and maintenance schedule in section
4.1 on page 22.
Inspection Checklist before Use
3. Operation
ITEMS
P
Initially, retighten the tapered roller
bearing in the pivot arm after 15 minutes
of initial use and again at 30 minutes.
Recheck again before the next use.
PMake sure the cutter is securely attached
to the tractor.
P
Use only an appropriately sized tractor.
See Section 3.2 Tractor Requirements on
page 10.
PMake sure the hydraulic hose is properly
attached to the tractor.
PMake sure all safety shields and guards
are properly installed.
PCheck the blade bolts and blade carrier
nut.
PCheck the condition of the blades.
P
Inspect the overall oset mower for
potential problems or damage. Do not
use the oset mower if it needs repairs of
any type.

17Blue Diamond® Attachments
3.4 Operation Checklist
Although the oset mower is easy to use, each
operation should review this section to familiarize
themselves with the detailed safety and operating
procedures. When using this machine, follow this
procedure before beginning operation:
3.5 Right of Way or Roadway
Mowing
Use all safety shields for highway, right-of-way,
parks, greenbelt mowing, or all other mowing
where human dwellings, vehicles, or livestock
could be within 300 feet of the multi-purpose
cutter.
No shielding is 100% eective in preventing
thrown objects. In order to reduce the possibility
of injury from thrown objects:
1. Maintain multi-purpose cutter shielding in good
operational condition.
2. Inspect the condition of the throw object
guards, oset mower side skirts, and skid
shoes daily. Replace or repair worn or
damaged guards.
3. Inspect the condition of the blades and blade
bolts daily. Replace any cracked, worn, bent, or
damaged blades. Always replace blade bolts
and lock washers when replacing blades. Make
sure the blade bolts are properly tightened.
Multi-purpose Cutters can throw objects 300 feet
or more under adverse conditions.
1. To avoid serious injury or death from thrown
objects, inspect the area thoroughly for
potential throw objects and remove them
before cutting.
2. Remove debris, rocks, wire, cable, metal
objects, and other foreign material from
mowing area.
3. Wire, cable, rope, chains, and metal objects
can be thrown or swung outside the deck with
great velocity.
4. Mark the location of objects that cannot be
removed.
3. Operation
ITEMS
PClear an area of at least 300 feet on all
sides of bystanders, especially children.
POperate the oset mower only in
conditions where there is clear visibility.
P
Inspect and clear the area to be cut of
stones, branches, debris, and any hard
objects that may be thrown.
PMark the location of objects that cannot
be removed.
PMake sure all safety shields and guards
are properly installed.
PCheck the blade bolts and blade carrier
nut.
PCheck the conditions of the blades.
P
Begin cutting at a slow speed, then
increase to a speed that gives a clean
cut without lugging the engine. Do not
operate above 5 MPH
P
Never allow blades to contact solid
objects like rocks, posts, wire, curbs,
guardrails, or the ground while mowing.
P
Avoid operating the oset mower
in reverse direction when possible.
Check to make sure that there are no
persons behind the oset mower, and
use extreme care when maneuvering in
reverse.

Blue Diamond® Attachments18
Stop mowing if passersby are within 300 feet
unless:
1. All thrown object shielding, including front and
rear deflectors, chain guards, steel guards,
bands, side skirts, and skid shoes are in place
and in good condition when mowing.
2. Mower sections or wings are adjusted to
be close and parallel to the ground without
exposing the blades.
3. Mowing area has been inspected and foreign
materials and debris have been removed.
4. Passersby are inside an enclosed vehicle.
3.6 Transporting Safety
Tractor Owner/Operator Manual: Always refer
to the tractor owner’s manual to determine its
compatibility and maximum safety.
Tractor Operation: Before attaching the cutter to
the tractor, be familiar with its controls and how to
stop it quickly in the event of an emergency. Read
and understand this manual and the one provided
with your tractor before transporting the multi-
purpose cutter.
Fall and Crush Hazard: Do not allow riders on the
multi-purpose cutter or tractor.
Maximum Transporting Speed: Do not exceed 20
MPH when transporting the oset mower. Slow
down for corners and rough terrain.
Visibility: Clean reflectors, SMV or SIS sign, and
lights before towing. Make sure all the lights and
reflectors required by highway and transport
authorities are in place and can be seen clearly by
all overtaking and oncoming trac.
Regulations: Make sure all local, state, and federal
regulations regarding the transport of equipment
on public roads and highways are met. Check
with the local authorities regarding transporting
the oset mower on public roads. Obey all
applicablelaws and regulations.
Rollover Protection: The tractor should be
equipped with a Roll Over Protective Structure
(ROPS) and a seat belt.
Drive Safely: Be a safe and courteous driver.
Anticipate what other drivers will do and drive
accordingly.
Allow Extra Distance: Apply brakes early. Leave
extra distance between your vehicle and the one(s)
ahead to provide adequate stopping space. Extra
distance will be required to stop the vehicle.
Clear Vision: Remove all objects from the area that
would prevent clear vision of the complete work
area of would present an obstacle when moving
the multi-purpose cutter.
Hitch Attachment: Be sure the cutter is securely
attached to the tractor and in good operating
condition before use.
Working Taillights: Make sure lights on the tractor
are working properly.
Additional Lighting: For cutters without lights,
install additional lights on the rear of the tractor to
safeguard against rear-end collisions. Daybreak
and dusk are particularly dangerous and rear pilot
vehicles are recommended. Cutters without lights
should be transported on public roads only during
daylight hours.
Hazard Flashers: Use hazard flashers on the
tractor when transporting unless prohibited by law.
Right-of-way: When traveling below the posted
speed limit, keep to the right and yield the right-of-
way to allow faster trac to pass.
3. Operation
DANGER
The following safety instructions can and will
result in serious injury and possibly even death if
they are not understood and followed.
WARNING

19Blue Diamond® Attachments
3.7 Storage
Storage Safety
At the end of the season, the multi-purpose cutter
should be thoroughly inspected and prepared
for storage. Repair or replace any worn or
damaged components to prevent any unnecessary
downtime at the beginning of the next season.
Placing In Storage
1. Remove all entangled vegetation.
2. Thoroughly wash the multi-purpose cutter with
a pressure washer or water hose to remove all
clippings, dirt, mud, or debris.
3. Select an area that is dry, level, and free debris
(inside a building is ideal). Move the multi-
purpose cutter to its storage area.
4. Lubricate all grease points. Make sure all
grease cavities have been filled with grease to
remove any water residue from washing.
5. Touch up all paint nicks and scratches to
prevent rusting.
Storage Safety
When removing the multi-purpose cutter from
storage, follow this procedure:
1. Attach the multi purpose cutter to the tractor
lift arms
2. Raise the multi-purpose cutter up o the
blocks.
3. Before placing the cutter back into service,
replace any worn or defective parts and
perform the Pre-Operation Checklist on page
17.
3. Operation
CAUTION
PERSONAL INJURY HAZARD
Store the multi-purpose cutter in an area away
from human activity. To prevent the possibility of
serious injury, donot permit children to play on or
around the stored multi-purpose cutter.
IMPORTANT
To prevent damage to the multi-purpose cutter,
store it in a dry, level area.
CAUTION
CRUSH HAZARD
Always set the multi-purpose cutter on safety
stands or on blocks for storage.

Blue Diamond® Attachments20
4.1 Maintenance Safety
Personal Protection Equipment: Wear close fitting
and belted clothing to avoid getting caught in
moving parts. Wear personal protection equipment
(PPE), which may include hard hat, safety glasses,
safety shoes, gloves, etc. appropriate for the work
site and the working conditions.
Damaged Parts Hazard: Do not use the multi-
purpose cutter if any parts are damaged. If
the multi-purpose cutter is believed to have a
defect which could cause it to work improperly,
immediately stop using it and remedy the problem
before continuing.
No Unauthorized Modifications: Do not modify
the cutter or safety devices. Do not weld on the
unit. Unauthorized modifications may impair its
function and safety and will void the warranty. If
the oset mower has been altered in any way
from the original design, the manufacturer does
not accept any liability for injury or warranty.
Crush Hazard: Always set the oset mower on
safety stands or on the ground when performing
maintenance.
Good Working Condition: Keep all parts in good
condition and properly installed. Fix damage
immediately. Replace worn or broken parts.
Replacement Parts: If replacement parts are
necessary, genuine factory replacement parts
must be used to restore the unit to its original
specifications. Blue Diamond® will not accept
responsibility for damage as a result of the use of
unapproved parts.
Safety Shields and Devices: When completing
a maintenance or service function, make sure all
safety shields and devices are installed before
placing the multi-purpose cutter in service.
4.2 Greasing
Grease all zerks according to the Service
Schedule on page 22. Use an SAE multiporpose
high-temperature grease with extreme pressure
(EP) performance. Also acceptable is an SAE
multipurpose lithium base grease.
1. Always use a handheld grease gun for all
greasing.
2. Wipe grease zerks with a clean cloth before
greasing to avoid injecting dirt and grit.
3. Apply grease until new grease can be seen
coming out of the joint.
4. Do not let excess grease collect on or around
parts, particularly when operating in sandy
areas.
5. Replace and repair broken grease zerks
immediately.
6. If any grease zerk will not take grease,
remove and clean it thoroughly. Also, clean
the lubricant passageway. Replace the zerk if
necessary.
4.3 Blade Servicing
Inspect blades before each use to determind that
they are properly installed and in good condition. If
any blade is bent, excessively nicked, worn, or has
any other damage, replace both blades. Do not
sharpen the blades. The blades have two cutting
edges and should be flipped when the first edge is
dull or damaged.
Manually wiggle the blade carrier to check for
any looseness. Recheck torque every fifty hours.
Retighten any loose parts.
4. Maintenance
DANGER
Failure to comply with the following safety
instructions can and will result in serious injury
and possibly even death.
WARNING
Table of contents
Other Blue Diamond Cutter manuals


Popular Cutter manuals by other brands

Scheppach
Scheppach FS3600 Translation of original instruction manual

Husqvarna
Husqvarna K 770 Vac Operator's manual

Malco
Malco HC1 Installation instruction

Wolfcraft
Wolfcraft VNC 250 operating instructions

Phoenix Contact
Phoenix Contact CUTFOX 10 Original operating instructions

Summa
Summa S 75 user manual

ES manufacturing
ES manufacturing MB110 Series OPERATING INSTRUCTIONS, MAINTENANCE & SAFETY

D-CUT
D-CUT LU-215 Operation manual

REMS
REMS Nano operating instructions

Modern
Modern RAPTOR Operator's manual

Grizzly
Grizzly MINI SHEET METAL CUTTER INSTRUCTION SHEET... instruction sheet

Gerber
Gerber GSx Plus user manual


