Blue Hawk SGY-NR-KITV User manual
ATTACH YOUR RECEIPT HERE
Serial Number Purchase Date
ITEM #0461680
MODEL #SGY-NR-KITV
FRAMING NAILER
WITH PALM NAILER
1
service department at 1-877-888-8225, 8 a.m. - 8 p.m., EST, Monday - Friday.
Questions, problems, missing parts? Before returning to your retailer, call our customer
R
www.lowes.comAB1319
Français p. 14
Español p. 27

TABLE OF CONTENTS
IMPORTANT
PRODUCT SPECIFICATIONS
.Safety Information ................................................................................................................... 5
Read and follow all safety rules and operating instructions before using product. Retain this manual
for future reference.
.Troubleshooting................................................. ....................................................................... 10
Package Contents .................................................................................................................. 3
Product Specifications ............................................................................................................... 2
..Operating Instructions...................................... ....................................................................... 7
..Care and Maintenance................................... ........................................................................ 10
.
Exploded Views ............................................... ........................................................................ 12
.
Warranty .................................................................................................................................. 12
2
Nail capacity
Nail length
Operating pressure
Air inlet
Dimensions
Weight
Nail shank dia.
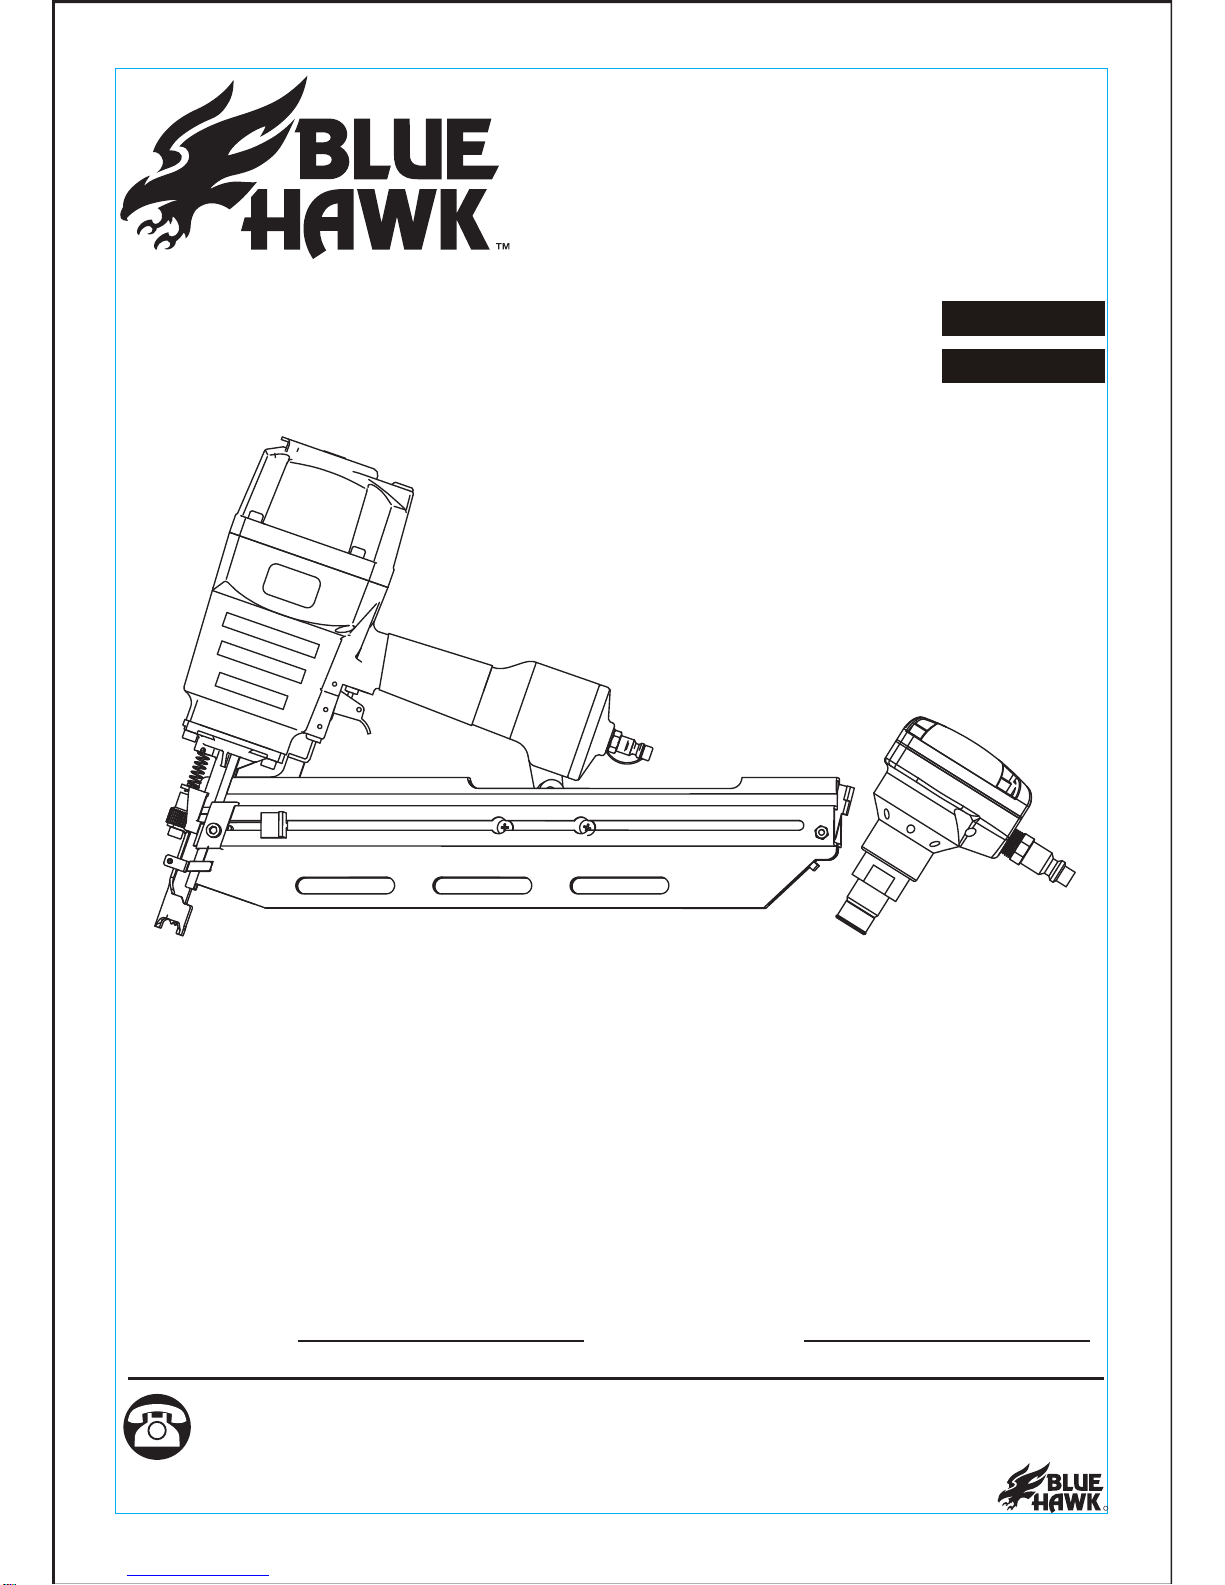
DESCRIPTION
2 x 30 pcs.
2 in. - 3-1/2 in.
80 - 120 PSI (5.5 - 8.2 bar)
1/4 in. N.P.T.
19.68 in. × 14.92 in. × 4.21 in.
(500 × 379 × 107 mm)
8.36 lbs.
2.87 mm - 3.33 mm
SPECIFICATION
Nail capacity
Nail length
Operating pressure
Air inlet
Dimensions
Weight
Nail head
DESCRIPTION
1 pcs.
2 in. - 3-1/2 in.
70 - 100 PSI (4.8 - 6.9 bar)
1/4 in. N.P.T.
4.05 in. × 2.08 in. × 4.05 in.
(103 × 53 × 103 mm)
0.81 lbs.
3 mm - 7.5 mm
SPECIFICATION
FRAMING NAILER
PALM NAILER
R
www.lowes.com

PACKAGE CONTENTS
QUANTITY
1
1
1
1
1
PART
A
B
C
D
E
DESCRIPTION
Air Deflector
Cylinder Cover
Gun Body
Drive Guide
Depth Adjustment QUANTITY
1
1
PART
F
G
DESCRIPTION
Magazine
Air Plug
3
16 GA FINISH NAILER
A
C
D
E
F
G
B
R
www.lowes.com

PACKAGE CONTENTS
QUANTITY
1
1
1
1
1
PART
A
B
C
D
E
DESCRIPTION
Cylinder Cover
Bolt
Gun Body Fix Set
Air Inlet Plug
QUANTITY
PART DESCRIPTION
4
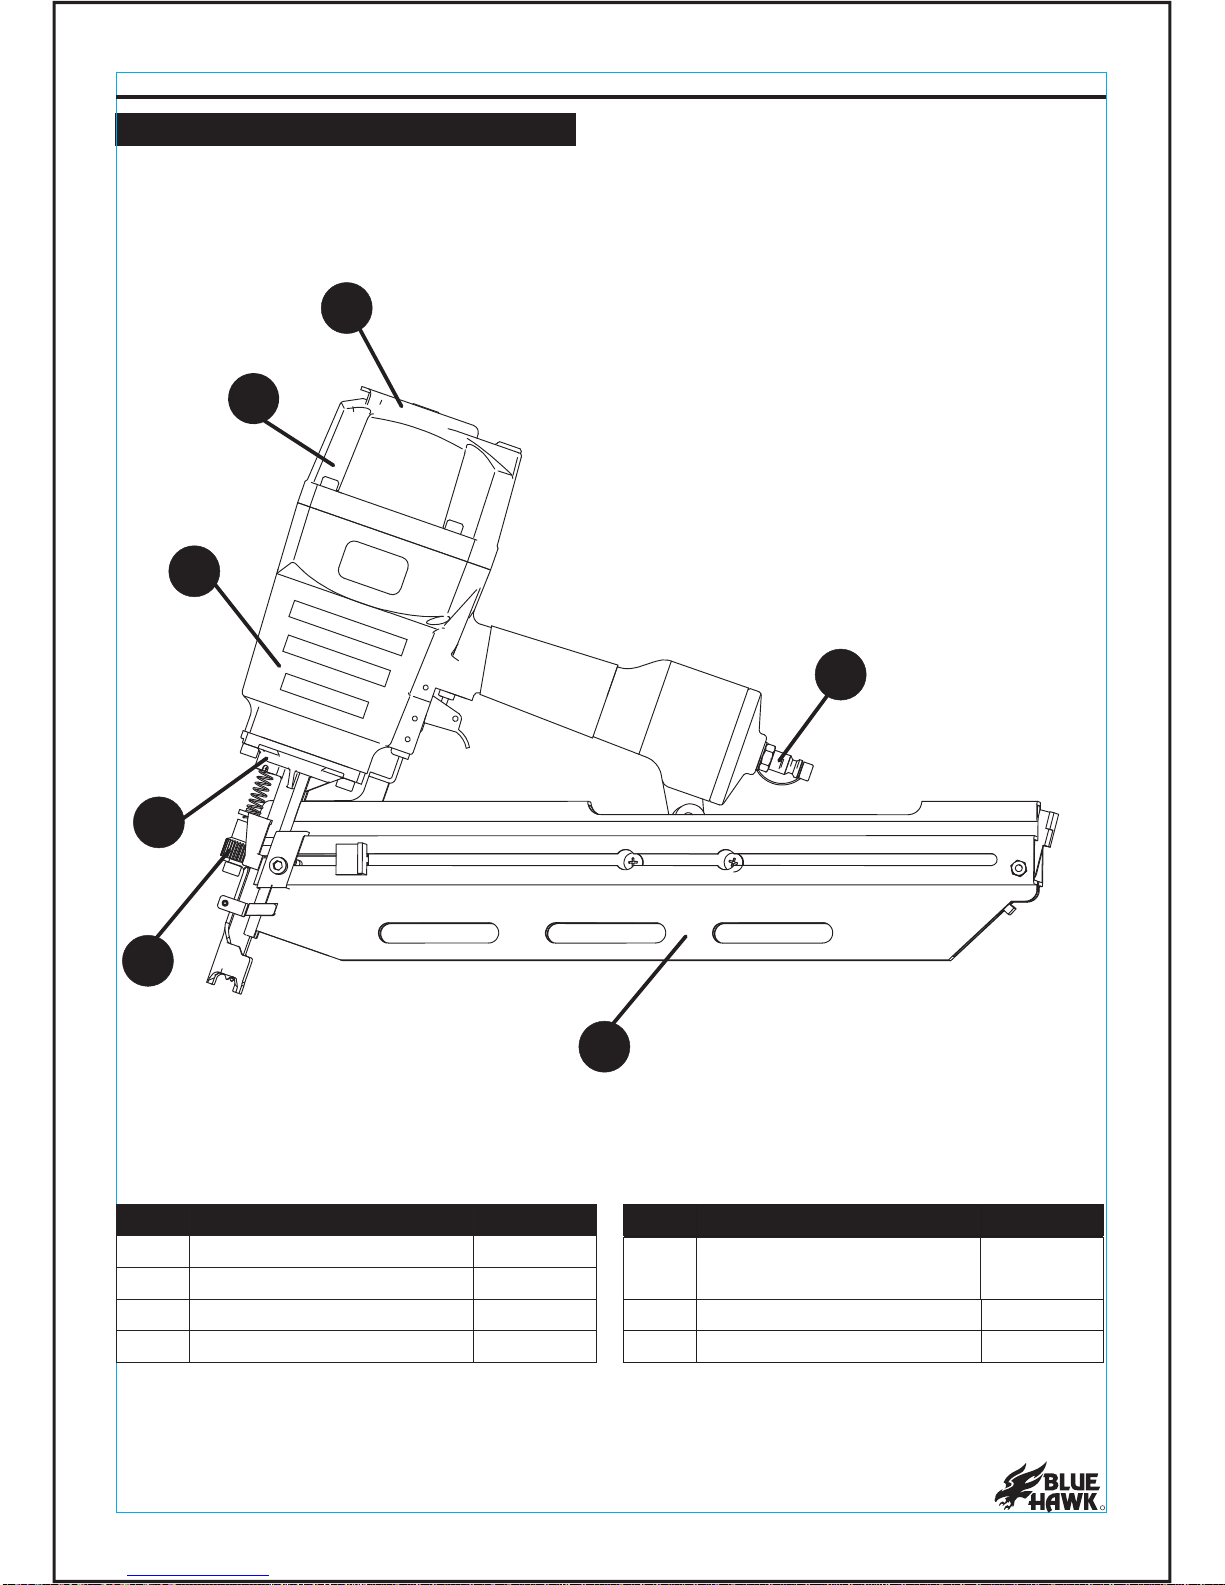
PALM NAILER
A
B
C
D
E
R
www.lowes.com

A
ra
Always be aware of air hose tripping hazard for anyone in the work area, especially if a long air
hose is used in work area.
Carry tool by the handle only.
Always keep the tool pointed away from yourself and others.
Do not keep the trigger depressed during loading of fasteners.
Always disconnect tool from air supply before loading fasteners to prevent any accidental firings
during connection.
Unintentional firing of fasteners may cause personal injury.
Disconnect tool from air supply hose and close the compressor before performing any
maintenance.
Never use a tool that is leaking air, has missing or damaged parts or requires repair.
Only use parts and accessories recommended by the manufacturer.
Read this manual and all operating instructions thoroughly before loading or unloading fasteners
or any other use of the tool. Failure to follow safety or operating instructions could result in
serious personal injury.
Do not drive fastener on scaffolding, ladders, and similar construction materials for which it’s not
intended.
Make sure all screws are securely tightened before use.
DO NOT CONNECT TOOL TO COMPRESSED AIR THAT EXCEEDS 120 PSI.
To avoid unintentional firing of tool, always be aware when safety part of trigger is depressed.
Keep hands and body away from rear area of gun to safely guard against possible injury.
SAFETY INFORMATION
NEVER USE OXYGEN, COMBUSTIBLES OR ANY OTHER BOTTLED GAS AS A POWER
SOURCE, as they can cause explosions and serious personal injury.
Keep chi ldren away. Children must never be allowed in the work area. Do not let them handle
brad nailer nails, fasteners, air hoses or any other equipment or tool.
Dress properly.Do not wear loose clothing or jewelry as they can be caught in moving parts.
Protective, electrically nonconductive clothes and nonskid footwear are recommended when
working. Wear restrictive hair covering to contain long hair.
Protect your eyes.Wear safety glasses or a face shield when using this product.
Protect your hearing. Noise can harm your hearing.
Always wear ear protection to safeguard your
Keep proper footing at all times. Do not overreach as slipping, tripping, and/or falling can be a
major cause of serious injury and/or death. Be aware of excess hose left in the working area or
work surface. Do not abuse hoses or connectors. Never carry the tool by the hose or yank it to
disconnect it from power supply. Keep hoses away from heat, oil, and sharp edges. Check hoses
for weak or worn connections before each use and make certain that all connections are secure.
hearing.
5
R
www.lowes.com

6
WARNING
SOME DUST CREATED BY PAINT SPRAYING, POWER SANDING, SAWING,
GRINDING, DRILLING, AND OTHER RELATED ACTIVITIES IS KNOWN TO THE
STATE OF CALIFORNIA TO CAUSE CANCER, BIRTH DEFECTS, AND OTHER
REPRODUCTIVE HARM. A LISTING OF CHEMICALS CAN BE OBTAINED FROM
www.oehha.ca.gov UNDER PROPOSITION 65. SOME EXAMPLES OF THESE
CHEMICALS ARE:
LEAD FROM LEAD BASED PAINTS
PRODUCTS
CRYSTALLINE SILICA FROM BRICKS, CEMENT AND OTHER MASONRY
ARSENIC AND CHROMIUM FROM CHEMICALLY TREATED LUMBER
YOUR RISK FROM THESE EXPOSURES VARIES, DEPENDING ON HOW OFTEN
YOU DO THIS TYPE OF WORK. TO REDUCE YOUR EXPOSURE TO THESE
CHEMICALS WORK IN A WELL VENTILATED AREA, AND WORK WITH APPROVED
SPECIALLY DESIGNED TO FILTER MICROSOPIC PARTICLES.
SAFETY EQUIPMENT, SUCH AS A RESPRIATOR OR DUST MASKS WHICH ARE
R
www.lowes.com

7
OPERATING INSTRUCTIONS
1
3
2
FRAMING NAILER
BEFORE LOADING OR UNLOADING FASTENERS, MAKE
SURE THE TOOL IS DISCONNECTED FROM THE AIR
SUPPLY, THE TRIGGER IS NOT DEPRESSED, AND THE
TOOL IS NOT POINTING TOWARD ANYONE.
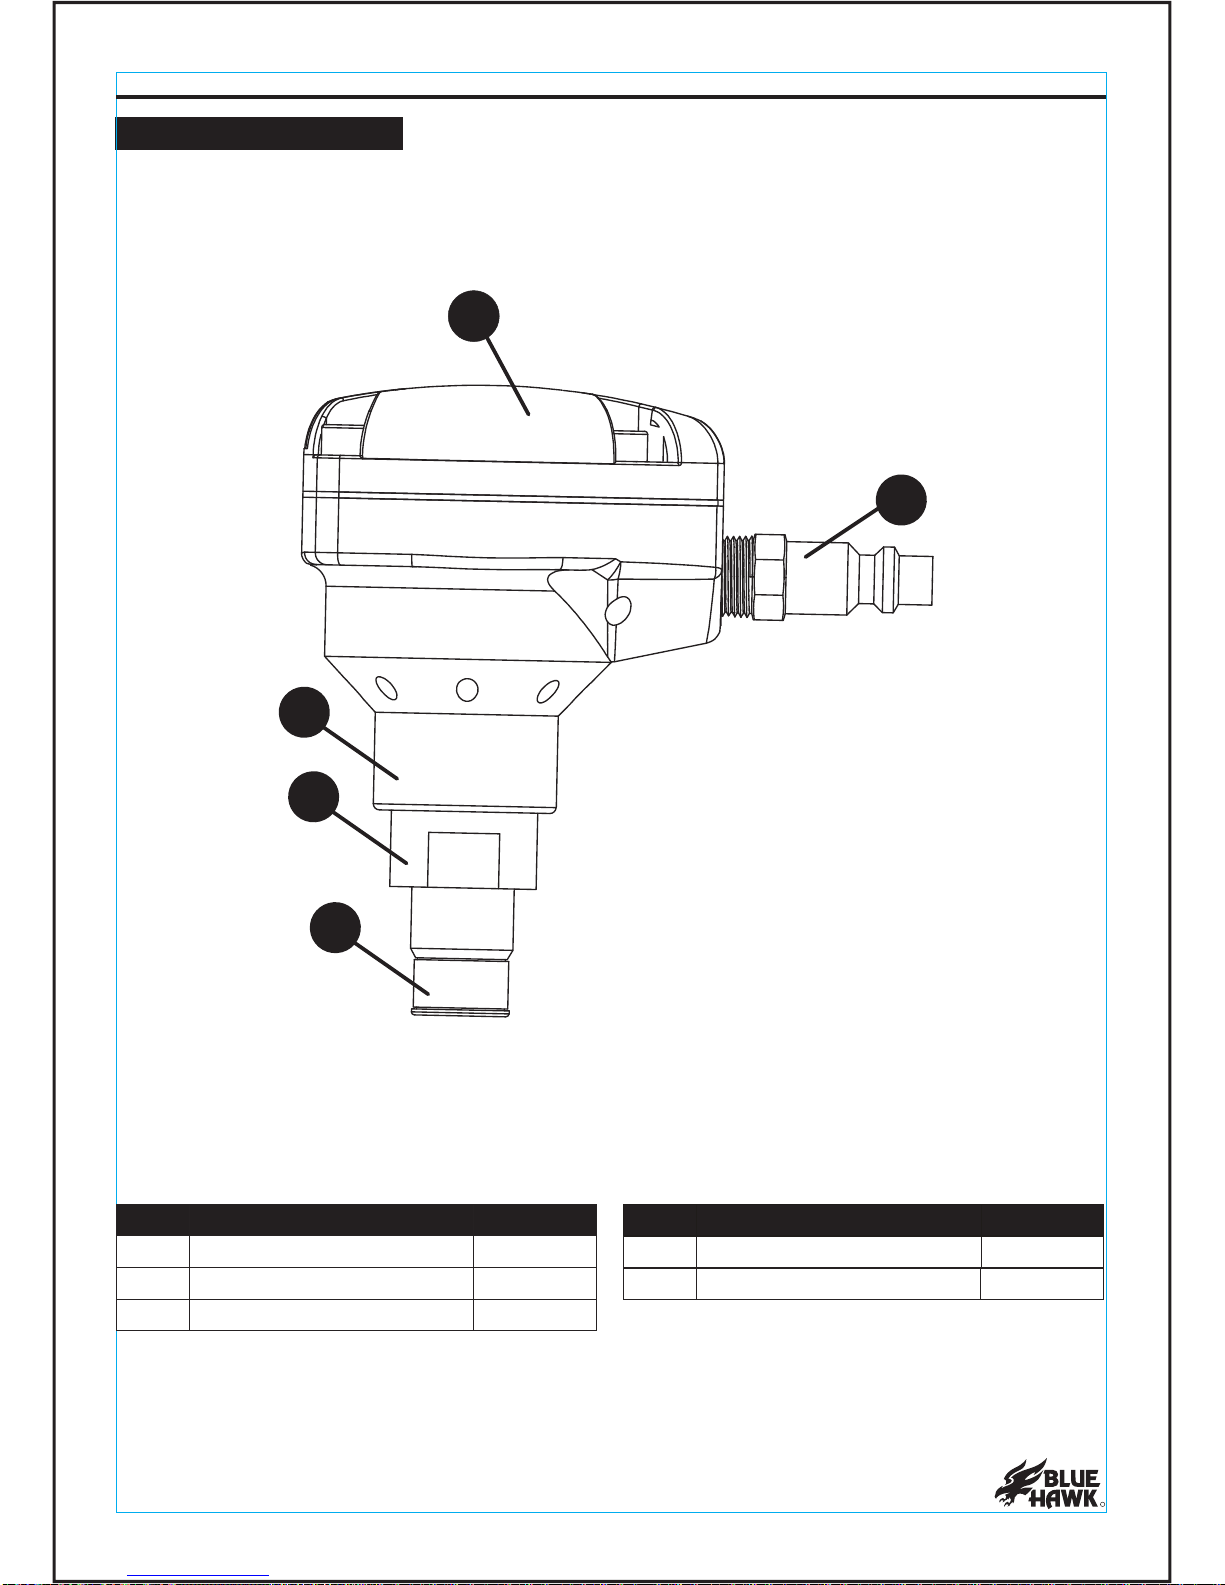
1. Pull back on nail switch release latch until you hear the latch
click and it’s locked in place.
2. Insert nails into magazine.
NOTE: Before inserting any nails into the gun, make sure you are
using the proper nail with the proper nail gun. If the incorrect
nail is used bodily injury or property damage may occur. Make
sure that the nail is facing the proper direction with the tip facing
down toward the bottom of the magazine and the head of the
nail facing up toward the top of the magazine. Please consult
your retailer if you have any questions on which nail is the correct
one to be used with this tool or how to place the nails properly
into the magazine.
3Press forward on the nail switch release latch so that it slides
forward until it makes contact with the inserted fasteners. It’s
recommended to test fire the fastener on a scrap piece of wood
to make sure the depth setting on the nailer is set properly.
R
www.lowes.com

OPERATING INSTRUCTIONS
4. Air supply
5. Loading fasteners and operating
When connecting air supply, always keephands and body away from discharge area of tool.
A filter regulation-lubrication (not included) is required and should be located as close to the
Make sure the air pressure is set at the correct range of 80 - 120 PSI before using. Never
exceed 130 PSI.
tool as possible.
Not all components shown are included.
Place five or six drops of pneumatic tool oil (not included) into the air inlet. If you use an
automatic inlet oiler, check and add oil if necessary.
Check and replace any damaged or worn parts on the tool.
Make sure the magazine is empty of all fasteners and the hose has a rated work
pressure, then connect the tool to air compressor using a 3/4 in. ID hose.
Regulate the air pressure to obtain 5 - 8 bardepending on working demands and
characteristics of workpiece.
Before loading the fasteners, disconnect the tool from the air supply. Gripping the tool firmly,
pull the pusher back and engage the latch.
Insert a strip of fasteners keeping point down.
Orient and slide this strip of fasteners forward to the front of the magazine.
Release the latch and pusher. Slide the pusher against the nails.
Test the driving depth in a sample piece of wood before using. If the fasteners are being
driven too far or not far enough, adjust the regulator to provide less air pressure or more air
pressure.
Tool
Quick
Quick
Coupler Quick
Coupler
Air Hose Regulator
Air
Compressor
Connector Quick Oiler Filter
Connector
4
8
Never operate tool unless safety nose is in contact with workpiece. Do not operate tool
without fasteners or damage to tool may result.
Never fire fasteners into air because fasteners may injure operator or others and damage to
tool may result.
R
www.lowes.com

9
OPERATING INSTRUCTIONS
1
PALM NAILER
2. Air supply
3. Loading fasteners and operating
When connecting air supply, always keephands and body away from discharge area of tool.
A filter regulator-lubrication (not included) is required and should be located as close to the
Make sure the air pressure is set at the correct range of 70 - 90 PSI before using. Never
exceed 100 PSI.
tool as possible.
Not all components shown are included.
Insert one piece of required nail into fixed set. Use one hand to hold the nail and the other
hand to hold the body of the tool. Press the tool until ram pin upwards 1 mm and attach
movement in succession.
Use clean, dry and regulated compressed air at 70-90 PSI.
After the nail is steady, remove the hand holding the nail and continue to drive the nail into
place.
Place some drops of lubrication into the air inlet before use, and clean the tool after use.
Tool
Quick
Quick
Coupler Quick
Coupler
Air Hose Regulator
Air
Compressor
Connector Quick Oiler Filter
Connector
2
KEEP YOUR HAND AND FINGERS AWAY FROM THE BASE
OF PALM NAILER WHILE IN USE. BEFORE PERFORMING
ANY MAINTENANCE, MAKE SURE THE TOOL IS
DISCONNECTED FROM THEAIR SUPPLY.
When setting a nail, it is recommended that the sides of the nail
are held under the head of the nail
When holding the nail properly, align the head of the nail with
the fix set at the base of the palm nailer. Make sure the nail is
aligned properly. Slightly apply pressure to the top of palm nailer
and the palm nailer will begin to fire. Once the nail is slightly
inserted into the surface pull your hand away from the nail. Keep
consistent pressure on the top of the palm nailer to continue to
drive the nail deeper into the surface.
NOTE: The palm nailer is designed to continuously fire when the
nail head and fix set make contact until the nail is flush into the surface you plan to nail into. You
can set a nail to any depth. To stop the nailer, release pressure from the top of the palm nailer.
R
www.lowes.com

CAREANDMAINTENANCE
TROUBLESHOOTING
10
Nail gun must be well-cleaned and lightly lubricated before storing
Place 2 to 6 drops of pneumatic tool oil into the air inlet before each work day or after 2 hours of
continuous use depending on the characteristicsof workpiece or type of fasteners.
Inspect trigger and safety mechanism to ensure system is safe and functional. Make sure there
are no loose or missing parts and no binding or sticking parts.
WARNING: If any of the following problems occur during operation, stop using the tool
immediately or serious personal injury could result. Only a qualified person or an
authorized service center can perform repairs or replacement of tool.
Disconnect tool from air supply before attempting repair or adjustment. When replacing O-rings
or cylinder, lubricate with air tool oil before assembly.
Air leak near top of
tool or in trigger area. 1. O-rings in trigger valve ar
e damaged.
2. Trigger valve heads are damaged.
3. Trigger valve stem, seal or O-ring
are damaged.
1. Check and replace O-ring.
2. Check and replace trigger valve heads.
3. Check and replace trigger valve
stem, seal or O-ring.
Air leak near bottom of
tool. 1. Loose screws.
2. Worn or d
amaged O rings or bumper.
-
1. Tighten screws.
2. Check and replace O-rings or bumper.
Air leak between body
and cylinder cap. 1. Loose screws.
2. Worn or damaged O-rings or seals. 1. Tighten screws.
2. Check and replace O-rings or bumper.
Blade driving fastener
too deep. 1. Worn bumper.
2. Air pressure is too high. 1. Replace bumper.
2. Adjust the air pressure.
Tool: cannot drive
fastener or operates
sluggishly.
1. Inadequate air supply.
2. Inadequate lubrication.
3. Worn or damaged O
-
rings or seals.
4. Exhaust port in cylinder head is
blocked.
1. Verify adequate air supply.
2. Place 2 to 6 drops of oil into air inlet.
3. Check and replace O-rings or seal.
4. Replace damaged internal parts.
Tool skips fasteners. 1. Worn bumper or damaged spring.
2. Dirt in front plate.
3. Dirt or damage prevents fasteners
from moving freely in magazine.
4. Worn or dry O
-
ring on piston or
lack of lubrication.
5. Cylinder cover seal leaking.
1. Replace bumper or pusher spring.
2. Clean drive channel on front plate.
3. Magazine needs to be cleaned.
4. O-ring needs to be replaced.
5. Lubricate cylinder cover seal.
PROBLEM POSSIBLE CAUSE CORRECTIVE ACTIONS
Tool jams. 1. Incorrect or damaged fasteners.
2. Damaged or worn driver guide.
3. Magazine or nose screw loose.
4. Magazine is dirty.
2. Check and replace the driver.
3. Tighten the magazine.
4. Clean the magazine.
1. Change and use correct fastener.
If your tool is used without the in-liner automatic oiler (not included), regular lubrication is required.
Store nail gun in a dry and safe place, out of reach of children
Storing
R
www.lowes.com
Clearing a jammed nail gun:
Disconnect the tool from the air supply before performing any maintenance. Once air supply is
disconnected, pull back on the nail switch release latch. Remove any fastener(s) or nail(s) which
are in the magazine. Insert a flathead screwdriver (not included) into the driving mechanism of the
nail gun and push the driving mechanism back into the gun body. This should free the fastener/nail
jam. Remove any bent fastener or nail from the gun body or driver guide and/or nail plate. Once
bent fastener or nail is removed, reinsert the fastener(s) or nail(s) into the magazine. Close the nail
switch release latch so that there is pressure on the fastener(s)/nail(s). Reconnect the air supply
to the nail gun.

11
www.lowes.com ®
WARRANTY
1-YEAR LIMITED WARRANTY
The manufacturer warrants this product against defects in materials and workmanship for
one year from date of purchase. If within this period a product is found to be defective in
material or workmanship, the product must be returned with a copy of the bill of sale as proof
of purchase to the place of purchase. The manufacturer will, at its option, repair, replace or
refund the purchase price to the consumer. This warranty does not cover the product becoming
defective due to misuse, accidental damage, improper handling and/or installation and specifically
excludes liability for direct, incidental or consequential damages. As some states do not allow
exclusions or limitations on how long an implied warranty lasts, the above exclusion and limitation
may not apply to you. This warranty gives you specific rights and you may also have other rights
which vary from state to state.

12
EXPLODED VIEWS
1
25 Cylinder
Copper Collar
Safety Nose Case
Magazine
Bolt
Washer
Nut
Washer Case
Drive Nail Bar
Bolt
Spacer
Bolt
Safety Pipe
Pusher
Spring
Latch Spring
Release Latch
Pin
Spring Core
Safety Pipe Case
Bolt
Nut
Flat Washer
Fixed Seat
Bolt
Rubber Handle Case
Trigger Valve Guide
O-ring
O-ring
O-ring
Switch Spring
Switch Pipe
O-ring
O-ring
Switch Seat
Pin
Trigger
O-ring
Safety Spacer
Pin
Safety Guide
Pin
Compressed Spring
Safety Yoke
Bolt
Spring Washer
Safety Nose
Compressed Spring
O-ring
Drive Guide
Spring Washer
Bolt
Pin
Bolt
Plate
Flat Washer
56
2
33
Bolt
Air Deflector
Deflector Rubber
Spring
Spring wire
Bolt
Spring Washer
Washer
Cylinder Core
Bolt
Cylinder Cover
Head Valve Piston
O-ring
O-ring
Spring Washer
Spring Seat
Compressed Spring
Collar
O-ring
Main Piston
O-ring
O-ring
O-ring
O-ring
Fix ring
Sealing Ring 57
3
34
65
4
35
66
5
36
67
6
37
68
7
38
69
8
39
70
9
40
71
10
41
72
11
42
73
12
43
74
13
44
75
14
45
76
15
46
77
16
47
78
17
48
79
18
49
80
19
50
81
20
51
82
83
84
85
86
87
21
22
23
24
52
53
54
55
61
62
63
64
58
59
60
No. Description Description DescriptionQty. Qty. Qty.No. No.
1
1
1
1
1
1
1
4
6
5
1
1
1
1
2
1
1
1
1
1
1
1
1
1
1
1
31
Bumper Outer Lane
Bumper
Cylinder Washer
Gun Body
Trigger Valve Seat
26
27
28
29
30 1
32 1
1
1
1
1
12
1
1
1
4
4
1
1
11
2
1
1
1
1
1
1
1
1
2
1
1
2
3
1
1
1
2
1
1
1
1
1
1
1
1
1
2
3
1
2
1
1
End Cap Washer
End Cap
Washer
Bolt
Air Plug
Air Piug Case
88
89
90
91
92
93
1
1
3
1
3
1
Adj. Block
94 1
Adj. Nut
Steel Ball
Bolt
Pin Case
Stop Collar
95
96
97
98
99
1
2
1
1
1
1
1
1
4
3
1
1
1
2
1
1
FRAMING NAILER
R
www.lowes.com

13
EXPLODED VIEWS
1Air Plug Case
Washer
Fix Set
Magnet
Spring
Bolt
Cylinder
O-ring
O-ring
Piston
Bumper
Sealing Washer
Gun Body
Air Inlet Plug
29
Bolt
Spring Wahser
Cylinder Cover
O-ring
Washer
O-ring
Slip Set
Seal Ring
310 17
411 18
512 19
613 20
714 21
815 22
16
No. Description Description DescriptionQty. Qty. Qty.No. No.
4
4
11
1
1
2
1
1
2
11
1
1
1
1
1
1
1
1
1
1
FRAMING NAILER
BLUE HAWK
is a registered
trademark of
L. F., LLC. All
Rights Reserved.
R
Printed in China
R
www.lowes.com

ARTICLE #0461680
MODÈLE #SGY-NR-KITV
CLOUEUSE DE
CHARPENTE AVEC
CLOUEUSE PORTATIVE
14
R
www.lowes.com
JOIGNEZ VOTRE REÇU ICI
Numéro de série Date d’achat
Des questions, des problèmes, des pièces manquantes? Avant de retourner l’article au
détaillant, appelez notre service à la clientèle au 1 877 888-8225, entre 8 h et 20 h (HNE),
du lundi au vendredi.

TABLE DES MATIÈRES
IMPORTANT
CARACTÉRISTIQUES DU PRODUIT
.Consignes de sécurité ............................................................................................................... 18
Avant d’utiliser cet article, lisez et suivez toutes les consignes de sécurité et le mode d’emploi.
Veuillez conserver ce manuel pour vous y référer ultérieurement.
.Dépannage................................................................................................................................. 23
Contenu de l’emballage ............................................. .............................................................. 16
Caractéristiques du produit ......................................... ................................................................. 15
..Mode d’emploi.................................................. ....................................................................... 20
..Entretien......................................................... ........................................................................ 23
.
Vues éclatées ........................................................................................................................... 25
.
Garantie ................................................................................................................................... 24
15
Capacité de clous
Longueur du clou
Pression de fonctionnement
Entrée d’air
Dimensions
Poids
Diamètre des clous à tige
Capacité de clous
Longueur du clou
Pression de fonctionnement
Entrée d’air
Dimensions
Poids
DESCRIPTION
2 x 30 pièces
2 po à 3 1/2 po
2 po à 3 1/2 po
5,5 bars à 8,2 bars (80 lb/po² à 120 lb/po²)
1/4 po NPT
19,68 po × 14,92 po × 4,21 po
(500 × 379 × 107 mm)
3,79 kg
2,87 mm à 3,33 mm
3 mm à 7,5 mm
CARACTÉRISTIQUES
1 pièce
4,8 bars à 6,9 bars (70 lb/po² à 100 lb/po²)
1/4 po NPT
4,05 po × 2,08 po × 4,05 po
(103 × 53 × 103 mm)
0,37 kg
CLOUEUSE DE CHARPENTE
CLOUEUSE PORTATIVE
R
www.lowes.com
DESCRIPTION CARACTÉRISTIQUES
Tête du clou
CONTENU DE L’EMBALLAGE
QUANTITÉ
1
1
1
1
1
PIÈCE
A
B
C
D
E
DESCRIPTION
Déflecteur
Couvercle du cylindre
Corps du pistolet
Guide d’enfoncement
Dispositif de réglage de
la profondeur
QUANTITÉ
1
1
F
G
DESCRIPTION
Magasin
Entrée d’air
16
CLOUEUSE DE FINITION DE CALIBRE 16
A
C
D
E
F
G
B
R
www.lowes.com
PIÈCE
CONTENU DE L’EMBALLAGE
QUANTITÉ
1
1
1
1
1
PIÈCE
A
B
C
D
E
DESCRIPTION
Couvercle du cylindre
Verrou
Corps du pistolet Ensemble de fixation
Raccord d’entrée d’air
17
CLOUEUSE PORTATIVE
A
B
C
D
E
R
www.lowes.com
PIÈCE DESCRIPTION QUANTITÉ

18
Lisez attentivement ce guide et tous les modes d’emploi avant de charger ou de décharger
les fixations ou d’utiliser l’appareil de quelque façon que ce soit. Le non-respect des
consignes de sécurité et du mode d’emploi peut entraîner des blessures graves.
www.lowes.com
CONSIGNES DE SÉCURITÉ
MA
ra
a
Soyez toujours conscient du danger de trébucher sur le tuyau d’air, surtout s’il est long, pour
tous ceux qui se trouvent dans l’aire de travail.
Tenez toujours l’outil uniquement par la poignée.
Ne pointez jamais l’outil vers vous ni vers les autres.
Ne gardez pas la gâchette enfoncée lors du chargement des fixations.
Débranchez toujours l’outil de l’alimentation en air avant de charger les fixations afin d’éviter un
déclenchement imprévu des fixations lors de la connexion.
Le déclenchement accidentel des fixations pourrait entraîner des blessures.
Débranchez l’outil du tuyau d’alimentation en air et fermez le compresseur avant d’effectuer tout
entretien.
N’utilisez jamais un outil qui présente une fuite d’air, auquel il manque des pièces, dont des
pièces sont endommagées ou qui nécessite une réparation.
N’utilisez que des pièces et des accessoires recommandés par le fabricant.
N’enfoncez pas la fixation sur un échafaudage, une échelle ou tout autre matériau de construction
similaire pour lequel elle n’est pas conçue.
Assurez-vous que toutes les vis sont serrées fermement avant l’utilisation.
NE BRANCHEZ PAS L’OUTIL À DE L’AIR COMPRIMÉ QUI DÉPASSE 120 LB/PO².
Ne laissez pas la gâchette enfoncée sur le mécanisme de mandrin de sécurité afin d’éviter un
déclenchement accidentel de l’outil.
Gardez toujours les mains et le corps éloignés
de l’arrière du pistolet pour vous protéger de toute
blessure.
N’UTILISEZ JAMAIS D’OXYGÈNE, DE COMBUSTIBLES NI AUCUN AUTRE GAZ
EMBOUTEILLÉ COMME SOURCE D’ALIMENTATION, puisqu’ils peuvent provoquer une
Gardez les enfants à l’écart. Ne laissez jamais un enfant accéder à l’aire de travail. Ne laissez
Habillez-vous convenablement. Ne portez pas de vêtements amples ni de bijoux, car ils risquent
Protégez vos yeux. Portez des lunettes de sécurité ou un écran facial lorsque vous utilisez ce
Protégez votre ouïe – le bruit peut la détériorer.
Portez toujours des protecteurs auditifs pour
Gardez une posture sécuritaire en tout temps. Ne vous étirez pas pour étendre votre portée;
AVERTISSEMENT
pas les enfants manipuler la cloueuse de finition, les clous, les fixations, les tuyaux à air, de
l’équipement ou des outils.
de se prendre dans les pièces mobiles. Des vêtements de protection non conducteurs et des
chaussures antidérapantes sont recommandés pour le travail. Couvrez vos cheveux s’ils sont
longs.
produit.
préserver votre ouïe.
vous risqueriez de glisser, de trébucher ou de tomber et de subir des blessures graves ou
mortelles. Faites attention à l’excédent de tuyau laissé dans l’aire de travail ou sur la surface de
travail. Ne faites pas un usage abusif des tuyaux ou des connecteurs. Ne transportez jamais
l’outil en le tenant par le tuyau et ne le tirez jamais sur le cordon d’alimentation pour le
débrancher. Tenez les tuyaux éloignés des sources de chaleur, de l’huile et des objets coupants.
Vérifiez si les raccords des tuyaux sont faibles ou usés avant chaque utilisation et assurez-vous
qu’ils sont bien solides.
explosion ou causer des blessures graves.

www.lowes.com
19
LES RISQUES LIÉS À L’EXPOSITIONÀ CES PRODUITS VARIENT SELON LE
NOMBRE DE FOIS OÙVOUS PRATIQUEZ CES ACTIVITÉS. AFIN DE LIMITER
VOTRE EXPOSITIONÀ CES PRODUITS CHIMIQUES, TRAVAILLEZ DANS UN
ENDROIT BIENVENTILÉ ET UTILISEZ DE L’ÉQUIPEMENT DE SÉCURITÉ
APPROUVÉ, TELQU’UN APPAREIL RESPIRATOIRE OU UN MASQUE
ANTIPOUSSIÈRE CONÇUS SPÉCIALEMENT POUR FILTRER LES PARTICULES
MICROSCOPIQUES.
A VERTISSEMENT
LA POUSSIÈRE CRÉÉE PENDANT LE PONÇAGE, LE SCIAGE, LE POLISSAGE, LE
PERÇAGE ET D'AUTRES ACTIVITÉS PEUT CONTENIR DES PRODUITS CHIMIQUES
RECONNUS PAR L'ÉTAT DE LA CALIFORNIE COMME ÉTANT LA CAUSE DE CANCERS,
D'ANOMALIES CONGÉNITALES ET D'AUTRES PROBLÈMES LIÉS AUX FONCTIONS
AU www.oehha.ca.gov, CONFORMÉMENT À LA PROPOSITION 65. VOICI
QUELQUES-UNS DE CES PRODUITS CHIMIQUES :
DU PLOMB PROVENANT DE PEINTURES À BASE DE PLOMB;
DE LA SILICE CRISTALLINE PROVENANT DE LA BRIQUE, DU CIMENT OU
D'AUTRES MATÉRIAUX DE MAÇONNERIE;
DE L'ARSENIC ET DU CHROME PROVENANT DU BOIS D'ŒUVRE TRAITÉ AVEC
UN PRODUIT CHIMIQUE.
REPRODUCTRICES. VOUS POUVEZ OBTENIR LA LISTE DES PRODUITS CHIMIQUES
20
MODE D’EMPLOI
1
3
2
CLOUEUSE DE CHARPENTE
AVANT DE CHARGER OU DE DÉCHARGER DES CLOUS,
ASSUREZ-VOUS QUE L’OUTIL EST DÉBRANCHÉ DE
L’ALIMENTATION EN AIR, QUE LA GÂCHETTE N’EST PAS
ENFONCÉE ET QUE L’OUTIL N’EST POINTÉ VERS
PERSONNE.
1. Tirez sur le verrou de déblocage des clous jusqu’à ce que
vous entendiez un déclic et qu’il soit verrouillé en position.
2. Insérez les clous dans le magasin.
REMARQUE : Avant d’insérer des clous dans le pistolet,
assurez-vous d’utiliser les clous adéquats avec le bon pistolet.
L’utilisation de clous inadéquats peut causer des blessures
corporelles ou entraîner des dommages matériels. Assurez-vous
que les clous sont dans la bonne direction : la pointe du clou doit
être dirigée vers le bas du magasin et la tête du clou doit être
dirigée vers le haut du magasin. Veuillez consulter votre
détaillant si vous voulez savoir quels clous peuvent être utilisés
avec quels outils ou pour savoir comment placer les clous
adéquatement dans le magasin.
3Poussez le verrou de déblocage des clous de façon à ce
qu’il glisse vers l’avant jusqu’à ce qu’il soit en contact avec les
clous à l’intérieur. Il est recommandé de tester les clous sur une
retaille de bois en premier afin de s’assurer que le réglage de
profondeur de la cloueuse est réglé adéquatement.
R
www.lowes.com
Table of contents
Languages:
Other Blue Hawk Nail Gun manuals

Popular Nail Gun manuals by other brands

Metabo HPT
Metabo HPT NR 3675DD Instruction and safety manual

EXTOL PREMIUM
EXTOL PREMIUM 8894580 Translation of the original user manual

DeWalt
DeWalt XR Li-Ion DCN680D2 Original instructions

Performance Tool
Performance Tool M643 owner's manual

Hitachi
Hitachi VH650 - Fencing Nailer, Full Head instruction manual

Parkside
Parkside PET 25 B1 Operation and safety notes


