Blue Ridge Mountain Cookery ClassicCooker 1000 User manual

1
OWNERS MANUAL
OWNERS MANUALOWNERS MANUAL
OWNERS MANUAL
C
CC
Classic
lassiclassic
lassicC
CC
Cooker
ooker ooker
ooker 1000
10001000
1000 Tow
Tow Tow
Tow-
--
-Behind
BehindBehind
Behind
Congra ula ions on purchasing a Blue Ridge Moun ain Cookery, Inc. gas grill. Made
primarily of s ainless s eel, wi h proper care, i will las you for years of professional
cooking. This manual will ou line some hings you should know abou your new
purchase, and will also help you roubleshoo problems you may have. Thank you for
your business- We apprecia e i !
Series 1000 Trailer Moun
Series 1000 Trailer MounSeries 1000 Trailer Moun
Series 1000 Trailer Moun ed
eded
ed
Grill
GrillGrill
Grill
Wi h he excep ion of he railer componen s, vir ually every par of he BRMC Series
1000 Cooker is made of s ainless s eel. The axles have a ra ing of 2000 lb., while he
dry weigh of he Cooker is 670 lb. The burners are ra ed a 30,000 BTUs each, and are
individually con rolled by valves affixed direc ly o he gas orifices.
The cooking surface is approxima ely 24.5” x 60”, and he gra e is ¼” s ainless s eel
rod. A o al of hree burners genera e he hea required o cook for your clien s. A se
of rolled s ainless s eel lids equipped wi h cool grip handles covers he cooking
surface. The lid moves on a pivo poin , so here are no hinges or lid s ays o opera e.
Each railer-moun ed barbecue comes equipped wi h a ligh package and license pla e
holder, and is s ree legal once i has been licensed by your s a e DMV.
The railer uni is no equipped wi h i s own se of brakes. Please ensure ha you allow
sufficien room for safe s opping of he ow vehicle and barbeque combined.
VIN Number
VIN NumberVIN Number
VIN Number
Every au o, ruck, bus, and railer manufac urer around he world mus iden ify each
vehicle hey manufac ure wi h a Vehicle Iden ifica ion Number ha is specific o ha
vehicle. BRMC mobile gas cookers are no differen . You will no ice ha here is a pla e
moun ed on he ongue of each railer ha lis s he VIN for ha uni . As well, you are
supplied wi h a Cer ifica e of Origin from BRMC ha also has he VIN prominen ly
displayed for licensing requiremen s.
Blue Ridge Moun ain Cookery, Inc.
Blue Ridge Moun ain Cookery, Inc.Blue Ridge Moun ain Cookery, Inc.
Blue Ridge Moun ain Cookery, Inc.
PO Box 70
Waynesboro, PA 17268
Ph: (717) 762-1211 Fax: (717) 762-1966
Email: [email protected] Web: www.classiccookers.com

2
General Precau ions
General Precau ions General Precau ions
General Precau ions for
forfor
for Your Safe y
Your Safe y Your Safe y
Your Safe y
1) Propane is a flammable gas ha is under pressure. Leaking propane may
cause a fire or explosion if igni ed.
2) An odor has been added o propane o make he de ec ion of a leak easier. If
you smell, hear or see leaking LP gas, immedia ely call he fire depar men . Do
no a emp o make repairs.
W
WW
WARNING
ARNINGARNING
ARNING: Under som
: Under som: Under som
: Under some circumstances, propane may lose the
e circumstances, propane may lose the e circumstances, propane may lose the
e circumstances, propane may lose the
distinctive odor that was added. Keep the service valve closed
distinctive odor that was added. Keep the service valve closed distinctive odor that was added. Keep the service valve closed
distinctive odor that was added. Keep the service valve closed
and plugged or capped when the cylinder is not hoo ed up,
and plugged or capped when the cylinder is not hoo ed up, and plugged or capped when the cylinder is not hoo ed up,
and plugged or capped when the cylinder is not hoo ed up,
including empty cylinders. Other strong odors may mas or
including empty cylinders. Other strong odors may mas or including empty cylinders. Other strong odors may mas or
including empty cylinders. Other strong odors may mas or
hide the odor of propane. Colds, allerg
hide the odor of propane. Colds, allerghide the odor of propane. Colds, allerg
hide the odor of propane. Colds, allergies, sinus congestion,
ies, sinus congestion, ies, sinus congestion,
ies, sinus congestion,
and the use of tobacco, alcohol or drugs may impair your
and the use of tobacco, alcohol or drugs may impair your and the use of tobacco, alcohol or drugs may impair your
and the use of tobacco, alcohol or drugs may impair your
ability to smell.
ability to smell.ability to smell.
ability to smell.
3) Propane is heavier han air, and may ini ially concen ra e in low places prior o
dissipa ing.
4) Con ac wi h he liquid con en s of he cylinder will cause freeze burns o he
skin.
Some Do’s and Don’ s
Some Do’s and Don’ sSome Do’s and Don’ s
Some Do’s and Don’ s
1) When ranspor ing he cylinder or when i is o herwise no connec ed for use,
keep i secure in an uprigh posi ion wi h he cylinder valve urned off and
igh ly plugged or capped (per he cylinder manufac urers ins ruc ions).
2) Take your cylinder only o a repu able supplier for filling, repairs or disposal of
unused propane.
3) Cau ion your LP gas supplier o:
•
Be cer ain he cylinder is purged of rapped air prior o firs filling;
•
Be cer ain no o fill he cylinder beyond 80% capaci y;
•
Be cer ain he cylinder requalifica ion da e is checked
4)
If you replace your cylinder a an exchange service, be sure he new cylinder
has he same connec ion as he one you had previously.
•
5) DO NOT
DO NOT DO NOT
DO NOT allow children o amper or play wi h he cylinder or grill.
•
6) DO NOT
DO NOT DO NOT
DO NOT use, s ore or ranspor he cylinder where i would be exposed
o high empera ures. Do no use or s ore he cylinder in a house, building,
garage or enclosed area. The pressure relief valve may open, allowing a
large volume of flammable gas o escape.
7) CAUTION: DO NOT
CAUTION: DO NOT CAUTION: DO NOT
CAUTION: DO NOT depressurize he cylinder before aking i o be refilled.

3
Using Your BRMC Cooker Safely
Using Your BRMC Cooker SafelyUsing Your BRMC Cooker Safely
Using Your BRMC Cooker Safely
Blue Ridge Moun ain Cookery recommends ha you clean your grill af er every
use. A liberal applica ion of a residen ial or commercial grade oven cleaner
(such as Easy Off) should be sprayed on he grill surface and in erior ub. Rinse
horoughly wi h a high-pressure wa er hose.
I is impor an o remember o fire up your BRMC Cooker af er cl
I is impor an o remember o fire up your BRMC Cooker af er clI is impor an o remember o fire up your BRMC Cooker af er cl
I is impor an o remember o fire up your BRMC Cooker af er cleaning so
eaning so eaning so
eaning so
you elimina e wa er ha has collec ed in he burners.
you elimina e wa er ha has collec ed in he burners. you elimina e wa er ha has collec ed in he burners.
you elimina e wa er ha has collec ed in he burners.
The cylinder valve ou le mus be plugged whenever he cylinder is no
connec ed o he grill or being ranspor ed, unless i is a quick connec ype of
cylinder valve. The plug is an addi ional safe y measure designed o hold he
propane on he ank if he handwheel is inadver en ly opened. Quick connec
cylinder valves have an ex ra check valve so hey do no require a plug.
Pro ec ive caps are available for quick connec valves, and should be used o
help keep dir and o her con aminan s from he ou le .
Use your propane cylinder(s) in he posi ion hey were designed for. The Classic
Cooker Series 4000 is designed for wo uprigh gas cylinders. The Classic
Cooker Series 1000, however, is designed o use a single horizon al ank.
DO NOT
DO NOT DO NOT
DO NOT use BRMC Cookers indoors. When propane burns, i uses oxygen. If
he grill is used indoors, his can resul in asphyxia ion or carbon monoxide
poisoning.
DO NOT
DO NOT DO NOT
DO NOT use BRMC Cookers close o he side of a house or s ruc ure, and
never use under any surface ha will burn, such as a carpor , en or awning. If
here is a fire due o a propane leak, or a flare up from grilling, he fire can be
spread o combus ible ma erial close by or above.
DO NOT
DO NOT DO NOT
DO NOT s ore a spare cylinder under or near he grill or in he garage, due o
exposure o high empera ure.
Connec ing he Cylinder o he Grill
Connec ing he Cylinder o he Grill Connec ing he Cylinder o he Grill
Connec ing he Cylinder o he Grill
When connec ing he regula or o he cylinder valve, be sure he pressure relief
valve (usually loca ed opposi e he connec ion o he regula or) is direc ed away
from he fron of he grill. If he relief valve should open, he propane will be
direc ed o an area ha will do he leas harm.
Ensure ha all hoses, fi ings and he regula or are properly pro ec ed from hea
and acciden al damage. Hoses can be burned or chaffed if rou ed improperly.
Hoses are secured a he BRMC fac ory wi h ie down plas ic s raps o preven

4
chaffing. Be sure ha all burner con rol valves on he grill are urned off. Af er
connec ion is comple e, check for leaks.
Thread he connec or a ached o he inle side of he regula or in o he service
valve on he cylinder. Remember ha since he connec ion has a lef
Remember ha since he connec ion has a lefRemember ha since he connec ion has a lef
Remember ha since he connec ion has a lef -
--
-handed
handed handed
handed
hread, you mus urn i coun er clockwise o igh en.
hread, you mus urn i coun er clockwise o igh en.hread, you mus urn i coun er clockwise o igh en.
hread, you mus urn i coun er clockwise o igh en. Tigh en he connec ion
wi h a small adjus able or open-ended wrench.
Where allowed by local regula ions, some grill cylinder valves may be equipped
wi h a device, which allows you o connec wi hou ools. There are wo such
ypes of valves.
One ype uses a spring-loaded sleeve on he valve, and is known as a quick
disconnec . When he sleeve is pulled back, he regula or probe can be
inser ed. Release he sleeve o comple e he connec ion.
The o her ype is known as a quick connec valve. This one has large hreads on
he ou side of he valve. A large plas ic nu on he regula or screws on o he
valve hreads.
Checking For Leaks
Checking For LeaksChecking For Leaks
Checking For Leaks
Before ligh ing your BRMC Cooker, check all connec ions for igh ness using a
solu ion of 1/2 liquid soap and 1/2 wa er. DO NOT
DO NOT DO NOT
DO NOT use ma ches or ligh ers o
check for leaks. DO NOT
DO NOT DO NOT
DO NOT smoke while performing leak es s. Wi h all he valves
on he grill urned off, slowly open he cylinder valve by urning he handle
coun erclockwise. Apply he solu ion o he connec ions being es ed (hose
connec ions, service valve, base and s em of he service valve, and regula or).
If bubbles appear, become larger in size or increase in number a any
connec ion, a leak exis s. This mus be correc ed before he grill can be used.
Turn he cylinder service valve handle comple ely off by urning clockwise.
Disconnec he regula or connec or from he cylinder, and call your local
propane gas supplier for fur her ins ruc ions.

5
Ligh ing Your BRMC Grill
Ligh ing Your BRMC GrillLigh ing Your BRMC Grill
Ligh ing Your BRMC Grill
WARNING
WARNINGWARNING
WARNING:
::
:
Failure o open lid while igni ing he barbeque, or
Failure o open lid while igni ing he barbeque, or Failure o open lid while igni ing he barbeque, or
Failure o open lid while igni ing he barbeque, or
no
nono
no wai ing five minu es o allow he gas o clear if he
wai ing five minu es o allow he gas o clear if he wai ing five minu es o allow he gas o clear if he
wai ing five minu es o allow he gas o clear if he
barbeque does no ligh , may resul in an explosive flame up
barbeque does no ligh , may resul in an explosive flame up barbeque does no ligh , may resul in an explosive flame up
barbeque does no ligh , may resul in an explosive flame up
which can cause serious bodily injury or dea h.
which can cause serious bodily injury or dea h.which can cause serious bodily injury or dea h.
which can cause serious bodily injury or dea h.
The Series 4000, Series 3000 and he Series 1000 BRMC Grills are equipped
wi h a 15” long bu ane ligh er for ease of ligh ing your barbecue. If here are no
leaks a any of he connec ions, proceed as follows:
Series 1000
• Turn cylinder handle coun erclockwise o open valve on he ank.
• Open lid; remove he s ainless s eel drip pan (if equipped) ha covers he
en ire cooking area.
• Turn gas con rol valve undernea h coun er op on halfway, hen place he
igni ed end of he bu ane ligh er (supplied) hrough he hole nex o he gas
con rol valve. The resul ing flame will igni e he propane, and your burner
will be fired. Once he burner has igni ed, you may now se your gas con rol
knob o he desired flame se ing.
• Follow he same direc ions for he number of burners you wish o ligh .
In he even he burner does no igni e wi hin five (5) seconds, urn he
con rol off, and une o he roubleshoo ing sec ion of his manual.
• Do No use he s ainless s eel drip pan if you are grilling food.
Do No use he s ainless s eel drip pan if you are grilling food. Do No use he s ainless s eel drip pan if you are grilling food.
Do No use he s ainless s eel drip pan if you are grilling food.
This is o be used only if you are cooking large amoun s of
This is o be used only if you are cooking large amoun s of This is o be used only if you are cooking large amoun s of
This is o be used only if you are cooking large amoun s of
fa y mea , such as a pig. Op imum hea will be
fa y mea , such as a pig. Op imum hea will befa y mea , such as a pig. Op imum hea will be
fa y mea , such as a pig. Op imum hea will be reduced if you
reduced if you reduced if you
reduced if you
use he drip pan when grilling.
use he drip pan when grilling.use he drip pan when grilling.
use he drip pan when grilling.
Disconnec ing he Cylinder from he BRMC Grill
Disconnec ing he Cylinder from he BRMC GrillDisconnec ing he Cylinder from he BRMC Grill
Disconnec ing he Cylinder from he BRMC Grill
1. Before disconnec ing he cylinder, close he cylinder valve. Turn he
handwheel clockwise o close.
2. Disconnec he regula or from he cylinder valve.
If he valve is a POL s yle, disconnec he POL connec ion from he
cylinder valve by urning he POL connec ion clockwise. Inser a POL plug in o
he valve ou le . Keep he service valve closed and plugged when he cylinder is
no connec ed for use.
If a valve is a quick disconnec s yle,
quick disconnec s yle,quick disconnec s yle,
quick disconnec s yle, re rac he sleeve o disconnec .
If a valve is a quick connec s yle,
quick connec s yle, quick connec s yle,
quick connec s yle, unscrew he regula or nu o disconnec .

6
Replacing an Emp y Cylinder
Replacing an Emp y CylinderReplacing an Emp y Cylinder
Replacing an Emp y Cylinder
If he cylinder has no been filled before, he propane supplier mus purge he
cylinder wi h propane vapor o remove he air. Also, if he cylinder valve has
been lef open, air may have en ered he cylinder, and he supplier will have o
purge he cylinder before filling i .
Before filling he cylinder, he propane supplier will examine he cylinder o
make sure i is
sui able for filling. If i is an older cylinder, hey may mark he collar o indica e
ha he cylinder has been requalified. They will check he cylinder and valve for
leaks.
There are limi s on how much propane can be pu in o a cylinder. The cylinders
ha come wi h BRMC barbeques hold approxima ely 40 lbs. This leaves some
room for he liquid o expand. DO NOT
DO NOT DO NOT
DO NOT ask he propane supplier o overfill he
cylinder.
The propane supplier canno re urn he cylinder o use unless he cylinder valve
has a plug in he ou le . Valves wi h quick connec ou le s do no need a plug.
They should, however, have a dus cap.
The propane supplier canno re urn he cylinder o you unless i has a proper
warning label. The warning label will have informa ion on he po en ial hazards
of propane. Each consumer should read he warning label.
Transpor ing he Cylinder
Transpor ing he CylinderTranspor ing he Cylinder
Transpor ing he Cylinder
Secure he cylinder in an uprigh posi ion, unless you are using a cylinder ha is
designed for horizon al use, such as one for he Series 1000 Classic cooker. Pu
a cap or plug in he cylinder valve ou le , unless i is quick connec ype of
cylinder valve. Always make sure ha he valve hand wheel is fully closed.
Always make sure ha he valve hand wheel is fully closed.Always make sure ha he valve hand wheel is fully closed.
Always make sure ha he valve hand wheel is fully closed.
DO NOT
DO NOT DO NOT
DO NOT ranspor more han four 20 lb. cylinders a any ime in an enclosed
vehicle.
Take he cylinder(s) direc ly o your BRMC Barbeque af er hey have been filled.
DO NOT
DO NOT DO NOT
DO NOT leave cylinders in he runk or in direc sunligh . The inside of he
vehicle can become ho , which will raise he pressure of he propane. If he
pressure becomes high enough, he relief valve will ven flammable gas.
S oring he Cylinder
S oring he CylinderS oring he Cylinder
S oring he Cylinder

7
DO NOT
DO NOT DO NOT
DO NOT s ore propane cylinders indoors (such as a garage) or near sources of
hea .
DO NOT
DO NOT DO NOT
DO NOT s ore spare cylinders under he BRMC Barbeque.
There is a relief valve on he cylinder. If he pressure inside he cylinder ge s oo
high, he relief valve will open and discharge propane.
Repairing he Cylinder or Disposing
Repairing he Cylinder or Disposing Repairing he Cylinder or Disposing
Repairing he Cylinder or Disposing of Unused
of Unusedof Unused
of Unused Propane
Propane Propane
Propane
DO NOT
DO NOT DO NOT
DO NOT use if he cylinder shows signs of ampering or abuse.
DO NOT
DO NOT DO NOT
DO NOT a emp any repairs o he cylinder or cylinder valve. Take he cylinder
o your propane supplier for any repairs.
DO NOT
DO NOT DO NOT
DO NOT dispose of unused propane by opening he cylinder valve and ven ing
vapor o he a mosphere. Take he cylinder o your propane supplier.
In Summary, Some impor an ips
In Summary, Some impor an ipsIn Summary, Some impor an ips
In Summary, Some impor an ips
DO NOT
DO NOTDO NOT
DO NOT
....Use he propane cylinder if i shows signs of den s, gouges, rus , bulges, fire
damage, corrosion, leakage, or o her forms of ex ernal damage. Consul your
local propane supplier for fur her ins ruc ions.
....A emp o repair cylinder valves, regula or, or hose connec ions. All repair
work should be done by your local propane supplier.
....A emp o ligh he uni unless he lid(s) are open and
andand
and he s ainless s eel drip
pan has been removed.
.... Allow anyone (including children) o amper wi h componen s of he grill or
he propane gas cylinder.
.... Allow anyone o conduc any ac ivi ies around he BRMC when he barbeque
is in use, or following i s use. The grill body, lids and o her par s of he
barbeque will remain ho for some ime following i s use.
.... Use he BRMC barbeque direc ly adjacen o he side of a s ruc ure, and
never under any surface such as a carpor , porch or garage.

8
.... S ore cylinders inside enclosed s ruc ures or in areas where he cylinder
would be exposed o excessive hea . This includes s oring a spare cylinder close
o a grill.
.... Dispose of unused propane by opening he valve and ven ing o he
a mosphere. Take he cylinder o your propane supplier for disposal.
DO
DODO
DO
...enjoy he fun and convenience of cooking on your new Blue Ridge Moun ain
Gas Barbeque. You will find he craf smanship o be second o none, and wi h
he use of propane, here is no was e of ime and energy. As a professional
chef, ca erer, ren al s ore owner, or serious home Grillophile, you deserve o
work wi h he superior componen s o complimen your grilling effor s.
Thank you for purchasing a Blue Ridge Moun ain Cookery Barbeque. We
apprecia e i .
Troubleshoo ing
Troubleshoo ingTroubleshoo ing
Troubleshoo ing
1. The BRMC Cooker does no ligh .
•
On he Series 4000 Cooker, make sure ha all of he valves are open o he
side you wish o ligh , and he handwheel on he ank is open.
•
On he Series 1000 Cooker, make sure all valves are open from he ank
handwheel.
•
Make sure here is fuel in he ank
•
Follow ligh ing procedures ou lined in manual by inser ing a long barbeque
ma ch or flexible ip bu ane ligh er ha is li ; place near small openings on
burner ring, and open gas con rol valve.
•
Ensure ha he air chamber is fully open on each burner.
2. Yellow or orange flame is visible, ra her han a blue flame.
•
Ensure ha he air chamber behind he gas con rol valve is fully open and
igh ened in his posi ion. Due o ravel, his shu er may par ially or fully
close in ransi .
• Make sure ha he burners are clean and free of grease.

9
How to Use Your Classic Cooker
The following pages are meant only as a basic, practical gui e to grilling, barbecuing, smoking,
an properly utilizing the options on the ClassicCooker Series 1000, 3000, 4000, an Patio
Grills. The more you use your grill, the more familiar you will become with how it cooks, what
types of temperatures to expect, an how to utilize your unit to best fit your cuisine.
There will be a brief overview of the basic parts of the grill an then a break own on how to use
your cooker to grill, barbecue, smoke, or steam foo . I will also explain how to use the various
options that you may have purchase with your unit.
The Cooking Parts – there are (7) important pieces of your Classic Cooker unit that affect how
it cooks an allow it to perform as well as it oes. Each piece serves a unique function an it is
important to know what they o an how they work. I will start from the bottom an work up.
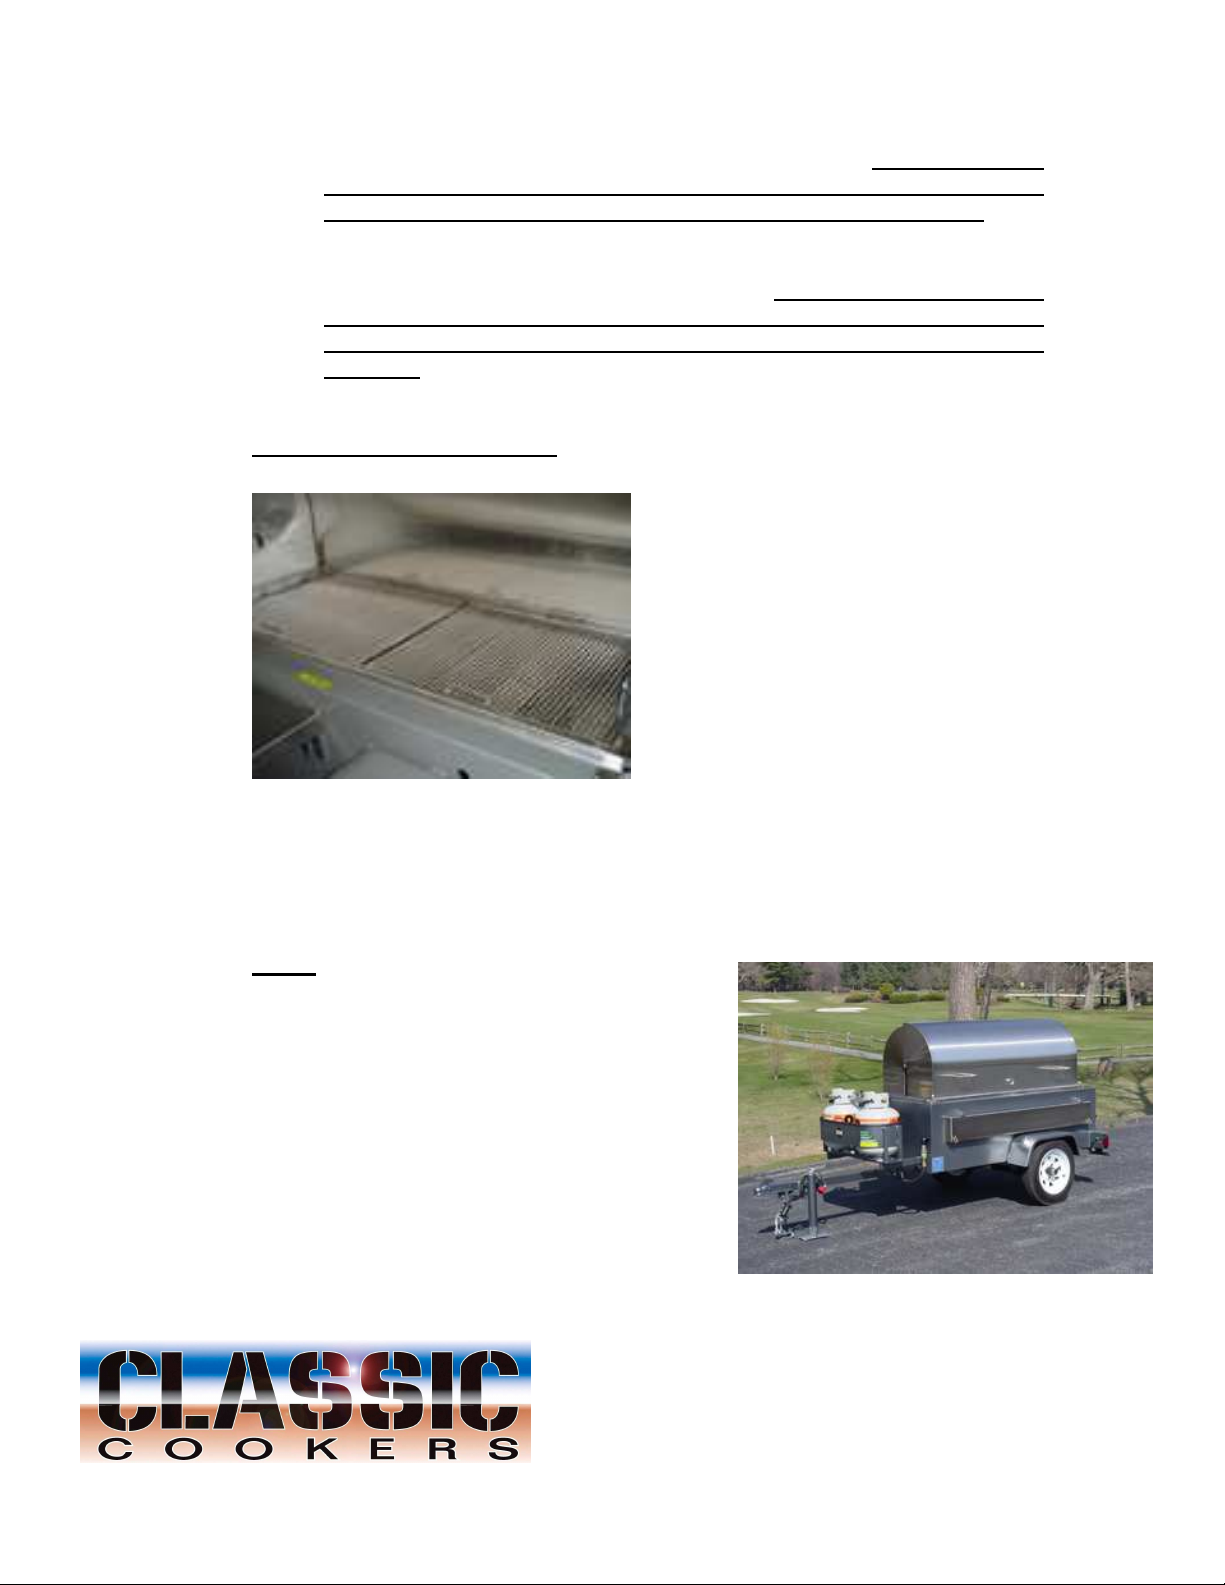
1. Firebox – This is the stainless steel box insert that houses the burners, grates, ra iant,
an roasting pan. It is the basic insi e shell that allows for
easy cleaning an provi es an insi e barrier against heat. On
the bottom of the firebox there are four “tente ” ventilation
holes that fee oxygen to the burners an allow greater heat
output. The three stainless steel burner mounts are also
locate in the bottom of the grill an allow for easy
installation an removal of the burners. There is also a grease
rain cut into the rear of the firebox to allow grease to flow
out of the unit when using the roasting pan or to allow foo
particles an water to exit the unit while cleaning.
2. Burners – Each BRMC firebox contains three, in ivi ually
controlle , cast iron, loop burners. Each burner is attache to the
mounting bracket via two locking pins. To remove the burner,
simply remove the pins, slightly lift up on the burner, an pull the
burner out. Each loop burner uses 30,000 BTU’s an will create
enough heat to raise the surface temperature of the cooker to
650° F an can hol a continuous temperature as low as 125° F.
3. adiant – Attache at six points aroun the insi e
of the firebox with post mounts an removable
pins, the ra iant performs several vital functions.
Constructe of ¼” plate steel, the ra iant is one of
the few internal parts not constructe of stainless
steel an will, over time, evelop rust. Because
stainless steel con ucts heat, but oes not hol
heat, plate steel is use instea . When the ome
of the unit is lifte , approximately 150° to 175° F is lost from the cooking area. Because
the ra iant hol s heat very well, the unit excels at quick heat recovery an will come
back up to temperature in less than two minutes after the ome is close again. The
ClassicCooker Grills & oasters
PO Box 70 ● Waynesboro, PA 17268 ● Phone 800-COOKERS
717-762-1211 ● Fax 717-762-1966

10
ra iant also protects the burners from grease an foo particles an re uces flare-ups by
searing grease onto the surface. Simply flip the ra iant each time you use the cooker to
burn the grease off the bottom an provi e a clean surface on the top. Last, but not least,
the ra iant provi es an even cooking temperature across the surface of the grill. For
maximum heat coverage, the Cooker shoul always be place on as level a surface as
possible.
4. Grease Funnel – Although small, the grease
funnel in the Cooker provi es a vital safety role in
the overall performance of your unit. Constructe
of stainless steel an mounte on the en of the
heat ra iant, towar the rear of the firebox, the
grease funnel gui es grease from the cooking
surface of the unit to the opening on the bottom of
the unit. When roasting foo s with the roasting
pan in place, the grease funnel allows grease to
easily flow away from the flames an out of the
grill, greatly re ucing the opportunity for grease
fires to evelop in the firebox. It is very important
that the grease funnel stays in place at all times
uring the cooking process an that excess grease
buil up that may occur in the funnel is cleane out on a regular basis.
5. oasting Pan – The roasting pan
is the most important part of your
unit when you are slow-cooking,
smoking, or roasting meats on your
Cooker. THE ONLY TIME
THE OASTING PAN IS USED
IS WHEN PE FO MING
THESE COOKING
TECHNIQUES; FO DI ECT
G ILLING, THE OASTING
PAN IS EMOVED F OM
THE FI EBOX. When being
utilize , the pan rests on the le ge
below the cooking grates with the
rain spout towar the rear of the Cooker, over the grease funnel. Never try to cook foo
irectly on the roasting pan. The roasting pan accomplishes three important tasks:
a. The roasting pan collects grease from fatty foo s such as pork shoul ers or ribs
an prevents the grease from reaching the ra iant an the burners. Notice that
the pan slants from one en to the other, towar a spout mounte in the eep en
of the pan. This spout must always be place above the grease funnel to allow
the proper flow of grease out of the unit.
b. The roasting pan also is bevele in the center an features holes cut along both
si es approximately ¾ of the length of the pan. This special configuration forces
the heat in the firebox to come up an aroun the e ges of the pan an along
with the curve shape of the omes, creates convection insi e the cooking area.
The convection movement of the heat allows foo to be roaste evenly on all
11
si es, without having to use a rotisserie or turning the meat. This allows you to
cook a brisket, steamship rounds, turkeys, or even whole hog (refer to
recipe for “Pig oast on the Cooker”) on the unit without a rotisserie!
c. The roasting pan also prevents the cooking area insi e the omes from reaching
temperatures in excess of 350° F. This allows for the foo on the cooking
surface to roast slowly an maintain moisture. Do not try to grill over the
roasting pan, as the grill surface will not reach optimal grilling
temperature, and although food will cook, it will take much longer than
necessary.
6. Cooking Grates / oller Grates – Unless equippe with optional equipment, such as
the steam table, gri le plate, or one of our various rotisseries, all the foo prepare on
the Classic Cooker is cooke on the
cooking grates, also referre to as
roller grates. Steaks, burgers, hot
ogs, etc. are cooke on the roller
grates, irectly over the ra iant.
Turkeys, pork shoul ers, hogs, ribs,
etc. are roaste on the roller grates,
irectly over the roasting pan. The
roller grates on your cooker are
constructe of soli stainless steel,
free rolling ro s which provi e a
great cooking surface allowing for
searing of grille foo s, while provi ing an easy-to-clean an sanitary surface that will
never rust. Notice that the ro s are “loosely” fitte into the “ro en s”; this allows the
ro s to expan an contract as they heat up or cool own, without warping or twisting.
For optimal performance, spray a non-stick coating, or apply olive oil to the ro s before
placing foo on the grill.
7.
Domes – commonly referre to as omes or li s,
these are the soli stainless steel curve pieces over
the top of each firebox or cooking area. Split into
two pieces for venting an ease of access to the
cooking surface, the shape also assists in creating
convection insi e the unit when the omes are own
or close . The primary ome is the taller piece an
is locate on the front of the unit, along with the
burner controls an the rop own shelf. The
secon ary si e is fixe on CC3000 an CC4000
8.
units, but can be opene on the Patio an CC1000
units.

12
Direct Grilling on the Classic Cooker
(Steaks, Hot Dogs, Sausages, Chicken, Kebobs, Etc.)
Before tackling “grilling”, let me first efine some terms an give a brief overview of the ifference
between grilling an barbecuing. For everyone in North Carolina an Texas, skip this part an move
irectly to “Grilling”, everyone else please rea this.
The Difference between Grilling and Barbecue
This is a question that is aske by many, but not wi ely known or un erstoo . A lot of the
confusion lies in the fact that people often use the same piece of equipment for grilling as
they o for barbecue. The two are however antithetical to one another.
Grilling
Grilling is a high heat cooking metho . Foo is cooke irectly over the coals an is
normally rea y in a matter of minutes. Grilling temperatures are usually in excess of 500
egrees Fahrenheit, an foo is cooke close to the heat source. The high heat chars the
surface of the foo , seals in the juices an creates a smoky caramelize crust.
Grilling is the ol est, most wi esprea an most forgiving metho of cooking. Rich an
poor alike practice it on six continents in restaurants, street stalls, an backyar s.
Barbecue
Barbecuing by contrast lies at the opposite en of the spectrum from grilling. It is a long,
slow, in- irect, low-heat metho that utilizes very low temperatures, smoke, an time to
cook the foo . Barbecue temperatures are usually between 200 an 300 egrees
Fahrenheit. This low heat generates smoke, an this smoke gives barbecue its
characteristic flavor. The heat source is often separate from the cooking chamber, which
contains the actual foo .
This metho of cooking is i eally suite to large pieces of meat such as whole pigs. It is
also perfect for cuts with lots of tough connective tissue, like brisket an spareribs. In fact
barbecue was tra itionally associate with the poorer echelons of society, who were
unable to affor the more expensive cuts of meat.
Indirect Grilling
ClassicCooker Grills & oasters
PO Box 70 ● Waynesboro, PA 17268 ● Phone 800-COOKERS
717-762-1211 ● Fax 717-762-1966

13
More recently a hybri metho of cooking, Indirect Grilling, has become very popular.
This metho bri ges the gap between barbecue an grilling. As with barbecuing the foo
is not cooke irectly over coals. But the actual cooking takes place in the same chamber
as the heat source, an temperatures usually range between 350 an 400 egrees
Fahrenheit. Woo chips or chunks are often place on the heat source to generate smoke
for flavor. In irect grilling effectively transforms your barbecue grill into an out oor
oven, which is perfect for cooking larger cuts of meat such as prime rib an turkey. .
In irect grilling gives you the best of both grilling an barbecuing - the charcoal flavor
from grilling an the ten erness an smoky flavor from barbecue. Whereas the flavor of
true barbecue is har to beat, the tra e-off is that it takes a lot longer than grilling or
in irect grilling.
We actually use all three of the above cooking metho s an each metho can be utilize
on the Classic Cooker Patio, 1000, 3000, an 4000 unit. Each metho has its own merits
Direct Grilling
Grilling irectly on the roller grates of your ClassicCooker unit is as easy as it soun s. There is one
common mistake ma e when first time users try an cook burgers, ogs, chicken, steaks, or whatever on the
grill. Remember:
Before grilling on the Cooker, remove the roller grates and
remove the roasting pan. With the roasting pan in place,
the grill surface will not achieve temperatures above 350° F
and it will take forever to grill your foods. emove the
roasting pan to achieve grill temperatures in excess of 600°
F. Grilling is done directly over the heat radiant.
Once you have remove the roasting pan, set it off to the si e an place the roller grates back into the grill.
Season the grates using a non-stick spray or a light coating of olive oil to ensure that your foo oes not
stick.
Check to make sure all of the burners are in the “OFF” position (horizontal), an open BOTH propane
tanks. It is important that both tanks are open (especially on the CC1000 an Patio unit) to ensure that the
regulator oes not “freeze up”, particularly on very warm ays, an to keep the tanks at an even level an
keep the pressure at a stea y rate.
Following the instructions in the manual, light each burner in ivi ually, an allow the grill to “warm up” for
10 to 15 minutes to reach the esire temperature. Place foo on the grill an grill to your heart’s content,
a justing the burners accor ingly to meet your temperature nee s.
Grease will rip onto the heat ra iant an sear on the metal, creating smoke that will filter back into the foo
an give your foo an a itional flavor boost. An abun ance of grease will cause minor flare-ups, so make
sure to not walk away from the grill while it is in use. It is also recommended that the heat radiant be
“flipped” each time you grill on the Cooker. Simply remove the six clips that hol the ra iant in place,

14
lift the ra iant out, an turn it over. This will allow the grease to burn off the bottom of the ra iant an
provi e a relatively clean, grease free surface to grill over each time.
When you are finishe grilling, turn off the gas at the bottles an let the flames go out in the burners. After
the flames have ie , turn the burners off (horizontal position). By turning off the gas before turning off the
burners, any gas trappe in the gas lines will be burne off.
OASTING ON THE COOKE
What to Roast
All ClassicCooker Tow-Behin mo els an the ClassicCooker Patio Cooker come
stan ar as both a grill an a slow roaster. We have roaste – an have ha customers
roast – whole hog (up to 165lbs.), turkeys, pork shoul ers, hams, ribs, pit beef, lamb, an
venison on our units – right on the grates, without a rotisserie!
Getting Rea y
Open the ome an remove the two cooking grates. Remove the roasting pan an
examine the insi e of the cooker to make sure that it is clean an there is not any grease
buil -up.
If you want to add smoke to your roasting, now is the time to get the cooker rea y. Place
chunks of woo ( note chunks, not chips) that have been soaking at least six hours
irectly onto the ra iant, towar the front of the cooker. Apple an cherry are my
favorite, but mesquite an hickory work well too. Just make sure to use fairly large
pieces an that they are soake through to prevent flame-ups. Depen ing on the size of
the woo , you will get smoke from 3-6 hours.
Start the cooker. Make sure all control knobs are in the “off” or horizontal position an
turn on both LP tanks. Turning on both tanks will prevent freeze up an will allow you to
get 10-12 hours of continuous cooking time. Also this will eplete both tanks
simultaneously, so you on’t use one tank an then fin that the other tank is empty. One
at a time, turn on a burner an then light the burner using the flex lighter provi e with
the unit. Burners will not light off each other an have to be lit in ivi ually. Continue
until all burners are lit.
Over the Fire
Set the roasting pan in place. The roasting pan is the 5’ stainless steel, bevele pan that came with the
cooker. Make sure to position the roasting pan so that the opening on the end sits above the funnel
that leads to the opening in the bottom of the grill (hole shoul be towar the rear of the grill). If it is
not in place properly, the grease from your foo will go into the bottom of the grill an there is a real

15
chance for fire. When the pan is in the proper position, no problem. The grease will flow onto the roasting
pan own to the opening, own the funnel an out un erneath the grill. Just sli e a bucket or metal pan
un er the hole, so the grease won’t hit the groun . You will get about ½ gallon of grease from a 60lbs. pig
– the larger the pig, the more grease you get. Also, make sure the grill is as level as you can get it. It is
OK if the front of the grill is a tiny (an I mean tiny) bit up to help the grease flow towar s the hole, but try
to keep it level.
The roasting pan is esigne to create a convection movement with the heat insi e the omes. Notice the
pan is bevele to catch the grease an funnel it to the opening on the one en . Also notice that there are
holes cut each si e about ¾ of the length of the pan. Set the hea of the pig at the en towar the front of
the grill, where there are no holes, to prevent burning.
Replace the cooking grates over the top of the roasting pan. Be careful, the cooker is on.
Prepare your meat with whatever rub you esire – DO NOT W AP THE COOKING G ATES IN
FOIL O THE MEAT IN FOIL, THAT WILL T AP THE G EASE AND C EATE A SE IOUS
FI E POSSIBILITY. Lay the meat across the grates.
.
Check it every ½ hour or so to make sure the grease is flowing properly, etc. Have your thermostat rea y to
check temps. Also remember, you have ½ hour to 45 minutes after you take the meat off the grill to let it
“set up” before you carve it
Close ome.
You might be eager to shorten the cooking time as much as possible. (Not sure why you woul want to cut
into beer- rinking time) but, BE WARNED, it is important that the meat oes not roast too rapi ly at the
beginning. This will result in the outsi e becoming har , preventing the heat from penetrating to the
interior. So, start off slowly an gra ually turn the heat up. The most ifficult part of pulling off a goo
slow cooke roast is getting the outsi e of the meat gol en brown an nicely caramelize an at the same
time getting the meat insi e cooke all the way through to the bone. For the majority of the cooking
uration you will want your fire to be at about 325° F (The fire is at 325° F if you can hol your han at the
cooking level for at least 8, but no more than 12 secon s).
When is the Meat Rea y?
In roasting like most other forms of cooking, the length of time the meat must cook epen s on a number of
factors: the size of the carcass; the heat of the fire; prevailing win an weather con itions; an not least,
the ability of the chef to control fire an beast. . Figure a ½ hour for every 9 poun s – 100lbs. pig = 5 - 6
hours.
When your foo has been cooking for the suggeste amount of time, insert an instant rea meat
thermometer into the thickest part of the cut. Pork shoul register about 170° F to be one. If you on’t
have a thermometer, pierce the thickest part of the meat with a skewer or knife. The juices shoul run clear,
without any trace of pink.
When you are finishe roasting, turn off the gas at the bottles an let the flames go out in the burners. After
the flames have ie , turn the burners off (horizontal position). By turning off the gas before turning off the
burners, any gas trappe in the gas lines will be burne off.

16
PIG OAST ON THE G ILL
Whole Pig (average 100-120 lbs. cleane )
1 lb. Black pepper
25 garlic cloves
Salt
5 lbs. Stuffing
Meat Thermometer
Nee le an cooking string
Vegetable Oil
Or er pig from butcher cleane an in a “Tucke ” or “Sitting” position.
Preparing the Carcass
Calculate the amount of salt an pepper require for seasoning the whole carcass by
allowing 1 teaspoon of salt an pinch of freshly groun black pepper, per poun . Mix the
salt an pepper together an rub a quarter of the mixture on the insi e of the stomach
cavity, keeping the rest to season the beast towar s the en of the cooking time.
Cut slits in skin an insert garlic cloves.
If you plan on closing the stomach cavity for cooking, as oppose to roasting it open-
style, make up the following mixture an rub this into the cavity of a lamb or pig before
closing it.
3 tablespoons lemon juice
3 tablespoons orange juice
3 tablespoons cooking oil
6 cloves garlic, coarsely chopped
3 tablespoons coarse salt
2 teaspoons black pepper
Or use one of the rub recipes attache for Zip Zap rub or Zap Zip rub. They work great
too.
Stuffing I eas
If you eci e to stuff your beast – highly recommen e - the type of stuffing you use, will
epen on what you are cooking. Use your imagination, but to get you starte here are a
couple of recipes, which work well with pork.

17
Dried Fruit Stu ing
2 tablespoons cooking oil
2 medium onions, chopped
1 clove garlic, chopped
3 pounds ground pork or veal
500 grams dried apricots, coarsely chopped
½ cup dry white wine
2 teaspoons grated lemon rind
½ cup chopped parsley
Salt and reshly ground black pepper
Heat the cooking oil in a pan and ry the onion and garlic gently until the onion is
translucent. Add the remaining ingredients and mix lightly.
Pork and Rice Stu ing
7 pounds ground pork
8 cups cooked rice
3 cups sultanas, soaked in hot water or dry white wine, then drained
4 cloves garlic, chopped
6 eggs, beaten
Dash cayenne pepper
Salt and reshly ground black pepper
Mix all the ingredients or the stu ing lightly but thoroughly.
For something really di erent and great, we place up to our chickens or Cornish hens
(also covered with the rub) in the cavity o the pig. This serves two purposes. First, it
helps to keep the stomach cavity o the pig rom sinking in rom the cooking. Secondly, it
provides some antastic chicken that alls o the bone!
Over the Fire
Set the roasting pan in place. The roasting pan is the 5’ stainless steel, bevele pan that
came with the cooker. Make sure to position the roasting pan so that the opening on
the end sits above the funnel that leads to the opening in the bottom of the grill (hole
shoul be towar the rear of the grill). If it is not in place properly, the grease from the
pig will go into the bottom of the grill an there is a real chance for fire. When the pan is
in the proper position, no problem. The grease will flow onto the roasting pan own to
the opening, own the funnel an out un erneath the grill. Just sli e a bucket or metal
pan un er the hole, so the grease won’t hit the groun . You will get about ½ gallon of
grease from a 60lbs. pig – the larger the pig, the more grease you get. Also, make sure

18
the grill is as level as you can get it. It is OK if the front of the grill is a tiny (an I mean
tiny) bit up to help the grease flow towar s the hole, but try to keep it level.
The roasting pan is esigne to create a convection movement with the heat insi e the
omes. Notice the pan is bevele to catch the grease an funnel it to the opening on the
one en . Also notice that there are holes cut each si e about ¾ of the length of the pan.
Set the hea of the pig at the en towar the front of the grill, where there are no holes, to
prevent burning.
Prepare your pig as escribe above – DO NOT W AP THE COOKING G ATES IN
FOIL O THE ENTI E PIG IN FOIL, THAT WILL T AP THE G EASE AND
C EATE A SE IOUS FI E POSSIBILITY. After placing the roasting pan, position
the cooking grates in place over the roasting pan an lay the hog across the grates.
You might want to consi er using only the center an rear outsi e burners while cooking.
This places the heat below the legs an shoul ers of the beast. These are the thickest parts
an will take the longest to cook.
Check it every ½ hour or so to make sure the grease is flowing properly, etc. Have your
thermostat rea y to check temps. Also remember, you have ½ hour to 45 minutes after
you take the pig off the grill to let it “set up” before you carve it
Close ome.
You might be eager to shorten the cooking time as much as possible. (Not sure why you
woul want to cut into beer- rinking time) but, BE WARNED, it is important that the
carcass oes not roast too rapi ly at the beginning. This will result in the outsi e
becoming har , preventing the heat from penetrating to the interior. So, start off slowly
an gra ually turn the heat up. The most ifficult part of pulling off a goo pig roast is
getting the outsi e of the beast gol en brown an nicely caramelize an at the same time
getting the meat un er the skin cooke all the way through to the bone. For the majority
of the cooking uration you will want your fire to be at about 325° F (The fire is at 325° F
if you can hol your han at the cooking level for at least 8, but no more than 12
secon s).
When is the Meat Rea y?
In pig roasting like most other forms of cooking, the length of time the meat must cook
epen s on a number of factors: the size of the carcass; the heat of the fire; prevailing
win an weather con itions; an not least, the ability of the chef to control fire an
beast. . Figure a ½ hour for every 9 poun s – 100lbs. pig = 5 - 6 hours.
When your beast has been cooking for the suggeste amount of time, insert an instant
rea meat thermometer into the thickest part of the hin leg. A pig shoul register about
170° F to be one. If you on’t have a thermometer, pierce the thickest part of the beast
with a skewer or knife. The juices shoul run clear, without any trace of pink.

19
Carving
Carefully remove the pig from the grill an place on a large table or giant-size carving
boar . This can be tricky, an remember, THE PIG IS HOT – DON’T BURN
YOURSELF! We use gloves.
If you have a beast with a hea , you might want to ress it up at this point (This helps
make the beast less scary for the ki s to look at!). In any event, allow your beast to rest
for about 30 minutes before beginning the carving process. This will allow the beast to
cool own an make for easier carving, but will also allow the juices of the pig to raw
back into the meat.
1. Remove any crackling (skin) if applicable. Cut this into serving portions an serve
separately
2. If the beast was stuffe , cut the string an open the belly, then remove the stuffing
an serve it separately.
3. Remove the larger joints of meat, such as the legs an shoul ers. Slice the meat of
these joints thinly across the grain, starting at the shank en an carving aroun
towar s the bone.
4. Remove the loins from each si e of the spine an carve the meat crosswise into
slices.
5. Separate the base of the ribs from the spine an cut into in ivi ual ribs. If you are
having ifficulty separating the base of the ribs from the spine, a pair of heavy-
uty tree pruning shears will o the job nicely!
Remember to count all your fingers before an after carving your beast.
A Wor about Crackling
There is no oubt that Pork Fat Rules! Nowa ays pigs are being bre a lot leaner an
there is less of this goo stuff to go aroun . If however you are fortunate enough to get a
pig that has a goo concentration of fat un er the back skin, you can seriously impress
your guests by cooking the crackling to a salty crisp. This is easier sai than one, but if
one right, will be one of the talking points of your spit-roast.
Here are some tips for great crackling:
•
For the last 45 minutes of cooking you can increase the heat quickly, which will
crisp up the cracking.
•
Try not to use too much basting on the skin if possible (if the skin starts to burn in
places you will nee to baste it). The reason for this is that the more you baste the
skin, the tougher the crackling will be, an potentially it will not be crisp at all.
There is normally sufficient fat un er the skin of a pig to provi e a goo ‘natural’
basting.

20
•
For the purposes of goo cracking, it is preferable to use ry spices an herbs on
the skin of the pig. Just be careful of using anything that has any sugar content in
it, as this will burn on the skin.
•
45 minutes before the pig is one, you shoul liberally sprinkle coarse salt over
the skin of the pig. This will absorb the moisture in the skin an will crisp up the
crackling.
•
If the skin is still not crisping properly towar s the en of the cooking. Take a cup
full of col water an pour it over each of the two shoul ers an each of the two
hams. This will wash a lot of the fat off the skin, an will cause the skin to shrivel
an crisp up easier. Soun s weir , but it works!
This is How We Do It.
This is our process for cooking a pig for a Satur ay afternoon party. We have pig parties
all year long – it’s always fun, no matter what the weather. We start on Fri ay morning by
buying the pig an finish on Sun ay spen ing most of the ay cleaning! In between we
have a hell of a goo time, but it can be very exhausting.
Cooking a pig is like running a marathon. Not that any of us here has ever run a
marathon, but we’re tol that you nee to pace yourself uring the race. You also nee to
pace yourself when you’re cooking a pig. If you on’t have enough help an get some
sleep along the way, you won’t be able to enjoy the party or the foo ! It’s best to have at
least three people on the cooking crew.
On Fri ay morning we take the truck to Breckbill Stock Farm. Don, who has been raising
an butchering pigs there for something like 25 or 30 years, takes us out to the pens to
pick out our pig. We’re looking for about a 160 – 200 poun er "on the hoof." Anything
bigger is just too har to han le. An a 180 lbs. pig “on the hoof” usually equals 120lbs.
cleane . Don always tells us to figure on about two poun s, on the hoof, per person. We
usually have about 100 people at our parties an we always have plenty of leftover pork.
Of course we also cook brisket, chicken, chicken wings an other goo ies to go with the
pig. You nee to consi er your crow when etermining the size pig you nee . One
hun re lumberjacks certainly will eat more that 100 guests that inclu e women an
chil ren.
Don scurries the pig into the butchering area an the butchering is one. We won’t go
into the etails of the butchering, but actually it is fascinating to watch. When Don an
his crew finish butchering the pig, they put it on a cart an wheel it to the truck. We ha
earlier lai out an ol blanket an then plastic on top of the blanket onto which Don rops
the pig. We cover up the pig an rive back to the office.
When we get to the office, we lay the pig out in a sha y spot on a banquet table that has
been isinfecte with a solution of one-tablespoon bleach to one gallon of water.
Although Don an his crew o a pretty goo job of cleaning up the pig, we go over it
Table of contents
Other Blue Ridge Mountain Cookery Grill manuals


