BlueEyes iCam User manual

iCam
Full HD Camera
Operation Manual
VER 2.1.18-B2143
2015/08/14

BlueEyes Technology
1
www.BlueEyes.tw
Operation manual
BlueEyes iCam Full HD Camera
Thank you for using the product of BlueEyes Technology.
The manual will introduce the product of BlueEyes Technology. Please read the manual
before you start using the product.
Though the information in the manual has been verified before publish, the actual
specification should be based on the actual shipment. BlueEyes Technology doesn’t
have to guarantee, proclaim or declare for the content, along with other purpose. In
addition, the product specification and information that mentioned in the manual is for
reference only. The content might be update at any time without notice. If there is any
mistake of the information, including software, firmware, and hardware that mentioned
in the manual BlueEyes Technology has no responsibility for the mistake.
Please reach BlueEyes website to get the upgrade of the product specification, our
company will not notice you. If you want to get the latest product information, operation
manual, firmware, or you have any question to the products of BlueEyes Technology,
please contact your local agent or go to the official website of BlueEyes Technology for
further information.
It is not allowed to copy/ use the content or to change the information and publishing of
the manual without BlueEyes Technology’s written consent.
Copyright 2015 BlueEyes Technology Inc. All Rights Reserved.
BlueEyes Technology Corp.
Add: 7F-3, No.200, Sec. 4, Wenxin Rd., North District,
Taichung City 40462, Taiwan
TEL: +886 4 2297 0977 / +886 982 842 977
Fax: +886 4 2297 0957
E-mail:support@blueeyes.com.tw
Website: www.BlueEyes.com.tw

BlueEyes Technology
2
www.BlueEyes.tw
Index
1. Outline....................................................................................................................................4
1.1 Instruction.....................................................................................................................................................4
1.2 Features ........................................................................................................................................................4
1.3 Composition..................................................................................................................................................5
2. Safety and precautions...........................................................................................................6
3. Device Description .................................................................................................................7
3.1 Back Panel.....................................................................................................................................................7
3.2 Fixed iCam camera........................................................................................................................................8
3.3 Scanning iCam camera..................................................................................................................................8
3.4 LED Indicator (Separately Sold) ....................................................................................................................9
3.5 Live Video....................................................................................................................................................11
4. Location of camera...............................................................................................................12
4.1 Location of camera .....................................................................................................................................12
5. Adjusting lenses ...................................................................................................................15
5.1 Lens of iCam................................................................................................................................................15
5.2 IRIS (O←→C) ................................................................................................................................................15
5.3 Advices for classroom lighting improvement.............................................................................................16
5.4 Zoom (W←→T) ............................................................................................................................................16
5.5 Focus (∞←→N) .............................................................................................................................................17
6. Cleaning and Maintaining the Lens ......................................................................................17
7. Setting ..................................................................................................................................19
7.1 Video Setting...............................................................................................................................................19
7.2 Camera Setting ...........................................................................................................................................22
7.3 Privacy Mask Setting...................................................................................................................................25
7.4 Audio Setting ..............................................................................................................................................27
7.5 Network Setting..........................................................................................................................................29
7.6 Solving Color Cast when rotating................................................................................................................30
8. Watermark............................................................................................................................32
8.1 Trademark of education institute...............................................................................................................32
8.2 Making Trademark Picture .........................................................................................................................32
8.3 Upload Watermark .....................................................................................................................................33
8.4 Notices ........................................................................................................................................................35
9. QR code ...............................................................................................................................36

BlueEyes Technology
3
www.BlueEyes.tw
9.1 About QR code............................................................................................................................................36
9.2 Make QR code.............................................................................................................................................36
9.3 Upload QR code..........................................................................................................................................39
9.4 Notices ........................................................................................................................................................41
10. Motion detection of iFollow .................................................................................................42
10.1 Enable and set the motion detection .......................................................................................................42
10.2 Notices......................................................................................................................................................44
11. Q&A....................................................................................................................................45
Q1: Can the camera be on for 24 hours? .........................................................................................................45
Q2: How to adjust if the image is blurred?.......................................................................................................45
Q3: Why the words on the board trembling? ..................................................................................................45
Q4: How to clean the lens?...............................................................................................................................45
Q5: How long does it take to start up the camera? .........................................................................................45
Q6: Ripple shows when using projector or digital board .................................................................................45
Q7: The video file cut into one or several pieces .............................................................................................46
Q8: How to restore to default? ........................................................................................................................46
Q9: How to reduce background noise..............................................................................................................47

BlueEyes Technology
4
www.BlueEyes.tw
1. Outline
1.1 Instruction
Most of the recording systems use traditional security camera, so the quality was very bad.
The students have to look closely to see the words on the blackboard. This kind of camera is
not suitable for education institute environment.
BlueEyes Technology develops the Full HD Camera especially for the education institute
environment, and registrated the trademark as iCam®. Now we have the third generation
iCam. It not only reserves the high quality of shooting, but also upgrades the sound receiver. In
order to enhance the characters on the whiteboards, digital boards, and projectors, iCam can
detect the external environment automatically and make the characters clearer. Watching the
iCam videos is like watching Blu-ray movies in the movie theaters.
1.2 Features
–The only camera designed for educational facilities –full HD camera for lecture
recording
–Full HD 1080P. The quality is 24 times better than the traditional camera
–Designed for whiteboards, digital boards, projectors, and touch-panel TV,
enhance sharpness of images.
–Recording indicator makes teachers easy to see if the recording is on.
–Full-time audio and video synchronization
–TAMRON mega-pixel compatible varifocal lenses
–SONY Exmor Back-illuminated sensor
–Texas Instruments DaVinci video processor (DSP)
–LED indicator
–Built-in microphone
–Built-in privacy masking feature
–Embedded watermark/ QR Code copyright protection
–Made in Taiwan
–Industrial grade. It can be operated for 24 hours without overheating.
Note: iCam is not normal network camera. It is Full HD camera designed for education institutes.
More information and features, please check official website of BlueEyes Technology:
http://www.blueeyes.com.tw/iLearning_iCam.php
BlueEyes Technology
5
www.BlueEyes.tw
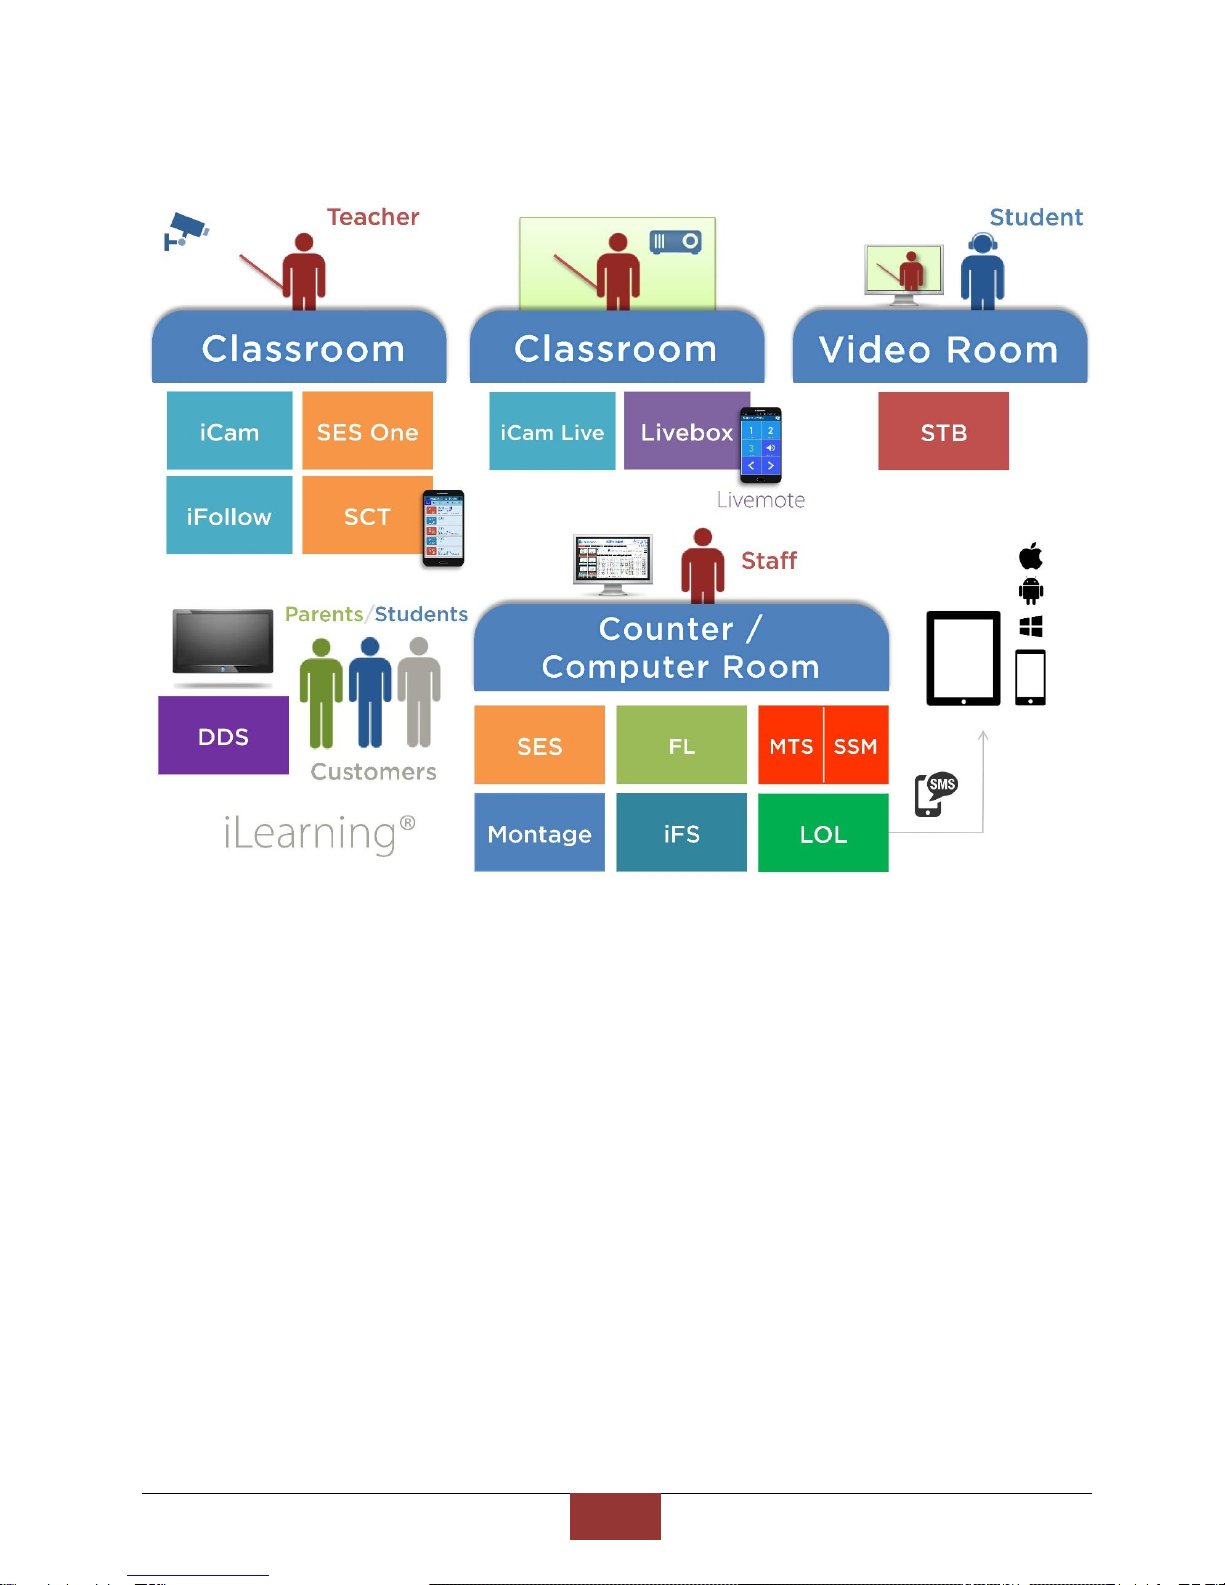
1.3 Composition

BlueEyes Technology
6
www.BlueEyes.tw
2. Safety and precautions
–Please do not leave or install the device in damp, direct sunlight, hot or confined
spaces.
–Do not put anything that would fall into the machine on top of the machine.
–Do not place the machine on an unstable place. It may fall down, resulting in an
injury.
–Please use this machine in a place with good ventilation. Do not block the heat
dissipation vents. Poor heat dissipation can lead to a rise internal temperatures
and cause malfunctions
–Use dry rag to clean the machine. Do not use solvent.
–We will not be liable for any damage caused by the use of third party power
supplies in this machine
–Never plug the machine into a power socket that is shared with other equipment
(extension load/cord, 2- or 3-way adapter, etc.). This may result in fire or
electrical shock or fire.
–Please do not disassemble, re-design or maintain the device by yourself.
–The processors and accessories all pass the safety test of CE and FCC.
Please plug the cables of iCam when thundering to avoid lightning strikes. Lightning
strike is natural disaster so it is not in our warranty.
http://www.BlueEyes.com.tw/warranty.php

BlueEyes Technology
7
www.BlueEyes.tw
3. Device Description
3.1 Back Panel
-- Back penal --
Back panel descriptions:
DC12V
DC12V power input.
LAN
Attach the provided RJ-45 cable and the port is auto-sensing and supports negotiations
at 10/100 speeds.
VIDEO
Connect to video equipment, such as a monitor or projector.
LINE IN
Connect to an audio input source.
Do not test or connect the interface not commonly used. It may cause instability of
the system.
BlueEyes Technology
8
www.BlueEyes.tw
3.2 Fixed iCam camera
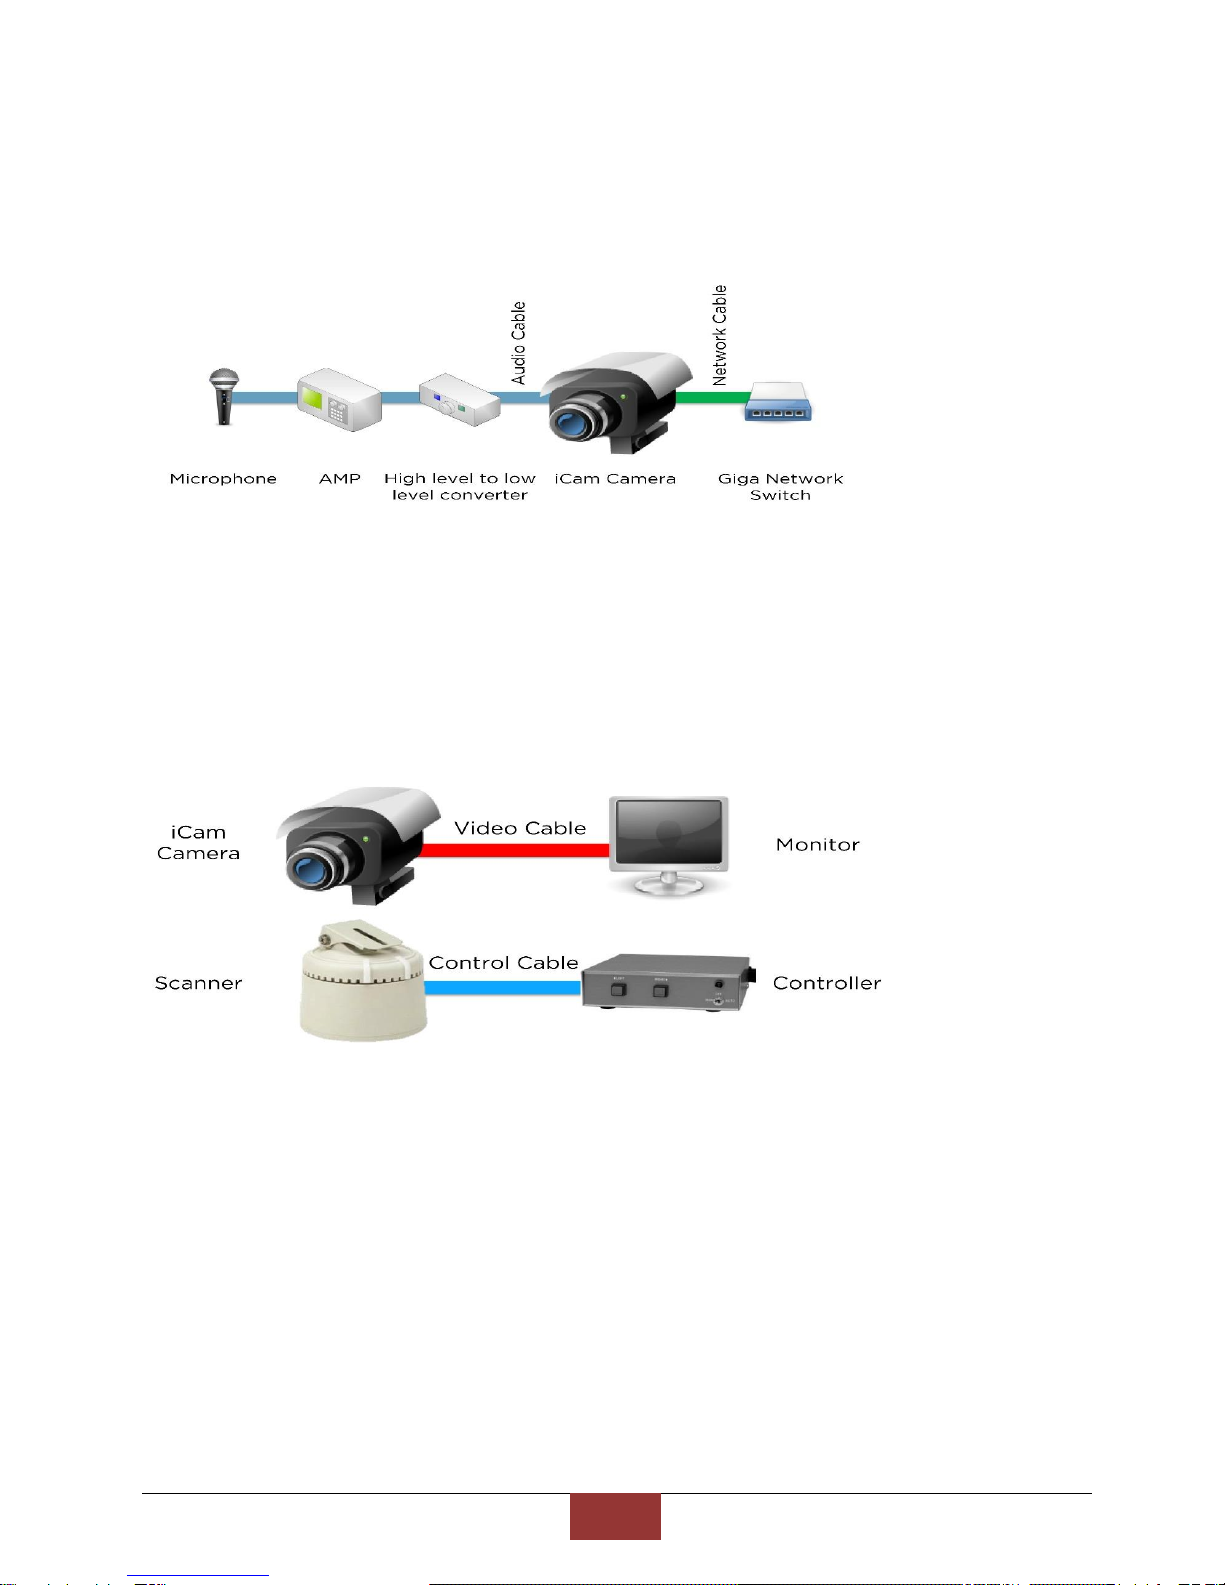
Fixed iCam camera diagram:
3.3 Scanning iCam camera
Scanning iCam camera diagram:
–The small monitor can suck on the direction controller. If you worry that it is not
steady enough, you can stick directly on the monitor.
–There are two control buttons on the direction controller of the scanning iCam
camera, and the left and right controller is for SES. If you worry that the students
might drop it on the floor, you can stick it in the table with double-sided tape or
silicone as some of the education institutes do.
–Use flexible wire for network cable, video cable and audio cable to avoid fixed screw
loosening or interfaces dropping after long use.
–Put termination plug at the end of the left and right turn.
–After installing, you must rotate to the end and see the image simultaneously to

BlueEyes Technology
9
www.BlueEyes.tw
make sure the cables would not be pulled or the fixed screw of the camera would
not loosen when rotating.
–Use [single tone]for audio cable
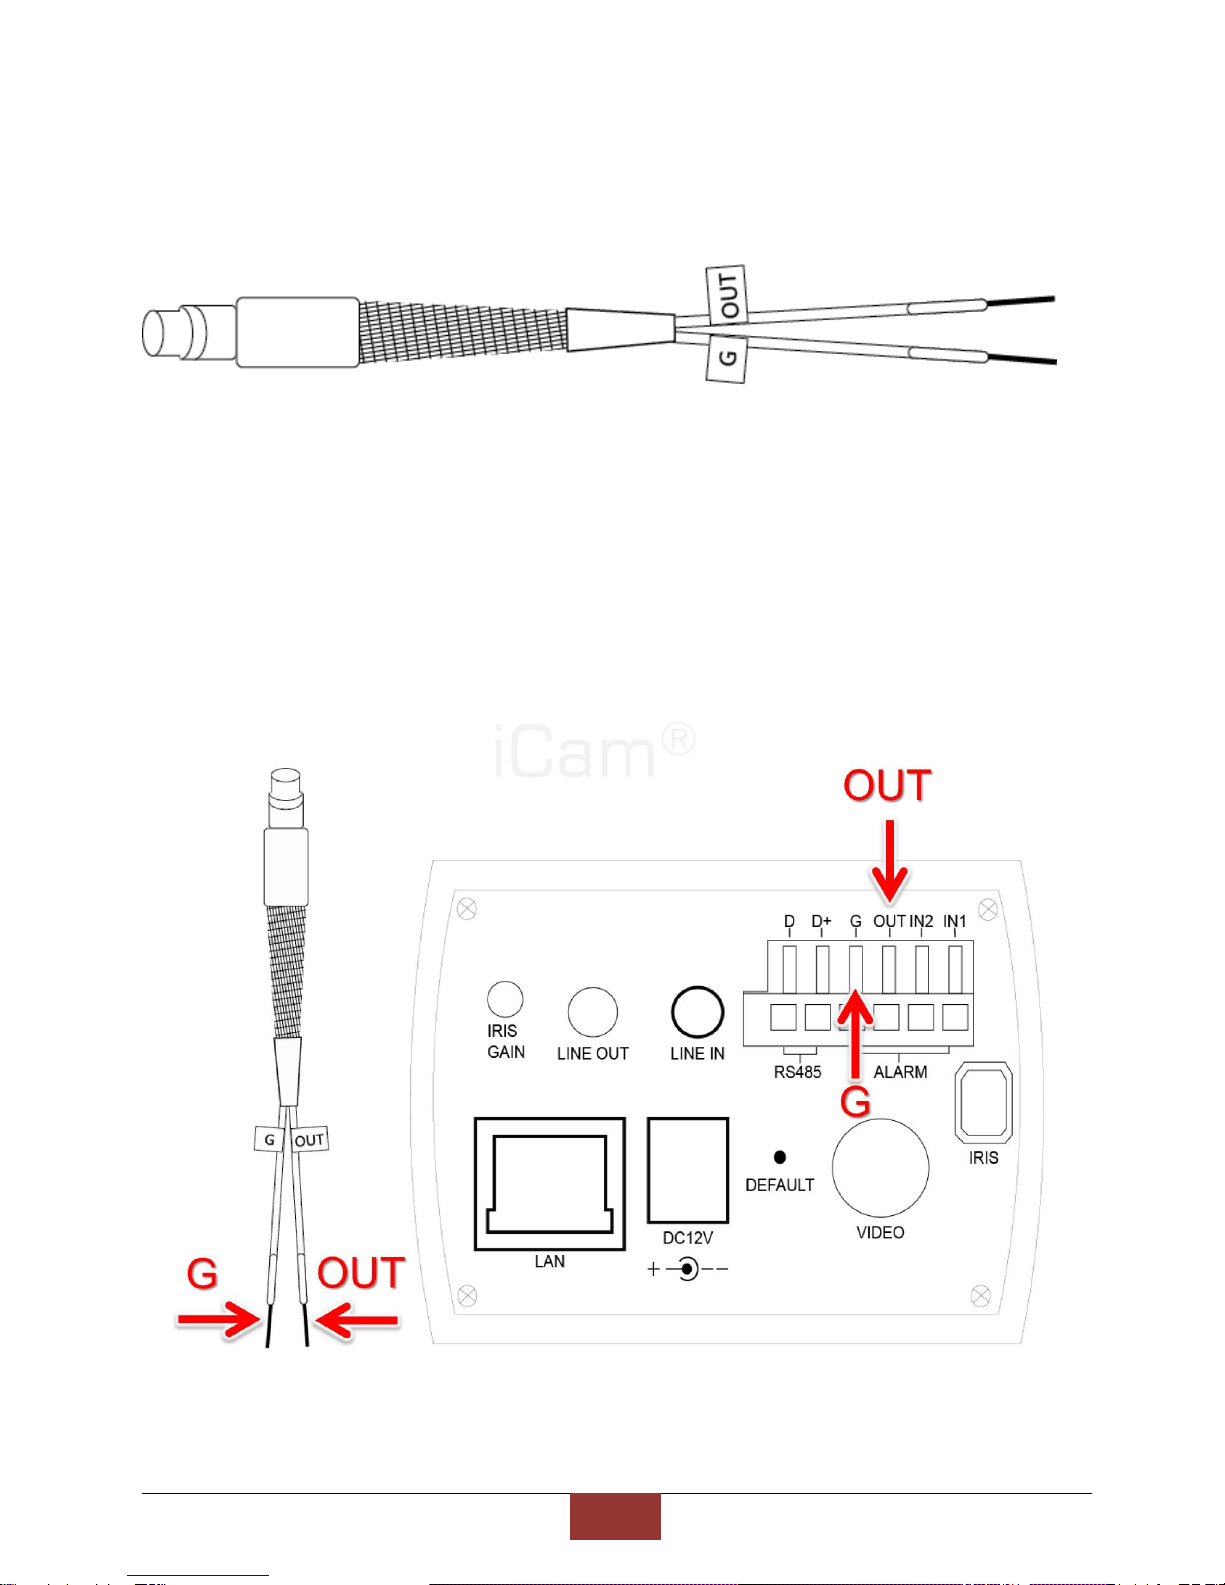
3.4 LED Indicator (Separately Sold)
LED indicator on iCam shines when recording, or iFollow technology appointed.
LED should go with SES lecture recording system. If you use SES Lite, the LED
indicator would not work.
※Appearance Picture
BlueEyes Technology
10
www.BlueEyes.tw
※Diagram
※Wiring Diagram
LED indicator has two cables: G and OUT. Plug the two cables in the corresponding point on
the back panel.
BlueEyes Technology
11
www.BlueEyes.tw
Plug the cable of LED indicator, press the tenon until inserting.
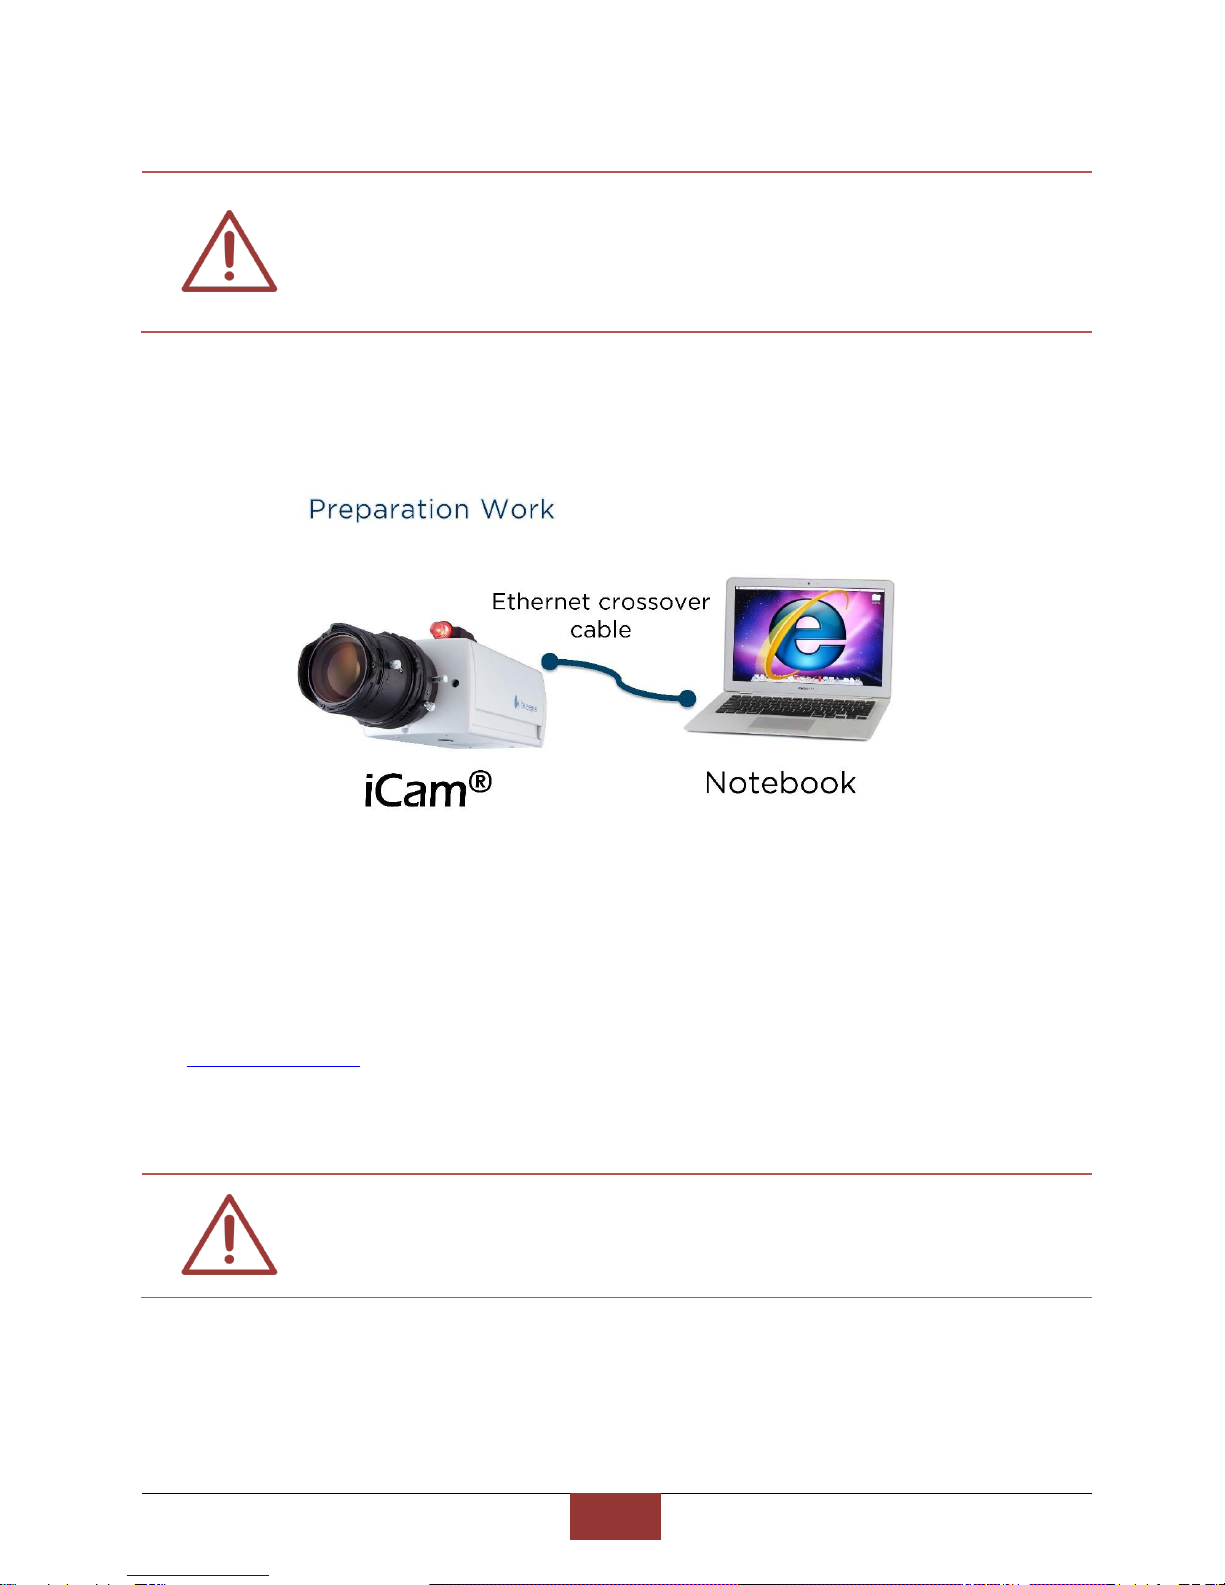
3.5 Live Video
Follow these steps to see the live video:
1. Open Microsoft Internet Explorer(IE) browser
2. Type the following URL into the address bar of your web browser on your admin computer
and press Enter.
http://ip_address/ (default IP address is set in the range of 192.168.1.171-176)
3. Enter account and password
4. Click LiveView to watch the video.
The operator username is sesuser. As a default, check the factory configured list.
You can edit account name or password in setting. We recommend using Microsoft
Internet Explorer version 10 or higher web browser.

BlueEyes Technology
12
www.BlueEyes.tw
4. Location of camera
4.1 Location of camera
–The height of center blackboard is the best location.
–Higher than the students.
–Lower than the upper side of the blackboard
–Better install on the wall at the back of the classroom.
Viewport of the location of camera
If you didn’t install the camera at the location aimed the center of the blackboard, the
blackboard would show as a trapezoid

BlueEyes Technology
13
www.BlueEyes.tw
Elevation of the location of camera
If you install the camera too high, the blackboard would show as a trapezoid, the bottom is
shorter than the upper side.

BlueEyes Technology
14
www.BlueEyes.tw

BlueEyes Technology
15
www.BlueEyes.tw
5. Adjusting lenses
5.1 Lens of iCam
Please loosen the nuts on the lens before adjusting the lens. But please do not remove it or it
may get lost.
The adjust order is
A. Focus distance (W←→T)
B. Focus (∞←→N)
C. IRIS (O←→C).
5.2 IRIS (O←→C)
–O = Open, C = Close
–IRIS controls the light amount, so the light has big influence to the shooting effect.
–The more the light come in, the better the shooting is.
–We advise you to turn the IRIS to maximum to get enough light.
–If you use digital board or projector, you can adjust the IRIS to maximum then close
down gradually.
–The light should be the same as class time.
–Fasten the nut after adjusting.
–When adjusting the camera lens, try to arrange during the class because the light
(fluorescent light or sunshine) would influence the shooting.
–If the education institute records class in the evening, it is better for you to adjust

BlueEyes Technology
16
www.BlueEyes.tw
lens in the evening.
–Steady light is very important for shooting.
5.3 Advices for classroom lighting improvement
–Use antidazzle lamp
–Add antidazzle division
–Use thick curtain to block sunlight. Turn on the light even it is daytime.
5.4 Zoom (W←→T)
–W = Wide(wide angle/close)
T = Tele(distance angle/far)
–The tips for adjusting is to make the left and right sides of the shooting scene justify
both sides of the board, but when using scanner module, make the up and down
sides of the shooting scene justify up and down sides of the board.
–Fasten the nut after adjusting.

BlueEyes Technology
17
www.BlueEyes.tw
5.5 Focus (∞←→N)
–∞=infinite, N=near-end
–The focus lock nut is close to the body, loosen it before adjusting.
–If you use digital board or projector, turn it on to adjust focus.
–The tips for adjusting is to write【正】in the center and four sides of the board.
–Adjust the focus to see the words clearly.
–Fasten the nut after adjusting.
6. Cleaning and Maintaining the Lens
–The lens is imported from Japan, it is very expensive.
–Do not touch the lens during construction.
–We would cover a dust cover on the lens, and please do not remove it until adjusting.
–If you find the lens have dust or fingerprint
Please blow the dust away with [lens blower] first
Then wipe the lens clockwise from center to the outer with [lens pen]
–Do not blow with mouth or wipe with tissue.

BlueEyes Technology
18
www.BlueEyes.tw
Do not remove the lens. This may make the lens stained with dust and fingerprint.
╳━╳━╳━╳━╳━╳━╳━╳━╳━╳━╳━╳━╳━╳━╳━╳━╳━╳━╳━╳━╳━╳━╳━╳━╳━╳━╳━╳

BlueEyes Technology
19
www.BlueEyes.tw
7. Setting
7.1 Video Setting
1. You can change all video streaming related elements in Video Setting page, this
page is separated into two parts as shown below. The upper half is streaming setting
and bottom half is camera additional information. All function is explained as below:
Table of contents
Other BlueEyes Security Camera manuals


