BLUEFIN Fitness PRO User manual
For use with BLUEFIN FITNESS PRO Vibration Plate


WHAT’S IN
THE BOX?
1 x Bluefin PRO Vibration Plate
1 x Power Connection Cable
1 x UK Power Cable
1 x EU Power Cable
1 x AUX Audio Cable
1 x Instruction Manual
1 x Workout + Nutrition Guide
1 x Exercise Chart
2 x Workout Cables
Using Accessories:
Your vibration plate comes with 2 bungee cables for use in upper body
exercises in conjunction with the plate. Attach the silver clips on the
bungees to the corresponding brackets on either side of the bottom of the
plate. Please do not attempt to attach or detach accessories from the plate
while in use.

ASSEMBLY
INSTRUCTIONS
We recommend 2 people assist in assembling this unit. Place
all parts in a cleared area and remove the packing materials.
Do not dispose of the packing materials until assembly is
completed. Before you start installation inspect and prepare
all parts and screws featured in this manual.
Assembly Parts:
1 x Allen Wrench
2 x Crosshead Screws
7 x Flat Washers
15 x Hex Screws
1 x Power Connection Cable
1 x Part A (Short Central Support Tube)
1 x Part B (Long Central Support Tube)
1 x Part C (Base Plate)
1 x Part D (Control Console)
2 x Part E (Bottom Support Poles)
2 x Part F (Top Support Poles)
1 x Part G (Bottle Holder)
ASSEMBLY
INSTRUCTIONS
Connect the Central Support Tube by inserting Part A into Part B. Secure
with 3 x Hex Screws & 3 x Flat Washers to the front & back.
Connect the Power Connection Cable to the Sensor Wire on your Base Plate
(Part C). Feed the connected cable through the assembled Central Support
Tube.
Insert the Central Support Tube (Parts A & B) to the Base Plate (Part C) &
securely fasten using 2 x Hex Screws.
Attach the connected cable to the Sensor Wire on your Control Console (Part
D) & securely attach your Control Console (Part D) to the Central Support
Tube (Parts A & B) using 2 x Hex Screws & 2 x Flat Washers.
Attach 2 x Bottom Support Poles (Parts E) to the Base Plate (Part C) using 2
x Hex Screws & 2 x Flat Washers. Tighten to secure.
Attach 2 x Top Support Poles (Parts F) to the 2 x Bottom Support Poles
(Parts E) using 4 x Hex Screws & 4 x Flat Washers. Tighten to secure.
Attach 2 x Top Support Poles (Parts F) to the Control Console (Part D) &
Central Support Tube (Parts A & B) using 4 x Hex Screws & 4 x Flat Wash-
ers. Tighten to secure.
Attach Bottle Holder (Part G) to the Central Support Tube (Parts A & B)
using 2 x Crosshead Screws.
NB/ You must ensure that the Power Connection Cable was securely
attached to the Sensor Wires on the Base Plate & Control Console.
1
2
3
4
5
6
7
8
Place your Bluefin vibration plate on a flat, hard & even surface. If you live
in a flat or an apartment building we recommend placing a yoga mat or rug
beneath the plate to absorb any noise. Bluefin fitness plates are very quiet
but all vibration plates make at least some noise.
Insert the power cable into the back of the plate and plug the other end into
the electrical outlet. Make sure the plate is close enough to the electrical
outlet that the cord is not stretched. Ensure that the power switch next
to the plug is turned on. If the switch is illuminated, the machine is on.
When not in use, switch the machine off and ensure that this button is not
illuminated.
Familiarise yourself with the console controls before stepping onto the
plate. Place your feet on either side of the plate for more intensity and bet-
ter balance. Please be sure to step on the plate slowly and carefully before
starting any workout setting. We recommend beginning with speeds below
120 or using program setting P0.
GETTING
STARTED

Using Your Console:
(i) Scroll through Programs P03 to P10.
(ii) Press START to start.
Increase time setting for manual programs.
NB/ Only available for Manual Program.
Increase or decrease speed level.
NB/ Only available for Manual Program.
Quick-start select for low, medium & high speed.
NB/ Only available for Manual Program.
Quick-start select for 5 mins, 10 mins or 15 mins.
NB/ Only available for Manual Program.
Start or Stop your training program.
CONTROLS
MODE
TIME
START
/ STOP
SPEED
+/-
LOW / MID
/ HIGH
900S / 600S
/ 300S
CONTROLS
CAL/BMI Calculator:
To calculate your BMI, please ensure the power is on and timer is off.
Check that the “Time” field shows “F01”.
In BMI field select “1” for male or use “SPEED +” or “SPEED –“ to change to
“2” for female. Press the “TIME” key to confirm.
The system will automatically progress to the AGE setting “F02” ,
press“SPEED +” or “SPEED –“ to change user age. Press the “TIME” key to
confirm.
The HEIGHT setting will come up now in “F03” counted by METERS and cm.
Users can select their height using “SPEED+“ or “SPEED –“ to change from
0.10 to 2.50. (Default is 1.70). Press the “TIME” key to confirm.
The WEIGHT setting at “F04” cycles through next. This is measured in kg.
Users can select “SPEED+“ or “SPEED –“ to change from 010 to 150. The
default weight is 70 kg. Press the “TIME” key to confirm.
Put both hands on the metallic hand sensors and then the BMI will display.
NB/ Moisten the hands slightly if contact is not registered.
1
2
3
4
5
6
7
ONTROLS
Manual Workouts:
The time can be programmed up to 20 minutes.
The speed level can be programmed up to 180.
Programmed Workouts:
15 minute low-intensity program. Perfect for warming-up, gentle
massage and recovery after exercise.
15 minute low-to-moderate-intensity program. Perfect for warming
up, gentle massage and recovery after exercise.
15 minute variable-intensity program. Variable incremental program
for muscle toning.
15 minute moderate-intensity program.
Moderate intensity program with incremental intensity for fat loss.
15 minute high-intensity interval training program.
Interval program for fat loss and muscle toning.
15 minute moderate-intensity interval training program.
Interval program for fat loss and muscle toning.
15 minute high-intensity muscle building program.
Incremental high intensity program for muscle building and toning.
15 minute short-burst high-intensity interval program.
High intensity interval program for fat loss and toning.
15 minute high-intensity fat loss program.
High intensity program for fat loss and toning.
15 minute ultra-high-intensity fat loss program.
Highest intensity program for fat loss and toning.
WORKOUT
SETTINGS
M
P0
P1
P2
P3
P4
P5
P6
P7
P8
P9

TECH
SPECS
MOTOR
FUNCTIONS
POWER REQUIRED
LEVELS
PROGRAMS
MANUAL FUNCTION
USER WEIGHT
UNIT WEIGHT
WARRANTY
Single Motor
Vibration
AC 100-240v
180 levels
10 built in programs
180 levels & variable time control
Maximum: 150kg
21kg
Lifetime Motor Warranty

WARRANTY
General wear and marks from use.
Water damage.
Damage due to impromper use.
Chassis damage and scratching due to impromper use or dropping.
Electronic damage due to impromper use or dropping.
The Bluefin warranty covers any technical faults with your item. If you need to make
a warranty claim contact us via email at support@bluefintrading.co.uk
Your warranty begins on receipt of delivery, technical faults are covered for 12
months and the motor is covered for life!
If you have any questions regarding your warranty please email us at:
support@bluefintrading.co.uk
Your warranty does not cover the following:
LIFETIME MOTOR WARRANTY

For the latest & up-to-date EU declaration of conformity for this product, please visit:
www.bluefinfitness.com/manuals/pro_DoC.pdf
Importer Address:
Bluefin Trading Ltd
Keelham Farm
Hebden Bridge
UK
HX7 8TG
www.bluefinfitness.com
EU-Declaration of
Conformity

Für den Gebrauch der BLUEFIN FITNESS
PRO Vibrations-Platte


WAS IST IN
DER BOX?
1 x Bluefin PRO Vibrations-Platte
1 x Stromanschlusskabel
1 x UK-Stromkabel
1 x EU-Stromkabel
1 x AUX-Audio-Kabel
1 x Bedienungsanleitung
1 x Trainings- & Ernährungsplan
1 x Übungsübersicht
2 x Trainingsseile
Zubehör:
Deine Vibrations-Platte wird mit 2 Trainingsseilen geliefert, die für
Oberkörperübungen verwendet werden können. Befestige dazu die
silbernen Clips an den Trainingsseilen an den entsprechenden Halterungen
auf beiden Seiten an der Geräteunterseite. Bitte versuche nicht, das
Zubehör während des Gebrauchs am Gerät anzubringen oder abzunehmen.

MONTAGEANLEI-
TUNG
Wir empfehlen 2 Personen bei der Montage dieses Geräts.
Breite alle Teile aus und entferne das Verpackungsmaterial.
Entsorge das Verpackungsmaterial allerdings erst nach
Abschluss der Montage. Überprüfe und bereite vor Beginn
der Montage alle in diesem Handbuch aufgeführten Teile und
Schrauben vor.
Einzelteile:
1 x Inbusschlüssel
2 x Kreuzschlitz-Schrauben
7 x Unterlegscheiben
15 x Sechskantschrauben
1 x Stromanschlusskabel
1 x Part A (Kurze zentrale Stützröhre)
1 x Part B (Lange zentrale Stützröhre)
1 x Part C (Basisplatte)
1 x Part D (Steuerkonsole)
2 x Part E (Untere Stützstangen)
2 x Part F (Obere Stützstangen)
1 x Part G (Flaschenhalter)

GEANLEI-MONTAGEANLEI-
TUNG
Verbinde das zentrale Stützrohr, indem du Teil A in Teil B einführst. Mit 3 x Sech-
skantschrauben und 3 x Unterlegscheiben vorne und hinten befestigen.
Schließe das Stromanschlusskabel an das Sensorkabel an der Basisplatte an
(Teil C). Führe das angeschlossene Kabel durch das montierte zentrale Stützrohr.
Setze das zentrale Stützrohr (Teile A und B) in die Basisplatte (Teil C) ein und
befestige es mit 2 Sechskantschrauben.
Befestige das angeschlossene Kabel am Sensorkabel der Steuerkonsole (Teil
D) und befestige die Steuerkonsole (Teil D) mit 2 x Sechskantschrauben und 2 x
Unterlegscheiben sicher am zentralen Stützrohr (Teile A und B).
Befestige 2 x untere Stützstangen (Teile E) mit 2 x Sechskantschrauben und 2 x
Unterlegscheiben an der Basisplatte (Teil C). Zum Sichern festziehen.
Befestige 2 x obere Stützstangen (Teile F) mit 4 x Sechskantschrauben und 4
x Unterlegscheiben an den 2 x unteren Stützstangen (Teile E). Zum Sichern
festziehen.
Befestige 2 x obere Stützstangen (Teile F) mit 4 x Sechskantschrauben und 4 x
Unterlegscheiben an der Steuerkonsole (Teil D) und dem zentralen Stützrohr
(Teile A & B). Zum Sichern festziehen.
Befestige den Flaschenhalter (Teil G) mit 2 x Kreuzschlitzschrauben am zentralen
Stützrohr (Teile A und B).
Hinweis: Achte darauf, dass das Stromanschlusskabel fest mit den Sensorka-
beln an der Basisplatte und der Steuerkonsole verbunden ist.
1
2
3
4
5
6
7
8

ERSTE
SCHRITTE
Stelle deine Bluefin Vibrations-Platte auf eine flache, harte und ebene
Oberfläche. Wenn du in einer Wohnung oder in einem Wohnhaus lebst,
empfehlen wir dir, eine Yogamatte oder einen Teppich unter das Gerät zu
legen, um Geräusche zu absorbieren. Bluefin Fitnessplatten sind zwar sehr
leise, jedoch machen alle Vibrations-Platten Geräusche.
Stecke das Netzkabel in die Rückseite des Geräts ein und das andere Ende
in die Steckdose. Achte darauf, dass sich das Gerät nahe genug an der
Steckdose befindet, damit das Stromkabel nicht gespannt wird. Stellen
sicher, dass der Netzschalter neben dem Stecker eingeschaltet ist. Wenn
der Schalter leuchtet, ist das Gerät eingeschaltet. Schalte das Gerät bei
Nichtgebrauch aus und achte darauf, dass diese Taste nicht leuchtet.
Mache dich mit den Bedienelementen der Konsole vertraut, bevor du das
Gerät benutzt. Stelle dich mit beiden Füßen mittig auf das Gerät, um eine
höhere Intensität und ein besseres Gleichgewicht zu erzielen. Bitte achte
außerdem darauf, dass du langsam und vorsichtig auf das Gerät trittst,
bevor du mit dem Training beginnst. Wir empfehlen dir, mit einer Geschwin-
digkeit von unter 120 zu beginnen oder die Programmeinstellung P0 zu
verwenden.
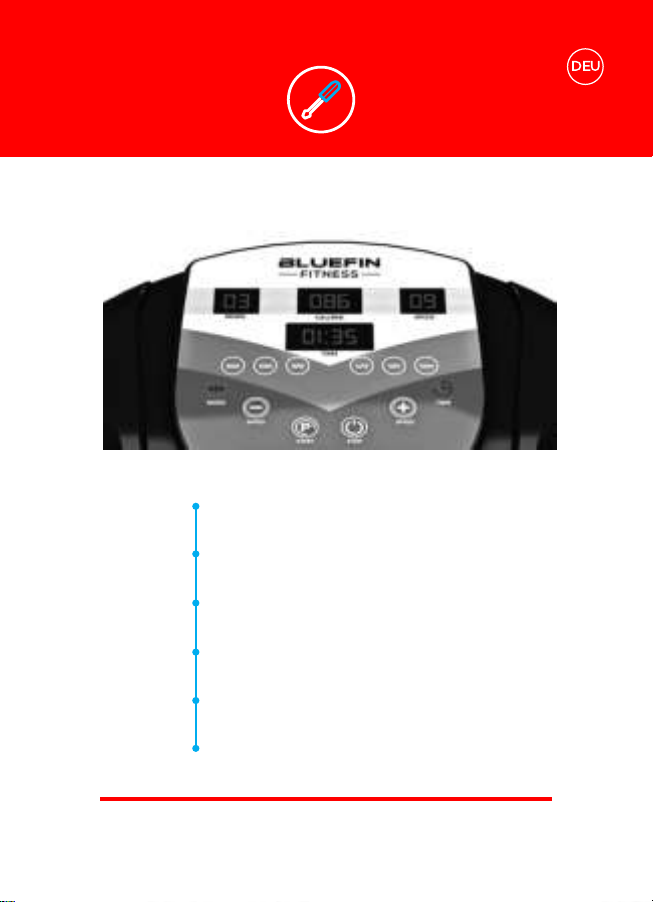
BEDIENELEMENTE
Verwenden Ihrer Konsole:
(i) Durch die Programme P03 bis P10 navigieren.
(ii) START drücken, um zu beginnen.
Zeiteinstellung für manuelle Programme erhöhen.
Hinweis: Nur für manuelles Programm verfügbar.
Geschwindigkeitsstufe erhöhen oder verringern.
Hinweis: Nur für manuelles Programm verfügbar.
Schnellstartauswahl für geringe, mittlere & hohe Geschwindig-
keitsstufe. Hinweis: Nur für manuelles Programm verfügbar.
Schnellstartauswahl für 5 min, 10 min oder 15 min.
Hinweis: Nur für manuelles Programm verfügbar.
Trainingsprogramm beginnen oder beenden.
MODE
TIME
START
/ STOP
SPEED
+/-
LOW / MID
/ HIGH
900S / 600S
/ 300S

BEDIENELEMENTE
KAL-/BMI-Berechnung:
Stelle sicher, dass die Stromversorgung eingeschaltet und der Timer
ausgeschaltet ist.
Überprüfe, ob im Feld “Zeit” “F01” angezeigt wird.
Wähle im BMI-Feld “1” für männlich aus oder verwende “SPEED +” oder
“SPEED -”, um für weiblich auf “2” zu wechseln. Drücke zur Bestätigung
die Taste „TIME“.
Das System wechselt automatisch zur AGE-Einstellung „F02“. Drücke
„SPEED +“ oder „SPEED -“, um das Alter des Benutzers zu ändern. Drücke
zur Bestätigung die Taste „TIME“.
Die Einstellung HEIGHT wird jetzt in „F03“ angezeigt (in METER und cm). Du
kannst nun deine Körpergröße mit „SPEED +“ oder „SPEED -“ auswählen,
um von 0,10 auf 2,50 zu wechseln. (Die Standardeinstellung beträgt 1,70 m).
Drücke zur Bestätigung die Taste „TIME“.
Als Nächstes folgt die Einstellung WEIGHT bei „F04“. Dein Körpergewicht
wird in kg gemessen. Du kannst „SPEED +“ oder „SPEED -“ auswählen,
um das Körpergewicht von 010 auf 150 zu verändern. Das Standardgewicht
beträgt 70 kg. Drücke zur Bestätigung die Taste „TIME“.
Lege beide Hände auf die metallischen Handsensoren. Der BMI wird nun
angezeigt.
Hinweis: Befeuchte die Hände leicht, wenn kein Kontakt registriert wird.
1
2
3
4
5
6
7
Table of contents
Languages:
Other BLUEFIN Fitness Power Tools manuals


