Quinton MedTrack CR60 User manual

MedTrack®Rehabilitation
Treadmill User Guide
042102-001 Rev A

This is the CE marking of conformity indicating that the
device having this symbol on its immediate label meets the
applicable requirements of the European Medical Device
Directive.
Authorized European Representative
Medical Device Safety Service
Burckhardtstr. 1
D-30163 Hannover, Germany
Caution! Due to rapid changes in computer technology, the
specifications provided in this manual are subject to change
without notice.
Federal law restricts this device to sale by or on the order of
a physician.
Trademarks
Quinton and MedTrack are trademarks or registered trademarks of
Quinton Cardiology, Inc.
All other product and company names are trademarks or registered
trademarks of their respective companies.
Copyright 2004 Quinton Cardiology, Inc.
All rights reserved
MedTrack Rehabilitation Treadmills User Guide
Publication No. 042102-001 Rev A (September 2004)
3303 Monte Villa Parkway
Bothell WA 98021-8969
Telephone: 425-402-2000 Fax: 425-402-2001
Toll-free USA: 800-426-0337
E-mail: [email protected]
For sales and technical support outside the USA, Quinton customers
should contact their local sales and technical support representative.
Visit us at www.quinton.com

MedTrack Rehabilitation Treadmills User Guide Preface iii
Preface
This manual contains the patient and user safety
requirements, operating instructions and maintenance
requirements for the Quinton®MedTrack® CR60
rehabilitation treadmills. The manual is intended for use by
trained clinicians working with cardiac or sports
rehabilitation patients in a clinical setting. It is expected that
the clinician will instruct the patient in the proper use of the
treadmill and its accessories. Before using the treadmill, read
the manual carefully, noting the Safety Requirements in
Appendix A.
There are no user-serviceable parts in the treadmill. Any
attempt by non-Quinton-authorized personnel to service the
equipment may void the warranty. Upon request, Quinton
will provide a technical document containing block-level
theory of operation, troubleshooting, removal and
replacement instructions (by module), maintenance, and
other information that will assist appropriately-trained
personnel to repair those parts of the equipment designated
by Quinton as repairable.
Liability Notice
Failure to follow the conditions set forth below shall limit, to
the extent allowed by law, Quinton Cardiology, Inc.’s
responsibility for the safety, reliability, and performance of
this equipment:
The operator manual must be read in full by each operator
before the product is first used.

iv Preface MedTrack Rehabilitation Treadmills User Guide
Assembly operations, extensions, readjustments,
modifications, or repairs must be carried out only by
Quinton-trained or Quinton-authorized personnel.
The electrical wiring within the treadmill’s setting and the
electrical installation of the treadmill must comply with the
applicable local or provincial requirements.
The equipment must be used in accordance with the
instructions for use.
Caution! Accessory equipment connected to analog, digital, or
power interfaces must be either equipment offered for sale
by Quinton Cardiology, Inc. or equipment that, when
connected to such interfaces, maintains the safety and
specified performance of the overall system and the
individual devices. For example, such safety is maintained
if the individual equipment and overall system complies
with relevant safety requirements found in International
Electrotechnical Commission (IEC) standards.

MedTrack Rehabilitation Treadmills User Guide Contents v
Contents
Introduction
MedTrack Treadmill . . . . . . . . . . . . . . . . . . . . . . . . . . . . . . . . . . . . . . . . . . 1-1
Treadmill Configuration . . . . . . . . . . . . . . . . . . . . . . . . . . . . . . . . . . . . . . . 1-2
Controls . . . . . . . . . . . . . . . . . . . . . . . . . . . . . . . . . . . . . . . . . . . . . . . . . . . . 1-2
Power . . . . . . . . . . . . . . . . . . . . . . . . . . . . . . . . . . . . . . . . . . . . . . . . . . 1-2
Controller . . . . . . . . . . . . . . . . . . . . . . . . . . . . . . . . . . . . . . . . . . . . . . . 1-3
Controller Keys . . . . . . . . . . . . . . . . . . . . . . . . . . . . . . . . . . . . . . . . . . . . . . 1-4
Displays and Indicators . . . . . . . . . . . . . . . . . . . . . . . . . . . . . . . . . . . . . . . . 1-5
Displays. . . . . . . . . . . . . . . . . . . . . . . . . . . . . . . . . . . . . . . . . . . . . . . . . 1-5
Indicators. . . . . . . . . . . . . . . . . . . . . . . . . . . . . . . . . . . . . . . . . . . . . . . . 1-5
Setting the Speed Range . . . . . . . . . . . . . . . . . . . . . . . . . . . . . . . . . . . . . . . 1-6
Limit Controls . . . . . . . . . . . . . . . . . . . . . . . . . . . . . . . . . . . . . . . . . . . . . . . 1-7
Limited Access . . . . . . . . . . . . . . . . . . . . . . . . . . . . . . . . . . . . . . . . . . . 1-7
Time Limit . . . . . . . . . . . . . . . . . . . . . . . . . . . . . . . . . . . . . . . . . . . . . . 1-7
Speed Limit . . . . . . . . . . . . . . . . . . . . . . . . . . . . . . . . . . . . . . . . . . . . . . 1-7
Accessories and Options . . . . . . . . . . . . . . . . . . . . . . . . . . . . . . . . . . . . . . . 1-7
Operating the Treadmill
Guidelines for Safe Operation . . . . . . . . . . . . . . . . . . . . . . . . . . . . . . . . . . . 2-1
Controls . . . . . . . . . . . . . . . . . . . . . . . . . . . . . . . . . . . . . . . . . . . . . . . . . . . . 2-2
Five-minute Auto Reset . . . . . . . . . . . . . . . . . . . . . . . . . . . . . . . . . . . . 2-3
Limited-Access Control . . . . . . . . . . . . . . . . . . . . . . . . . . . . . . . . . . . . 2-3
Activation . . . . . . . . . . . . . . . . . . . . . . . . . . . . . . . . . . . . . . . . . . . 2-3
Deactivation . . . . . . . . . . . . . . . . . . . . . . . . . . . . . . . . . . . . . . . . . . 2-4
Magnetic Key as Emergency Stop . . . . . . . . . . . . . . . . . . . . . . . . . 2-4

vi Contents MedTrack Rehabilitation Treadmills User Guide
Time Limit Control . . . . . . . . . . . . . . . . . . . . . . . . . . . . . . . . . . . . . . . 2-4
Activation . . . . . . . . . . . . . . . . . . . . . . . . . . . . . . . . . . . . . . . . . . . . 2-4
Deactivation . . . . . . . . . . . . . . . . . . . . . . . . . . . . . . . . . . . . . . . . . . 2-5
Speed Limit Control . . . . . . . . . . . . . . . . . . . . . . . . . . . . . . . . . . . . . . 2-5
Activation . . . . . . . . . . . . . . . . . . . . . . . . . . . . . . . . . . . . . . . . . . . . 2-5
Deactivation . . . . . . . . . . . . . . . . . . . . . . . . . . . . . . . . . . . . . . . . . . 2-5
Units Default Setting . . . . . . . . . . . . . . . . . . . . . . . . . . . . . . . . . . . . . . 2-5
Guidelines for Getting on and off the Treadmill . . . . . . . . . . . . . . . . . . . . 2-6
Operating the Treadmill . . . . . . . . . . . . . . . . . . . . . . . . . . . . . . . . . . . . . . . 2-6
Maintenance/Troubleshooting
Daily Visual Inspection . . . . . . . . . . . . . . . . . . . . . . . . . . . . . . . . . . . . . . . 3-1
Cleaning . . . . . . . . . . . . . . . . . . . . . . . . . . . . . . . . . . . . . . . . . . . . . . . . . . . 3-2
Exterior . . . . . . . . . . . . . . . . . . . . . . . . . . . . . . . . . . . . . . . . . . . . . . . . 3-2
Daily . . . . . . . . . . . . . . . . . . . . . . . . . . . . . . . . . . . . . . . . . . . . . . . . 3-2
Weekly . . . . . . . . . . . . . . . . . . . . . . . . . . . . . . . . . . . . . . . . . . . . . . 3-2
Interior . . . . . . . . . . . . . . . . . . . . . . . . . . . . . . . . . . . . . . . . . . . . . . . . . 3-2
Disinfection . . . . . . . . . . . . . . . . . . . . . . . . . . . . . . . . . . . . . . . . . . . . . . . . 3-2
Adjustments . . . . . . . . . . . . . . . . . . . . . . . . . . . . . . . . . . . . . . . . . . . . . . . . 3-3
Belt Tension . . . . . . . . . . . . . . . . . . . . . . . . . . . . . . . . . . . . . . . . . . . . . 3-3
Belt Tracking . . . . . . . . . . . . . . . . . . . . . . . . . . . . . . . . . . . . . . . . . . . . 3-4
Cumulative Usage . . . . . . . . . . . . . . . . . . . . . . . . . . . . . . . . . . . . . . . . . . . 3-5
Distance . . . . . . . . . . . . . . . . . . . . . . . . . . . . . . . . . . . . . . . . . . . . . . . . 3-5
Time. . . . . . . . . . . . . . . . . . . . . . . . . . . . . . . . . . . . . . . . . . . . . . . . . . . 3-5
Electrical Testing . . . . . . . . . . . . . . . . . . . . . . . . . . . . . . . . . . . . . . . . . . . . 3-6
Moving and Storing the treadmill . . . . . . . . . . . . . . . . . . . . . . . . . . . . . . . 3-6
Re-use . . . . . . . . . . . . . . . . . . . . . . . . . . . . . . . . . . . . . . . . . . . . . . . . . 3-7
Troubleshooting . . . . . . . . . . . . . . . . . . . . . . . . . . . . . . . . . . . . . . . . . . . . . 3-7
Error Codes . . . . . . . . . . . . . . . . . . . . . . . . . . . . . . . . . . . . . . . . . . . . . 3-7
Self-test Errors . . . . . . . . . . . . . . . . . . . . . . . . . . . . . . . . . . . . . . . . 3-8
Operation Codes . . . . . . . . . . . . . . . . . . . . . . . . . . . . . . . . . . . . . . . 3-8
Troubleshooting Guide . . . . . . . . . . . . . . . . . . . . . . . . . . . . . . . . . . . . 3-8
Safety Requirements
Warnings and Cautions. . . . . . . . . . . . . . . . . . . . . . . . . . . . . . . . . . . . . . . . A-1
EMC Declaration Tables . . . . . . . . . . . . . . . . . . . . . . . . . . . . . . . . . . . . . . A-4

MedTrack Rehabilitation Treadmills User Guide Contents vii
Specifications
MedTrack CR60 Specifications. . . . . . . . . . . . . . . . . . . . . . . . . . . . . . . . . B-1
Performance . . . . . . . . . . . . . . . . . . . . . . . . . . . . . . . . . . . . . . . . . . . . B-1
Physical . . . . . . . . . . . . . . . . . . . . . . . . . . . . . . . . . . . . . . . . . . . . . . . . B-1
Environmental. . . . . . . . . . . . . . . . . . . . . . . . . . . . . . . . . . . . . . . . . . . B-2
Power Requirements . . . . . . . . . . . . . . . . . . . . . . . . . . . . . . . . . . . . . . . . . B-2
Controller . . . . . . . . . . . . . . . . . . . . . . . . . . . . . . . . . . . . . . . . . . . . . . B-2
Speed vs Weight Range . . . . . . . . . . . . . . . . . . . . . . . . . . . . . . . . . . . . . . B-4
% Grade vs Angle Relationship. . . . . . . . . . . . . . . . . . . . . . . . . . . . . . . . . B-4
Angle/Grade Chart . . . . . . . . . . . . . . . . . . . . . . . . . . . . . . . . . . . . . . . B-5
Receiving and Installation
Receiving. . . . . . . . . . . . . . . . . . . . . . . . . . . . . . . . . . . . . . . . . . . . . . . . . . C-1
Installation Notice . . . . . . . . . . . . . . . . . . . . . . . . . . . . . . . . . . . . . . . . . . . C-1
Site Requirements . . . . . . . . . . . . . . . . . . . . . . . . . . . . . . . . . . . . . . . . . . . C-2
Installation . . . . . . . . . . . . . . . . . . . . . . . . . . . . . . . . . . . . . . . . . . . . . . . . . C-3
Tools . . . . . . . . . . . . . . . . . . . . . . . . . . . . . . . . . . . . . . . . . . . . . . . . . . C-3
Procedure . . . . . . . . . . . . . . . . . . . . . . . . . . . . . . . . . . . . . . . . . . . . . . C-3
Testing the Treadmill and Controller. . . . . . . . . . . . . . . . . . . . . . . . . . . . . C-7
Controls, Displays, Indicators
Controls . . . . . . . . . . . . . . . . . . . . . . . . . . . . . . . . . . . . . . . . . . . . . . . . . . . D-1
Power . . . . . . . . . . . . . . . . . . . . . . . . . . . . . . . . . . . . . . . . . . . . . . . . . D-1
Units . . . . . . . . . . . . . . . . . . . . . . . . . . . . . . . . . . . . . . . . . . . . . . . . . . D-2
Start Belt . . . . . . . . . . . . . . . . . . . . . . . . . . . . . . . . . . . . . . . . . . . . . . . D-2
Up/Down. . . . . . . . . . . . . . . . . . . . . . . . . . . . . . . . . . . . . . . . . . . . . . . D-2
Faster/Slower . . . . . . . . . . . . . . . . . . . . . . . . . . . . . . . . . . . . . . . . . . . D-2
+/- . . . . . . . . . . . . . . . . . . . . . . . . . . . . . . . . . . . . . . . . . . . . . . . . . . . . D-2
Clear . . . . . . . . . . . . . . . . . . . . . . . . . . . . . . . . . . . . . . . . . . . . . . . . . . D-2
Select. . . . . . . . . . . . . . . . . . . . . . . . . . . . . . . . . . . . . . . . . . . . . . . . . . D-3
Cool Down . . . . . . . . . . . . . . . . . . . . . . . . . . . . . . . . . . . . . . . . . . . . . D-3
Stop Belt . . . . . . . . . . . . . . . . . . . . . . . . . . . . . . . . . . . . . . . . . . . . . . . D-3
5-Minute Auto Reset. . . . . . . . . . . . . . . . . . . . . . . . . . . . . . . . . . . . . . D-3
Limited Access Control . . . . . . . . . . . . . . . . . . . . . . . . . . . . . . . . . . . D-4
Time Limit Control . . . . . . . . . . . . . . . . . . . . . . . . . . . . . . . . . . . . . . . D-4
Speed Limit Control . . . . . . . . . . . . . . . . . . . . . . . . . . . . . . . . . . . . . . D-5
Units Default Setting. . . . . . . . . . . . . . . . . . . . . . . . . . . . . . . . . . . . . . D-5
Displays . . . . . . . . . . . . . . . . . . . . . . . . . . . . . . . . . . . . . . . . . . . . . . . . . . . D-5
Grade. . . . . . . . . . . . . . . . . . . . . . . . . . . . . . . . . . . . . . . . . . . . . . . . . . D-5

viii Contents MedTrack Rehabilitation Treadmills User Guide
Speed . . . . . . . . . . . . . . . . . . . . . . . . . . . . . . . . . . . . . . . . . . . . . . . . . . D-6
Multifunction Display . . . . . . . . . . . . . . . . . . . . . . . . . . . . . . . . . . . . . D-6
Indicators . . . . . . . . . . . . . . . . . . . . . . . . . . . . . . . . . . . . . . . . . . . . . . . . . . D-6
Enter Weight . . . . . . . . . . . . . . . . . . . . . . . . . . . . . . . . . . . . . . . . . . . . D-6
Enter Time . . . . . . . . . . . . . . . . . . . . . . . . . . . . . . . . . . . . . . . . . . . . . . D-6
Multifunction. . . . . . . . . . . . . . . . . . . . . . . . . . . . . . . . . . . . . . . . . . . . D-7
Units. . . . . . . . . . . . . . . . . . . . . . . . . . . . . . . . . . . . . . . . . . . . . . . . . . . D-7
Symbol Definitions
Symbol Definitions . . . . . . . . . . . . . . . . . . . . . . . . . . . . . . . . . . . . . . . . . . . E-1
Glossary
Glossary . . . . . . . . . . . . . . . . . . . . . . . . . . . . . . . . . . . . . . . . . . . . . . . . . . . . F-1
Index
Index. . . . . . . . . . . . . . . . . . . . . . . . . . . . . . . . . . . . . . . . . . . . . . . . . . . Index-1

MedTrack Rehabilitation Treadmills User Guide Introduction 1-1
1
Introduction
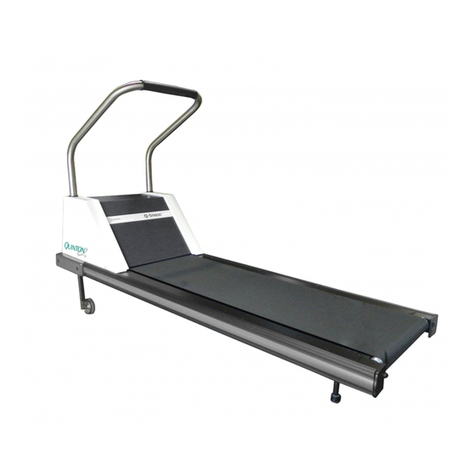
The MedTrack rehabilitation treadmill is a motorized
treadmill designed for rehabilitation exercise.
MedTrack Treadmill
MedTrack rehabilitation treadmills feature a 20 in. x 60 in.
walking surface, variable speed and grade, and a built-in
controller. Side handrails are optional.

1-2 Introduction MedTrack Rehabilitation Treadmills User Guide
Treadmill Configuration
Controls
Power
The circuit breaker on the front of the treadmill hood controls
the power to the treadmill (see item 1 in the next drawing).
The circuit breaker must be set to ON for the treadmill to run.
As long as the treadmill is plugged into a powered socket and
the circuit breaker is set to ON, the treadmill is receiving
power, even when the controller power is turned off.
WARNING! Turn off the treadmill circuit breaker before
connecting or disconnecting the treadmill from the
power outlet.
1
3
2
4
1. Controller
2. Walking belt
3. Front of hood
4. Rear of treadmill

MedTrack Rehabilitation Treadmills User Guide Introduction 1-3
Hood Configuration Plate for Treadmill
Controller
The controller is a computerized panel used to operate the
treadmill. It is mounted above the front handrail. All
commands, including power, are entered by pressing one of
the soft-touch keys on the panel. Visual indicators and
displays show the operational status and exercise results.
1. Circuit Breaker
2. Power cord
1
2

1-4 Introduction MedTrack Rehabilitation Treadmills User Guide
Controller Keys
Key Function
Power Activates and deactivates the control panel.
Start Belt Activates the walking belt, the timer, and the
distance counter.
Stop Belt
Stops the walking belt gradually. There are two
Stop Belt keys on the panel. The two keys
function identically and can be used at any time
during the exercise.
Faster Increase belt speed. You can change the speed
at any time during the exercise.
Slower Decreases belt speed. You can change the
speed at any time during the exercise.
Up Increases treadmill grade (incline). Range: 0 to
15%.
Down Decreases treadmill grade (incline). Range: 0 to
15%.
Cool Down
Slows the treadmill to minimum speed and zero
grade so that the exerciser can cool down
before stopping.
Select
Used to enter the user’s weight and exercise
time. Used to select a parameter for the
multifunction display.
+ Increases value for weight and time selections.
- Decreases value for weight and time selections.
Clear
Erases the elapsed time, distance, and calorie
readings, and resets the timer to zero. If the
walking belt has been stopped, it also resets the
weight to the default value.
Units
Changes the unit of measurement used for
calculations and displays. Choose English or
metric units.

MedTrack Rehabilitation Treadmills User Guide Introduction 1-5
Displays and Indicators
Displays
Indicators
Display Function
Grade Displays the treadmill grade in percent.
Multifunction
(center)
Displays error messages, weight, time, and
exercise parameters. Located between grade
and speed.
Speed Displays the belt speed in mph or km/h.
LED Indication
MPH The system is set to English units.
KM/H The system is set to metric units.
Enter Weight When this LED is flashing, you can enter the
patient’s weight.
Enter Time When this LED is flashing, you can enter the
exercise time.
Time The exercise time is displayed (mins:secs).
Distance The elapsed distance is displayed (miles or
kilometers)
Pace The pace of the exercise is displayed (min/miles
or min/km)
Calories The total number of calories burned during the
exercise is displayed.
Calories/min
The number of calories burned each minute at
the current speed and grade settings is
displayed.
METS Metabolic units are displayed.
Scan
Time, distance, pace, calories, calories/min, and
METS are displayed sequentially for three
seconds each.

1-6 Introduction MedTrack Rehabilitation Treadmills User Guide
Setting the Speed Range
When you replace a controller, you must configure it to work
with the specific treadmill.
Perform the following steps to set the speed range for the
treadmill.
1. Enter the service mode by simultaneously pressing Stop
Belt, Slower, and Faster.
2. Choose the appropriate configuration number from the
following:
3. Hold down Stop Belt and press the +or -key until the
correct configuration number appears in the center
display.
Caution! The configuration must be set to CP1 or CP3. Do not
attempt to use any other configuration.
4. Press Select to store the configuration.
5. Exit the service mode by simultaneously pressing Stop
Belt, Slower, and Faster.
Speed Range Configuration Setting
0.6 to 7.2 MPH CP1
1.0 to 12.0 MPH CP3

MedTrack Rehabilitation Treadmills User Guide Introduction 1-7
Limit Controls
Limited Access
A limited-access control lets you restrict treadmill use to
authorized personnel. It also lets you stop the treadmill
quickly in an emergency.
The invisible, magnetically-activated control is located
behind the magnet logo on the controllers. When the control
is activated, the treadmill will not start until you place the
security magnet (supplied with the treadmill) over the logo.
Time Limit
The time limit control lets you set a maximum time for
treadmill use, ranging from 7 to 96 minutes.
Speed Limit
The speed limit control lets you set a maximum speed for
treadmill use. This is particularly useful for unmonitored
treadmills.
Accessories and Options
The following are available for order:
Access Magnet
Part No. Description
30005-004 Left Handrail Kit
30005-005 Right Handrail Kit


MedTrack Rehabilitation Treadmills User Guide Operating the Treadmill 2-1
2
Operating the Treadmill
Guidelines for Safe Operation
• Before permitting anyone to use the treadmill, warn them
of the risk of falling during exercise. Remind them to
exercise caution during use. Instruct them in the safe and
proper use of the treadmill as described below.
• Keep the treadmill area clear. Maintain a minimum open
space of 1.5 feet (0.5 meter) on each side and 6 feet (2
meters) at the rear.
• Be sure the power plug is connected to an approved,
dedicated AC outlet.
• Ensure that the handrails are securely attached.
• Instruct the patient to always face the front of the
treadmill when stepping on or off the belt. Do not step
onto the belt while facing the side of the treadmill.
• Never place chairs or other objects on the treadmill.
• Allow sufficient room for patients to maneuver around the
system and to safely mount and dismount the treadmill.
• Ensure the patient understands the proper treadmill
mount and dismount procedure.
• Do not leave a patient unattended on the treadmill.
• Patients and clinicians should secure long hair and loose
clothing before using and operating the treadmill.

2-2 Operating the Treadmill MedTrack Rehabilitation Treadmills User Guide
• Do not press Start Belt when anyone is standing on the
treadmill belt. Be sure all patients are so instructed.
• Have the patient straddle the treadmill belt or stand on
the deck’s edge at start up
• Keep speed and grade at minimum settings when getting
on and off the treadmill. Instruct patients to check speed
and grade before stepping onto the belt.
• Do not remove the treadmill hood or place your hands
beneath the treadmill while the treadmill is plugged into a
power source.
• Regularly inspect cables and treadmill belts for wear or
damage.
• Have the patient hold the handrail and step off to the side
of the treadmill at end of test.
• Properly train new staff.
Quinton recommends that a copy of these pages be posted
near the treadmill or that this information be made readily
available in some way. This is not, however, a substitute for
proper training of patients by the clinician.
♦A copy of the safety guidelines is available as a laminated card
for convenient posting, P/N 042111-001 Rev A.
Controls
All commands are entered by pressing a key on the controller.
The treadmill cannot operate when the controller power is
off.
Warning! The Power key on the controller does not turn off the
electrical current to the treadmill. The treadmill
continues to draw power, even when the controller is
off. To avoid electric shock, do not remove the
treadmill hood or place your hands beneath the
treadmill while the treadmill is plugged into a power
source.

MedTrack Rehabilitation Treadmills User Guide Operating the Treadmill 2-3
Five-minute Auto Reset
If you do not use the treadmill within five minutes after
entering the weight and exercise time or within five minutes
after pressing Stop Belt, the controller automatically resets the
elapsed time and distance to zero and prompts you to enter
the weight.
Limited-Access Control
A limited-access control lets you restrict treadmill use to
authorized personnel. It also lets you stop the treadmill
quickly in an emergency. The invisible, magnetically-
activated control is located behind the magnet logo on the
bottom left side of the controller.
Activation
The treadmill ships from the factory with the limit-access
control deactivated. Anyone can turn on the treadmill. To
activate the control, place the magnetic key supplied with the
treadmill precisely over the magnet logo on the front panel of
the controller. The magnet will activate the control.
Magnetic Key Placed Over Logo
Once the control is activated, the treadmill will not start, nor
will the displays light up, unless the magnetic key is on the
logo. If you remove the key, the belt will stop, the Start Belt
and Grade keys will be disabled, and the word “SAFE” will
appear in the center display. Accumulated values will remain
on display until you turn off the power.
Magnetic
Key

2-4 Operating the Treadmill MedTrack Rehabilitation Treadmills User Guide
To restart the treadmill, replace the magnetic key, then, if the
power key on the controller is on, press Start Belt; if the power
key is off, press Power.
Deactivation
To deactivate the control:
1. Remove the magnetic key and press the Power key off.
2. Press and hold the +, -, and Power keys until the 8s on the
display go off, then release the keys. The control remains
inactive, granting unrestricted access, until you place the
magnetic key over the logo again.
Magnetic Key as Emergency Stop
The magnetic key has a cord that you can attach to the
patient's wrist or belt during exercise. If the patient moves too
far from the controller, the cord will pull the key off the
controller and stop the walking belt.
Time Limit Control
The time limit control lets you set a maximum time for
treadmill use, ranging from 7 to 96 minutes. When the time
limit is activated, the treadmill runs for the time entered by
the clinician, then automatically changes to minimum speed
and grade. The speed and grade controls remain inoperative
until you press the Stop Belt key.
Activation
To limit the exercise time, use the following procedure:
1. Simultaneously press Stop Belt, Cool Down, and Select.
2. Press the +or -keys to increase or decrease the time to the
desired limit. Press Clear to set the limit automatically to
30 minutes.
3. Press Select.
Other manuals for MedTrack CR60
1
Table of contents
Other Quinton Treadmill manuals

Quinton
Quinton MedTrack CR60 User manual

Quinton
Quinton HR ClubTrack Plus 00425 Manual

Quinton
Quinton TM55 User manual

Quinton
Quinton ClubTrack 510 User manual

Quinton
Quinton Q55 User manual

Quinton
Quinton ClubTrack 510 User manual

Quinton
Quinton ClubTrack User manual

Quinton
Quinton ClubTrack 510 User manual

Quinton
Quinton TM55 User manual

Quinton
Quinton Q50 User manual