Bluefin LED DL6D User manual

1
Bluefin Led Underwater lights.
Domestic DL6D Installation manual.
Thank you for choosing Bluefin LED underwater lights, our products have been designed and tested
rigorously to ensure the optimum performance and longevity.
All Bluefin Led lights are water tested so please be aware there may be moisture present on the light.
Please ensure that your product is installed as per our instructions below, failure to do so may
invalidate your warranty.
Specs: electrical/fuse ratings
Voltage
Current
Fuse rating
DL6D
24V ONLY
24V-1.8amp
3 amp
DL6DCC
24V ONLY
24v-2amp
8 amp
Warnings:
•Do not under any circumstances hold the light by the cable. (the light is not designed to be
hung by the cable and will result in damage to the unit).
•Do not remove the inline HYDRO LOCK or your warranty will be void.
•Do not disassemble the light and puck or you warranty will be void.
•The cable must be protected with the outer tube supplied or your warranty will be void.
•Do not use abrasives on the lenses.
Tools required for installation:
•3mm (1/8”) drill bit
•Drill
•Posi head hand screwdriver
Installation:
There are two mounting methods to the dock light product which will depend on your mounting
point, these are show below as option 1 and 2. The tubing installation must be done before the
lights are submerged in the water.
The light can be mounted with a top or side entry, either can be used depending on your cable exit
route.
All lights are configured for top or side entry as standard.
Ensure that you plan your cable tubing and fitment before progressing with the light installation.
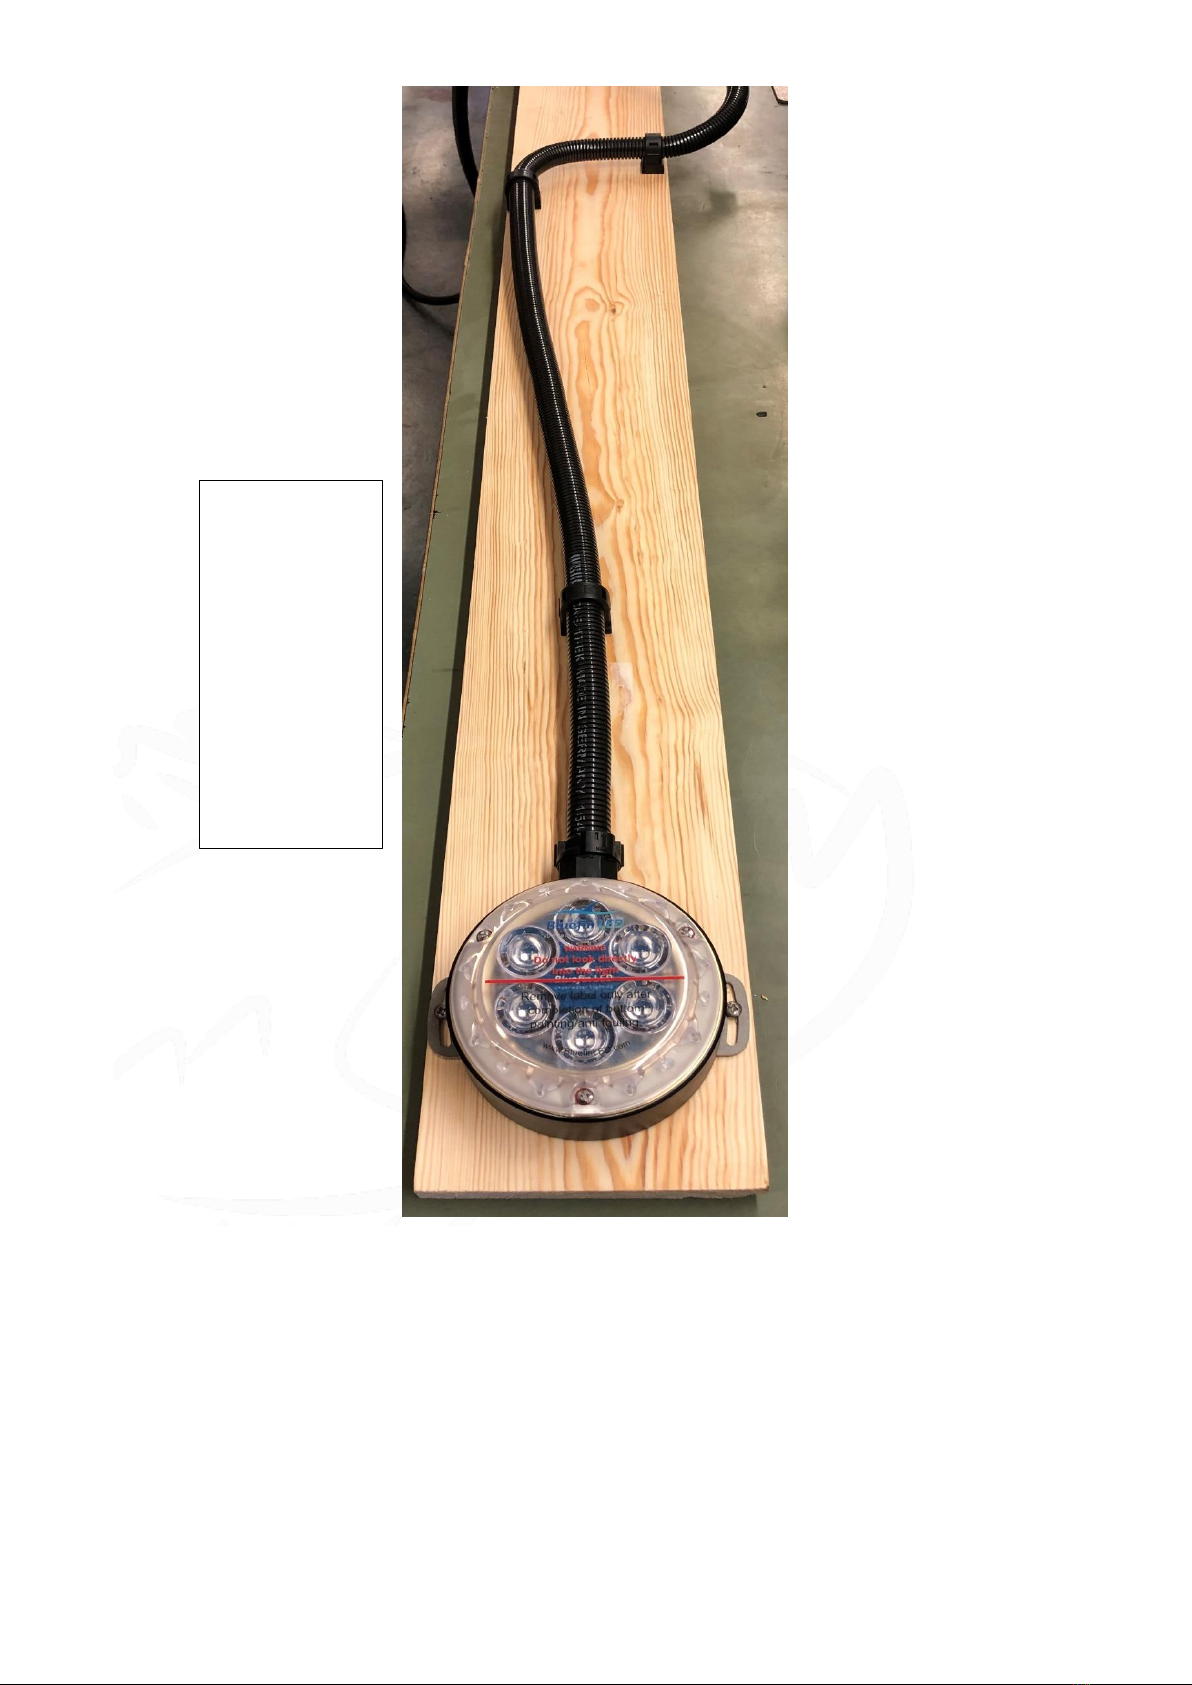
BlefinLed suggests fitting the light and tubing to a plank of treated wood before installation into
water as shown in Fig 14
The light must remain underwater at all times so please ensure that you take into consideration tides
and the water line.
Ensure that your Tube is connected to the Dock Light puck before installation to the dock.
Option 1 screw mounting
Drill 3mm (1/8”) pilot holes to match the mounting holes on the Dock light puck. Fig 2/3
Screw the dock light puck to the plank using the 2 screws provided. Fig 4
Option 2 Strap/wire mounting.
The dock light puck has side entry slots for strapping to pilings or docks. Fig 2

2
Strap the Dock light puck to the dock or piling using an appropriate strap or wire to hold the dock
light in position securely, please ensure that you do not modify the light to achieve this and use wire
or straps that will fit the slot size on the Dock light puck.
For both Option 1 and 2
Cut the tubing to the required length ensuring that the Moisture guard will be inside the tube.
Thread the cable through the tubing. Fig 5
Connect the tubing to the Puck tube clamp and clip in place. Fig 6/7/8
Fix tube clamps in appropriate places to hold the tube in place, you can turn the Tube in many
different angles to provide the acquired routing for the tube. Fig 9/10/11/13
Protective Tubing
The cable of the light must be protected by the tubing supplied as the harsh water environment
will erode the cable and damage will occur.
Electrical connection:
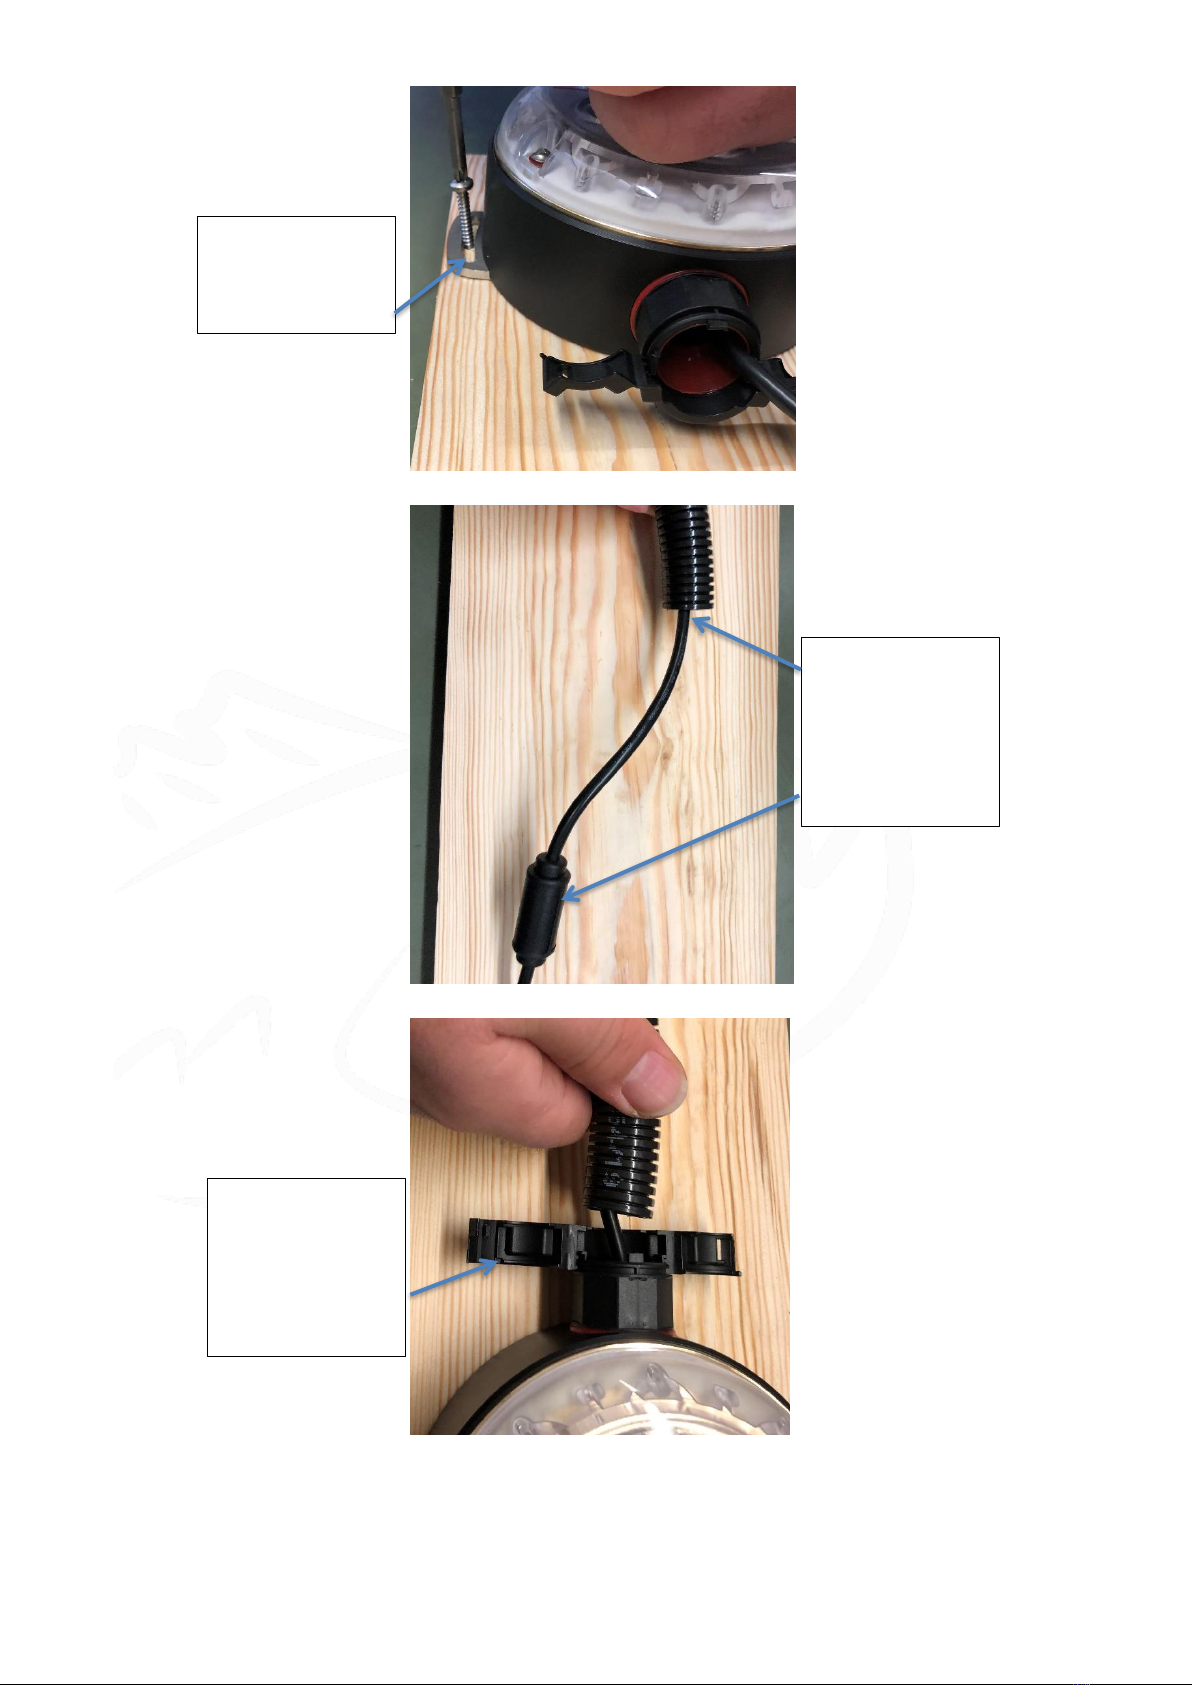
You will notice an inline HYDRO LOCK attached to your cable (Fig 1). If this is removed your
warranty will be void.
If you have purchased a dock light kit please refer to the power supply box manual for the next step.
If you have purchased the light as a single light please refer to the junction box manual for the next
step.
Fig 1
Fig 2
Fig 3
Mounting Screw
holes for
mounting with the
2 screws provided.
Strap/wire
mounting slot
Drill 3mm hole for
mounting Screws
both sides.
3
Fig 4
Fig 5
Fig 6
Unclip Tube clamp
ready for inserting
the tube. Be
careful not to
break the clip.
Thread the cable
through the tube.
Ensure the
Moisture guard is
inside the tube.
Screw down with
screws supplied
on both sides.

4
Fig 7
Fig 8
Fig 9
Fig 10
Insert Tubing into
the tube clamp
ensuring that it is
pushed in to the
bottom.
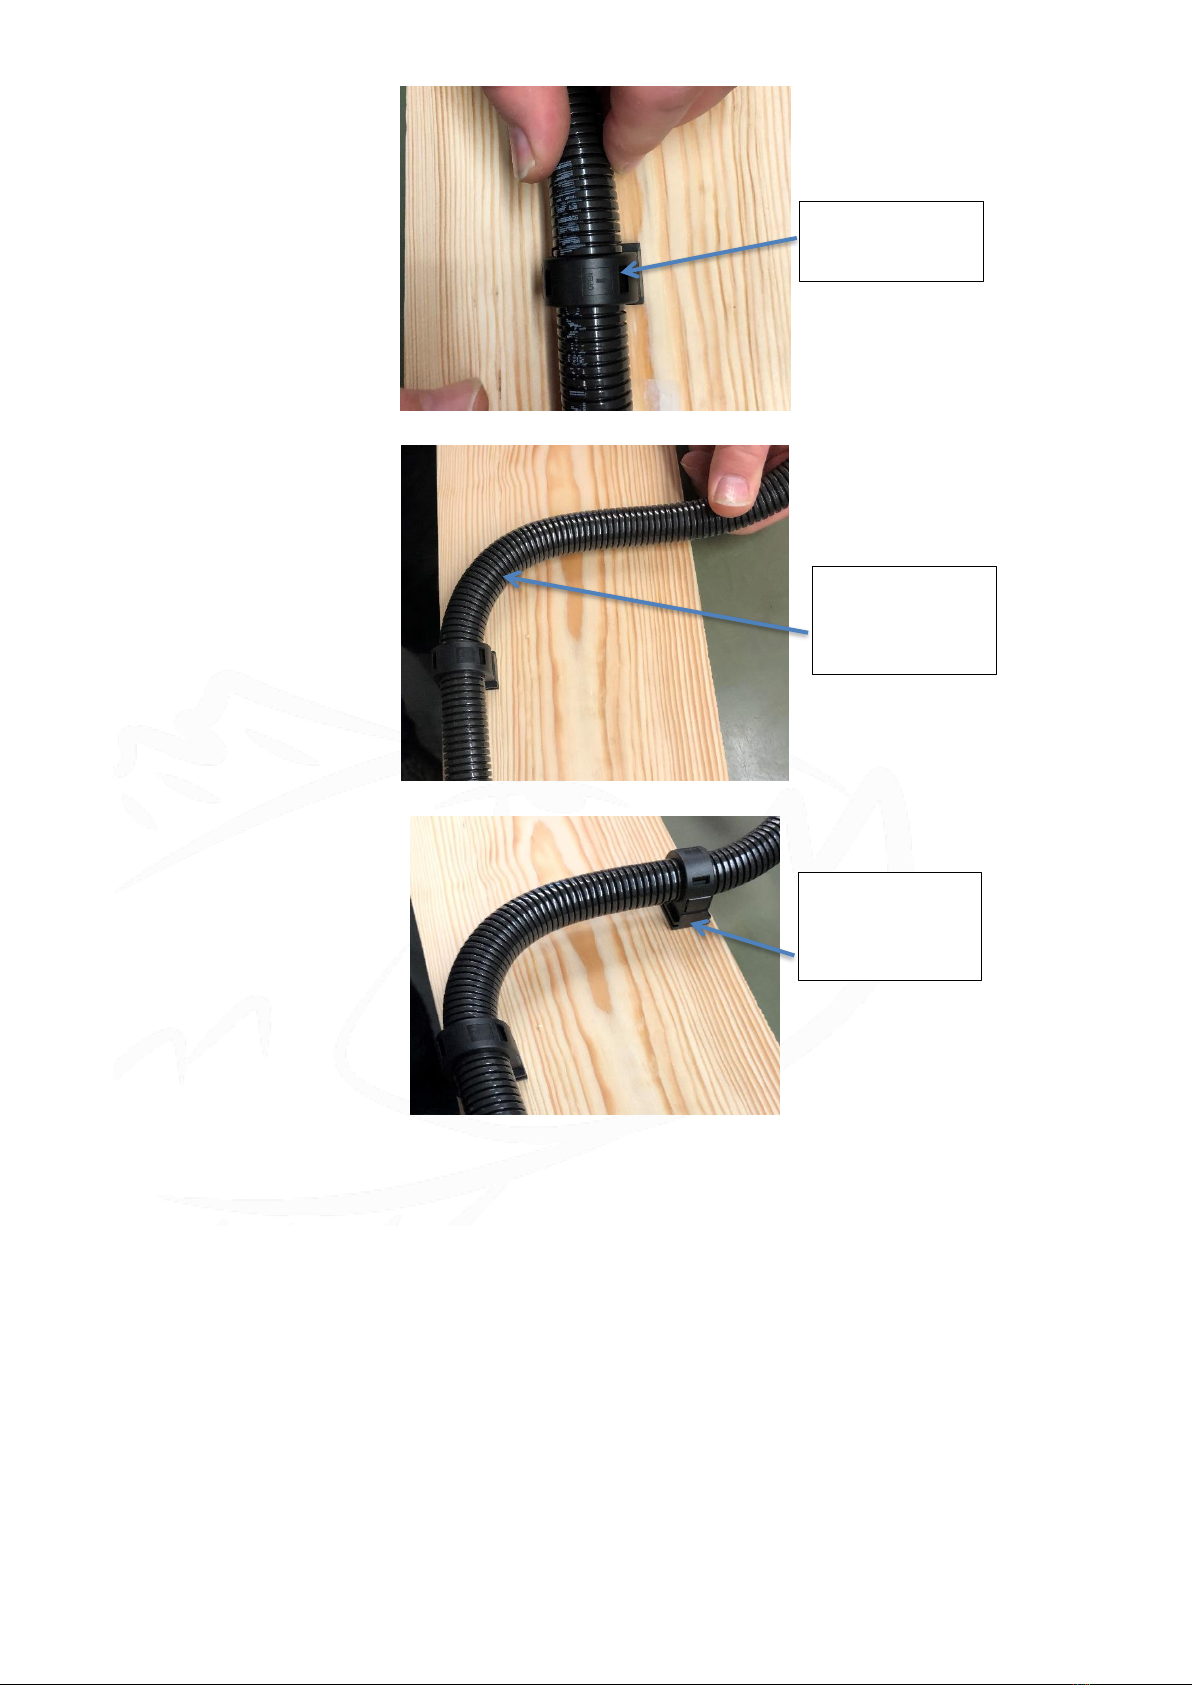
Fasten tube
clamp ensuring
that the clamp is
fully fastened.
Locate and fix
tube clamps with
screws supplied.
Clip tube into
tube clamps.
5
Fig 11
Fig 12
Fig 13
Fasten tube
clamps.
The tube can be
turned through
90 deg angles.
Example of 90
deg angles with
tube clamps.
6
Fig 14
Testing:
Test the light before installation ensuring that you use the correct input voltage and the light is
illuminated correctly. (take care to not look directly at the light as this could cause damage to eyes)
After installation ensures again that the light is illuminated correctly and the lens label is removed.
The Dock Light is fully IP68, care must be taken to ensure that all electrical and tube connection are
water tight.
DL6CC (Colour change) Operation.
1. When powered up for the first time or from reset the light will turn on in white and scroll
through the colour range and keep scrolling until stopped by any of the steps below.
2. To pick a particular colour turn the light off and on again quickly and the chosen colour will
be selected.
3. If you turn off and on again quickly for the second time the light will start to strobe.
Example of
standard fitment
to a plank of
wood before
submersion into
water.
Ensure that the
stage is done in
advance of final
fitment into
water.
7
4. When you turn off the light and leave for over 10 seconds when turned on again the light will
reset back in the white mode.
5. If the lights ever get out of sync i.e. either colour or mode, repeat step 4 to re-set to initial
colour cycle mode, the more lights installed this process may need to be more frequently
repeated.
The light has internal indicator Led’s for fault finding, these are as follows:
•Over voltage will flash red. (check the voltage to the light)
•Under voltage will show a constant red. (check the voltage to the light)
•Over temperature will show amber. (allow the light to cool down and check if submerged)
Maintenance:
Regularly check the installation for water tightness.
Only clean the light with a soft bristle brush.
Warranty:
For any warranty issues please contact your point of sale retailer or go to
www.bluefinled.com for further advice.
Bluefin LED LTD warrants the lights/hardware it manufactures and produces to be free from
defects in workmanship and materials for a period of two years, starting from the date of original
purchase, as recorded on the sales receipt.
The warranty is non-transferable and limited to the original purchaser of the product. During the
two-year warranty period Bluefin LED will repair or replace the defective item (at its option) at no
additional charge on a “like for like” basis. Products either repaired or replaced under this
warranty shall only be warranted for the unexpired portion of the warranty applying to the original
product(s).
Bluefin LED is not responsible for labour charges to remove or replace lights or for haul-out fees.
No refunds will be given.
This limited warranty does not extend to any products which have been damaged as a result of
misuse, abuse, improper installation/modification, galvanic corrosion, failure to follow and adhere
to installation instructions provided by Bluefin LED, improper shipping, neglect, damage caused
by disasters such as fire, flood, lightning “acts of god”, installation by unqualified personnel.
www.bluefinled.com for further advice.
Installer please ensure that the SERIAL NUMBERS of the lights are written below and the
manual is handed over to the end user.
Please make a note of the serial numbers of the lights here.
SERIAL NUMBERS
Bluefin LED
Cottage Farm, Cottage Lane,
Norton Juxta Twycross, Atherstone. CV9 3QH
Sales - Tel: 07950 909048 Email: simon.steadman@bluefinled.com
Service - Tel: 01827 880450 Email: mark.branson@bluefinled.com
Administration - Tel: 01827 880450 Email: samantha.barrie@bluefinled.com
Registered Address: Square Rig Limited, t/a Bluefin Led, Cottage Farm, Cottage Lane, Norton Juxta Twycross, Atherstone, CV9 3QH
Company Registration Number: 08871451 VAT Number: 179 2690 64

8
This manual suits for next models
1
Table of contents
Popular Aquarium manuals by other brands


Reef Factory
Reef Factory Thermo control Device manual

CIANO
CIANO nexus Pure BettaLife user guide

Fluval
Fluval FLEX instruction manual

D-D The Aquarium Solution
D-D The Aquarium Solution Aqua-Pro Reef 1200 installation instructions

EcoSystem Aquarium
EcoSystem Aquarium ECO MHsun owner's manual

SuperFish
SuperFish Home 8 Warranty and manual


